1
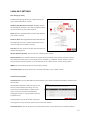
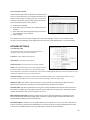
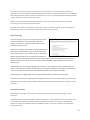
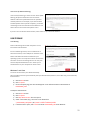
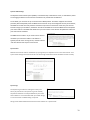
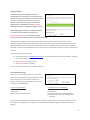
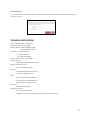
User Manual HIGH POWERTM WI-FI® Router LP-2026 1 Contents INTRODUCTION...................................................................................................................................................... 4 Package Contents ......................................................................................................................................................5 LED Indicators ...........................................................................................................................................................5 Back Panel Description..............................................................................................................................................6 BASIC SETUP GUIDE ............................................................................................................................................... 7 5GHz WI-FI SETTINGS ........................................................................................................................................... 11 Basic Settings (5.0GHz) ...........................................................................................................................................11 Guest Networks (5.0GHz)........................................................................................................................................12 Security Settings (5.0GHz) .......................................................................................................................................12 Advanced Settings (5.0GHz) ....................................................................................................................................13 Wi-Fi Protected Setup – WPS (5.0GHz) ...................................................................................................................13 Wireless Coverage Controls (5.0GHz) .....................................................................................................................14 Access Schedule (5.0GHz) .......................................................................................................................................14 2.4GHz WI-FI SETTINGS ........................................................................................................................................ 15 Basic Settings (2.4GHz) ...........................................................................................................................................15 Guest Networks (2.4GHz)........................................................................................................................................15 Security Settings (2.4GHz) .......................................................................................................................................16 Advanced Settings (2.4GHz) ....................................................................................................................................16 Wi-Fi Protected Setup – WPS (2.4GHz) ...................................................................................................................17 Wireless Coverage Controls (2.4GHz) .....................................................................................................................17 Access Schedule (2.4GHz) .......................................................................................................................................18 NETWORK SETTINGS ............................................................................................................................................ 18 Local Network (LAN) ...............................................................................................................................................18 IPv6 Local Network (LAN)........................................................................................................................................19 Internet Network (WAN) .........................................................................................................................................19 Advanced Settings ...................................................................................................................................................20 SMART FEATURES ................................................................................................................................................ 21 Block Websites ........................................................................................................................................................21 User Access (MAC Address Filtering) ......................................................................................................................21 User Access (IP Address Filtering) ...........................................................................................................................22 USB STORAGE ...................................................................................................................................................... 22 Local Sharing ...........................................................................................................................................................22 FTP Server ...............................................................................................................................................................24 FIREWALL SETTINGS ............................................................................................................................................. 25 Port Filtering ...........................................................................................................................................................25 Port Forwarding ......................................................................................................................................................25 2 DMZ (Demilitarized Zone) .......................................................................................................................................26 Virtual LAN ..............................................................................................................................................................26 Denial of Service .....................................................................................................................................................27 QUALITY OF SERVICE ............................................................................................................................................ 27 ROUTING SETUP .................................................................................................................................................. 28 MANAGEMENT FEATURES .................................................................................................................................... 29 System Status ..........................................................................................................................................................29 Network Statistics ...................................................................................................................................................29 Dynamic DNS Settings .............................................................................................................................................30 System Clock ...........................................................................................................................................................30 System Logs .............................................................................................................................................................30 Upgrade Firmware ..................................................................................................................................................31 Save and Reload Settings ........................................................................................................................................31 Password Settings ...................................................................................................................................................32 TECHNICAL SPECIFICATION ................................................................................................................................... 32 DEFAULT SETTINGS............................................................................................................................................... 33 TROUBLESHOOTING ............................................................................................................................................. 34 REGULATORY INFORMATION ............................................................................................................................... 40 3 INTRODUCTION Thank you for purchasing Loopcomm product. At loopcomm we strive to provide you with the highest quality products through innovation and advanced technology. We pride ourselves on delivering products that outperform the competition and go beyond your expectations. If you have any questions please feel free to contact us. We’d love to hear from you and thank you for your support! Email: [email protected] Website: www.loopcomm.com Product view 4 Package Contents Check to make sure you have all the contents within your package: High Power LP - 2026 Wi-Fi Router Two Detachable High Gain Antennas RJ-45 Ethernet Cable Power Adapter CD: User Manual Quick Installation Guide (QIG) LED Indicators Power: Indicates when the Router is powered on. The LED will remain on. 5.0GHz Wireless Activity: Blinks rapidly when wireless data traffic is transmitted or received over the 5GHz wireless network. 2.4GHz Wireless Activity: Blinks rapidly when wireless data traffic is transmitted or received over the 2.4GHz wireless network. Internet Connection: Indicates when the Router is connected to a broadband modem. The LED will blink rapidly when Internet traffic is transmitted or received. Gigabit Wired Ports 1-4: Indicates when a networking device is connected to a wired port on the back of the Router. The LED will blink rapidly when wired data traffic is transmitted or received. USB Connection: Indicates when a USB storage device is connected to the USB port. 5 Back Panel Description Antenna Connectors: RJ-SMA antenna connectors. Attach the included high gain antennas to these connectors. Reset: Push down once to reboot the Router. Hold down for 5-10 seconds to reset the router back to factory settings. WPS: Hold down for 3 seconds to enable WPS push button configuration. Wired Devices: Gigabit RJ-45 ports for connecting to wired computers or network devices. Modem: Gigabit RJ-45 port for connecting to your Broadband Modem. USB Port: Attach USB storage devices, such as USB flash drives and external hard drives, for file sharing. LED On/Off: Push to turn LED indicators on or off. Power On/Off: Push to turn the Router on or off. Power: Power adapter port. Input: 100-240v. 6 BASIC SETUP GUIDE Setup Preparations Disconnect and power off your existing router. Disconnect your existing router from your computer, your broadband modem and its power outlet. If you do not have an existing router please continue to the next step. Power off your Modem Power off the modem by disconnecting the modem’s power adapter from the power outlet. If your modem has a backup battery, remove the backup battery from your modem. Do NOT power on the modem until prompted at a later step. Connect the Router to your Modem Do NOT connect the power adapter to the Router at this time. a) Use the included blue Ethernet cable and connect one end of the cable to your modem. b) Connect the other end of the cable to the blue Modem port on the Router. 7 Power on your Modem Plug in your modem’s power adapter and backup battery (if available): Attach Antennas, Power On & Connect to your Computer a) Attach the antennas to the antenna connectors on the Router. b) Connect the included grey Ethernet cable to an available port on your computer or connect to the Router’s Wi-Fi Network: Loopcomm_2.4GHz or Loopcomm_5GHz. Password: Loopcommwifi c) Attach the Power Adapter to the Router’s PWR port and a power outlet. Open your Web Browser to Access the Setup Wizard a) Open your web browser. b) Type http://setup.loopcomm.com into the web address bar. c) If the web menu fails to open, type the following IP address into your web address bar: http://192.168.1.200 8 Welcome to the Setup Wizard If this is your first time setting up the Router, the Setup Wizard should automatically load. If you wish to manually configure your router you can also choose to skip the Setup Wizard. Double check that the modem is connected to the Router’s Modem port. Check that your antennas are all attached firmly to the antenna connectors. Click Next to continue. If the Dashboard loads (see right image) instead of the Setup Wizard, scroll to the bottom and click the Setup Wizard button to access the Wizard. Internet Connection Detection The Wizard will try to detect your Internet settings and configure the router. Please be patient. If there is a problem with the Automatic Configuration, the wizard will notify you of the issue. If the Internet connection detection was successful, you will see a green check mark. Click Next to continue. 9 Personalize your Wi-Fi Settings The default ID of your 5GHz Wi-Fi network and 2.4GHz WiFi network is: Loopcomm_5GHz Loopcomm_2.4GHz To change it, enter a new name in the SSID field. Users connecting wirelessly to the Router will use these IDs to identify your wireless network. The default Security Key (WPA/WPA2) of your Wi-Fi networks is: loopcommwifi To change them, enter a new key in the Security Key field for both 2.4GHz and 5GHz networks. The keys must be at least 8 characters long. Click Next to apply your settings. Create a Password for your Router This password is NOT your Wi-Fi network password. This password is to access the web menu of the Router to access additional router settings. Leave this blank if you do not wish to have a password. Click Apply to save your settings. The Router will reboot. This process may take up to 1 minute. The page will automatically reload after the Count down. If it does not, you may need to manually refresh the page or check your connection to the Router. Setup Summary Once the Router has rebooted, it will load the Setup Summary page and provide you with the details of your setup. It is recommended that you print this page for your records. Open a new web browser window and check that you have access to the Internet. At this time, you may disconnect from the Router and start a wireless connection. If you have any wired devices that you would like to attach to the Router you may do so now as well. Enjoy your new Loopcomm Wireless network! 10 WEB MENU DASHBOARD Welcome to the Dashboard Once you have completed the Router Setup Wizard, going to http://setup.loopcomm.com will now bring you to the Router’s Dashboard. The Dashboard provides you with information regarding your internet connection and basic router settings. From here you can enable or disable guest networks, have a quick glance at what devices are connected to your Router and enable or disable website blocking features. For more advanced settings click on More Settings to navigate through the configuration menu. 5GHz WI-FI SETTINGS Basic Settings (5.0GHz) The Basic Settings page allows you to adjust settings for your 5GHz local wireless network. Disable 5.0GHz Wireless Connections: Disabling will turn off all 5GHz Wi-Fi activity. Users will no longer be able to connect wirelessly to your 5GHz network. Band: Select the compatible Wi-Fi standard and speed for your wireless network. Broadcast SSID: Selecting Disable Broadcast SSID will hide the visibility of the router’s 5GHz network SSID. Users must manually enter the SSID to connect. Data Rate: Sets the maximum wireless data rate that your network will operate on. Wireless Network ID (SSID): The name of your 5GHz wireless network. Channel Number: Wi-Fi networks operate on specific wireless channels. Some network channels may have more interference than others. If your performance is unstable, try a different channel number. If you are using a repeater with this network, it is recommended you set a static channel, instead of using "Auto". 11 WMM: Prioritizes multimedia data over the wireless network. Associated Clients: Shows the active users connected wirelessly to your 5GHz network. Guest Networks (5.0GHz) Guest Networks: You may add additional names (SSID) to your Wireless Network with different characteristics for each SSID. Each additional Network or SSID can have its own security, band and data rate settings. You may restrict users to specific SSIDs or provide access only to some users with lower bandwidth by changing the band (i.e. only allow 802.11b access to specific users). Guest Networks may also be set with restrictions so that guests can only access the Internet and not the local network. Associated Clients: View all computers and network devices that are connected to your network wirelessly. Security Settings (5.0GHz) The Security page allows you to change the type of wireless security settings for your 5.0GHz wireless network. Using the drop down menu, you can select which network you wish to configure and may adjust the security settings below. If you are using the Guest Network feature, you will be able to adjust the security settings for your additional SSIDs as well. (For 2.4GHz Guest Networks, view the 2.4GHz Wi-Fi Settings menu) Encryption Types: WEP is rated as a low level encryption and is compatible with all wireless devices and operating systems. Using WEP may slow down your wireless performance. WPA is a medium level encryption and is supported by most wireless devices and operating systems. WPA2 is a high level encryption and is supported by most wireless devices and operating systems. WPA Mixed Mode allows the use of both WPA and WPA2 at the same time. If you are not sure which encryption type to use, we recommend you choose WPA/WPA2 Mixed Mode. 12 Advanced Settings (5.0GHz) Advanced Wireless Settings should only be adjusted by technically advanced users. It is not recommended that novice users adjust these settings to avoid degrading wireless performance. Fragment Threshold: The default and recommended setting is at 2346, meaning the Router will never fragment any frames that it sends to wireless users. RTS Threshold: Adjusts the size of RTS data packets. Lower values reduce throughput, but allow the system to recover quicker from interference/collisions. Higher values provide the fastest throughput. Beacon Interval: Indicates the frequency interval of the beacon. A beacon is a packet broadcast by the router to synch the wireless network. Preamble Type: Defines the length of the Cyclic Redundancy Check for communication between the router and roaming wireless users. IAPP: Inter-Access Point Protocol. STBC: Space Time Block Coding improves reception by coding the data stream in blocks. Wi-Fi Protected Setup – WPS (5.0GHz) WPS is a Wi-Fi feature created to make Wi-Fi setup simple and easy. Some wireless routers and adapters support this feature with varying names (i.e. one touch setup or WPS). You may enable WPS setup here by selecting the type of WPS setup you wish to use. The Router supports all types of WPS setup: Option A: Push button: You may push the WPS button on the web menu or use the physical button on the back of the Router. Option B: PIN: Some wireless devices use PIN number to access wireless network. If your wireless device requests for a PIN number, use the PIN code located here. Option C: Enter PIN: Some wireless devices require that you use a PIN number to add them to the wireless network. If your wireless device has a PIN number locate the number and enter in the field, then press Start Pin. 13 Wireless Coverage Controls (5.0GHz) Adjust the output power of the Router to control the coverage distance of your 5GHz wireless network. For a smaller coverage area, you can select a lower output power. For the maximum wireless coverage, select the 100% selection. Access Schedule (5.0GHz) Access Schedules will enable or disable your 5GHz wireless access at a set time based on your predefined schedule. This feature is often used for restricting access to all users (such as children, employees, guests) during specific times of the day for parental control or security reasons. a) Enable Access Schedule b) Select which days you wish for your 5.0GHz Wi-Fi to be available c) Select the time frame during that day that you wish for your 5.0GHz Wi-Fi to be available d) Apply Changes Note: Make sure you have already configured your Time Zone Settings in order for your schedule to work correctly. Time Zone Settings can be adjusted from the web menu under Management > Time Zone Settings. 14 2.4GHz WI-FI SETTINGS Basic Settings (2.4GHz) The Basic Settings page allows you to adjust settings for your 2.4GHz local wireless network. Disable 2.4GHz Wireless Connections: Disabling will turn off all 2.4GHz Wi-Fi activity. Users will no longer be able to connect wirelessly to your 2.4GHz network. Band: Select the compatible Wi-Fi standard and speed for your wireless network. Broadcast SSID: Selecting Disable Broadcast SSID will hide the visibility of the router’s 2.4GHz network SSID. Users must manually enter the SSID to connect. Data Rate: Sets the maximum wireless data rate that your network will operate on. Wireless Network ID (SSID): The name of your 2.4GHz wireless network. Channel Number: Wi-Fi networks operate on specific wireless channels. Some network channels may have more interference than others. If your performance is unstable, try a different channel number. If you are using a repeater with this network, it is recommended you set a static channel, instead of using "Auto". WMM: Prioritizes multimedia data over the wireless network. Associated Clients: Shows the active users connected wirelessly to your 2.4GHz network. Guest Networks (2.4GHz) Guest Networks: You may add additional names (SSID) to your Wireless Network with different characteristics for each SSID. Each additional Network or SSID can have its own security, band and data rate settings. You may restrict users to specific SSIDs or provide access only to some users with lower bandwidth by changing the band (i.e. only allow 802.11b access to specific users). Guest Networks may also be set with restrictions so that guests can only access the Internet and not the local network. Associated Clients: View all computers and network devices that are connected to your network wirelessly. 15 Security Settings (2.4GHz) The Security page allows you to change the type of wireless security settings for your 2.4GHz wireless network. Using the drop down menu, you can select which network you wish to configure and may adjust the security settings below. If you are using the Guest Network feature, you will be able to adjust the security settings for your additional 2.4GHz SSIDs as well. Encryption Types: WEP is rated as a low level encryption and is compatible with all wireless devices and operating systems. Using WEP may slow down your wireless performance. WPA is a medium level encryption and is supported by most wireless devices and operating systems. WPA2 is a high level encryption and is supported by most wireless devices and operating systems. WPA Mixed Mode allows the use of both WPA and WPA2 at the same time. If you are not sure which encryption type to use, we recommend you choose WPA/WPA2 Mixed Mode. Advanced Settings (2.4GHz) Advanced Wireless Settings should only be adjusted by technically advanced users. It is not recommended that novice users adjust these settings to avoid degrading wireless performance. Fragment Threshold: The default and recommended setting is at 2346, meaning the Router will never fragment any frames that it sends to wireless users. RTS Threshold: Adjusts the size of RTS data packets. Lower values reduce throughput, but allow the system To recover quicker from interference/collisions. Higher values provide the fastest throughput. Beacon Interval: Indicates the frequency interval of the beacon. A beacon is a packet broadcast by the router to synch the wireless network. Preamble Type: Defines the length of the Cyclic Redundancy Check for communication between the router and roaming wireless users. IAPP: Inter-Access Point Protocol. STBC: Space Time Block Coding improves reception by coding the data stream in blocks. 16 Wi-Fi Protected Setup – WPS (2.4GHz) WPS is a Wi-Fi feature created to make Wi-Fi setup simple and easy. Some wireless routers and adapters support this feature with varying names (i.e. one touch setup or WPS). You may enable WPS setup here by selecting the type of WPS setup you wish to use. The Router supports all types of WPS setup: Option A: Push button: You may push the WPS button on the web menu or use the physical button on the back of the Router. Option B: PIN: Some wireless devices use PIN number to access wireless network. If your wireless device requests for a PIN number, use the PIN code located here. Option C: Enter PIN: If your wireless device has a PIN number, locate the number and enter it into the field. Press Start PIN when ready. Wireless Coverage Controls (2.4GHz) Adjust the output power of the Router to control the coverage distance of your 2.4GHz wireless network. For a smaller coverage area, you can select a lower output power. For the maximum wireless coverage, select the 100% selection. 17 Access Schedule (2.4GHz) Access Schedules will enable or disable your 2.4GHz wireless access at a set time based on your predefined schedule. This feature is often used for restricting access to all users (such as children, employees, guests) during specific times of the day for parental control or security reasons. a) Enable Access Schedule b) Select which days you wish for your 2.4GHz Wi-Fi to be available c) Select the time frame during that day that you wish for your 2.4GHz Wi-Fi to be available d) Apply Changes Note: Make sure you have already configured your Time Zone Settings in order for your schedule to work correctly. Time Zone Settings can be adjusted from the web menu under Management > Time Zone Settings. RTA NETWORK SETTINGS Local Network (LAN) These settings are for your local network only and do not apply to your Internet / ISP connection. IP Address: The IP address of the Router. Subnet Mask: The subnet of the Router. Default Gateway: The access point to another network. DHCP: Each network device on your local network will have its own IP Address. The DHCP server automatically assigns the IP addresses to each device connected to your network. Disabling DHCP will require that each device on your network be assigned a manual or static IP address. DHCP Client Range: The range of IP addresses provided by the DHCP server is defined by this field. You can limit how many IP addresses are used in your network by setting a smaller or larger range. DHCP Lease Time: The amount of time each device is given a specific IP is decided by the DHCP lease time. After the Lease Time expires, the DHCP server will assign another IP address to the device. Set Static DHCP: This allows specific devices to be given a specific IP address each time the device connects to the network. The DHCP server will always assign the same IP address to the same device. This feature is often used for shared devices such as network printers or servers. 802.1d Spanning Type (STP): A network protocol that ensures a loop-free topology for networks that have Ethernet bridges. The STP prevents bridge loops and allows a network design to include redundant links to provide automatic backup paths if active links fails. Clone MAC Address: The Router can use a MAC address that you define as its own. This is often used when an Internet Provider only authorizes one MAC address to access the Internet. Cloning the MAC address will make it so that the cloned MAC address is the only MAC address seen by the Internet Provider. 18 IPv6 Local Network (LAN) These settings are for your IPv6 local network only and do not apply to your Internet / ISP connection. The LAN IPv6 LinkLocal Address is the IPv6 Address that you use to access the web-based management interface. If you change the LAN IPv6 Address here, you may need to adjust your PC’s network settings to access the network again. DHCP can be used to acquire an IPv6 prefix for the LAN interface. These settings are for advanced users with a good understanding of IPv6 addresses, DHCPv6 servers and DNSv6 servers. If you are not familiar with these settings, please contact a network administrator for assistance. IP Address: The IPv6 IP address of the Router. Prefix Length: Functions similar to the subnet mask of an IPv4 IP address. The IPv6 Local IP Address is the IPv6 Address that you use to access the web-based management interface. If you change the LAN IPv6 Address here, you may need to adjust your PC’s network settings to access the network again. DHCP can be used to acquire an IPv6 prefix for the LAN interface. DHCPv6 is a network protocol that is used for configuring IPv6 hosts with IP addresses, IP prefixes and/or other configurations required to operate on an IPv6 network. IPv6 hosts can acquire IP addresses by using DHCPv6. The DHCP Unique Identifier (DUID) is used by a client to get an IP address from a DHCPv6 server. The server compares the DUID with its database and delivers configuration data (address, lease times, DNS servers, etc.) to the client. Internet Network (WAN) The Basic Setup Wizard will assist you in setting up your Internet connection. However, in the case that you wish to adjust settings manually, the options on this page provides you with the tools to do this easily. Select your Internet Connection type from the drop down menu: Manual IP (Static): For Internet connections where the Internet provider does not provide you with an IP address automatically. If you know the IP address and DNS settings that your Internet provider uses, select this option. Automatic/Dynamic (DHCP): This is the configuration type most often used by Internet providers. Automatic configurations are used by both DSL and Cable as well as other providers. Under the Automatic Configuration method, the Internet provider will assign your router an Internet IP address automatically. 19 If for some reason you do not get an IP address and you know that your Internet provider uses DHCP, try resetting your modem. Remove the power adapter from the modem as well as the backup battery (if available). Wait about 30 seconds and then power the modem back on. You can run through the Basic Setup Wizard again to see if that fixes your Internet connection issues. PPPoE connections normally requires login information. If you do not know the settings for your PPPoE connection, please contact your Internet provider. PPTP and L2TP connections requires login information as well as IP address settings. If you do not know the settings for your PPTP / L2TP connection, please contact your Internet provider. RTA Advanced Settings These settings apply to the Local Network and your Internet Connection Network. If you are not familiar with these settings, please refer to a network administrator to avoid putting your network at risk. Enable uPnP: Universal Plug and Play is a network feature that allows uPnP enabled devices to “just work” with each other when connected to the same network. UPnP can work across different network media, such as an Ethernet connection or wireless connection. With UPnP enabled, network devices may change security settings within the Router’s firewall to allow access over the Internet. By default, UPnP is disabled to avoid exposing your network to security issues. Enable IGMP Proxy: Internet Group Management Protocol is a communication protocol used by hosts and routers on the network to establish multicast group memberships. IGMP Proxy is typically used to implement multicast routing and commonly used when advanced protocols such as PIM is not suitable. Enable Ping Access on WAN: Allows users to ping the WAN interface IP address from the Internet. Enable Web Server Access on WAN (Remote Management): Allows access to the Web Menu over the Internet. Enable IPsec pass through on VPN connection: Allows the IP security protocol suite to pass through on a VPN connection. IPv6 Advanced Settings: Enable IPv6 pass through on VPN connection: Allows the IPv6 protocol suite to pass through on a VPN connection. Enable Tunnel 6to4: Enabling this feature, enables encapsulation of IPv6 packets into IPv4 for transport across an IPv4 network. It allows for automatic IPv6-to-IPv4 address translation, and treats the underlying IPv4 network as one big non-broadcast multi-access (NBMA) network, rather than a collection of independent point-to-point links. 20 SMART FEATURES The Router provides your network with Smart Features that helps to provide convenience and protection for your wired and wireless network. The Smart Features allows you to control access of your wireless network through: on/off schedules, specific user authorizations, and wireless coverage control. These settings apply to your local wireless and wired network. Block Websites To block a website, you must first enable URL filtering. After it has been enabled, you can begin adding as many websites as you wish into the URL Address field. Note: If you wish to block www.google.com, simply type in "google" and the Router will block all websites with the text "google" in the URL. 0 User Access (MAC Address Filtering) User Access allows you to deny access or allow access to specific users connecting to the network. Each networking device has a unique address called a MAC address (a 12 digit hex number). By inputting the MAC address into the field, you can define whether that device is allowed into your network or not allowed. A MAC Address may sometimes be referred to as a Physical Address. Most networking devices have their MAC Address located on a label on the actual device. For Windows computers with internal networking adapters, the MAC Address can be found by viewing the Network Connection Details of the network adapter. The MAC Address will be listed as the Physical Address. Be sure to enter the MAC Address without any symbols. For example, a MAC Address of 78-DD-78-AA-78-BB would be entered as 78DD78AA78BB. RT0 21 User Access (IP Address Filtering) User Access (IP Filtering) is similar to User Access (MAC filtering) except that the Router uses the local IP address to filter the specific data from the specified network protocol. For example, if you chose to block TCP data packets from a specific computer, you would need to figure out what that device's IP address is and select TCP from the Protocol drop down menu. If you are not sure which Protocol to filter, select "Both" as your Protocol selection. USB STORAGE Local Sharing Share a USB storage device with computers on the local network of the Router. Insert a USB storage device, such as a flash drive or external hard drive, to the USB port on the back of the Router and follow the directions below for your operating system. The computer must be connected to the router to access the storage device. You may also want to Map the Network Drive so it shows up as a standard drive on your computer for easier access. Windows 7 and Vista To access the drive from your Windows desktop: Note: If the USB drive does not appear automatically under your Networked devices (Windows 7, Vista or Mac OS X), you will need to Map the Network Drive. a) Click the Start button. b) Click Computer. c) On the Computer page, the drive should appear on the left hand column under Network as LOOPCOMM_USB. To Map the Network Drive: a) b) c) d) e) Click the Start button. Click Computer. Click Map Network Drive from the top bar. Select a drive letter (any), then enter in the folder field: \\LOOPCOMM_USB\public\ or \\router’s LAN IP address\public\ If the drive fails to open, click browse and locate LOOPCOMM_USB under Network. 22 Windows XP To access the drive from your Windows desktop: Note: If the USB drive does not appear automatically under your Networked devices (Windows 7, Vista or Mac OS X), you will need to Map the Network Drive. a) Click the Start button. b) Click My Computer. c) Click on My Network Places and locate the drive named LOOPCOMM_USB. To Map the network drive: a) Click the Start button. b) Right Click My Computer and select Map Network Drive. c) Select a drive letter (any), then enter in the folder field: \\LOOPCOMM_USB\public\ or \\router’s LAN IP address\public\ d) If the drive fails to open, click browse and locate LOOPCOMM_USB under Network. Mac OS X To access the drive from your Mac desktop: Note: If the USB drive does not appear automatically under your Networked devices, you will need to Map your Network Drive (Instructions below). a) Open Finder. b) On the left hand menu, under Shared, click LOOPCOMM _USB. To Map the network drive: a) b) c) d) e) Open Finder. From the menu on the top of the desktop, select Go. Select Connect To Server from the drop down menu. Enter the address of the network drive: smb://loopcomm_usb/public or smb://router’s LAN ip address/public Then click Connect. If the network drive does not appear on your Mac desktop, follow these steps: a) b) c) d) Open Finder. Select Preferences from the drop down menu. Check show "Connected Servers". The drive should now appear on your desktop. 23 FTP Server Share a USB storage device with computers remotely over the Internet. A FTP server allows you to access files through the use of an FTP client remotely over the Internet. Insert a USB storage device, such as a flash drive or external hard drive, to the USB port on the back of the Router. a) From the USB Storage/FTP Server page of the web menu, enter a FTP server name. b) Select whether you wish to have an open or secured access to your FTP server. c) Open your FTP client software (not provided) and create a new FTP connection. d) Enter the Internet Address for the router as the IP address for your FTP connection. When prompted enter your login information to access the USB Storage device remotely. 24 FIREWALL SETTINGS The Router’s Firewall is designed to prevent unauthorized users from accessing your network. This section will go over the different features of the Firewall and how to configure them. Port Filtering Port Filtering is a security measure that prevents users from using specific ports for reasons other than what those ports were originally intended for. For example, TCP port 21 is traditionally used for FTP. However, there is nothing stopping a user from using port 21 for purposes other than FTP access. By enabling Port Filtering on TCP port 21, only FTP communications would be allowed. No other types of communication would be allowed on this port. Hackers may sometimes scan for all open ports on your network as a method of hacking into your network. Port Filtering and other firewall features help to prevent this from happening. To set up Port Filtering, select a range of ports you wish to filter. If you are trying to filter a single port, enter the port number twice. (For example, Port 21: 21 – 21) Select the Protocol of the port you are filtering. If you do not know what protocol you wish to filter, select “Both”. Port Forwarding Port Forwarding is a rule that tells the Router that if a specific type of request comes in on a specific port, then that request should be forwarded to a specific device on the private network. Port Forwarding is often used for setting up servers, cameras and other devices that require remote access. Enable Port Forwarding: Enables designated ports to begin forwarding. IP Address: The IP address of the device behind the Firewall that is being designated for Port Forwarding. Protocol: Select UDP, TCP or Both for the protocols to be forwarded. Port Range: Select a range of ports for the designated IP address that you wish to be forwarded. Comment: Create a name that you can use to easily identify this Port Forwarding entry. 25 DMZ (Demilitarized Zone) A DMZ is a network location or IP Address that is not protected by the firewall. When enabling DMZ, it is important to note that the device on the IP Address designated as part of the DMZ does not have any protection from the Router’s firewall. The device’s only security would be those built into the operating system. As a general safety rule, devices placed on the DMZ should not have any other network connections to any other devices. Enable DMZ: Enables the Demilitarized Zone. DMZ Host IP Address: The designated IP Address of the network device to have unrestricted access through the Router’s Firewall. Virtual LAN A VLAN has the same attributes as a physical local area network (LAN), but it allows for devices to be grouped together even if they are not located on the same physical network switch. The benefit of a VLAN is that it allows network traffic to flow more efficiently for computers or network devices that are within sections of mutual interest. In addition, changes to the VLAN can be made virtually via a user interface rather than manually changing cables and network switches. VLAN are often used to segment network devices based on their department, user types or common applications. Bandwidth can then be more easily managed by adjusting the bandwidth to specific VLANs based on their priorities. RTA0 26 Denial of Service A Denial of Service attack is an attempt by a user (or users) to make a server’s or network’s services unavailable. The user sends a server multiple requests with false return addresses. The server will attempt to respond by sending a request back to the user; however, since the address is false, the server will wait for a response before closing the connection. When multiple requests like this occur, servers may often get overloaded with too many requests and stop functioning altogether. This is a typical DoS attack, although DoS attacks may not be limited to this type of attack. The Router can assist in preventing these types of attacks by scanning the network for patterns of activity that represent DoS attacks. If a pattern comes in frequently, the Router can attempt to block messages containing that pattern and thus protect the server from becoming overloaded and unresponsive. RT0 QUALITY OF SERVICE QoS prioritizes and guarantees network performance for a specific IP Address range or MAC Address. QoS is often used for applications that require steady bandwidth. Common applications include VoIP phones, video streaming applications (i.e. DVRs, network cameras, video on demand), online gaming and servers. It is important to note that while QoS helps to prioritize and guarantee bandwidth for a specific device, it does not provide you with more bandwidth than you currently have. For example, if your Internet Provider rates your Internet connection speed at 5Mbps, QoS will not improve that connection. QoS helps you better manage the 5Mbps that you have so that the bandwidth is prioritized for devices on your network that may need the provided 5Mbps more than other devices. However, if you have an application that requires more than 5Mbps of steady bandwidth, the application will continue to experience “lag” with or without QoS since your available bandwidth is less than the required bandwidth of your application. 27 ROUTING SETUP Dynamic Routing allows the Router to automatically learn network destinations for devices/networks that are directly connected to the router. RIP and RIP2 are routing protocols that may be used for the router to learn routes from other routers running those same protocols. This allows the Router to adapt to changes and failures within the network topology and find the best route. Static Routing allows the administrator to manually enter into the Router’s routing table. These routes do not change and must be manually reconfigured if the route fails. 28 MANAGEMENT FEATURES The Management Features on the Router allows you to view the status of the system, your Internet connection, wireless network and local area network. The Network Statistics page provides detailed traffic data for each connection type. System Status The System Status provides you with a snapshot of your Router’s current connections and settings. The System Information section provides you with the router’s firmware version and build. This is used to help our support department determine what firmware version your device is running. The Current Date / Time is the setting for the system clock. If this time is off, go to the System Clock section and configure your system time. The Internet Connection Status displays the information from your Internet Provider. If for some reason your Internet connection stops working, you may try running through the Basic Setup Wizard again. The Wireless Settings shows the details of the 2.4GHz and 5.0GHz wireless networks. The Local Area Network settings display the current configurations for local network IP address and DHCP server settings. Network Statistics Network statistics shows the data activity for each connection type on the Router (Internet, Wireless and Wired). The Wireless Connection statistics shows all data activity for both the 2.4GHz and 5.0GHz wireless networks separately. The Wired Connection statistics shows all data activity for all users physically connected to the wired ports on the Router. The Internet Connection statistics shows the data activity for all upload and download data over your Internet connection. 29 Dynamic DNS Settings The Dynamic Domain Name System (DDNS) is a method to keep a web domain name, or web address, linked to a changing IP address as most Internet Providers do not provide static IP addresses. To use DDNS, you must first set up an account with a DDNS provider. The Router supports two of these providers (TZO and DynDNS). Once the DDNS service has been set up and configured correctly on the Router, the DDNS service will constantly track the IP address of your Internet connection. Each time your Internet Provider changes your IP address, the Router will inform the DDNS service and the DDNS service will update your new IP address. The DDNS web domain that you have chosen to use will then be updated to redirect to your new Internet IP address. The DDNS service makes it so you never have to check or remember your Internet IP address. This feature is typically used for users running servers, network cameras and other devices that require remote access. System Clock Maintain the internal clock for the Router by syncing with your computer’s time or over the Internet. Your system clock settings need to be accurate in order for logs and wireless access schedules to work correctly. System Logs The System Log is useful for viewing the activity and history of your Router. The System Log is also used by Loopcomm technicians to help troubleshoot your router when needed. It is recommended that you enable all logs s in the event that troubleshooting is required. All log entries will be deleted each time the Router reboots or is powered off. 30 Upgrade Firmware Loopcomm continuously updates the firmware for all products in an effort to constantly improve our products and their user experiences. When connected to an active connection with Internet access, the Router can automatically check for new firmware updates that are available by pressing Check Now. Follow the prompts to complete the upgrade process. Before upgrading the firmware, remember to always save your current settings first by going to the Save/Reload Settings page. The firmware upgrade process will reset the settings of the Router to default settings. Manual Firmware Upgrade: In the case that the Router does not have access to the Internet, you can manually upgrade the firmware by downloading the firmware file from the Loopcomm website. The firmware update is downloaded as a zip file and you will need to have an unzipping program to open the file. Inside the file will be a text document with details on the current firmware release and instructions on how to upgrade the firmware. To manually upgrade your firmware: a) Download the file from www.loopcomm.com and remember the location where you saved it. Firmware files may also be provided by Loopcomm. b) Click Choose File and locate the file. c) Click Upload to begin upgrading. Note: Firmware files normally have a .bin file extension. Save and Reload Settings Saving your current settings allows you to back-up your current settings which may be reloaded at a later time. This feature may be useful for testing new features and settings without having to worry about returning to a stable platform. To save current settings: To load previously saved settings: a) Click Save. b) Select a file name and location. a) Click Browse. b) Locate the previously saved settings file. c) Click Upload to restore the settings to the saved file. You may also reset the Router’s settings to factory settings by pressing Reset. By resetting the Router you will lose all previous configurations and will need to run the Basic Setup Wizard again to configure the Router’s Settings. 31 Password Settings If you wish to enable a password to protect unauthorized access to the web menu and Basic Setup Wizard, you may enter one here. TECHNICAL SPECIFICATION Wireless Standard: 802.11a/b/g/n/ac Frequency Band: 2.4 GHz, 5.0GHz Wireless Speed: 2.4GHz: 300Mbps (Tx/Rx) 5.0GHz: 867Mbps (Tx/Rx) Amplifier: 2 x 2.4GHz Amplifiers 2 x 5.0GHz Amplifiers 4 x Low Noise Amplifiers Wireless Output Power: Up to 29dBm Wireless Security: • WEP, WPA, WPA2, WPA Mixed, WPS Wireless Coverage Control: • 15% - 100% Output Power Antennas: • 2 x Detachable High Gain Antennas • 2 x Reverse SMA Connector Ports: • 4 x RJ-45 10/100/1000 LAN ports • 1 x RJ-45 10/100 /1000 WAN ports • USB 2.0 Port for Storage Devices Mounting: • Wall, Stand or Desktop Setup Requirements: • Wired or wireless PC/Mac • Google Chrome, Internet Explorer (8.0 and up) or Safari web browser. 32 DEFAULT SETTINGS The default settings for your Router are listed here. If for some reason you need to return your Router back to default settings, hold down the Reset button on the back panel for 10 seconds. The Router will reset back to factory settings as listed below: IP Address: 192.168.1.200 Web Menu Access: http://setup.loopcomm.com 2.4GHz Wireless SSID: Loopcomm_2.4GHz Wireless Security Key (WPA/WPA2 Mixed Mode): loopcommwifi 5.0GHz Wireless SSID: Loopcomm_5GHz Wireless Security Key (WPA/WPA2 Mixed Mode): loopcommwifi 33 TROUBLESHOOTING The tips in this guide are listed in order of relevance. Try solution (a) before trying solution (b), etc. Troubleshooting: Web Menu Issues I entered setup.loopcomm.com and it failed to open the Setup Wizard. a) Make sure your computer is connected to the Router using the included Ethernet cable. Do not try to connect with a wireless connection. Ensure that the power on the Router is on. b) Check that your computer IS NOT connected to any wireless networks. If it is, disable your Wi-Fi connection and disconnect from all wireless networks. Reboot the router and try again. c) Close your current web browser and reopen it. Use Google Chrome or Internet Explorer (v8.0 and up). d) Open your web browser and enter 192.168.1.200 into the web address bar. e) If you can access the web menu, but not the Setup Wizard, the Router may have previously been configured. There is a link to re-access the Setup Wizard from the Dashboard. Scroll to the bottom of the Dashboard page to find the Setup Wizard link. f) Another way to access the Setup Wizard is to reset the Router to default settings by holding the Reset Button (located on the back panel) for ten (10) seconds and try again. The Setup Wizard will always appear if the Router has not yet been configured. After it has been configured the Dashboard will appear instead. I entered setup.loopcomm.com and it failed to open the Web Menu Dashboard. a) Make sure your computer is connected to the Router using the included Ethernet cable. Do not try to connect with a wireless connection. Ensure that the power on the Router is on. b) Check that your computer IS NOT connected to any wireless networks. If it is, disable your Wi-Fi connection and disconnect from all wireless networks. Reboot the router and try again. c) Close your current web browser and reopen it. Use Google Chrome or Internet Explorer (v8.0 and up). d) Open your web browser and enter 192.168.1.200 into the web address bar. e) If the Setup Wizard appears instead of the Dashboard, the Router has not yet been configured. Complete the Setup Wizard or skip the Setup Wizard to access the Dashboard. f) Reset the Router to default settings by holding the Reset Button (located on the back panel) for ten (10) seconds and try again. Complete the Setup Wizard or skip the Setup Wizard to access the Dashboard. 00 I have entered setup.loopcomm.com, but I cannot enter the Web Menu. I am prompted for a login and password, but it does not let me continue. a) Check that you are using the right login and password. b) If you forgot your login and password for the Web Menu, reset the Router to default settings and try again. To reset the Router to default: On the back panel of the router find the Reset button. Use a pen tip to hold down the reset button for 5 to 10 seconds. The router will reinitialize and restore its default settings. 34 I am having problems with features on the Web Menu. When clicking buttons, it does not register my action. a) Check that you are using a supported web browser: Google Chrome, Internet Explorer (8.0 and up) and Safari. If you are using an unsupported web browser, such as Firefox, please change to one of the supported web browsers and try again. Troubleshooting: Internet Connection Issues The Basic Setup Wizard could not automatically configure my Internet connection. a) Reset your modem by holding down the reset button located on the back of the modem for approximately five seconds. Try the automatic configuration again. b) Static IP: Your Internet connection may require a static IP setting. Check with your ISP to obtain the IP settings. c) DSL Connections: Your Internet connection may require login information. If you are using PPPoE mode, you will need to manually configure your Internet connection settings and obtain your username and password. d) Cable Modem: Your Internet connection may require you to clone your MAC address. Go to More Settings > IP Settings > Internet Network (WAN) and select Automatic/Dynamic (DHCP) from the drop down menu. Clone your PC’s MAC address under the DNS settings. I have gone through the Setup Wizard and I do not have Internet. a) Detach the power adapter and disconnect all computers from the Router. Turn off the power to your modem and remove the backup battery (if available). Wait 2 minutes and power the modem back on. Wait 2 minutes for the modem to initialize. Power on the Router and connect your computer to the router. Open your web browser and try to access the Internet. b) Check that your Internet connection through the modem is working. Power off the Router and disconnect your computer from the router. Turn off the power to your modem and remove the backup battery (if available). Wait 2 minutes and power the modem back on. Wait 2 minutes for the modem to initialize. Attach your computer directly to the modem and power on your computer. Open your web browser and check to see if you can go online. If you cannot go online, there may be a problem with your Internet provider. Please contact your Internet provider to troubleshoot your connection issues. 35 My Internet connection is unstable and drops intermittently. a) Power off your computer, the Router and your modem. Power on your modem and wait 2 minutes. Power on the Router and wait 1 minute for the router to initialize. Power on your computer and try again. b) Check to see if other computers are also having this problem. If they are not, check to see if your antivirus software or firewall software is conflicting with your Internet connection. You may also try temporarily disabling all firewalls or anti-virus software to see if that is what is causing the problem. c) If you have a PPPoE or another Internet connection requiring login credentials, you may need to adjust the reconnection or time out settings. Go to the IP Settings > Internet Connection (WAN) page and configure your Internet connection to automatically reconnect. d) If you are using Windows XP, check that your computer is using Service Pack 2 or greater. Windows XP users with Service Pack 1 may experience intermittent wireless connections. My Internet connection is abnormally slow. a) Check with your Internet provider to ensure that they are not experiencing system wide issues. b) Check with speedtest.net to see the speed of your Internet provider. Connect directly to your modem with your computer and check speedtest.net again. If the speed results are the same, the issue is with your Internet provider. Please contact your provider to troubleshoot the issue. c) Check the Internet connection speed on another computer that is connected to the Router. If the other computer does not have Internet speed problems, the networking equipment or operating system on your original computer may be outdated or may be experiencing problems. Viruses and other software may slow down a computer’s overall speed significantly. d) If you are using a wireless connection to the Router, check that your wireless signal strength is above 3 bars. If not, you may need to move closer to the Router. Troubleshooting: Local Network Issues My computer is getting an IP address of 169.254.x.x and Windows says “Limited or no Connectivity”. a) Make sure the Router is powered on. b) Check that your computer’s network adapter is enabled and is set to “Obtain IP address automatically”. c) Release and Renew your IP Address on your computer. To do this on a Windows computer: Click Start > Run and type CMD. When the command prompt appears, type ipconfig/release and press enter. Type ipconfig/renew and press enter. Check that your computer’s network adapter has an IP address of 192.168.1.x d) Restart your computer and check again. e) Restart the Router and check again. f) Make sure DHCP is enabled in the Router’s Web Menu (Go to More Settings > IP Settings > Local Area Network (LAN) > DHCP Settings. g) Check that your Firewall or Anti-Virus software is not preventing you from accessing shared devices on you network. 36 Troubleshooting: Wireless Issues I am only getting 3 or 4 wireless signal bars on my wireless computer and I am within 10 feet of the wireless router. a) Step back at least 10 feet from the Router and check your signal again. The Router emits high power, long range Wi-Fi signals that may confuse your wireless adapter signal reading at close range. The speed and signal are at 100%, however your readout may not be displaying the data correctly. b) Change the wireless channel on your Router to find a channel with less interference. Do this for both 2.4GHz and 5.0GHz wireless networks. I am not getting a strong wireless connection from all distances from the wireless router. a) Check that your antennas are securely fastened to the Router. b) Check if other computers are experiencing the same issue. If not, the wireless adapter in your computer may be experiencing problems or maybe older and have poor wireless performance. c) Avoid placing the Router near or around Microwaves and 2.4GHz wireless phones. d) Avoid using wireless channels that are crowded. Change the wireless channel on the Router. e) Place the Router in a higher location near the center of your desired coverage location. f) Position the antennas on the Router in opposite orientations.0 My wireless adapter does not connect at the maximum wireless speed. a) Your wireless network adapter may be outdated and have older wireless technology not capable of achieving the wireless network speeds of the Router. To achieve maximum wireless speeds, it is required that you have a 802.11n (2.4GHz) or 802.11ac (5.0GHz) adapter. b) Check that you are using the latest Wi-Fi security type: WPA or WPA2 WEP security may slow down your wireless speeds. c) Check that the Router’s wireless data rate is set to AUTO or 11N (2.4GHz) and 11AC (5.0GHz) data rate speeds. d) Wireless speeds degrade as you get further away from the wireless router. e) Check that the wireless channel set on the Router is not crowded. Try changing the wireless channel to another channel and test the speed again. f) Do not use Internet websites (i.e. speedtest.net or other websites) to test your wireless speeds. Speed test websites measure your Internet connection speed, which is controlled by your Internet provider. Wireless speeds are for your local network and not your Internet connection. To test wireless speeds, a local test or file transfer will be required to test the true wireless speed. 37 I cannot connect my Windows Vista computer to the wireless network. I enter my wireless password and I see an error. a) Manually add a wireless network to your Vista computer: • Click Start, and then click Network. • Select Network and Sharing Center. • Click Manage Wireless Networks. • Click Add and select Manually create a network profile. • Type in the SSID, and select the type of security and enter your security key. • Select “Start this connection Automatically” and click Next. • Go to Network and Sharing Center and select Manage Network Connections. • Right click Wireless Network Connection and then select Status. • Click details and check to see that your IPv4 IP address is correct (192.168.1.x). b) Disable IEEE 802.1x authentication on your computer. I cannot connect my Windows XP computer to the wireless network. I enter my wireless password and I see an error. a) Make sure your computer has the latest Windows Service Pack. Windows Service Pack 1 does not support WPA security. Upgrade to the latest Service Pack to support the latest wireless encryption. b) Manually add a wireless network to your XP computer. c) Disable IEEE 802.1x authentication. Troubleshooting: USB Storage Issues I cannot access my USB storage device after I plug it into the router. Follow the instructions below for your operating system. Windows 7 and Vista To access the drive from your Windows desktop: Note: If the USB drive does not appear automatically under your Networked devices (Windows 7, Vista or Mac OS X), you will need to Map the Network Drive. a) Click the Start button. b) Click Computer. c) On the Computer page, the drive should appear on the left hand column under Network as Loopcomm_USB. To Map the Network Drive: a) b) c) d) e) Click the Start button. Click Computer. Click Map Network Drive from the top bar. Select a drive letter (any), then enter in the folder field: \\Loopcomm_USB or \\shared disk IP address If the drive fails to open, click browse and locate Loopcomm_USB under Network. 38 Windows XP To access the drive from your Windows desktop: Note: If the USB drive does not appear automatically under your Networked devices (Windows 7, Vista or Mac OS X), you will need to Map the Network Drive. a) Click the Start button. b) Click My Computer. c) Click on My Network Places and locate the drive named Loopcomm_USB. To Map the network drive: a) b) c) d) Click the Start button. Right Click My Computer and select Map Network Drive. Select a drive letter (any), then enter in the folder field: \\Loopcomm_USB or \\shareddisk IP address If the drive fails to open, click browse and locate Loopcomm_USB under Network. Mac OS X To access the drive from your Mac desktop: Note: If the USB drive does not appear automatically under your Networked devices (Windows 7, Vista or Mac OS X), you will need to Map the Network Drive. a) Open Finder. b) On the left hand menu, under Shared, click Loopcomm USB. To Map the network drive: a) b) c) d) Open Finder. From the menu on the top of the desktop, select Go. Select Connect To Server from the drop down menu. Enter the address of the network drive: Loopcomm_USB or shared disk IP address, then click Connect I cannot access my USB storage device remotely. a) Insert a USB storage device, such as a flash drive or external hard drive, to the USB port on the back of the Router. b) From the USB Storage/FTP Server page of the web menu, enter a FTP server name. c) Select whether you wish to have an open or secured access to your FTP server. d) Open your FTP client software (not provided) and create a new FTP connection. To find a FTP client software, go to downloads.com and search for FTP client software. Download a FTP software suitable for your needs and continue with the next step. e) Enter the Internet Address for the router as the IP address for your FTP connection. When prompted enter your login information to access the USB Storage device remotely. The Router freezes or I cannot access the web when a USB storage device is connected. a) Remove the USB storage device from the Router and reboot it by unplugging the power adapter. Once rebooted, try inserting the USB storage device again. b) Make sure your UBS storage device is not corrupted and is working properly and try again. 39 REGULATORY INFORMATION Federal Communication Commission Interference Statement: This equipment has been tested and found to comply with the limits for a Class B digital device, pursuant to Part 15 of the FCC Rules. These limits are designed to provide reasonable protection against harmful interference in a residential installation. This equipment generates uses, and can radiate radio frequency energy and, if not installed and used in accordance with the instructions, may cause harmful interference to radio communications. However, there is no guarantee that interference will not occur in a particular installation. If this equipment does cause harmful interference to radio or television reception, which can be determined by turning the equipment off and on, the user is encouraged to try to correct the interference by one or more of the following measures: • Reorient or relocate the receiving antenna. • Increase the separation between the equipment and receiver. • Connect the equipment into an outlet on a circuit different from that to which the receiver is connected. • Consult the dealer or an experienced radio/TV technician for help. FCC Caution: This device complies with Part 15 of the FCC Rules. Operation is subject to the following two conditions: (1) This device may not cause harmful interference, and (2) this device must accept any interference received, including interference that may cause undesired operation. RF Radiation Exposure and Hazard Statement: To ensure compliance with FCC RF exposure requirements, this device must be installed in a location such that the antenna of the device will be greater than 20 cm (8 in.) away from all persons. Using higher gain antennas and types of antennas not covered under the FCC certification of this product is not allowed. Installers of the radio and end users of the product must adhere to the installation instructions provided in this manual. This transmitter must not be co-located or operating in conjunction with any other antenna or transmitter. Non-modification Statement: Use only the integral antenna supplied by the manufacturer when operating this device. Unauthorized antennas, modifications, or attachments could damage the TI Navigator access point and violate FCC regulations. Any changes or modifications not expressly approved by the party responsible for compliance could void the user's authority to operate this equipment. Copyright © 2015 Loopcomm Technology Inc. All rights reserved. 40