1
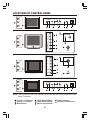
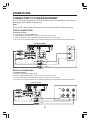
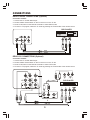
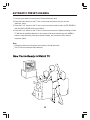
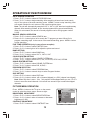
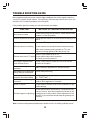
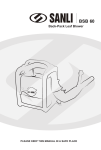
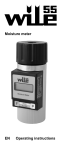
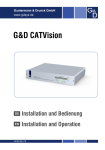
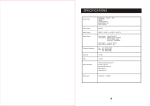
Pantone 2746C
Black
COLOUR TELEVISION
USER MANUAL
Before operating this product,
please read these instructions completely.
INTRODUCTION
Thank you very much for your purchase of this product.
To enjoy your set to the full from the very beginning, read this manual carefully and keep it
handy for ready reference.
CONTENTS
SAFEGUARDS & SAFETY
2
PRODUCT FEATURES
3
LOCATIONS OF CONTROL PANEL
4
OPERATION OF REMOTE CONTROL
5-6
CONNECTIONS
7-9
AUTOMATIC PRESET CHANNEL
10
OPERATION OF FUNCTION MENU
11-14
TROUBLE SHOOTING GUIDE
15
SPECIFICATIONS
16
1
SAFEGUARDS & SAFETY
IMPORTANT SAFEGUARDS
When using electrical appliances, in order to reduce the risk of fire, electric shock, and/ or
injury to persons, basic safety precautions should always be followed.
FOR YOUR SAFETY
Read all instructions carefully even if you feel you are quite familiar with the appliance.
This appliance is not intended for use by young children or infirm persons without
supervision.
Young children should be supervised to ensure that they do not play with the appliance.
This appliance should be placed on a flat, stable surface before it is operated.
Total darkness or a reflection on the picture tube can cause eyestrain. Soft and indirect
lighting is recommended for comfortable viewing.
INDOOR USE ONLY - this appliance is not intended for outdoor use.
Do not expose this appliance to rain or moisture. Do not immerse.
Do not place items filled with liquids, such as vases, on the appliance. Do not expose
appliance to dripping or splashing liquids.
Do not place naked flame sources, such as candles, on the appliance.
Do not locate the appliance near heat sources such as radiators, heaters, air ducts or
direct sunlight.
Do not block any of the ventilation openings. Ensure that vents are not covered by
newspapers, tablecloths, curtains, etc. Do not install in a tight fitting cabinet.
Do not insert or allow foreign objects to enter any grille openings.
This appliance is not intended for use in bathrooms, laundry areas or similar moist
locations. Never locate this a ppliance in the immediate surroundings of, or where it may
fall into, a bath, basin, washtub , shower or swimming pool.
Do not run the power cord under carpeting. Arrange the supply cord away from traffic
areas and where it will not becom e a trip hazard.
To disconnect the appliance, turn appliance off, switch off power outlet and remove plug
from power outlet.
Do not abuse supply cord. Never carry the appliance by the supply cord. Never yank the
supply cord from the power ou tlet; instead, grasp the plug and pull to disconnect. Keep
supply cord away from heated surfaces.
Do not operate the appliance with a damaged supply cord or plug or after the appliance
malfunctions, has been dropped or damaged in any way. Consult an authorised service
facility or similarly qualified person for examination.
When cleaning the picture tube face, turn off television and remove plug from power
outlet. Using a dry cloth, wipe the television ensuing that no dust or lint enters any vents.
This product has not been designed for any other uses other than those specified in this
booklet. This product is intended for household use only.
All television receivers are high voltage instruments. Your PICTURE TUBE is highly
evacuated. If broken, glass fr agments will be violently expelled. Scratching, chipping, or
putting undue pressure on th e tube is dangerous and should be avoided. During thunder
and lightning, unplug the pow er cord and antenna cord to prevent your TV set from
damage. All inside work on your receiver should be performed by an authorised
repair agent.
The television(or this product) shouldn't suffer the drop of water or water to splash.
The television(or this product) shouldn't place or a type of product that fills up liquid such as
the vase.
The power supply plug of the television(or this product) be of the power supply/bresk device,
should be putting to pull out eas ily of place usage.
Batteries(battery pack or batteries installed) shall not be exposed to excessive heat such as
sunshine, fire or the like.
2
PRODUCT FEATURES
INSTALLATION
Locate the receiver in the room where direct light does not strike the screen.
Total darkness or a reflection on the picture screen can cause eyestrain.
Soft and indirect lighting is recommended for comfortable viewing.
Allow enough space between the receiver and the wall to permit proper ventilation.
Avoid excessively warm locations to prevent possible damage to the cabinet, or premature
component failure.
This TV receiver can be connected to AC supply, never connect to DC supply or any other
power supply.
Do not install the receiver in a location near heat sources such as radiator, air ducts, direct
sunlight or in a closed area.
COMPULSORY WARNING
If the supply cord is damaged it must be replaced by the manufacturer or its service agent
or a similarly qualified person in order to avoid a hazard.
CAUTION
DO NOT OPEN - DO NOT ATTEMPT TO REPAIR, DISASSEMBLE OR MODIFY
THIS APPLIANCE.
DANGEROUS HIGH VOLTAGES EXIST INSIDE THIS APPLIANCE.
THIS APPLIANCE IS ONLY TO BE SERVICED BY A QUALIFIED PERSON.
NO USER - SERVICEABLE PARTS INSIDE.
WARNING:
Some of TV are designed by unilateral power switch, beware
of shock when repairing it.
3
VIDEO L-AUDIO-R
LOCATIONS OF CONTROL PANEL
V+
P-
P+
V+
P-
P+
TV/AV MENU
V-
V+
R-AUDIO-L VIDEO
P-
P+
TV/AV MENU V-
P+
R-AUDIO-L VIDEO
PV+
VMENU
VIDEO L-AUDIO-R
TV/AV
TV/AV MENU V-
NOTE: The TV pictures used in the manual may not look like the actual, please refer to the
actual TV pictures
Program +/- Buttons
Volume +/- Buttons
Menu Button
TV/AV Switch Button
Power On/Off Button
Side AV Input Socket
4
Power Indicator
Remote Control Sensor
OPERATION OF REMOTE CONTROL
DESCRIPTION OF REMOTE CONTROL KEYS
7
1
The unit has the function of no signal muting and
no signal auto switching off. If there is no signal
for 15 minutes, it can be turned to standby status
automatically.
8
2. SCREEN DISPLAY BUTTON
3
Press the DISP button to display the current
information of the TV.i.e. Channel, Picture Mode,
Sound Mode(optional), Clock.
4
10
9
2
11
11
6
5
3. CHANNEL BUTTON
16
14
15
18
12
13
1) When the channel number has one figure,
press 0~9 button directly.
2) When the channel number has two figures(1099), first press -/-- button to see -- on the
screen, then press 0~9 button. For example,
first press -/-- button to see -- on the screen,
then press 2 , 5 button to choose channel
25.
3) When the channel number has three figures
(100~199), first press -/-- button to see 1-- on
the screen, then press 0~9 button. For
example, first press -/-- button to see 1-- on
the screen, then press 2 and 5 button to
choose channel 125.
17
4. RETURN BUTTON
TV Mode:
Press the button, the program can be
interchanged between present program and
former program.
AV Mode:
Press the button back to TV channel.
BATTERY INSTALLATION OF REMOTE CONTROL UNIT
5. PROGRAM NUMBER BUTTONS
1.Remove the battery compartment cover.
2.Insert the two AAA (pencil size)1.5V
batteries. Make sure the polarity(+or-) of the
batteries matches the polarity marks inside the
unit.
3.Close the battery compartment door.
Note:
Replace with new batteries when the TV set
begins to show the following symptoms.
Operation is unsteady or the TV set does not
function properly with the remote control unit.
Press these buttons to select the next higher or
lower program number.
6.VOLUME ADJUSTMENT BUTTONS
Press these buttons to increase or decrease the
sound volume level, volume bar will be displayed.
7.TV/AV SELECTION BUTTON
1) Press the button to select TV or AV input signal.
2) FM Function(Optional)
Press the TV/AV button thrice to select FM radio
input signal.
(a)FM Manual Tuning - Press menu button
once and V+/V- to set the FM channel.
(b) FM Auto Tuning- Press menu button twice
and then press V+ to auto tune FM channel.
Press 1~9 buttons to select channels.
Note: To receive the FM signal always set the
manual antenna provided with the television set.
1. POWER(STAND-BY) BUTTON
Firstly, the power supply of the unit must be
switched on, When it is in standby status, press
standby button, after several seconds, the unit is
on. Press the button once again to turn the unit
off (standby status).
Also the unit can be switch on by pressing
P+/P- button on the TV set when it is in
standby status.
5
OPERATION OF REMOTE CONTROL
DESCRIPTION OF REMOTE CONTROL KEYS
8.SOUND MUTE BUTTON
18.LOCK BUTTON
Press the MUTE button to mute the sound
completely. Press the button once again to
restore the previous sound level, and cancel
the mute.
Press the button,
---- will appears on the
screen.
Pressing the password the digits that you defined
yourself correctly, the lock menu will be effective.
A. Select each function using the P+/P- button.
B. Each value can be changed by the V+/V- button.
C. In the menu:
a) 'Lock' is general lock, only when this item is
'On', 'Parental Lock' and 'Hotel Mode' can be
effective.
b) When 'Parental Lock' is effective, the screen
is set black and sound is muted.
c) When 'Hotel Mode' is effective, volume is
limited due to the value of 'Volume Limited'.
D. When you will change the password, you may
be selected 'Change PIN' item, and press
V+/V- button, the 'Change PIN' menu will
appear.
New Password: input 4 digits you like.
Confirm: again input above new password 4
digits correctly.
E. Press the LOCK button, the lock menu will
disappear.
Note:
The search menu will not appear when any
program would be locked.
The general lock is on searching menu, only
when the general lock put on, the function of lock
may be effective.
After new password was set, the basic
password 4100 still is available.
9.PICTURE EFFECT BUTTON
Press the P.P button to cyclically select
STANDARD, DYNAMIC, PERSONAL, MILD.
10. SLEEP TIMER BUTTON
Press the button, it can preset the unit with
definite time(0~240minutes). After that the unit
can be automatically switched to standby. The
sleep timer can be set in steps of 15 minutes
with a maximum of 240 minutes.
11.MENU BUTTON
Press the button to select Picture menu, Sound
menu, Timer menu, Settings menu and Search
menu .
12.SOUND SYSTEM BUTTON
Press the SYS button to select Sound system.
13.ZOOM BUTTON
Press the button to cyclically select 4:3 or
mode.
14.GAME BUTTON
In TV mode, press the GAME key, game may be
appeared.
SNAKE:
Press V+/V- button, the snake may be turn on to
right, left, up or down. Press MENU button, the
game will restart.
LOCK
TV
LOCK
PROGRAM
PARENTAL LOCK
HOTEL MODE
VOLUME LIMIT
CHANGE PIN
15.CALENDAR BUTTON
Press the CAL button, calendar will be appeared.
Press P+/P- button to change the year. Press
V+/V- button to change the month.
Select
Adjust
OFF
5
OFF
OFF
32
M Exit
16.S.M BUTTON
1) Sound Effect (Optional)
Press the S.M button to cyclically select SPEECH,
THEATRE, MUSIC or PERSONAL.
2) Sound Menu (Optional)
Press the S.M button to select Sound menu.
CHANGE PIN
TV
NEW PIN
CONFIRM
-------
17.SCAN BUTTON
Press the SCAN button, the television will scan all
the program in memory once. Every program will
stay for about 1 second.
Select
6
Adjust
M Exit
CONNECTIONS
INSTALLATION OF ANTENNA
Aerial cable
Connect the 75 OHM coaxial cable from the antenna to the antenna jack on the rear panel, as shown
above.
Note:
For better reception, especially in outlying area or where ghost or interference happens, an external
roof-mounted antenna is recommended.
For UHF TV reception, use the specified UHF antenna. Consult the local sale dealer.
When using 300 OHM flat cable, a 300 OHM - 75 OHM adapter should be adopted for a proper
connection to the antenna jack.
POWER CONNECTION
Plug the AC cord into an AC outlet.
Press the Power button to turn on, press the Power button again to shut off.
Note:
This unit should be operated from a household AC supply.
When you disconnect the power supply cord, pull it out by the plug. Never pull the cord itself.
CAUTIONS:
During a power outage, the TV should be unplugged from the AC outlet. To conserve energy the TV
should be unplugged from the AC outlet if not being used for a prolonged period of time.
7
CONNECTIONS
CONNECTION TO OTHER EQUIPMENT
This TV set can be connected to a video cassette recorder, video disc player, video camera,
game player.(Not available for audio only)
Note:
If it is non-AV1, AV2 models, please don't input the rear AV and side AV at the same time.
SIDE AV CONNECTIONS
Connection scheme:
1. Connect the TV set with DVD Player.
2. Press the Mains Power Button on the TV set to turn on the TV set.
3. Press TV/AV button on the Remote Controller to select AV or AV2 mode.
4. To return to TV program, select the TV mode by pressing the TV/AV button of the remote control.
R-AUDIO-L VIDEO
DVD PLAYER
WHITE
RED
YELLOW
REAR AV CONNECTIONS
Connection scheme:
1. Connect the TV set with DVD Player.
2. Press the Mains Power Button on the TV set to turn on the TV set.
3. Press TV/AV button on the Remote Controller to select AV or AV1 mode.
4. To return to TV program, select the TV mode by pressing the TV/AV button of the remote control.
DVD PLAYER
OUT
IN
L-AUDIO-R
WHITE
RED
YELLOW
8
VIDEO
CONNECTIONS
REAR S-VIDEO CONNECTIONS (Optional)
Connection scheme:
1. Connect the TV set with DVD Player.
2. Press the Mains Power Button on the TV set to turn on the TV set.
3. Press TV/AV button on the Remote Controller to select SVHS mode.
4. To return to TV program, select the TV mode by pressing the TV/AV button of the remote control.
DVD PLAYER
AUDIO
S-VIDEO
REAR YUV CONNECTIONS (Optional)
Connection scheme:
1. Connect the TV set with DVD Player.
2. Press the Mains Power Button on the TV set to turn on the TV set.
3. Press TV/AV button on the Remote Controller to select YUV mode.
4. To return to TV program, select the TV mode by pressing the TV/AV button of the remote control.
DVD PLAYER
IN
AUDIO
Y
Cb / Cr
9
AUTOMATIC PRESET CHANNEL
1. Connect your cable or Antenna to the Terminal Antenna Jack.
2. Press the menu button on the TV set or on the remote control until you see the
Search
menu.
3. Press the P+/P- button on the TV set or on the remote control to select AUTO SEARCH
item and AUTO SEARCH item turns black.
4. Press the V+/V- button on the TV set or on the remote control to begin searching and the
TV will find all available channels. In the course of the auto searching, press MENU
button to stop searching. After auto search finished, the unit returns to the normal
reception status.
Note:
Please be patient as it will take a few minutes to find all channels.
This TV set can memorize 200 channels.
Now You're Ready to Watch TV
10
OPERATION OF FUNCTION MENU
MENU OPERATION
Press MENU button on the TV set or on the remote control to select picture menu, sound
menu, timer menu, settings menu and search menu. Shown as below:
(PICTURE MENU)
(SOUND MENU)
PICTURE
TV
BRIGHTNESS
CONTRAST
COLOR
SHARPNESS
TINT
TONE
Select
Adjust
SOUND
TV
50
80
50
75
0
NORMAL
VOLUME
BASS
TREBLE
BALANCE
LOUDNESS
AVL
Select
M Exit
Adjust
M Exit
Select
Adjust
ON
--:---:---:-5
M Exit
(SEARCH MENU)
SETTINGS
Adjust
TIMER
CLOCK
OFF TIME
ON TIME
ON PROGRAM
ON
ON
SEARCH
TV
PROGRAM
COLOR SYSTEM
SOUND SYSTEM
SKIP
BAND
AUTO SEARCH
SEARCH
FINETUN.
LANGUAGE
ENGLISH
BLUE SCREEN
ON
PICTURE ENHANCE OFF
CURTAIN
OFF
TILT
0
EXCHANGE
8
5
GAME
CALENDAR
Select
TIMER
TV
50
80
70
0
(SETTINGS MENU)
TV
(TIMER MENU)
Select
M Exit
Adjust
5
AUTO
B/G
OFF
VHF-L
M Exit
Note:
1. The Search menu will not be displayed when you press menu button if the TV is in the AV mode.
2. : This icon is option.
SEARCH MENU OPERATION
Press MENU button on the TV set or on the remote control to select the Search menu.
Shown as below:
SEARCH
TV
PROGRAM
COLOR SYSTEM
SOUND SYSTEM
SKIP
BAND
AUTO SEARCH
SEARCH
FINETUN.
Select
Adjust
11
5
AUTO
B/G
OFF
VHF-L
M Exit
OPERATION OF FUNCTION MENU
AUTO SEARCH OPERATION
1. Press P+/P- button to select AUTO SEARCH item.
2. Press V+/V- button to begin searching. After searching all wave band, auto search
stop. In the course of the auto searching, press MENU button to stop searching. After
auto search finished, the unit returns to the normal reception status.
Note: The unit will automatically search all VHF-L, VHF-H, UHF band and supplementary
channel. After searching finished, all fine tuned programs will be stored automatically.
When it is auto search, the amount of stored programs can be 200 (program number
0-199).
MANUAL SEARCH OPERATION
1. Press P+/P- button to select SEARCH item.
2. Press V+/V- button right or left to search the TV program you want. When find a
program, searching stops. In the course of the manual searching, press MENU button
to stop searching.
FINE TUNE OPERATION (only in case of poor reception)
1. Press P+/P- button to select FINETUN. Item.
2. Press V+/V- button right or left to adjust the picture and sound.
BAND SETTING
1. Press P+/P- button to select BAND item.
2. Press V+/V- button to select VHF-L, VHF-H, UHF.
COLOUR SYSTEM SETTING
1. Press P+/P- button to select COLOR SYSTEM item.
2. Press V+/V- button to select AUTO, PAL, NTSC3.58, NTSC4.43, SECAM.
SOUND SYSTEM SETTING
1. Press P+/P- button to select SOUND SYSTEM item.
2. Press V+/V- button to select D/K, M, B/G, I.
PROGRAM SELECTION
1. Press P+/P- button to select PROGRAM item.
2. Press V+/V- button or numeric keys to select Program Number.
SKIP SETTING
1. Press P+/P- button to select SKIP item.
2. Press V+/V- button to select On (channel skipped) or Off (channel not skipped).
Note: When Skip item is set to On , this position will be skipped while you use P+/Pbutton to scan the stored channels. You can still use numeric keys to select the skipped
channels.
PICTURE MENU OPERATION
Press MENU button on the TV set or on the remote
control to select the picture menu. Shown as right:
BRIGHTNESS ADJUSTMENT
1. Press P+/P- button to select BRIGHTNESS item.
2. Press V+/V- button in order to increase or decrease
brightness (0~100).
CONTRAST ADJUSTMENT
1. Press P+/P- button to select CONTRAST item.
12
PICTURE
TV
BRIGHTNESS
CONTRAST
COLOR
SHARPNESS
TINT
TONE
Select
Adjust
50
80
50
75
0
NORMAL
M Exit
OPERATION OF FUNCTION MENU
2. Press V+/V- button in order to increase or decrease contrast (0~100).
COLOUR ADJUSTMENT
1. Press P+/P- button to select COLOR item.
2. Press V+/V- button in order to increase or decrease colour (0~100).
SHARPNESS ADJUSTMENT
1. Press P+/P- button to select SHARPNESS item.
2. Press V+/V- button in order to increase or decrease sharpness (0~100).
TINT ADJUSTMENT
1. Press P+/P- button to select TINT item.
2. Press V+/V- button to increase or decrease tint (-50~0~+50).
Note: Tint control will be appeared only if a NTSC signal is being received.
TONE ADJUSTMENT
1. Press P+/P- button to select TONE item.
2. Press V+/V- button to select NORMAL, COOL, WARM.
SOUND MENU OPERATION
Press MENU button on the TV set or on the remote
TV
SOUND
control to select the sound menu. Shown as right:
VOLUME
50
BASS
80
VOLUME ADJUSTMENT
TREBLE
70
0
BALANCE
1. Press P+/P- button to select VOLUME item.
LOUDNESS
ON
2. Press V+/V- button in order to increase or decrease
AVL
ON
volume (0~100).
BASS ADJUSTMENT
Select
Adjust
M Exit
1. Press P+/P- button to select BASS item.
2. Press V+/V- button in order to increase or decrease bass (0~100).
TREBLE ADJUSTMENT
1. Press P+/P- button to select TREBLE item.
2. Press V+/V- button in order to increase or decrease treble (0~100).
BALANCE ADJUSTMENT
1. Press P+/P- button to select BALANCE item.
2. Press V+/V- button in order to adjust left and right track (-50~0~+50).
LOUDNESS / AVL SETTING
1. Press P+/P- button to select LOUDNESS or AVL item.
2. Press V+/V- button to select On or Off.
Note: AVL, Bass, Treble, Balance, Loudness, are all options.
SETTINGS MENU OPERATION
Press MENU button on the TV set or on the remote
control to select the settings menu. Shown as right:
LANGUAGE SETTING
1. Press P+/P- button to select LANGUAGE item.
2. Press V+/V- button to select different languages.
13
SETTINGS
TV
LANGUAGE
ENGLISH
BLUE SCREEN
ON
PICTURE ENHANCE OFF
OFF
CURTAIN
0
TILT
EXCHANGE
8
5
GAME
CALENDAR
Select
Adjust
M Exit
OPERATION OF FUNCTION MENU
BLUE SCREEN SETTING (Optional)
1. Press P+/P- button to select BLUE SCREEN item.
2. Press V+/V- button to select ON or OFF.
PICTURE ENHANCE / CURTAIN SETTING (Optional)
1. Press P+/P- button to select PICTURE ENHANCE or CURTAIN item.
2. Press V+/V- button to select ON or OFF.
TILT SETTING (Optional)
1. Press P+/P- button to select TILT item.
2. Press V+/V- button to select -5, -4, -3, -2, -1, 0, +1, +2, +3, +4, +5.
EXCHANGE OPERATION
1. Press P+/P- button to select EXCHANGE item.
2. Press Numeric buttons to select the targeted channel number.
3. Press V+/V- button, exchange is over.
GAME OPERATION
1. Press P+/P- button to select GAME item, then press V+/V- button, game may be
appeared. Press V+/V- button, the snake may be turn on to right, left, up or down.
2. Press MENU button, the game will restart.
3. Press DISP button to exit game.
CALENDAR OPERATION
1. Press P+/P- button to select CALENDAR item.
2. Press V+/V- button to enter the calendar setting
3. Press P+/P- button to change the Year, press V+/V- button to change the Month.
4. Press MENU or DISP button to exit the calendar setting.
TIMER MENU OPERATION
Press MENU button on the TV set or on the remote
TV
TIMER
control to select the timer menu. Shown as right:
TIMER
ON
TIMER SETTING
CLOCK
--:-1. Press P+/P- button to select TIMER item.
OFF TIME
--:-ON TIME
--:-2. Press V+/V- button to ON or OFF.
ON PROGRAM
5
24 HOUR CLOCK SETTING (The clock must be set before
you select the other items)
1. Press P+/P- button to select CLOCK item.
Select
Adjust
M Exit
2. Press V+/V- button to select the Hour or the Minute. Press
P+/P- button to set the Hour(00~23) or the Minute (00~59).
ON TIME / OFF TIME SETTING
1. Press P+/P- button to select ON TIME or OFF TIME item.
2. Press V+/V- button to select the Hour or the Minute. Press P+/P- button to set the
Hour(00~23) or the Minute (00~59).
Note: When On Time item is set, then press STAND-BY button on the remote control. Make
sure the TV set is under stand-by mode .
When Off Time item is set, the SLEEP function is cancelled automatically.
ON PROGRAM
1. Press P+/P- button to select On PROGRAM item.
2. Press V+/V- or Numeric keys to select On-Program number.
On Program Operation:
For example, the Clock is 14:00, the positi on is at channel 5 at present. If On Time is preset
at 16:45 and On PROG is preset to channel 10 . Make sure the TV set is under stand-by
mode. The position will change to cha nnel 10 automatically while the Clock is 16:45.
14
TROUBLE SHOOTING GUIDE
Many apparent malfunctions are caused slight misadjustments of the regular controls of
your unit or equally simple causes. If any difficulty arises through normal use of your unit,
check the list of common problems in the list below.
If the problem persists, unplug your unit and contact your dealer.
SYMPTOM
METHODS OF CHECKING OR ADJUSTING
No picture or sound
Check the AC plug is in the socket. Check house circuit
breaker is in the ON position.
Picture normal but no sound
Check that the volume is not at its minimum setting or on
MUTE.
Check that TV set power switch is ON.
Remote control not working
Check batteries are operational and inserted correctly.
Make sure infrared receiving window on TV is not
exposed to strong lighting or blocked in any way.
Ensure TV/AV switch is set to TV.
Cannot receive any TV signal Check aerial location and connection.
Re-check your tuning method.
No program signals output
from external source
Check TV/AV button to make sure it is in the correct
position for reception.
Contrast and brightness
problems
Make necessary adjustments to relevant settings.
Intermittent poor contrast and
colour fading on all channels
Check aerial positioning
Some channels have poor
reception and colour fading
Readjusting fine tuning with great care ( refer to section
on: FINE TUNE ).
Dotted lines or stripes appear There may be Interference from another electrical
product. Move appliance if it persists.
on screen
Snow on screen
Check aerial for broken circuit, loose connection or any
visible damage.
Double images or ghosting
Check aerial location and direction - strong winds may
cause it to move. Also check whether mountains or tall
buildings may be the problem. Minor adjustment of the
direction of your antenna should keep the ghosting to a
minimum.
Note: External rooftop/antenna adjustment should be left to a suitably qualified person.
15
SPECIFICATIONS
NOTE
POWER
SHOWN ON BACK PLATE
POWER CONSUMPTION
SHOWN ON BACK PLATE
SOUND-SYSTEM
D/K, B/G, I, M
COLOUR-SYSTEM
PAL/SECAM
(OPTIONAL)
NTSC playback
(OPTIONAL)
ANTENNA
75
VIDEO CONNECTION
INPUT: 2, OUTPUT: 1
Phono: 1VP 75
AUDIO CONNECTION
INPUT: 2, OUTPUT: 1
Phono: 500mVrms
S-VIDEOCONNECTION
(For some models)
INPUT: 1
CHANNEL
200
PIC. TUBE MEAS.
14", 15", 21", 25", 29", 34"
SOUND OUTPUT POWER
14"/15":
1W (Mono),
1W+1W (Stereo)
21":
2W (Mono),
2W+2W (Stereo)
25":
3W (Mono),
3W+3W (Stereo)
29":
3W (Mono),
3W+3W (Stereo)
34":
4W+4W
NET WEIGHT
SHOWN ON CARTON BOX
DIMENSIONS
SHOWN ON CARTON BOX
Y: 1Vp; P: 75
C: 0.28Vp; P: 75
NOTE:
DESIGN & SPECIFICATIONS ARE SUBJECT TO CHANGE WITHOUT PRIOR NOTICE.
INFRA-RED REMOTE CONTROL
FEATURES
EFFECTIVE DISTANCE POWER
POWER SUPPLY
FULL FUNCTION REMOTE CONTROL
8 METRES
DC 3V (TWO BATTERIES, SIZE AAA)
16