1
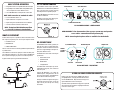
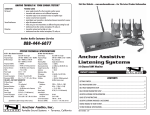
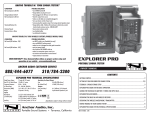
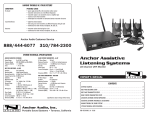
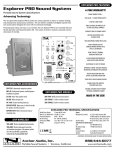
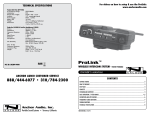
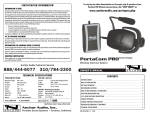
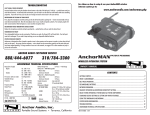
GETTING STARTED
Please check your new unit carefully for any damage which may have occurred during shipment. Each Anchor product is carefully inspected at the factory and packed in specially designed boxes for safe transport.
Notify the freight carrier immediately of any damage to the shipping box or product. Repack the unit in the original box and
wait for inspection by the carrier’s claim agent. Notify your dealer of the pending freight claim.
NOTE: All damage claims must be made with freight carrier!
RETURNING SYSTEMS FOR SERVICE OR REPAIR
For service or repair, please contact the dealer you purchased your system from or Anchor Audio Customer Service at (888)
444-6077 to obtain a RA (Return Authorization) number. All shipments to Anchor Audio must include an RA number and must
be shipped prepaid. C.O.D. shipments will be refused and returned at your expense.
IMPORTANT: Save the shipping box & packing materials,
they were specially designed to ship your unit!
WARRANTY REGISTRATION
Visit our website at www.anchoraudio.com and select “Warranty Registration”. Complete the online form to activate the
two-year limited warranty on your PortaCom intercom system.
ANCHOR AUDIO CUSTOMER SERVICE
888-444-6077
PORTACOM TECHNICAL SPECIFICATIONS
Operating Distance
Normal Line Level
Signal-to-Noise Ratio
Distortion
Connecting Cables
Compatibility
B3-100 – Branch Box
Connectors (3-pin XLR)
Dimensions
Weight
BP-200 – Belt pack
Input Line Connector
Headset Connector
Bridging Impedance
DC Current Reqs.
Dimensions
Weight
Up to 2,500 ft (total cable length)
-15dBV
-65dB
< 0.5%
Standard 1-pair shielded mic cable
w/ 3-pin XLR (heavy-duty cable
recommended for runs over 250 ft)
Generally compatible w/ industry
standard system (call for info)
Input – 1 female / Output – 3 male
1.9 x 4.1 x 4.25” / 48 x 105 x 108 mm
19.2 oz / 0.5 kg
3-pin XLR – female
4-pin XLR – male
10k ohm min
20mA max
3.6 x 2.6 x 2.1” / 91 x 66 x 53 mm
7.36 oz / 0.2 kg
H-200/H-200S – Dual-Earpiece/Single-Earpiece Headset
Connector
4-pin XLR – female
Microphone Type
Dynamic, low impedance
Dimensions
3.5 x 7.4 x 7.9” / 8.9 x 18.8 x 20 cm
Weight
H-200 16 oz / .45 kg
H-200S 13 oz / .37 kg
PC-100 – Two-Channel Power Console
Output Connectors
3-pin XLR – 4 male
Voltage Output
22 volts DC to belt packs
Max. Current Capacity 400mA
Max. Belt Packs
20 BP-200 belt packs
Input Power Reqs.
24VAC, 50/60Hz, 750mA;
30 – 40VDC, 500mA
Dimensions
1.75 x 8.5 x 4.5” / 45 x 216 x 114 mm
Weight
57.6 oz / 1.63 kg
AC Power Adapter
Anchor model AC-20
Input Voltage
120VAC, 60Hz
Output Voltage/Current 24VAC @ 750mA
(Specifications subject to change without notice)
Anchor Audio, Inc.
Portable Sound Systems • Torrance, California
PORTACOM
2-CHANNEL INTERCOM SYSTEM
OWNER’S MANUAL
A MESSAGE FROM THE OWNER
Thank you for choosing an Anchor Audio intercom system. Our products incorporate state-of-the-art
design and the finest quality of materials and workmanship. We’re proud of our products and appreciate the confidence which you have shown by selecting an Anchor system.
I hope you’ll take a few minutes to review this manual. We’ve incorporated several unique features
into our products, and your knowledge of how to use them will enhance the performance and your
enjoyment of the system.
David Jacobs, President
on behalf of all Anchor Employees
100-0081-000/B - 12/06
BASIC SYSTEM OPERATION
1. Plug headset connector into 4-pin XLR Headset Jack on belt pack
PC-100 POWER CONSOLE
3. Connect BP-200 Belt Packs to the Output Jacks on the PC-100
The PC-100 Power Console can power up to 20 BP200 Belt Packs over a combined total of 2,500 feet of
cable. It has a power switch, an input for connecting
the AC adapter and four 3-pin XLR output jacks.
NOTE: Make connections w/ standard mic cables.
Using the RM-100 bracket you can mount one or two
PC-100s in a standard rack.
2. Plug AC adapter into standard 110V AC outlet (230V AC export)
then into AC Input Jack on the PC-100 Power Console
4. Set the PC-100 Power Switch to “on”
5. Adjust headset boom so microphone is close to mouth
POWER SWITCH
AC/DC INPUT JACK
Belt packs are connected to the PC-100 using standard mic cable with 3-pin XLR connectors.
6. Adjust listening level w/ Headset Volume Control on Belt Pack
POWER INDICATOR LIGHT
7. Use Channel Switch to select between channel A or B
PC-100 POWER CONSOLE - CONTROL PANEL
NOTE: The Optional RM-100 Rackmount Allows
1 or 2 PC-100’s To Mount In Standard Racks.
NEED MORE HELP? View demonstration videos on proper system setup and operation
at our website: www.anchoraudio.com/portacom.php
WHAT IS PORTACOM?
NOTE: Custom length microphone cables are available from Anchor Audio.
PortaCom Intercom System is a portable two-channel communication device
that’s simple to set up and easy to use. The main system components include:
• PC-100 Power Console
• BP-200 Belt Packs
• H-200 & H-200S Headsets
Station-to-station connections are made using standard microphone cable with
3-pin XLR connectors.
The PC-100 Power Console has four output jacks to make a 4-headset system.
You can add more headsets/users to the system by using the B3-100 Branch
Box to expand and reconfigure your system for use in almost any situation.
A typical 6-headset system using one B3-100 is illustrated here:
OUTPUT JACKS
BP-200 BELT PACK
The BP-200 Belt Pack has a female, 3-pin XLR, Line
Input Jack and a male, 4-pin XLR, Headset Jack.
Both jacks are located on the bottom side of the belt
pack. Power is supplied through the microphone cable by the PC-100 Power Console.
A/B CHANNEL SWITCH
MIC MUTE BUTTON
HEADSET JACK
HEADSET
VOLUME
CONTROL
The BP-200 controls can be found on the belt pack
top and feature:
• Headset Volume Control
• A/B Channel Switch
• Mic Mute Button
• Call Light & Button
The Headset Volume Control adjusts only the individual headset listening level, not the volume level
of the entire system.
Setting the Mic Mute Button to “on” enables the
headset microphone. Setting the button to “off” will
short or mute the microphone. The Mic Mute Button
does not affect the headset listening volume.
Pushing the Call Button will light the Call Light on
all belt packs connected to the system. Use the Call
Light to alert any users who may not be wearing
their headsets.
CALL LIGHT
CALL BUTTON
LINE INPUT JACK
PB-200 BELT PACK - TOP/BOTTOM
H-200 & H-200S PORTACOM HEADSETS
PortaCom comes with single-earpiece (H-200S) and/or dual-earpiece (H-200) headsets. To use plug the headset cable into the bottom of the BP-200 Belt Pack. Adjust the headset listening level using the Headset Volume Control on the belt pack.
The headset’s female 4-pin XLR connector plugs into the 4-pin XLR
jack on the bottom of the belt pack. A wiring diagram of the headset connector is shown at right.