1
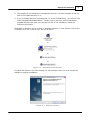
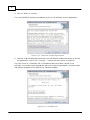
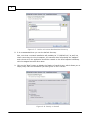
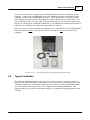
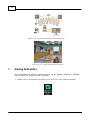
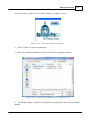
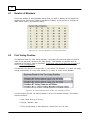
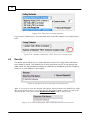
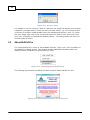
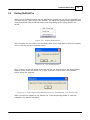
RollCall-Pro Basic
Installation and Setup Manual
Published by: Current Works, Inc.
February 2013
RollCall-Pro Basic Version 3.1a
Contents
3
Table of Contents
Part I Purpose of this Manual
4
Part II RollCall-Pro Installation
4
1 System...................................................................................................................................
Requirements
4
2 System...................................................................................................................................
Software
4
3 System
...................................................................................................................................
Hardware
10
4 Typical
...................................................................................................................................
Installation
11
Part III Starting RollCall-Pro
12
Part IV Setting Custom Configurations
14
1 Number
...................................................................................................................................
of Members
16
2 First Voting
...................................................................................................................................
Position
16
3 Minimum
...................................................................................................................................
Number of Voters
17
4 Voting
...................................................................................................................................
Defaults
17
5 Results
................................................................................................................................... 18
6 Save ...................................................................................................................................
Custom Configuration
19
7 Name...................................................................................................................................
Assignments
19
8 Save ...................................................................................................................................
Changes
21
Part V Additional Menu Items
21
1 Cancel
...................................................................................................................................
the Current Vote
21
2 About...................................................................................................................................
RollCall-Pro
22
3 Exiting
...................................................................................................................................
RollCall-Pro
23
Part VI Customer Service
Index
24
25
© 2013 Current Works, Inc.
3
4
1
Purpose of this Manual
The purpose of this Installation & Setup Manual is to assist in the configuration of the
system before using it in a meeting. It is not written specifically for an information
technology professional, but the information it presents is useful for someone with this
background, who might have the responsibility of installing and configuring RollCall-Pro.
There is a separate Operator’s Manual which is designed to assist the person who will
actually operate the RollCall-Pro system in a meeting.
You should also become familiar with the SideKeys User Manual that came with this
System. This manual provides valuable information regarding the setup, maintenance and
trouble shooting of the wireless keypad system.
2
RollCall-Pro Installation
Normally this software is installed on a single PC or laptop computer that is usually
situated in a board/council chamber. The RollCall-Pro System could also be setup on a
network computer that is then accessed through any room with a computer that has a
network connection to the central server where the program was installed. The following
instructions assume a normal PC or laptop installation, but where a network install would
differ, the network installation differences will be noted — the major difference being
where you install the software and where you save the Results.
Note: To install onto the network, you must install the CD onto the network server
computer, BUT the RollCall-Pro USB SideKeys receiver must be installed on the local PC in
board/council chamber in order for the keypads to work correctly.
2.1
System Requirements
Minimum system requirements to run RollCall-Pro include the following:
Pentium III Processor
Microsoft Windows 2000 and up
CD-ROM drive and USB port
RollCall-Pro Hardware (USB SideKeys Receiver and Keypads)
The RollCall-Pro Setup installs all of its files on the drive where the Windows operating
system is installed. The default directory is “C:\RollCall-Pro\”.
Note: RollCall-Pro is designed to operate under 1024 X 768 resolution.
2.2
System Software
To install the RollCall-Pro software:
1. Load the RollCall-Pro System CD into the CD-ROM of the computer.
© 2013 Current Works, Inc.
RollCall-Pro Installation
5
2. The program is not designed to automatically Startup. You must navigate to the CD
and to the Install Directory on it.
3. In the D:/Install Directory (assuming that “D” is the CD-ROM drive), you will see a file
called "setupRollCallProBasic30.exe". Double-click on this icon and the installation
program will start and guide you through the rest of the installation. Follow the
onscreen instructions.
Depending on whether you've chosen (in Windows Explorer) to view Icons or Tiles or List
or Details, you'll see a “Setup icon” like one of these:
or
or
or
Figure 2-1. RollCall-Pro Setup Icons
The Welcome Screen is the first window you will encounter after you have started the
RollCall-Pro System installation:
Figure 2-2. Welcome Screen
© 2013 Current Works, Inc.
6
4. Click on “Next” to continue.
The next RollCall-Pro Software installation screen is the Software License Agreement:
Figure 2-3. Software License Agreement
5. Carefully read this agreement and when you are finished reading and willing to accept
the agreement, click on the “I accept…..” button and then “Next” to continue.
The next screen is a “Read Me” file of information about this latest version of the
software. It contains useful information about the system requirements, customer notes
and planned upgrades of the RollCall-Pro software program:
Figure 2-4. Read Me File
© 2013 Current Works, Inc.
RollCall-Pro Installation
7
Click “Next” to display the User Information Screen:
Figure 2-5. User Information
6. Enter your Name and Company/Organization. Choose “Anyone” or “Only for me”.
7. Click “Next” to display the Destination Folder screen. The default Destination Folder is
on the “C” hard drive of the local computer, in a Folder named “RollCall-Pro” (C:
\Program Files\RollCall-Pro\). If this location is satisfactory, press “Next”. If you want
the program installed elsewhere, click on the “Change” button and see the following
screen:
Figure 2-6. Choose the Default Destination Directory
© 2013 Current Works, Inc.
8
Figure 2-7. Define a Custom Destination Directory
8. It is recommended that you use the default directory.
Also, note that a network installation will probably be “C:\RollCall-Pro\” as well, but
when connecting via a local computer, the network drive will probably be “mapped”
and a shortcut to the application should be created on the local computer's desktop
with the mapped network drive name.
9. Click on the “Next” button to display the Ready to Install Screen, which allows you to
simply verify that the information you have given so far is correct:
Figure 2-8. Ready to Install
© 2013 Current Works, Inc.
RollCall-Pro Installation
9
10. If everything is correct, click on the “Install” button. If anything is incorrect, click
“<Back” to correct the information before proceeding.
This is the last point where the program asks for information for the installation. From this
point forward, the RollCall-Pro System installation will start and will copy files to your
computer.
When the installation process is complete, the Setup Complete Screen displays:
Figure 2-9. Setup Complete
11. The RollCall-Pro software installation is now complete and all that remains to do is to
click on the “Finish” button.
Once the setup screens are gone, you will notice two icons on your desktop. One is a
colorful Icon named “Shortcut to RollCall-Pro Basic".
This icon is linked directly to the RollCall-Pro software application. When you want to start
up the RollCall-Pro software program, simply double -c lic k on this icon.
The other icon provides a shortcut to the Roll Call-Pro Folders where, along with several
other folders, the Results Folder is located:
© 2013 Current Works, Inc.
10
The Results documents are saved in the folder named “Results”:
Figure 2-10. RollCall-Pro Folder
RollCall-Pro Results files in the Results folder are labeled/named by the meeting date:
Figure 2-11. Results Folder
2.3
System Hardware
The hardware needed to complete the system includes the wireless SideKeys Keypads and
the USB SideKeys RollCall-Pro Receiver.
© 2013 Current Works, Inc.
RollCall-Pro Installation
11
To connect the receiver, simply plug the USB SideKeys Receiver into a USB port on the
computer. Ensure that the USB cable is securely plugged into both the USB port on the
computer as well as the USB SideKeys Receiver. The first time this connection is made
the computer will need to locate and assign the proper USB Drivers to the Receiver. This
step could take from 5 to 30 seconds; be patient and wait for the red light to light-up on
the face of the Receiver. Additional information on the SideKeys wireless keypad system is
available in the SideKeys User Manual included with the system.
Note also that if you have installed the software onto a network server, the USB SideKeys
Receiver hardware must be connected to the local computer, not the network server
computer.
Figure 2-12. System Hardware (Keypads and Receiver)
2.4
Typical Installation
The following diagram and picture give the user an idea on how to setup the system to
work in a City Council Chamber, Board Room, or any room where the system may be used.
Possible scenarios are TV monitors hanging in the corners of a room, a projected display
on a white wall or drop down screen, or a number of other display possibilities. The
projection device can either be a portable system or a permanent hanging projector from
a ceiling.
© 2013 Current Works, Inc.
12
Figure 2-13. Typical Hardware Setup Diagram
Figure 2-14. Typical Installation Photo
3
Starting RollCall-Pro
Once the RollCall-Pro software is loaded properly and the SideKeys hardware is installed,
the full RollCall-Pro system is ready to operate.
1. Double-click on the RollCall-Pro Shortcut icon that is on your computer desktop:
© 2013 Current Works, Inc.
Starting RollCall-Pro
13
The first screen you will see is the START window (or "Splash" screen):
Figure 2-15. Starting RollCall-Pro System
2.
3
Click on “Start” to open the application.
Select any available configuration file the first time the program is opened:
Figure 2-16. Select the Configuration you want to load
4. The Member Names contained in the RollCall-Pro configuration that you selected will
appear:
© 2013 Current Works, Inc.
14
Figure 2-17. Default Settings Screen
4.
At this point you can go begin using the RollCall-Pro System to experiment with the
system and see how it works with this Default Setup. In this case you should read
the Operator’s Manual to see how the System would be used in a meeting.
If you want to proceed to Configure this RollCall-Pro software for your particular
Board/Council, continue on to "Setting Custom Configurations" for the specifics of
creating your own customized Configuration.
4
Setting Custom Configurations
1. To change this initial configuration to your own Customized Configuration, Right Click
anywhere on this initial screen. A small pop-up window displays several options.
2. Left Click in the pop-up to Select the “Hide/Unhide Tabs” option, as shown here:
Figure 3-1. Pop-up Choice: Hide/Unhide Tabs
© 2013 Current Works, Inc.
Setting Custom Configurations
15
3. The Function Tabs on the right side of the screen will appear, as shown below:
Figure 3-2. RollCall-Pro Display Screen with Tabs
4. To create a custom configuration for your Board/Council click on the “Setup” tab along
the lower right-hand side of the screen to display several pieces of basic information
that are required for RollCall-Pro Setup:
Figure 3-3. RollCall-Pro Setup Screen
© 2013 Current Works, Inc.
16
4.1
Number of Members
This is the Number of Voting Member panels that you wish to display on the RollCall-Pro
Display Screen. Select the number of members to display on the screen by clicking the
radio button next to the desired number:
Figure 3-4. Set the Number of Voting Members
4.2
First Voting Position
The Business Rules for “First Voting Position ” are simply the rules that apply to the first
name in the left hand column on the main display. This Member #1 position must be
assigned to the Mayor, Chair or President, if they only vote in the case of a tie vote or if
this is a non-voting position.
This position can hold one of three roles: 1) the official “Tie-Breaker” or 2) have the same
Voting responsibility as every other member or 3) serve as a Non-Voting Member.
Figure 3-5. Defining the Role of the Top Voting Position
The first setting for this Top Voting Position is as the Tie-Breaker Position. This means
that the position:
1. Only votes when a tie occurs,
2. Cannot “Abstain”, and
3. Their voting display is “Not Required”, unless there is a Tie Vote.
© 2013 Current Works, Inc.
Setting Custom Configurations
17
This position is typically filled by the Mayor, Chairman or President of the Board.
The second choice for this position is acting as a “Normal” voter and voting along with
everyone else on the issues. This position will NOT break ties. If a tie vote does occur,
the display will simply show the vote as a tie. The Board would use its own Rules of Order
to decide how the tie vote is resolved.
The last choice in this section is to display the name of the person in charge but not to
give them any voting rights at all. For example, a City might have an Executive that is
not allowed to vote on issues, but regularly sits with the rest of the council members and
runs the meetings. In this case, the Executive’s name would be displayed, but he would
not allowed to vote on any items.
4.3
Minimum Number of Voters
This function allows the user to choose a minimum number of voters (Quorum) that must
be present in order for the session to go forward. If this number of Members does not
buzz-in during the initial Roll Call, the Voting System will not proceed. A notice will appear
in the bottom center of the RollCall-Pro Display Screen indicating an insufficient number of
Voters is Present to conduct official business. Likewise, if the number of Members
“Present” in the meeting falls below this Quorum during the course of the meeting, the
system will not allow a Roll Call Vote.
Figure 3-6. Set the Minimum # Members Present for the Meeting
4.4
Voting Defaults
This function allows the user to select a default voting criteria to use throughout a
meeting.
Figure 3-6. Voting Defaults
The choices available for selection are "Majority Vote (51% or more)", "2/3 Vote (66% or
more)", "3/4 Vote (75% or more)", "No Vote Required", and "Custom Vote (Enter a
Number)".
© 2013 Current Works, Inc.
18
Figure 3-8. Options for Voting Defaults
If you select "Custom Vote", you must also enter a specific number in the Custom Vote
field.
Figure 3-9. Number of Needed "YES" Votes for Custom Vote
4.5
Results
This Setup option allows you to choose whether to save the voting results and where
they should be saved. The defaults are to save them as a text file in the Results subfolder within the main RollCall-Pro Folder (the RollCall-Pro Installation process provides a
Shortcut on your desktop to this Folder).
Figure 3-10 Option to save Results & Location Path
Not e : If y ou w ish t o sa v e t he Re sult s som e w he re diffe re nt t ha n in t he RollCa ll-Pro folde r,
like on t he Ne t w ork Se rv e r, y ou m ust spe c ify t he loc a t ion pa t h t o w he re y ou w a nt t he
Re sult s sa v e d. T his is done in t he Directory File Name fie ld on t his sc re e n:
Figure 3-11 Path to directory where RCP Results are to be saved
© 2013 Current Works, Inc.
Setting Custom Configurations
4.6
19
Save Custom Configuration
This Setup option allows you to retrieve a previously saved RollCall-Pro Configuration or to
save a newly created or revised Configuration. To save a new, custom RollCall-Pro
Configuration file, click on the “Save File” button. To retrieve a custom RollCall-Pro
Configuration file, click on the “Retrieve File” button (shown below). You can save as
many unique RollCall-Pro Configuration Files as you like in the RollCall-Pro folder.
Figure 3-12. Retrieve or Save new Configurations
Not e : Aga in, if y ou w a nt t o sa v e t he RollCa ll-Pro soft w a re progra m a nd re la t e d
c onfigura t ions on t he ne t w ork se rv e r, y ou m ust spe c ify t he file loc a t ion pa t h t o t he
RollCa ll-Pro folde r a nd t he Configura t ion folde r on t he Se rv e r.
Figure 3-13. Save or Retrieve a Custom RollCall-Pro Configuration File
4.7
Name Assignments
The most important part of the customization process is the Name Assignments section.
This section “assigns” names to the display panels on the Discussion and Voting screens.
© 2013 Current Works, Inc.
20
This is accomplished by replacing “Member X” with the name of one of your Voting
Members.
Figure 3-14. Enter the Names of Members
You can enter Voting Members’ names by clicking on the Member # box and typing the
name in place of the “Member #”. Move to the next box with the keyboard “Tab” key.
It is useful to number the Voting Members, perhaps by District # represented or by their
seating position. Each Member must use the Keypad # that is next to their Name on
this page. For example: Keypad #3 will always buzz-in to register votes for Member 3.
Keypads are physically numbered on the nose label and on the keypad insert:
Figure 3-15. Keypad/Voter Numbers
Special Note: If the Mayor or Chair or President only votes in the case of a tie, they
must always be assigned to Keypad #1, regardless of which District he/she represents.
This Number 1 keypad is the only keypad that can be used to break a Tie Vote.
© 2013 Current Works, Inc.
Setting Custom Configurations
4.8
21
Save Changes
When you have finished setting all the Setup options for your board or council, you should
click the "Save File" button and save your new (or modified) configuration with an
appropriate name.
Special Note: With one exception, if you choose not to Save your changes, the new
settings will be active during this session, but will not be active the next time this
Configuration is used.
This does not apply to Quorum Rules. If you modify the Minimum Number of Voters after
starting RollCall-Pro, you must:
1. Save the configuration file,
2. Exit RollCall-Pro, then
3. Re-launch RollCall-Pro.
5
Additional Menu Items
When you “ right m ouse -c lic k” on the RollCall-Pro screen, you get a pop-up window of
several options. So far we have discussed the "Hide/Unhide Tabs” function. In this
section we will describe the other functions that are also available in this pop-up window:
5.1
Cancel the Current Vote
The “Cancel Vote” option is also available on the pop-up window when you “ right m ouse c lic k” anywhere on the RollCall-Pro Display Screen:
Figure 4-1. Cancel Vote Option
The “Cancel Vote” option only works in the middle of a voting session before all the votes
are locked in/confirmed and disclosed. Click on the Right Mouse button, and the menu in
Figure 4.4 will appear. Left Click on the “Cancel Vote” menu item, and then the system
will ask you to confirm your cancellation:
© 2013 Current Works, Inc.
22
Figure 4-2. Are you sure?
For example, if you are voting on “Item 5”, and after the voting has started, but not been
completed, you might wish to cancel the vote for some reason, e.g., the Criteria to Pass
is incorrect or another Voting Member enters the meeting and wishes to vote. To cancel
the vote, simply right click on the screen and select the “Cancel Vote” menu item, then
click "Yes" in the pop-up confirmation window (above). The voting session will return to
the Discussion of Item 5.
5.2
About RollCall-Pro
The “About RollCall-Pro” screen is also available from the “ right m ouse -c lic k” anywhere on
the RollCall-Pro Display Screen. This window provides additional information about the
installed version of RollCall-Pro System that you have:
Figure 4-3. Accessing About RollCall-Pro
The following figure shows the RollCall-Pro Basic System “About RollCall-Pro" box:
Figure 4-4. About RollCall-Pro Box for Version 3.0
© 2013 Current Works, Inc.
Additional Menu Items
5.3
23
Exiting RollCall-Pro
When you are finished working with the RollCall-Pro System you can exit the program from
the same pop-up “ right -m ouse c lic k” window. This method of exiting the program provides
some protections from accidental closure and from closing before Voting Results are
saved.
Figure 4-5. Exiting RollCall-Pro
After choosing the Exit option, the next popup asks if you really want to Exit the program,
just in case this was an accidental choice:
Figure 4-6. Exit Confirmation
Also, if there is a Roll Call voting result that has not yet been saved in the Results folder,
another Popup screen will direct you to click “Proceed” to save these voting Results
before exiting the program:
Figure 4-7. If the Last Voting Results have not been Saved, you cannot Exit.
When you Exit the program in this manner the “Time the Meeting Ended” is time also
stamped in the Results document.
© 2013 Current Works, Inc.
24
6
Customer Service
This RollCall-Pro Installation and Setup Manual is intended to provide guidance to
prepare your system for the meeting.
The RollCall-Pro Operator’s Manual is intended to provide guidance in the use of this
system in running the meeting.
The SideKeys User’s Manual is intended to provide guidance in the use of the wireless
keypads in this system.
If you have any need for additional assistance in the use of these tools, please contact
us.
Current Works, Inc.
1395 Horizon Drive
Johnsburg, IL 60051
888-526-1200
Email: [email protected]
Website: www.rollcallpro.com
Customer Service available Monday-Friday 8:30am – 4:30pm Central Time.
© 2013 Current Works, Inc.
Index
RollCall-Pro, Exiting
RollCall-Pro, Starting
Index
-S-
-A-
Save Changes
21
Save Custom Configuration
19
Setting Custom Configurations
14
Starting RollCall-Pro
12
System Hardware
10
System Requirements
4
System Software
4
About RollCall-Pro
22
Additional Menu Items
21
-CCancel the Current Vote
21
Criteria for Voting
17
Custom Configurations, Saving
Custom Configurations, Setting
Customer Service
24
19
14
Exiting RollCall-Pro
23
-FFirst Voting Position
16
-IInstallation, General
4
Installation, Software
4
Installation, Typical
11
-MMembers, Number of 16
Minimum Number of Voters
17
-NName Assignments
19
Number of Members
16
Number of Voters, Minimum
-R18
© 2013 Current Works, Inc.
-VVoting Defaults
17
Voting, Cancel the Current Vote
21
Voting, First Voting Position
16
-E-
Results
23
12
17
25