1
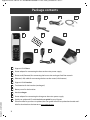
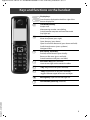
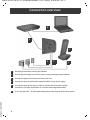
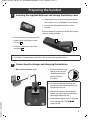
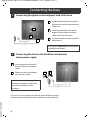
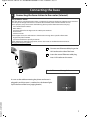
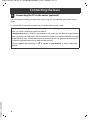
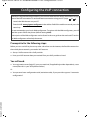
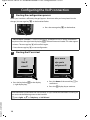
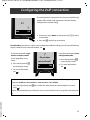
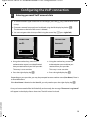
Gigaset A510 IP / IM-OST en / A31008-M2230-R601-1-TE43 / title.fm / 9/14/11
Congratulations
By purchasing a Gigaset, you have chosen a brand that is fully committed
to sustainability. This product’s packaging is eco-friendly!
To learn more, visit www.gigaset.com.
Version 5, 23.09.2008
Gigaset A510 IP / IM-OST en / A31008-M2230-R601-1-TE43 / title.fm / 9/14/11
Gigaset A510 IP / IM-OST en / A31008-M2230-R601-1-TE43 / security.fm / 9/5/11
Safety precautions
Warning:
Be sure to read this user guide and the safety precautions on the CD before using your telephone.
Explain their content and the potential hazards associated with using the telephone to your children.
> Use only the supplied power adapters, as specified on the back of the base or charger.
Use only the cables supplied for fixed line and LAN connection and connect these to the intended port only.
> Use only the recommended, rechargeable batteries, as this could otherwise result in significant health
>
>
>
>
>
>
>
>
>
>
>
>
>
risks and personal injury. For example, the outer casing of the batteries could be damaged or the batteries
could explode. The phone could also malfunction or be damaged as a result of using batteries that are not
of the recommended type.
Insert rechargeable batteries with the correct polarity and use them in accordance with the user guide
(polarity symbols are displayed in or on the handset battery compartment).
Batteries should not be disposed of in general household waste. Observe the local waste disposal regulations, details of which can be obtained from your local authority or the dealer you purchased the product
from.
Using your telephone may affect nearby medical equipment. Be aware of the technical conditions in your
particular environment, e.g., doctor's surgery.
Do not hold the rear of the handset to your ear when it is ringing or when handsfree mode is activated.
Otherwise you risk serious and permanent damage to your hearing.
Your Gigaset is compatible with the majority of digital hearing aids on the market. However, perfect function with all hearing aids cannot be guaranteed.
The handset may cause an unpleasant humming or whistling noise in hearing aids or cause them to overload. If you require assistance, please contact the hearing aid supplier.
Do not install the base and charger in bathrooms or shower rooms. The handset, base and charger are not
splashproof.
The charger and base are designed for use in dry rooms in a temperature range of +5°C to +45°C.
Do not use the phone in environments with a potential explosion hazard, e.g., paint shops.
Never expose the telephone to heat sources, direct sunlight or other electrical appliances.
Protect your Gigaset from moisture, dust, corrosive liquids and fumes.
If you give your Gigaset to a third party, make sure that you also give them the user guide.
Remove faulty bases from use or have them repaired by our Service team, as they could interfere with other
wireless services.
All electrical and electronic products should be disposed of separately from general household waste using
designated local authority sites.
If a product displays this symbol of a crossed-out rubbish bin, the product is subject to
European Directive 2002/96/EC.
Correct disposal and separate collection of used equipment will help to prevent potential negative consequences for the environment and human health. They are a prerequisite for the re-use and recycling of used electrical and electronic equipment.
For further information on disposing of your used equipment, please contact your local
authority, your refuse collection service or the dealer you purchased the product from.
Please note that only terminals that are operated in-house (inside buildings) may be connected to the analogue TAE connection.
Warning:
Version 5, 23.09.2008
The device cannot be used in the event of a power failure. It is also not possible to transmit emergency calls.
Furthermore, emergency numbers cannot be dialled, if the keypad lock is activated!
1
Gigaset A510 IP / IM-OST en / A31008-M2230-R601-1-TE43 / Pack_Content.fm / 9/5/11
Package contents
1
2
8
4
7
6
5
Version 5, 23.09.2008
3
9
10
1
Gigaset A510 IP base
2
Power adapter for connecting the base to the mains power supply
3
Phone cord (flattened) for connecting the base to the analogue fixed line network
4
Ethernet (LAN) cable for connecting the base to the router (LAN/Internet)
5
Gigaset A510H handset
6
Two batteries for the handset (uncharged)
7
Battery cover for the handset
8
Handset charger
9
Power adapter for connecting the charger to the mains power supply
10
Quick user guide and CD with detailed user guide for your Gigaset.
If the firmware for your base is updated, the user guide will also be updated and made available for download on the Internet at www.gigaset.com.
2
Gigaset A510 IP / IM-OST en / A31008-M2230-R601-1-TE43 / overview_handset.fm / 9/5/11
Keys and functions on the handset
n
B
c
w
a
Talk/Handsfree key:
Accept a call
After entering number: start dialling
Switch between earpiece and handsfree mode
(key lights up)
Control key:
Mute microphone (press right)
Open directory (press down)
Open list of online directories (press down and hold)
Scroll through menus (press up/down)
Navigate in text
End call key, on/off key:
End call, cancel function (press briefly)
Return to idle status (press and hold)
Switch handset on/off (press and hold)
1
Fast access key (press and hold):
Listen to messages on the network mailbox
P
* key: Ring tone on/off (press and hold)
#
f
S
Version 5, 23.09.2008
Display keys:
Start function displayed to the left or right of the
bottom display line.
# key: Keypad lock on/off (press and hold);
toggles between upper/lower case and digits
Message key: Open call and message lists
Consultation/pause key (fixed line)
3
Gigaset A510 IP / IM-OST en / A31008-M2230-R601-1-TE43 / connect_overview.fm / 9/5/11
Connection overview
6
5
1
Version 5, 23.09.2008
4
3
2
1
Preparing the handset: inserting the batteries
2
Connecting the charger to the mains power supply and charging the batteries
3
Connect the phone cord and power lead to the base
4
Connect the base to the fixed line network and the mains power supply
5
Connect the base to the router in order to connect the base to the Internet
(connection via router and modem or via router with integrated modem)
6
PC in LAN (optional) – for advanced configuration of the Gigaset A510 IP base station
4
Gigaset A510 IP / IM-OST en / A31008-M2230-R601-1-TE43 / install.fm / 9/5/11
Preparing the handset
1
Inserting the supplied batteries and closing the battery cover
> Check the polarity when inserting the batteries
(see symbols in or on the battery compartment).
> Use only the rechargeable batteries recommended.
Once the batteries have been inserted, the handset
switches on automatically.
> First insert the tabs on the top of the
A
battery cover in the recess on the
housing A .
> Then press the cover until it clicks
B
into place B .
> The display is protected by a plastic film. Please remove the protective film!
2
Connecting the charger and charging the batteries
> Place the handset in the
> Observe the sequence (A, B)!
charger and wait until
the batteries are fully
charged (approx.
6.5 hours).
B
A
6.5 h
> Do not put the handset back in the
charger until the batteries are fully discharged through use.
> After the first battery charge and discharge, you may place your handset in
the charger after every call.
Version 5, 23.09.2008
> The battery charging status is displayed
in the idle display: = e V U
(empty to full).
5
Gigaset A510 IP / IM-OST en / A31008-M2230-R601-1-TE43 / install.fm / 9/5/11
Connecting the base
3
Connecting the phone cord and power lead to the base
B
A
Insert the (flattened) phone cord into
the lower connection socket at the rear
of the base.
B
Insert the power lead of the power
adapter into the upper connection
socket at the rear of the base.
C
Insert both cables into their respective
cable recesses.
A
C
Use only the supplied phone cord and the
supplied power adapter.
4
Connecting the base to the fixed line network and
mains power supply
A
Insert the phone cord into the
fixed line network connection
socket.
B
Then insert the power adapter
into the mains socket.
B
A
Keep the power adapter plugged in at
all times for operation, as the phone
does not work without a mains
connection.
Version 5, 23.09.2008
You can now use your phone to make calls via the fixed line network:
Enter the number using the handset, and then press the talk key c.
6
Gigaset A510 IP / IM-OST en / A31008-M2230-R601-1-TE43 / install.fm / 9/5/11
Connecting the base
5
Connecting the base station to the router (Internet)
Data protection notice
When the device is connected to the router, it automatically contacts the Gigaset support server to make it
easier for you to configure the devices and to enable communication with the Internet services.
For this purpose, every device sends the following device-specific information once every day:
> Serial number/item number
> MAC address
> Private IP address for the Gigaset in the LAN/its port numbers
> Device name
> Software version
On the support server, this information is linked to the existing device-specific information:
> Gigaset.net phone number
> System-related/device-specific passwords
Further information about the Gigaset.net service data saved can be found on the Internet at:
www.gigaset.net/privacy-policy
B
A
A
Connect one Ethernet cable plug to the
LAN socket at the side of the base.
B
Insert the second Ethernet cable plug
into a LAN socket on the router.
Use the Ethernet cable supplied.
Version 5, 23.09.2008
As soon as the cable connecting the phone and router is
plugged in and the router is switched on, the button lights
up on the front of the base (paging button).
7
Gigaset A510 IP / IM-OST en / A31008-M2230-R601-1-TE43 / install.fm / 9/5/11
Connecting the base
6
Connecting the PC to the router (optional)
You can change the settings on the phone's base using a PC connected to your phone via the
router.
> Connect the PC network connection to a free LAN socket on your router.
Version 5, 23.09.2008
The procedure below requires that your phone is automatically assigned an IP address by the
router (i.e., DHCP is enabled on router and phone).
In exceptional cases (e.g., if DHCP is not enabled on the router), you will have to assign a fixed IP
address to the base for LAN access. You must enter this IP address on the handset before carrying
out the following steps. Further information can be found in the user guide on the enclosed CD.
The following handset menu can be used to make the entry:
w (press right on the control key) ¢ Ï ¢ System ¢ Local Network ¢ (enter system PIN if
required)
8
Gigaset A510 IP / IM-OST en / A31008-M2230-R601-1-TE43 / configuration.fm / 9/14/11
Configuring the VoIP connection
Instead of using the following procedure, you can also enter the VoIP access data and the assignment of the VoIP connection as send and receive connection using your PC (steps 7 to 12 ):
> Launch the Web browser on your PC.
> Enter the URL www.gigaset-config.com in the address field of the web browser and press the
return key.
You are connected to your base's Web configurator. To register with the Web configurator, you will
need the system PIN for the phone (default setting: 0000).
A description of the Web configurator can be found in the user guide on the enclosed CD and in
the Web configurator online help document.
Prerequisite for the following steps:
Before you can use VoIP to phone any other subscribers on the Internet, the fixed line network or
the mobile phone network, you need a VoIP account.
> Set up a VoIP account with a VoIP provider.
> Have your VoIP account data you received from your VoIP provider to hand.
You will need:
> Your registration name (login ID), your password and, if applicable (provider-dependent), a user
name (often this is your VoIP phone number).
Or
> Your personal auto-configuration code (activation code), if your provider supports "automatic
Version 5, 23.09.2008
configuration".
9
Gigaset A510 IP / IM-OST en / A31008-M2230-R601-1-TE43 / configuration.fm / 9/14/11
Configuring the VoIP connection
7
Starting the configuration process
When your handset is sufficiently charged (approx. 20 minutes after you have placed it in the
charger), the message key f on the handset flashes.
> Press the message key f on the handset.
If "New firmware available" is shown in the display, updated firmware is already available for
your phone. Press the right-hand display key §Yes§. The new firmware is loaded. This takes approx.
6 minutes. The message key f will now flash again.
> Press the message key f to start configuration.
8
Starting the IP assistant
¶
The IP wizard
helps you to
Start IP
configure an IP
wizard?
No
Yes
> Press the key below §Yes§ on the display
(= right display key).
Back
V
OK
> Press the down of the control key w to
scroll down.
> Press the §OK§ display key to continue.
Version 5, 23.09.2008
If the connection assistant does not start correctly, or if you cancel the connection assistant, you
can start it via the following menu on the handset:
w (press right) ¢ Ï ¢ Telephony ¢ VoIP Wizard
10
Gigaset A510 IP / IM-OST en / A31008-M2230-R601-1-TE43 / configuration.fm / 9/14/11
Configuring the VoIP connection
The configurable IP connections are shown in the following
displays (IP 1 to IP 6). VoIP connections that are already
configured are marked with ³.
IP 1
³
Back
OK
> If necessary, press down on the control key w to select
a connection.
> Press the §OK§ display key to continue.
Provided that your phone is set for auto-configuration (default setting), you will see the following
display. Otherwise, for more information, see 10 .
If you have received a registration name/password
and, if applicable, a user
name:
> Press the key below §No§
on the display screen.
¶
Do you have
auto conf code?
No
Yes
If you have received an autoconfiguration code:
> Press the key below §Yes§
on the display screen.
> For more information,
see
9
.
> For more information,
see
10
.
If your phone cannot establish a connection to the Internet, one of the following messages is
displayed: IP address not available or Internet conn. not available.
> Press the right display key §OK§ to end the VoIP wizard and start the connection assistant
(step
12
).
Version 5, 23.09.2008
Further information about possible error causes can be found in the user guide on the enclosed
CD.
11
Gigaset A510 IP / IM-OST en / A31008-M2230-R601-1-TE43 / configuration.fm / 9/14/11
Configuring the VoIP connection
9
Entering an auto-configuration code
Enter auto
> Enter your auto-configuration code using the keypad
conf. code:
> Press the right-hand display key §OK§.
5
All data required for VoIP telephony is loaded directly from
the Internet to your phone.
Following successful download, IP account is registered is
shown in the display.
Proceed as described under 12 .
Del.
10
(max. 32 characters).
OK
Selecting a provider and loading provider data to the base
Select Country:
Select Provider:
Germany
Provider 2
Back
OK
> Select your country with the control key
w
(press down arrow).
> Press the display key §OK§.
Back
OK
> Select your provider with the control key
w
(press down arrow).
> Press the display key §OK§.
The general access data for your VoIP provider will be downloaded and saved on the phone.
If your provider is not in the list, you must cancel the VoIP assistant:
> Press and hold the end call key a to return your handset to idle status.
> Perform the configuration and the assignment of the send and receive connection using the
Version 5, 23.09.2008
Web configurator. You will find more detailed information about this in the user guide on the
enclosed CD.
12
Gigaset A510 IP / IM-OST en / A31008-M2230-R601-1-TE43 / configuration.fm / 9/14/11
Configuring the VoIP connection
11
Entering personal VoIP account data
> To switch between upper and lower case and digits, press the # key (several times if necessary).
> Characters entered incorrectly can be deleted using the left display key below §Del.§.
The character to the left of the cursor is deleted.
> You can navigate within the input field using the control key w (press right/left).
Provider Data
Provider Data
User ID:
Password:
Back
OK
> Using the number keys, enter the
authentication name (user identification)
that you received from your VoIP provider.
This entry is case-sensitive.
> Press the right display key §OK§.
Back
OK
> Using the number keys, enter the
authentication password that you
received from your provider.
This entry is case-sensitive.
> Press the right display key §OK§.
Depending on your provider, you may be prompted to enter another name (User Name). Enter it
as described above.
If the User Name is identical to the User ID, you only need to press the right display key §OK§.
Version 5, 23.09.2008
Once you have entered all the VoIP data fully and correctly, the message "IP account is registered"
will appear in the display after a short time. The VoIP wizard is closed.
13
Gigaset A510 IP / IM-OST en / A31008-M2230-R601-1-TE43 / configuration.fm / 9/14/11
Assigning the send/receive connection
12
Launching the connection assistant
To call other parties using the newly configured VoIP connection (e.g., IP 1), you must assign the
connection to one or more of the registered handsets as a send connection.
Default assignment: The VoIP connection is assigned to every registered handset as a receive connection (incoming calls can be received). It is not assigned to any handset as a send connection.
The following is shown in the display:
a.
¶
Assign connect.
> Press the display key §Yes§ if you wish to change the
to INT1?
No
Yes
setting for the send and receive connections of the
handset with the internal name INT 1.
> Press the display key §No§ if you do not wish to change
the setting for this handset.
b.
The receive connections currently assigned to the handset are displayed.
INT 1
You have to press down on the control key w to scroll
through the list.
receiv. calls for
Phone
Change V
OK
> Press the display key §OK§ if you do not wish to change
the setting. The following steps are skipped. Continue
from e.
> Press the display key §Change§ if you wish to change
the receive connection setting.
c.
Receiv.calls for:
IP1
f Yes
Version 5, 23.09.2008
Back
14
g
V
OK
If no calls to the VoIP connection IP1 are to be signalled
on the handset:
> Press right on the control key w to set to No.
Gigaset A510 IP / IM-OST en / A31008-M2230-R601-1-TE43 / configuration.fm / 9/14/11
Assigning the send/receive connection
d.
Receiv.calls for:
Phone
f Yes
Back
g
V
OK
> Press down on the control key w to switch to the
next connection. Select either Yes or No as described
above.
> Repeat the steps for each connection.
> Press the display key §OK§ once you have finished configuring the settings for the handset.
The updated list of receive connections is displayed one more time for you to check. Press the
display key §OK§ to confirm the assignment.
e.
INT 1
The send connection currently set for the handset is
displayed: Phone.
send calls via:
Phone
Change
> Press the display key §OK§ if you do not wish to change
OK
the setting. Skip the following step.
> To change the setting, press the display key §Change§.
f.
Which connection/phone number should the handset
use to make a call:
INT 1
> Press right on the control key w repeatedly, until the
send calls via:
f IP1
Back
g
required connection is displayed (in the example,
IP1).
OK
Version 5, 23.09.2008
> Press the display key §OK§ to save the settings.
The connection selected here is used as the standard send connection on this handset if you briefly
press the talk key c after entering the number.
15
Gigaset A510 IP / IM-OST en / A31008-M2230-R601-1-TE43 / configuration.fm / 9/14/11
Assigning the send/receive connection
Instead of a fixed connection, you can also select Select at each call. Each time you make a call, you
must then select the connection you wish to use.
You can go on to start the connection assistant for each additional handset registered to the base.
The following is displayed in sequence for each handset:
Assign connect. to INT1?
> Perform steps a. to f. (see above) for each registered handset.
Completing the installation
After successfully configuring the settings, Connec. assign. completed is displayed briefly. Afterwards, the handset returns to idle status (an example of the display in idle status):
Ð
U
INT 1
12.09.
10:53
Redial
Menu
The following are displayed:
Reception between the base and the handset:
good to low: Ð ¨ § ¦, no reception: ¥
Charge status of the batteries:
= e V U (flat to full)
= Battery almost empty (less than 10 minutes talktime)
= e V V (charging)
INT 1: Internal name of the handset
You can configure five additional VoIP connections (VoIP phone numbers) on
your Gigaset. In the user guide on the enclosed CD, you will find detailed information about setting up, configuring new connections and operating your
phone, as well as possible solutions to frequently asked questions and problems.
Version 5, 23.09.2008
To ensure that you can always be reached via the Internet, the router must be permanently
connected to the Internet.
16
Gigaset A510 IP / IM-OST en / A31008-M2230-R601-1-TE43 / configuration.fm / 9/14/11
Gigaset.net directory entry
Entering names in the Gigaset.net directory
Gigaset.net* is a VoIP service provided by Gigaset Communications GmbH, which you can use to
make free calls to other Gigaset VoIP users across the world.
Every Gigaset.net subscriber can create an entry with a name of their choice in the Gigaset.net
online directory. Follow the steps below, if you wish to create and entry in the Gigaset.net directory
for your phone **:
> Press and hold the down arrow on the control key w.
> Press down on the control key w repeatedly until Gigaset.net is selected.
> Press the display key §OK§. A connection to the Gigaset.net online directory is established.
> Press the display key below §Menu§.
> Press down on the control key w repeatedly until Own Details appears in the display and then
press the display key §OK§. Your Gigaset.net number is shown in the display.
> Press the display key below §Edit§.
You will see the following display:
Your nickname
> Using the number keys, enter the name that you
Back
OK
would like to be listed under in the Gigaset.net directory.
> Press the right display key §OK§.
Version 5, 23.09.2008
If an entry already exists with this name, the message "Nickn. exists Please change!" will appear.
You will be prompted to enter a name again.
* Exclusion of liability
Gigaset.net is a voluntary service provided by Gigaset Communications GmbH with no liability or guarantee for
the availability of the network. This service can be terminated at any time.
** Data protection notice
The nickname is saved on a central Gigaset server and appears in the Gigaset.net directory. You can receive calls
from other users of the Gigaset.net service under this nickname. By entering your data, you agree to having
your data saved.
17
Gigaset A510 IP / IM-OST en / A31008-M2230-R601-1-TE43 / telephony.fm / 9/14/11
Making calls
Making calls
> Enter a phone number using your handset's number keys.
Please note that, even with local calls, you must always dial the area code for calls via VoIP
(provider-dependent).
You have assigned the handset a fixed send connection
(default assignment: fixed-line connection):
> Briefly press the talk key c.
The number will be dialled via this send connection.
Or
> Press and hold the talk key c. The list of your phone's connections is displayed (Phone, IP1,
IP2, ...).
> Select a send connection and press the display key §Dial§; the number will be dialled via the
selected send connection.
You have assigned Sel. at each call to the handset:
> Press the talk key c. The list of your phone’s connections is displayed.
> Select a send connection and press the display key §Dial§; the number will be dialled via the
Version 5, 23.09.2008
selected send connection.
18
Gigaset A510 IP / IM-OST en / A31008-M2230-R601-1-TE43 / CC.fm / 9/14/11
Customer Service & Assistance
Do you have any questions? As a Gigaset customer, you can find help quickly in this User Manual and in the
service section of our Gigaset online portal www.gigaset.com/service.
Please register your phone online right after purchase.
This enables us to provide you with even better service regarding questions or a warranty claim. In order to contact our customer service via email, please use the email contact form from our Gigaset online portal after
selecting your home country.
Our representatives are also available on the telephone hotlines for consultation.
Australia . . . . . . . . . . . . . . . . . . . . . . 1300 780 878
Austria. . . . . . . . . . . . . . . . . . . . . 0043 1 311 3046
Bahrain . . . . . . . . . . . . . . . . . . . . . 97 31 73 11 173
Belgium . . . . . . . . . . . . . . . . . . . . . . .0 78 15 66 79
Bosnia Herzegovina . . . . . . . . . . . . .033 276 649
Brazil . . . . . . . . . . . . . . . . . . . . . . . . . . . . 4003 3020
(grandes cidades e regiões metropolitanas Custo de uma ligao local)
. . . . . . . . . . . . . . . . . . . . . . . . . . . . . . 0800 888 3020
(demais localidades - Gratuito)
Bulgaria. . . . . . . . . . . . . . . . . . . . .+359 2 9710666
(0.50 евро на минута от всички държави за
стационарни телефони. За обаждания от
мобилни телефони може да има други цени).
Canada . . . . . . . . . . . . . . . . . . . . . 1-866 247-8758
China . . . . . . . . . .0 21 400 670 6007 (RMB 0.11)
Croatia. . . . . . . . . . . . . . . . 01 2456 555 (0,23 Kn)
Czech Republic. . . . . . . . . . . . . . . . 0 233 032 727
Denmark. . . . . . . . . . . . . . . . . +45 (0) 35 25 86 00
Finland . . . . . . . . . . . . . . . . . . . . . . . 09 231 134 25
France . . . . . . . . . . . . . . . . . . . . . +33 170 706 181
Coût d’un appel local depuis une ligne fixe
France Télécom.
Germany. . . . . . . . . . . . . . . . . . . . . 01805 333 222
Der Anruf kostet Sie aus den deutschen Festnetzen 0,14 € pro Minute. Anrufe aus den deutschen Mobilfunknetzen kosten höchstens 0,42
€ pro Minute.
Greece. . . . . . . . . . . . . . . . . . . . 801-100.0.500
(Χρέωση 0,0026 € το λεπτό για το σταθερό
δίκτυο της Ελλάδας. Για κλήσεις από κινητό
ίσως ισχύουν άλλες χρεώσεις)
Hong Kong . . . . . . . . . . . . . . . . . . . . . . 2763 0203
. . . . . . . . . . . . . . . . . . . . . . . . . . . . . . . . . . 2389 7285
Hungary . . . . . . . . . . . . . . . . 01 267 21 09 (27 Ft)
India. . . . . . . . . . . . . . . . . . . . .Please refer to your
. . . . . . . . . . . . . . . . . . . . . . . . . . local warranty card
Indonesia . . . . . . . . . . . . . . . . . . .(62-21) 5673813
. . . . . . . . . . . . . . . . . . . . . . . . . . (62-21) 888856000
Ireland . . . . . . . . . . . . . . . . . . . . . . . 18 50 77 72 77
Italy . . . . . . . . . . . . . . . . . . . . . . . . . . . 199.15.11.15
(€ cent 8,36 + IVA al minuto da telefono fisso
della rete Telecom Italia senza scatto alla risposta mentre per le chiamate effettuate attra-
verso la rete di altri operatori fissi o mobili consultate le tariffe del vostro operatore)
Jordan . . . . . . . . . . . . . . . . 00962 6 5625460/1/2
Kuwait . . . . . . . . . . .+965 -22458737/22458738
Lebanon . . . . . . . . . . . . . . . . . . . . . +9611240259/
. . . . . . . . . . . . . . . . . . . . . . . . . . . . . . .+9611236110
Luxembourg . . . . . . . . . . . . . . . +352 8002 3811
Malaysia . . . . . . . . . . . . . . . . . . . +603-8076 9696
Malta . . . . . . . . . . . . . .+390 2360 46789 (0,10 €)
Mexico
. . . .01800 999 4442738 (01800 999 GIGASET)
Netherlands . . . . . . . . . . . . . . . . . . 0900-3333102
(0,25 € per minuut (vast net). Voor oproepen uit
het mobiele netwerk kunnen andere prijzen
gelden.)
New Zealand . . . . . . . . . . . . . . . . . . 0800 780 878
Norway . . . . . . . . . . . . . . . . . . . . . . . . . 22 70 84 00
(Oppstartskost 89 øre + 15 øre pr minutt fra
fasttelefon. For samtaler fra mobil vil det gjelde
egne priser.)
Oman . . . . . . . . . . . . +968 709281 Ext. 49/21/75
Poland . . . . . . . . . . . . . . . . . . . . . . . . . 801 140 160
Portugal . . . . . . . . . . . . . . . . . . (351) 808 781 223
(custo de uma chamada local)
Romania . . . . . . . . . . . . . . . . . . +40 021 204 9130
Russia . . . . . . . . . . . . . . . . . . . . . . .8 (495) 2281312
Serbia. . . . . . . . . . . . . . . . . . . . . . . . . 0800 222 111
Singapore . . . . . . . . . . . . . . . . . . . . . . . . 6735 9100
Slovak Republic . . . . 02 59 68 22 66 (4,428 sk)
Slovenija . . . . . . . . . . . . . . . . . . . . . . . . 01 5644171
South Africa . . . . . . . . . . . . . . . . +2711 46 13 181
Spain . . . . . . . . . . . . . . . . . . . . . . . . . . . 902 103935
Sweden . . . . . . . . . . . . . . . . . . . . . . . . . 87 50 99 11
Switzerland . . . . . . . . . . . . . . . . . . . 0848 212 000
Taiwan . . . . . . . . . . . . . . . . . . . . . . . . 02 266 24343
Turkey . . . . . . . . . . . . . . . . . . . . . . 0216 459 98 59
Ukraine . . . . . . . . . . . . . . . . . +380-44-451-71-72
United Arab Emirates . . . . . . . .+97144458255/
. . . . . . . . . . . . . . . . . . . . . . . . . . . . . +97144458254
United Kingdom. . . . . . . . . . . . 0 84 53 67 08 12
USA . . . . . . . . . . . . . . . . . . . . . . . . . 1-866 247-8758
Vietnam. . . . . . . . . . . . . . . . . . . . . . . 1900 545 416
Version 5, 23.09.2008
For questions about VoIP access, please contact the respective service provider.
Please have your record of purchase ready when calling.
Replacement or repair services are not offered in countries where our product is not sold by authorised dealers.
19
Gigaset A510 IP / IM-OST en / A31008-M2230-R601-1-TE43 / CC.fm / 9/14/11
Authorisation
This device is intended for analogue phone lines in your network.
Voice over IP telephony is possible with an additional modem via the LAN interface.
Country-specific requirements have been taken into consideration.
We, Gigaset Communications GmbH, declare that this device meets the essential requirements and
other relevant regulations laid down in Directive 1999/5/EC.
Version 5, 23.09.2008
A copy of the 1999/5/EC Declaration of Conformity is available at this Internet address:
www.gigaset.com/docs
20
Version: 14.09.2011