1
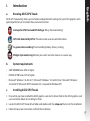
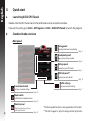
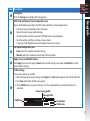
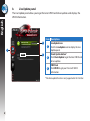
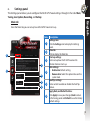
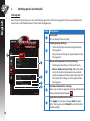
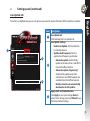
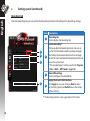
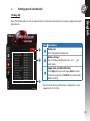
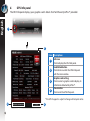
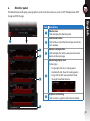
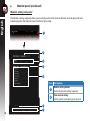
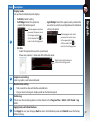
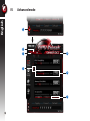
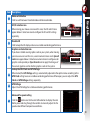
ASUS GPU Tweak
User Manual
Q6866
First Edition
December 2011
English
Contents
I.
Introduction...............................................................................................................................3
a.
b.
c.
Knowing ASUS GPU Tweak.......................................................................................................................... 3
System requirements..................................................................................................................................... 3
Installing ASUS GPU Tweak......................................................................................................................... 3
II. Quick start..................................................................................................................................4
a.
b.
c.
Launching ASUS GPU Tweak....................................................................................................................... 4
Standard mode overview............................................................................................................................. 4
Advanced mode overview........................................................................................................................... 5
III. Standard mode.........................................................................................................................6
a.
b.
c.
d.
e.
Tuning panel..................................................................................................................................................... 6
Live Update panel........................................................................................................................................... 8
Settings panel.................................................................................................................................................. 9
GPU Info panel...............................................................................................................................................14
Monitor panel.................................................................................................................................................15
IV. Advanced mode.................................................................................................................... 18
Introduction
a.
Knowing ASUS GPU Tweak
English
I.
ASUS GPU Tweak utility allows you to monitor and optimize the settings for your ASUS graphics card’s
optimal performance. It includes these exclusive functions:
Link up the GPU Clock and GPU Voltage: Worry-free overclocking!
GPU Info detected by GPU-Z: Provide a more accurate card information.
In-game video recording: Preset recording hotkeys for easy sharing.
Widget style monitoring: Monitor your card’s real-time statuses in a easier way.
b.
System requirements
• AMD HD6000 Series GPU or higher
• NVIDIA GT500 Series GPU or higher
• Microsoft® Windows® 32-/64-bit 7 / Microsoft® Windows® 32-/64-bit Vista / Microsoft® Windows®
32-/64-bit XP (Microsoft .NET Framework 3.5 is required for Windows XP)
c.
Installing ASUS GPU Tweak
1. Ensure that you have installed the ASUS graphics card and its driver. Refer to the ASUS graphics card
user manual for details on installing its driver.
2. Locate the ASUS GPU Tweak driver folder and double-click the setup.exe file to start the installation.
3. Follow the onscreen instructions to finish the installation.
English
II.
Quick start
a.
Launching ASUS GPU Tweak
• Double-click the GPU Tweak icon on the notification area to restore the window.
• If you exit the utility, go to� Start > All Programs > ASUS > ASUS GPU Tweak to launch the program.
b.
Standard mode overview
Main panel
Tuning panel
Provides professional overclocking
Page 6
Live Update panel*
Keeps your system up-to-date
Page 8
Settings panel
Customizes your GPU Tweak
Page 9
GPU Info panel**
Displays your card’s details
Page 14
Profile settings
Launch benchmark
Test your overclock settings
Save your overclock settings
Page 7
Page 10
Mode switch
Full functions for advanced users
Page 18
Monitor panel
Real-time monitoring of your
card’s performance
Page 15
* The driver update function is only supported on V3.0 or later.
** The GPU-Z support is subject to change without prior notice.
English
Monitor panel
Exit
Minimize
Link/Unlink
Monitor setting
c.
Page 16
Advanced mode overview
Click
(mode switch) to switch between the Standard mode and Advanced mode*. The main
differences between these two modes are the functions of the Main panel. See the table below for details.
Standard mode vs. Advanced mode
Items
Adjust GPU Clock
Adjust GPU Voltage
Lock GPU Clock and GPU Voltage
Adjust Memory Clock
Adjust Fan Speed
Advanced Fan Speed settings
Adjust 2D/3D mode separately, disable 2D
Adjust several cards separately
“√” : Available; “–“ : Not available
Standard Mode
√
–
–
√
√
–
–
–
Advanced Mode
√
√
√
√
√
√
√
√
* See page 18 for details.
III.
Standard mode
a.
Tuning panel
English
The Tuning panel allows you to select from the preset profiles or to manually adjust the GPU
Clock, Memory Clock, and Fan Speed settings.
1
2
3
4
5
Profile bar
English
Items Descriptions
Tuning icon
1
Click the Tuning icon to display the Tuning panel.
GPU Clock and Memory Clock configuration area
Do any of the following to adjust the GPU Clock and Memory Clock configurations:
• Directly enter your preferred value in the boxes.
2
• Move the sliders to your preferred value.
• Click the red bars and then press the Left/Right keys on your keyboard.
• Click the red bars and then scroll your mouse wheel.
* See page 10 for detailed mouse and keyboard sensitivity settings.
Fan Speed configuration area
3
• Auto: Select this mode for automatic tuning.
• Manual: Select this mode to manually adjust the Fan Speed.
Apply, Cancel, and Default buttons
4
Click Apply to save your changes, Cancel to discard the changes you made, and Default to use the
factory default settings.
Profile settings
To save your settings to a profile:
1. After configuring the tuning settings, click Apply. The Save button appears next to the Profile bar.
2. Click Save and the four Profile icons appear.
3. Click a Profile icon to save your changes to it. The saved profile turns red indicating that it is
5
activated.
Power Saving profile
Gaming profile
Save button
Profile icons
b.
Live Update panel
English
The Live Update panel allows you to get the latest VBIOS and driver updates and displays the
VBIOS information.
2
1
3
Items Descriptions
Live Update icon
1
Click the Live Update icon to display the Live
Update panel.
Check Update button*
2
Click Check Update to get the latest VBIOS and
driver updates.
VBIOS tab
3
Click VBIOS to get your VGA card’s VBIOS
information.
* The driver update function is only supported on V3.0 or later.
c.
Settings panel
The Settings panel allows you to configure the ASUS GPU Tweak settings through its five tabs: Main,
Tuning, Live Update, Recording, and Hotkey.
English
Main tab
From the Main tab, you can set up how ASUS GPU Tweak starts up.
2
3
1
4
5
6
Items Descriptions
Settings icon
1
Click the Settings icon to display the Settings
panel.
Main tab
2
Click to display the Main tab.
Start-up settings
3
Tick to set up how ASUS GPU Tweak and its
Monitor function starts up.
Skin settings
• Enable skin: Default setting.
4
• Remove skin: Select this option to lessen the
system load.
Tool Tips settings
5
Tick or untick to enable or disable the Tool Tips
feature.
Apply, Back, and Default buttons
Click Apply to save your changes, Back to return
6
to the Tuning panel and Default to use the factory
default settings.
c.
Settings panel (continued)
Tuning tab
English
From the Tuning tab, you can set up the display priorities of the Tuning panel, the mouse and keyboard
sensitivities, and the Benchmark Quick Start configuration.
1
2
3
4
5
10
Items Descriptions
Tuning tab
1
Click to display the Tuning tab.
Display priority settings
• Tick to display the item and configure on the
2
Tuning panel.
• Drag an item to change its display order on the
Tuning panel.
Mouse and keyboard sensitivity settings
• Tick to keep the settings at the next launch.
• Mouse / Keyboard sensitivity: Move the slider
3
to set a fixed interval between mouse wheel
scrolls or keyboard strokes when adjusting the
GPU clock, GPU voltage, and fan speed on the
Tuning panel.
Benchmark Quick Start settings
4
Allows you to select a program to be launched when
clicking the Benchmark button
.
Apply, Back, and Default buttons
Click Apply to save your changes, Back to return
5
to the Tuning panel, and Default to use the factory
default settings.
c.
Settings panel (continued)
Live Update tab
1
2
3
Items Descriptions
Live Update tab
1
Click to display the Live Update tab.
Live Update settings
• Enable Live Update: Tick to enable the
Live Update feature.
• Update check frequency: Sets the
update check frequency and modes.
•Automatic update: Automatically
update to the latest drivers and VBIOS
2
from ASUS official website.
• Automatic update (Urgent only):
Automatically update only when
critical drivers and VBIOS updates are
available from ASUS official website.
•Notify me but do not automatically
download or install updates.
Apply, Back, and Default buttons
Click Apply to save your changes, Back to
3
return to the Tuning panel, and Default to use
the factory default settings.
English
From the Live Update tab, you can set up how you want to receive the latest VBIOS and driver updates.
11
c.
Settings panel (continued)
Recording tab
English
From the Recording tab, you can enable the Recording function and configure the Recording settings.
1
2
3
4
Items Descriptions
Recording tab
1
Click to display the Recording tab.
Enable Recording**
Tick to enable the Recording function. You can set
up the Start/End video recording hotkeys through
the Hotkey tab. See more details on the next page.
2
Untick this item to disable the Recording function to
lessen the system load.
*The recorded reports will be saved in the Program
Files > ASUS > GPU Tweak > Log folder.
Record file settings
3
Click to configure the recorded file.
Apply, Back, and Default buttons
Click Apply to save your changes, Back to return
4
to the Tuning panel, and Default to use the factory
default settings.
** The Recording function is only supported on V3.0 or later.
12
c.
Settings panel (continued)
Hotkey tab
1
2
3
English
From the Hotkey tab, you can set up the hot keys to quickly show the main screen or apply some quick
adjustments.
Items Descriptions
Hotkey tab
1
Click to display the Hotkey tab.
Hotkey settings*
2
Key in a hotkey combination (Ctrl + Alt + __) for
each action.
Apply, Back, and Default buttons
Click Apply to save your changes, Back to return
3
to the Tuning panel, and Default to use the factory
default settings.
* The Start/End video recording hotkeys configuration is only
supported on V3.0 or later.
13
d.
GPU Info panel
English
The GPU Info panel displays your graphics card’s details that TechPowerUp GPU-Z* provided.
1
2
Items Descriptions
Info icon
1
Click to display the GPU Info panel.
Link/Unlink button
2
Click to link or unlink the GPU Info panel
with the main window.
Graphics card setting
3
Click to select a graphics card to display its
information detected by GPU-Z*.
Close button
4
Click to exit the GPU Info panel.
* The GPU-Z support is subject to change without prior notice.
3
14
4
e.
Monitor panel
The Monitor panel displays your graphics card’s real-time statuses, such as GPU Temperature, GPU
Usage and VID Usage.
2
3
4
English
1
Items Descriptions
Monitor icon
1
Click to display the Monitor panel.
Link/Unlink button
2
Click to link or unlink the Monitor panel with the
main window.
Monitor setting button
3
Click to display the Setting sub-panel. See more
details on the next page.
Monitoring display area
Tracking tips:
• Single right-click: Fix a tracking point.
• Double left-click: Clear all tracking points.
4
• Drag with the left mouse button: Check
through the whole timeline.
5
Graphics card setting
Click to select a graphics card to be monitored.
5
15
e.
Monitor panel (continued)
Monitor setting sub-panel
English
The Monitor setting sub-panel allows you to configure the Fetch Interval, Monitor panel display, and items
to be displayed in the Monitor panel and their display order.
1
2
3
4
5
Items Descriptions
Monitor setting button
1
Click to display the Setting sub-panel.
Time interval setting
2
Click to specify a monitoring time interval.
6
7
16
Items Descriptions
Display modes
Sets up how the Monitor panel displays.
3
This bar appears only when
you move the mouse cursor
to the upper-right corner
of this window. Click
to
return to the Settings panel.
• Light Widget: Select this option to only monitor the
crucial items, which are configurable on the Monitor
setting sub-panel.
• No Skin:
• Select this option to lessen the system load.
• Allows easy zoom-in / zoom-out of the Monitor panel.
This bar appears only when
you move the mouse cursor
to the upper-right corner
of this window. Click
to
return to the Settings panel.
English
• Full Skin: Default setting
• Full Widget: Select this option to
simplify the Monitor panel.
Right click on the black area to
return to the Settings panel.
4
5
6
7
Graphics card setting
Select a graphics card to be monitored.
Monitor item setting
• Tick or untick to show or hide the selected item.
• Drag an item to change its display order on the Monitor panel.
Enable Log
Tick to save the monitoring data in written format in the Program Files > ASUS > GPU Tweak > log
folder.
Apply, Back, and Default buttons
Click Apply to save your changes, Back to return to the Monitor panel, and Default to use the factory
default settings.
17
English
IV.
Advanced mode
1
2
3
4
5
6
7
18
2
3
4
5
6
2D/3D selection icon
When moving your mouse cursor over this icon, the 2D and 3D icons
appear below it. Select one icon to configure the 2D and 3D settings
separately.
English
Items Descriptions
Mode switch button
1
Click to switch between Standard mode and Advanced mode.
Disables 2D
Click to keep the 3D display and ensure a stable overclocking performance.
Graphics card selection icon
If you have installed several graphics card on your system, when moving
your mouse cursor over this icon, several numerical icons and a Sync all
cards icon appear below it. Select one numerical icon to configure each
graphics card separately or Sync all cards icon to apply the changes of
the current graphics card to all other graphics cards in the system.
Link up the GPU Clock and GPU Voltage
When locked, the GPU Voltage setting is automatically adjusted to the optimal value according to the
GPU Clock setting to ensure a stable overclocking performance. When open, you can adjust the GPU
Clock and GPU Voltage settings separately.
GPU Voltage
Adjust the GPU Voltage for a stable overclocking performance.
Advanced fan speed setting
7
Click the
button next to the User Define button to display the User
Define panel and drag through the red dots to manually adjust the fan
speed under different temperature conditions.
19