1
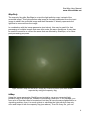
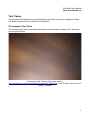
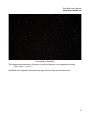
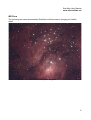
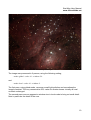
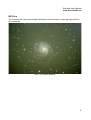
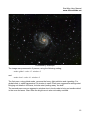
StarWipe User Manual
www.siliconfields.net
StarWipe User Manual
Introduction
StarWipe is a tool for astrophotographers. Its main uses are negating the effects of light
pollution and the removal of vignetting. It can also be used to enhance contrast locally in
images or revealing previously hidden detail; it can be used to reduce glare caused by light
diffusion in deep space objects or to counter the effects caused by other types of light
scattering such as haze (terrestrial or non-terrestrial). StarWipe also enables further
processing to extract even more detail from an image, making curve manipulation and
sharpening algorithms like Unsharp Mask more effective.
StarWipe can be used as one of the very first tool in the processing chain; that is, before
any stacking, aligning or other processing is performed. It ensures that all images to be
stacked are uniformly lit and there are minimal brightness variations caused by objects
drifting into vignetted areas, or other light level altering events (haze, or an inconsiderate
neighbour or spouse). This should help the stacking and aligning process.
StarWipe can also be used, in a variety of ways, as a post-processing tool to bring out
more detail in a finalised picture, or unlocking an 'end-of-the-road' scenario, opening up an
image to further processing and detail extraction.
StarWipe is part SiliconFields' bigger, ever evolving suite of image processing tools, plans
and schematics for astrophotographers on a sub-shoestring budget. While it also holds
potential for more professional users (as demonstrated in the test cases), it's main
purpose is to take advantage of the ever increasing computing and resolving power of
consumer personal computers and digital compact cameras and put it to use for the
'sidewalk asrtonomer'. While there is no substitute for quality optics, professional build
quality mounts and dark sky sites, some of the problems stemming from a lack of high
standard hardware or optimal seeing conditions can now be overcome by software running
on comparatively cheap hardware.
StarWipe was written in (too much of) the author's spare time and is made available free of
charge for personal use. If you find this program useful, please consider making a
donation by PayPal to [email protected].
Any feedback, comments and/or feature requests are also welcome at
[email protected] and www.siliconfields.net as well as interesting job and/or
contracting opportunities.
StarWipe may be used free of charge for personal use. Please contact the author for
commercial and/or institutional use. Lastly, please do not redistribute StarWipe without
prior consent from the author.
1
StarWipe User Manual
www.siliconfields.net
Usage
StarWipe is a command-line tool and takes the following parameters (note the double
dashes!);
• --mode=[global|local]
•
--in=infile
•
--out=outfile
•
--inmap=infile
•
--scale=percentage
•
--window=percentage
•
--evmode=[channel|pixel]
•
--nonormalize
•
--maponly
•
--preblur
StarWipe only requires the --in and --mode parameters to be set, but experimenting
with other values is highly recommended and often necessary.
An example of usage would be;
StarWipe --in=myinfile.bmp --out=myoutfile.tiff --scale=10 --window=8 --maponly
--mode=global
This would tell StarWipe to read 'myinfile.bmp', process it in 'global' mode and use
10% for the scale value and 8% of the window value. The --maponly flag tells
StarWipe to only output the light pollution map and not the corrected image. It also
tells StarWipe to write the light pollution map to 'myoutfile.tiff'.
In
The in parameter specifies the input file. The file should either be a 24-bit or 32-bit
RGB BMP file or a 24-bit or 48-bit TIFF file. The input image should be
uncompressed. StarWipe currently does not support any other fileformats.
A single asterisk ('*') may be used as a wildcard to put StarWipe into batchprocessing mode. In batch processing mode, output files are written to a file with the
same file name, but with '_wiped' appended to it.
2
StarWipe User Manual
www.siliconfields.net
Out
The out parameter specifies the output file. The output file is a 48-bit uncompressed
TIFF file. StarWipe currently does not support any other output formats.
In case batch-processing mode is engaged, the out parameter is ignored.
Mode
StarWipe can operate in two main modes; global and local. They both employ
different algorithms to determine the areas that benefit from contrast improvement.
Global mode affects large areas of the image and is most suitable for removing light
pollution, vignetting, glare and aggressive detail enhancing.
Local mode affects smaller areas of the image and is most suitable for bringing out
small detail and localised contrast enhancement. Local mode is best used with small
values for the window and scale parameters.
Scale
The scale parameter specifies a scaling percentage that is applied to the input image
before it is processed by StarWipe. The scaling down eliminates noise and mitigates
artificial irregularities which can confuse StarWipe. Depending on preference, smaller
values can produce a 'softer' effect. Additionally, smaller values greatly reduce
computing times. Depending on the application, larger or smaller values may be
more effective in achieving the desired result.
Window
The window parameter specifies the overall strength of local contrast enhancement
versus the rest of the image. Smaller values have a greater effect on local contrast.
In Global mode, smaller values may introduce artefacts in the form of fuzzy circles. In
this case, it is best to choose a less aggressive value, or it may be appropriate to
switch to 'local' mode.
EvMode
The evmode parameter specifies the valuation method StarWipe uses to determine
contrast. Per-channel is the most effective, while per-pixel produces slightly softer
results which, depending on your preference, may be more pleasing.
NoNormalize
Since the lightpollution map is subtracted form the original image, the result is a
dimmer image. StarWipe restores the brightness to its original value by default. The
nonormalize flag tells StarWipe not to normalize the output. This can be useful if the
user wishes to restore or enhance brightness by other means (such as a photo
editing suite, image stacker or Siliconfield's StarSqueeze). This parameter is ignored
when the –maponly flag is specified.
3
StarWipe User Manual
www.siliconfields.net
MapOnly
The maponly flag tells StarWipe to output the light pollution map, instead of the
corrected image. This light pollution map image is normally subtracted from the input
image to obtain the corrected image and then discarded. It directly represents the
light that is removed from the image.
In combination with the inmap parameter (see below), this may be useful for fast
processing of multiple images that were shot under the same conditions. It may also
be useful to examine or correct the areas that are affected by StarWipe, or for other
post-processing purposes.
Light pollution map for the M101 image by Charles Kuehne (see test cases),
exported by using the maponly flag.
InMap
Using the inmap parameter, StarWipe can be told to use a pre-computed light
pollution map in an image file, instead of calculating a new one. If, for example, you
have a lot of files that need to be stacked, but they all have the same lightpollution or
vignetting problem, then it is much quicker to calculate the light pollution map only
once and output it with the maponly flag (see above). Then for every file, you can
4
StarWipe User Manual
www.siliconfields.net
import that same light pollution map using inmap, instead of having to calculate it for
every file.
The inmap/maponly combination can also be useful if you feel StarWipe's
calculations just can't quite get it right. In that case you can export StarWipe's
lightpollution map using the maponly flag, see where StarWipe went wrong, modify it
Photoshop (or The GIMP etc.) and reapply it to the image using the inmap parameter.
One last way the inmap/maponly combination may be useful, is when you're trying to
apply StarWipe to an excessively noisy image and the preblur functionality is
unsatisfactory (see below).
In this case, take the original image, then blur it (or use noise removal plug-in) in
Photshop (or The GIMP, etc.) until the noise is gone. Then feed this image to
StarWipe and output the light pollution map using the maponly flag.
Then feed the original noisy image to StarWipe, but, using the inmap parameter, tell it
to use the lightpollution map we just computed using the blurred version. StarWipe
will now output a properly corrected image.
PreBlur
The preblur parameter blurs the input image before passing it on to the light pollution
detection algorithm. Because StarWipe does not deal well with excessively noisy
images, dead pixels and/or other anomalies, blurring the image can help smoothen
out the unnatural data and keep StarWipe on track.
The parameter passed is used to define a window size in pixels, over which the input
will be averaged. A small value should suffice to smoothen out noise or other
anomalies.
Because light pollution and contrast differences tend to occur over large areas,
blurring should not have a great impact on StarWipe's accuracy.
5
StarWipe User Manual
www.siliconfields.net
Limitations and areas of improvements
StarWipe is, as of May 2010, a command-line tool for Linux and Windows operating
systems. It does not have a graphical user interface.
Input and output formats are limited to uncompressed either 24-bit or 32-bit BMP, or 24-bit
or 48-bit TIFF.
Depending on settings, StarWipe's lightpollution detection algorithm can be very sensitive
to bad pixel data such as dead pixels, JPEG artefacts or other non-natural anomalies in
the image.
StarWipe is most suitable for Deep Space Objects, generic wide angle views and screenfilling lunar images. StarWipe is less suited to other types of astrophotography images and
even less so for other types of photography, with the possible exception of medical
imaging such as X-ray and MRI imaging.
StarWipe, especially in global mode, sometimes has the tendency to remove natural
background light levels (e.g “Gegenschein” etc.) in favour of using the freed up dynamic
range for bringing out detail. The resulting image may be considered by purists as
unnatural. However, if desired, the natural background level may be reintroduced quite
easily in Photoshop, The Gimp or similar software.
6
StarWipe User Manual
www.siliconfields.net
Test Cases
The following test cases demonstrate StarWipe's potential to enhance images and bring
out detail using the various methods at its disposal.
Circumpolar Star Trails
The following test case demonstrates StarWipe's effectiveness in getting rid of extremely
severe light pollution.
Circumpolar Star Trails by Nick Ares (source:
http://www.flickr.com/photos/aresauburnphotos/2714286479/ under Creative Commons 2.0
license). Original.
7
StarWipe User Manual
www.siliconfields.net
Processed by StarWipe
The image was processed in 2 passes, using the following, very aggressive setting;
--mode=global --window=1
StarWipe has completely eliminated the light pollution and cloud interference.
8
StarWipe User Manual
www.siliconfields.net
M8 Core
The following test case demonstrates StarWipe's effectiveness in bringing out hidden
detail.
M8 Core by Marc Aragnou
9
StarWipe User Manual
www.siliconfields.net
Processed by StarWipe
The image was processed in 2 passes, using the following setting;
--mode=global --scale=10 --window=50
and
--mode=local --scale=10 --window=2
The first pass, using global mode, removes overall light pollution and normalises the
image's contrast. The very conservative 50% value for window leaves virtually all local
contrast unchanged.
The second pass uses an aggressive window size in local mode to bring out small detail.
Note in particular the detail in the core.
10
StarWipe User Manual
www.siliconfields.net
M8 Core
The following test case demonstrates StarWipe's effectiveness in reducing light pollution
and vignetting.
M101 by Charles Kuehne
11
StarWipe User Manual
www.siliconfields.net
Processed by StarWipe
The image was processed in 2 passes, using the following setting;
--mode=global --scale=15 –window=5
and
--mode=local --scale=10 –window=2
The first pass, using global mode, removes the heavy light pollution and vignetting. For
global mode, a rather aggressive 5% window is used. Even more aggressive settings start
bringing out details in the arms, but also start 'peeling away' the dust.
The second pass uses an aggressive window size in local mode to bring out smaller detail
in the core and arms. Glare from the bright core is also noticeably reduced.
12
StarWipe User Manual
www.siliconfields.net
Acknowledgements
The following people have been helpful in assessing StarWipe's usefulness and have
kindly donated some of their images to help evaluate StarWipe's effectiveness and
illustrate its use;
•
•
•
Alan Mehan, Australia
Marc Aragnou, Australia
Charles Kuehne, United States
13
StarWipe User Manual
www.siliconfields.net
Changelog
0.5
•
Initial release
0.6
•
•
•
Enhanced lightmap scaler (bicubic)
Added 'preblur' functionality
Fixed manual
0.7
•
•
•
•
Deprecated 'excolor' functionality
Added uncompressed 24-bit and 48-bit TIFF import
Output format now 48-bit TIFF instead of 24-bit BMP
Changed internal processing to 64-bit
14