1
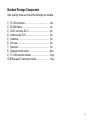
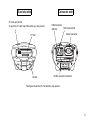
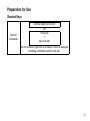
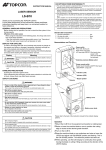
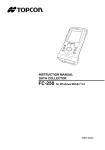
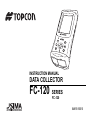
FC-120
ESC
Alt
INSTRUCTION MANUAL
DATA COLLECTOR
FC-120
SERIES
FC-120
64855 90010
Foreword
Thank you for purchasing the TOPCON Data Collector FC-120 series.
For superior product performance, please read this instruction manual carefully and keep it in a
convenient place for future reference.
General Handling Precautions
• Before starting work or operation, be sure to check that the instrument is functioning correctly with
normal performance.
• Always make sure instrument is dry before putting it in the soft case. Never store a damp
instrument.
• Do not leave the instrument under strong sunlight for a long time. It may cause the instrument to
malfunction.
• When waterproofness is necessary, close all the caps securely. However, the serial connector has
a waterproof structure, so it will remain waterproof even if its cap is not closed.
1
Display for Safe Use
In order to ensure the safe use of this product, prevent any danger to the operator or others, or
damage to property, important warnings are placed on the product and inserted in the instruction
manual. We recommend that you become familiar with the meaning of these Warnings and
Cautions before continuing.
Display
Meaning
WARNING
Ignoring or disregard of this display may lead to the danger of death or serious
injury.
CAUTION
Ignoring or disregard of this display may lead to personal injury or physical damage.
• Injury refers to hurt, burn, electric shock, etc.
• Physical damage refers to extensive damage to equipment and structure or furnishings.
2
Safety Cautions
WARNING
There is a risk of fire, electric shock or physical harm if you attempt to disassemble or repair the instrument
yourself.
This is only to be carried out by TOPCON or an authorized dealer, only!
May ignite explosively.
Never use an instrument near flammable gas, liquid matter, and do not use in a coal mine.
High temperature may cause fire.
Do not cover the charger while it is charging.
Risk of fire or electric shock.
Do not use a wet battery or charger.
Battery can cause explosion or injury.
Do not dispose in fire or heat.
To reduce the risk of hazards, use only CSA/UL certified power supply cord set, cord is Type SPT-2 or heavier,
minimum No.18 AWG copper, one end is provided with a moulded-on male attachment plug cap (with a specified
NEMA configuration), and the other end is provided with a moulded-on female connector body (with a specified
IEC non-industrial type configuration).
The short circuit of a battery can cause a fire.
Do not short circuit battery when storing it.
Battery can cause outbreak of fire.
Do not use any other type of charger other than the one specified.
Risk of fire or electric shock.
Do not use any power voltage except the one given on manufacturers instructions.
3
CAUTION
Do not allow skin or clothing to come into contact with acid from the batteries, if this does occur then wash off
with copious amounts of water and seek medical advice.
Do not connect or disconnect equipment with wet hands, you are at risk of electric shocks if you do!
Do not touch the charger, AC-DC converter or heating part of the instrument for a long period while charging the
battery. There is a risk of low-temperature burn.
Exceptions from Responsibility
1) The user of this product is expected to follow all operating instructions and make periodic checks of the product’s
performance.
2) The manufacturer, or its representatives, assumes no responsibility for results of a faulty or intentional usage or
misuse including any direct, indirect, consequential damage, and loss of profits.
3) The manufacturer, or its representatives, assumes no responsibility for consequential damage, and loss of profits by
any disaster, (an earthquake, storms, floods etc.), fire, accident, or an act of a third party and/or a usage in other than
usual conditions.
4) The manufacturer, or its representatives, assumes no responsibility for any damage, and loss of profits due to a
change of data, loss of data, an interruption of business etc., caused by using the product or an unusable product.
5) The manufacturer, or its representatives, assumes no responsibility for any damage, and loss of profits caused by
usage other than explained in the user manual.
6) The manufacturer, or its representatives, assumes no responsibility for damage caused by wrong movement, or
action due to connecting with other products.
4
Contents
Foreword .......................................................................................................................... 1
General Handling Precautions................................................................................... 1
Display for Safe Use .................................................................................................. 2
Safety Cautions ......................................................................................................... 3
Exceptions from Responsibility.................................................................................. 4
Contents .................................................................................................................... 5
Standard Package Components................................................................................ 7
Nomenclature................................................................................................................... 8
FC-120....................................................................................................................... 8
Connectors .............................................................................................................. 10
Preparation for Use ........................................................................................................ 11
Shortcut Keys .......................................................................................................... 11
Battery ..................................................................................................................... 12
Setting Handstrap .................................................................................................... 16
Touch Screen .......................................................................................................... 17
How to Insert CF Card ............................................................................................. 18
Transmittion Data to The PC.......................................................................................... 19
Using Interface Cable .............................................................................................. 19
Using Bluetooth® ..................................................................................................... 20
RAM Data Backup.......................................................................................................... 21
Execute the Backup function ................................................................................... 21
5
Set the Automatic Backup for every suspension ..................................................... 22
Set the restoration after hard reset .......................................................................... 22
Resetting FC-120 ........................................................................................................... 23
Soft Reset ................................................................................................................ 23
Hard Reset............................................................................................................... 24
Specifications ................................................................................................................. 25
Storage Precautions....................................................................................................... 28
6
Standard Package Components
Upon opening, make sure that all the followings are included.
1) FC-120 Instrument.................................................... 1set
2) BT-66Q Battery ......................................................... 1pc.
3) AC/DC converter AD-13 ........................................... 1pc.
4) Interface cable F-25.................................................. 1pc.
5) Handstrap ................................................................. 1pc.
6) Soft case ................................................................... 1pc.
7) Stylus pen ................................................................. 1pc.
8) Display protection sheet ........................................... 5pcs.
9) FC-120 Instruction manual ....................................... 1copy
10) BTManager2.0 Instruction manual............................ 1copy
7
Nomenclature
FC-120
Card slot cap
Display and Touch screen
FC-120
Enter key
Speaker
Stylus pen
Charge LED
Hook for tripod
Escape key
Hook for handstrap
Cursor keys
Alt key
ESC
Cover screw
To tighten or
loosen the screw,
use a coin.
Alt
Home key
Battery cover
Microphone
Power key
Connector caps
8
Windows key
Hook for handstrap
Card slot side
Connector side
CF card eject button
To eject the CF card, stand the button up, then press it.
USB Connector
Hard reset switch
(Mini-B)
Serial Connector
CF slot
SD slot
AC/DC converter Connector
This figure shows the FC-120 with the cap opened.
9
Connectors
Serial connector
USB Connector
(Type Mini-B)
10
No.1
No.2
No.3
No.4
No.5
No.6
No.7
No.8
No.9
No.1
No.2
No.3
No.4
No.5
DCD
RXD
TXD
DTR
GND
DSR
RTS
CTS
RI
VDD
VV+
NC
GND
(IN)
(IN)
(OUT)
(OUT)
(IN)
(OUT)
(IN)
(IN)
Preparation for Use
Shortcut Keys
Shortcut
Commands
Continue tapping on an item
OR
Press [Alt]
+
tap on an item
are the same as a right click on a mouse. A menu is displayed
containing commands specific to the item.
11
Battery
Battery Installation
12
1
Using a coin, loosen the cover screw on the
battery cover.
2
3
Remove the battery cover.
4
Using a coin, install the battery cover.
Tighten the cover screw firmly.
Install the battery pack.
(Confirm the direction of battery
installation.)
Battery terminal
Battery Charging
1
After installing the battery, plug the connector
of AC/DC converter in the FC-120.
2
Plug the AC/DC converter in an outlet. Then
the charge LED will light.
Charging is completed after approximately
6 hours.
The display can be turned on or off by the
power key.
Charge LED
AC/DC converter
The charge LED of FC-120 will indicate
charging status;
Red ON
: Charging.
Green ON : Charging completed.
Red Flashing : Charging error.
Connector
Note:The instrument may develop heat while charging, there is no problem of it.
Always use the AC/DC converter provided with the product.
13
Note
1) Recharge batteries at the room temperature between +10°C to +40°C (+50°F to +104°F).
2) The battery source will discharge when not being used. Always charge before use.
3) If the instrument is not used over an extended period of time, be sure to charge battery source
every 15 days and store in a place at 30°C or below. If you allow the battery to be completely
discharged, it will have an effect on the proper charging in the future.
4) The charger may develop heat while charging. This is not a breakdown.
5) Attempting to charge batteries immediately after charging may cause a degradation of the
batteries.
6) Do not charge successively. It may cause degradation of batteries and/or the battery charger. If
more charging needs to be done, wait approximately 30 minutes before charging.
14
How to save battery power:
• Backlight
If the backlight is not needed, lower the brightness or set so that the light will turn off after a
short time. Brightness can be adjusted by the following procedure:
1
2
Press [Alt] + tap the background of Desktop[Properties] [Backlight].
Adjust by [
] or [
] icon of Brightness setting.
• Low temperature use
Battery capacity is reduced at low temperatures. When using under low temperature
conditions, keep the equipment as warm as possible.
• CF cards, SD cards, USB port
Disconnect cards and cables when not in use.
15
Setting Handstrap
1
2
Set the handstrap on the handstrap hook c.
Set the handstrap on the handstrap hook d.
Handstrap
16
Touch Screen
Adjusting Touch Screen
1
Turn on the instrument after hard-reset or
tap [Start], [Setting], [Control Panel],
[Stylus], [Calibration], [Recalibrate].
2
Using a stylus pen, touch the center of the
target.
3
After touching all targets(5 points), press
[ENT] key or tap the display.
(Use an accessory stylus pen to touch a
screen. Do not use neither a ball-point pen
nor pencil.)
Stylus pen
FC-120
Targets
17
How to Insert CF Card
Please make sure you have the front and back of the CF cards facing correctly when inserting into
the card slot.
If you forcibly insert the card incorrectly, the pin at the card slot may be damaged and cause a
breakdown.
Front of the card
FC-120
Please insert straight down into the card slot.
If you forcibly insert the card at an angle, the pin at the card slot may be damaged and cause a
breakdown.
18
Transmittion Data to The PC
Using Interface Cable
1
2
3
4
5
Install ActiveSync in your PC (if it is not already installed).
Connect the FC-120 to your PC with an interface cable F-25 as shown below.
The FC-120 will give the prompt, “Connecting to Host”.
The PC will prompt you to set up a partnership or set up as a guest.
Select the [NO] key to setting up as a guest.
PC
FC-120
Interface(USB) cable F-25
FC-120
ESC
Alt
USB port (TYPE A)
6
USB port (TYPE Mini-B)
Press the [Next] key. Once a connection has been established, the ActiveSync window will
appear on your PC.
19
7
Click the [Explorer] icon. You will then see the FC-120 file structure.
Reference software for Connectivity
See the WEB page as follows.
http://www.microsoft.com/windowsmobile/
Using Bluetooth®
The FC-120 has Bluetooth transmission function built-in. Information can be exchanged between
instruments equipped with the same function using wireless. *1)
Regarding the Bluetooth setting, please see the instruction manual, “BTManager 2.0”.
*1)Serial Port Profile, Dial-Up Network Capable.
20
RAM Data Backup
If your device had not recharged during several days, the battery will be running down, and you
would lose all of data on the device other than that in the "Storage Card (internal Flash ROM)".
In addition, you might perform hardware-reset by the hardware problem or software problem. In this
case, you would lose all data same as the above.
You can use Backup function of FC-120 in order to evade such kind of uneasiness. Your data will be
restored to latest condition* automatically when rebooting by using the Backup function.
The Backup function saves all data files of RAM (except for OS files), registry file and additionally
installed programs into named "Backup" folder in the "Storage Card" .
* Restoring former backed up data may be incomplete if you upgrade OS version.
* The conditions that you executed the backup function last.
Execute the Backup function
1
Tap the icon "Start"-"Settings"-"Control Panel"-"System"-"Backup". You can see the "Backup"
screen on Display.
2
Tap the “Ram data backup” button. Backup function will start. Return to "Backup" screen
automatically, when the data back up has been completed.
3
Tap the button "OK" on title bar. After that "Backup" screen will close automatically.
* Backing up data may be incomplete if remaining capacity of "Storage Card" is not enough.
Please make sure the remaining capacity of "Storage Card" before proceeding to the data
back up.
* Restoration will be impossible if you delete the "Backup" folder in the "Storage Card".
21
Set the Automatic Backup for every suspension
1
On the "Backup" Screen, please check it 'ON/OFF' "RAM data will be backed up before
suspension".(Factory setting is 'ON' as default)
2
Tap the button "OK" on title bar. After that, "Backup" screen will close automatically.
Set the restoration after hard reset
22
1
On the "Backup" Screen, check it 'ON/OFF' the "Data restoration after hard reset."
(Factory setting is 'ON' as default)
2
Tap the button "OK" on title bar. After that, "Backup" screen will close automatically.
Resetting FC-120
If there is no response to the pressing of a key or tapping of the display, you need to reset the FC120. There are 2 methods to reset the FC-120.
Soft Reset
With the soft reset, all running applications will be shutdown, and data you are editing will be lost;
however, installed programs and stored data are protected.
How to soft reset
1
2
Remove all cables or cards (CFs, SDs) that are currently mounted.
Press the [Alt], [K] and [J] keys simultaneously for at least 2 seconds.
23
Hard Reset
If the instrument does not function properly after soft reset has been done, perform a hard reset.
A hardware reset will revert all settings to defaults and erase all RAM data.
A hardware reset will erase all RAM data and applications.
Regular backups will ensure RAM data and applications can be restored.
How to hard reset
1
2
3
24
Remove all cables or cards (CFs, SDs) that are currently mounted.
Lightly press the hard reset switch beside the AC/DC converter connector with stylus pen.
Turn on the Power key.
Specifications
Controller
Microprocessor
Processor speed
Operating system
Memory
Display
Touch panel
Keyboard
LED
Interface
Audio
: XScale PXA 270
: 520MHz
: Microsoft® Windows CE 5.0
: RAM 64MB SDRAM
: ROM 128 or 256MB Flash ROM
: Display resolution
240×320 QVGA
: Type
3.5 inch TFT Color LCD
: Light
LED back light
: Analog resistive film
: 10 keys (Power key included)
: 1 LED (charge)
: Conforming to RS-232C (D-sub 9)
: USB (rev 1.1) (Type Mini-B)
: Compact Flash (conforming to Type I/II)
: SDIO/SD/MMC card slot
: Sealed speaker (mono), sealed microphone
25
Bluetooth® Functions
Transmission specifications
Transmission method
Modulation method
Data transmission speed
Antenna
Frequency range
Transmission distance
Corresponding profile
: Bluetooth® version 1.2
: Frequency hopping spread spectrum (FH-SS) communication
: GFSK
: 1Mbps (Max.)
: Chip Antenna (built-in)
: 2.4GHz (2,402~2,480MHz) (0~78ch)
: 5m (In good visibility) *1)
: Serial port, Dial-Up Network
Water resistance and dust resistance
: IP66 *2)
Operation temperature
: -20°C to +50°C (-4°F to +122°F)
Storage temperature
: -30°C to +60°C (-22°F to +140°F)
Shock resistance
: Dropping this instrument from a height of 1 meter does not affect its
functions *3)
Operating time *4)
FC-120
: Approx. 20 hours (typical use)
: Approx. 45 hours (with no display light, no touch)
Charging time
Dimensions
Weight
: Approx. 6 hours (with AC-DC converter)
: 182×103×59 (mm)
: 0.6kg (with battery)
*1) Transmission distance is influenced by the environment. The distance of radio wave transmission may be reduced in
reinforced concrete buildings or near large-sized metal furniture.
*2) When caps are installed.
26
*3) Each of the instrument's 6 sides was dropped onto a concrete surface, and the instrument's operation was then
confirmed. Only the exterior of the instrument was damaged.
*4) Battery capacity will differ depending on whether Bluetooth is used or not, brightness of the backlight, room temperature
and application software used.
(When Bluetooth is used, battery capacity will lower approximately 30%)
Battery (BT-66Q)
Type
:
Regular voltage
:
Nominal capacity :
Exterior dimensions :
Weight
:
AC-DC Converter (AD-13)
Lithium-ion battery
7.4V
2,500mAh
72×39×22 (mm)
110g
Input
: AC100V-240V, 50-60Hz, 0.6A
Output
: 12V, 1.25A Max 15W
Charging temperature : 10°C to +40°C
Exterior dimensions: 74×43.5×34 (mm)
(Not including cable and AC plug)
Weight
: 412 g(Not including AC plug)
27
Storage Precautions
Always clean the instrument after use.
1) If the instrument becomes wet from rain, dry moisture and stow in its soft case.
2) To clean the instrument, dust off well and then wipe clean with a soft cloth.
Use a clean cloth moistened with neutral detergent or water to clean the soft case. Never use
ether, benzene, thinner or other solvents.
The Bluetooth® word mark and logos are owned by the Bluetooth SIG, Inc. and any use of such
marks by Topcon Corporaton is under license.
XScale is a registered trademark of US Intel Corporation in the U.S.A and other countries.
Microsoft, Windows CE and ActiveSync are registered trademarks of US Microsoft in the U.S.A and
other countries.
28
Regulatory Information
The following sections provide information on this product's compliance with government regulations
FCC Compliance
This device complies with Part 15 of the FCC Rules. Operation is subject to the following two
conditions: (1) This device may not cause harmful interference, and (2) this device must accept
any interference received, including interference that may cause undesired operation.
NOTE:This equipment has been tested and found to comply with the limits for a Class A digital
device, pursuant to part 15 of the FCC Rules. These limits are designed to provide reasonable
protection against harmful interference when the equipment is operated in a commercial
environment. This equipment generates, uses, and can radiate radio frequency energy and, if
not installed and used in accordance with the instruction manual, may cause harmful interference
to radio communications. Operation of this equipment in a residential area is likely to cause
harmful interference in which case the user will be required to correct the interference at his own
expense.
WARNING:
Change or modifications not expressly approved by the party responsible for compliance could
void the user's authority to operate the equipment.
Specified cables must be used for connection to host computer and/or peripherals in order to
meet FCC emission limits.
29
Community of Europe Compliance
Standards used:
EN 60950-1: 2001,First Edition+A11: 2004
EN 300 328 V1.7.1 (2006-10)
EN 301 489-17 V1.2.1 (2002-08)
EN 301 489-1 V1.6.1 (2005-09)
EN 55022:2006 Class A
EN 61000-3-2:2000+A2:2005
EN 61000-3-3:1995+A1:2001
Hereby, TOPCON CORP. declare that this DATA COLLECTOR FC-120 is in compliance with the
essential requirements and other relevant provisions of Directive 89/336/EEC and 73/23/EEC.
30
©2008 TOPCON CORPORATION
ALL RIGHTS RESERVED
Unit 69 Western Parkway Business Center
Krungdhonburi Rd., Klongtonsai, Klongsarn, Bangkok 10600 Thailand.
Taman Ampang Hilir, 55100 Kuala Lumpur, MALAYSIA
Phone: 60-3-42701192 Fax: 60-3-42704508
www.topcon.de
89, Rue de Paris, 92585 Clichy, Cedex, France.
P. O Box293705, Office C-25(row C-2), Dubai Airport Free Zone, Dubai, UAE
Phone: 971-4-2995900 Fax: 971-4-2995901
75-1 Hasunuma-cho, Itabashi-ku, Tokyo 174-8580, Japan
www.topcon.co.jp
5E