1
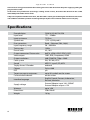
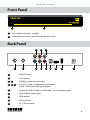
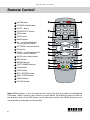
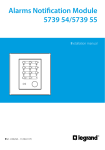
User Manual Trophy TA-1001HD DVB-C HDTV digital receiver Trophy-Access decoder Personal Video Recorder Trophy TA-1001HD User Manual Contents 2 Device Operation Specification Front panel Back panel Remote control Connection of Device to TV Set with RCA input Connection of Device to TV Set with SCART input Data Panel Reading Address Messages Main menu File viewer Recording Timer Programming Timer Programming using EPG information Quick recording Timeshift Mosaic Preview Stream selection System setup Program setup Transponder List editor Cable TV scan Service list editor Audio/video setup OSD Setup Password and parental settings Restore factory setting Power up state Trophy-Access Decoder Number 3 4 5 5 6 7 7 8 9 9 9 10 11 12 12 13 13 13 14 14 15 15 16 16 17 17 18 18 18 www.trophy.com.ua Trophy TA-1001HD User Manual Device Operation Safety Requirements DVB-C HDTV Set Top Box design complies with international safety standards. However, operation with any electric appliances requires caution. We recommend you to ask a qualified master to install the device. If you choose to install it yourself, please read this Operation Manual carefully. Pay special attention to safety requirements below. Supply Voltage Power supply must be AC 180 V…250 V, 50/60 Hz. Make sure your power supply complies with these requirements. Overload Avoid overloading the supply network by extension cords or adapters. It may cause fire or give you an electric shock. Liquid Substances Store liquid substances away from the device and make sure no such substances get inside the Set Top Box. Foreign Objects Please keep coins and other small objects away from the device to prevent their getting through the vent slots, which may cause serious damage to your Set Top Box. Getting of insects into the device may also damage the device and, consequently, cause fire. Cleaning Disconnect the device from power supply before cleaning. Use soft, slightly damp cloth to clean the surface of the casing. Never use any solvents! Ventilation Make sure the vent slots are open and the location where the device is installed allows free air circulation. Never put the device on a soft surface or cloth. Do not operate and never store the device on the heat or under direct sunlight. Never put any other appliances on top of the device. Connected Devices Do not connect any unauthorized appliances to the device as it is dangerous and may damage the appliance and this device. Location Install the device indoors on hard surface. Make sure the device is well protected from direct sunlight or moisture. WARNING: Never remove the top or back panel of the device. The device contains no parts and units which can be handled by the user. If necessary, call service center for qualified personnel. Do not leave the operating device unattended. Make sure it is out of reach of children. www.trophy.com.ua 3 Trophy TA-1001HD User Manual In the event of a long pause between the watching, disconnect the device from the power supply by pulling the plug out of the socket. In the event of any malfunction (lost image, cracking sound or odor), disconnect the device from the socket immediately and call the service center. Subject to compliance with the instructions, the device life is 5 (Five) years following the manufacture date. Terms and conditions of further operation must be agreed upon by the owner of device and the service company. Specifications 4 Demodulation Input level Input resistance Symbol rate Error correction Input frequency range Tuning step Picture ratio Output connectors Picture ratio Video output Output resolution Color system Sound Trophy-Access2 Decoder Chipset EPG Target message to customers Current balance details Interface language Supply voltage Wattage Dimensions Weight QAM 16/32/64/128/256 -75…-25dBm 75 Ohm 1,725...6,9 Msymb/s Reed – Solomon (204; 188,8) 50…900 MHz 1 MHz 4:3; 16:9 6хRCA, HDMI, USB, S/PDIF, LOOP CVBS, RGB, Component, HDMI 480i,576&576i, 720p x 1080i PAL, SECAM, NTSC MPEG-1 Layer2, DD, MP3 onboard Fujitsu H60 yes up to 80 symbols on the screen on the screen English, French, German, Indonesian, Russian, Ukrainian External Adapter input 180...250VAC External Adapter output +12V up to 14W 220х120х45 1,6 kg www.trophy.com.ua Trophy TA-1001HD User Manual Front Panel TROPHY TA-1001HD STANDBY TROPHY-ACCESS 1 2 1 - LED indicator of power / standby 2 - Infrared port to receive signal from the remote control. Back Panel 3 5 AUDIO-R AUDIO-L RF IN LOOP 1 2 Pr Y 4 7 CVB-S Pb 6 1 – Cable TV input 2 – LOOP output 3 , 5 – Left/Right audio channel output 8 SPDIF HDMI USB DC 12V 9 10 11 12 4 , 6 , 8 – In Cb/Y/Cr mode – component signal outputs. In RGB – Blue/Green/Red signal outputs 7 – Composite “Video” output. In RGB mode – synchronization signal 9 – Optical digital audio output 10 – HDMI output 11 – USB connector 12 – DC +12V connector www.trophy.com.ua 5 Trophy TA-1001HD User Manual Remote Control 1 MUTE button 2 STANDBY mode button 3 DIGITS – 0 to 9 4 TV/RA SELECT button 5 EPG button 6 INFO button 7 MENU button 8 UP – switching channels, Cursor control in MENU 9 LEFT/RIGHT volume control 10 OK button 11 DOWN – switching channels, Cursor control in MENU 12 AUDIO track select button 13 1 2 3 4 5 6 7 8 9 10 11 12 13 EXIT button 14 15 14 REWIND button 16 17 15 FAST FORWARD button 18 19 16 PLAY button 20 21 17 STOP button 18 RED / RECORD button 19 BLUE / PAUSE button 20 GREEN button 21 YELLOW button Note: MENU appears as text messages on the screen. The lines you select are highlighted. ОК button always confirms your choice in current MENU. Push MENU button to return to the previous menu. Push EXIT button to exit the menu mode. Push MENU button to save automatically any changes you have made. 6 www.trophy.com.ua Trophy TA-1001HD User Manual Connection of Device to TV Set with RCA Input AUDIO-R AUDIO-L RF IN LOOP Pr Y CVB-S Pb SPDIF HDMI USB DC 12V USB DC 12V Cable TV input Connection of Device to TV Set with SCART Input AUDIO-R AUDIO-L RF IN LOOP Pr Y CVB-S Pb SPDIF HDMI Cable TV input RCA SCART CVBS General (20) VIDEO (17) General Cb General (7) BLUE (5) General Y General (11) GREEN (9) General Cr General (15) RED (13) General www.trophy.com.ua 7 Trophy TA-1001HD User Manual Data Panel While switching channels or pushing INFO button, the screen will flash Data Panel. You can set the data panel lifetime on the screen. Go to “Main menu” - “System setup” -“OSD buttons to set “OSD display time” from 1 sec to 30 sec. setup”. Use Upper right corner of the data panel shows current time as broadcast by the central station of cable TV operator. EPG (Electronic Program Guide) information is displayed in the center of the panel. Line 1 shows the name of the current program and time of its beginning. Line 2 shows the name of the next program and time of its beginning. The scale in the upper part of data panel shows how much of the programs you have missed. Current balance on your subscriber account is shown in the bottom left corner of the panel. When your balance reaches “0”, your device will automatically block your access to paid programs. Attention! If your device was disconnected from the socket, allow up to 30 seconds after switching on to receive details on the balance and current time from the digital transponder. 8 www.trophy.com.ua Trophy TA-1001HD User Manual Reading Address Messages Broadcasters may send address messages to your device. To read the message, press YELLOW button. Happy birthday, Vladimir Georgievich Main menu Press MENU to enter the MAIN MENU. File viewer menu Set Top Box provides the following additional features: - record TV programs and radio programs on an external USB device (FAT, FAT32). - playback of TS video, - display JPEG, BMP, PNG, JPG images on TV, - play mp3 music files. To use these features, you need to connect your own USB storage device (e.g. USB flash) to the USB connector on the rear panel of the Set Top Box. www.trophy.com.ua 9 Trophy TA-1001HD User Manual To open the FILE VIEWER menu, click OK Use OK button and up/down/left/right buttons to select the folder and file for viewing. JPEG files are displayed on the screen immediately after the cursor select. To view videos, you must move the cursor to the desired file and click OK. To finish viewing the video, press STOP button. If you want to listen to an MP3 album, you can select desired folder and click OK. On the screen you will see a Musicbox menu. At the bottom of the menu are buttons you need to select tracks in a music album. Recordings menu Press MENU to enter the MAIN MENU. Select “Recordings” row and click OK button. The screen will display the “Playback list” menu. This menu has complete information about the date, title and duration of video-clip. You can select desired videofile on your flash device. Click OK button to view the videofile. If you want to stop viewing of the file, click STOP button. 10 www.trophy.com.ua Trophy TA-1001HD User Manual Timer Programming menu There are three recording modes: Timer mode, Quick Recording mode (in detail it will be discussed in section “Quick Recording mode” of this User’s Guide) and Timeshift mode (in detail it will be discussed in section “Timeshift mode” of this User’s Guide). In this chapter we will discuss Timer mode recording. You can program the timer manually or using the EPG information. To program the timer manually, do the following: Press MENU to enter the MAIN MENU. Select “Timer Programming” row and click OK button. The screen will display the “Time settings” menu. Due to the fact that all broadcasters transmit data of the current time, it is better to enable the automatic adjustment of the time in the menu. In the “Time setting” menu you can also set the current date and GMT time, enable Dayling Saving Time (Summer/Winter Time), set the time zone. Press MENU button to enter the “Timer programming” menu. In this menu you can set the date and time of video-clip recording on a particular television channel from the channel list. You can edit this information. To do this you must press OK button, then the “Edit Timer” menu will appear. www.trophy.com.ua 11 Trophy TA-1001HD User Manual Timer Programming using EPG information This recording mode is the most convenient and fast. Press EPG button twice. On the screen you will see the schedule for the day. Click buttons to select the next day. Click buttons to select the video you want to record. Then click BLUE button for timer programming. Now, this information will be saved in the “Timer Programming” menu. Quick recording mode If you want to record the current program, you can press RECORD (Red) button. On the screen you will see the EDIT TIMER menu. If you do not want to make additional settings, press the RED button. Recording will start after a few seconds. Recording will stop automatically at the time specified in “End time” menu bar. The recording can be stopped at any time by pressing the STOP button. 12 www.trophy.com.ua Trophy TA-1001HD User Manual Timeshift mode If you have urgent business, but do not want to miss the interesting information you can use Timeshift mode. You must connect your USB-flash to the receiver to do this. While watching a program you can press PAUSE (Blue) button and go about your business. The program will be recording to the flash at this time. You can continue viewing of the program later by pressing the PAUSE (Blue) button. On the information panel displays a red dot and the duration of the recorded scene. You can stop recording by pressing STOP button. Be careful. In this case, you will continue to watch the program only in real time. Mosaic Preview Press MENU to enter the MAIN MENU. Select “Mosaic Preview” row and click OK button. On the screen you’ll see nine windows where you may display still images of nine channels from the list. To select other channels you may use buttons. Stream Selection menu Press AUDIO button to enter the Stream Selection menu. buttons to select AUDIO TRACK, Stereo/mono and digital sound processing mode. Use Please note that data always goes to SPDIF regardless whether the current program has AC3 or not. www.trophy.com.ua 13 Trophy TA-1001HD User Manual System Setup menu Press MENU to enter the MAIN MENU. Select the “System setup” row and click OK button. With the first and second sub-menu you can select the language of OSD and set the parameters of time. Program setup menu Press MENU to enter the MAIN MENU. Select the “System setup” row and click OK button. With the first and second sub-menu you can select the language of OSD and set the parameters of time. 14 www.trophy.com.ua Trophy TA-1001HD User Manual Transponder list editor menu Press MENU to enter the MAIN MENU. Select the “System setup” row and click OK button. Select the “Program setup” row and click OK button. Select the “Transponder list editor” row and click OK button. Select the “Select transponder” row. Delete unnecessary transponders using the RED button. Enter the frequency, symbol rate and modulation type of new transponder. Press GREEN button to add a new trasponder. Thus save the settings on all transponders. Two scales at the bottom indicate the level and quality of the signal on each transponder. Now you are ready to process a channel search. Press MENU to enter the PROGRAM SETUP menu. Cable scan menu Press MENU to enter the MAIN MENU. Select the “System setup” row and click OK button. Select the “Program setup” row and click OK button. Select the “Cable scan menu” row and click OK button. buttons. Select satellite with You can choose method of cable scanning. The first method is channel scanning. The second method is an automatic scanning under transponder list. In addition, if the transport stream contains NIT data, the receiver will automatically add to the list all new transponders. After selecting a transponder or after selecting an automatic method, select the “Start scanning” row and then click OK button. On the screen you will see the process of channel searching. After searching press MENU button. www.trophy.com.ua 15 Trophy TA-1001HD User Manual Service list editor menu Press MENU to enter the MAIN MENU. Select the “System setup” row and click OK button. Select the “Program setup” row and click OK button. Select the “Service list editor” row and click OK button. Using the buttons you can edit the service list and create favorite programs lists. Description of buttons you can see at the bottom of the menu. After editing of service list, press MENU button. You can set the Parental Lock on certain channels. To do this, select the desired channel and press STOP button. This line will be red. In the future, to watch this channel you will need to enter the Parental Lock code. All details of this function you can find in “Password and parental settings” menu. Audio/video setup menu Press MENU to enter the MAIN MENU. Select the “System setup” row and click OK button. Select the “Audio/video setup” row and click OK button. Select 16:9 or 4:3 format. Select Scaling method. Select 1080 I, 480/576 P/I or 720 P HDMI standard. Select PAL, SECAM or NTSC SD standard. Select RGB, Component or Composite video output. Select Audio delay in the case of AC3 sound. 16 www.trophy.com.ua Trophy TA-1001HD User Manual OSD setup menu Press MENU to enter the MAIN MENU. Select the “System setup” row and click OK button. Select the “OSD setup” row and click OK button. You can set how long Data Panel will be displayed on the screen. Also you can change transparency, color and location of OSD. Password and parental settings menu Press MENU to enter the MAIN MENU. Select the “System setup” row and click OK button. Select the “Password and parental settings” row and click OK button. You can block the ability to work with the “Main menu” by Menu Lock Password (Master Password). The default Master Password is 1234. If you want to change it click on the “Change master password” line. If you have locked the channel in “Service list editor” menu (red line), to open this channel you will need to enter the parent password. The default Parent Password is 0000. If you want to change it click on the “Change password for locked channels” line. www.trophy.com.ua 17 Trophy TA-1001HD User Manual Restore factory settings menu Be extremely careful while working with this menu! If you click OK button on this menu, all your setting will be deleted! Press MENU to enter the MAIN MENU. Select the “System setup” row and click OK button. Select the “Restore factory settings” row and click OK button. Power up state menu Press MENU to enter the MAIN MENU. Select the “System setup” row and click OK button. Select the “Power up state” row and click OK button. Select Standby or Full Power Up mode upon initial receiver power-up. Trophy-Access Decoder Number Press MENU to enter the MAIN MENU. Select the “Information” row and click OK button. You can see Decoder number of your receiver on “Decoder ID” line. 18 www.trophy.com.ua