1
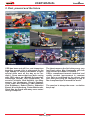
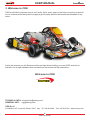
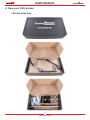
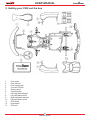
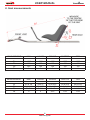
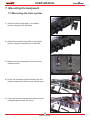
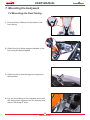
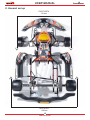
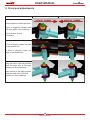
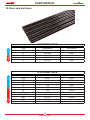
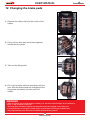
USER MANUAL
1
www.kartcrg.com
USER MANUAL
2
www.kartcrg.com
INDEX
1. Introduction to the company
PAG. 4
2. Past, present and the future
PAG. 5
3. Welcome to CRG
PAG. 6
4. How your CRG arrives
PAG. 7
5. Getting your CRG out the box
PAG. 8
6. Seat measurements
PAG. 9
7. Mounting the bodywork
7.1 Mounting the side fairing
7.2 Mounting the front bumpers
7.3 Mounting the front spoiler
7.4 Mounting the front fairing
7.5 Mounting the rear bumper
PAG. 10 -14
8. General set-up
PAG. 15
9. Front end adjustments
10. Rear axle hardness
PAG. 16
11. Bleeding the CRG brake system
PAG. 18
12. Changing the brake pads
PAG. 19
13. Safety instructions
PAG. 20 - 21
PAG. 10
PAG. 11
PAG. 12
PAG. 13
PAG. 14
PAG. 17
3
www.kartcrg.com
USER MANUAL
1. Introduction to the company
CRG, is a world leading company in the production and marketing of chassis and spare
parts for karts; it was founded in 1986 building up on the experience of its promoting
partners in the company Kalì-Kart dating
back to the 70s.The latter started up as a
small chassis manufacturing company providing products for racing enthusiasts but
within a few years it became a nationally recognized reality obtaining its first Italian title
in class 125cc in 1979 which was later on followed by several international wins too.The
newly born CRG established itself within the
world’s karting panorama thanks to a constant commitment to research and technical
development of its products and in the 90s
its structure was converted from craft-made
production into industrial manufacturing.
The expansion of the capillary network
of importers and distributors in all five
continents started in the same period with a
keen eye on important markets like Europe and
United States. Currently there are about
100 official resellers in the world including some in emergent countries like EastEurope and Arabian Countries.In mid 90s
CRG started the development of a new line
specifically dedicated to the study and design of kart engines. This new activity required an high level of specialization both
in terms of production structure and person
qualification which motivated the foundation of a separate company, named Maxter
S.r.l, following the company and production
restructuring that took place in year 2000.
In 2003 the company structuring was completed by the creation of Tinini Group, the
head holding controlling and coordinating
Maxter S.r.l. and newco CRG S.p.A., that has
been focused on its core business since
then. Both units have been relocated since
the end of 2009 to a new industrial hub that
represents even better the leadership role
of the company in its sector. Aside of the
technological evolution of karts and their
components, the company focused its commitment to international racing: the Racing
Team showcase feature s a very high num-
ber of World titles, European and Continental championships as well as countless international wins in the most prestigious races.
A team of high-level professional mechanics supports works drivers during the racing weekends providing them with precious
technical support while testing the newly
devised products of the company through
study, research and severe field testing on
the most prestigious circuits.
4
www.kartcrg.com
USER MANUAL
2. Past, present and the future
CRG has been and still is a real champions
breeding ground: this is witnessed by the
high number of drivers that,thanks to their
special skills went all the way up to Formula 1. Some names that have been racing
with CRG colors are: Michaël Schumacher,
Alessandro Zanardi, Ralf Schumacher, Giancarlo Fisichella, Nick Heidfeld, Jan Magnussen, Jos Verstappen, Giorgio Pantano,
Tonio Liuzzi, Nico Rosberg, Lewis Hamilton,
Kimi Raikkonen, Robert Kubica, Sébastien
Buemi, Nico Hulkenberg, Pastor Maldonado,
Giedo Van der Garde and many more motorracing champions.
The latest name on the list is the young, very
fast Dutch driver Max Verstappen who has
now reached the ranks of Formula 1.
CRG’s commitment towards technical and
quality product improvement is constant
over time as confirmed by the drivers that
year after year bring the company on top of
the championships all around the world.
The passion is always the same... evolution
keeps up!
5
www.kartcrg.com
USER MANUAL
3. Welcome to CRG
CRG would like to welcome you to our Family. As for many years it has been our policy to treat all
of our customers like family and to supply a good quality product that meets the demands of any
driver.
Inside this manual you will find some hints and tips about building your new CRG and how to
maintain it to a high standard. Also enclosed are some basic set up instructions.
Welcome to CRG
TECHNICAL INFO: [email protected]
GENERAL INFO: [email protected]
CRG S.p.A
Via Mantova 4F, Lonato del Garda, 25017. Italy Tel. 030.9912604
6
www.kartcrg.com
Fax. 030.9130704 www.kartcrg.com
USER MANUAL
4. How your CRG arrives
• Accessories box
7
www.kartcrg.com
USER MANUAL
5. Getting your CRG out the box
1.
2.
3.
4.
5.
6.
7.
8.
9.
10.
11.
12.
13.
Front spoiler
Front nerf bars
Front nassau panel
Your new CRG kart
Steering wheel
Accessories box
Left hand plastic side pod
Left hand lateral nerf bar
Right hand plastic side pod
Left hand lateral nerf bar
CRG wheels
Rear bumper
CRG seat
8
www.kartcrg.com
USER MANUAL
6. Seat measurements
MEASUREMENT
MINI
JUNIOR
SENIOR
SHIFTER
DD2
D1
D2
D3
D4
1095
195
145
0
1250
195
140
0
1275
195
130
5
1285
195
120
5
1285
195
125
5
MEASUREMENT
MINI
JUNIOR
SENIOR
SHIFTER
DD2
D1
D2
D3
D4
43 & 1/8
6 & 11/16
5 & 3/4
0
49 & ¼
6 & 11/16
5&½
0
50 & 3/16
6 & 11/16
5 & 1/8
3/16
50 & 9/16
6 & 11/16
4&¾
3/16
50 & 9/16
6 & 11/16
4 & 15/16
3/16
( All measurements in mm)
( All measurements in inches)
9
www.kartcrg.com
USER MANUAL
7. Mounting the bodywork
7.1 Mounting the side fairings
1. Place the plastic side pod on the metal
side bar.
2. Fix it in place with the screws supplied.
3. Insert the side bar into the supports on the
chassis and attach with the fixing spring
which is supplied.
10
www.kartcrg.com
USER MANUAL
7. Mounting the bodywork
7.2 Mounting the front bumpers
1. Insert two the M6 bolt’s with their washers.
2. Tighten the bolt so it does not turn.
3. Attach the upper front bumper using the M6
counter sunk bolts and washers on the two
points.
4. Using the two M6 bolts attach the two plastic
halfs of the clamp together.
11
www.kartcrg.com
USER MANUAL
7. Mounting the bodywork
7.3 Mounting the front spoiler
1. Attach the first fixing plate to the plastic
spoiler using the four M6 bolts.
2. Attach the second fixing plate to the plastic
spoiler using the remaining four M6 bolts.
3. Make sure the fixing plate is fixed on in the
middle position.
4. Place the complete spoiler between the two
metal bumpers with the bumper clamps open.
5. Close the bumper clamps and make sure the
complete spoiler does not move.
12
www.kartcrg.com
USER MANUAL
7. Mounting the bodywork
7.4 Mounting the front fairing
1. Push the three rubbers into the holes in the
front fairing.
2. Attach the front fairing support brackets to the
kart using the bolts supplied.
3. Attach the three front fairing pivot supports to
the brackets.
4. Lay the front fairing on the brackets and insert
the fairing pivot supports into the rubbers and
the put the fixing ‘R’ clips.
13
www.kartcrg.com
USER MANUAL
7. Mounting the bodywork
7.5 Mounting the rear bumper
1. Attach the flat plates onto the vertical supports
using the M8 bolts supplied respecting the left
and right direction which is shown in the
picture.
2. Using the bumper rubber kit supplied for your
specific kart mount the complete supports on
the chassis.
3. Attach the plastic rear bumper to the supports
on the chassis using the M8 counter sunk bolts
and washers supplied.
4. The rear bumper when mounted should look
like the example displayed in the picture.
14
www.kartcrg.com
USER MANUAL
8. General set-up
FRONT WIDTH
1210mm
REAR WIDTH
1395mm
15
www.kartcrg.com
USER MANUAL
9. Front end adjustments
2mm negative camber per side.
4mm of negative camber total
left and right in dry conditions.
0mm camber in wet
conditions
1 line of positive caster per side
in dry conditions.
4 lines of positive caster per
side in wet conditions.
Use the kart in the low position
and the stub axle in the high
position in dry conditions.
Use the kart in the high position
and the stub axle in the low
position in wet conditions.
16
www.kartcrg.com
USER MANUAL
10. Rear axle hardness
HARD
SOFT
Ø 40 REAR AXLE
TYPE
MT
S
M
H
K
HARDNESS
100-110
120-130
150-160
180-190
200-210
THICKNESS
3mm
3mm
3mm
3mm
3mm
HARD
SOFT
Ø 50 REAR AXLE
TYPE
S20
S25
T3
T6
T1
T4
T7
M20 (STD)
M25
T2
T5
HARDNESS
60-70
90
90-100
110
120
130
140
160-170
160-170
200
230-250
17
www.kartcrg.com
THICKNESS
2mm
2,5mm
2mm
2mm
2,5mm
2,5mm
2mm
2mm
2,5mm
2mm
2mm
USER MANUAL
11. Bleeding the CRG brake system
1. Fill the master cylinder with the brake fluid as
indicated by the red arrow.
2. The brake fluid in the master cylinder should
always be at the correct level indicated by the
red arrow.
3. To bleed the brake:
• The pedal should be pushed down gently so
the oil passes through the system.
• When the pedal is right down you should open
the bleed valve on the caliper as shown in the
picture and the air will come out of the tube
attached to the bleed valve.
• When the pedal reaches the end of its course
the bleed valve should be closed and the pedal
returning to the normal position.
• Checking always the level of the brake fluid.
• Then repeating this procedure until the feeling
in the pedal becomes very hard and the travel
is at its shortest.
WARNING
• CRG recomends Xeramic DOT 4 brake fluid for this system.
• The brake fluid should be changed every 15 hours.
• The seals should be changed every 25 hours.
• There should always be 3mm to 5mm of play on the pedal
18
www.kartcrg.com
USER MANUAL
12. Changing the brake pads
1. Remove the safety clip from the center of the
caliper.
2. Using a 4mm allen key and a 8mm spanner
loosen the fixing bolts.
3. Take out the fixing bolts.
4. Pull out the brake pad and exchange with the
new. After the brake pads are changed put the
fixing bolts and safety clip back onto the
caliper.
WARNING
• CRG recomends not to let the brake pad wear go to low.There should always be a minimum of
5mm - 7 mm of ferodo on the pad.
• The fixing bolts should be tightened up fully the loosened of slightly so the bolts turn.
• It is important the correct type of brake pad is used with the correct type of brake disco
• Only original brake pads should be used with the CRG brake systems.
19
www.kartcrg.com
USER MANUAL
13. Safety instructions
This guide is compiled by C.R.G. to provide the user with the procedures for
the safety and maintenance of their Kart.
Carefully read the instructions, notes and safety notices in this manual.
A failure to comply with safety regulations may result in serious consequences.
A Kart can be dangerous if not properly maintained or used improperly.
General Instructions
• Use the Kart only on a track specified for Karting with a homologation or licence given by the
respected governing bodies.
• Make sure that on the track there is not visible residues and traces of petrol or oil
Avoid touching the engine, rotating parts and parts that are hot
• Be careful not to step on the throttle cable and fuel lines and brake pipes when getting in or
getting out of the Kart
• Avoid contact with the side fairings getting in or out of the Kart
• Take care when re-fueling to prevent the spillage of fuel; a spillage of fuel can cause accidents
or even fire hazards
• Check that the throttle cable is not too tight: as this could accelerate the Kart without the
presence of the driver
• Pay attention when standing near the Kart while the Kart is being warmed up on the Kart stand
• In cleaning avoid using oily sprays near the brake disc and calipers
• Replace damaged rims; a damaged rim may lead to loss of pressure in the tire and may have
serious consequences
• Never allow a Kart to go on track with broken or missing parts
• Never go on track with worn or damaged tires: the bursting of the rubber can lead to very serious consequences
• Cold tires have reduced traction and increase the possibility of losing control of the Kart on track
• Too much grip on track can lead to injury to the ribs of the driver
Kart
•
•
•
•
The Karts should be kept in a original state
Use only original spare parts from C.R.G.
Maintain the Kart adequately and to a high standard
Use a tire with adequate grip to the track surface (if needed, contact CRG)
Not using the Kart or original spare parts can result in serious consequences.
20
www.kartcrg.com
USER MANUAL
Drivers
• Inquire about safety issues that are prohibited and / or any restrictions imposed by the owners
or organization of the track
• Make sure that you understand any restrictions about size and / or age if below the minimum
requirements by the regulations of individual countries
• Know the meaning of the flag signals and follow the instructions of the staff of the track
• No long hair or clothing articles should come out of the helmet and thereby reach the rotating
parts of the Kart which could be fatal
• Having health problems, especially a history of heart problems, problems related to the neck or
back, nervous disorders can be dangerous while driving
• Being under the influence of drugs or alcohol is strictly prohibited
• It is not recommended to drive in very cold weather as it slows down the senses and reactions
of the driver
Always observe the safety regulations: the dangerous behavior of a driver puts himself
and others at high risk.
Clothing
• Wear a helmet, the correct size for the pilot’s head, approved according to national or
international regulations, with safety closure under the chin
• Do not use clips or straps to tie long hair under the helmet
• Wear appropriate closed shoes with short laces
• Use a race suit and gloves that complies with the national or international regulations
• Wear a rib protectors that is the correct size (recommended)
• Use neck protection in case of problems with the neck and head
It is the drivers responsability to make sure that they are wearing the correct accessories
and garments of clothing while driving on track.
Summary of general checks before taking to the track
• The brake is an essential element of security.
• Do not start the Kart if the brake system is defective or if you have any doubts. A braking system
that is defective or damaged brake hoses can result in serious consequences.
• Check the wear of the brake pads
• Check that there are no oil leaks in the brake system
• Check that the integrity of steering components: Assure all ball joints and bearings dont have
eccessive play
• Check that both pedals are functioning correctly
• Check that the wheels are properly fixed and mounted onto the kart
• Check that the chain has the correct tension and is lubricated adequately
• Ensure that spoilers and fairings are properly fixed onto the kart
• Check tire wear is of a adequate standard
• It is advised to inflate the tires according to the recommended tire pressure of the tire
manufacturer
• Steering wheels should be mounted onto the steering column with two bolts, if using only one
electrical tape is recommended in case of breakages of the single bolt
• CRG does not respond to any guarantee claims if the parts fitted are not original parts of
CRG
21
www.kartcrg.com
USER MANUAL
22
www.kartcrg.com