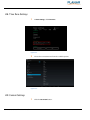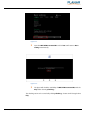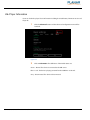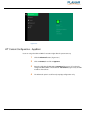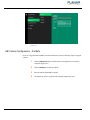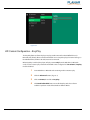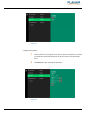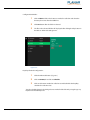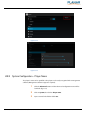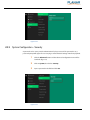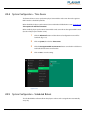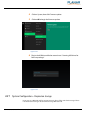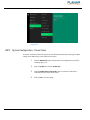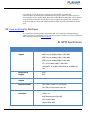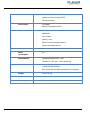
1
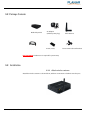
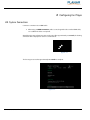
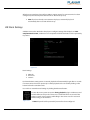
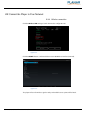
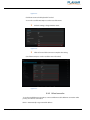
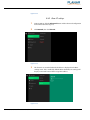
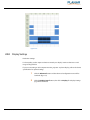
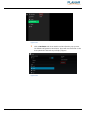
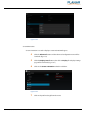
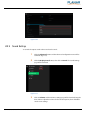
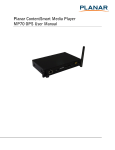
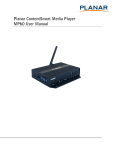
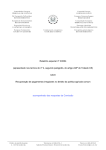
Planar ContentSmart Media Player
MP70 User Manual
Contents
1
Overview ............................................................................................................................................................ 3
1.1 Feature Highlights ....................................................................................................... 3
1.2 Package Contents ........................................................................................................ 4
1.3 Installation...................................................................................................................... 4
1.3.1 Attach wireless antenna ................................................................................................. 4
1.3.2 Mounting Option: [Attach on the back of the monitor using Velcro] .......... 5
1.4 Physical View ................................................................................................................. 5
1.4.1 Physical features (left to right in previous illustration)....................................... 6
2
Configuring the Player .................................................................................................................................. 7
2.1 System Connections ................................................................................................... 7
2.2 Basic Settings ................................................................................................................ 8
2.3 Connect the Player to Your Network .................................................................... 9
2.3.1 Wireless connection ......................................................................................................... 9
2.3.2 Static IP – manually assign network IP address ................................................... 10
2.3.3 Wired connection............................................................................................................ 11
2.3.4 Proxy settings ................................................................................................................... 12
2.3.5 Show IP settings .............................................................................................................. 14
2.4 Time Zone Settings .................................................................................................. 15
2.5 Content Settings ....................................................................................................... 15
2.6 Player Information.................................................................................................... 18
2.7 Content Configuration – AppStart ..................................................................... 19
2.8 Content Configuration – FailSafe........................................................................ 20
2.9 Content Configuration – EasyPlay ...................................................................... 21
2.10 Display Settings ...................................................................................................... 25
2.11 Sound Settings........................................................................................................ 28
2.12 System Configuration – Player Name ............................................................. 29
2.13 System Configuration – Security ...................................................................... 30
2.14 System Configuration – Time Server .............................................................. 31
2.15 System Configuration – Scheduled Reboot ................................................. 31
2.16 System Configuration - Firmware Update .................................................... 32
2.17 System Configuration – Expansion storage ................................................. 33
2.17.1 Manual Expansion ........................................................................................................ 34
2.17.2 Auto Expansion ............................................................................................................. 35
2.18 System Configuration - Factory Reset ............................................................ 36
2.18.1 Using the reset button ................................................................................................ 36
2.18.2 Using a USB mouse ...................................................................................................... 36
2.19 System Configuration – Power Save ............................................................... 37
3
Content Management ................................................................................................................................ 38
4
Authoring in HTML5 .................................................................................................................................... 38
5
Working with SMIL ....................................................................................................................................... 38
5.1 Introduction................................................................................................................ 38
5.2 www.a-smil.org for Developers ........................................................................... 39
6
MP70 Specifications ..................................................................................................................................... 39
7
Technical Support......................................................................................................................................... 41
7.1 FAQ ................................................................................................................................ 41
7.2 Planar Support ........................................................................................................... 44
7.2.1 Cables and Accessories ................................................................................................. 44
7.2.2 Contact Planar .................................................................................................................. 44
Planar ContentSmart MP70 User Manual
2
1
Overview
This document describes the hardware operation of the Planar® ContentSmart™ Media Player
MP70, system set-up and frequently asked questions.
1.1 Feature Highlights
The Planar ContentSmart MP70 is a UHD (3840 x 2160) high definition digital signage media
player featuring an industrial-grade mechanical design, versatile open-standard HTML5 and
SMIL programmability.
•
Hardware decoding of MPEG1/2/4, H.264, H.265, and VC-1 media formats
•
8GB on-board flash local storage with Micro SD expansion slot
•
Integrated audio and video output via HDMI 2.0
•
2 USB ports
•
Built-in wireless b/g/n network
•
Support for HTML5 widgets for dynamic content (W3C Widgets standard)
•
Industry leading W3C SMIL support for developers
•
Supports full POPAI Screen Media Formats Standards profiles S1 to S12, and E1 to E8
•
Multiple 3rd party software solution compatibility
Planar ContentSmart MP70 User Manual
3
1.2 Package Contents
Media Player Unit
HDMI Cable
AC Adapter
(with US power plug)
Velcro (2 sets)
Wi-Fi Antenna
Power & micro SD card brackets
NOT INCLUDED: A USB mouse is required for system setup
1.3 Installation
1.3.1 Attach wireless antenna
Attach the wireless antenna as shown below, and then screw antenna clockwise onto the post.
Planar ContentSmart MP70 User Manual
4
1.3.2 Mounting Option: [Attach on the back of
the monitor using Velcro]
Separate the Velcro pads and stick on the bottom of player. Stick the other Velcro pads onto the
back of monitor, then attach the player to it. Use HDMI cable to connect player and the monitor.
1.4 Physical View
Planar ContentSmart MP70 User Manual
5
1.4.1 Physical features (left to right in
previous illustration)
Planar ContentSmart MP70 User Manual
•
S/PDIF audio out
•
HDMI 2.0 connector for digital video and audio combined output
•
DC input port
•
Wireless antenna post
•
Kensington lock hole
•
Micro USB for ADB , Android debug console port
•
Ethernet port for network content update
•
Micro SD card slot
•
3.5 mm jack audio out
•
USB ports for USB content update and configuration
•
Reset button to perform factory reset
•
Power/Status LED indicator
6
2
Configuring the Player
2.1 System Connections
Connect to a monitor via an HDMI cable.
When using an HDMI connection, audio is sent along with video over the HDMI cable,
so no additional cables are required.
Attach the AC power adapter to power on the unit. After approximately 15 seconds, the booting
animation will be displayed on screen as shown below:
Figure 2.1.1
The boot-up process takes approximately 40 seconds to complete.
Figure 1.1.2
Planar ContentSmart MP70 User Manual
7
After boot-up completes, player will stay in Basic settings menu if no content service has been
configured (i.e. first boot-up for brand new unit or after a factory reset).
Note: If you have already sent content to the player, content will play back
automatically after 15 seconds after boot-up.
2.2 Basic Settings
A USB mouse must be attached to the player to configure settings. If the display has a HIDcompliant touch screen, a USB mouse is not required and all the click action can be replaced by
tap actions.
Figure 2.2.1
Basic Settings:
Network
Time zone
Content
Each time the Basic settings menu is entered, playback will automatically begin after 15 seconds
if content services have been previously set. Auto playback can be canceled by clicking on the
button before the countdown ends.
User is able to enter Advanced Settings by clicking the Advanced button.
To enter the menu system at any time during playback, plug in a USB mouse and
hold the left mouse key in the corner area as shown below for 10 seconds. If the
player has touch screen, tapping and holding in the corner areas for 10 seconds
will also bring you to the menu.
Figure 2.2.2
Planar ContentSmart MP70 User Manual
Note: Player will ask for password if password has been configured.
8
2.3 Connect the Player to Your Network
2.3.1 Wireless connection
Click the Wireless LAN setting to launch the wireless configuration UI.
Figure 2.3.1
Click the ON/OFF button as indicated below to turn ON Wireless interface (network).
Figure 2.3.2
The player will scan for wireless signals nearby and available access points will be listed.
Planar ContentSmart MP70 User Manual
9
Figure 2.3.3
Click on the network ID to connect. If the network requires authentication, you will be asked to
provide a password.
Figure 2.3.4
2.3.2 Static IP – manually assign network IP
address
1
Planar ContentSmart MP70 User Manual
Check the box that says "Show advanced options"
10
Figure 2.3.5
Click down arrow to hide keyboard if needed.
You can also scroll down/swipe to see the rest of the menu.
2
Under IP settings, change DHCP to Static.
Figure 2.3.6
3
Fill the form and click Connect to complete the setting.
(Scroll down/swipe to see the rest of the menu if needed)
Figure 2.3.7
2.3.3 Wired connection
To use the wired Ethernet connection, connect an Ethernet cable. Ethernet connection takes
priority over wireless connection.
DHCP – Automatically assign network IP address
Planar ContentSmart MP70 User Manual
11
1
Turn on Ethernet by checking the “Use Ethernet” box. If using DHCP, no
further action is required.
Figure 2.3.8
Static IP – Manually assign network IP address
1
Click Static IP Settings to configure static IP address.
Figure 3
2.3.4 Proxy settings
1
Planar ContentSmart MP70 User Manual
In Basic settings, click the Advanced button and the advanced configuration
menu will be launched.
12
Figure 4.10
2
Click Network, then click Advanced.
Figure 2.3.11
3
Planar ContentSmart MP70 User Manual
Proxy setting menu will be launched. Input proxy hostname and port, then
click Done to finish configuration.
13
Figure 2.3.12
2.3.5 Show IP settings
1
In Basic settings, click the Advanced button and the advanced configuration
menu will be launched. (Figure 12)
2
Click Network, then click Show IP.
Figure 2.3.13
3
This feature is to control whether the IP address is displayed in the Basic
settings menu. This is enabled by default. When disabled, basic settings will
display “connected” instead of the assigned IP address.
Figure 2.3.14
Planar ContentSmart MP70 User Manual
14
2.4 Time Zone Settings
1
In Basic Settings, click Time zone.
Figure 2.4.1
2
Choose the correct time zone from the available options.
Figure 2.4.2
2.5 Content Settings
1
Planar ContentSmart MP70 User Manual
Click the Set content button.
15
Figure 2.5.1
2
Input the SMIL/HTML5 content URL and click Set. It will return to Basic
Settings automatically.
Figure 2.5.2
3
The player will check the availability of SMIL/HTML5 content URL, with the
Play button showing Checking…
The checking action can be canceled by clicking Checking… button. It will change back to
Play.
Planar ContentSmart MP70 User Manual
16
NOTE: It is highly recommended to let the player check the availability of the content URL.
Clicking Play button with a bad/invalid URL set will cause the player to reboot if the
FailSafe function is not configured.
Figure 2.5.3
4
If the SMIL/HTML5 content URL is available, the Play button will change to a
15-second countdown and the playback will start after the countdown. The
countdown can be canceled by clicking the button.
If it keeps showing Checking… for a long time, go back to Set content to check the
correctness of the URL.
Figure 2.5.4
Planar ContentSmart MP70 User Manual
17
2.6 Player Information
Users can check the player’s basic information including the Health status, Firmware version and
Player ID.
1
Click the Advanced button and the advanced configuration menu will be
launched.
Figure 2.6.1
2
Click on Information. The definitions of the Health Status are:
Green – Normal. The device is connected to the URL server.
Blue – Local. The device is playing content from the USB drive or SD card.
Gray – Disconnected. The device is disconnected.
Planar ContentSmart MP70 User Manual
18
Figure 2.6.2
2.7 Content Configuration – AppStart
Users can assign the URL and APP for execution right after the system starts up.
Planar ContentSmart MP70 User Manual
1
Click the Advanced button. (Figure 2.6.1)
2
Click on Content, then click on AppStart.
3
Enter the valid URL of HTML/SMIL in AppStart (Figure 2.7.1). If you already
configured SMIL/HTML5 content URL via ”Set content” (Figure 2.5.2), the URL
would be showed here.
4
The Advanced option is used for 3rd-party App configuration only.
19
Figure 2.7.1
2.8 Content Configuration – FailSafe
Users can assign the URL and APP for execution while the system has failed to play the assigned
content.
Planar ContentSmart MP70 User Manual
1
Click the Advanced button and the advanced configuration menu will be
launched. (Figure 2.6.1)
2
Click on Content, then click on FailSafe.
3
Enter the URL of HTML/SMIL in FailSafe.
4
The Advanced option is used for 3rd-party App configuration only.
20
Figure 2.8.1
2.9 Content Configuration – EasyPlay
The EasyPlay features allows the player to play media content from the USB flash drive (or
MicroSD card) directly. Please note that media files are not copied to player’s internal storage so
the USB flash drive (or Micro SD card) must not be removed.
When EasyPlay is enabled, the player will play content only from the USB drive (or MicroSD
card). If a user wants to play content from the URL server configured via ”Set content”, EasyPlay
must be disabled.
Planar ContentSmart MP70 User Manual
1
Insert USB drive or MicroSD card containing media content to play.
2
Click the Advanced button. (Fig. 2.6.1)
3
Click on Content, then click on EasyPlay.
4
Click Disabled/Enabled button to enable EasyPlay and choose from 2
available operation modes: Photo Mode and Movie Mode.
21
Figure 2.9.1
Configure Photo Mode:
1
Click on Photo for choosing photos and music. Click on the buttons as marked
in red below and select the directories for photos and music from the USB
drive.
2
Click Set button after selecting the directories.
Figure 2.9.2
Planar ContentSmart MP70 User Manual
22
Configure Movie Mode:
1
Click on Movie. Click on the button as marked in red below and select the
directory for movies from the USB drive.
2
Click Set button after the folder is selected.
3
The files in the selected folders will be played after clicking the Play button in
the Basic or Advanced settings menu.
Figure 2.9.3
EasyPlay Schedule Configuration:
1
Click the Advanced button. (Fig. 2.6.1)
2
Click on Content, then click on Schedule.
3
Click on the buttons marked in red below to enable/disable the EasyPlay
schedule for each time slots.
Type the scheduled time in the dialogue boxes marked in blue below by using the pop-up
keyboard or the USB keyboard.
Planar ContentSmart MP70 User Manual
23
Figure 2.9.4
4
The "On" times assigned in the time slots A-E are inclusive. For example, a
schedule assigned per the example below:
Figure 2.9.5
The exact playback time will be the time slots marked in blue as shown in figure 2.9.6. The
dark blue parts are the overlap time of C/D and D/E.
Planar ContentSmart MP70 User Manual
24
Figure 2.9.6
2.10
Display Settings
Resolution Settings:
For best quality, set the output resolution to match your display’s native resolution to avoid
image scaling and blur.
If you are connecting an LCD computer monitor, projector or plasma display, refer to the device
specifications for optimal settings.
Planar ContentSmart MP70 User Manual
1
Click the Advanced button and the advanced configuration menu will be
launched. (Fig. 2.6.1)
2
Click the Display/sound button, then click on Display. The Display Settings
page will be launched.
25
Figure 2.10.1
3
Click on Resolution and select suitable resolution from the pop-up menu.
The default configuration is Auto Detect - player will auto detect and use the
best optimized resolution that your display supports.
Figure 2.10.2
Planar ContentSmart MP70 User Manual
26
Figure 2.10.3
Screen Orientation:
Screen orientation is to set the display to rotate 90/180/270 degrees.
4
Click the Advanced button and the advanced configuration menu will be
launched. (Fig. 2.6.1)
5
Click the Display/sound button, then click on Display. The Display Settings
page will be launched. (Fig. 2.10.1)
6
Click on the Screen orientation marked in red below.
Figure 2.10.4
7
Planar ContentSmart MP70 User Manual
Click on the preferred angle from the menu.
27
Figure 2.10.5
2.11
Sound Settings
To control the output sound volumes and touch sounds:
1
Click the Advanced button and the advanced configuration menu will be
launched. (Fig. 2.6.1)
2
Click the Display/sound button, then click on Sound. The Sound Settings
page will be launched.
Figure 2.11.1
3
Planar ContentSmart MP70 User Manual
Click on Volumes and the Volumes settings page will be launched. Drag the
blue sliders to adjust the volumes for the selected options, then click OK to
save the new settings.
28
Figure 2.11.2
Figure 2.11.3
2.12
System Configuration – Player Name
The player’s name can be specified so the player can be easily recognized in the management
software (Management software support is required).
Planar ContentSmart MP70 User Manual
1
Click the Advanced button and the advanced configuration menu will be
launched. (Fig. 2.6.1)
2
Click on System, then click on Player name.
3
Input a name for the field and click Set.
29
Figure 2.12.1
2.13
System Configuration – Security
A password can be set to provide authentication for player access. If the password is set, a
password prompt will appear if a user is trying to enter the Basic settings menu from playback.
1
Click the Advanced button and the advanced configuration menu will be
launched. (Fig. 2.6.1)
2
Click on System, then click on Security.
3
Input a password in the field and click Set.
Figure 2.13.1
Planar ContentSmart MP70 User Manual
30
2.14
System Configuration – Time Server
The feature allows users to synchronize player’s time with the web server where the appStart
URL hosted. It is disabled by default.
When disabled, the player synchronizes it’s time with Android default time server (pool.ntp.org).
This requires an internet connection.
When enabled, player synchronize it’s time with the web server where the appStart URL hosted
(based on http response header’s time).
1
Click the Advanced button and the advanced configuration menu will be
launched. (Fig. 2.6.1)
2
Click on System, then click on Time server.
3
Click the Use AppStart URL as time server button as marked in red below to
enable/disable the time server function.
4
Click on Set to save the setting.
Figure 2.14.1
2.15
System Configuration – Scheduled Reboot
The Scheduled Reboot feature allows the player to reboot on the assigned time automatically
every day.
Planar ContentSmart MP70 User Manual
31
1
Click the Advanced button and the advanced configuration menu will be
launched. (Fig. 2.6.1)
2
Click on System, then click on Scheduled Reboot.
3
Click the Enable daily reboot button as marked in red below to
enable/disable the daily reboot function. Click on the dialogue box to set the
time. The value can be entered with the pop-up keyboard or USB keyboard.
4
Click on Set to save the setting.
Figure 2.15.1
2.16
System Configuration - Firmware Update
Firmware updates can be performed by using a USB flash drive. Please read the release notes
regarding the changes that will be made to your player before applying the upgrade.
IMPORTANT: DO NOT unplug the USB drive or power down the player while the system is
performing the firmware update.
1
Download the latest firmware from http://www.planar.com/contentsmart
and copy it to the root directory of a USB drive.
2
Plug in the power cord into the device.
3
After the boot-up completes, click the Advanced button on the Basic
settings menu. (Fig. 2.6.1)
Planar ContentSmart MP70 User Manual
32
4
Click on System, then click Firmware update.
5
Click on OK to begin the firmware update.
Figure 2.16.1
6
Plug in the USB drive while the screen shows “Scanning USB drives for
firmware package.”
Figure 2.16.2
2.17
System Configuration – Expansion storage
Users may use a MicroSD card for content storage in place of the main device storage. Please
note that internal storage is disabled when using a MicroSD card.
Planar ContentSmart MP70 User Manual
33
2.17.1 Manual Expansion
1
Power off device.
2
Insert Micro SD card, then plug in power cord to power on.
3
In the Basic settings menu, click the Advanced button and the advanced
configuration menu will be launched. (Fig. 2.6.1)
4
Click on System, click on Expansion storage and click Initialize. Player
will format Micro SD card then reboot by itself.
Figure 2.17.1
Figure 2.17.2
5
Planar ContentSmart MP70 User Manual
After boot up, check player information and new capacity will be
displayed.
34
Figure 2.17.3
2.17.2 Auto Expansion
In the Basic settings menu, click the Advanced button and the advanced
configuration menu will be launched. (Fig. 2.6.1)
Click on System, click on Expansion storage and enable auto-format.
Figure 2.17.4
Power off device.
Insert Micro SD card, then plug in power cord to power on.
Planar ContentSmart MP70 User Manual
35
After boot up, check player information and new capacity will be
displayed. (Fig 2.17.3)
2.18
System Configuration - Factory Reset
If you forget the system password you have set, you must reset the system to regain access to
the player.
2.18.1 Using the reset button
PRESS and HOLD the reset button with a pin.
RE-CONNECT the power cord.
WAIT until the status LED flashes.
RELEASE reset button and wait for system to initialize.
2.18.2 Using a USB mouse
System reset will re-initialize the system, clear passwords and return settings to their default
values. Perform the following:
CONNECT a USB mouse or using touch screen for input.
Click the Advanced button and the advanced configuration menu will be
launched. (Fig. 2.6.1)
Click on System configuration and choose Factory default.
Click on OK button to perform the system reset.
Planar ContentSmart MP70 User Manual
36
Figure 2.18.1
2.19
System Configuration – Power Save
The Power Save feature allows the player to power off automatically while staying at the Basic
settings menu without any action taken for 10 minutes.
Planar ContentSmart MP70 User Manual
1
Click the Advanced button and the advanced configuration menu will be
launched. (Fig. 2.6.1)
2
Click on System, then click on Power save.
3
Click the Enable Power Save mode button as marked in red below to
enable/disable the power save function.
4
Click on Set to save the setting.
37
Figure 2.19.1
3
Content Management
Please refer to the Planar ContentSmart User Manual for instructions.
4
Authoring in HTML5
A major advancement in the player is the ability to playback HTML5
content which can contain dynamic information.
To find out more about using HTML5 for digital signage, visit
http://www.digisignage.com/
5
Working with SMIL
The player uses open communications protocols for content presentation and playback control.
SMIL-compliance means predictable results across multiple devices. SMIL’s non-proprietary
nature means that your investments are never obsolete.
5.1 Introduction
Planar ContentSmart MP70 User Manual
38
Using SMIL (pronounced “smile”), the language created by W3C for multimedia
communications, the media player understands the language “spoken” by professional tools
from companies such as Adobe, Apple, Microsoft, and Real Networks. What this means is quicker,
easier, and better integration of your players into your digital signage networks, opening up
avenues of software controls and realizing the full potential of your player hardware down the
road.
5.2 www.a-smil.org for Developers
The media player operating system utilizes W3C SMIL as the underlying scripting language,
which lends well to customization to your project management needs. For resources, downloads
and community support, visit www.a-smil.org.
6
Video format
support
MP70 Specifications
H.264/AVC up to 2160p @24fps (3840x2160)
MPEG-4 up to 1080p @60fps (1920x1080)
MPEG-2 up to 1080p @24fps (1920x1080)
MPEG-1 up to 1080p @60fps (1920x1080)
VC-1 up to 1080p @30fps (1920x1080)
H.265/HEVC: 4k @60fps (4096x2160)up to 50Mbps bit
rate
Image format
support
JPEG
Audio codec
support
MPEG Audio (MP3)
Dynamic content
W3C HTML5 (HTML, CSS, JavaScript)
PNG
W3C SMIL 3.0 instructions (sub-set)
Physical I/O
connectors
HDMI 2.0
USB 2.0 x 2
RJ45 Ethernet port (Giga LAN)
Wi-Fi antenna port
Micro USB for ADB
Planar ContentSmart MP70 User Manual
39
Micro SD card slot
Audio out (3.5mm Analog, S/PDIF)
LED: Power/Status
Local storage
8 GB eMMC
Micro SD card expansion slot
Accessories
AC adapter
HDMI cable
Wi-Fi antenna
Velcro ( 2 sets )
Micro SD card slot bracket/screw x1
Power jack bracket/screw x1
Power requirement
12V 1.5A DC
Power
consumption
5W
Environmental
Operating temperature: 0 – 50°C
Humidity: 5 – 85% @ 45 °C non-condensing
Dimensions
Top housing: 5.65x 4.16x1.32 inches
(143.60x105.90x33.65mm)
Base: 5.65x5.04x1.32 inches (143.60x128.13x33.65mm)
Weight
1.05 lbs (478 g)
Certifications
CE, FCC, IC, RoHS
Warranty
Three years
Planar ContentSmart MP70 User Manual
40
7
Technical Support
7.1 FAQ
The operation indicators light up but no video is displayed on the screen
Ensure that your video cable (HDMI) is securely connected. When using an HDMI
connection, choose high quality, certified HDMI cable or try using shorter length cables.
Check if your monitor is turned on and the correct video input source is selected.
What video format can I play?
Video files encoded in MPEG-4 AVC up to 1920x1080 resolution at 10 Mbps bitrates or
HEVC H.265 up to 20 Mbps bitrates should play fine. If a certain video does not played
as scheduled, or if it plays poorly contact Planar Support.
The player is placed near my Wi-Fi access point yet the connection is unreliable.
Wi-Fi appliances in general should be placed 10 feet (3 meters) from the Wi-Fi access
point for reliable operation. Try relocating the access point further away from the player
to improve connection.
If both Ethernet & Wi-Fi are connected, which one will take precedence?
If both connections are available, Ethernet will be used.
What should I do if I forgot my password?
Perform a factory reset.
Use the S/W RESET button located at the back of the media player to restore factory
settings. This will also clear the player’s password.
How do I manage the playback of contents?
The media player is designed to be interoperable with leading 3rd party management
software solutions or via SMIL open standard commands.
Can the player display Flash or Microsoft PowerPoint presentations?
The player features limited PowerPoint support, but not Flash support.
While PCs can play many formats with varying degrees of success, RISC-based media
players are designed to reliably play specific video formats (see spec for details). While
Microsoft PowerPoint native files cannot play directly on a RISC-based player, the file
can be converted into an image format to be played as an image slideshow.
Planar ContentSmart MP70 User Manual
41
Why won’t some media files play properly?
The video data bit-rate used may have exceeded the recommended bit rate.
The video data bit-rate is the amount of video or audio data used per second to store or
play the contents, usually expressed in Mbps (mega-bits per second). Video encoded
with excessive bit-rates will not playback smoothly in the media player, likely due to
storage I/O bottleneck.
Visit http://www.planar.com/contentsmart for compatible media format presets.
The media playback looks different on a PC compared to the media player’s screen.
(Wrong aspect ratio)
There are 2 major aspect ratios (width-to-height ratios) for video content, but there are
many kinds of displays. If you play 4:3 video on a 16:9 display (or vice versa), a circle
becomes oval and the picture takes on a squeezed or stretched look. To avoid this
distorted look, adding black bars are a common technique.
The Network Media Player can be configured to automatically add black bars for certain
types of displays. You can set the output resolution in the player’s configuration menu
to match the native resolution of your display.
Some JPEG images cannot be played in the media player.
The media player works best with 4K UHD (3840 x 2160) images. Playback of native
images directly from the camera may result in an image being displayed incorrectly or
not at all.
Does the media player support video streaming?
No. Media players play files from local storage and do not support real-time video
streaming over the network. This delivers an optimum viewing experience free of
playback quality issues such as stuttering, blocking or blue-screens.
The player is not playing. What should I do?
Play list errors and scheduling issues are two major causes of playback problems. To
determine if the problem is caused by a bad playlist, delete the playlist and restart the
player. The player should loop through all media files, indicating a fault with the playlist.
If the playback is scheduled to play at specific time, check to see if the device is set to
the right time zone on the world clock. If nothing appears wrong, the time zone setting
is often the reason the program is not played.
The video is playing but I can’t hear any sound, what should I do?
Planar ContentSmart MP70 User Manual
42
Check volume (mute) settings on monitor.
Planar ContentSmart MP70 User Manual
43
7.2 Planar Support
7.2.1 Cables and Accessories
To find cables and accessories for your Planar monitor, touch screen or other Planar products
visit our online store at www.PlanarOnline.com.
7.2.2 Contact Planar
Visit Planar at www.planar.com/Supportfor operations manuals, touchscreen drivers, warranty
information and access to Planar's Technical Library for online trouble shooting. To speak with
Planar Customer Support, have your model and serial number available and call:
Planar Support
Tel:
1-866-PLANAR1 (866-752-6271) or +1 503-748-5799 outside the US
Hours: 24 hours a day, 7 days a week
Toll or long distance charges may apply.
Planar ContentSmart MP70 User Manual
44
Planar Systems, Inc.
Customer Service
24x7 Online Technical Support: www.planar.com/Support
1195 NW Compton Drive
Beaverton, OR 97006-1992
Tel: 1-866-PLANAR1 (866-752-6271), +1 503-748-5899 outside the United States
Hours: 24 hours a day, 7 days a week
© 2015 Planar Systems, Inc.
9/2015
Planar is a registerd trademark of Planar Systems, Inc. Other brands and names
are the property of their respective owners. Technical information in this
document is subject to change without notice.
020-1291-00A