1
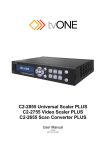
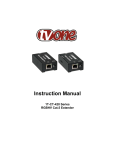
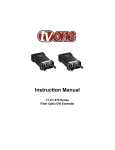
tvONE USA North, Central and South America 2791 Circleport Drive Erlanger, KY 41018 USA tvONE EMEA Europe, Middle East, Africa and Asia Pacific Continental Approach Westwood Industrial Estate Margate, Kent CT9 4JG, UK Tel +1 859-282-7303 Fax +1 859-282-8225 Tel +44 (0)1843 873300 Fax +44 (0)1843 873301 Sales: [email protected] Tech support: [email protected] Sales: [email protected] Tech Support: [email protected] C2-2855/2755/2655 Quick Start Guide www.tvone.com 1 Unpack the contents of the box: 1 x tvONE C2 device, 1 x 12V DC Power Supply Unit + 1 x IEC cable, 1 x USB Pen Drive (contains the user manual & software), 4 x Rubber Feet, 1 x Safety Information Sheet 1 x Product Registration Card 2 Connect your unit Connect your A/V input devices and output devices . Optionally, connect to your network via Ethernet or a local PC via RS232 (required for remote operation, stills and logo management and firmware updating) . Finally plug in the locking power supply and apply power to the unit . The unit will power on automatically. 3.5mm - PC/HD IN + 12V DC INPUT CONNECTIONS: PC/HD (HD15), YC (Mini DIN), CV (BNC), AUDIO (3.5mm & Phoenix Connectors), HDMI, DVI-U (DVI-D, DVI-A + via adapters HDMI, PC/HD, CV & YC), 3G/HD/SD-SDI (BNC) ETHERNET YC IN HDMI IN A1 AUDIO STEREO A2 A3 OUT CV OUT CV IN DVI-U IN DVI-U OUT RS 232 YC OUT HDMI OUT SDI OUT SDI IN LOCKING 12V POWER CONNECTION The OLED display shows the location within the menu structure and current unit setup. SCALED OUTPUT CONNECTIONS: AUDIO (Phoenix Connectors), CV (BNC), YC (Mini DIN) DVI-U (DVI-D, DVI-A + via adapters HDMI, PC/HD, CV & YC), HDMI, 3G/HD/SD-SDI (BNC), CONTROL & UPLOAD CONNECTIONS: ETHERNET, RS232 depending upon the version you have purchased. Status indicators show the current unit setup. Back button navigates back through menu. Buttons 1 - 6 for Source selection, Menu items and recalling Presets Press and hold power button Current Menu Location. Active Selection. Preset Button used to toggle Preset mode Current Menu Navigation Position. Navigation Hints. Toggle to access buttons 7 - 12. Press and Hold for Shortcuts. Buttons to navigate and select menu items. Valid selections are illuminated. Hold ‘ok’ button to save system settings 3 Menu Overiew Setup Your C2 unit has 3 sets of Menus: LIVE The LIVE menu set provides operator functionality and is used for Preset Recall, Source Selection, Picture-in-Picture (PIP) Control, Swapping Layers, Keying, Audio Routing, Logo Selection, Image Freezing, Transition Selection. • System • Sources/Outputs • Presets • Layers • Transitions 4 Live Shortcut • Preset Control • Source Selection • View • Keying • Freeze • Logos • Source • Audio Switching Sources From the HOME menu on the display. Use the cursors to highlight the ‘Live’ menu and select it with ‘ok’. Use the same method to navigate into either the “Primary” or “Background” menus. SETUP This menu set is used to configure System settings, Inputs, Outputs, Layers, Presets and Transitions. Select your video source using either the , and ‘ok’ buttons or the accelerator buttons 1-6. SHORTCUT This menu is used to access all operational shortcuts. Press to navigate back up the menu tree. 7 5 Layering Control Your unit can control layering of Logos, Primary & Background video and a Back Color. This adds great flexibility to simply control layering and external referencing. The Primary Layer can have Scaling, Keying and Aspect Ratio Correction (ARC) applied. The Back Color is a user defined RGB color that is always behind the other layers. It is always present but is hidden if other layers are selected full screen. Logos can be imported using the CORIOcontrol Software. Logos are always in front of other layers. They can be positioned and their opacity can be changed. They cannot be scaled. Primary Layer can be any input or still image. This layer can be scaled, keyed and have Aspect Ratio Correction applied. Background Layer can be any video input. 8 7 Status Indicators Keying on Logo visible Primary Freeze on Primary Layer Background Layer Full Screen Full Screen & Genlocked* Picture-in-Picture Hidden & Genlocked* Hidden Hidden & Framelocked† Genlock* - Output is automatically set to match the exact Background Source Width, Height & Frame Rate. Framelock† - Output is set to a user defined resolution which must exactly match the frame rate of the Background Source (only supported by some resolutions – see manual) None (Scaler) 9 Panel Shortcuts Presets To Recall a Preset press To Capture a Preset press To Delete a Preset press then press a “1 - 6” button. then press & hold a “1 - 6” button. , then press & hold a “1 - 6” button for longer than Capture. To Load the Default Preset press & hold the Preset Button To Access Presets 7 - 12 toggle the ALT button and use buttons “1 - 6” Navigation To exit a menu press the Back Button Saving To Save Current Settings, press & hold the ‘ok’ button with “Settings Saved”. until the unit acknowledges Reset To Reset Settings press the ‘ok’, Back & Power buttons together for 5 seconds. Reset Settings does not affect Presets, Still images or Logos already saved to the unit. Panel Lock To Lock/Unlock the Panel press and together. Shortcut Menu The Shortcut Menu accesses frequently used menu items either through the menu or numeric pad. To go to it press & hold the ALT button . Shortcut options are: 1 - Views, 2 - Keying, 3 - Freeze, 4 - Logos, 5 - Source and 6 - Audio. 10 7 Changing View Mode From the HOME menu on the display. Use the cursors to highlight the ‘Live’ menu and select it with ‘ok’. Use the same method to navigate into either the “Primary” or “Background” and then “View” menu. The Primary source can be either Full Screen (default), PIP (Picture-In-Picture) or Hidden. The Background source can be Full Screen, Hidden - note this effects the output resolution, or None meaning the unit operates as a Scaler. 6 Changing Output Resolutions From the HOME menu on the display. Use the cursors to highlight the ‘Setup’ menu and select it with ‘ok’. Use the same buttons to navigate to the “Output,” “Video”, and then “Resolution” menu. Press ‘ok’ to allow you to change the resolution. Use the and to select the resolution you require. Press ‘ok’ to confirm your selection. The factory default is 1280x720p 60Hz. Note: Setting the Output Resolution only works when Live\Background\View Mode is set to “None (Scaler)”. Live Menu Map Live • • • • • • • • • • • • • • • • • • • • • • • • • • • • • • • • • - Primary Background Audio Layer Order Keying Freeze Presets Logo Transition • • • • • - View DVI-U HDMI SDI PC/HD YC CV Still #1 - #5 View - Fullscreen PIP Hidden • - Fullscreen (Genlock) Hidden - Framelock - Genlock None (Scaler) DVI-U HDMI SDI PC/HD YC CV DVI-U HDMI SDI Follow Primary Follow Background Mute A1 A2 A3 3.5mm P/B (Primary in front of Background) B/P (Background in front of Primary) On Off On Off Load Default None #1 - #12 None #1 - #5 <choose effect> Information on the Setup Menu settings is contained in the manual.