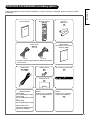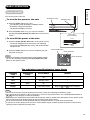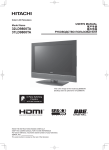
1
USER’S MANUAL USER’S MANUAL MANUEL UTILISATEUR BEDIENUNGSANLEITUNG MANUAL DEL USUARIO MANUALE D’USO BRUKSANVISNING BRUKERHÅNDBOK KÄYTTÖOPAS BRUGERVEJLEDNING GEBRUIKSAANWIJZING ǼīȋǼǿȇǿǻǿȅ ȋȇǾȈȉǾ UŽIVATELSKÁ PěÍRUýKA PODRĉCZNIK UĩYTKOWNIKA FELHASZNÁLÓI KÉZIKÖNYV Colour LCD Monitor Model Name UT32MH70U UT32MH70E UT37MX70U UT37MX70E UT42MX70U UT42MX70E Model UT32MH70U is depicted. READ THE ENCLOSED INSTRUCTIONS CAREFULLY. KEEP THIS USER’S MANUAL FOR FUTURE REFERENCE. Record the serial number of your monitor for future reference. SERIAL NO. This serial number is located on the back of the monitor. Ver. 1 ENGLISH USER’S MANUAL Thank you for purchasing the Hitachi LCD Monitor. Please read this user’s manual carefully before operating this product. To ensure proper operation, please read and follow ALL the instructions, especially the “IMPORTANT SAFETY INSTRUCTIONS” and “SAFETY PRECAUTIONS”. Please keep this user’s manual for future reference. Ver. 1 CONTENTS IMPORTANT SAFETY INSTRUCTIONS .............1 INTRODUCTION................................................2 About This Manual ...................................................... 2 Trademark Credits ...................................................... 2 Software...................................................................... 2 Information for users applicable in European Union countries ........................................................... 2 Features...................................................................... 2 SAFETY PRECAUTIONS ...................................3 Important for United Kingdom ..................................... 3 Explanation of the Symbols ........................................ 3 Cleaning and Maintenance ......................................... 7 Main Unit Installation .................................................. 8 Anti-tumble Measures ................................................. 8 ABOUT LCD PANEL ..........................................9 Common Characteristics of the LCD Panel ................ 9 SUPPLIED ACCESSORIES (including option)...10 COMPONENT NAMES .....................................11 Main Unit................................................................... 11 Remote Control......................................................... 12 PREPARATION ................................................13 Remote Control Battery Installation .......................... 13 Handling the Remote Control ................................... 13 Caution When Moving the Main Unit ........................ 13 CONNECTION .................................................14 1. Connect Power Cord to the Rear Panel ............... 14 2. Connect your External Equipment (if any) to the Unit ............................................................. 14 Connecting Equipment with HDMI or DVI Output Terminal........................................... 14 Connecting to Equipment with Video Output Terminal.................................................. 15 Connecting to PC ............................................... 16 3. Attach Cushion, Secure with Clamps and Fit Terminal Cover...................................................... 16 4. Connect the Power Plug into the Wall Socket ...... 17 BASIC OPERATION .........................................18 Power On/Off ............................................................ 18 Volume Up/Down ...................................................... 19 Mute .......................................................................... 19 Input Switching to HDMI and RGB ........................... 20 Input Signal Screen Display...................................... 20 SETUP OPERATION ........................................21 How to Use the On-Screen Display (OSD) System... 21 Select Language ....................................................... 21 Main Menu List ......................................................... 22 Watching Images from HDMI/Composite Input ........ 23 Setting Picture Adjustment .................................... 23 Reducing Noise ..................................................... 25 Making the Moving Image Smooth ........................ 26 Advanced Setting .................................................. 27 Viewing Images from a PC ....................................... 28 Setting Picture Adjustment .................................... 28 Advanced Setting .................................................. 29 FUNCTION ......................................................30 Size Switching .......................................................... 30 HDMI/Composite Signal Input ............................... 30 Display Size ....................................................... 30 Position Adjustment ........................................... 31 RGB Signal Input................................................... 31 Display Size ....................................................... 31 Power Save Mode .................................................... 32 When HDMI/Composite Input is Selected ............. 32 When RGB Input is Selected................................. 32 TROUBLESHOOTING ......................................33 When the Following Messages Appear on the Screen ........................................................... 33 Symptom and Checklist ............................................ 33 PRODUCT SPECIFICATIONS ..........................36 Signal Input ............................................................... 37 Recommended Signal List ........................................ 38 IMPORTANT SAFETY INSTRUCTIONS Please read these instructions thoroughly. Please retain these instructions for future reference. Heed all warnings and cautions to prevent potential danger. Follow all instructions. Improper handling could cause personal injury and/or serious damage to the unit that may shorten its service lifetime. Do not block any ventilation openings. Install the product in accordance with the manufacturer’s instructions. If problems occur during installation or operation of the product, before calling for technical support or service technicians, please read “TROUBLESHOOTING” ( 33 ~ 35 ) to determine the symptoms. If serious problems occur (such as smoke or an abnormal odor from the unit), unplug the power cord, and then, contact your local dealer immediately. 1 INTRODUCTION ENGLISH Thank you for purchasing the Hitachi LCD Monitor. We hope that you will enjoy the peak performance of this product. This LCD Monitor has been designed to comply with international standards. However, it could cause personal injury and property damage if improperly handled. In order to prevent potential danger and obtain maximum benefit from your set, please observe the following instructions when installing, operating, and cleaning the product. Keep this manual for future reference and record the serial number of your set in the space provided on the front cover page of this manual. About This Manual The information in this manual is subject to change without notice. This manual has been produced with the utmost care. If you have any comments or questions regarding this manual, please contact your local dealer or our Customer Service Centre. Before operating the set, please fully understand the prerequisites such as specifications or constraints for the hardware and software. We are not responsible and accept no liability for any loss, damage or injury as a result of misuse. Reproduction, copying, utilization, modification and/or transmission in whole or in part of this manual are prohibited except by prior written consent. All other products and company names used in this manual are trademarks or registered trademarks of their respective owners. Trademark Credits VGA and XGA are trademarks of International Business Machines Corporation. VESA is a registered trademark of the Video Electronics Standard Association. HDMI, the HDMI logo and High-Definition Multimedia Interface are trademarks or registered trademarks of HDMI Licensing LLC. Even if no special note has been made of company or product trademarks, these trademarks have been fully respected. Software It is illegal for you to alter, decompile, disassemble, decrypt, or otherwise reverse-engineer the software installed in this product. Information for users applicable in European Union countries This symbol on the product or on its packaging means that your electrical and electronic equipment should be disposed at the end of life separately from your household wastes. There are separate collection systems for recycling in EU. For more information, please contact the local authority or the dealer where you purchased the product. Features Ultra-slim-line LCD monitor. Large-screen and high-definition LCD. Enjoy high resolution display. (32 inch model: 1366 (H) x 768 (V) pixels, the other size model: 1920 (H) x 1080 (V) pixels) Improved digital signal processor. High quality sound with deeper, richer and dynamic bass tones. Accepts a digital input device with HDMI terminal. Enjoy the image from your PC with a large, high-definition LCD screen. Easy-to-use On-Screen Display system operated by remote control. Low power consumption with power saving feature. 2 SAFETY PRECAUTIONS For your safety, please read the following precautions carefully before using this product. Improper use would cause serious personal injury and/or damage to your property or the product. Important for United Kingdom IMPORTANT FOR UNITED KINGDOM WORDING FOR CLASS I EQUIPMENT INSTRUCTION BOOKS AND LABELS The mains lead on this equipment is supplied with a molded plug incorporating a fuse, the value of which is indicated on the pin face of the plug. Should the fuse need to be replaced, an ASTA or BSI approved BS 1362 fuse must be used of the same rating. If the fuse cover is detachable never use the plug with the cover omitted. If a replacement fuse cover is required, ensure it is of the same colour as that visible on the pin face of the plug. Fuse covers are available from your dealer. DO NOT cut off the mains plug from this equipment. If the plug fitted is not suitable for the power points in your home or the cable is too short to reach a power point, then obtain an appropriate safety approved extension lead or consult your dealer. Should it be necessary to change the mains plugs, this must be carried out by a competent person, preferably a qualified electrician. If there is no alternative to cutting off the mains plug, ensure that you dispose of it immediately, having first removed the fuse, to avoid a possible shock hazard by inadvertent connection to the mains supply. WARNING: THIS EQUIPMENT MUST BE EARTHED IMPORTANT Green & Yellow to Earth The wires in the mains lead are coloured in accordance with the following code : Green and Yellow = Earth, Blue = Neutral, Brown = Live. As these colours may not correspond with the coloured markings identifying the terminals in your plug, proceed as follows: Brown to Live The wire which is coloured GREEN and YELLOW must be connected to the terminal in the plug which is marked with the letter E or by the earth symbol or coloured GREEN or GREEN and YELLOW. The wire coloured BLUE must be connected to the terminal marked with the letter N or coloured BLUE or BLACK. The wire coloured BROWN must be connected to the terminal marked with the letter L or coloured BROWN or RED. Fuse Cord Clamp Blue to Neutral Explanation of the Symbols The following are the symbols used in this manual and affixed to the unit itself. Please fully understand the meanings of the symbols before reading the instructions in this section. WARNING Never ignore the instruction. There are risks of serious or fatal injury to the user. CAUTION Do not ignore the instruction. There are risks of personal injury and/or property damage. Other Symbols The triangle with illustration is intended to alert the users that there are risks of fire, explosion, or high temperature if the product is handled improperly. Each illustration within the triangle specifies the contents in detail. (The figure on the left is an example.) The circle with diagonal line and illustration indicates a prohibited action (the symbol to the left indicates that dismantling is prohibited). This symbol indicates a compulsory action. The contents are clearly indicated in or adjacent to an illustration (the symbol to the left indicates that the power plug should be disconnected from the power outlet). 3 SAFETY PRECAUTIONS (continued) ENGLISH WARNING There is a risk of fire, electric shock, or serious injury. ʄ If serious problems occur, unplug the power cord immediately. Serious problems such as: Smoke, abnormal odor or noise emitted from the product. No picture, no sound or distorted picture on the display. Foreign matter (such as water, metals etc.) entered the unit. Do not continue using the product under these abnormal conditions. Unplug the power cord, and contact your dealer immediately. For your safety, never try to repair the product yourself. Disconnect the plug from the power outlet. ʄ Do not allow liquids or any foreign matter (such as metals or flammable items) to enter the unit. If this does occur, unplug the power cord, and contact your dealer immediately. Exercise special caution when young children are around the unit. ʄ Do not remove covers, or modify the product. High-voltage components are installed inside of the unit. Removing covers can expose you to high -voltage electric shock, and other hazardous conditions. Contact your local dealer to perform servicing such as inspection, adjustment or repair work. Do not dismantle. ʄ Install the unit in a proper location where it does not expose anyone to danger. If you bump against the edges of the unit, you could be injured. ʄ Do not place any objects on top of the unit. Objects such as: Liquid containers (vase, fish tank, flowerpot, cosmetics or liquid medicine). If water or any liquid spills onto the unit, it may cause short-circuiting and result in fire or electric shock. If this occurs, unplug the power cord, and contact your dealer immediately. Do not place anything heavy on top of the unit. Do not climb on or hang from the unit. Do not allow your pets to get on top of the unit. ʄ Do not install the unit in an unsuitable location. This could cause a malfunction or in extreme cases danger of electric shock. Locations where high moisture is likely, such as bathrooms or shower rooms, close to windows, or outside where rain, snow or other inclement conditions could occur, should be avoided. Please also avoid installing the unit in a location where fumes from hot springs could come into contact with it. 4 SAFETY PRECAUTIONS (continued) WARNING There is a risk of fire, electric shock or serious injury. ʄ Unplug the unit in the event of a lightning storm. To reduce the risk of electric shock, do not touch the product when lightning occurs. Disconnect the plug from the power outlet. ʄ Do not do anything that may damage the power cord. Do not damage, modify, twist, forcibly bend, heat, or pull excessively on the power cord. Do not place heavy objects (including the unit itself) on top of the power cord. If the power cord is damaged, contact your dealer for repairs or exchange. ʄ Use only with designated power supply voltage. To prevent the risk of fire and electric shock, operate the product only with the power supply voltage indicated on the unit. ʄ Be careful not to drop or allow any impact to affect the unit. Take extra care whilst moving the unit. There is no protection glass on the surface of the LCD panel. Therefore do not press the panel surface with your fingers or hands. Also do not hit any objects against the monitor. These actions would damage the LCD cells or the panel surface and could cause failure or personal injury. In the event that you drop the unit or the cabinet is damaged, unplug the power cord and contact your local dealer immediately. Continuing use of the product under the above conditions may cause fire or electric shock. ʄ Clean dust or metals from on or around the pins of the power plug regularly. Continuing use of the product under the above conditions may cause fire or electric shock. Always unplug the power cord first, then clean the pins using a dry cloth. ʄ Do not place the unit on an unstable surface. Unstable surfaces such as: Tilted surface or shaky shelving, table, stand or trolley. If the unit falls down, this could cause personal injury. 5 SAFETY PRECAUTIONS (continued) ENGLISH CAUTION ʄ Do not place or use the unit in a dusty location. This could cause a malfunction. ʄ Do not cover or block any ventilation holes on the product. The unit would overheat and this could cause fire or damage to the product which may shorten its service lifetime. Install the product in accordance with the instructions in this manual. Do not place the unit with the ventilation side downward. Do not install the unit on carpeting or bedding. Do not cover the unit with table cloths etc. ʄ Be sure to ground the earth cable correctly. Especially when you use a power cord adapter, be sure to connect the earth cable to the ground terminal. Incorrect connection could cause fire or electric shock. For your safety, always make sure to unplug the power cord before connecting or disconnecting the earth cable. Connect the earth cable. ʄ Observe the anti-tumble measures described in this manual. If the unit tumbles over, there is a risk of personal, possibly fatal injury. Also, this would damage the product seriously. ʄ Do not install the unit near to medical devices. To prevent malfunction of medical devices, do not use the product and medical devices in the same room. ʄ Do not place a CRT-based television near the speakers of the LCD Monitor. This could cause partial discoloration or blurring of the image on the CRT-based television. Please install it away from the speakers of the unit. ʄ Disconnect all of the external connection cables and detach the anti-tumble measures before moving the unit. Otherwise fire, electric shock or personal injury may result. ʄ Connect the power plug securely. Improper connection will cause overheating and may result in fire. Do not touch the pins of the plug whilst connecting it to the wall socket. This could cause electric shock. If the plug is not suitable for the wall socket, contact your dealer for replacement. ʄ Do not handle the power cord with wet hands. This could result in electric shock. ʄ Do not pull the cord when you unplug the power cord. This may damage the cord and could result in fire or electric shock. Grip the plug when disconnecting it. ʄ Unplug the power cord when you do not intend to use the product for long periods of time. ʄ Handle the batteries properly. Improper or incorrect use of the batteries may cause corrosion or battery leakage, which could cause fire, personal injury or damage to property. Use only the types of batteries which are indicated in this manual. Do not replace batteries with used ones. Install the batteries correctly by observing the polarity (+ and -) indications on the battery compartment. Do not dispose of used batteries as domestic waste. Dispose of them in accordance with the local regulations. 6 SAFETY PRECAUTIONS (continued) PRECAUTIONS ʄ Do not install the unit in locations where it will be subjected to high temperature. This could damage the cabinet or components of the product. Do not install near any heat sources such as radiators, heating grilles, stoves, or other apparatus that produce heat. Keep the unit out of direct sunlight. Otherwise the resulting increase in temperature of the unit may cause a malfunction. ʄ Viewing Advice The lighting of the environment in which the product is used should be appropriate. Too bright/dark environments are not good for your eyes. Take time to relax your eyes occasionally. When you use the product, view from a distance equal to 3 to 7 times the height of the screen. This is the best viewing distance in order to protect your eyes against eyestrain. Adjust the volume to an appropriate level, especially during the nighttime. ʄ Transporting the product When the product needs to be transported due to moving or repair, use the carton box and buffer material that came with the product. Always transport the product upright; otherwise this could damage the panel glass or degrade the phosphors of the panel. ʄ Keep radios away from the unit whilst in use. The unit is designed to meet the international EMI standards to prevent radio interference. However, the unit may generate noise in the radio. If noise is heard on the radio, please try the following actions. Adjust the direction of the radio antenna in order not to receive interference from the unit. Keep the radio away from the unit. ʄ Infrared communication devices Infrared communication devices such as cordless microphones or cordless headphones may not operate properly around the unit. This is because of communication failure. Please note that this is not a malfunction. ʄ When you dispose of the product at the end of its service lifetime, follow the regulations in your residential area. For more information, contact the local authority or the dealer where you purchased the product. Cleaning and Maintenance Please make sure to unplug the power cord before cleaning the unit. ʄ How to clean the LCD panel of the unit. Wipe the panel with a lint-free and dry cloth in order to prevent damage to the panel surface. Do not use a chemical cloth or cleaners. Depending on the ingredients, these may cause discoloration and damage to the panel surface. Do not wipe with a rough cloth or rub hard. This may damage the panel surface. In case of greasy dirt such as fingerprints, wipe the panel surface with a lint-free cloth moistened with a diluted neutral detergent solution (dilute 1 part of detergent to 100 parts of water), and then wipe with a soft and dry cloth. Do not use a spray cleaner. This could cause a malfunction. ʄ How to clean the cabinet of the unit. The following may cause cracking, deformation and peeling of paint. Do not wipe the cabinet with benzene, thinners and other chemical products. Do not spray volatile solutions such as insecticide over the cabinet. Do not leave the cabinet in prolonged contact with plastic or rubber materials. Do not use a chemical cloth, cleaner or wax. Depending on the ingredients, these may cause cracking and deformation. Use a lint-free cloth (e.g. cloth for cleaning glasses) to clean the cabinet and control panel of the unit. In case of the excessive dirt, wipe with a soft cloth moistened with a diluted neutral detergent solution and then wipe with a soft and dry cloth. Never use the following detergents. They could cause cracking, discoloration and scratching. Acidic/alkaline detergents, alcoholic detergents, abrasive cleaners, soap powder, OA cleaner, car wax, glass cleaner, etc. 7 SAFETY PRECAUTIONS (continued) ENGLISH Main Unit Installation When installing the main unit, be sure to use the specified mounting units in order to obtain maximum performance and maintain safety. We assume no responsibility nor liability for personal injuries or property damage caused by use of other mounting units or improper installation. With respect to installation of the Tabletop stand, be sure to use the supplied Tabletop stand TS70T32KE for UT32MH70U/E, TS70T37KE for UT37MX70U/E or TS70T42KE for UT42MX70U/E. Please read User’s manual for the Tabletop stand very carefully before installation. *The Tabletop stand is attached to the monitor in pictures in this User’s manual. If using Wall or Ceiling Mounting units, contact your local dealer and ask for an approved installation specialist to set up the unit. Never attempt to install it yourself. That could cause injury or damage. Please make sure that there is adequate space around the unit to prevent overheating. Make sure not to block any ventilation holes. Do not install the unit in a small space such as inside a cabinet, closet or box. Leave at least 10cm of clearance from each side of the unit and 30cm from the top of the unit to ceiling. 10cm or more 30cm or more 10cm or more 10cm or more 10cm or more Anti-tumble Measures Install in a stable location and take safety precautions against to ensure that the monitor does not fall. Securing to a table Please secure to a table after installing the Tabletop stand. Fasten the fastening strap to a table using the wood screw provided.* *The fastening strap and the wood screw are packed with the Tabletop stand. Wood screw (4 x 20 screw) : 1 pc. NOTE Attach the fastening strap to the Tabletop stand before installing the Tabletop stand to the monitor. See User’s manual for the Tabletop stand about the procedure for attaching. Securing to ceiling or wall Use the specified mounting unit to secure the set to a ceiling or wall. NOTE For more information regarding mounting of the unit, please contact your dealer. Please install the unit in a proper location where it does not expose anyone to the danger of bumping themselves (for example their hands, head or face, etc) against the edges of the unit and causing personal injury. 8 ABOUT LCD PANEL Common Characteristics of the LCD Panel The following are common phenomena occurring when operating the LCD Panel, due to its structural characteristics. Please note that these are not malfunctions. Defective Spots on Panel The LCD panel is manufactured with high-precision technology. However, there might be some spots that are not illuminated, or are brighter than others, or are in different colours, etc. Surface on Panel The LCD panel displays images by the fluorescent lamps internally. This can raise the temperature of the display surface. In addition, do not allow any heavy impact to affect the surface of the panel because the LCD panel is made using fine processing glass. Use Under Low Temperature Conditions Because of the structural characteristics of the LCD panel, the response speed of the LCD panel becomes slower when the ambient temperature around the monitor becomes too low. In some cases, this may result in a residual image. The residual image will disappear of its own accord as the temperature rises again to a normal level. 9 SUPPLIED ACCESSORIES (including option) User’s Manual Remote Control 12 13 ENGLISH Check the supplied accessories before installation. In case of missing or damaged, please contact your dealer immediately. AA Size Battery X 2 13 Quick Guide/ Translation of On-Screen Display (OSD) Power Cord 14 17 UK only Except UK * The type of power plug provided is different depending on the model. HDMI Cable HDMI Cushion The Control Panel Label 14 16 17 16 11 Terminal Cover 17 Tabletop Stand TS70T32KE (for UT32MH70U/E model), TS70T37KE (for UT37MX70U/E model) or TS70T42KE (for UT42MX70U/E model) Option: D-sub15 pin - composite cable (TP-RGBCV02 S) Option: D-sub15 pin - extension cable (TP-ATRGB02) 15 16 Please read User’s manual for tabletop stand regarding installation. 10 COMPONENT NAMES Main Unit Front Panel q w y e r t u q w e r t y u Cabinet Panel Remote Control Receiver Indicating Lamp Speaker Illumination Lamp Tabletop Stand Control panel (on the underside) [Example: 32 inch model] l ; ( i o a s d f )( kj h g f d s a o i OK) (Ż) (Ź) (ź) (Ÿ) Power switch Control Terminal* Service use only PC (RGB)/DVI Analogue Audio Input Terminal PC Connection Terminal (D-sub 15 Pin) Reset button (See 33 ) g h j k l ; Ÿ button ź button Volume Up/Ź button Volume Down/Ż button Input Select/OK button Menu/Return button * The Control Terminal allows linked operation with a Hitachi Media Box which equips a control terminal with logo. The Control Panel Label The supplied Control Panel Label will help you to recognise the function of each button on the Control Panel more easily should you require it. q Face the front panel of the monitor and peel the Control Panel Label from the back of the sheet but be careful not to stick it to the monitor until you are sure of the correct position. w Align the label with the bottom of the cabinet and slide it to adjust so that each marking on the label meets the position of each button on the Control panel, and then press firmly to attach. Refer to the above diagram of the Control panel about the position. 11 COMPONENT NAMES (continued) ENGLISH Main Unit (continued) Rear Panel q Power Cord Socket w HDMI Input Terminal wq Please refer to 14 ~ 17 for detailed information regarding the connections. Remote Control Power On/Off Press this button to switch monitor On or Off standby. Power Off Press this button to switch monitor Off standby. RGB Input Select Press this button to select RGB (/Composite) input. Menu Cursor Power On Press this button to switch monitor On. Volume Up/Down Mute HDMI Input Select Press this button to select HDMI input. Recall Press this button to show the input signal status. OK Input Select Press this button to change input mode. HDMI RGB (/Composite) Auto Adjust Press this button to adjust the picture automatically in RGB mode. Return Press this button to return to the previous menu. Picture Mode Picture mode can be changed each time pressed in the following sequence. Dynamic Natural Cinema Size Press this button to change picture size. 12 PREPARATION Remote Control Battery Installation The remote control operates on 2 “AA” batteries. 1. Open the battery compartment cover Slide open the battery compartment cover on the backside in the direction of the arrow, and remove the cover. Handling the Remote Control Use the remote control within a distance of about 5m from the front of the unit’s remotecontrol sensor and within an angle of about 30 degrees on both sides. 2. Install the batteries Install 2 “AA” batteries (included) making sure the polarities match the indication inside the compartment. 3. Close the battery compartment cover Within 30 degrees Within 30 degrees About 3m About 3m Make sure the projections locate in the corresponding holes and slide the compartment cover until it clicks shut. About 5m CAUTION Risk of corrosion or battery leakage possibly resulting in physical injury and/or property damage including fire. Never mix used and new batteries in the device. Replace all the batteries in the device at the same time. Remove the batteries if the remote control is not going to be used for an extended period of time. To avoid possible malfunction, read the following instructions and handle the remote control correctly. Do not drop or allow impact to affect the remote control. Do not spill water or any liquid on the remote control. Do not place the remote control on a wet surface. Do not place the remote control under direct sunlight or near sources of excessive heat. Caution When Moving the Main Unit Whenever the unit is moved, two people are required to transport it safely. Whenever the unit is moved, it should be lifted forwards by holding the top and base on both sides of the unit for stability. 13 CONNECTION ENGLISH The unit is suitable for various kinds of connections. Make a connection in the following steps. Be sure to unplug the power cord from the wall socket first when connecting external equipment. 1. Connect power cord to the rear panel. 2. Connect your external equipment (if any) to the unit. 3. Attach cushion, secure with clamps and fit terminal cover. 4. Connect the power plug to the wall socket. 1. Connect Power Cord to the Rear Panel Connect the power cord to the unit. Do not connect the power plug to the wall socket until all other connections are completed. 2. Connect your External Equipment (if any) to the Unit Connecting to Equipment with HDMI or DVI Output Terminal The HDMI terminal can be connected to devices with HDMI output. If the external device has a DVI output, this can be connected using an HDMI-DVI cable. If the HDMI-DVI cable is used, connect analogue audio signal to the PC (RGB)/DVI Analogue Audio Input terminal. Please be sure to attach the supplied cushion around the HDMI cable when connecting. See 16 . [Example] DVD-Player IN OUT Set-Top Box HDMI [Example: 32 inch model] AUDIO (HDMI) or (HDMI) (HDMI) Camcorder (DVI) Home video game system AUDIO Information The HDMI (High Definition Multimedia Interface) is a multimedia I/O interface. Only one cable is used to transmit all video/audio/control signals, thus facilitating easy connection. Moreover, the digital signals can produce high quality data without any degradation. If your external device has an HDMI terminal, HDMI connection is recommended for higher quality picture and sound. NOTE PC (RGB)/DVI Analogue Audio Input terminal This terminal can be used in either one of the following cases only. q The external device is connected to the PC Connection terminal of the unit. w The DVI output of an external device is connected to the HDMI terminal using an HDMI-DVI cable. Make sure that the video and audio terminals are connected to the same external device. For details of the output format of an external device, refer to “Recommended Signal List” on 38 . We do not guarantee that all images from DVI connection can be displayed properly. HDMI terminal PC (RGB)/DVI Analogue Audio Input terminal PC Connection terminal 14 CONNECTION (continued) 2. Connect your External Equipment (if any) to the Unit (continued) Connecting to Equipment with HDMI or DVI Output Terminal (continued) HDMI-Interfaced System With “HDMI Control” function, you can interface the connected equipment through the HDMI terminal automatically if the connected equipment meets an industry standard “HDMI CEC (Consumer Electronics Control)”. 1. Press the button. Function HDMI Control Auto Input Change Off System Standby Off 2. Select “Function” menu. 3. Select “HDMI Control”. 4. Select “Auto Input Change” or “System Standby”. Select Return Exit Condition: whilst the monitor is in Standby mode. When the connected equipment starts (such as DVD playback and Disc insertion), the monitor is automatically turned On and switches the picture and audio to HDMI input. Off Auto Input Change On Condition: whilst the monitor is On. When the monitor is switched off or set to Standby mode, the connected equipment is also turned off or in Standby mode. Off System Standby On NOTE If an HDMI-DVI cable is used, this HDMI-interfaced system is not available. There may be a slight operation delay (e.g. switch On/Off the monitor or the connected equipment) when using this “HDMI Control” function. Please check if the connected equipment supports HDMI CEC and ensure that this operation is activated in the connected equipment before using this “HDMI Control” function. Connecting to Equipment with Video Output Terminal The unit can be connected to equipments having video output using the optional D-sub 15 pin - composite cable. [Example] IN OUT * VCR DVD player D-sub 15 pin AUDIO Set-Top Box AUDIO or Camcorder *Optional D-sub 15 pin - composite cable [Example: 32 inch model] Home video game system NOTE Refer to 15 27 for details of switching between RGB and Composite input. CONNECTION (continued) ENGLISH 2. Connect your External Equipment (if any) to the Unit (continued) Connecting to PC The PC connection terminal (D-sub 15 pin) + the PC (RGB)/DVI Analogue Audio Input terminal are connected to the PC, allowing an analogue RGB signal. IN OUT [Example] D-sub 15 pin AUDIO AUDIO or [Example: 32 inch model] How to connect from terminals on the Control panel (on the underside) to external equipment To insert D-sub 15 pin, tilt the monitor forward and bring the terminals into view. 2 people are required to hold the monitor and insert D-sub 15 pin safely. Be careful not to damage the panel. * * [Example: 32 inch model] [Example: Connecting to PC] * You may wish to leave an optional D-sub 15 pin extension cable connected to this terminal to make future connections easier. 3. Attach Cushion, Secure with Clamps and Fit Terminal Cover 1 Attach the supplied cushion around the HDMI cable. Cushion (supplied accessory) HDMI cable 2 Attach the cushion around the HDMI cable so as not to leave any clearance. Unfasten 2 clamps, and then connect the HDMI cable and power cord to the monitor through open clamps. Clamp HDMI cable Power cord 16 CONNECTION (continued) 3. Attach Cushion, Secure with Clamps and Fit Terminal Cover (continued) 3 4 Secure the HDMI cable and power cord with clamps. Clamp Fit the terminal cover onto the monitor. Insert the hook first to fit the terminal cover. NOTE When removing the terminal cover Hook Terminal Cover Put your fingers into the terminal cover and pull it up towards you. 4. Connect the Power Plug into the Wall Socket Connect the power cord after completing all other connections. (For some countries the type of plug is different that depicted.) UK only Except UK CAUTION Use only the power cord provided. Do not use a power supply voltage other than that indicated (AC220-240V, 50Hz). It may cause fire or electric shock. For the LCD monitor, a three-core power cord with a ground terminal is used for efficiency protection. Always be sure to connect the power cord to a three-pin grounded outlet and make sure that the cord is properly grounded. If you use a power source converter plug, use an outlet with a ground terminal and screw down the ground line. Ensure that both ends of the power cord are easily accessible. If you have to change the power cord, please use a certified power cord that meets your region’s safety standards. 17 BASIC OPERATION ENGLISH Power On/Off Turn On the power of the unit. Illumination Lamp To turn On the power to the unit: Indicating Lamp 1. Press the Power switch on the unit. The Indicating Lamp illuminates in Green, and the Illumination Lamp turns into Blue. The image will display on screen. 2. Once the Power switch is on, you can turn On/Off by pressing the Power (On/Off, On, Off) button on the remote control. Power Switch (on the underside) To turn Off the power to the unit: Front 1. Press the Power (On/Off, Off) button on the remote control. The image disappears from the screen. The Indicating Lamp turns into Red (Standby mode), and the Illumination Lamp turns off. 2. Press the Power switch on the unit to completely turn Off the power to the unit. Rear Power On/Off button Power Off button NOTE Power On button Whilst the Indicating Lamp illuminates in Red (Standby mode), you can turn On/Off by pressing the Power (On/Off, On, Off) button on the remote control. The Indicating Lamp/Illumination Lamp Status Indicating Lamp Illumination Lamp Power Status Remark Off – Off – Red – Standby mode – Green Blue On Orange – Power Save mode – Refer to 32 and 33 for the condition. NOTE Whenever the monitor receives signal from the remote control, the indicating lamp blinks in green. If the image does not appear on the screen at all, or if there is any problem with it, see “TROUBLESHOOTING” on 33 ~ 35 . This may help you to solve the problems. After turning On, it takes about 6 seconds until the monitor starts up. Please note that buttons on the remote control and the unit (such as the Power button) do not work during this period of time. Do not switch the power On/Off repeatedly within a short period of time. It could cause a malfunction. If a power cut occurs during use of the unit, to avoid sudden surges of electricity when the power comes back on, unplug the power cord before leaving home. 18 BASIC OPERATION (continued) Volume Up/Down 1. To increase the sound volume, press the Volume Up button on the remote control or control panel. The Volume Indicator value on the screen will shift to the right. Volume Up/Down button Mute button 2. To decrease the sound volume, press the Volume Down button on the remote control or control panel. The Volume Indicator value on the screen will shift to the left. Mute 1. To mute sounds, press the button on the remote control. The sound of the unit is temporarily turned Off. The colour of the Volume Indicator will turn into grey whilst muting the volume. 2. To turn the sound back on, press the button again, or press the Volume Up button on either the remote control or control panel. The colour of the Volume Indicator will turn back to blue. NOTE You can decrease the volume by pressing the Volume Down button whilst the sound is muted. 19 Volume Up/Down button 20 BASIC OPERATION (continued) ENGLISH Input Switching to HDMI and RGB By pressing the Input Select button, you can switch the input to display the image outputting from the external equipment connected to each terminal (HDMI and RGB (/Composite)). HDMI Input Select button <From Remote Control> Press the button on the remote control. RGB Input Select button Each time this button is pressed, the screen displays the corresponding mode in the following sequence. HDMI Press the or Menu button RGB (/Composite) button to directly select the input mode. <From Control panel> The Input modes can also be switched using the Input Select button on the control panel. Each time this button is pressed, the screen displays the corresponding mode in the following sequence. HDMI Input Select button RGB (/Composite) NOTE Menu button Switching between RGB and Composite Input. Input Select button When pressing the button, you will see the image from either RGB or Composite input. You can set up the mode in advance if necessary. 1. Press the button. 2. Select “Setup” menu in RGB or Composite mode. 3. Select “RGB Input”. Select “Composite” to display the image from video output via the optional D-sub 15 pin – composite cable. Select “RGB” to display the image from PC. See 27 and 29 for details of “RGB Input” menu. Input Signal Screen Display The input signal status can be displayed on the screen by pressing the The display will go out in approximately 6 seconds. HDMI mode RGB mode Composite mode HDMI DVI 720R RGB H : 48.4kHz V : 60.0 Hz Composite button on the remote control. Input mode *HDMI - DVI connection only Signal mode Input mode Input horizontal frequency Input vertical frequency Recall button Input mode 20 SETUP OPERATION How to Use the On-Screen Display (OSD) System You can use the On-Screen Display system to access the various kinds of the features and functions. Basic Operation Picture Audio Function Setup Language Select OK Set ◄► 1. Press the button on the remote control or the Menu button on the control panel of the unit. The Main Menu is displayed on the screen as shown on the right. 2. To select the item, press the button. The selected item will be highlighted in Yellow. <Main Menu> ◄► 3. Press the OK button to set your selection. The selected menu page will be displayed on the screen. 4. Use the Press the 5. Use the button to choose the item on the menu page. OK ◄► Press the Menu button button to set your selection. button to adjust the item values or choose options. OK button to set your selection. 6. To exit from the menu, press the button. NOTE The OSD menu screen will be closed automatically when no operation has been made for about one minute. If the item on the menu is shown in grey, it means that it cannot be selected or adjusted. Menu button Select Language Select the language from the list so that the OSD menu can be displayed in the selected language. How to set Language 2. Select your preferred language from the list using the The selected item will be highlighted in Yellow. ◄► 1. Enter the “Language” menu from the Main Menu. button. 3. Press the OK button to set your selection. The mark on the left turns into a double circle when the selection is fixed. 4. Press the 21 button to exit from the entire OSD menu. Language ޓޓޓޓޓEnglish ޓޓޓޓޓEnglish (US) ޓޓޓޓޓFrançais ޓޓޓޓޓEspañol ޓޓޓޓޓDeutsch ޓޓޓޓޓᣣᧄ⺆ ޓޓޓޓޓޓਛᢥ ❥ޓޓޓޓޓ㜚ਛᢥ ޓޓޓޓޓ Select OK Set Return SETUP OPERATION (continued) ENGLISH Main Menu List • Please refer to supplied “Translation of On-Screen Display (OSD)” to check translation of menu items. Menu Picture (HDMI/Composite) Picture (RGB) Audio Function Select between 3 picture modes according to the lighting condition. Contrast Adjust to increase or decrease the picture contrast. 23 Brightness Adjust to brighten or darken the picture. 23 Colour Adjust to increase or decrease the colour density. 23 Sharpness Adjust to sharpen or soften the picture. 23 Hue Adjust to obtain natural skin colour. 23 Colour Temperature Select between 3 settings according to your preferred colour tone. 23 Back Light Adjust to increase or decrease the brightness of back light on LCD panel. 23 Reset Reset each item on the menu screen to the factory setting. 23 Deep Colour Enhance the colour depth of picture. 24 Select between 3 contrast modes to suit your preference. 24 3D Colour Management Adjust the suitable tint, colour density, and brightness on image. 24 Black Enhancement Adjust the black level compensation. 24 DNR Reduce noise for picture signal. 25 MPEG NR Reduce mosquito noise in the picture. 25 Cross Colour NR Reduce noise caused by colour mixture of adjacent pixels. 25 Game Mode Reduce the time-lag of speed on the moving image during TV game play. 15 Film Mode Adjust to make the moving image smooth. 26 3D Comb Filter Reduce the colour blurring to reproduce purer colour. 24 Reset Reset each item on the menu screen to the factory setting. 24 Colour Temp. Adjust Set specific adjustment in each of 3 colour temperature modes. 24 Contrast Adjust to increase or decrease the picture contast. 28 Brightness Adjust to brighten or darken the picture. 28 Colour Adjust to increase or decrease the colour density. 28 Hue Adjust to obtain natural skin colour. 28 Colour Temperature Select between 3 settings according to your preferred colour tone. 28 Colour Temp. Adjust Set specific adjustment in each of 3 colour temperature modes. 28 Back Light Adjust to increase or decrease the brightness of back light on LCD panel. 28 Reset Reset each item on the menu screen to the factory setting. 28 Treble Adjust to increase or decrease the level of treble. (-15~+15) - Bass Adjust to increase or decrease the level of bass. (-15~+15) - Balance Adjust the balance of sound from the bottom right and left speakers. (-10~+10) - Surround Select surround-sound. (Off/On) - Bass Boost Enhance bass sounds. (Off/On) - Clear Voice Select clearer and more realistic sounds. (Off/On) - Perfect Volume Adjust sound volume appropriately. (Off/On) - Speakers Select if using internal speakers. (Off/On) - Reset Reset each item on the menu screen to the factory setting. - System This function is not available. - Auto Input Change HDMI Control System Standby Setup (RGB) Language 23 Contrast Mode Video Power Save Setup (HDMI/Composite) Page Picture Mode In response to the connected equipment (such as DVD) through HDMI cable, the monitor is automatically turned On and switched to HDMI input. In response to the monitor, the connected equipment (such as DVD) through HDMI cable is automatically turned Off (standby mode). 15 15 Save power consumption when no signal can be input in HDMI/Composite input mode. 32 RGB Input Select the effective signal. 27 Colour System Select colour system. 27 Auto Adjust Adjust Horizontal Position, Vertical Position, Horizontal Clock, and Clock Phase automatically. 29 Horizontal Position Adjust the display position horizontally. 29 Vertical Position Adjust the display position vertically. 29 Horizontal Clock Minimize the vertical stripes on the screen. 29 Clock Phase Minimize the blurring of the letters and stripes on horizontal row. 29 Reset Reset each item on the menu screen to the factory setting. 29 Frequency Display Set On for PC signal frequency information to be displayed on the Input Signal Screen Display. 29 WXGA Mode Select the resolution when WXGA signal is received. 29 RGB Input Select the effective signal. 29 - 21 NOTE Some of the menus’ contents are different depending on the model. Please refer to “Setup hint” on the following pages. The menu setting can be stored for each of inputs except “Picture Mode”. 22 SETUP OPERATION (continued) Watching Images from HDMI/Composite Input 1. Connect to external equipment. (See 14 and 15 for details.) 2. Press the or button to switch to HDMI mode. Press the or button to switch to composite mode. 3. Press the button. Setting Picture Adjustment You can adjust the display condition such as colour settings. Select “Picture” from Menu list. Picture Picture Mode Contrast Brightness Colour Sharpness Hue Colour Temperature Back Light Reset Select OK Set Picture Dynamic +31 –31 0 +15 0 Normal +20 Reset Return Dynamic Deep Colour Contrast Mode 3D Colour Management Black Enhancement DNR MPEG NR Cross Colour NR Game Mode Film Mode 3D Comb Filter Reset Select OK Set Picture Colour Temp. Adjust Off Normal Off Off Off Off Off Off Off Off Reset Return Select OK Set Dynamic Return * The OSD screen may be different depending on the model. Selected Items Setup hint Dynamic Picture Mode Natural Cinema Contrast -31~+31 (+32~+40) This adjusts the contrast to meet the surrounding brightness by using the ◄► button. The maximum value is extended up to [+40] by pressing button for more than 2 seconds at [+31]. The the value between [+32] ~ [+40] appears in magenta. This is the special feature for dark images, so it is recommended to set the value less than [+31] under normal conditions. Brightness -31~+31 Adjust brightness according to personal preference by using the ◄► button. Colour -31~+31 Adjust colour according to personal preference by using the ◄► button. Sharpness -15~+15 Preferred sharpness can be adjusted by pressing the button for softer image or the button for sharper image. Hue -31~+31 Pressing the button enhances red and weakens green, whilst pressing the button weakens red and enhances green. The setup hint is to adjust for realistic skin colour. Cool Colour Temperature Normal Warm Back Light Reset 23 You can make the best selection from 3 modes depending on the lighting condition and intended use. Dynamic: Suitable for brighter conditions. Natural : Suitable for normal lighting conditions. Cinema : Suitable for watching movies. -20~+20 You can select from 3 settings depending on the colour condition using the ◄► button. This is not available when “Deep Colour” is “On” in HDMI mode. Adjust the brightness of the Back Light for maximum visibility. Each item on this menu screen can be restored to the factory settings by pressing the OK button. SETUP OPERATION (continued) ENGLISH Watching Images from HDMI/Composite Input (continued) Setting Picture Adjustment (continued) Selected Items Setup hint Off Deep Colour On Dynamic Normal Contrast Mode Linear Off 3D Colour Management On Enhance the colour depth of picture during HDMI input. This is not available for UT32MH70U/E model. Please check if the connected equipment supports Deep Colour and ensure that this operation is activated in the connected equipment before using this function. It allows you to choose from 3 modes. Dynamic: Sharpen the gradation to improve the contrast feeling. Normal : Improve the contrast feeling to reproduce a faithful gradation. Linear : Reproduce as faithful gradation as possible. This is not available when “Deep Colour” is “On” in HDMI mode. On : It automatically adjusts the suitable tint, colour density, and brightness on images. Off : Set it off if the image does not look natural. This is not available when “Deep Colour” is “On” in HDMI mode. Off Low Black Enhancement Middle Adjusts the black level compensation. This is not available when “Deep Colour” is “On” in HDMI mode. High Off Game Mode On Off Low 3D Comb Filter Middle High This is available only when using D-sub 15 pin - composite cable. This reduces the dot and colour blurring in minute scales so that it can reproduce purer colour. This is not available for NTSC4.43, PAL60, SECAM, PAL-N and PAL-M system. This is available only when receiving NTSC/PAL composite signal. Each item on this menu screen can be restored to the factory settings by pressing the OK button. Reset Amplitude Red Green Colour Temp. Adjust During TV game play, you can reduce the time-lag of speed on the moving image. This function is not available for UT32MH70U/E. On Blue Cut Off Red Green Blue Off On: When you want to set specific adjustments in each of the 3 Colour Temperature modes. You can adjust on the Amplitude and Cut Off. The settings reflect on the Colour Temperature. Amplitude: Subdue the colours (Red/Green/Blue) on the brighter parts (-63~0). Cut Off : Subdue the colours (Red/Green/Blue) on the darker parts (-31~+31). Off: Remains as default setting. This is not available when “Deep Colour” is “On” in HDMI mode. 24 SETUP OPERATION (continued) Watching Images from HDMI/Composite Input (continued) Picture Reducing Noise Deep Colour Contrast Mode 3D Colour Management Black Enhancement DNR MPEG NR Cross Colour NR Game Mode Film Mode 3D Comb Filter Reset Select OK Set You can reduce the unwanted picture noise. Select “Picture” from the Menu list. Dynamic Off Normal Off Off Off Off Off Off Off Off Reset Return * The OSD screen may be different depending on the model. Selected Items Setup hint Off DNR Low Middle This is a noise reduction system for picture signals. High Off MPEG NR Low This is a noise reduction system for MPEG picture signals. (e.g. against mosquito noise and block noise.) High Off Cross Colour NR Low High 25 This reduces noise caused by colour mixture of adjacent pixels. This is not available when “Game Mode” is On. This is not available for UT32MH70U/E model. SETUP OPERATION (continued) Picture Making the Moving Image Smooth Using this function helps to make the moving image smooth. Select “Picture” from the Menu list. Deep Colour Contrast Mode 3D Colour Management Black Enhancement DNR MPEG NR Cross Colour NR Game Mode Film Mode 3D Comb Filter Reset Select OK Set ENGLISH Watching Images from HDMI/Composite Input (continued) Dynamic Off Normal Off Off Off Off Off Off Off Off Reset Return * The OSD screen may be different depending on the model. For UT32MH70U/E: Selected Items Setup hint Off Film Mode On On: Automatically identifies if it is a movie and faithfully reproduces the original film images. Off: Set to Off if the image does not look natural. This is available only when receiving NTSC, 480i, PAL, SECAM, 576i, or 1080i input signals. For UT··MX70U/E: Selected Items Setup hint Off Original Film Mode Smooth1 Smooth2 NOTE This helps to make the moving image smooth. Original: Automatically identifies the source of movie (3:2 pulldown, 2:2 pulldown) and faithfully reproduces the original film images. Smooth1: Automatically identifies the source of movie (3:2 pulldown, 2:2 pulldown) and reproduces the smooth motion. Smooth2: Reproduces the clear moving image when the input signal is 50Hz or 60Hz. Off: Set to Off if the image does not look natural. This is not available in the following cases. OSD is displayed. “Game Mode” is On. About “Film Mode” The image might not look natural depending on the image contents. Phenomena such as q When switched to the subtitles of a film or images, the image displays fine horizontal streak lines. w When switched to scenes such as commercial and animation, the image displays fine horizontal streak lines. e When displaying a ticker or subtitle, the text on the image becomes rough (aliasing). r When watching the image in Composite mode, which is connected to any external equipment, the OSD of external equipment displays fine horizontal streak lines. These phenomena occur due to the method of converting the image. Please note that this is not a malfunction. In the event that this is disturbing, please set to Off. In addition, the effect of this menu might vary depending on the size setting (See 30 ). Also, this might be ineffective depending on the scene of the image. 26 SETUP OPERATION (continued) Watching Images from HDMI/Composite Input (continued) Setup Video Power Save RGB Input Colour System Advanced Setting Select “Setup” from the Menu list. Select On/Off Off Composite Auto Return VC143-141 06-0 [Example] Selected Items Setup hint Off Video Power Save On See 32 for details. RGB RGB Input Select the effective signal. Composite Auto PAL SECAM NTSC 4.43 Colour System NTSC 3.58 PAL60 Selects the colour system depending on the input signal. Generally, select [Auto] to receive all signals. If the input signal has too much noise, the signal level is too low or the operation is unstable in [Auto], select the system according to the colour system of the input signal. Composite input only. PAL-M PAL-N NOTE Watching through the optional D-sub 15 pin - composite cable If your external equipment does not have an HDMI terminal or a DVI terminal, you can watch images from your external equipment through the optional D-sub 15 pin - composite cable. 1. Connect to your external equipment with the optional D-sub 15 pin - composite cable. (See 2. Switch to RGB input by pressing the 3. Press the or 15 ) button. button and select “Setup” from the menu list. 4. Select “Composite” in “RGB Input”. NOTE Checking software version The software version is displayed on Setup (HDMI/Composite) menu. Setup Video Power Save RGB Input Colour System Select On/Off Off Composite Auto Return VC143-141 06-0 Software version [Example] 27 SETUP OPERATION (continued) 1. Connect to the PC. (See 16 for details of connection to PCs.) 2. Switch to RGB input by pressing the 3. Press the ENGLISH Viewing Images from a PC or button. button. Setting Picture Adjustment You can adjust the display condition such as position adjustment and colour settings. q “Picture” Menu Select “Picture” from the Menu list. Picture Contrast +31 Brightness –31 Colour 0 Hue +31 Colour Temperature Normal Colour Temp. Adjust Back Light +20 Reset Reset Select Selected Items Return Setup hint -31~+31 (+32~+40) Contrast OK Set This adjusts the contrast to meet the surrounding brightness using the ◄► button. The maximum value is extended up to [+40] by pressing the button for more than 2 seconds at [+31]. Values between [+32] ~ [+40] appear in magenta. This is the special feature for dark images, so it is recommended to set the value less than [+31] under normal conditions. Brightness -31~+31 Adjust the brightness according to personal preference using the ◄► button. Colour -31~+31 Adjust the colour according to personal preference using the ◄► button. Hue -31~+31 Pressing the button enhances red and weakens green, whilst pressing the button weakens red and enhances green. These adjustments are for realistic skin colour. Cool Colour Temperature Normal You can select from 3 settings with the ◄► button. Warm Colour Temp. Adjust On Amplitude Red Green Blue Cut Off Red Green Blue Off: Remains as default setting. Off Back Light Reset On: When you want to set specific adjustments in each of the 3 colour temperature modes. You can adjust the Amplitude and Cut Off. The settings reflect on the Colour Temperature. Amplitude: Subdues the colours (Red, Green, Blue) on the brighter parts (-63~0). Cut Off : Subdues the colours (Red, Green, Blue) on the darker parts (-31~+31). -20~+20 Adjusts the brightness of Back Light for maximum visibility. Each item in the “Picture” Menu can be restored to the factory setting by pressing the OK button. 28 SETUP OPERATION (continued) Viewing Images from a PC (continued) Setting Picture Adjustment (continued) Setup Auto Adjust Adjust Horizontal Position 0 Vertical Position +31 Horizontal Clock –20 Clock Phase +10 Reset Reset w “Setup” Menu Select “Setup” from the Menu list. Select Selected Items Return Exit Setup hint Adjusts Horizontal Position, Vertical Position, Horizontal Clock, and Clock Phase automatically. Press the OK button to start automatic adjustment as necessary. The message “Auto Adjusting” is displayed. The image might not be adjusted to its optimum condition depending on the types of signals. In that case, adjust each item manually. Auto Adjust Horizontal Position -63~+63 Adjusts the display position horizontally. When the value exceeds a possible range, it will be displayed in magenta. Vertical Position -31~+31 Adjusts the display position vertically. When the value exceeds a possible range, it will be displayed in magenta. Horizontal Clock -31~+31 Minimizes vertical stripes on the screen. Clock Phase 0~+63 Minimizes the blurring of letters and stripes on horizontal row. Be sure to adjust Horizontal Clock before adjusting Clock Phase. When the value exceeds a possible range, it will be displayed in magenta. Each item in “Setup” Menu can be restored to the factory setting by pressing the OK button. Reset Setup Frequency Display WXGA Mode RGB Input Advanced Setting Select “Setup” from the Menu list and skip to the second page. Select Off Off RGB On/Off Return * The OSD screen may be different depending on the model. Selected Items Frequency Display Setup hint Off On Set to On for PC signal frequency information to be displayed on the Input Signal Screen Display. Off WXGA Mode 1280X768 Selects the resolution when a WXGA signal is received. 1360X768 RGB RGB Input Selects the effective signal. Composite 29 FUNCTION ENGLISH Size Switching Each time the button of the remote control is pressed, the screen display size is switched in sequence, and the status will be displayed at the bottom of the screen. HDMI/Composite Signal Input Size button Display Size Watching Standard Definition Pictures (480i, 480p, 576i, 576p, Composite) 4:3 Panoramic 1 Panoramic 2 Zoom 1 Full Zoom 2 Watching High Definition Pictures (720p, 1080i, 1080p) Full 1 Full 2 Zoom You can display the image at its optimum condition by selecting display size depending on the current output image as shown below. Input Signal Display Screen Display Size To display suitable screen as follows. When Watching Standard Definition Pictures: 4:3 Plays a 4:3 image on screen faithfully. Blanking occurs on both sides. Panoramic 1 Plays a 4:3 image which enlarges horizontal and vertical size of the middle in equal scales, and displays both sides appearing much wider. Panoramic 2 The vertical size of Panoramic1 is reduced so that you can see the whole image, including any subtitles, that might otherwise not be fully visible on the screen. Zoom 1 Plays a 16:9 image in 4:3 frame (Vista size) faithfully. *In some cases, slight blanking may remain at the top and bottom. Zoom 2 Plays a 21:9 image in 4:3 frame (Cinema size) expanding vertically. *In some cases, slight blanking may remain at the top and bottom. (4:3 Signal) (Vista) (Cinema) Full Plays a 4:3 image faithfully in the standard vertical size and horizontally squeezed. (Squeeze) When Watching High Definition Pictures: (16:9 Signal) (4:3 Image in 16:9 Frame) Full 1 Plays a 16:9 image faithfully showing 95% of the size. Full 2 Plays a 16:9 image faithfully showing 100% of the size. *In some cases, the screen display has unnecessary blanking or noise at the edges. Zoom Plays a 4:3 image in 16:9 frame by enlarging a 4:3 image to fill the 16:9 screen. 30 FUNCTION (continued) Size Switching (continued) HDMI/Composite Signal Input (continued) Position Adjustment 1. Press the ◄► Vertical picture position can be adjusted for Panoramic 1, Zoom 1 and Zoom 2 mode as follows. button whilst operating the picture size display. ◄► 2. “Position” display will appear. 3. Adjust the position using the button. The adjustment ranges of each picture size are as shown below. Display Size Adjustable Range Panoramic 1 -12~+12 Zoom 1, Zoom 2 -31~+31 Position + 31 Position - 31 PressŸ Pressź CAUTION Using a wide-screen monitor The monitor has a screen mode selection feature. If an incompatible screen mode is selected to play certain software, such as a TV programme, the image would appear different from the original. Take this into consideration when making screen mode choices. Use of the wide feature displaying enlarged pictures in coffee shops, hotel and other establishments for commercial or public viewing purposes could infringe on the copyright holder’s rights, which are protected by Copyright Law. When a normal 4:3 image (not wide screen) is displayed over the entire screen in the Panoramic mode, the peripheral image may disappear partly and/or appear distorted in some cases. Use 4:3 mode to view the image reflecting the original intention. RGB Signal Input Display Size You can select a suitable size depending on the resolution. Normal Full Real* * Real mode gives the image with same shapes as that of a computer monitor (neither compression nor stretching). This mode is not available if the input signal is 1280 x 1024 (SXGA) in the UT32MH70U/E model. Display Area Selection Diagram Resolution Display 640 X 480 (VGA) 800 X 600 (SVGA) 1024 X 768 (XGA) 1280 X 1024 (SXGA) 640 X 400 (VGA) 1280 X 768 (WXGA) 1360 X 768 (WXGA) 31 Input signal Full display Full Circular display Normal Real* FUNCTION (continued) ENGLISH Power Save Mode When HDMI/Composite Input is Selected You are provided the function to save power consumption when no signal is detected in HDMI/Composite input. Set to On in “Video Power Save” from the Setup Menu, which leads to the power save mode. 1. Press the Setup Video Power Save RGB Input Colour System Select button when in HDMI/Composite input. 2. Select the “Setup” menu and press the OK On/Off Off Composite Auto Return button. 3. Select “Video Power Save”. Off On Video Power Save When no signal is detected Condition Indicating Lamp When signal is input during On in “Video Power Save” Power Save Orange Turns On automatically. When RGB Input is Selected When the unit is connected to a VESA DPMS computer, the Power Save mode (Operation mode: Off) can be set to be activated automatically when the computer is not being used, in order to reduce the power consumption of the unit. RGB sync signal Horizontal Yes No Yes No Vertical Yes Yes No No PC signal Active (normal display) Operation mode On Blank (no display) Off Indicating lamp Lights green Lights orange To return to operating status, operate the personal computer, or press either the Input Select button on the control panel or the or button on the remote control. 32 TROUBLESHOOTING Before calling a service technician, check the following tables first. If the problem cannot be solved with the suggested procedures, contact your local dealer. For your safety, NEVER try to repair the product yourself. When the Following Messages Appear on the Screen Message Condition / Action Power Save This indicates it is in Power Save mode. (in HDMI/RGB/Composite input) This message appears 5 seconds before Power Save mode starts. The indicating lamp lights in orange. No Sync. Signal The unit cannot detect any signals from any input terminals. Check if the cable is connected correctly and firmly. Check if the power of any external equipment is ON. Check if the input selection matches the connection terminal. Check if the PC is in Power Save mode or not. Invalid Scan Freq. The unit receives unsupported signals. Check if the cable is connected correctly and firmly. Check if the input signal is compatible with the specification of the monitor. Not Available This shows when the selected operation is not available. Auto Adjusting This indicates that it is in the process of auto adjusting. (in RGB mode) Page 32 14 ~ 16 32 36 , 38 29 Symptom and Checklist Symptoms Checklist No picture - no sound Check the Indicating lamp status (Off, Red, Green, or Orange). Check the connection of the power cord and/or other cables. Check if the power of the unit or external equipment is ON. Check if the correct mode is selected. Check if the unit is in “Standby mode” or “Power Save mode”. Adjust the values in “Picture” menu and “Audio” menu. Multiple images-normal sound Check the connections to external equipment. Intermittent interference Check if the source of interference is shielded correctly. Move these kinds of electrical devices away from the unit. Page 14 ~ 18 20 , 32 14 ~ 16 Check the volume level. Normal picture, but no sound Check if the button has been pressed or not. Check the connections to external equipment. Connect to PC (RGB)/DVI Analogue Audio Input terminal if the input signal screen display shows “DVI” by pressing the 19 , 20 button. Check if “Speakers” in “Audio” menu is set to On. No picture - normal sound Check the value level of “Brightness” and “Contrast” in “Picture” menu. Check the connections to external equipment. Check the setting of “RGB Input” in “Setup” menu in RGB or Composite input. The remote control does not work. Check if the batteries are installed correctly. The batteries might be exhausted. Replace them with new ones. Remove all obstructions from in front of the sensor window on the unit. Check if the buttons on the control panel are working. The buttons both on the remote control and control panel do not work. 33 Unplug and Connect the power cord again. Hold down the Reset button on the control panel for over a second. 14 ~ 16 23 27 ~ 29 12 , 13 11 TROUBLESHOOTING (continued) Symptoms Checklist ENGLISH Symptom and Checklist (continued) Page 14 ~ 16 , No colour-normal sound Check the connections to external equipment. Check “Colour System” in Composite input. No picture The Indicating lamp ĺ Off Check if the power cord is plugged into the socket securely. Check if the power switch on the unit is on. No picture The Indicating lamp ĺ Orange It means that the unit is in “Power Save mode”. Check if all the cables to external equipment are connected correctly and securely. Check if the power to the external equipment is ON. Check if the HDMI mode has been selected correctly. Check if the PC is in Power Save mode or not. Refer to “Power Save Mode” and “When the Following Messages Appears on the Screen”. No picture The indicating lamp ĺ Green Check if the signal cable is connected correctly and securely. Adjust the level of “Brightness” and “Contrast” lower. The top of the unit and surface of the panel heat up. This may occur if you use the unit for a long time. Unplug the power cord for a while. Please note that this is not a malfunction. 36 , 38 Some screen display sizes cannot be switched in. button on the remote Check the signal status by pressing the control. The available screen display size is different depending on the current signal status. 30 , 31 Image cannot be displayed from HDMI input. Check if the cables are connected correctly. Check the output format of the equipment. (Please refer to “CONNECTION” and “Recommended Signal List”.) The image and audio are mismatched when in RGB or HDMI-DVI mode. Check if the PC (RGB)/DVI Analogue Audio Input terminal is connected to the same external device. 27 17 , 18 32 14 ~ 16 20 , 14 , 36 ~ 38 14 , 16 34 TROUBLESHOOTING (continued) Symptom and Checklist (continued) Symptoms Checklist The image on the screen is moving in an oblique direction. (RGB input mode only) Adjust “Horizontal Clock” and “Clock Phase”. 29 The coarse horizontal stripes can be seen in full-display mode. (RGB input mode only) Adjust “Horizontal Clock”. 29 Part of the image is missing. (RGB input mode only) AAAAA The horizontal stripes are moving vertically with flickering screen. (RGB input mode only) When the characters are displayed on the whole screen, the vertical stripes appear and some of the characters are blurred. (RGB input mode only) Try “Auto Adjust” or press the button on the remote control. Check if the input signal is compatible with the signals on “Recommended Signal List”. Check if “WXGA Mode” is set correctly. 29 , 38 Check the signal status of the PC by pressing the button on the remote control. Try “Auto Adjust” or press the button on the remote control. If the display condition is not improved with “Auto Adjust”, adjust “Horizontal Clock”. 29 Try “Auto Adjust” or press the button on the remote control. If the condition is not improved with “Auto Adjust”, adjust “Clock Phase” until you get the clearest image. 29 When small patterns are displayed on the screen, the entire screen is flickering. (RGB input mode only) Try “Auto Adjust” or press the button on the remote control. If the condition is not improved with “Auto Adjust”, adjust “Clock Phase” until you get a flicker-free display. 29 Image cannot be displayed in the correct position. (RGB input mode only) Press the button to check if the input signal of the displayed image is compatible with the specification of the unit. When the letter string is displayed in full-screen, all of the characters on the screen are blurred. (RGB input mode only) 35 Page ABCDEFGHIJ abcdefgABCDEFGabcd ABCDEFGHIJ abcdefgABCDEFGabcd ABCDEFGHIJ abcdefgABCDEFGabcd ABCDEFGHIJ abcdefgABCDEFGabcd 20 , 36 38 PRODUCT SPECIFICATIONS Display dimensions Approx. 32 inches (698 (H) x 392 (V) mm, diagonal 801mm) Resolution 1366 (H) x 768 (V) pixels ENGLISH SPECIFICATION Panel including Stand: 814 (W) x 587 (H) x 249 (D) mm excluding Stand: 814 (W) x 538 (H) x 39* (D) mm *thinnest part: 35mm Net dimension including Stand: 13.5kg Net Weight excluding Stand: 10.9kg UT32MH70U/E Temperature Operating: 5ºC to 35ºC Relative humidity Operating: 20% to 80% Ambient conditions Power supply AC220-240V, 50Hz Power consumption/ at stand by 132W/<0.8W Audio output speaker 6W + 6W Display dimensions Approx. 37 inches (820 (H) x 461 (V) mm, diagonal 941mm) Resolution 1920 (H) x 1080 (V) pixels Panel Net dimension including Stand: 936 (W) x 657 (H) x 310 (D) mm excluding Stand: 936 (W) x 607 (H) x 39* (D) mm *thinnest part: 35mm Net Weight including Stand: 17.4kg excluding Stand: 14.6kg UT37MX70U/E Temperature Operating: 5ºC to 35ºC Relative humidity Operating: 20% to 80% Ambient conditions Power supply AC220-240V, 50Hz Power consumption/ at stand by 171W/<0.8W Audio output speaker 6W + 6W Display dimensions Approx. 42 inches (930 (H) x 523 (V) mm, diagonal 1067mm) Resolution 1920 (H) x 1080 (V) pixels Panel Net dimension including Stand: 1036 (W) x 728 (H) x 310 (D) mm excluding Stand: 1036 (W) x 678 (H) x 39* (D) mm *thinnest part: 35mm Net Weight including Stand: 20.9kg excluding Stand: 18.0kg UT42MX70U/E Temperature Operating: 5ºC to 35ºC Relative humidity Operating: 20% to 80% Ambient conditions Power supply AC220-240V, 50Hz Power consumption/ at stand by 234W/<0.8W Audio output speaker 6W + 6W (HDMI input) Input terminals HDMI: HDMI input terminal Audio input terminal (Mini-pin)* Input signals HDMI: VGA/60, 480i, 576i, 480p, 576p, 720p/50, 720p/60, 1080i/50, 1080i/60, 1080p/50, 1080p/60, 1080p/24 (RGB/Composite input) Input terminals Analogue RGB input terminal (D-sub 15 pin) Audio input terminal (Mini-pin)* Input signals 0.7 Vp-p, analogue RGB (Recommended Signal) Composite video: PAL, SECAM, NTSC3.58, NTSC4.43, PAL60, PAL-M, PAL-N Sync signals H/V separate, TTL level [2K] The unit takes at least 30 minutes to attain the status of optimal picture quality. * This Analogue Audio Input terminal can be used for PC (RGB) or HDMI-DVI. 36 PRODUCT SPECIFICATIONS (continued) Signal Input RGB terminal (D-sub 15 pin connector) Pin Input signal 1 R 2 G/Composite 3 B 4 No connection 5 No connection 6 R.GND 7 G.GND/Composite.GND 8 B.GND 9 +5V 10 GND 11 No connection 12 [SDA] 13 H.sync 14 V.sync. 15 [SCL] HDMI connector pin specifications 37 Pin Input signal Pin Input signal 1 TMDS Data2+ 11 TMDS Clock Shield 2 TMDS Data2 Shield 12 TMDS Clock- 3 TMDS Data2- 13 CEC 4 TMDS Data1+ 14 Reserved(N.C. on device) 5 TMDS Data1 Shield 15 SCL 6 TMDS Data1- 16 SDA DDC/CEC Ground 7 TMDS Data0+ 17 8 TMDS Data0 Shield 18 +5V Power 9 TMDS Data0- 19 Hot Plug Detect 10 TMDS Clock+ PRODUCT SPECIFICATIONS (continued) ENGLISH Recommended Signal List With HDMI input Signal mode No. Signal Name Resolution Vertical frequency (Hz) Horizontal frequency (kHz) Dot clock frequency (MHz) 1 2 3 4 5 6 7 8 9 10 11 12 VGA 576i 480i 576p 480p 1080i/50 1080i/60 720p/50 720p/60 1080p/50 1080p/60 1080p/24 640 X 480 720(1440) X 576 720(1440) X 480 720 X 576 720 X 480 1920 X 1080 1920 X 1080 1280 X 720 1280 X 720 1920 X 1080 1920 X 1080 1920 X 1080 59.94 50.00 59.94 50.00 59.94 50.00 60.00 50.00 60.00 50.00 60.00 24.00 31.47 15.63 15.73 31.25 31.47 28.13 33.75 37.50 45.00 56.25 67.50 27.00 25.18 27.00 27.00 27.00 27.00 74.25 74.25 74.25 74.25 148.50 148.50 74.25 Remarks CEA-861D CEA-861D CEA-861D CEA-861D CEA-861D CEA-861D CEA-861D CEA-861D CEA-861D CEA-861D CEA-861D CEA-861D With RGB input Timing Name Horizontal Frequency (kHz) Vertical Frequency (Hz) Pixel Frequency (MHz) Sync Polarity (H/V) Remarks 640 x 400 @ 70Hz 640 x 480 @ 60Hz 800 x 600 @ 60Hz 1024 x 768 @ 60Hz 1280 x 768 @ 60Hz 1280 x 1024 @ 60Hz 1360 x 768 @ 60Hz 31.469 31.469 37.879 48.363 47.776 63.981 47.712 70.086 59.940 60.317 60.004 59.870 60.020 60.015 25.175 25.175 40.000 65.000 79.500 108.000 85.500 -/+ -/+/+ -/-/+ +/+ +/+ VGA VGA VESA VESA VESA / WXGA Mode: 1280 x 768 VESA VESA / WXGA Mode: 1360 x 768 The type of video board or the connecting cable used may not allow for correct displays adjustment of Horizontal Position, Vertical Position, Horizontal Clock and Clock Phase. The unit differentiates the signal modes according to the horizontal and vertical frequencies and the horizontal and vertical sync signal polarities. Note that different signals having all these elements alike may be handled as the same signal. For UT32MH70U/E model, the image with 1280 x 1024 @ 60Hz is degraded vertically. 38 Thank you for purchasing this Hitachi LCD Monitor. In the unlikely event that this product should develop a fault, we undertake to repair or replace any part of the product which fails due to a manufacturing defect within 12 months of the date of purchase provided that ... 1. the product has been installed and used only in accordance with the instructions supplied with the product. 2. the product has not been repaired, maintained, or modified by any person other than a Hitachi authorized dealer. 3. the product serial number has not been removed or altered. •This guarantee does not apply to a product acquired second hand or for commercial or communal use. •This guarantee does not cover the replacement of exhausted batteries or the adjustment of user controls. •Any parts replaced under this guarantee shall become the property of Hitachi Europe Ltd. •Please note that evidence of the date of purchase will be required before any service under this guarantee is carried out. Use the boxes provided below to record your LCD Monitor’s Model and Serial Number these are found on the rating plate located on the rear of the LCD Monitor. Also, record where and when you purchased this LCD Monitor. This information will help any future queries you may have and should be used in all correspondence with Hitachi service centres. MODEL SERIAL NUMBER DEALER/STORE DATE PURCHASED This guarantee does not affect your statutory rights. In all cases of difficulty, please consult your Hitachi dealer. 39 Hitachi Ltd. Consumer Business Group Shin-Otemachi Bldg 5f, 2-1, Otemachi 2-Chome, Chiyoda-Ku, Tokyo 100-0004 Japan HITACHI EUROPE LTD. Consumer Affairs Department PO Box 3007 Maidenhead Berkshire SL6 8ZE UNITED KINGDOM Te l : 0870 405 4405 Email: [email protected] HITACHI EUROPE S.A. 364, Kifissias Ave. & 1, Delfon Str. 152 33 Chalandri Athens GREECE Te l : 210 6837200 Fax: 210 6835694 Email: [email protected] HITACHI EUROPE GmbH Munich Office Dornacher Strasse 3 D-85622 Feldkirchen bei München GERMANY Te l : 089-991 80-0 Fax: 089-991 80-224 Hotline: 0180-551 25 51 (12ct/min.) Email: [email protected] HITACHI EUROPE S.A. Gran Via Carles III, 86 Planta 5a Edificios Trade - Torre Este 08028 Barcelona SPAIN Te l : 93 409 2550 Fax: 93 491 3513 Email: [email protected] HITACHI EUROPE S.r.l. Via T. Gulli n.39 20147 MILAN ITALY Te l : 02 487861 Fax: 02 48786381 Servizio Clienti Te l . 02 38073415 Email: [email protected] HITACHI EUROPE S.A.S Lyon Office Digital Media Group 94 Quai Charles de Gaulles, 69006 Lyon FRANCE Te l : 04 72 14 29 70 Fax: 04 72 14 29 99 Email: [email protected] HITACHI EUROPE LTD. Benelux Branche Office Bergensesteenweg 421 1600 Sint-Pieters-Leeuw BELGIUM Tel : 0032/2 363 99 01 Fax: 0032/2 363 99 00 Email : [email protected] HITACHI EUROPE LTD. Kodaňská 46 101 00 Praha 10 CZECH REPUBLIC Tel : 234 064 512 Fax: 234 064 213 Email : [email protected] HITACHI EUROPE AB Box 77 S-164 94 KISTA SWEDEN Te l : 08 562 711 00 Fax: 08 562 711 11 Email: [email protected] HITACHI EUROPE AB (Norway Branch Nuf) Strandveien 18 1366 Lysaker NORWAY Te l : 67519030 Fax: 67519032 Email [email protected] HITACHI EUROPE AB Egebækvej 98 2850 Nærum DENMARK Te l : 43 43 60 50 Fax: 43 43 60 51 Email [email protected] HITACHI EUROPE AB Lars Sonckin kaari 16 FIN-02600 ESPOO FINLAND Te l : 010-8503085 Fax: 010-8503086 Email [email protected] www.hitachidigitalmedia.com