1
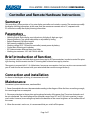
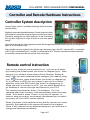
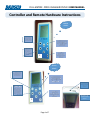
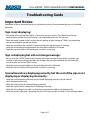
LED Display Manufacturing
695 Palmetto Rd. Tupelo, MS 38801 • Tel. 662-566-2047, Fax. 662-566-2048 • www.dadsco.com • [email protected]
FULL MATRIX - PRICE CHANGER DISPLAY
USER MANUAL
Ver. 1.0 & 2.0 -
June 18, 2013
Contents
Controller and Remote hardware Instructions
Summary . . . . . . . . . . . . . . . . . . . . . . . . . . . . . . . . . . . . . . . . . . . . . . . . . . . . . . . . . .
Parameters . . . . . . . . . . . . . . . . . . . . . . . . . . . . . . . . . . . . . . . . . . . . . . . . . . . . . . . .
Brief introduction of function . . . . . . . . . . . . . . . . . . . . . . . . . . . . . . . . . . . . . .
Connection and installation . . . . . . . . . . . . . . . . . . . . . . . . . . . . . . . . . . . . . . . .
Maintenance . . . . . . . . . . . . . . . . . . . . . . . . . . . . . . . . . . . . . . . . . . . . . . . . . . . . . . .
Controller System description . . . . . . . . . . . . . . . . . . . . . . . . . . . . . . . . . . . . . . .
Remote control instruction . . . . . . . . . . . . . . . . . . . . . . . . . . . . . . . . . . . . . . . . .
Remote control working elements . . . . . . . . . . . . . . . . . . . . . . . . . . . . . . . . . .
Troubleshooting Guide . . . . . . . . . . . . . . . . . . . . . . . . . . . . . . . . . . . . . . . . . . . .
2
2
2
2
2
3
3
4
5
PC Software Instructions
Summary . . . . . . . . . . . . . . . . . . . . . . . . . . . . . . . . . . . . . . . . . . . . . . . . . . . . . . . . . . . 6
Installation of hardware driver and the search of COM No . . . . . . . . . . . . 6
Introduction of the operating interface and its operation . . . . . . . . . . . . . 7
Page 1 of 7
FULL MATRIX - PRICE CHANGER DISPLAY USER MANUAL
Controller and Remote Hardware Instructions
Summary
This controlling system contains a Gas price display controller and a wireless remote. The remote can modify
the display showing information, at the same time, the remote can connect with a PC, cooperate with
PC software to modify the display showing information.
Parameters
•
•
•
•
•
•
•
•
•
Display color: Single color
Showing Digital: Static display, most drive 8sets of display (4 digits per sign)
Showing Intensity: Two grades adjustable, or adjustable by timing.
Refresh frequency: 20 frame/second
EMS memory capability: Extensible
Working voltage: DC5-15V(only for controller),remote power by battery.
Display data: Showing price number.
RF Communication distance: More than 300m
Working circumstance: -10°C~80°CÅA10~80%RH
Brief introduction of function
Sign controller receives and sends data or control message by RF Communication, in order to control Gas price
sign showing. And the remote transfer PC showing data or control message by wireless.
The remote is powered with 3 1.5v AA batteries, low power consumption. And you can also u can connect with
your PC and transfer and connect with your remote and then send a message wirelessly.
Connection and installation
As shown in the diagram of wiring, it’s convenient to install.
Maintenance
Convenient system maintenance, need no effect:
1. Power line and data line must be connected according to the diagram. When the lines are not long enough,
the same longer lines are accepted.
2. Please pay attention to the positive and negative electrodes of the power line. These two electrodes can’t
be miss-connected. The rated voltage of the controller ranges from DC5 to DC15V, but in practice, it ranges
much wider. However, lower voltage may lead to the decrease of the screen brightness or the malfunction of
the screen.
3. When the remote is not in use, it is recommend that you switch off the power.
Page 2 of 7
FULL MATRIX - PRICE CHANGER DISPLAY USER MANUAL
Controller and Remote Hardware Instructions
Controller System description
Control System sends its saved data iteratively, about 10 seconds
for each refresh.
Brightness automatic adjustable function: Control system can adjust
sign brightness automatic by circumstance ray testing resistance.
At present, setting the sign 100% brightness in day, and setting
the sign 60% brightness in night in order to save more power
energy.
1
2
Data refresh, change the showing data by remote, the changed data will be saved in sign till you change data
again, or it will not lose in sign.
One controller can only connect 4 sets of price signs, the nearest sign is the NO.1, and near NO.1 is connected
to NO.2, No2 is connected to NO. 3 and No 3 is connected to NO.4. There are two communication connecto
on controller, so one controller can control 8 sets price signs.
Remote control instruction
1
Easy to use, once you have powered it on, you can go to Menu,
by pressing the Power button (as shown on diagram pg 4). After,
doing so you will have three options Price Changer, Setting &
Help. Once you have selected which category you need by using
your
arrows, press enter button (as shown on diagram pg
4). If you want to (ESC) for any reason or get out of a current
selection, press the ESC button (as shown on diagram pg 4).
When you want to connect to a PC, you can either Bluetooth or
go Wireless to connect the sign and remote to your PC!!!
The remote is powered by three 1.5V batteries. If it’s not
operated after three minutes, it will automatically enter into sleep
mode. And need to press “Power” or any key to operate. In
order to save the energy, we sincerely recommend you to switch
the power off if you don’t use the remote.
When the power of the batteries is low and the remote can’t work
normally, the batteries in the remote will need to be changed.
There is NO indicator for the batteries being low, you will have to
change the batteries periodically.
Page 3 of 7
2
FULL MATRIX - PRICE CHANGER DISPLAY USER MANUAL
Controller and Remote Hardware Instructions
NEWER
SERIES
1
OLDER
SERIES
Mini SD Port: for
secondary display
graphics
2
Page 4 of 7
FULL MATRIX - PRICE CHANGER DISPLAY USER MANUAL
Troubleshooting Guide
Important Notice:
Remember to always disconnect power to sign before servicing. We recommend that you use a certified
electrician.
Sign is not displaying:
• Turn power off to sign and leave off for 5-10 minutes and turn back on. This should reset the sign.
• Check to make sure that the circuit breaker is not overloaded and is the "ON" position
• Check the power supplies to be sure that they are getting an input voltage of 120VAC and outputting
the correct voltage to operate the display.
• Check the controller to be sure that it is powered and receiving the correct DC voltage.
• Check the communication cable between the controller and the first LED board.
• Check the input on the first LED board to be sure that it is receiving.
Sign is displaying but will not change message:
• Be sure to hit the "ENTER" button each time after you make a change to the price of a particular sign
number or the remote will not remember the changes that you have made and will not display the
new price after you hit the "SEND" button.
• Check the communication cable from the controller to the first LED board.
• Check the input on the first LED board to be sure that it is receiving.
Several boards are displaying correctly but the rest of the sign is not
displaying or displaying incorrectly:
• Check the communication cable from the last board displaying correctly to the first board
that is displaying incorrectly.
• Check the output of the last board displaying correctly
• Check the input of the first board that is displaying incorrectly.
• Check the wiring diagram to make sure that the communication cables are routed correctly.
• Check the power supply that is powering that part of the sign to make sure that it is functioning properly.
Page 5 of 7
FULL MATRIX - PRICE CHANGER DISPLAY USER MANUAL
PC Software Instructions
Summary
Gas price display sending system, Gas Price Ver1.0 & 2.0, is a PC software which is exclusively used to send
the price information to the gas price display. This software is operated together with the remote.
Gas Price Ver1.0 & 2.0 is a green software which needs no installation. Copy the file to your PC, click it twice, and
Copy the file to your PC, click it twice, and then you can use it. This software can only be used as a tool
to edit the gas price information. It is operated together with the gas price display, the remoter and
the LED display controller. It has no practical significance to use this software separately.
Computer configuration requirements: winXP/2000 operating system, one free USB interface at least.
Installation of hardware driver
and the search of COM No.
PL2303 is a conversion chip which converts USB interface of the remoter to COM port of the computer. If you
want to use the computer to operate the remoter that has USB interface, hardware driver, PL2303, must be
installed first. Full details are given in appendix “Installable Program”.
After installation, restart the computer, and connect the USB line of the remoter to the computer. The computer
will discover the hardware automatically. At this point, click “my computer”, find “properties” -> “hardware” ->
“device manager” -> “port”, then you can see the created USB-COM number.
Please insert the USB again when use next time.
Page 6 of 7
FULL MATRIX - PRICE CHANGER DISPLAY USER MANUAL
PC Software Instructions
Introduction of the operating interface and its
operation
Click the icon twice in the file to start
the software. This software needs no
installation and can be operated
directly. The operating interface is
shown as follows:
As shown here, the operating interface
consists of two parts. One is Gas Price
Display. The other is COM Port.
1. Display and edit the price info: Directly fill the gas price in the Gas Price Display window.
Save data: Click the button “Save Data” to save the edited data in your PC. When you start this software next
time, the previously saved data will be shown.
2. Choose hardware interface: When the USB line connects the remoter with the computer, a virtual COM
port will be created in the computer. First, we need to figure out the serial number of the created COM port.
Then, choose the corresponding serial number in the COM Port window. Click the button “Open COM Port”.
This button will turn grey if the serial number is correct. If not, please check the line connection or the COM
serial number.
3. Close COM Port: If you want to remove the USB line, please click the button “Close COM Port” first.
4. Send data: After setting the data and choosing the right COM port, click the button “Send Data” to send
the data, and corresponding message box will pop up, telling you whether it succeeded or not. If the data is
not sent successfully, please check the line connection or the setting.
5. Remark: The data sent from the PC to the remoter is of two-way communication. However, it’s one-way
communication between the remoter and the display.
Page 7 of 7