1
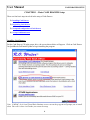
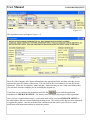
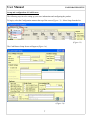
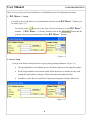
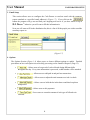
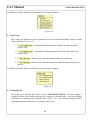
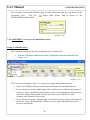
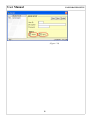
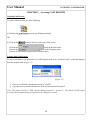
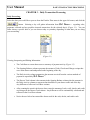
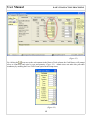
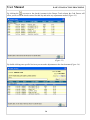
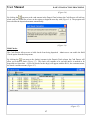
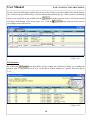
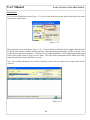
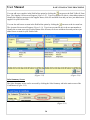
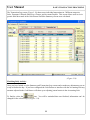
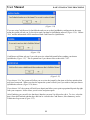
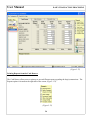
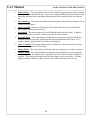
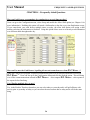
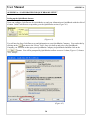
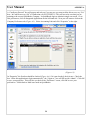
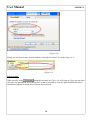
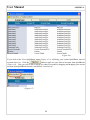
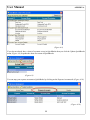
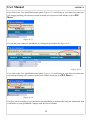
CASH DRAWER and
CASH DRAWER for QUICKBOOKS
Users Manual
Increase your back office efficiency and accuracy by integrating
R.O. Writer TM with your accounting system.
Powered By:
User Manual
TABLE OF CONTENTS
Copyright
©2000-2004 THE BACK OFFICE. All rights reserved. No part of this publication may be reproduced, stored in a
retrieval system, or transmitted in any form or by any means, electronic, mechanical, photocopying, recording or
otherwise, without the prior written consent of THE BACK OFFICE 1609 N. Ankeny Blvd., Suite 100, Ankeny, IA
50021.
The software described in this document is furnished under a license and may be used or copied only in accordance
with terms of that license.
Trademarks
MS Access is a trademark of Microsoft Corporation; R.O. Writer TM is a trademark of Progressive Automotive
Systems. All other names are trademarks or registered trademarks of their respective manufacturers.
All trademarks are the property of the respective companies. QuickBooks is a registered trademark and service mark
of Intuit, Inc. in the United States and other countries. For use with U.S. Editions of QuickBooks 2002-2004. The
Back Office, LLC is not a part of, nor affiliated with, Intuit Inc.
Changes
The material in this document is for information only and is subject to change without notice. While reasonable efforts
have been made in the preparation of this document to assure its accuracy, THE BACK OFFICE assumes no liability
resulting from errors or omissions in this document or from the use of the information contained herein.
1
User Manual
TABLE OF CONTENTS
CONTENTS
INTRODUCTION .....................................................................................................................3
Mission Statement .......................................................................................................................3
What is Cash Drawer? .................................................................................................................3
What is Cash Drawer for QuickBooks?.......................................................................................3
Who is The Back Office, LLC.....................................................................................................3
What kind of support is offered with Cash Drawer? ...................................................................3
How can I reach The Back Office, LLC, if I have questions?.....................................................3
CHAPTER 1 – BASIC CASH DRAWER SETUP..................................................................4
How do I setup Cash Drawer?
Installing Cash Drawer ..............................................................................................................4
Registering Cash Drawer ...........................................................................................................5
Set up and configuration of Cash Drawer..................................................................................7
Set up of Additional Users.........................................................................................................11
CHAPTER 2 – ACCESSING CASH DRAWER ....................................................................13
How do I open the Cash Drawer?
Opening Cash Drawer................................................................................................................13
Logging into Cash Drawer ........................................................................................................13
CHAPTER 3 – DAILY TRANSACTION PROCESSING………………………………….14
How do I utilize Cash Drawer?
Daily Processing .......................................................................................................................14
Held Checks...............................................................................................................................17
Edit Payments ............................................................................................................................18
Paid In/Out.................................................................................................................................19
Sales Summary Screen ..............................................................................................................20
Transaction Log Screen .............................................................................................................21
Finalizing Daily Activity .......................................................................................................22
Printing Reports from Cash Drawer .....................................................................................23
CHAPTER 4 – FREQUENTLY ASKED QUESTIONS....................................................... 26
How can Cash Drawer accommodate for counting down several times per day?.......................26
How can I be sure Cash Drawer is pulling all current transactions over from R.O. Writer?.......26
Can I finalize multiple days at once?...........................................................................................26
How do I contact technical support?............................................................................................27
What kind of maintenance is required? .......................................................................................27
APPENDIX A: “CASH DRAWER FOR QUICKBOOKS” ...............................................................28
APPENDIX B: “LICENSE AGREEMENT” .......................................................................................33
APPENDIX C: “SUPPORT AGREEMENT”......................................................................................35
2
User Manual
INTRODUCTION
INTRODUCTION
Mission Statement – Our goal at The Back Office is to provide high quality, highly functional software that
enables users to be more productive, more competitive, and most importantly more profitable. Keeping in
mind that our software handles critical business functions, we at The Back Office design all our software to
be flexible, stable and reliable. We stand behind our products and are confident they will meet or exceed
expectations.
What is Cash Drawer?
Cash Drawer allows users to quickly and easily count down their cash drawer at the end of each business day
or multiple times through out the business day if they choose to set up the shift option.
What is Cash Drawer for QuickBooks?
Cash Drawer for QuickBooks allows users to quickly and easily count down their cash drawer at the end of
each business day or multiple times through out the business day if they choose to set up the shift option and
transfer their information to QuickBooks with the click of a button.
Who is The Back Office, LLC?
The Cash Drawer was written by a CPA (the founder of The Back Office) and is supported by accounting
professionals who have experience with automotive industry accounting issues. We pride ourselves on
superior customer service and support and we will be with you to provide ongoing technical support.
What kind of support is offered with Cash Drawer?
THE BACK OFFICE prides itself on superior personalized customer support for all of our products.
Installation, setup, and configuration will be provided by your R.O. Writer TM distributor. We will provide
you with ongoing technical product support as you need it.
How can I reach The Back Office if I have questions?
We can be easily reached toll free at 1-866-964-9699. You can also email us at [email protected] , fax us at
515-964-5779 or check out our website at www.tboffice.net.
3
User Manual
CASH DRAWER SETUP
CHAPTER 1 – Basic CASH DRAWER Setup
There are four basic steps involved in the setup of Cash Drawer:
1) Installing Cash Drawer
2) Registering Cash Drawer
3) Set up and configuration of Cash Drawer
4) Set up of additional users
Installing Cash Drawer:
Put the Cash Drawer CD in the proper drive, the screen shown below will appear. Click on Cash Drawer
for QuickBooks Full Install/Update to begin installing the program.
Note: If MDAC, Jet 4.0 and Visual Basic Runtime are not current the program will prompt you to install
them. Once this is done it will make you restart the setup.
4
User Manual
CASH DRAWER SETUP
Next you will be prompted through several Cash Drawer install/setup screens. The following is a
chronological list of those screens. See attached document for install/setup screens.
1. Cash Drawer Setup – This a welcome screen. Click Next to continue.
2. License Agreement – Click in the appropriate box if you agree to the terms of the agreement
and then Next to continue.
3. User Information – Prompts you to enter your name and the company’s name. Click Next
after entering this information.
4. Installation Folder – the folder the program will be stored in. Click Next to continue.
5. Shortcut Folder – Shows where the shortcut to the program will be saved. Click in the
appropriate box if you want the shortcut to be available to all users or just the current user.
Click Next to continue.
6. Ready to Install – Click Install to begin the installation.
7. Installing Cash Drawer – The program will begin its installation. A progress indicator will be
displayed as the program installs.
8. Installation Complete – Installation is done, click Finish to end.
Registering Cash Drawer:
In order to use Cash Drawer you must register it. Registering the product allows you to keep users up-todate for support and maintenance purposes. To register, open Cash Drawer and go to the Help menu at
the top of the screen and choose Register (Figure 1.1).
To open the Cash Drawer program do one of the following:
a) Double click on the
icon on your Windows desktop.
OR
b) Click on the
button in the lower left corner of the screen.
Click on the
option in the Start menu.
Click on the
option in the Programs menu.
Click on the Cash Drawer option in the TBOffice menu.
5
User Manual
CASH DRAWER SETUP
(Figure 1.1)
The registration screen will appear (Figure 1.2).
(Figure 1.2)
Enter all of the Company and Contact information in the appropriate fields, and then select the Accept
option in the lower left corner of the screen. You can click on the View button to view the full license
agreement. Fill in the “Accepted by” name and date. Make sure that you use a valid email address that
you can check from the computer you are installing the program on.
Verify that you are connected to the Internet and click the
icon to send the registration
information to THE BACK OFFICE. The Status screen will display the progress of the registration.
Once you have completed these steps, a verification email will be sent from THE BACK OFFICE to
the email address that was entered in the Registration screen. This email verifies that you have attempted
to register the product. Once the order has been confirmed with the reseller you will receive email
notification with instructions on how to unlock the product.
6
User Manual
CASH DRAWER SETUP
Set up and configuration of Cash Drawer:
The following steps involve setting up your store information and configuring the product.
To begin, select the Configuration menu at the top of the screen (Figure 1.3). Select Setup from the list.
(Figure 1.3)
The Cash Drawer Setup Screen will appear (Figure 1.4).
(Figure 1.4)
7
User Manual
CASH DRAWER SETUP
There are seven (if you are using Cash Drawer for QuickBooks) areas of configuration and setup.
1. R.O. Writer TM Version
You need to direct Cash Drawer to read information from the current R.O. Writer TM database you
are using (Figure 1.5)..
By clicking on the
icon next to the Type: field you can browse to your R.O. Writer TM
database. If R.O. Writer TM is already installed click on the
program will go out and automatically find the R.O. Writer TM database.
button and the
(Figure 1.5)
2. Drawer Setup
Next go to the Drawer Setup section to set your opening and target balances (Figure 1.6).
•
The Opening Balance is the amount in your cash drawer when you start using the product.
•
Set the Target Balance to the amount usually left in the drawer to start the next day with
(setting the target balance is simply a default value and can be adjusted daily).
•
In addition, set the date you would like to begin processing data with the Cash Drawer.
(Figure 1.6)
8
User Manual
CASH DRAWER SETUP
3. Email Setup
This section allows users to configure the Cash Drawer to send an email with the summary
reports attached to a specified email address(s) (Figure 1.7). If you click on the
button the program will go out and find your outgoing mail server if you have email set up in
R.O. Writer TM otherwise you will want to fill this information in.
Next you will want to fill in the distribution list; this is a list of all the people you wish to send the
summary reports to.
(Figure 1.7)
4. Options
The Options Section (Figure 1.8) allows users to choose different options to enable. Detailed
procedures on how each option is used in daily processing can be found in Chapter 2 (Page 13).
•
– Allows users to keep track of cash collected during different shifts
throughout the day. Every time information is processed, a shift number will be attached.
•
– Allows users to add paid in and paid out transactions.
•
– Allows users to adjust the total amounts received via check.
•
– Allows users to hold checks in the drawer and thus keep them
undeposited.
•
- Allows users to edit payments.
•
– Forces users to count the amount of each type of bill and coin
collected.
9
User Manual
CASH DRAWER SETUP
To enable any of these options, click the box next to the specified option.
(Figure 1.8)
5. Credit Cards
The Credit Card options are related to payments received via credit cards and how they are treated
in the Cash Drawer (Figure 1.9).
•
– Automatically adds the amount collected in credit cards to the
Drawer Total.
•
– Automatically adds the amount collected in credit cards to the
Deposit Total.
•
– Allows users to edit the amounts collected in credit cards.
•
– Allows users to edit the amount of credit card charges deposited for
the day.
To enable any of these options, click the box next to the specified option.
(Figure 1.9)
6. Accounting Link
This setup step is optional and will be set up by THE BACK OFFICE. Technical support is
available to assist users with this step and can be reached at 1-866-964-9699. Users can configure
Cash Drawer to interface with Accounting Link (Figure 1.10). This can make keeping track of
adjustments and petty cash in their accounting system easier.
10
User Manual
CASH DRAWER SETUP
The Location ID and Export Path boxes help you map information from the Cash Drawer to the
Accounting Link.
Click the
button under Export Path to browse to the
TBOffice\TBOLink\Data folder.
(Figure 1.10)
7. See APPENDIX C for set up of the QuickBooks section.
Set up of Additional Users:
The Cash Drawer allows for the setup of additional users and passwords.
•
From the Cash Drawer Main Screen, select Configuration, then select Maintain Users
(Figure 1.15).
(Figure 1.15)
The Users screen will appear (Figure 1.16) and you can begin adding additional users.
•
Enter a User ID (three characters), Description and Password for the additional user.
•
If you want the user to have Admin rights, click on the box next to Admin at the bottom of
the screen. Users with Admin rights will have access to the configuration and setup screens
while users without Admin rights will only have access to the Cash Drawer, Sales
Summary, and Transaction Log screens.
•
If you want the user to have exporting right, click on the box next to Export at the bottom of
the screen. Users with Export rights will have access to export information from Cash
Drawer to QuickBooks.
11
User Manual
CASH DRAWER SETUP
(Figure 1.16)
12
User Manual
ACCESSING CASH DRAWER
CHAPTER 2 – Accessing CASH DRAWER
Opening Cash Drawer:
To open Cash Drawer do one of the following:
a) Click on the
icon on your Windows desktop.
OR
b) Click on the
button in the lower left corner of the screen.
Click on the
option in the Start menu.
Click on the
option in the Programs menu.
Click on the Cash Drawer option in the TBOffice menu.
Logging into Cash Drawer:
To open Cash Drawer you must enter a UserID and password in the “Security Check” screen that displays
then the program starts (Figure 2.1).
(Figure 2.1)
•
•
Select a user from the drop down list next to “UserID”
Type the correct password for that user in the text box labeled “Password”.
Note: The default UserID is “TBO” and the default password is “password”. The default UserID cannot
be deleted but the administrative password can be changed as needed.
13
User Manual
DAILY TRANSACTION PROCESSING
CHAPTER 3 – Daily Transaction Processing
Daily Processing:
Select the date you would like to process from the Finalize Thru menu in the upper left corner, and click the
button. Selecting a day will gather information from R.O. Writer TM regarding sales,
payments collected and any payables incurred transactions for the selected day(s) (Figure 3.1). You can
either choose a specific date or you can choose today or yesterday depending on what date you are doing
your reconciling.
(Figure 3.1)
Viewing, Interpreting and Editing Information:
•
The Cash Drawer screen shows users a summary of payment activity (Figure 3.2)
•
The Opening Balance column represents the amount of Cash, Checks and Charge receipts that
were in the drawer and undeposited at the beginning of the day.
•
The Daily Activity column summarizes the amounts received from the various methods of
payment as reported by R.O. Writer TM.
•
The Drawer Total column is the amounts in the Opening Balance column plus the amounts in
the Daily Activity column to represent what should be in your drawer at the end of the day.
Any differences reflect an Over/Short variance.
•
After counting the actual cash drawer down, enter the amounts of cash, verify checks, and credit
card charges in the Drawer Total column. Any differences will be automatically calculated and
reflected in the Over/Short column.
•
Notice the user below has entered the drawer total for the cash, checks, and credit cards.
14
User Manual
DAILY TRANSACTION PROCESSING
(Figure 3.2)
By clicking the
icon next to the cash amount in the Drawer Total column, the Cash Drawer will prompt
users to count bills and coins by type and quantity (Figure 3.3). Admin users can make this procedure
mandatory by enabling the Force Cash Count option in the Setup menu.
(Figure 3.3)
15
User Manual
DAILY TRANSACTION PROCESSING
By clicking the
icon next to the check(s) amount in the Drawer Total column, the Cash Drawer will
allow you to see all the checks entered for that day and make any adjustments needed (Figure 3.5).
(Figure 3.5)
By double clicking on a specific line item you can make adjustments to the check amount (Figure 3.6).
16
User Manual
DAILY TRANSACTION PROCESSING
(Figure 3.6)
By clicking the
icon next to the cash amount in the Deposit Total column, the Cash Drawer will ask how
much cash you would like to leave in the register to begin the next day with (Figure 3.4). The program will
then calculate the deposited amounts automatically.
(Figure 3.4)
Held Checks:
The Cash Drawer allows users to hold checks from being deposited. Admin users can enable the Hold
Checks option from the Setup menu.
By clicking the
icon next to the check(s) amount in the Deposit Total column, the Cash Drawer will
allow you to hold a check (Figure 3.7). The check will continue to be on hold until it is marked to be
deposited at a future date. A list of all checks for the day(s) will appear with the R.O.#, the customers name,
the check # and the amount (Figure 3.7).
(Figure 3.7)
17
User Manual
DAILY TRANSACTION PROCESSING
To put a check on hold simply uncheck the box next to the check(s) you wish to hold back from the deposit.
This will leave the specified check(s) out of the amount deposited for the day. When you have selected the
check(s) you would like to put on hold click the
icon at the top of the screen. All checks on hold
will appear at the bottom of the screen (Figure 3.8). Click the
save changes and exit this screen.
button at the top of the screen to
(Figure 3.8)
Edit Payments:
By clicking the
icon in the Daily Activity column, the Cash Drawer allows you to change the
payment type of a payment received. You can do this by double clicking on a specific line item (Figure
3.10).
(Figure 3.10)
18
User Manual
DAILY TRANSACTION PROCESSING
Paid In/Out:
To access the Paid In/Out screen (Figure 3.11) click on the Paid in/out menu option at the top of the main
screen in the Cash Drawer.
(Figure 3.11)
The paid in/out screen will appear (Figure 3.12). Choose Paid In or Paid Out and a supplier from the Paid
To/Rec’d From window, enter the amount, the date, a description, the payment type, and the “Account” they
would like the transaction changed to. Click Save to record the adjustment. A log of adjustment transactions
will be kept in this screen so users can view them. The effect of the transaction will be added to the daily
summary totals in the main Cash Drawer screen.
Note: After making adjustments users will be required to process the day again so any changes made will be
reflected.
(Figure 3.12)
19
User Manual
DAILY TRANSACTION PROCESSING
You can add a new supplier in the Paid In/Out option by clicking the
icon next to the Paid To/Rec’d From
box. The Supplier List screen will appear (Figure 3.13). Type in a supplier ID, this is a short abbreviation to
identify the supplier, next type in the supplier name, click save and then close and you have just added a new
supplier for your Paid In/Outs.
You can also add a new account in the Paid In/Out option by clicking the
icon next to the Account box.
The Account List screen will appear (Figure 3.14). Type in an account ID, this is the account number to
identify the account, next type in a description of the account, click save and then close and you have just
added a new account for your Paid In/Outs.
(Figure 3.13)
(Figure 3.14)
Sales Summary Screen:
The Sales Summary screen can be accessed by clicking the Sales Summary tab in the main screen of the
Cash Drawer (Figure 3.15).
(Figure 3.15)
20
User Manual
DAILY TRANSACTION PROCESSING
The Sales Summary screen (Figure 3.16) allows users to see information regarding Sales, COGS, Profit,
A/R, A/P and other activity as reported by R.O. Writer TM for the day(s) selected.
(Figure 3.16)
Transaction Log Screen:
The Transaction Log (Figure 3.17) screen can be accessed by clicking the Transaction Log tab on the top of
the screen.
(Figure 3.17)
21
User Manual
DAILY TRANSACTION PROCESSING
The Transaction Log screen (Figure 3.18) shows users individual transactions in 5 different categories,
Sales, Payments Collected, Other Fees, Charges, and Accounts Payable. This screen allows users to see in
greater detail how totals in the Cash Drawer and Sales Summary screens were calculated.
(Figure 3.18)
Finalizing Daily Activity:
Once you have looked over the Summary and Transaction Log screens and or made any adjustments you are
ready to finalize the day. If you have configured the Cash Drawer to interface with the Accounting Link any
amounts adjusted in the Cash Drawer will show up as adjusting journal entries in the Accounting Link.
To finalize, select the
icon. You will be reminded that once finalized, information can’t be
changed for the selected day(s) (Figure 3.19).
22
User Manual
DAILY TRANSACTION PROCESSING
(Figure 3.19)
If you are using Cash Drawer for QuickBooks and you set up the QuickBooks configuration in the setup
menu the system will ask you if you wish to send your data to QuickBooks software (Figure 3.20). Choose
“Yes” and the information will be transferred from Cash Drawer to QuickBooks.
(Figure 3.20)
Cash Drawer will then ask you if you wish to review a detailed journal before sending your data to
QuickBooks (Figure 3.21). This is optional but if you choose to do so then click “Yes”.
(Figure 3.21)
If you choose “Yes” the system will allow you to review the journal by line item to find any mistakes that
may have been made. When you close the reports the system will ask you if you wish to send your data to
QuickBooks software (Figure 3.20) above.
If you choose “No” the system will build your deposit and allow you to print a preprinted deposit slip right
from your computer. It also allows you to review and print reports.
After Finalizing you can still view that day(s) data but you won’t be allowed to edit it. To view, select the
day(s) from the Finalized and that days data can be viewed in the Cash Drawer, Sales Summary, and or
Transaction Log screens (Figure 3.22).
23
User Manual
DAILY TRANSACTION PROCESSING
(Figure 3.22)
Printing Reports from the Cash Drawer:
The Cash Drawer allows users to print up to seven different reports regarding the day(s) transactions. The
Reports option is located on the right side of the screen (Figure 3.23).
(Figure 3.23)
24
User Manual
DAILY TRANSACTION PROCESSING
•
Deposit Ticket – This report allows users to print a deposit slip representing all the funds that
were selected for deposit for the day. Users can even get QuickBooks pre printed deposit slip
forms that match up to this report thus eliminating the need to manually write out a deposit
slip.
•
Sales Summary – This report will display all the information from the Sales Summary Tab in
a printer friendly format.
•
Checks on Hold – This report will display all the checks that were placed on hold while
processing the specific day(s) activity.
•
Sales Detail – This report prepares a list of all the individual sales for the day. It displays
customer names, R.O. numbers, and the sales totals for each customer.
•
Payments Detail – This report displays information for all payments collected for the day.
Different payment sources are grouped together and information about the source, R.O.
number, customer and amounts received are also displayed.
•
Other Fee Detail – This report displays other fees such as tire disposal and other fee types
that were added to an R.O. Writer ticket.
•
Charge Detail – This report displays all charges that were charged on account by customer.
•
Payables Detail – The payables detail report displays information about accounts payable
transactions for the day whether they are payables incurred or checks written to vendors for
payables. The report groups transactions into two groups, invoices and checks. The date,
supplier, reference number (usually a check#), P.O. number and amount are shown.
25
User Manual
FREQUENTLY ASKED QUESTIONS
CHAPTER 4 – Frequently Asked Questions
How can Cash Drawer accommodate for counting down several times per day?
Users can go to the Configuration menu, select Setup and enable the Allow Shift option (see Chapter 1 for
more information). Enabling this option will attach a shift number to the date every time finalization occurs.
If you count down your cash drawer multiple times everyday, the allow shift option will assign a shift
number each time the information is finalized. Using this option allows users to accurately track information
over different shifts throughout the day.
How can I be sure the Cash Drawer is pulling all current transactions over from R.O. Writer TM?
When the Cash Drawer program is opened it automatically pulls over all current information recorded in
R.O. Writer TM. Users can also go to the Configuration menu and click the Refresh option. This will bring
over all the current transactions entered in R.O. Writer TM. Also compare R.O. Writer TM sales reports to
the reports before finalizing.
Can I finalize multiple days at once?
Yes, in the Finalize Thru drop down box you can select today or yesterday and it will pull all dates with
activity prior to yesterday or today or you can select the most current date to today and it will do the same
thing.
26
User Manual
FREQUENTLY ASKED QUESTIONS
How do I contact technical support?
If you need technical support regarding the Accounting Link please contact:
THE BACK OFFICE, LLC
Phone (515)-964-8261 or 1-866-964-9699
Fax
(515)-964-5779
Email [email protected]
What kind of maintenance is required?
THE BACK OFFICE charges an annual maintenance fee for its products. Included with the purchase of
Cash Drawer is one year of free maintenance and support. After the 1st year THE BACK OFFICE will
send the customer an “Annual Support Agreement”. This annual maintenance fee includes telephone and or
electronic support for THE BACK OFFICE products as well as product updates.
27
User Manual
APENDIX A
APPENDIX A: “CASH DRAWER FOR QUICKBOOKS SETUP”
Setting up the QuickBooks feature:
Users can configure Cash Drawer for QuickBooks to send your information to QuickBooks with the click of
a button. In the Cash Drawer set up menu go to the QuickBooks section (Figure A.1).
(Figure A.1)
You will need to direct Cash Drawer to send information to your QuickBooks Company. You can do this by
icon next to the “Direct” field. Once you browse and select your QuickBooks
clicking on the
Company you will need to then open your QuickBooks Company in QuickBooks and then click on the
button. You will be prompted by QuickBooks to allow access to it’s data (Figure A.2) choose
“Yes, Always”.
(Figure A.2)
28
User Manual
APENDIX A
A “Confirm to Proceed” box will pop up and ask you if you are sure you want to allow this access, say “Yes”
here. In Cash Drawer say “Ok” to Connection was SUCCESSFUL! This will test to be sure that you are
pointing to the correct QuickBooks Company. In QuickBooks login as Admin in single user mode. Go to
edit, preferences, click on Integrated Applications on the left hand side. Next you will want to click on the
Company Preferences tab (Figure A.3). Select Accounting Link and click “Properties” to the right.
(Figure A.3)
In “Properties” the first box should be checked (Figure A.4), if it is not checked, check it now. Check the
box “Allow this application to login automatically”, the “Login as:” box will fill in with “Admin”. Click OK
to save your properties. This will take you back to the “Preference” screen; click OK to save your
preferences. Switch back to Multi user mode in QuickBooks.
29
User Manual
APENDIX A
(Figure A.4)
Finally you will want to enter your QuickBooks class and your Sales Tax Vendor (Figure A.5).
(Figure A.5)
Edit Accounts:
button the Account List (Figure A.6) will come up. Here you can either
When you click on the
click on View QuickBooks if you already have a chart of accounts or click on Update QuickBooks to have
QuickBooks updated to include all accounts in the account list.
30
User Manual
APENDIX A
(Figure A.6)
If you click on the View QuickBooks menu (Figure A.7) it will bring your current QuickBooks chart of
accounts into view. Click the
button to pull over your chart of accounts from QuickBooks
(Figure A.8). Here you will be able to assign you chart of accounts by dragging and dropping your current
accounts from QuickBooks into the Cash Drawer “Activity List”.
(Figure A.7)
31
User Manual
APENDIX A
(Figure A.8)
If you do not already have a chart of accounts set up in QuickBooks then you click the Update QuickBooks
menu (Figure A.9) to update the chart of accounts in QuickBooks.
(FigureA.9)
You can map your expense accounts to QuickBooks by clicking on the Expense Accounts tab (Figure A.10).
(Figure A.10)
32
User Manual
APENDIX A
If you click on the View QuickBooks menu option (Figure A.11) it will bring up your chart of accounts and
you can drag and drop your expense accounts to match your expense accounts already set up in R.O.
Writer TM.
(Figure A.11)
You can map your vendors to QuickBooks by clicking on the Vendors tab (Figure A.12).
(Figure A.12)
If you click on the View QuickBooks menu option (Figure A.13) it will bring up your chart of accounts and
you can drag and drop your vendors to match your vendors already set up in R.O. Writer TM.
(Figure A.13)
You have just successfully set up Cash Drawer for QuickBooks to automatically send your information from
Cash Drawer to your QuickBooks Company with the click of a button.
33
User Manual
APPENDIX B
APPENDIX B: “LICENSE AGREEMENT”
IMPORTANT: Please read the following License Agreement thoroughly. If you Accept the
agreement, click on the Accept button.
To cancel the installation, click on the
Decline
button.
This is a legal agreement between Licensee and THE BACK OFFICE, LLC. ("THE BACK
OFFICE"). THE BACK OFFICE is willing to license this software to you only upon the
condition that you accept all of the terms and conditions contained in the following
license agreement. Please read the terms and conditions carefully as continuing with
the setup procedure will indicate your acceptance of all of the terms and conditions of
the license agreement ("agreement"). If you do not agree to the terms and conditions,
THE
BACK
OFFICE
is
unwilling
to
license
the
software
to
you.
Definitions
"Software" shall be taken as referring to the Accounting Link files supplied in the
software archive and to any and all copies, updates, modifications, functionallyequivalent
derivatives,
or
any
parts
or
portions
thereof.
"Licensor"
shall
be
taken
as
referring
to
THE
BACK
OFFICE,
LLC.
"Licensee" shall be taken as referring to the person or business entity who purchased
this License to use this Software or for whom such License was purchased.
Grant
of
License
Upon acceptance of the Agreement, as evidenced by continuing with the setup procedure,
THE BACK OFFICE grants Licensee a non-transferable, non-exclusive, non-sublicensable
license
to
use
the
enclosed
software
program
(the
"Software").
Copyright
The Software and the accompanying documentation may not be reproduced in any form,
except for the sole purpose of making a backup copy for archival purposes. You may not
reproduce
the
written
documentation
accompanying
the
Software.
Other
You may not use, copy, modify,
merged portion, in whole or
Agreement. Licensee shall not
Software or attempt to do so.
the
Restrictions
or transfer the Software or any copy, modification, or
in part, except as expressly provided for in this
decompile, disassemble, or reverse engineer any of the
Licensee shall not rent, lease, sublicense, or transfer
Software.
Proprietary
Rights
Other than any license granted herein, Licensor retains exclusive proprietary rights
(including all rights, title, and interest) in the Software. Licensee agrees not to
represent that the Licensor is affiliated with or approves of Licensee's application
software in any way.
Licensee shall not use Licensor's name, trademarks, or any
Licensor
designation
in
association
with
Licensee's
application
software.
Termination
This license is effective until terminated. Licensee may terminate it at any time by
destroying all copies of the Software covered by this Agreement and all support files
generated by the Software. It will also terminate if Licensee fails to comply with any
term or condition of this Agreement. Licensee agrees that upon such termination to
destroy this Software, including all copies, functionally-equivalent derivatives, and
all
portions
and
modifications
thereof
in
any
form.
Warranties:
Disclaimers
34
User Manual
APPENDIX B
THIS SOFTWARE IS PROVIDED "AS IS", WITHOUT WARRANTY OF ANY KIND, EITHER EXPRESSED OR
IMPLIED, INCLUDING, BUT NOT LIMITED TO, THE IMPLIED WARRANTIES OF MERCHANTABILITY AND
FITNESS FOR A PARTICULAR PURPOSE. THE ENTIRE RISK AS TO THE QUALITY AND PERFORMANCE
OF THE SOFTWARE IS WITH YOU. SHOULD THE SOFTWARE PROVE DEFECTIVE, YOU (NOT THE BACK
OFFICE, LLC.) ASSUME THE ENTIRE COST OF ALL NECESSARY SERVICING, REPAIR, OR CORRECTION.
The Back Office does not warrant that the functions contained in this Software will
meet your requirements or that the operation of this Software will be uninterrupted or
error-free.
Remedies:
Limitations
Licensee's sole and exclusive remedy against Licensor shall be, at Licensor's sole
discretion:
a. the replacement of any diskette not meeting The Back Office's "Limited Warranty"
and
which
is
returned
to
The
Back
Office,
or
b. if The Back Office is unable to deliver a replacement diskette which is free of
defects in materials or workmanship, you may terminate this Agreement by returning this
Software
and
your
money
will
be
refunded.
IN NO EVENT WILL THE BACK OFFICE, LLC. BE LIABLE TO YOU FOR ANY DAMAGES, INCLUDING ANY
LOST PROFITS, LOST SALES, INJURY TO PERSON OR PROPERTY OR ANY OTHER INCIDENTAL OR
CONSEQUENTIAL DAMAGES ARISING OUT OF THE USE OR INABILITY TO USE THIS SOFTWARE EVEN IF
THE BACK OFFICE, LLC. OR ITS AUTHORIZED REPRESENTATIVE(S) HAS BEEN ADVISED OF THE
POSSIBILITY OF SUCH DAMAGES, OR FOR ANY CLAIM BY ANY OTHER PARTY. IN NO EVENT SHALL
LICENSOR'S LIABILITY EXCEED AMOUNTS PAID TO LICENSOR BY LICENSEE UNDER THE TERMS OF THE
AGREEMENT.
General:
Licensee may not sublicense, assign or otherwise transfer this License or Software
except as expressly provided in this Agreement. Any attempt to otherwise sublicense,
assign, or transfer any of the rights, duties or obligations hereunder is expressly
prohibited
and
will
terminate
this
Agreement.
By continuing the setup procedure, Licensee acknowledges that Licensee has read this
agreement, understands it, and agrees to be bound by its terms and conditions.
Licensee further agrees that this is the complete and exclusive statement of the
agreement between us, which supercedes any proposal or prior agreement, oral or
written, and any other communications between us relating to the subject matter of this
agreement.
This
Agreement
will
be
governed
by
the
laws
If you Accept the agreement, click on the Accept button.
click on the Decline button.
35
of
the
Iowa,
USA.
To cancel the installation,
User Manual
APPENDIX C
APPENDIX C: “SUPPORT AGREEMENT”
The Back Office shall provide support and updates for the above referenced Software
subject to the following conditions:
Remote Support:
The Back Office agrees to make available to Licensee telephone and or electronic
support during The Back Office's normal business hours (8:00am to 5:00pm Central time,
Monday through Friday, excluding holidays). Licensee must have Internet connection and
a working copy of PCAnywhere (or other acceptable remote desktop sharing software) for
use in diagnosing problems.
Fees:
Licensee agrees to pay The Back Office an annual fee for support in accordance with the
charges referenced above. All fees are payable in advance at the time of signature of
this agreement.
Malfunction Correction:
The Back Office will provide a reasonable resolution or 'fix' to Software malfunctions,
errors or problems in a timely manner. The Licensee must provide adequate information
and documentation to enable The Back Office to recreate the malfunction, error or
problem.
General:
The Back Office shall have no responsibility for hardware or software which has been
subject to improper use, accident, neglect or modification. It is beyond the scope of
support provided by The Back Office to train and/or Support software not manufactured
buy us, including but not limited to Microsoft Windows, Microsoft Internet Explorer and
PCAnywhere.
Enhancements and Releases:
The Back Office may from time to time, at its discretion, issue Enhancements, Releases
and Database Updates to improve functionality and useful of the Software. Licensee
will receive (via internet) at no charge all Updates to the Software issued by The Back
Office during the term of this agreement. Such Updates will be distributed to the
Licensee within 12 months after The Back Office has made it available to Licensee, The
Back Office will have no further obligation to provide support on those parts of the
Software updated by such update.
36