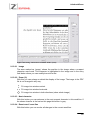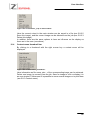
1
OMNISCAN 12
User Manual
TS-0682E 06.06.2008
ZEUTSCHEL GmbH, Heerweg 2, D-72070 Tübingen-Hirschau, Germany
Table of Contents
Table of Contents
1
Preface .................................................................................. 13
2
Upgrade recomendations .................................................... 15
2.1
Special hints for changing from Omniscan 11.8 (or earlier) to 12.0 (or later)15
2.2
Upgrade Omniscan 11.x to 12.x...................................................................... 15
2.3
Suggested upgrade procedure ....................................................................... 15
3
Introduction .......................................................................... 17
3.1
Scan concept ................................................................................................... 17
3.2
Structure of the manual................................................................................... 19
4
System Requirements.......................................................... 20
4.1
PC ..................................................................................................................... 20
4.2
Operating system ............................................................................................ 20
5
Quick Introduction ............................................................... 21
5.1
5.1.1
Express mode .................................................................................................. 21
Display this dialog each time when Omniscan starts.......................................... 21
5.2
5.2.1
5.2.2
5.2.3
Create new job ................................................................................................. 22
Job name........................................................................................................... 22
Directory to save the scan job:........................................................................... 22
Job parameters.................................................................................................. 23
5.3
Open job........................................................................................................... 23
5.4
Scan.................................................................................................................. 24
5.5
Rescan.............................................................................................................. 25
5.6
5.6.1
5.6.2
Cutouts............................................................................................................. 25
Insert cutouts ..................................................................................................... 25
Delete cutouts.................................................................................................... 27
5.6.2.1
5.6.2.2
5.6.2.3
5.6.2.4
5.6.2.5
Cutout number................................................................................................................................. 27
With the color................................................................................................................................... 27
Also delete corresponding image .................................................................................................... 28
Yes .................................................................................................................................................. 28
No .................................................................................................................................................... 28
5.6.3
5.6.4
Edit cutout settings (graphically) ........................................................................ 28
Activate cutout frame ......................................................................................... 30
2
Table of Contents
5.7
5.7.1
5.7.2
5.7.3
5.7.4
5.7.5
Image processing ............................................................................................ 30
...individually and manually after the scanning ................................................... 31
...after scanning to batches and manually.......................................................... 32
...during scanning to batches and automatically................................................. 32
...during job termination to batches and automatically........................................ 32
Set-up dialog for image processing tools ........................................................... 33
5.8
5.8.1
5.8.2
5.8.3
Thumbnail bar.................................................................................................. 35
Placing of the thumbnails................................................................................... 37
Moving the thumbnail bar................................................................................... 37
Context menu .................................................................................................... 38
5.8.3.1
5.8.3.2
5.8.3.3
5.8.3.4
5.8.3.5
5.8.3.6
5.8.3.7
5.8.3.8
Image Information............................................................................................................................ 39
Insert................................................................................................................................................ 39
Delete this image............................................................................................................................. 39
Delete selected image(s) ................................................................................................................. 39
Save this image ............................................................................................................................... 40
Open in a new window..................................................................................................................... 40
Insert selected image(s) before or behind ....................................................................................... 40
Print selected image(s) .................................................................................................................... 40
6
Program Options .................................................................. 41
6.1
6.1.1
6.1.2
6.1.3
6.1.4
6.1.5
6.1.6
6.1.7
6.1.8
6.1.9
6.1.10
6.1.11
6.1.12
6.1.13
6.1.14
6.1.15
Omniscan ......................................................................................................... 41
Language .......................................................................................................... 41
Create cutout immediately again........................................................................ 41
Remember position and zoom of the extra window(s)........................................ 42
Beep after the scan............................................................................................ 42
Beep after image processing ............................................................................. 42
Display insert image .......................................................................................... 42
Display test period warning................................................................................ 42
Display inactive frames...................................................................................... 43
Display progress................................................................................................ 43
Use the simulated book cradle........................................................................... 43
Create thumbnails.............................................................................................. 43
Default job directory........................................................................................... 43
Default job name ............................................................................................... 43
Counter start value ............................................................................................ 43
Increment name................................................................................................. 43
6.1.15.1
6.1.15.2
6.1.15.3
6.1.15.4
Mode................................................................................................................................................ 44
Expert Mode .................................................................................................................................... 44
Book Scan Mode ............................................................................................................................. 44
Easy Mode....................................................................................................................................... 44
6.1.16
6.1.17
6.1.18
Scan delay......................................................................................................... 44
Pass word.......................................................................................................... 44
More Settings .................................................................................................... 46
6.1.18.1
6.1.18.2
6.1.18.3
6.1.18.4
6.1.18.5
6.1.18.6
6.1.18.7
6.1.18.8
6.1.18.9
6.1.18.10
6.1.18.11
6.1.18.12
6.1.18.13
Aliasing method ............................................................................................................................... 46
Size of the marker in pixels.............................................................................................................. 46
Linie size.......................................................................................................................................... 46
Display targets outside (instead of inside) ....................................................................................... 46
Keep position of the cutouts (instead of size) .................................................................................. 47
Display express mode dialog........................................................................................................... 47
Use multithreading........................................................................................................................... 47
Use the filter assistent ..................................................................................................................... 47
Show clip settings on new job.......................................................................................................... 47
Page up after scan .......................................................................................................................... 47
Keep rawscan in memory ................................................................................................................ 47
Do scanner test (continous mode only) ........................................................................................... 47
ROI full width ................................................................................................................................... 47
3
Table of Contents
6.2
6.2.1
6.2.2
6.2.3
6.2.4
6.2.5
6.2.6
6.2.7
6.2.8
6.2.9
6.2.10
6.2.11
6.2.12
6.2.13
6.2.14
6.2.15
6.2.16
6.2.17
6.2.18
6.2.19
6.2.20
6.2.21
6.2.22
Extended settings Omniscan 12..................................................................... 49
General.............................................................................................................. 49
FullscanFirst ...................................................................................................... 49
SkipCheck ......................................................................................................... 49
MagnifierSize..................................................................................................... 49
ProcessLogging................................................................................................. 49
UseCardReader................................................................................................. 50
MetaDataOnFragments ..................................................................................... 50
BeepOnStartScan.............................................................................................. 51
CheckMemoryAvailable ..................................................................................... 51
ShowMemoryWarning ....................................................................................... 51
SuppressResWarning........................................................................................ 52
SuppressRedock ............................................................................................... 52
CorrectSubfileType ............................................................................................ 52
FootPedalMode ................................................................................................. 53
PercentUpscale ................................................................................................. 53
ShowThumbIDs ................................................................................................. 53
ShowTrialWarning ............................................................................................. 53
ShowTrialEnd .................................................................................................... 54
ShowScannerResolution.................................................................................... 54
ROIFullWidth ..................................................................................................... 54
ContinousRescan .............................................................................................. 55
StartScanOnGlas............................................................................................... 55
6.3
6.3.1
6.3.2
6.3.3
6.3.4
6.3.5
6.3.6
Color management .......................................................................................... 56
Scanner profile .................................................................................................. 56
Automatic .......................................................................................................... 56
Monitor profile.................................................................................................... 56
Printer profile ..................................................................................................... 57
Target profile ..................................................................................................... 57
Color management active .................................................................................. 57
7
Job Options .......................................................................... 58
7.1
7.1.1
7.1.2
7.1.3
7.1.4
7.1.5
7.1.6
7.1.7
7.1.8
7.1.9
7.1.10
7.1.11
7.1.12
7.1.13
7.1.14
7.1.15
7.1.16
7.1.17
7.1.18
7.1.19
Cutout settings ................................................................................................ 59
Select cutout...................................................................................................... 60
Cutout group...................................................................................................... 60
Page.................................................................................................................. 60
Create cutout ..................................................................................................... 61
Frame color ....................................................................................................... 62
Copy settings from............................................................................................. 62
Unit .................................................................................................................... 62
Automatic Adaption............................................................................................ 62
Distance from the left......................................................................................... 62
Distance from above.......................................................................................... 62
Width ................................................................................................................. 63
Height ................................................................................................................ 63
Use geometrie off .............................................................................................. 63
Standard paper size........................................................................................... 63
Portrait/landscape format................................................................................... 63
Left .................................................................................................................... 63
Right .................................................................................................................. 64
Centering........................................................................................................... 64
Couple cutout 1 and 2........................................................................................ 64
4
Table of Contents
7.1.20
7.1.21
7.1.22
7.1.23
7.1.24
7.1.25
7.1.26
7.1.27
7.1.28
7.1.29
7.1.30
Save settings ..................................................................................................... 64
Reject changes.................................................................................................. 64
New clip............................................................................................................. 64
Resolution in dpi ................................................................................................ 64
Method of interpolation ...................................................................................... 64
Colors/gray levels .............................................................................................. 65
File format ......................................................................................................... 65
Compression factor............................................................................................ 65
Use filter of ........................................................................................................ 66
Process all cutouts directly after the scan .......................................................... 66
Image processing .............................................................................................. 66
7.1.30.1
7.1.30.2
7.1.30.3
7.1.30.4
7.1.30.5
7.1.30.6
7.1.30.7
7.1.30.8
7.1.30.9
Available image processing tools .................................................................................................... 67
Active image processing tools ......................................................................................................... 67
Add .................................................................................................................................................. 69
Remove ........................................................................................................................................... 69
Up... ................................................................................................................................................. 69
Down... ............................................................................................................................................ 69
Save ................................................................................................................................................ 69
Load................................................................................................................................................. 69
Conceptiual Changes ...................................................................................................................... 69
7.2
7.2.1
Scan settings ................................................................................................... 69
Scan mode ........................................................................................................ 70
7.2.1.1
7.2.1.2
7.2.1.3
Complete scan................................................................................................................................. 70
Circumscribing rectangle / ROI frame.............................................................................................. 70
First scan always fullscan ................................................................................................................ 70
7.2.2
7.2.3
7.2.4
7.2.5
7.2.6
7.2.7
7.2.8
7.2.9
Image processing .............................................................................................. 70
Scanner reset .................................................................................................... 71
Extended ........................................................................................................... 71
Use filter of ........................................................................................................ 71
Brightness ......................................................................................................... 71
Contrast............................................................................................................. 71
Resolution in dpi ................................................................................................ 71
Colors/gray levels .............................................................................................. 71
7.3
7.3.1
7.3.2
7.3.3
7.3.4
7.3.5
7.3.6
7.3.7
7.3.8
7.3.9
7.3.10
7.3.11
7.3.12
7.3.13
7.3.14
Meta data.......................................................................................................... 71
Entry name ........................................................................................................ 73
Job-specific........................................................................................................ 73
Scan-specific ..................................................................................................... 74
Cutout-specific................................................................................................... 75
Chapter-specific................................................................................................. 75
Count................................................................................................................. 76
Close on enter ................................................................................................... 77
Use text from filter (Barcode) ............................................................................. 77
Show this item in extra window .......................................................................... 77
Value ................................................................................................................. 77
Add.................................................................................................................... 77
Delete ................................................................................................................ 77
Use entry as TIFF tag no. .................................................................................. 77
Index export....................................................................................................... 79
7.3.14.1
7.3.14.2
7.3.14.3
7.3.14.4
7.3.14.5
7.3.14.6
7.3.14.7
7.3.14.8
7.3.14.9
Entry separator ................................................................................................................................ 79
Data set separator ........................................................................................................................... 79
Available entries .............................................................................................................................. 79
Active entries ................................................................................................................................... 80
Add >> ............................................................................................................................................. 80
<< Remove ...................................................................................................................................... 80
Up /\ ................................................................................................................................................. 80
Down \/ ............................................................................................................................................ 80
Create XML Output.......................................................................................................................... 80
5
Table of Contents
7.3.14.10 Output file name .............................................................................................................................. 82
7.4
7.4.1
Job completion ................................................................................................ 82
Renaming .......................................................................................................... 83
7.4.1.1
7.4.1.2
7.4.1.3
7.4.1.4
Numbering starts ............................................................................................................................. 83
Increment......................................................................................................................................... 83
Digits................................................................................................................................................ 83
File name......................................................................................................................................... 83
7.4.2
Use job completion stack ................................................................................... 85
7.4.2.1
7.4.2.2
7.4.2.3
7.4.2.4
7.4.2.5
7.4.2.6
Available job completions ................................................................................................................ 86
Selected job completions................................................................................................................. 86
Add >> ............................................................................................................................................. 86
<< Remove ...................................................................................................................................... 86
Up /\ ................................................................................................................................................. 86
Down \/ ............................................................................................................................................ 87
7.4.3
7.4.4
7.4.5
7.4.6
Print all images .................................................................................................. 87
Move complete job............................................................................................. 87
Start a new job after job termination (same parameters).................................... 87
Delete all job files after termination .................................................................... 87
7.5
7.5.1
7.5.2
7.5.3
7.5.4
Job Settings ..................................................................................................... 88
Tracker border width.......................................................................................... 88
Use only active clips to evaluate scan mode...................................................... 88
Check URI for each image................................................................................. 89
Toolbars ............................................................................................................ 89
8
Image Processing Tools ...................................................... 90
8.1
8.1.1
Imaging kit........................................................................................................ 90
Median filter ....................................................................................................... 90
8.1.1.1
8.1.1.2
8.1.1.3
Purpose ........................................................................................................................................... 90
Mode of operation............................................................................................................................ 90
Set-up options ................................................................................................................................. 90
8.1.2
Sharpen............................................................................................................. 91
8.1.2.1
8.1.2.2
8.1.2.3
Purpose ........................................................................................................................................... 91
Mode of operation............................................................................................................................ 91
Set-up options ................................................................................................................................. 91
8.1.3
Smooth .............................................................................................................. 91
8.1.3.1
8.1.3.2
8.1.3.3
Purpose ........................................................................................................................................... 91
Mode of operation............................................................................................................................ 92
Set-up options ................................................................................................................................. 92
8.1.4
Rotation ............................................................................................................. 92
8.1.4.1
8.1.4.2
8.1.4.3
Purpose ........................................................................................................................................... 92
Mode of operation............................................................................................................................ 92
Set-up options ................................................................................................................................. 93
8.1.5
Unsharp masking............................................................................................... 93
8.1.5.1
8.1.5.2
8.1.5.3
Purpose ........................................................................................................................................... 93
Mode of operation............................................................................................................................ 93
Set-up options ................................................................................................................................. 94
8.1.6
Cut..................................................................................................................... 95
8.1.6.1
8.1.6.2
8.1.6.3
Purpose ........................................................................................................................................... 95
Mode of operation............................................................................................................................ 96
Set-up options ................................................................................................................................. 96
8.1.7
Deskew.............................................................................................................. 98
8.1.7.1
8.1.7.2
8.1.7.3
Purpose ........................................................................................................................................... 98
Mode of operation............................................................................................................................ 99
Set-up options ................................................................................................................................. 99
8.1.8
Despeckle........................................................................................................ 101
8.1.8.1
8.1.8.2
Purpose ......................................................................................................................................... 101
Set-up options ............................................................................................................................... 101
6
Table of Contents
8.1.9
Flip .................................................................................................................. 101
8.1.9.1
8.1.9.2
8.1.9.3
Purpose ......................................................................................................................................... 101
Mode of operation.......................................................................................................................... 101
Set-up options ............................................................................................................................... 101
8.1.10
Inverting........................................................................................................... 102
8.1.10.1
8.1.10.2
8.1.10.3
Purpose ......................................................................................................................................... 102
Mode of operation.......................................................................................................................... 102
Set-up options ............................................................................................................................... 102
8.1.11
Stamp .............................................................................................................. 102
8.1.11.1
8.1.11.2
8.1.11.3
Purpose ......................................................................................................................................... 102
Mode of operation.......................................................................................................................... 102
Set-up options ............................................................................................................................... 103
8.1.12
Automatic printing ............................................................................................ 105
8.1.12.1
8.1.12.2
8.1.12.3
Purpose ......................................................................................................................................... 105
Mode of operation.......................................................................................................................... 105
Set-up options ............................................................................................................................... 105
8.1.13
Binarization...................................................................................................... 107
8.1.13.1
8.1.13.2
8.1.13.3
Purpose ......................................................................................................................................... 107
Mode of operation.......................................................................................................................... 107
Set-up options ............................................................................................................................... 107
8.1.14
Graduation curve (color) .................................................................................. 109
8.1.14.1
8.1.14.2
8.1.14.3
Purpose ......................................................................................................................................... 109
Mode of operation.......................................................................................................................... 109
Set-up options ............................................................................................................................... 109
8.1.15
8.1.16
Graduation curve (gray level)........................................................................... 116
Include color correction.................................................................................... 116
8.1.16.1
8.1.16.2
8.1.16.3
8.1.16.4
Purpose ......................................................................................................................................... 116
Mode of operation.......................................................................................................................... 116
Set-up options ............................................................................................................................... 116
Corresponding setting in the section color management............................................................... 117
8.1.17
Read barcode .................................................................................................. 117
8.1.17.1
8.1.17.2
8.1.17.3
Purpose ......................................................................................................................................... 117
Mode of operation.......................................................................................................................... 117
Set-up options ............................................................................................................................... 117
8.1.18
Scale ............................................................................................................... 118
8.1.18.1
8.1.18.2
8.1.18.3
Purpose ......................................................................................................................................... 118
Mode of operation.......................................................................................................................... 118
Set-up options ............................................................................................................................... 119
8.1.19
Cut/add border................................................................................................. 124
8.1.19.1
8.1.19.2
8.1.19.3
Purpose ......................................................................................................................................... 124
Mode of operation.......................................................................................................................... 124
Set-up options ............................................................................................................................... 124
8.1.20
Add ruler.......................................................................................................... 125
8.1.20.1
8.1.20.2
8.1.20.3
Purpose ......................................................................................................................................... 125
Mode of operation.......................................................................................................................... 125
Set-up options ............................................................................................................................... 126
8.1.21
Optical character recognition (OCR) ................................................................ 126
8.1.21.1
8.1.21.2
Purpose ......................................................................................................................................... 126
Set-up options ............................................................................................................................... 127
8.1.22
Command........................................................................................................ 128
8.1.22.1
8.1.22.2
8.1.22.3
Purpose ......................................................................................................................................... 128
Mode of operation.......................................................................................................................... 128
Set-up options ............................................................................................................................... 128
8.1.23
Trim to print space ........................................................................................... 129
8.1.23.1
8.1.23.2
8.1.23.3
Purpose ......................................................................................................................................... 129
Mode of operation.......................................................................................................................... 129
Set-up options ............................................................................................................................... 130
8.1.24
Add clip............................................................................................................ 134
8.1.24.1
8.1.24.2
8.1.24.3
Purpose ......................................................................................................................................... 134
Method of operation....................................................................................................................... 134
Possible settings............................................................................................................................ 134
8.1.25
Paper white...................................................................................................... 135
8.1.25.1
Purpose ......................................................................................................................................... 135
7
Table of Contents
8.1.25.2
8.1.25.3
Method of operation....................................................................................................................... 135
Possible settings............................................................................................................................ 136
8.1.26
Saturation ........................................................................................................ 140
8.1.26.1
8.1.26.2
8.1.26.3
Purpose ......................................................................................................................................... 140
Mode of operation.......................................................................................................................... 140
Possible settings............................................................................................................................ 140
8.2
8.2.1
Optional image processing modules ........................................................... 141
Orthoscan........................................................................................................ 141
8.2.1.1
8.2.1.2
8.2.1.3
8.2.1.4
Purpose ......................................................................................................................................... 141
Boundary conditions ...................................................................................................................... 143
Set-up options ............................................................................................................................... 148
Ortho plus ...................................................................................................................................... 149
9
Job Terminations ............................................................... 151
9.1
Hermes digital................................................................................................ 151
9.2
E-mail.............................................................................................................. 151
9.3
Flyers.............................................................................................................. 151
9.4
HAriel.............................................................................................................. 151
9.5
LEA ................................................................................................................. 151
9.6
Subito ............................................................................................................. 152
9.7
9.7.1
9.7.2
9.7.3
9.7.4
Create multi image file................................................................................... 152
Cutout.............................................................................................................. 152
File format ....................................................................................................... 153
JPEG quality/compression factor ..................................................................... 153
File name......................................................................................................... 154
9.8
9.8.1
9.8.2
9.8.3
9.8.4
9.8.5
9.8.6
9.8.7
9.8.8
Print all images .............................................................................................. 155
Cutout.............................................................................................................. 156
Printer.............................................................................................................. 156
Fit to paper ...................................................................................................... 157
Double first image............................................................................................ 157
Quick mode ..................................................................................................... 157
Footer line ....................................................................................................... 157
Paper alignment .............................................................................................. 157
Options ............................................................................................................ 158
9.9
Copy files to ................................................................................................... 158
9.10
FTP transmission........................................................................................... 159
9.11
9.11.1
9.11.2
User-defined command ................................................................................. 159
Settings ........................................................................................................... 159
Special cases .................................................................................................. 160
9.12
9.12.1
9.12.2
9.12.3
Searchable PDF ............................................................................................. 160
Clip .................................................................................................................. 160
Skip images ..................................................................................................... 161
File name......................................................................................................... 161
8
Table of Contents
9.12.4
9.12.5
9.12.6
9.12.7
9.12.8
9.12.9
Create PDF/A-1b compatible file...................................................................... 161
Add job name .................................................................................................. 161
Ask for filename............................................................................................... 161
Use image resolution (otherwise 72 dpi) .......................................................... 161
Create text file ................................................................................................. 161
Interaktive correction mode.............................................................................. 161
9.12.9.1
9.12.9.2
9.12.9.3
9.12.9.4
9.12.9.5
9.12.9.6
9.12.9.7
9.12.9.8
9.12.9.9
Image............................................................................................................................................. 163
Zoom (%)....................................................................................................................................... 163
Next character ............................................................................................................................... 163
Reset word / reset line ................................................................................................................... 163
Next word / Next line...................................................................................................................... 164
Previous word / previous line......................................................................................................... 164
Next page ...................................................................................................................................... 164
Cancel interactivity......................................................................................................................... 164
Cancel correction........................................................................................................................... 164
9.12.10 Details ............................................................................................................. 165
9.12.10.1 Case sensitifity .............................................................................................................................. 165
9.12.10.2 Detect style of lettering automatically ............................................................................................ 165
9.12.10.3 Quality level ................................................................................................................................... 165
9.12.11 Language ........................................................................................................ 165
9.13
9.13.1
9.13.2
9.13.3
9.13.4
OCR ................................................................................................................ 166
Clip .................................................................................................................. 166
Skip images ..................................................................................................... 166
Filename.......................................................................................................... 167
Header............................................................................................................. 167
9.14
9.14.1
9.14.2
XML................................................................................................................. 167
XML source file name ...................................................................................... 167
Target directory ............................................................................................... 167
10
User Interface ..................................................................... 168
10.1
10.1.1
Menu commands ........................................................................................... 168
Menu file.......................................................................................................... 168
10.1.1.1
10.1.1.2
10.1.1.3
10.1.1.4
10.1.1.5
10.1.1.6
10.1.1.7
10.1.1.8
10.1.1.9
10.1.1.10
10.1.1.11
New... ............................................................................................................................................ 168
Open.............................................................................................................................................. 168
Close ............................................................................................................................................. 168
Delete last cutout........................................................................................................................... 168
Delete selected image(s) ............................................................................................................... 168
Save job settings with .................................................................................................................... 168
Save as default job ........................................................................................................................ 168
Factory settings ............................................................................................................................. 168
Terminate ...................................................................................................................................... 168
Print... ............................................................................................................................................ 170
Exit................................................................................................................................................. 171
10.1.2
Menu image processing function ..................................................................... 172
10.1.2.1
10.1.2.2
10.1.2.3
10.1.2.4
10.1.2.5
10.1.2.6
10.1.2.7
10.1.2.8
10.1.2.9
10.1.2.10
10.1.2.11
10.1.2.12
10.1.2.13
10.1.2.14
Use the image processing dialog................................................................................................... 172
Back............................................................................................................................................... 172
Deskew manually .......................................................................................................................... 172
Erase ............................................................................................................................................. 172
Erase once .................................................................................................................................... 172
Cut ................................................................................................................................................. 172
Cut once ........................................................................................................................................ 173
Rotate left ...................................................................................................................................... 173
Rotate right .................................................................................................................................... 173
Upside down.................................................................................................................................. 173
Sharpen ......................................................................................................................................... 173
Smooth .......................................................................................................................................... 173
Median filter ................................................................................................................................... 173
Rotation ......................................................................................................................................... 173
9
Table of Contents
10.1.2.15
10.1.2.16
10.1.2.17
10.1.2.18
10.1.2.19
10.1.2.20
10.1.2.21
10.1.2.22
10.1.2.23
10.1.2.24
10.1.2.25
10.1.2.26
10.1.2.27
10.1.2.28
10.1.2.29
10.1.2.30
10.1.2.31
Orthoscan ...................................................................................................................................... 173
Unsharp masking........................................................................................................................... 174
Cut ................................................................................................................................................. 174
Deskew.......................................................................................................................................... 174
Despeckle...................................................................................................................................... 174
Flip................................................................................................................................................. 174
Inverting......................................................................................................................................... 174
Stamp ............................................................................................................................................ 174
Automatic print............................................................................................................................... 175
Binarization.................................................................................................................................... 175
Graduation curve ........................................................................................................................... 175
Include color correction.................................................................................................................. 175
Read barcode ................................................................................................................................ 175
Scale.............................................................................................................................................. 175
Add/cut border ............................................................................................................................... 176
Paper white.................................................................................................................................... 176
Saturation ...................................................................................................................................... 176
10.1.3
Menu overview ................................................................................................ 177
10.1.3.1
10.1.3.2
10.1.3.3
10.1.3.4
10.1.3.5
10.1.3.6
10.1.3.7
10.1.3.8
10.1.3.9
10.1.3.10
10.1.3.11
10.1.3.12
10.1.3.13
10.1.3.14
10.1.3.15
10.1.3.16
10.1.3.17
10.1.3.18
10.1.3.19
10.1.3.20
10.1.3.21
Current scan .................................................................................................................................. 177
First image..................................................................................................................................... 177
Last image ..................................................................................................................................... 177
All................................................................................................................................................... 177
Maximize ....................................................................................................................................... 177
Minimize ........................................................................................................................................ 177
1 to 1.............................................................................................................................................. 177
Maximize rectangle........................................................................................................................ 177
Symbol bar .................................................................................................................................... 177
Status bar ...................................................................................................................................... 177
Navigator ....................................................................................................................................... 178
Cutout settings............................................................................................................................... 178
Express mode dialog ..................................................................................................................... 178
Image processing settings ............................................................................................................. 178
Omniscan settings ......................................................................................................................... 179
Meta data settings ......................................................................................................................... 179
Job Settings................................................................................................................................... 179
Job termination settings................................................................................................................. 179
Digital watermark settings.............................................................................................................. 179
Color management settings........................................................................................................... 180
Correct colors ................................................................................................................................ 180
10.1.4
Menu scanner.................................................................................................. 181
10.1.4.1
10.1.4.2
10.1.4.3
10.1.4.4
10.1.4.5
10.1.4.6
10.1.4.7
10.1.4.8
10.1.4.9
10.1.4.10
Scan .............................................................................................................................................. 181
Rescan .......................................................................................................................................... 181
Continuous scan............................................................................................................................ 181
Zeutschel Scanner......................................................................................................................... 181
TWAIN scanner ............................................................................................................................. 181
Virtual scanner............................................................................................................................... 181
Empty book seesaw....................................................................................................................... 181
„Linked together scan“ („interleave mode").................................................................................... 181
Glass plate..................................................................................................................................... 182
Settings.......................................................................................................................................... 182
10.1.5
Select .............................................................................................................. 182
10.1.5.1
10.1.5.2
10.1.5.3
10.1.5.4
10.1.5.5
10.1.5.6
10.1.5.7
10.1.5.8
10.1.5.9
10.1.5.10
10.1.5.11
10.1.5.12
10.1.5.13
10.1.5.14
10.1.5.15
New chapter .................................................................................................................................. 182
Left page/right page....................................................................................................................... 182
Group A – E................................................................................................................................... 182
Adjust trackers............................................................................................................................... 182
Color, gray, Photo, black/white ...................................................................................................... 182
Renew all clips............................................................................................................................... 182
Increase/reduce numerator............................................................................................................ 182
Brighter, darker.............................................................................................................................. 183
Increase/decrease threshold ......................................................................................................... 183
Set Threshold and brightness........................................................................................................ 183
Couple cutouts............................................................................................................................... 183
Flip cutouts .................................................................................................................................... 184
Previous image, next image .......................................................................................................... 184
Add next scan behind .................................................................................................................... 184
Add next scan before the current................................................................................................... 184
10
Table of Contents
10.1.5.16
10.1.5.17
10.1.5.18
10.1.5.19
10.1.5.20
Adapt printout to the size of the page ............................................................................................ 184
Maximize print edge, minimize print edge...................................................................................... 184
Activate/deactivate cutout.............................................................................................................. 185
Select filterstack ............................................................................................................................ 185
New clip ......................................................................................................................................... 185
10.1.6
Menue Book Mode........................................................................................... 185
10.1.6.1
10.1.6.2
10.1.6.3
10.1.6.4
10.1.6.5
10.1.6.6
10.1.6.7
10.1.6.8
10.1.6.9
Orthoscan ...................................................................................................................................... 185
Configure Orthoscan...................................................................................................................... 185
Cut ................................................................................................................................................. 185
Configure cut ................................................................................................................................. 185
Configure none .............................................................................................................................. 185
Left Side ........................................................................................................................................ 185
Right Seite ..................................................................................................................................... 186
Both Sides ..................................................................................................................................... 186
Full................................................................................................................................................. 186
10.1.7
Menu “?” .......................................................................................................... 186
10.1.7.1
10.1.7.2
10.1.7.3
10.1.7.4
10.1.7.5
Help ............................................................................................................................................... 186
Start remote maintenance ............................................................................................................. 186
Information about Ominscan ......................................................................................................... 186
Dongle information ........................................................................................................................ 187
Create diagnostic info .................................................................................................................... 188
10.2
Image view in the main window / mouse usage .......................................... 188
10.3
Context menu main window.......................................................................... 189
10.4
10.4.1
Context menu thumbnail bar ........................................................................ 190
Image information ............................................................................................ 191
10.5
Symbol bar (toolbar)...................................................................................... 192
10.6
Status bar....................................................................................................... 196
11
Scanner-specific Options .................................................. 197
11.1
11.1.1
11.1.2
11.1.3
11.1.4
11.1.5
11.1.6
11.1.7
11.1.8
11.1.9
11.1.10
11.1.11
11.1.12
OS10000-R2/OS12000.................................................................................... 197
Speed .............................................................................................................. 197
Book thickness (OS12000 only)....................................................................... 197
Mode ............................................................................................................... 197
White reference ............................................................................................... 198
Max. scans without white reference ................................................................. 198
Resolution ....................................................................................................... 198
Scan bidirektional ............................................................................................ 198
Perfect Book .................................................................................................... 198
Use finger removal........................................................................................... 198
Brightness/Gamma/Threshold ......................................................................... 198
Output raw image ............................................................................................ 199
Glass plate ...................................................................................................... 199
11.2
11.2.1
11.2.2
11.2.3
11.2.4
11.2.5
11.2.6
11.2.7
11.2.8
OS14000 ......................................................................................................... 200
Speed .............................................................................................................. 200
Book thickness ................................................................................................ 200
Mode ............................................................................................................... 200
Do white reference........................................................................................... 200
Max. scans without white reference ................................................................. 200
Resolution ....................................................................................................... 201
Scan bidirektional ............................................................................................ 201
Brightness/Gamma/Threshold ......................................................................... 201
11
Table of Contents
11.2.9
11.2.10
11.2.11
11.2.12
Output raw image ............................................................................................ 201
Use Gamma .................................................................................................... 201
Glass plate ...................................................................................................... 201
Calibration ....................................................................................................... 202
11.3
11.3.1
11.3.2
TWAIN scanner .............................................................................................. 203
Select data source ........................................................................................... 203
Display user interface ...................................................................................... 203
11.4
11.4.1
11.4.2
11.4.3
11.4.4
Virtual scan .................................................................................................... 204
Scanner size, width, height, use original size................................................... 204
Resolution, use original value .......................................................................... 204
Color depth...................................................................................................... 204
Image source................................................................................................... 205
12
Copy Protection.................................................................. 206
13
Manufacturer and Service.................................................. 207
13.1
Manufacturer.................................................................................................. 207
13.2
Service............................................................................................................ 207
14
Appendix............................................................................. 209
14.1
Shortcuts........................................................................................................ 209
14.2
14.2.1
14.2.2
Stamp creation with „imaging“..................................................................... 212
How to create a text file in the TIFF format? .................................................... 212
Create example file with imaging ..................................................................... 212
14.3
14.3.1
14.3.2
Verso Recto numbering ................................................................................ 216
Introduction:..................................................................................................... 216
Settings ........................................................................................................... 216
14.3.2.1
14.3.2.2
Meta data....................................................................................................................................... 216
Job termination (copy) ................................................................................................................... 217
14.3.3
14.3.4
14.3.5
Result .............................................................................................................. 217
Special features............................................................................................... 218
Alternative ....................................................................................................... 218
12
Introduction
1
Preface
OMNISCAN 12 is a scanning software for professional users.
Each professional scanning operation is determined by the following items:
1. Which scans shall be systematically summarized to one job?
2. Which image processing tools shall be used for the scans?
3. Which color depth, resolution or which compression is suitable for the saving of
the scans?
4. Shall a color management be used?
5. What shall happen to the data then?
OMNISCAN 12 makes it possible for you to concentrate on the desired scanning
result most largely without compromising with the determination of these items.
The workflow is being organized by OMNISCAN 12 so efficiently, that the question
for feasibility and speed can be pushed into the background.
This is achieved by
1. the organization of a series of scans to one job, to which all settings are saved,
and which can be restored simply and completely any time by the dialog „open
file“.
2. the optional „imaging kit“, which provides a variety of image processing tools,
which themselves avoid working with an image processing software from
outstanding providers and all the data transfer arising with that.
3. the combination of image processing tools with „filter stacks“, which make it
possible to apply an arbitrary combination of image processings to a particular
image or to a series of images any time.
4. the saving of such filter stacks, so that they are available any time having once
been created.
5. the support of the color management, which enables for the keeping of the color
fastness within a workflow.
6. the specification of all current color depths, resolutions and storage formats for
as many as you like cutouts and arbitrary combinations, which are scanned with
ONE scan operation.
7. the export of these and other „job parameters“ to other jobs, so that settings
which have been found once can always be used again.
8. the possibility to organize the automatic transition of the scanned and possibly
processed images to a further processing with special „job terminations“, as e.g.
bar code recognition, sending, separation of images and text or the imbedding
to a DMS software.
9. the permanent development of all mentioned functionalities, especially also
those due to special wishes of the customers.
OMNISCAN 12 consists of a basic module and the optional „imaging kit“.
Additionally other image processing modules and job terminations are also
available.
The basic module covers the possibility to scan an image with two cutouts which
can be selected arbitrarily and to save the images with file formats which are not
subject to a license.
The imaging kit allows for the scanning with an arbitrary number of cutouts and the
13
Introduction
use of image processing functions. (see 8.1 Imaging kit).
Any OMNISCAN 12 licence offers a trial period with all functioned enabled for 30
days or 1000 scans. (for more information see 12 Copy Protection).
OMNISCAN 12 supports all Zeutschel scanners.
14
Introduction
2
Upgrade recomendations
2.1
Special hints for changing from Omniscan 11.8 (or earlier) to 12.0 (or later)
Up to Omniscan version 11.10 it was not posible to choose the filters and the file
format independent for each color mode. Now you can choose for instance in one
clip the fileformat TIFF JPEG with suitable filtering for color 24 bit and the file
format TIFF G4 with different filtering independet from each other.
Also the logic to choose the color mode is changed. Up to now the input color
mode for the filtering was selected. Now it’s the output color mode. Until now you
could choose 24 bit color and select binarisation as a filter function. Now you first
choose black and white as color mode and can than select binarisation as a filter.
Internal Omniscan automatically decides to scan in grayscale and use the
binarisation filter afterwards. So the selected colormode decides about the result
of the filtering not of the input into the filtering.
2.2
Upgrade Omniscan 11.x to 12.x
The main difference between Omniscan 11.x and 12.x is the new 64-bit
multithreading architecture. This change in the architecture of Omniscan was
made because of the requirement to process huge images fast and save. To run
Omniscan 12.x, a PC with a 64-bit operating system (Windows XP x64) is
required. Omniscan jobs from 11.x installations can be used with Omniscan 12.x.
They will be converted into the new format within the first start of the job. There is
no guaranty for the correct conversation of the jobs. An Omniscan 12.x Dongle
can be used only with Omniscan 12.x and not with Omniscan 11.x and the other
way round.
2.3
Suggested upgrade procedure
With each new version of the Omniscan it happens that the changes are not
accepted by the users or there are some initial problems using the new functions.
Also the reuse of the old jobs can not be guaranteed under all circumstances even
if doing a automatic conversion while loading the job.
It has been found favorable to keep a fallback to the previous version. With a
Omniscan 12.x dongle you can always use older versions of Omniscan 12.x. Also
you can install as many instances of Omniscan on the same machine in parallel as
you like to. To get the settings that where found to be suitable into the new
installation the following procedure is recommended.
Copy the complete Omniscan folder of the current installation, normaly found
under c:\program files\Zeutschel\Omniscan 12 to another folder named for
instance Omniscan12.1. Then uninstall Omnniscan 12.x using “Add and Remove
Programs” in the control panel. That removes only the Omniscan 12.x application
and not the settings. Then install the new Omniscan over the current version by
using c:\program files\Zeutschel\Omniscan 12 as target directory. Now the new
Omniscan should have all the settings like for instance the temporary directory for
the scan jobs as the old one had.
If you want to use both versions in parallel you can start the copy also directly.
May be you have to switch the language to some other language (s. 6.1.1
Language) and back and may be you have to switch the scannerdriver to the
virtuall scanner (s. 10.1.4.6 Virtual scanner), and back so that Omniscan can find
15
Introduction
the belonging files at the new location.
Is the preservation of the settings not that important, or if you want to check the
settings anyway it is recommended to install the new Omniscan into a different
directory. The settings of the old version remain unchanged and the old version is
kept running unchanged.
16
Introduction
3
Introduction
3.1
Scan concept
The job administration is the central element of OMNISCAN 12.
Scanning is carried out in principle within a job.
All data relevant for a job are contained in a folder, which is called job folder. The
name and the memory location of this folder can be selected by the user when
creating a new job (for details see paragraph 5.2 Create new job).
The job folder contains essentially two elements:
1. Images which have been created within this job.
2. The job file.
By opening the job file a job is completely restored with the state it has been
closed for the last time (for details see paragraph 5.3 Open job).
Among others the „cutout settings“ are included in the job file (for details see
paragraph 7 Job Options).
OMNISCAN 12 gains all images from the cutout settings. Usually all the images,
which have been created by a scanner, are called „scans“. This indication is
useful, because normally only one image is created with one scanning operation.
This indication is misleading with OMNISCAN 12, because one scan allows the
creation of as much as possible different images. These images may be different
in their motive, resolution, color depth, the file format they are saved with and the
image processing tools, which are automatically applied to the image.
The selection of particular images and their special settings can be carried out
before the scanning operation as well as also afterwards.
These options are achieved by the following concept.
The main window of OMNISCAN 12 displays either an empty book cradle or the
image lately scanned, as soon as a job has been created or opened.
Figure 1: OMNISCAN 12 with an „empty book cradle“
17
Introduction
Figure 2: OMNISCAN 12 with a scan
The cutout frames can be found in this image.
The actual scan forms the background, that means the image which is directly
provided by the scanner. This full-frame image is created and being processed
due to the settings of the scanner settings (see paragraph 7.2 Scan settings).
The cutouts define the images in this full-frame image, which constitute the
content of the scan job and thus the working result. If the cutouts are placed on the
„empty book cradle“, they are applied for the next and all the following scans. If
they are included in one scan, the corresponding images are always saved in the
job folder. Each new cutout and each new setting of an existing cutout is
immediately carried out. (More information about the cutouts see 5.6 Cutouts and
7.1 Cutout settings). Therefore another scanning is not required. (For more details
of the process of a scanning operation see 5.4 Scan).
Each image belonging to a job is displayed in the thumbnail bar, even if having just
been created by inserting a cutout. With this thumbnail bar among others an image
can be displayed in the main window by double-clicking. In this window it can then
be processed as a usual scan, that is be processed and viewed (for details see 5.8
Thumbnail bar).
The new concept of OMNISCAN 12 requires habituation for all users, which have
been working with a conventional scanning program until now. It will be paid off
soon by gaining great efficiency with the creation of complex scan jobs.
OMNISCAN 12 makes possible a particularly efficient creation and processing of
images.
The efficiency of OMNISCAN 12 gained by the scanning concept is still increasing
by the fact, that it is possible to store the settings for the cutouts once created in a
job including the image processing tools to be used and their parameters
completely in an extra file, i.a. to export them (see 10.1.1.6 Save job settings with).
It is possible to create as many job parameter files as you like, from which the
18
Introduction
suitable file is selected then with each creating of a new job and thus the
corresponding settings can be imported (see 5.2.3 Job parameter).
After the images have been scanned and processed, OMNISCAN 12 offers the
possibility to start a further processing with an automatic job termination. Here
some generally available ways are possible, as e.g. the changing of the names of
the image files. This is described in detail in 7.4 Job . And it is possible there to
select additional termination modules. For a description of these termination
modules see 9 Job Terminations.)
3.2
Structure of the manual
After an overview of the essential characteristics of OMNISCAN 12 in the preface
the introduction explains the scan concept of OMNISCAN 12.
As with the complete manual the introduction often refers to other paragraphs of
the manual, in which there is an explanation in detail or a completion of a
mentioned item. These references are active on the screen, i.a. clicking to that
reference results in a jump to the place of reference.
After the explanation of the scan concept and a list of the „system requirements“
with item 3, chapter 5 describes a „Quick Introduction“. Here the steps are
explained one by one, which must be carried out to work with OMNISCAN 12.
After the quick introduction the set-up options of OMNISCAN 12 are explained
systematically. These are the program-related settings in chapter 6 „Program
Options“ as well as the job-related settings in chapter 7 „Job Options“.
Chapter 8 describes the image processing tools, at first those included in the
„imaging kit“ (see 8.1 Imaging kit ) and then the additional modules (see 8.2
Optional image processing module).
Chapter 9 Job Terminations describes spezial functions which may be carried out
at the end of a job.
Chapter 10 „User Interface“ explains the menu entries and the functions of the
buttons of the tool bar.
Functions which can only be invoked with the menu entries and which have still
not be described in the „quick introduction“, as for example printing, are explained
in detail here.
Chapter 11 „Scanner-specific Options“ describes the set-up options, which may be
different depending on the scanner OMNISCAN 12 is being used with.
Chapter 12“ is an indication to the copy protection of OMNISCAN 12.
This manual automatically opens as a PDF-file, as soon as key F1 is pressed or
the menu entry „help“ has been clicked on. (Absolutely necessary: Acrobat Reader
must be installed.)
19
System requirements
4
System Requirements
4.1
PC
In order to use the software OMNISCAN 12 effectively, a PC is required, which
meets the requirements of the scanner and the tasks to be carried out. Details are
included in the separate qualification profile (TS-0404D (German) or TS-0404E
(English)) for the PC.
4.2
Operating system
Windows XP x64
20
Quick introduction
5
Quick Introduction
OMNISCAN 12 is job-oriented, i.a., all actions of the user are carried out in
principle within a particular job1, such as scanning, image processing and the setup of parameters as resolutions, color depths etc.
Therefore after the program start of Omniscan it is necessary at first to create a
new job or to open an already existing job.
Scanning is only possible after a job has been created or opened. If a job is
opened, all settings for the cutouts, the corresponding scanner being connected
and the job terminations are available.
5.1
Express mode
The dialog “express mode” will be opened after the program start of Omniscan 12
and after the exit of a job, if it is not switched off. It is possible to select one of up
to twelve various job settings here (number and position of cutouts, resolution,
color depth, filter stack etc.), which shall be used for the next job.
Figure 3: Dialog „express mode“
5.1.1
Display this dialog each time when Omniscan starts
The opening of this dialog after the program start of Omniscan 12 and after having
left a job can be stopped, if the check mark has been removed here.
Once the display has been switched off it is possible to switch it on again in the
dialog “Settings – Omniscan extended” (s. 6.1.18 More Settings).
In addition, the dialog can be opened again using the menu View, Express Mode
Dialog or the corresponding Toolbar Icon.
Since the job settings and the „filter stacks“ can be exported and imported, this does not mean that
1
a new starting is required with each new job
21
Quick introduction
5.2
Create new job
The dialog „new job“ is opened by selecting a button in the dialog “express mode”,
the menu item „file - new“, by the button „new“ or by the buttons „scan“ and
„rescan“, as far as there is no job opened.
Figure 4: Dialog „new job“
5.2.1
Job name
Here the name of the job is entered. It will be displayed continuously on the title
bar of the program (above left). The job name is also the name of the job file, in
which all job parameters are saved and which allows to open a job again any time.
A default is offered which can be configured with the dialog „omniscan settings“
(see 6.1 Omniscan).
5.2.2
Directory to save the scan job:
Either the file path, in which the folder with the job files is saved, is entered here or
it can be selected with the „browser“ and the button „search“. Then the name of
this job folder must be attached to the end of the path.
Except of the job folder the folders of the path must already be existing, but they
can be created with the „search browser“.
The job folder is created automatically.
A default is being offered, which can be configured with the dialog „omniscan
settings“ (see 6.1 Omniscan).
22
Quick introduction
5.2.3
Job parameters
Here the job parameters or the job settings are selected, with which the new job is
being created.
(More information about job parameters see paragraph 7 Job Options).
A presetting which can be set by the user is always offered, which can be taken
over in a simple way. Additionally all job parameter sets which have been set and
saved by users can be selected (see paragraph 10.1.1.6 Save job settings with).
For this just select (click button „search“) the corresponding job parameter file
(ending .ojp) (click to the button “search”) or select a parameter set saved in the
express mode history (pulldown menu).
Figure 5: Selection job parameter set
As an alternative option it is possible to take over the job parameters of an existing
job by selecting the corresponding job file here. The job parameters will then be
extracted from this file.
It is possible to determine any „job parameter set“ as a default job set-up which is
offered automatically (see paragraph 10.1.1.7 Save as default).
5.3
Open job
An already existing job is opened by a standard dialog „open file“. As usual it can
be found with the menu entry „open file“ and additionally with the button „open“.
Merely the job file „jobname“.ojp“ must be clicked to and opened.
This file is in the job folder with the name selected when having created the job, in
which also images and thumbnails of the job can be found.
23
Quick introduction
Figure 6: Dialog „open job“
Then the job is opened with just that status in which it has been saved or
terminated for the last time.
This function can also be used for the „job recovery“, because the latest status can
be restored even after an uncontrolled end of program.
5.4
Scan
If a job is opened, a scanning operation can be started in four different ways.
1. With the button „scan“
2. By the menu entry „scanner -> scanning“
3. By pressing the F2 key.
4. By using the footpedal (see installation instructions TS)
A scanning operation has the following components:
1. A scan is carried out according to the settings of the „scan settings“ (see
paragraph 7.2 Scan settings).
2. The scanned image is displayed in the main window together with the current
cutout frames.
3. All existing cutouts are saved on the hard disk according to their settings with
the indication „cutout settings“ (see paragraph 7.1 Cutout settings).
4. For the complete scanning operation and all cutouts or saved images
thumbnails are inserted to the thumbnail bar (see 5.8 Thumbnail bar).
(Whether and how the main scan will be saved is determined by the selection of
„memory behaviour scan“ (see paragraph 6.1.11 Create thumbnails))
After the scanning has been carried out it is possible to edit the cutouts one by one
(see paragraph 5.7.1 (image processing)...individually and manually after the
scanning) and to add cutouts (see paragraph 5.6.1 Insert cutouts). Newly added
cutouts are realized immediately and saved on the hard disk. A rescan is not
necessary.
24
Quick introduction
5.5
Rescan
A rescan overwrites the last scan and all the cutouts gained from that, but
otherweise has the same functionality as the scanning itself. A rescan can be
initiated in three ways.
1. With the button „rescan“
2. By the menu entry „scanner-> rescan“
3. By the F3 key.
5.6
Cutouts
Because the desired images are always gained from a complete scan in
OMNISCAN 12, the cutouts are like that what is indicated usually with the term
„scan“. After each scan these „individual scans“ are immediately available on the
hard disk.
Therefore at least one cutout must have been selected with each scanning
operation.
Many cutouts with any combinations of parameters can be selected, which are all
realized by one scanning operation (see 7.1 Cutout settings).
For each cutout frame displayed in one image an image corresponding to the
cutout has been saved on the hard disk in principle. This image is displayed as a
thumbnail together with all other images of the current scan job on the thumbnail
bar (see 5.8 Thumbnail bar).
5.6.1
Insert cutouts
The inserting of cutouts is always carried out in the main window. There are two
starting situations possible:
1. Immediately after a job has been created or opened a cutout can be inserted in
front of the background of an empty book cradle. Only the cutout settings are
saved and they are only used with the next scan.
2. If a complete scan is displayed in the main window, cutouts may be inserted
directly to this scan. The images corresponding to the new cutouts are saved
immediately and they are displayed as a thumbnail. Therefore a new scanning is
not necessary.
(Exception: Settings for the new cutout have been selected which do absolutely
not allow a conversion from the existing scan or only with suboptimal results. The
former is e.g. the case, if a gray-level scanning has been carried out but the cutout
is desired as a color image. The second is the case if a higher resolution has been
selected for the cutout compared to that which has been used for the scanning,
and a complete scan with a higher resolution is possible).
The way of inserting a new cutout is the same with both cases:
1. By clicking to the right mouse key while the mouse cursor is either in the display
area of the „empty book cradle“ or of a complete scan a context menu appears
with the entries „new“, „delete“ and „settings“.
25
Quick introduction
Figure 7: Insert cutout in front of empty book cradle
Figure 8: Insert cutout to a displayed complete scan
26
Quick introduction
After having clicked to the context menu entry „new“ the index card „cutout
settings“ of the dialog „settings“ is displayed.
Here the desired settings can be carried out now (see paragraph
7.1 Cutout settings). But it is also possible to take over the presettings and to
determine then the position and size of the cutout graphically.
As soon as the dialog „settings“ is left, the new cutout frame is added to the main
window. In case that a scan is already displayed in the main window the new
image is immediately written down to the hard disk and it will be displayed as a
thumbnail.
Additional you can create a new cutout in the clip settings dialog with the button
„New clip“ (s. 7.1 Cutout settings). This new clip will be added as last clip to the list
and created as copy of the selected clip. The settings dialog to this new clip will be
displayed and offers changing. If you want to change size and position of this clip
graphically this can be done right after closing the settings dialog.
5.6.2
Delete cutouts
At first the cutout to be deleted must be activated (see 5.6.4 Activate cutout
frame).
By clicking to the right mouse key while the mouse cursor is in the main window
with the cutout frames, the context menu with the entries „new“, „delete“ and
„settings“ is displayed.
After „delete“ has been selected the following dialog is opened:
Figure 9: Dialog „delete Clip“
5.6.2.1 Cutout number
Here the number of the cutout is displayed which will be deleted.
(This is the cutout which has been active lately. Because usually a cutout
becomes active automatically if the context menu is opened in its field, this is the
desired cutout in most cases. Therefore the activation of the cutout to be deleted is
not obligatory before the context menu is being opened. But because it is
confusing when several cutouts are laying one above the other, the previous
activation of the cutout is recommended nevertheless).
5.6.2.2 With the color
To make clear which cutout frame will be deleted the color of the corresponding
frame is displayed here.
27
Quick introduction
5.6.2.3 Also delete corresponding image
If the context menu with the entry „delete“ has not been opened being in front of
the background of an empty book cradle but within a scan, there will be an image
belonging to this cutout (see paragraph 5.6 Cutouts).
If the check mark has been placed here, this image will be also deleted. Otherwise
the deletion of the cutout will be effective only with the next scan.
5.6.2.4 Yes
By clicking to the button the deletion will be carried out.
Then the cutouts will be numbered again.
5.6.2.5 No
Here the deletion can be stopped.
5.6.3
Edit cutout settings (graphically)
Paragraph 7.1 „Cutout settings“ describes in detail the way of carrying out the
cutout settings.
Additionally the placing and the size of the cutouts can be also changed
graphically.
At first the cutout must be activated whose position or size is to be changed (see
5.6.4 Activate cutout frame).
The activated cutout can be changed in two ways:
1. Position
If the mouse cursor is put into the area of an active cutout, it changes to a „cross“.
If now the left mouse key is pressed permanently, the complete cutout can be
moved. By letting off the left mouse key the cutout is placed as it is displayed with
the fine frame carried along.
Figure 10: Move cutout
The behaviour of the cutout can be set as soon as it meets the border of the image
(see paragraph 6.1.18.2 Size of the marker in pixels).
2. Size
Each cutout frame altogether has 8 „pointers“ in each corner and in the middle of
each side. Their position and size can be set. See paragraphs 6.1.18.4 “Display
targets outside (instead of inside)” and 6.1.18.2 “Size of the marker in pixels”.)
If the mouse cursor moves over these pointers, it will be changed to a double
arrow which displays to what direction the frame can be moved at this position by
pressing the left mouse key.
By letting off the left mouse key the size of the cutout is changed so as it is
displayed with the fine frame carried along.
28
Quick introduction
The change of the size and position of a cutout is immediately realized, i.a. the
new image is immediately saved and it is displayed on the thumbnail bar.
A new scanning is not necessary.
29
Quick introduction
5.6.4
Activate cutout frame
An activated cutout is highlighted by an uninterrupted frame. All other cutouts have
a hatched frame. Additionally the number of the active frame is displayed in front
of the background of the frame color, the numbers of the other frames have no
background.
In the following figure the active cutout with the number 4 is enclosed by an
inactive cutout.
Figure 11: Active and inactive cutouts
A cutout gets active when the left mouse key is clicked while the mouse cursor is
within the cutout.
If the area of the mouse cursor is enclosed by several cutout frames, they will be
activated successively.
5.7
Image processing
Scanned images can be processed with a number of image processing tools.
Possible are e.g. cutting, sharpening with different methods, smooth or a book fold
equalization. Thus e.g. the readability or the brilliance of an image can be
improved, noise be reduced or the efficiency of the application of a text recognition
software (OCR) be increased.
(An enumeration and description of the processing tools available in OMNISCAN
12 can be found in paragraph 8 „Image Processing Tools“.)
The processing tools can be used with OMNISCAN 12 in the following ways:
30
Quick introduction
5.7.1
...individually and manually after the scanning
i.a. for each individual image the image processing tools can be used by direct
selection.
All images produced within a job are displayed on the right side of the program
surface with thumbnails (see 5.8 Thumbnail bar).
After having clicked to a thumbnail the corresponding image is displayed in the
main window.
(For the setting of the display in the main window see 10.1.3 Menu overview).
The image displayed in the main window can be processed. For this purpose
several processing tools are available with the menu entry „processing“.
Figure 12: Menu „image processing“
31
Quick introduction
If the option „use the image processing dialog“ has been activated right above in
the menu entries, the affiliated set-up dialog is displayed after an image
processing tool has been selected (see paragraph 5.7.5 Set-up dialog for image
processing tools).
The processing is carried out when the set-up dialog is left with „OK“.
If the option „use the image processing dialog“ has NOT been activated, an image
processing tool selected in the menu bar is immediately applied to the image in the
main window according to the lately selected settings.
5.7.2
...after scanning to batches and manually
It is possible to make out a list with image processing tools for each cutout in the
cutout settings. This selection is applied to the corresponding cutout immediately,
i.a. the image being processed is immediately saved and displayed as a
thumbnail.
(For more details see paragraph 7.1.30 Image processing).
5.7.3
...during scanning to batches and automatically
A list with the image processing tools can be made out for each cutout in the
cutout settings. This selection is automatically applied to the cutout with each
following scan.
5.7.4
...during job termination to batches and automatically
NOTE: Not yet realized with Omniscan 11.0.!
It is possible to make out a list with image processing tools for each cutout in the
cutout settings. These settings are automatically applied to all cutouts with the
same cutout number during the job termination, provided that the option „directly
after the scan...“ is not activated.
(For more details see paragraph 7.1.30 Image processing).
32
Quick introduction
5.7.5
Set-up dialog for image processing tools
Image processing tools offer different set-up options to determine how the tool can
be applied exactly.
OMNISCAN 12 offers a similar set-up dialog for all image processing tools.
It is explained in the following by the example „sharpen“.
(An enumeration and description of the set-up options also displayed in this dialog
respectively and of the processing tools available in OMNISCAN 12 can be found
in paragraph 8 „Image Processing Tools“.)
Figure 13: Set-up dialog „image processing tools“
The settings dialog of the filters is divided into three parts.
In the upper third you will find two windows. If a preview is available in the left of
these windows a part of the image in the main view is visible. The right window will
show this part after processing with the selected filter and the current settings from
the dialog. If no preview is possible both of these windows are empty.
The displayed cutout can be selected arbitrarily in two ways:
1. By moving the image.
As soon as the mouse cursor has been moved to the left image, that is the view
of the current version, it takes the form of a hand. In this position the mouse
cursor is fixed on the image by continuously pressing the left mouse key.
The cutout is moved then by moving the mouse cursor. The movement is done
simultaneously with both cutouts.
The image processing tool is applied to the preview image when the left mouse
key has been let off again.
33
Quick introduction
2. By the navigator.
See below (Button navigator)
The third below always displays the entry fields which are used for the setting of
the corresponding image processing tool.
(Entry fields and meaning of the parameters are described in paragraph 8 „Image
Processing Tools “).
The count, position and meaning of the buttons in the middle third depend on the
selected filter. Here only the buttons you can find together with each filter are
described.
Zoom in: If a preview for the current filter is available clicking on this button
shows a smaller part of the image in bigger magnification.
Zoom out: If a preview for the current filter is available clicking on this button
shows a bigger partof the image in smaller magnification.
Navigator: If a preview for the current filter is available the displayed part of
the image can freely be choosen with the navigator.
Figure 14: Navigator „image processing“
Inverted image cutout
With continuous clicking with the left mouse key to the button with the „crossed
arrow“ in the middle of the image processing dialog the image to be processed is
displayed in a smaller total view.
In the middle of the image below the mouse cursor the cutout is displayed
invertedly, that is displayed in the preview.
This cutout can be arbitrarily moved now, as long as the left mouse key is kept
pressed. By letting off the mouse key the navigator disappears and the preview
shows up again.
34
Quick introduction
Waste paper basket: The parameters of the current filter can be reset to a
suitable start value for further optimization.
5.8
Thumbnail bar
All images belonging to an opened job are displayed in a thumbnail bar. This bar
allows an overview of all images already created. By clicking to a thumbnail with
the left mouse key the image is displayed in the main window and it can then be
processed (see 5.7.1 (Picture processing)...individually and manually after the
scanning).
Viewing an image in the main window is supported by display functions (see
10.1.3.1 to 10.1.3.7) and the navigator (see 10.1.3.11 Navigator).
The cutouts of the current scan are displayed in front of the background of its
frame
color.
The images in the thumbnail bar are displayed with a pale gray background,
except the cutout of the current scan. The background color of the cutouts of the
current scan is identical with the frame color of the corresponding cutout.
Figure 15: non-current scan
Figure 16: current scan
The background color of a thumbnail changes to a dark blue, when the mouse
cursor is being moved over the thumbnail.
Figure 17: Mouse not over the current scan
Bild 18: Mouse over current scan
35
Quick introduction
By clicking to a thumbnail using the left mouse key and the resulting display of the
image in the main window the background color of the thumbnail to a light blue. In
addition the thumbnail gets a pink frame. By this it is indicated as selected.
Figure 19: Selected non-current scan
Figure 20: Selected current scan
The selection of other thumbnails is possible by pressing the SHIFT key or the
STRG key and the left mouse key simultaneously.The current scan cannot be
selected. By clicking to the current scan an existing selection will be cancelled.
Figure 21: Multiple selection SHIFT key
Figure 22: Multiple selection STRG key
36
Quick introduction
5.8.1
Placing of the thumbnails
As a default new images are always inserted to the lower end of the list.
But the position, to which newly scanned images are inserted, can be selected
arbitrarily.
For this purpose it is necessary to click with the left mouse key into the field
between the two thumbnails where the new image or the new images shall be
inserted. After that a thumbnail with an „empty book cradle“ is inserted at the
desired position.
If the option „Display inserted image“ is activated (see paragraph program settings
6.1.6 Display insert image), the placing of the new cutout is supported, because
the distance between both thumbnails is automatically enlarged and it is provided
with an icon, if the mouse cursor is moved to the field between the thumbnails.
It is possible to drag images from another job or an other source into the current
job. Just drop them into the thumbnail bar. The image (or the images) are inserted
into the job at the position of the insert marker. In this case no meta data entry is
possible.
5.8.2
Moving the thumbnail bar
The thumbnail bar can in principle be moved arbitrarily, e.g. also to a second
screen.
The thumbnail bar can be moved by clicking with the left mouse key to the field
above the thumbnails. The field can be moved to an arbitrary position with the
mouse key kept pressed.
If the new position is placed on the right or left border of the program surface, the
bar is „docked“ in the main window, i.a. flushly in line with the borders.
(It may occur after the docking that the display of the bar does not make use of the
complete height available. This can be corrected, if the reappearing of the program
surface is forced by a single change of size, which is cancelled immediately again
by using the reduction or full screen button right above in the corner of the title
bar).
37
Quick introduction
5.8.3
Context menu
After having clicked to a thumbnail with the right mouse key a context menu is
displayed.
Figure 23: Context menu „thumbnail“
38
Quick introduction
5.8.3.1 Image Information
The following dialog with image information will be opened.
Figure 24: Image information
5.8.3.2 Insert.
N.N.
5.8.3.3 Delete this image
Deletes the image over which the mouse cursor is.
5.8.3.4 Delete selected image(s)
Deletes all selected images.
(An image which has been selected and which is currently displayed in the main
window may also be deleted with the context menu which can be invoked in the
main window using the right mouse key.)
39
Quick introduction
5.8.3.5 Save this image
Opens the file memory dialog and thus offers the option to save the image, over
which the mouse cursor is, additionally to an arbitrary directory.
(The memory dialog can also be invoked with the context menu which can be
invoked with the right mouse key in the main window, if an image (and not the
main scan with the cutout frames) is displayed there.
5.8.3.6 Open in a new window
Displays the image belonging to the thumbnail in an additional window.
Then the cutout from which the image has been created will be considered. An
additional window can be opened for each cutout. Images which may be assigned
to the same cutout will always be displayed in the same additional window (the
image selected lately will always be displayed.) After a scan or rescan the cutout
formed of the current scan will be displayed in each opened additional window.
5.8.3.7 Insert selected image(s) before or behind
All selected images will be moved before or behind the image, over which the
mouse cursor is, with “insert selected image(s) before” or “insert selected image(s)
behind”.
5.8.3.8 Print selected image(s)
Prints all selected images.
The printing dialog will be displayed before the first image is printed (see 10.1.1.10
Print...). The active settings there will be used for all images to be printed.
40
Program settings
6
Program Options
Program options are settings which are valid with all actions of the program, i.a.
which are not job-specific.
These settings can be carried out even then, if no job is loaded.
The corresponding index cards „omniscan“ and „color management“ are available
either with the context menu „settings“ and the selection of the corresponding
„index card“, or with the menu „view“ and the selection of the entry there.
6.1
Omniscan
Figure 25: Index card „omniscan“
6.1.1
Language
Here the language settings are made. They will be only effective after a restart of
OMNISCAN 12.
6.1.2
Create cutout immediately again
If a check mark has been set here, all modifications which have been made with
the clip settings are realized immediately. If for example the frame is moved or the
resolution is changed, the image corresponding with the new frame will be saved
immediately and the display in the thumbnail bar will be updated.
If no check mark has been set here, the modifications of the clip settings are
applied to the saved image only after having clicked to the scan button, the color
of which changes to orange after the first modification. A scan will only be possible
after this update has been carried out. Alternatively the rescan button can be used
41
Program settings
to apply the changed clip settings to a rescan operation and therefore to reject the
current scan completely.
6.1.3
Remember position and zoom of the extra window(s)
If some additionaly windows are opened using the thumbnail contect menü „Open
in new window“ (see Chapter 10.4 Context menu thumbnail bar) information about
position, size and zoom of this window are saved together with the job. The
windows will be restored after the next scan.
6.1.4
Beep after the scan
After the scan a tone is sounding.
For changing the standard tone an event group „Omniscan“ can be found at
„characteristics of sounds and audio devices“ (start, settings, system control,
sounds and audio devices). There the tones of ScanComplete, Processing
Complete (see 6.1.5 Beep after image processing) and StartScan (if activated in
the Omniscan.XML) can be set.
6.1.5
Beep after image processing
After the image processing a tone is sounding (see also 6.1.4 Beep after the
scan).
6.1.6
Display insert image
All images of a scan job are displayed in a thumbnail window (see 5.8 Thumbnail
bar).
In this window the position can be selected to which the next cutout shall be
inserted.
For this purpose ist is necessary to click with the right mouse key in the field
between both thumbnails. Then a thumbnail with an „empty book cradle“ is
inserted at the desired position.
If „display insert image“ is activated, the placing of the new cutout is supported by
the automatic increasing of the distance between two thumbnails and its providing
with an icon, if the mouse cursor is moved to the field between the thumbnails.
6.1.7
Display test period warning
A message is issued with each start of OMNISCAN 12 during the “trial period”,
that the dongle releases all options for a trial period or that after this period has
expired the not released options will be blocked, if a check mark has been set
here.
42
Program settings
6.1.8
Display inactive frames
Inactive frames for which no image is generated, will be displayed corresponding
to this setting either not at all or with a grey frame.
6.1.9
Display progress
If a check mark is set here, the progress of the current step in the status bar will be
displayed.
6.1.10 Use the simulated book cradle
If only a cutout is scanned instead of the complete scan area, there are two
display options of the not scanned area.
1. A virtual book seesaw is displayed. It is possible then to move the cutouts just
as it is possible with a frame scan.
2. Only a black frame is displayed, which makes clear the position of the cutout on
the book seesaw. But a moving of the frames beyond the actually scanned cutout
is not possible. This option is recommended when the size of the scanned images
reaches the limit of the PC.
If a check mark has been set, the first option will be used.
6.1.11 Create thumbnails
If no check mark has been set here, only the affiliated file names will be displayed
instead of images in the thumbnail bar. The setting or removing of the check mark
is only possible if no job is loaded
6.1.12 Default job directory
Here the job directory can be set, which will be offered as a default any time a new
job is created (see 5.2 Create new job). The path can be entered into the text field
or it can be selected after having clicked to the button „search“.
6.1.13 Default job name
Here the job name can be entered, which will be offered as a default any time a
new job is created (see 5.2 Create new job).
6.1.14 Counter start value
Here a number can be entered which is automatically attached to the default job
name and which is incremented then, if the option „increment name“ (see 6.1
Omniscan) is activated.
6.1.15 Increment name
Here the option can be selected that an incremented number is attached
automatically to the default job name starting out from the entry „counter start
value“ (see 6.1 Omniscan).
43
Program settings
6.1.15.1 Mode
Here you have to choose between three different modes. They differ in the amount
of usable functions and settings of Omniscan.
6.1.15.2 Expert Mode
The Expert Mode is intended to be used by experienced users who want to use all
functions and posibilities of the current Omnsican installation. If you find subjects
in the manual you can’t see in the Omnsican this mode has to be used.
6.1.15.3 Book Scan Mode
The Book Scan Mode is optimized for quick and easy work with books. It covers
the same functions as the easy mode does and additionally the configuration and
entry of meta data (7.3 Meta data) can be used. Also the menu entry „BookMode“
(10.1.6 Menue Book Mode) and some new buttons in the toolbar (10.5 Symbol bar
(toolbar)) becomes visible. You should only switch into the bookmode without a job
loaded since some filters and clips have to be switched/defined for correct
working. This is done automatically while creating a new job in the bookscan
mode. If for some reason you want to switch a loaded job into the book scan mode
you have to have two clips that will be used for the left and right side of a book.
6.1.15.4 Easy Mode
This mode is used to quickly start working without having to deal with many mostly
irrelevant settings. In the easy mode all functions and settings not necessary are
hidden and uses standard or automatically choosen values. If for some reason it
becomes necessary to manually adapt some of these settings you can do that by
temporarily switching into the expert mode. Also under the thumbnails you will find
the filename of the image instead of the consecutive number found in the expert
mode.
6.1.16 Scan delay
Here a time period can be indicated with tenths of a second, by which a scan will
be started delayed after having been triggered by mouse click, keyboard, foot
pedal or „continous mode“.
6.1.17 Pass word
The button opens the dialog, in which a pass word can be deposited, which must
be entered before the changing of settings is possible.
The moving and activating or deactivating of cutouts is furthermore possible
without pass word.
44
Program settings
Figure 26: Dialog „Password“
If the pass word has been forgotten, please consult the support department.
The button „password“ will only be displayed if there is no user group
„ScanOperator“ (pay attention to capitalization and use of small letters) on the
computer Omniscan is installed on.
If this group exists, all users of the user group „ScanAdmin“ (pay attention to
capitalization and use of small letters) may use Omniscan unrestrictedly and all
users of the user group „ScanOperator“ may use it restrictedly (what means
entering the password as described above). The access to Omniscan will be
refused to the users of all other user groups.
45
Program settings
6.1.18 More Settings
Figure 27: Dialog "Omniscan settings extended"
6.1.18.1
Aliasing method
Here the method can be selected and parameterized, which is used for the display
of monochrome images on the screen. It has no influence on the saving of the
images.
6.1.18.2
Size of the marker in pixels
Here the size of the targets of the mouse cursor for the graphic change of the size
of the cutout frame can be selected.
(see 5.6.3 Edit cutout settings (graphically)).
6.1.18.3
Linie size
Here you can choose the thicknes of the lines that mark the clips (frames).
6.1.18.4
Display targets outside (instead of inside)
Here the position of the targets of the mouse cursor for the graphic change of the
size of the cutout frame can be selected
46
Program settings
(see 5.6.3 Edit cutout settings (graphically)).
6.1.18.5
Keep position of the cutouts (instead of size)
If the frame for a cutout reaches the edge of the image while moving (see 5.6.3
Edit cutout settings (graphically)), there are two options.
1. The cutout reaches the edge. There is no further moving towards the edge of
the image possible.
2. The cutout will be cut for the area going beyond the edge of image.
If „keep position of the cutouts (instead of size)“ is activated, the second option will
be carried out, otherwise the first.
6.1.18.6
Display express mode dialog
If a check mark has been set here, the dialog “express mode” will be displayed
after the program start of OMNISCAN 12 or after a job has been finished.
6.1.18.7
Use multithreading
Here
the
option
multithtreading
can
be
switched
on
or
off.
If multithreading is switched on, another scan operation can be started even when
the post-processing of the previous scan is running. More working memory is
required then.
6.1.18.8
Use the filter assistent
With this you can switch on and off the filter assistent. More information about the
filter assistant is available in 7.1.30.2 Active image processing tools.
6.1.18.9
Show clip settings on new job
If this is checked after creating a new job the clip settings are displayed
automatically (7.1 Cutout settings).
6.1.18.10
Page up after scan
This directly shows the last clip in the main window after a scan. This is identically
to the shortcut (s. Chapter 14.1 Shortcuts) Shift + F2 used together with a normal
scan. If “Page up after scan” is activ and the shortcut Shift + F2 is used the man
window shows the second but last image.
6.1.18.11
Keep rawscan in memory
This setting has the effect that the unfiltered scan is kept to reflect changes in the
filter settings without the need of a rescan. This option should only be used if the
used computer has enough ram memory. Using that together with big scanners
and high resolutions could be inhibited through restrictions of windows.
6.1.18.12
Do scanner test (continous mode only)
This leads to a scanner test if you activate “contionus mode“ from the scanner
settings too (10.1.4.3 Continuous scan). Don’t use for normal operations.
6.1.18.13
ROI full width
If ROI scan is activated only the area that is necessary to create the clips is
47
Program settings
scanned (plus a small border). Using a line scanner like the OS14000 you
particularly earn the time that would be used to move the scanhead over the whole
area. The scan width only influences the scan speed if the data transmission time
is responsible for the time. With a scanner like the OS14000 you can scan the
whole width without a speed loss, but earn the possibility to make the clip wider or
move the clip horizontaly without a rescan. This is especially important if you scan
books with pop up extensions. Using this switch causes Omniscan to create ROI
scans in full width.
48
Program settings
6.2
Extended settings Omniscan 12
6.2.1
General
The switches described below are intended for spezial purposes and because of
that are not available in the user interface to avoid puzzlement. Changes this
switches is on your own responsibility and should only be done if the
corresponding paragraph has been read and understoud. If in doubt you should
contact your local service partner.
All these switches are located in the file “Omniscan.xml” in the Omniscan
directory.
Switches that are not described here are only for internal purposes and should not
be changed. The possible consequences vary from “useless” over “annoying” to
“catastrophic”.
6.2.2
FullscanFirst
With this switch you can decide whether the first scan is done allways as fullscan
(instead of a ROI scan) to position the clips acording to the complete view of the
bookcradle (default). If this is not set to true even the first scan wil be made as ROI
scan.
<FullscanFirst>false</FullscanFirst>
<FullscanFirst>true</FullscanFirst>
6.2.3
First Scan is made as ROI
scan
First scan is allways a fullscan
SkipCheck
This controls whether the position of a window is checked for beeing on the main
screen. If set to false (default) before displaying a window of a settings dialog
whether it is on the main screen. If not it is repositioned to a save default value. If
this is set to treu this check is not done and the window will be set to its last
position. Particularly if you use more than one monitor this enables you to move
windows permanently to a secundary screen. If windows disapear completely in
this state you can temporarily set this switch to false, redisplay the windows and
the set the switch back.
<SkipCheck>false</SkipCheck>
<SkipCheck>true</SkipCheck>
6.2.4
Positioncheck is done
Positioncheck isn’t done
MagnifierSize
This controls the size of the screen magnifier. The standard size is a 200x200
pixel window. If you use bigger windows check whether the view on the window
becomes too slugish, especialy on slower PCs.
<MagnifierSize>200</MagnifierSize>
6.2.5
Size of the screen magnifier in
pixels
ProcessLogging
With this you can Omniscan put to create a log file. Detail for that on request.
49
Program settings
<ProcessLogging>false</ProcessLogging>
<ProcessLogging>true</ProcessLogging>
6.2.6
Logging switched off
Logging switched on
UseCardReader
With that Omniscan can be put to use a cardreader to check for a charge card and
enough deposit on it. Also the card can be charged for a configurable amount.
Details for that on request.
<UseCardReader>false</ UseCardReader>
<UseCardReader>true</ UseCardReader>
6.2.7
Check of the card reader is
switched off.
Check of the card reader is
switched on
MetaDataOnFragments
Omniscan can ask for new meta data for clip specific data not only for each new
clip, but also for parts of it (so called fragments) that are created e.g. by the cut or
orthoscan filter. If such a filter is active and this switch is set for each side of the
book new meta data is asked for. If this switch is not set both of the sides get the
same mata data (default).
<MetaDataOnFragments>false</MetaDataOnFragments>
<MetaDataOnFragments>true</MetaDataOnFragments>
Shares meta date for each
fragment of a clip
For each fragment of a clip new
meta data is asked for.
50
Program settings
6.2.8
BeepOnStartScan
With that you can select a sound for the start of a scan. If Omniscan is run once
with sound on you will find a entry in the system settings of windows in the tab
sounds for “Start scan” under “Omniscan”. There you can select the desired sound
(*.wav file). This is true for „BeepAfterProcessing“ and „BeepAfterScan“ too.
However these two can be switched in the Omnsican settings.
<BeepOnStartScan>false</BeepOnStartScan>
<BeepOnStartScan>true</BeepOnStartScan>
6.2.9
Sound on start of a scan
switched off
Sound on start of a scan
switched on
CheckMemoryAvailable
At the start Omniscan checks whether enough memory is available. This can be
switched off here. This includes trying to put the various modules of Omniscan in
such a way in memory that the address space is optimaly used. If just the
annoying message should dissapear its better to just switch of the following
ShowMemoryWarning.
<CheckMemoryAvailable>true</CheckMemoryAvailable>
<CheckMemoryAvailable>false</CheckMemoryAvailable>
Memory checking switched on
Memory checking switched off
6.2.10 ShowMemoryWarning
With this you can switch of the message about to few memory. This switch only
can work if at least enough memory is available to scan in full resolution. If this is
the case the the user is asked whether he wants to see this message again. If
answered with no this switch is set to false.
<ShowMemoryWarning>true</ShowMemoryWarning>
<ShowMemoryWarning>false</ShowMemoryWarning>
Warning if low memory
switched on
Warning if low memory
switched off
51
Program settings
6.2.11 SuppressResWarning
This can supress a warning message if you create a clip with a higher resolution
than the scan. If set to false the operator will be warned if he tries to increase the
resolution to more than a factor of 2. If this switch is set the warning message is
not shown.
<SuppressResWarning>false</SuppressResWarning>
<SuppressResWarning>true</SuppressResWarning>
Warning message for
increasing of the resolution
activ
Warning message for
increasing of the resolution
switched off
6.2.12 SuppressRedock
Normaly if nothing else is to do Omniscan rearranges its toolbars. With that a
change in the window size doesn’t lead to a ugly display. Some graphic drivers
interpret this as new activity of Omniscan and renew the rearranging of the
toolbars. This leads to a flickering display which can be suppresed with this switch.
<SuppressRedock>false</SuppressRedock>
<SuppressRedock>true</SuppressRedock>
Rearranging of the toolbars
active
Rearranging of the toolbars
switched off
6.2.13 CorrectSubfileType
The used library creates even single TIFF-files as multipage Tiffs with just one
image inside. Some software is not capable of handling this. To enable these
programms for precessing of data Omniscan created to patch the subfile type for
all images it is writing on disk.
<CorrectSubfileType>false</CorrectSubfileType>
<CorrectSubfileType>true</CorrectSubfileType>
No patching of the subfile types
Subfile type will be changed to
„single page“
52
Program settings
6.2.14 FootPedalMode
The USB-footpedal has to be used different according toi the used operating
system. Especialy for windows versions in foreign languages the detection of the
windows version is not allways reliable. To force the correct mode it can be
selected here.
<FootPedalMode>0</FootPedalMode>
<FootPedalMode>1</FootPedalMode>
<FootPedalMode>2</FootPedalMode>
<FootPedalMode>3</FootPedalMode>
Automatic detection
Use XP Mode
Use Windows 2000 Mode
Use Polling Mode
6.2.15 PercentUpscale
To compute the necessary scan resolution from the selected clip resolutions first
off all the maximum clip resolution is determined. If this is between two resolutions
the scanner can deliver directly one of these resolutions has to be choosen. With
this value you can influence this decision. Is the maximum clip resolution higher
than 70% (default) of the difference above the lower scanner resolution the higher
on ewill be choosen. If it is lower the scan will be mad in the lower resolution.
<PercentUpscale>70</PercentUpscale>
Automatic resolution chooses
the higher resolution only if the
target resolution is more than
70% higher than the lower
scanner resolution.
6.2.16 ShowThumbIDs
Instead of the sequential number of the clip ist ID can be displayed below ist
thumbnail. This is intended for development purpose only.
<ShowThumbIDs>false</ShowThumbIDs>
<ShowThumbIDs>true</ShowThumbIDs>
Show sequential number under
thumbnail
Show ID under the thumbnail
6.2.17 ShowTrialWarning
Omniscan can be used with all options in the first 30 days or 1000 scans. After
that only the bought options are available any longer. At startup Omniscan alerts
the user that not all options available now will remain in perpetuity. This message
can be suppresed with this switch. Allways if the warning message shows up the
user has the oportunity to suppress this message. This switch will be cleared then.
<ShowTrialWarning>true</ShowTrialWarning>
<ShowTrialWarning>false</ShowTrialWarning>
Show warning message about
demo period
Don’t show warning message
about demo period
53
Program settings
6.2.18 ShowTrialEnd
Omniscan can be used with all options in the first 30 days or 1000 scans. After
that only the bought options are available any longer. At startup Omniscan alerts
the user that this time is over now. This message can be suppresed with this
switch. Allways if the warning message shows up the user has the oportunity to
suppress this message. This switch will be cleared then.
<ShowTrialEnd>true</ShowTrialEnd>
<ShowTrialEnd>false</ShowTrialEnd>
Show warning message about
expired demo period
Don’t show warning about
expired demo period
6.2.19 ShowScannerResolution
To create scans in Omniscan you just have to define the desired clips. Omniscan
computes from these clip parameters the necessary scan parameters. The
resolution belongs to this parameters. To avoid confusion of the operator this
computed resolution normally is not displayed. With this switch you can activate
the display of the computed (necessary) resolution.
<ShowScannerResolution>false</ShowScannerResolution>
< ShowScannerResolution>true</ ShowScannerResolution>
Computed scanner resolution is
hidden
Computed scanner resolution is
shown
6.2.20 ROIFullWidth
If ROI is selected only the necessary part of the book cradle is scanned (added by
a definalbe border). Using a line scanner like the OS14000 you primarily save part
of the time to move the scan head over the book cradle. The width of the scan only
has some influence if the data transfer limits the speed. With a scanner like the
OS14000 you can scan over the whole width without loss in speed, but you obtain
the possibility to move or resize the clip without the need of a rescan. Especially if
you scan books with unfolding extended pages. This switch causes Omniscan to
get all the scans with maximum width.
<ROIFullWidth>false</ROIFullWidth>
<ROIFullWidth>true</ROIFullWidth>
Width of a scan depends on the
size and position of the clips.
Width of a scan always
maximum.
54
Program settings
6.2.21 ContinousRescan
In the „continous scan“ mode normally every image will be put on harddisk. For
endurance testing (or on a fair) you can cause Omniscan to do rescans allways.
This is intended for development purpose only.
<ContinousRescan>false</ContinousRescan>
<ContinousRescan>true</ContinousRescan>
Scan normal in continous mode
Do rescans in continous mode
6.2.22 StartScanOnGlas
This switch enables Omniscan to scan if the glass plate of the OS12000 is closed.
Additionally the automatic glass plate opening must be activated.
<StartScanOnGlas>false</StartScanOnGlas>
<StartScanOnGlas>true</StartScanOnGlas>
Don’t scan on closing the glass
plate.
Scan on closing the glass plate.
55
Program settings
6.3
Color management
OMNISCAN 12 supports working with color management.
On this index card profiles can be selected, which can be attached to the images
created with OMNISCAN 12, and which can be used with the display or the
printing of the images.
Figure 28: Index card „color management“
6.3.1
Scanner profile
Here the profile can be selected which is attached to the images created in
OMNISCAN 12 with the use of the color profile.
The path to the profile can be entered to the text field or it can be selected by
clicking to the button „search“.
If the use of color profiles should be completely deactivated the „automatic“ has to
be unchecked (6.3.2 Automatic) and the entry filed has to be cleared completely.
6.3.2
Automatic
If a check mark has been set here, an enclosed standard color profile is attached
to the images.
6.3.3
Monitor profile
Here the profile can be selected, which is used with the display on the screen. The
path to the profile can be entered to the text field or it can be selected after the
button „search“ has been clicked to.
The „Rendering Intent“ can be set using the small button next to the search button.
This setting should only be changed by experts.
56
Program settings
6.3.4
Printer profile
Here the profile can be selected, which is used with the printout of an image. The
path to the profile can be entered into the text field or it can be selected after the
button „search“ has been clicked to.
NOTE: In Omnican 11.0 the use of the printer profile has still not been realized!
6.3.5 Target profile
Here the profile can be selected in whose color space the image will be saved. If
the image is still not available in this color space it is converted immediately before
it will be saved. The target profile will then be attached to the image depending on
the file format.
If nothing is entered here there will be no conversion and the scanner profile will
be attached.
The „Rendering Intent“ can be set using the small button next to the search button.
This setting should only be changed by experts.
6.3.6
Color management active
Only if this check mark has been set, the selected monitor profile is used for the
display on the screen. (The use of the profile delays the process of the build-up of
the image).
This setting has no influence, whether a selected scanner profile is attached to
scanned images or not.
Profiles may be attached to TIFF files and JPG files. This can be easily reached by
merely selecting the correct profile here. Of course, this will be only done with
color images.
The file name of the used color profile will be saved in addition to each image in
the job file and then be used with the display then. So it is made sure that the
correct color profile for the display will be used even with changes of the settings
during a running job.
57
Job settings
7
Job Options
The job options include the settings or parameters which are not valid for all jobs
in contrast to the program settings, but can be selected for each job individually.
These are:
1. Scan settings
These settings define the kind of scanning, i.a. what kind of image is
transferred from the scanner to OMNISCAN 12. These settings are carried out
with the index card „scan settings“ of the dialog „settings“ (see 7.2 Scan
settings).
2. Cutout settings
These settings define the number of images and the kind of settings which are
actually gained and stored by the image transferred from the scanner.
These cutouts are normally indicated as a „scan“. They are the images desired
by the user.
These settings are carried out with the index card „cutout settings“ of the dialog
„settings“ (see 7.1 Cutout settings).
3. Meta data
OMNISCAN 12 offers the option to write texts of information with each job and
to provide them with a title. It is possible then to assign the texts to a job, a
particular scan or a single image. These texts of information, called meta data,
can be stored as a TIFF-tag together with the images.
These metadata are established with the index card „meta data“ (see 7.3 Meta
data).
4. Job termination settings
These settings define how to proceed with all images of a scan job finally.
These settings are carried out with the index card „job termination“ of the dialog
settings (see 7.4 Job ).
5. Job settings
You set up the basic job settings here. This for instance includes the visibility of
the toolbars (10.5 Symbol bar (toolbar)). These settings are located in the „Job
settings“ part of the settings dialog (7.5 Job Settings).
The settings selected here are saved in the job file and they are restored each
time when a job is opened.
Additionally all these settings can be saved in one file separately as one job
parameter set (see 10.1.1.6 Save job settings with).
It is possible to take over the job parameters with this file when a job is created
newly (see paragraph 5.2 Create new job), i.a. the job settings can be exported
and imported.
The set-up of the job settings requires that a job is opened. If this is not the case,
the user is requested to create a new job or to open an existing job when trying to
open the corresponding index cards.
58
Job settings
7.1
Cutout settings
With this index card those settings are carried out which are used for one cutout
respectively.
The direct way to this index card is to activate the desired cutout in the main
window and to select „settings“ in the context menu, which is opened with the left
mouse key.
Figure 29: Direct call „cutout settings“
The settings of the desired cutout are then displayed automatically.
The „cutout settings“ can also be invoked with the menu entry „scanner – settings“
and the selection of the corresponding index card there.
In addition this index card is opened immediately when a new cutout is created.
After having left the dialog „settings“ with „OK“, the selected settings are
immediately used with the cutout.
59
Job settings
Figure 30: Dialog „cutout settings“
7.1.1
Select cutout
Here all currently existing cutouts can be selected from the list being displayed
below the text field after having clicked to the small arrowhead. The settings of the
selected cutout which are displayed immediately can then be changed.
7.1.2
Cutout group
Each cutout can be assigned to one of five cutout groups (A – E). These cutout
groups and with that the cutouts assigned to it can be activated by keyboard
commands or menu entries. So it is possible for example to activate or deactivate
several cutouts simultaneously with one keyboard command.
7.1.3 Page
Here a cutout may be defined as left or right. If this has happened, the color mode
of the corresponding page can be switched over or the page can be switched off
with an appropriate control in the toolbar.
Fig 31: Left / right control (big)
With that only those buttons will get active for which a corresponding cutout is
available. By clicking to one of the color symbols for off, black-and-white, grey or
color all cutouts of the color mode for the corresponding page will get active
60
Job settings
respectively, and all other color modes will be deactivated. If the prohibition sign
(off) occurs the page will be switched off completely. All cutouts which belong to
the other page or which have not been classified as left/right will not be influenced
by that.
By clicking to the book symbol a compressed display can be selected. There the
color symbol can be switched to by clicking. The highest color mode of all active
clips will be displayed then.
Fig 32: Left / right control (small)
The example shows a setting of black-and-white for the left page, and color for the
right page. If in the following cutouts are activated or deactivated in a different way
(e.g. with the cutout settings), this will be displayed accordingly.
The controls may be teared off from the toolbar (like all other toolbar controls) and
they can be placed on the desktop arbitrarily.
7.1.4
Create cutout
If a check mark has been set here the cutout is taken into account with the
scanning, i.a. a corresponding image is created and saved.
If a check mark has not been set here, the cutout settings remain unchanged, but
with the following scanning operations there is no corresponding image created or
saved.
This setting can also be set with shortcuts (s. 14.1 Shortcuts).
61
Job settings
7.1.5
Frame color
Here the color can be selected with the help of the palette which appears if the
arrowhead is clicked to.
7.1.6
Copy settings from
If the same characteristics, as another existing cutout has, shall be assigned
completely or partly to an existing cutout, this is possible by clicking to the button
“copy settings from”. The dialog “copy settings” will be displayed , in which the
desired settings and the cutout can be selected, from which the copy shall be
made.
Figure 33: Dialog „copy settings“
7.1.7
Unit
Here the units „pixel“, „inch“ and „mm“ can be selected for the indications of length
„distance from the left“, „distance from the right“, „width“ and „length“.
7.1.8
Automatic Adaption
If this option is activated all clips that are set as left or right side are automatically
relocated to he left or right side of a book if Orthoscan or Perfect Book (11.1.8
Perfect Book) is used. This is done until a clip is moved with the mouse. This
manual settings has priority. If you want to reactivate the automatic select “Ajust
trackers” from the „Select” menue (see chapter 10.1.5.4 Adjust trackers).
7.1.9
Distance from the left
Here the distance of the cutout to the left border of the image can be entered
indicated with the unit selected with „unit“.
The value can either be entered directly or it can be incremented step by step up
or down using the little arrowheads on the right edge of the field.
This setting can also be carried out graphically in the main window.
7.1.10 Distance from above
Here the distance of the cutout to the border above of the image can be entered
indicated with the unit selected with „unit“.
62
Job settings
The value can either be entered directly or it can be incremented step by step up
or down using the little arrowheads on the right border of the field.
This setting can also be carried out graphically in the main window.
7.1.11 Width
Here the width of the cutout can be entered indicated with the unit selected with
„unit“.
The value can either be entered directly or it can be incremented step by step up
or down using the little arrowheads on the right border of the field.
This setting can also be carried out graphically in the main window.
7.1.12 Height
Here the height of the cutout can be entered indicated with the unit selected with
„unit“.
The value can either be entered directly or it can be incremented step by step up
or down using the little arrowheads on the right border of the field.
This setting can also be carried out graphically in the main window.
7.1.13 Use geometrie off
Here the geometrie (position, height and width) of another clip can be used for the
current clip (stack clips). Changes of the geometrie of the clip selected here will be
automatically used for all connected clips. So the current clip has no longer tracker
handles, but can only be manipulated by changing the connected clip.
If you for instance choose „this clip“ in clip 1 (Color, JPEG) and select in clip 2
(black & white, TIFF-G4) clip 1 for the geometrie size and position of clip 1 and 2 is
allways identical, even if you move or resize the frame of clip 1.
A small differenz (less than 10 pixels) can ocur if you binarise with the optibin filter.
This function tries to find a dynamic, optimized binarisation threshold from the
environment of a pixel. This could lead to decrease in image size.
A litte different is the case where clip 1 is marked as left side and clip 2 is marked
as right side. Then the right one is mirrored at the right side of the left clip. So the
two clips don’t lie on the same position, but can only be manipulated by moving or
resizing clip 1.
7.1.14 Standard paper size
Here standard formats and the option „maximum“ for frames can be selected for
the determination of the size of the cutout.
7.1.15 Portrait/landscape format
If a standard format has been selected, it is possible to select between portait and
landscape format here. A change is only accepted when it is possible
geometrically.
7.1.16 Left
The cutout is moved up to the left border of the image.
63
Job settings
7.1.17 Right
The cutout is moved up to the right border of the image.
7.1.18 Centering
The cutout is moved to the center of the image.
7.1.19 Couple cutout 1 and 2
The coupling of the cutouts 1 and 2 results in the coordination of the setting of the
size and the placing of both cutouts. This is e.g. useful then, when both pages of a
book shall be scanned.
If the coupling is activated, each modification of the placing and of the size of one
of the two cutouts is transferred to the other one. It is started there from the
settings which were existing at the time of coupling.
If one of the cutouts is moved, the same is done with the other one. So both pages
of a book whose position has been changed can be „moved“.
If the size of one of the two cutouts is changed, the size of the other one is
changed „with mirror image“. If therefore a cutout is enlarged to the center of the
book, a cutout placed on the other side of the book approaches this cutout.
7.1.20 Save settings
By clicking to the button “save settings” the current settings of all cutouts will be
saved.
7.1.21 Reject changes
By clicking to the button “reject changes” the changes are rejected which have
been made since the opening of the dialog “settings” or which have been made
since the last saving of the settings (s. 7.1.20 Save settings).
7.1.22 New clip
With this a new clip can be created.
7.1.23 Resolution in dpi
Here
the
resolution
of
the
cutout
can
be
selected.
If the automatic system is activated, the sanner selects the resolution
automatically with the scanning operation. If a resolution has manually been set,
which differs from the resolution actually used for scanning, an interpolation will be
carried out.
If the option „auto“ is set with the settings of the resolution in the scanner settings
(see 7.2.8 Resolution in dpi), the scanning is carried out automatically with the
most favourable resolution. An increasing of the resolution by interpolation is
avoided if possible.
7.1.24 Method of interpolation
The method according to which the interpolation shall be carried out, if the cutout
resolution deviates from the scanner resolution.
64
Job settings
7.1.25 Colors/gray levels
Here the „color depths“ of a cutout can be selected.
Possible are: black/white, gray level 4 bit, gray level 8 bit, and 24 bit color.
If the option „auto“ is set with the settings of the color depths in the scanner
settings (see 7.2.9 Colors/gray levels), then automatically the scanning is carried
out with the highest color depth selected in one of the cutouts. If a color depth can
not be accomplished because a lower color depth has been entered manually with
the scanner settings, the user is informed about this.
7.1.26 File format
Here the file format is selected, with which a cutout will be saved.
The offer of the file formats varies according to the color selected with the color
depth. For each color format the file format can be selected individually.
Black/white
und b/w Photo
TIFF
TIFF G3 D2
TIFF G3
TIFF G4
TIFF Huffmann
TIFF packed
TIFF LZW2
Windows BMP
GIF
PCX
PNG
Gray level 4 bit
Gray level 8 bit
Color 24 bit
TIFF
TIFF packed
TIFF LZW3
Windows BMP
Windows BMP RLE
GIF
PCX
PNG
TIFF
TIFF JPEG
TIFF packed
TIFF LZW4
Windows BMP
Windows BMP RLE
GIF
JPEG
JPEG 2000
PCX
PNG
TIFF
TIFF JPEG
TIFF packed
TIFF LZW5
Windows BMP
JPEG
JPEG 2000
PCX
PNG
Table 1: File formats
7.1.27 Compression factor
For JPEG
JPEG is a lossy compression procedure with which the rate of compression and
the image quality can be adapted to the corresponding requirements. It must be
observed there that each increasing of the rate of compression and therefore the
reduction of the file size results in a deterioration of the image quality.
As far as JPEG has been selected as file format, the image quality can be set here
from 0-100. Higher values result in a better image quality, lower values on the
other hand result in a higher rate of compression.
For JPEG 2000
The compression factor defines the factor, for which the amount of data will be
reduced. The indication of the factor „0“ results in a loss-free compression.
(Depending on the image content this results in a reduction of the amount of data
with factor 2). In general settings between 10 and 20 have been proved.
In addition the filters for the discrete wavelet ransformation and the wavelet level
2
Nur mit Option LZW
Nur mit Option LZW
4
Nur mit Option LZW
5
Nur mit Option LZW
3
65
Job settings
can be selected. For this purpose the following dialog can be opened with the little
button right besides the window for the setting of the compression rate.
Figure 34: Extended settings „JPEG 2000“
7.1.28 Use filter of
If the same image processing functions shall be applied to several cutouts, it is
possible then to determine these image processing functions once for one cutout
and to refer to this cutout when using the other cutouts.
7.1.29 Process all cutouts directly after the scan
By removing the check mark it is possible to carry out the image processing
functions of all cutouts only with the job termination. A switching is possible any
time with a loaded job. Images which are already processed are indicated as such
and they will not be processed again.
7.1.30 Image processing
Here is the option of a preselection of image processings which can be applied to
the just selected cutout. Here for each color mode the filters can be selected
independently.
If the check mark „directly after the scanning..“ has been set, the image
processings are carried out immediately after the scanning operation and the
result is displayed in the main window according to the selection of the
corresponding cutout. If the check mark has not been set, the image processings
are carried out only during the job termination (see 7.4 Job ). The use of the image
processings only during the job termination is e.g. useful, when the immediate use
would delay the scanning operation. The work off of the image processings, called
filter stack, during the job termination can be carried out e.g. even at night without
staff.
(NOTE: In Omnican 11.0 the option of realizing image processing batches only
with the job termination is not realized! Therefore the check mark is gray).
The arrangement of the image processing tools is carried out in the following
dialog „image processing settings“, which is displayed by clicking to the button
„image processing“.
66
Job settings
Figure 35: Dialog „image processing settings“
7.1.30.1
Available image processing tools
All available image processing tools are offered in the list on the left side (see
paragraph 8 Image Processing Tools).
7.1.30.2
Active image processing tools
The image processing tools included in this list are applied to the selected cutout.
The image processing tools are being processed from above to below. Therefore
the sequence must be useful and it must be corrected, if necessary, by using the
button „upwards“ or „downwards“.
If, for example, „cut“ and „deskew“ are used simultaneously, first “deskew” and
then „cut“ should be used. Since „orthoscan“ cannot be used for 1 bit black/white
images, the image processing „binarization“ must only be used after „orthoscan“.
The filter assistant working in the background supports the arrangement of the
image processing sequence. Recommendations or a note will possibly be given
when unreasonable arrangements occur. With this recommendations the filter
assitant asks whether this recommendation shall be displayed again.
Figure 36: Recommendation of the filter assistant
67
Job settings
“Yes”
The recommendation will be displayed again during the current arrangement of the
image processing sequence.
“No”
The recommendation will be displayed again at the earliest when the image
processing is invoked again.
Together with the notes the filter assistant asks whether the last change shall be
cancelled.
Figure 37: Note of the filter assistant
“Yes”
The last change will be cancelled.
“No”
The last change will not be cancelled.
“No for all”
The last change will not be cancelled. Further this note will not be given again by
the filter assistant during the current arrangement of the image processing
sequence.
In the case of impossible arrangements the filter assistant displays an error
message and it issues a note, if necessary. After the dialog has been confirmed
the last change will be cancelled.
Figure 38: Error message of the filter assistant
68
Job settings
7.1.30.3
Add
Using this button, the processing tools selected from the list „available image
processing tools“ by clicking can be added to the list „active image processing
tools“.
The set-up options are displayed according to the added image processing tool on
the right side.
(For more details about image processing tools see paragraph 8, Image
Processing Tools).
7.1.30.4
Remove
Removes marked entries from the list „active image processing tools“.
7.1.30.5
Up...
Moves up a marked entry in the list „active image processing tools“.
7.1.30.6
Down...
Moves down a marked entry in the list „active image processing tools“.
7.1.30.7
Save
Saving of the current image processing sequence in a file, which makes it possible
to take over the image processing sequence set once for following cutouts (even
in other jobs).
7.1.30.8
Load
Loading of a image processing sequence from a file.
7.1.30.9
Conceptiual Changes
Up to Omniscan version 11.10 it was not posible to choose the filters and the file
format independent for each color mode. Now you can choose for instance in one
clip the fileformat TIFF JPEG with suitable filtering for color 24 bit and the file
format TIFF G4 with different filtering independet from each other.
Also the logic to choose the color mode is changed. Up to now the input color
mode for the filtering was selected. Now it’s the output color mode. Until now you
could choose 24 bit color and select binarisation as a filter function. Now you first
choose black and white as color mode and can than select binarisation as a filter.
Internal Omniscan automatically decides to scan in grayscale and use the
binarisation filter afterwards. So the selected colormode decides about the result
of the filtering not of the input into the filtering.
7.2
Scan settings
Scan settings are the settings which are used for the actually carried out scan,
called main scan. The selected cutouts are cut from this main scan and they are
converted according to their individual settings.
69
Job settings
Figure 39: Index card „scan settings“
7.2.1
Scan mode
Here the size of the main scan is determined.
There are two options possible.
7.2.1.1 Complete scan
If this option has been set, always a scan with the greatest possible expansion is
scanned and it is displayed in the main window.
7.2.1.2 Circumscribing rectangle / ROI frame
If this option has been set, a scan with the smallest possible expansion is
scanned, from which all selected cutouts can be gained. This is the rectangle
circumscribing all cutouts.
It is possible to determine in the entry field „pixel border“ how big the border may
be to be scanned around this circumscribing rectangle.
This setting may result in an acceleration of the scanning operation.
This option can not be selected if it is not supported by the connected scanner.
7.2.1.3 First scan always fullscan
With this you can decide whether the first scan is made as a fullscan to position
the clips more easily or directly as a ROI scan (you have to know where the clips
have to be).
7.2.2
Image processing
Image processing tools can be assigned here analogously to the option of the
cutout settings already for the complete scan, which are used automatically during
the scanning operation (see. 7.1.30 Image processing).
70
Job settings
7.2.3
Scanner reset
Here a scanner reset can be triggered.
7.2.4
Extended
The surface for the scanner-specific settings is opened by clicking to this button.
For more details see the scanner-specific part of these instructions (see 11
Scanner-specific Options).
7.2.5
Use filter of
Here the cutout can be selected, the „filter stack“ of which is already be applied to
the main scan. (For „filter stack of the cutouts“ see 7.1.30 Image processing).
Since it makes no sense usually to apply a filter stack twice to an image area (first
the main scan and then the cutout), the cutout with the “filter stack” taken over will
be inactive usually. Several „filter stacks“ can be applied with „dummy cutouts“, i.e.
such which will never be activated, which can then be applied here as required.
This selection is also possible with keyboard commands (see 14.1 Shortcuts).
7.2.6
Brightness
Here the brightness of the main scan can be set.
The control is not active (underlaid gray), if such a setting is not supported by the
connected scanner.
7.2.7
Contrast
Here the contrast of the main scan can be set.
The control is not active (underlaid gray), if such a setting is not supported by the
connected scanner.
7.2.8
Resolution in dpi
Here the resolution which is used for scanning is displayed or set up.
If the option „Auto“ is active, a resolution is automatically selected which is optimal
for the gaining of the resolution selected for the cutouts.
If „auto“ is not active, all resolutions are offered for the manual selection here
supported from the connected scanner on a hardware base.
If the manual selection does not make possible the realization of all settings
selected in the cutout settings, the user is informed correspondingly.
7.2.9
Colors/gray levels
Here the color depth used for the scanning is displayed or set up.
If the option „auto“ is active, a color depth is automatically selected, which is
required for the gaining of the color depth selected for the cutouts.
If „auto“ is not active, all color depths are offered for the manual selection here
supported from the connected scanner on a hardware base.
If the manual selection does not make possible the realization of all settings
selected in the cutout settings, the user is informed correspondingly.
7.3
Meta data
OMNISCAN offers the possibility to enter additional information, which cannot be
directly taken from the image, by the scan operator directly with the capturing. This
71
Job settings
may be arbitrary information as e. g. the title of the scanned book, an index, the
name of the person, who has made the scans or the customer.
Therefore a name must be given for each meta datum. The content can then be
entered directly or it can also be queried during the scanning operation according
to the configuration. For this purpose 4 different classes of meta data are
available. A meta datum may be valid for the complete job (job-specific), be valid
for one chapter (chapter-specific), be allocated to a scan (scan-specific) or be valid
for a particular image (cutout-specific). The cutout-specific meta data may be
allocated to a particular cutout in addition or they may be valid for all cutouts. In
addition, there is even the option to possibly increment numbers in a meta datum
automatically and to use a meta datum as a TIFF tag.
The such determined data can then be written to an index file in the job
termination, which may be also configured here.
The meta data are part of a job and they will be saved in the job parameters.
Therefore they can be taken over for a new job together with them (for more
details about job parameters s. 7 Job Options).
72
Job settings
Figure 40: Register carde „meta data“
The field of the radio buttons and checkboxes of the register card “meta data”
changes insignificantly according to the selection of the radio button.
Figure 41: Checkbox text according to the selection of the radio button
7.3.1
Entry name
Here the available meta data can be selected or a new meta datum can be added.
The configuration of a selected meta datum may be changed by typing over the
“value” belonging to it, for example, and/or the type belonging to it is changed by
selection of a radio button.
7.3.2
Job-specific
Data are job-specific when they are allocated completely to a job.
If the check mark has been set for the checkbox “ask once with job start” a query
dialog will be displayed for the user after the first scan, which is pre-allocated with
the last allocated value for this meta datum.
73
Job settings
Figure 42: Dialog „Entry of dynamic data“
The user may either take over or change the content of the meta datum here. After
the “OK button” has been confirmed the meta datum will be saved allocated to the
job.
If the option „use entry as TIFF tag no.“ (see 7.3.13) has been set, this meta date
will be attached to each individual image which is scanned within the job as a TIFF
tag.
7.3.3
Scan-specific
Data are scan-specific which are allocated completely to a scan.
(For more details what a scan in OMNISCAN 12 means see the chapter
Introduction).
If the check mark has been set for the checkbox “ask once for each scan” a query
dialog will be displayed for the user after each scan, which is pre-allocated with the
last allocated value for this meta datum.
Meta data, which have been marked as scan specific, are displayed after each
scanning operation.
Figure 43: Dialog „Editing meta data dynamically“
The user can either take over or change the content of a meta datum. After the
„OK button“ has been confirmed the meta datum will be saved allocated to the
scan.
74
Job settings
If the option „use entry as TIFF tag no.“ (see 7.3.13) has been set, this meta
datum is attached to each image which has been made due to the cutouts in this
scan as a TIFF tag.
7.3.4
Cutout-specific
Data are cutout-specific which are allocated to an individual cutout. The individual
images are made due to the cutouts.
(For more details what a cutout means exactly in OMNISCAN 12 see the chapter
Introduction).
If the check mark has been set for the checkbox “ask for each cutout” a query
dialog will be displayed for the user after each scan, which is pre-allocated with the
last allocated value for this meta datum.
Figure 44: Dialog „Entry of dynamic data“
Here the user can either take over or change the content of the meta datum. After
the „OK button“ has been confirmed, the meta datum will be saved allocated to the
cutout.
If the option „use entry as a TIFF tag no.“ (see 7.3.13) has been set, this meta
datum is attached as a TIFF tag to the image, which has been made due to this
cutout.
7.3.5
Chapter-specific
Data are chapter-specific which are allocated to all cutouts of a chapter.
With a chapter-specific meta datum a query dialog for the user will be displayed
with the last allocated value for this meta datum then, if he selects a new chapter
per menu command (select, new chapter) or per shortcut (Alt-C).
75
Job settings
Figure 45: Dialog “New chapter”
If a change of chapter between the left and the right page of a book occurs with
the scanning of a book the start of the next chapter may also be delayed. If the
check mark is set to “immediate”, the information for the next chapter is queried
immediately after OK has been clicked to and it will be used immediately. If this
check mark is deleted, the number of pages can be determined in the entry field
getting active below, which shall still belong to the old chapter, before the
information for the new chapter shall be queried. If therefore the left page of the
book lying on the plate still belongs to the old chapter and the right page belongs
to the new one (two cutouts), the 1 results in the fact that the left page still eblongs
to the old chapter and therefore gets assigned the corresponding meta data. As
soon as this has happened, the information for the new chapter will be queried and
the new information will be assigned to the right page.
Figure 46: Dialog „Entry of dynamic data“
The user can either take over or change the content of the meta datum here. After
the “OK button” has been confirmed the meta datum will be saved allocated to
each cutout.
If the option “use entry as TIFF tag no.” (see 7.3.13) has been set, this meta
datum will be attached as a TIFF tag to the image which has been made due to
this cutout.
7.3.6
Count
If the checkbox “count” is activated, the content of the meta datum will be
searched for a number and this will be increased by one. If there is no number
76
Job settings
found a “1” will be set at the end of the content.
If the checkbox “query” is activated, the content being made of the meta datum
may still be manually influenced in the displayed query dialog before using it.
7.3.7
Close on enter
Is the Checkbox „Close on enter“ checked you can complete the input of a meta
data entry with the enter key. A new line is then created by with Ctrl-Enter. If it is
not checked „Enter“ creates a new line. You can close the dialog with Ctrl-Enter
then. In any case the dialog can be closed with a click on the OK button.
7.3.8
Use text from filter (Barcode)
With this checkbox the value of the current meta data entry is automaticaly the
result of the barcode reading filter (8.1.17 Read barcode). This can be used for
job- and clip spezific entries.
7.3.9
Show this item in extra window
If this is checked the currently selected meta data is shown in a seperate window.
If this option is selected for a couple of entries they are all shown together in one
window.
7.3.10 Value
The content of the selected meta datum is entered to or displayed in this field.
A displayed content can be changed.
7.3.11 Add
If meta data entries are already available in the list “entry name” an entry will be
searched for there which is mostly similar to the new one to be made and the
button “add” is pressed then. The new name is entered to the mini dialog which
will be opened after that. After having clicked to OK a new entry in the list exists.
Figure 47: Dialog for the entry of the indication of a new meta datum
7.3.12 Delete
The button „delete“ deletes the just selected meta datum.
7.3.13 Use entry as TIFF tag no.
If this option has been set, the meta data are attached to the images according to
their allocation as a TIFF tag (see 7.3.2 Job-specific, 7.3.3 Scan-specific, 7.3.4
Cutout-specific and 7.3.5 Chapter-specific).
TIFF tags are provided with a number from 0 up to 65535. Some of these numbers
are combined in the TIFF specification with particular contents.
77
Job settings
Five of them can be selected from the list box after having activated the check
box.
269 Document name
270 Image description
285 Page name
315 Artist
33432 Copyright
An arbitrary number between 0 and 65535 can be selected deviating from these
defaults.
If the meta datum contains a dummy of the form %04n (where a number between
4 and 9 may be placed instead of 4), a sequential number will be entered at this
place in the job termination which corresponds with the numbering of the
thumbnail list. The number in %04n … %09n indicates how many digits the
number to be displayed has.
78
Job settings
7.3.14 Index export
To get the included meta data into a format which can be processed by the
programs and to which the included images are passed on, the index export is
available.
Figure 48: Dialog „settings for index export“
7.3.14.1
Entry separator
Here the symbol is selected or entered, with which the particular entries of an
image shall be separated in a file.
7.3.14.2
Data set separator
Here the symbol is selected or entered, which shall separate the particular data
sets in a file.
For a better distinction of entries and data sets it is useful to select different
separators.
7.3.14.3
Available entries
All available meta data are offered in the list on the left side.
79
Job settings
7.3.14.4
Active entries
The meta data listed here will be exported.
7.3.14.5
Add >>
The meta data selected in the list “available entries” can be added to the list
“active entries” using this button.
7.3.14.6
<< Remove
Removes marked entries from the list “active entries”.
7.3.14.7
Up /\
Moves a marked entry up in the list „active entries“.
7.3.14.8
Down \/
Moves a marked entry down in the list „active entries“.
7.3.14.9
Create XML Output
If this is checked the fields will change like in the image below. The “Index export
settings” become the “XML index export settings”.
Figure 49: Dialog „XML Index Export Settings
The creation of the XML-file is done by using a couple of template files that have
to be declared here. The “Job header” is the file that describes the beginning of
the XML-file. At the beginning of the output this file is copied. In doing so a couple
80
Job settings
of placeholders are replaced (see below) with a current value. The “Scan header”
is used respectively at the beginning of each scan. The placeholders are replaced
as well. The same is done for the “Scan trailer” and the “job trailer” that are
included at the end of the respective section. For each image in the job the “clip
template” is used. If you want to use different templates for different clips you can
include a %d into the filename which is then replaced with the respective clip
number. If no %d is in the “clip template” the same file is used for all defined clips.
If a chapter head or trailer is specified Omniscan searches for a chapter specific
meta data entries saved together with the image. If the value of this entry changes
from one image to the other a chapter head and/or trailer is included into the
output. If a scan head or trailer is specified too this is done only between scans.
So, if you want a chapter change between to images from the same clip (left side
old chapter, right side new chapter) the fields for scan header and scan trailer
have to be empty. Also it is recomended to use only one chapter specific meta
data entry.
Output filename specifies where Omniscan should put the XML-file. If no absolute
path is used (something like c:\example...) the file is created in the job directory. It
is recommended to use something like „index.xml“.
The Platzhalter in the XML components (Templates) are:
%pSerial%
%pClipCounter%
%pScanCounter%
%pPaginator%
%pWidth%
%pHeight%
%pResolution%
%pFilename%
%pUser%
%pComputer%
Serialnumber of the XML creation
Counter for each single image
Counter for the scans
Paginator
Image width
Image height
Resolution of the image
Filename (without Pfad)
Logged in user
Current computer name
// Current date and time
%pYear4%
Year 4-digits
%pYear2%
Year 2-digits (without century)
%pDay3%
Day of the year 3-digits
%pMonth%
Month 2-digits
%pDay%
Day 2-digits
%pHour%
Hour 2-digits
%pMinute%
Minute 2-digits
%pSecond%
Second 2-digits
%pMilli%
Milliseconds 3-digits
// file time of used image
%pfYear4%
Year 4-digits
%pfYear2%
Year 2-digits (without century)
%pfDay3%
Day of the year 3-digits
%pfMonth%
Month 2-digits
%pfDay%
Day 2-digits
%pfHour%
Hour 2-digits
%pfMinute%
Minute 2-digits
%pfSecond%
Second 2-digits
%pfMilli%
Milliseconds 3-digits
Use a introductory %p, a keyword and a closing % sign. The whole placeholder is
replaced by the respective meaning. If a %p without closing % or a unknown
81
Job settings
placeholder shows up Omniscan gives you a error message while trying to create
the XML-file.
Additionally you can use placeholders for a meta data entry defined inside
Omniscan. Use as usual a %m, the name of the meta data entry and a closing %
sign. Example: %mChapter% is replaced with „Contents“, „Chapter 1“, „Chapter 2“
and so forth, depending on the entries saved together with the image.
7.3.14.10
Output file name
Here the name (including the complete path) of the output file is entered directly or
supported by clickking to the button “search”.
If the output file is already existing with the job termination the user will be asked
whether he wants to attach or write over. If the check mark is set at “attach if file
already exists” this query is dropped and the file will always be attached.
7.4
Job completion
Images scanned with OMNISCAN 12 are automatically saved in a job file (see 5
Quick Introduction).
Figure 50: Index card „job completion “
It can be set with this index card whether and, if yes, how all these images are
being processed with the job termination.
(Provided that for the list or lists with the image processing tools to be used „only
use with job termination“ has been selected (see 7.1.30 Image processing), the
working off these lists takes place at first with the job termination. Then the
settings selected here are used).
The following options are available:
(The sequence from above to below corresponds with the sequence, with which
the job terminations are used).
82
Job settings
7.4.1
Renaming
There are two options offered for the „renaming/renumbering“.
1. A serial number, which is incrementing all images, is inserted to the file name,
which can arbitrarily be selected.
2. One or two numers are inserted to the file name, which can arbitrarily be
selected. One of the numbers counts the scan, from which the cutouts have been
gained. The other number increments the individual cutouts, which is starting from
the beginning for each scan.
The options can be realized with the following settings:
7.4.1.1 Numbering starts
The numbering of the images starts with the number displayed or entered here.
7.4.1.2 Increment
The numbering will be incremented with the increment entered here.
7.4.1.3 Digits
The number of digits of the numbering can be indicated here, which can be
completed with “leading zeros”, if necessary.
7.4.1.4 File name
Here the file name is entered, to which a numbering can be attached due to the
predefined values.
In addition the following options are available for a free placing of the numbering
and a distinction of the numbering according to cutout and scan:
To increment the images one by one and to select the placing of the numbering
freely,
the
file
name
must
have
the
following
form:
„arbitrary or no text“%n“arbitrary or no text“.
„%n“ is the token for the numbering.
I.a., the token “%n“ must be attached to the file name at an arbitrary place.
83
Job settings
Example:
The entries
Figure 51: Setting „rename“ for partial incrementing
result in the following names with 9 cutouts:
Figure 52: File names with partial incrementing
To increment individually first the scan from which the cutouts have been gained
and then the cutouts of each scan, the file name must have the following form.
„arbitrary or no text“(%s or %c)“arbitrary or no text“(%c or %c) „arbitrary or no
text“.
„%s“ is the token for the numbering of the scan.
„%c“ is the token for the numbering of the cutouts.
I.a. the tokens „%s“ and „%c“ must be added to the file name at an arbitrary place
and in an arbitrary sequence.
If %s is used, %c must also be used. %c may be combined alternatively with %s
or %n. If file names are occuring twice with that (e.g. by automatic page
separation), an “a” will be attached to the second file name to get a definite file
name.
An example:
The entries
Figure 53: Settings „rename“ for stepped incrementing
(complete entry in the field „file name“: „Scan%s_Auschnitt%c“)
result in the following names:
84
Job settings
Figure 54: File names with stepped incrementing
Number of digits
It is possible to combine the token for the numbering („%n“,“%s“,“%c“) with
a specification about the number of the leading zeros.
The specification has to be placed between the “%” and the letter „n“, „s“oder „c“.
It has the form “0-number of leading zeros”.
An example:
“%04n” means that the number will consist of 4 digits.
The numbers “1”, “7”, “12” and “100” will be displayed as „0001“, „0007“, “0012”
and „0100“.
If you supply neither %n,%s nor %c and the number of digits is set to 0 (direct
entered) then no numbering occurs. To omit repeated filenames a meta data has
to be part of the filename. Its up to the user to make sure that all files will get
different names and don’t overwrite each other. This can be eased e.g. by using
automatic counting (checkbox “count”) meta data entrys.
Meta data
With the renaming the meta data may be used as a part of the file name. For this
purpose the token %m<Metaname>% must be included to the file name. There
<Metaname> stands for the name of the meta datum. The complete token will be
replaced then by the value of this meta datum which is belonging to the
corresponding image.
7.4.2
Use job completion stack
If this box is checked all the job completions will be done that are selected inside
the dialog that shows up if the button configure is clicked. (Further details to job
completions under 9 Job Terminations).
85
Job settings
Figure 55: Dialog „Assemble job completion“
7.4.2.1 Available job completions
In the left list all available job completions are offered. (Further details to job
completions under 9 Job Terminations).
7.4.2.2 Selected job completions
The job completions shown in the right list will be executed in the shown order
from above to below. The order can be influenced with the up and down buttons. A
click with the left mouse button on such a entry opens the according configuration
dialog for this job completion.
7.4.2.3 Add >>
The in the list of the available job completions selected item can be added to the
active items in the right list.
The configuration dialog of this job compleiton opens then and offers more
detailed settings.
(Further details to job completions under 9 Job Terminations).
7.4.2.4 << Remove
Deletes the selcted item from the list „selected options“.
7.4.2.5 Up /\
Moves the selected entry up one step in the list „selected options“.
86
Job settings
7.4.2.6 Down \/
Moves the selected item one step down in the list „selected options“.
7.4.3
Print all images
This is working like the job completion print image files, described in Section 9.8
Print all images.
7.4.4
Move complete job
Here the moving of the complete job to another directory can be arranged. This
option is deactivated automatically after moving the job. Otherwise the job would
be moved to itself if a job completion is carried out another time (batch
processing).
7.4.5
Start a new job after job termination (same parameters)
A new job is automatically created after the job termination.
The name will be given according to the same configurable rules of the Omniscan
settings as that which will be offered with the creating of a new job. Those
parameters will be taken over, which have lately been selected with the creating of
a new job (see 5.2 Create new job).
7.4.6
Delete all job files after termination
All job files are (irrevocably!) deleted after the job termination.
87
Job settings
7.5
Job Settings
Set up job specific settings here.
Figure 56: Dialog "Job Settings"
7.5.1
Tracker border width
If the autmatic adaption (s. Section 7.1.8 Automatic Adaption) is active you can
influence the position and size of the clip here by giving a positive value for further
cutting of the clip or a negative value for including some more of the image than
Omniscan decided. With the value for overlap you can decide how much of the left
side will be visible on the right side and vice versa. A overlap of 0 cuts the two
clips without any overlap, a negative value creates a gap between the sides.
7.5.2
Use only active clips to evaluate scan mode
Normaly the resolution and color mode of the scan is evaluated from all defined
clips. So you can activate a clip without the need of a rescan. If such a clip is used
only rarely the scan speed could be increased by checking this checkbox. Then
the scan mode is evaluated only from the active clips and the scan is done with
lower resolution or in grayscale instead of color.
88
Job settings
7.5.3
Check URI for each image
Omniscan can request data from a external system (9.1 Hermes digital), by giving
a respective URI here. For this purpose Omniscan has to tell something about the
current job. This can for instance be done by using a barcode recognized by the
barcode filter (8.1.17 Read barcode) or some manual entry. Normaly you would
request this data on time after the first scan (with barcode). If this checkbox is
checked this request is carried out for each image. This data can then be shown in
a separate window on the screen if defined as meta data (7.3 Meta data). It is also
possible to set up the used language for the OCR (8.1.21 Optical character
recognition (OCR)).
7.5.4
Toolbars
With these checkboxes you can switch on and off all available toolbars (10.5
Symbol bar (toolbar)). All curently not usable toolbars are grayed out.
89
Image processing tools
8
Image Processing Tools
8.1
Imaging kit
The imaging kit includes the following image processing tools.
8.1.1
Median filter
8.1.1.1 Purpose
The median filter is used for the reduction of the image noise and it may result in a
clear improvement of the image quality. With gray scale images its use is
completely uncomplicated, with color pictures there may be a color change.
8.1.1.2 Mode of operation
The values of the pixels in the direct environment of a pixel are sorted according to
the quantity. The origin pixel value is replaced by the value in the middle of this
row or, if there is a even number of pixels, the average of both values. There are
two advantages by the fact, that the middle value and not the average value is
used, that is no average of the number of environment pixels.
1. Ruggedness against particular deflections of pixel values, because extreme
values are not considered at all.
2. Pixel values are not „invented“, but always an already existing value is taken
over. By this particularly sharp edges remain mostly unchanged.
8.1.1.3 Set-up options
Figure 57: Set-up options „median filter“
As a rule the settings „3 and 3“ and „5 and 5“ will produce the best results.
8.1.1.3.1
Neighborhood width
Set-up of the width of environment, which is consulted for the determination of the
middle value.
8.1.1.3.2
Neighborhood height
Set-up of the height of environment, which is consulted for the determination of the
middle value.
90
Image processing tools
8.1.2
Sharpen
8.1.2.1 Purpose
Increases the sharpness of an image.
8.1.2.2 Mode of operation
Contrasts found in an image are increased by the set-up of a darker value which is
set even darker and of a light value which is set even lighter. Contrast-free areas
remain unchanged.
8.1.2.3 Set-up options
Figure 58: Set-up options „sharpen“
The settings 1 to 5 can be selected. The higher the value, the better the
sharpness. With the settings 1 and 2 an area of 3 * 3 pixels is considered
respectively, otherwise an area of 5 * 5 pixels. Therefore the processing is carried
out much quicker with the settings 1 and 2.
8.1.2.3.1
Factor
Here the setting for the strength of the sharpening can be carried out.
8.1.3
Smooth
8.1.3.1 Purpose
It is for noise-reduction. The image seems to be more soft and so as if it would be
slightly unsharp.
It is particularly suitable for the correction of high deflections, i.a. of pixel values,
which exceed clearly the values of their neighbours. It is more careful as far as
edges are concerned than other glazing image processing tools, i.a. it results in
very low detail losses and fringements.
91
Image processing tools
8.1.3.2 Mode of operation
If the value of a pixel is higher than all those of its neighbored pixels, it is set to the
highest value of these neighbored pixels. If the value of a pixel is lower than all
those of its neighbored pixels, it is set to the lowest value of these neighbored
pixels.
8.1.3.3 Set-up options
Figure 59: Set-up options „smooth“
The settings 1 to 4 can be selected. The higher the value the stronger the smooth
will be. For the setting 1 „3 * 3“ pixels are considered, for the setting 2 „5 *5“ pixels,
for the setting 3 „7 * 7“ pixels and for the setting 4 „9 *9“ pixels. The processing is
therefore quicker the more less the value is set.
8.1.3.3.1
Factor
Here the setting for the strength of the smooth can be carried out.
8.1.4
Rotation
8.1.4.1 Purpose
Turn of the image
8.1.4.2 Mode of operation
The resulting image is increased as far as the turned image fits completely after
the turning. I.a. only with turns of 90 degrees or a multiple of that the file size
remains unchanged and the turn can be made undone. Turns with other angles
should be only used once.
92
Image processing tools
8.1.4.3 Set-up options
Figure 60: Set-up options „rotate“
An arbitrary angle (number of degree) can be entered, for which the image shall
be turned. The three buttons in the lower part of the window make it more easy to
rotate the image left or right (-90 or 90 degrees). Also you can turn the image
upside down what is the same as a rotation by 180 degrees.
8.1.4.3.1
Factor
Here the setting for the extent of the turn can be carried out.
An angle (the number of degree) is entered, for which the turn shall be carried out.
Positive angles result in a clockwise turn, negative angles result in a
counterclockwise turn.
8.1.5
Unsharp masking
8.1.5.1 Purpose
Mask unsharp is used contrary to its name to increase the edge contrasts. The
image makes a clearly more brilliant impression after processing.
8.1.5.2 Mode of operation
The term „unsharp masking“ is derived from a procedure, which has been used
with analoguous black/white films to sharpen the edges.
This procedure is repeated digitally. For this purpose differences between the
original pixel values and those of a duplicate calculated „unsharp“ are calculated
at first. Then these differences are added up with the original pixel values.
As a result the lower value of an edge is additionally reduced and the higher value
is additionally increased. The contrast increases then.
93
Image processing tools
8.1.5.3 Set-up options
Figure 61: Set-up options „unsharp masking“
Altogether there are three configurable parameters: Quantity, radius and
threshold.
The setting is much dependent from the copy and it is nearly impossible to give
obligatory rules for how to achieve the best results. The most suitable values can
only be determined with trial and error procedures. The pixel radius should be kept
rather small there and the „quantity“ should be set as high as possible without
producing a disturbing noise.
8.1.5.3.1
Quantity
Here it is set how strong the sharpening shall turn out. But the effects are within
the values predefined by the parameters „radius“ and „threshold“ and they are
rather for a fine setting.
Values between 100 and 999 can be set.
8.1.5.3.2
Radius
Here it is predefined how wide the range should be, which shall be taken ahead
of and after the edge for the edge sharpening.
The values 0 to 32 are possible, though the high values are hardly used.
8.1.5.3.3
Threshold
Here the value is influenced by which the pixel values of the original and of the
unsharp copy must be different of each other to be treated as an edge, which
shall be sharpenend.
The values 0 to 255 can be set. The lower the value the higher the areas in
which sharpening appears. Values above 20 might be useful only in special
cases.
94
Image processing tools
8.1.6
Cut
8.1.6.1 Purpose
The filter „cut“ automatically removes black borders. For this purpose the borders
of the image are moved to the borders of the copy.
Figure 62: Picture before „cutting“
Figure 63: Picture after „cutting“
with “Fill black border”
95
Image processing tools
8.1.6.2 Mode of operation
OMNISCAN 12 moves closer to the placing of the copy using the „document
parameters“(see 8.1.6.3.1 Job parameter and 8.1.6.3.2 Document pixel), and it
cuts the black edge then using “leave edge” (see ).
If the black border, which remains after the cutting of the image, shall be filled, the
edges of the pattern are determined with the „edge parameters“ (see 8.1.6.3.3
Edge threshold and 8.1.6.3.4 Edge pixel).
8.1.6.3 Set-up options
Figure 64: Set-up options „cut“
8.1.6.3.1
Document threshold
Threshold which determines when a pixel is considered as a possible part of the
document. The threshold is indicated in one per thousand in relation to the level of
brightness white. Can be set from 100 to 1000. If an ideal value is searched for, it
is recommended to start with a value of 300.
8.1.6.3.2
Document pixel
Number of pixels within a line or column, which must meet the threshold
indicated above (brightness of the pixel must be greater than the document
threshold or be equivalent to it), so that a line or a column can be treated as start
of the copy.
Can be set from 1 to 100. If an ideal value is searched for, it is recommended to
start with a value of 20.
8.1.6.3.3
Edge threshold
Threshold which determines when a pixel is considered as a possible part of an
edge of the document. The threshold is indicated in one per thousand in relation to
the level of brightness white.
Can be set from 100 to 1000. If an ideal value is searched for, it is recommended
to start with a value of 200.
This dialog entry is only be activated if the option “fill black border” has been
selected (see 8.1.6.3.5 Fill black border).
8.1.6.3.4
Edge pixel
96
Image processing tools
Number of pixels within a line or column, which, laying directly side by side (line)
or among each other (column), must meet the threshold indicated above
(brightness of the pixel must be greater than the edge threshold or be equivalent
to it), so that an edge of the copy is considered as recognized.
Can be set from 1 to 100. If an ideal value is searched for, it is recommended to
start with a value of 4.
This dialog entry is only be activated if the option “fill black border” has been
selected (see 8.1.6.3.5 Fill black border).
8.1.6.3.5
Fill black border
Results in the replacement of the black image background by a white one.
8.1.6.3.6
Split pages
The image is divided into two halves of the same size, which are saved in two
files.
8.1.6.3.7
Create left page
If the option “split pages” (see 8.1.6.3.6 Split pages) has been selected, then
there is the option that an image will be created of both halves or of only one of
the two halves. If a check mark has been set for this dialog entry, an image of the
left half will be created.
8.1.6.3.8
Create right page
If the option “split pages” (see 8.1.6.3.6 Split pages) has been selected, then
there is the option that an image will be created of both halves or of only one of
the two halves. If a check mark has been set for this dialog entry, an image of the
right half will be created
8.1.6.3.9
Page Overlay
If the option “split pages” has been selected, it is possible to set here by how
much millimeters both halves of the image shall be overlapped to each other.
8.1.6.3.10
Leave edge
If this option is checked a dialog shows up where you can set up the border for
each side individually. Using of negative values cuts even more of the image.
97
Image processing tools
8.1.7
Deskew
8.1.7.1 Purpose
Deskew is for the automatic straightening of pictures. The scan copy is turned so
that the borders form a parallel with the image borders. It is often an unjustifiable
effort to place the scan copy so that it is being scanned exactly straight. A postprocessing is often more effective.
(For deskew manually see 10.1.2.3 Deskew manually)
Figure 65: Picture before „deskew“
Figure 66: Picture after „deskew“
98
Image processing tools
8.1.7.2 Mode of operation
OMNISCAN 12 moves closer to the placing of the scanned document with the
„document parameters“ (see 8.1.7.3.2 and 8.1.7.3.3 Document pixel). Then the
upper border of the copy is determined due to the „edge parameters„ (see
8.1.7.3.4 Edge threshold and 8.1.7.3.5 Edge pixel ). This upper border is then
parallelized with the upper image border.
8.1.7.3 Set-up options
Figure 67: Set-up options „deskew“
8.1.7.3.1
Use top/bottom of the page
To deskew the document one border (edge) is searched for. The document will
then be rotated so that this edge is horizontal. You can choose here whether to
use the top or bottom of the page for that.
8.1.7.3.2
Document threshold
Threshold which determines, when a pixel is considered as a possible part of the
document. The threshold is indicated in one per thousand in relation to the level of
brightness white.
Can be set from 100 to 1000. If an ideal value is searched for, it is recommended
to start with a value of 300.
8.1.7.3.3
Document pixel
Number of pixels within a line or column, which must meet the threshold
indicated above (brightness of the pixel must be greater than the document
threshold or be equivalent to it), so that a line or a column can be treated as start
of the copy.
Can be set from 1 to 100. If an ideal value is searched for, it is recommended to
start with a value of 20.
8.1.7.3.4
Edge threshold
Threshold which determines, when a pixel is considered as a possible part of an
edge of the document. The threshold is indicated in one per thousand in relation to
the level of brightness white.
Can be set from 100 to 1000. If an ideal value is searched for, it is recommended
to start with a value of 200.
99
Image processing tools
8.1.7.3.5
Edge pixel
Number of pixels within a column, which, laying directly among each other, must
meet the threshold indicated above (brightness of the pixel must be greater than or
be equivalent to the edge threshold), so that an edge of the copy is considered as
recognized.
Can be set from 1 to 100. If an ideal value is searched for, it is recommended to
start with a value of 4.
8.1.7.3.6
Deskew text
If this box is checked Omnican tries to deskew the text. Otherwise the top or
bottom border is used for that (see section 8.1.7.3.1 Use top/bottom of the page).
100
Image processing tools
8.1.8
Despeckle
8.1.8.1 Purpose
Removes deflections of pixel values and is therefore for noise reduction. May
improve clearly the readability.
Can only be used in the black/white 1 bit mode.
Before:
Afterwards:
Figure 68: Picture improvement by despeckle function
Mode of operation
A 3 x 3 median filter is used, where all 9 pixel values are set to the median.
8.1.8.2 Set-up options
None
8.1.9
Flip
8.1.9.1 Purpose
Reflects the copy
8.1.9.2 Mode of operation
The opposite lines or columns are exchanged. I.a. with the vertical reflecting the
right outside column is exchanged with the left outside column, the second from
the right is exchanged with the second from the left etc.
8.1.9.3 Set-up options
Figure 69: Set-up dialog „flip“
101
Image processing tools
8.1.9.3.1
Horizontal flip
The copy is reflected horizontally.
8.1.9.3.2
Vertical flip
The copy is reflected vertically.
8.1.10 Inverting
8.1.10.1
Purpose
Inverting of the image.
Figure 70: normal picture
8.1.10.2
Figure 71: inverted picture
Mode of operation
Pixel values are converted to their counterpart. With black/white 1 bit images
black values are changed to white values and vice versa. With 8 bit images
the value 255 is changed to the value 0, the value 254 is changed to the
value 1 and so on.
8.1.10.3
Set-up options
None
8.1.11 Stamp
8.1.11.1
Purpose
Inserts an image (stamp) or a text to an image. Makes possible e.g. the indication
of scans with the name of the institution that has created the scans.
8.1.11.2
Mode of operation
The image, which is inserted, i.a. the stamp, is converted to the bit depth of the
image, to which it shall be inserted. Then the pixel values are calculated in a way
that can be selected with the selection options of the „merge mode“.
When a text is being entered, a separate image will be created from it before
stamping.
102
Image processing tools
8.1.11.3
Set-up options
Figure 72: Set-up options „stamp“
8.1.11.3.1
Stamp file name
Here a TIFF file must be either entered with the image, which is to be inserted as a
stamp, or it must be selected with the browser.
(Short instructions how to create a Tiff file with an arbitrary text by the Windows
tool „Imaging“ can be found in the appendix of 14.2 Stamp creation with
„imaging“).
8.1.11.3.2
Stamp text
Here the height of sign can also be selected apart from the entry of an arbitrary
text. A temporary image will then be created from this text. There a type with a
constant width of sign is selected. If the resulting image is greater with its
measures than the image, in which it shall be inserted as a stamp, the image
created from the text will be reduced in size. Nothing will be cut off from the text.
But the height of sign will then not be the same as specified before.
8.1.11.3.3
Merge mode
Here the procedure is determined, with which the stamp is inserted.
The standard procedure is „OVER“. This mode results in the fact, that the stamp
replaces the stamp place completely.
Figure 73: Merge mode „OVER“
103
Image processing tools
The other procedures are different depending on the fact, what bit depths the copy
and the stamp have.
If the stamp is a 1 bit black/white image, there are the following effects e.g.:
Figure 74: Merge mode „AND“
Figure 75: Merge mode „ADD SIGN CENTERED“
Figure 76: Merge mode „DIVIDE“
Figure 77: Merge mode „XOR“
8.1.11.3.4
Stamp position
Here the positioning of the stamp is carried out. The image borders above and
below can be selected, each on the left, centered and in the middle. Also the
stamp can be placed below the image. In this case a picture with the selected
color and the inserted stamp will be added to the image.
104
Image processing tools
8.1.12 Automatic printing
8.1.12.1
Purpose
With the automatic printing an image is printed without any other action of the user
directly after the scan. With that the scanner additionally works as a „copier“.
8.1.12.2
Mode of operation
The image or the images are printed with the standard printer and its standard
settings in view of the set-up options described below.
8.1.12.3
Set-up options
Figure 78: Set-up options „automatic print“
8.1.12.3.1
Printer
Select the desired printer:
8.1.12.3.2
Print mode
Two options can be selected, how to handle the size of the image regarding the
paper size:
1. Adapt to paper size.
The image is printed as large as possible, i.a. so that it covers the most possible
surface of the paper. If the option „automatic rotating“ is activated, then the
alignment of the image, that is „portrait format“ or „landscape format“, is selected
in such a way, that the optimal image size is used for printing. Otherwise the
alignment of the image remains unchanged.
2. Original size
The image is printed with its original size. Activating of the „use fit to page if too
large“ reduces the image size to the paper size if necessary. The aspect ratio isn’t
changed.
8.1.12.3.3
Position
Here is selected where the image is placed on the paper.
8.1.12.3.4
Automatic rotating
105
Image processing tools
If the print mode „adapt to paper size“ is selected, this option results in the fact,
that for the optimization of the print size the alignment of the image, that is „portrait
format“ or „landscape format“, is also selected correspondingly.
106
Image processing tools
8.1.13 Binarization
8.1.13.1 Purpose
Binarized images have the least possible storage requirements.
A binary image is a black-and-white image. Each pixel is therefore black or white.
For the storage of this information only one „bit“ is required. (It is 8 bit for the
possible pixel values 0 to 255 with a gray scale image, and it is 8 bit for each color
channel, that is altogether 24 bit per each pixel with a RGB color image).
In addition very high compression rates can be achieved with a black-and-white
image.
Furthermore some originals are readable optimally as a black-and white image,
since they have a maximal contrast.
The mode „black-and white“ is available alreday with the selection of the color
depth for the individual cutouts (see 7.1.25 Colors/gray levels).
The use as a filter is useful, if image processing shall be carried out before the
binarization starts, which is not possible with a binary image.
These are: Orthoscan, unsharp masking, sharpen, smooth, median filter, cropping,
deskew and the graduation curve.
The use of these filters and the following binarization can be automated with the
help of the filter stacks (see 7.1.30 Image processing))
8.1.13.2 Mode of operation
Pixel values below the threshold are set to „black“, pixel values above and equal to
the threshold are set to „white“.
8.1.13.3 Set-up options
Figure 79: Set-up dialog „binarization“
8.1.13.3.1
Binarization mode
Photo mode
This is a algotithm that is optimized for dealing with pictures. For that a dithering is
used, that is simulating grayscales by setting more or less black points.
Segmented
Omniscan devides the image in a picture and a text section using the contrast
107
Image processing tools
between pixels. The picture is binarised using the photo mode (dithering) and the
text section is binarised using optibin (dynamic thresholding).
Optibin
Here the binarisation is not done with a constant threshold, but with a threshold
that Omniscan determines from the neighborhood pixels. With this you can also
binarise images that are created with different brightness in different areas. Also
there is no need to give a binarisation threshold, this is detected automatically.
This algorithm is optimzed for use with a OCR.
Optibin+
Here like in the segmented mode the image is devided into picture and text, but
the line structure of a text is used as criterium.
8.1.13.3.2
Threshold
Setting to determine, which pixel values will be converted to „black“ and which will
be converted to „white“. If the „Ext.“ Switch is activated the the threshold given in
the toolbar is used (10.5 Symbol bar (toolbar)).
8.1.13.3.3
Noise threshold
Every paper that is scanned has a certain structure that can be seen in the scan.
This structure is more obvious the more fibered the paper is. To suppress this
structure in the binarised image you can increase the noise threshold.
For normal paper a value of 20 will give good results. For recycling paper or very
fibered paper the threshold should be increased.
8.1.13.3.4
Window size
Optibin checks inside a small window around the pixel for the necessary
binarisation threshold. Bigger windows allow a better adaption to brightness
changes, but need more time. Values in the range of 1 to 1.2 mm give best results
normally.
8.1.13.3.5
Text sensitivity
This value influences the necessary contrast of a object that is detected as text.
Higher values more easily declare a pixel as part of a text, lower values would lead
to detecting it as part of a picture. A value of 20 is recommended.
8.1.13.3.6
Mask enlargement
This value increases the area around the pixels found to be text. Usable are
values from 0 – 4. A value of 2 gives best rusults normally.
8.1.13.3.7
Background threshold
This tells about what brightness a pixel has to have to be considered as
background. A value of 150 gives best results normally.
108
Image processing tools
8.1.14 Graduation curve (color)
8.1.14.1 Purpose
The graduation curve is a medium to correct brightness and contrast very exactly.
Since this is possible for each color channel individually, a gray balance can be
carried out with the help of the graduation curve.
8.1.14.2
Mode of operation
Arbitrary target values (0 up to 255) can be assigned to all pixel values (0 up to
255) for each color channel independently from each other. The pixel values of an
image, to which the graduation curve has been applied, are replaced by the target
values.
8.1.14.3 Set-up options
B3
B2
B1
A1
A2
C2
C1
A3
D1
D2
D3
D4
Figure 80: Set-up dialog „graduation curve“
The set-up dialog „gradation curve“ offers the possibility to determine the
graduation curves with three function buttons, automatically and with an automatic
system.
109
Image processing tools
A) Function button
Set black point (B1)
Set gray point (B2)
Set white point (B3)
In detail:
1. Set black point
After the button „set black point“ (B1) has been clicked to, the mouse cursor turns
to a pipette, as soon as it is in the original cutout.
If the left mouse key is being clicked to then, the point on the top of the pipette will
be the black point.
That means the following:
a) An average value is being determined from the pixel values of the selected
surroundings and from those of the direct surroundings. All pixel values, which
have exactly this average value or which are smaller than the value of this point,
will be set to the value „0“. This will be done for each color channel individually.
Therefore the adaptation of the graduation curve is only visible in the graduation
curve of the individual color channels.
b) The pixel values, which are higher than that of the black point, are stretched to
the complete tonal value range. Therefore gaps are produced in the new
histogram.
An example:
Figure 81: Graduation curve „red“ with set black point
On the x-axis (horizontal line) of the coordinate system the initial value and on the
y-axis (vertical line) the necessary target value is being recorded. In addition the
current histogram of the selected image can be seen. Almost all pixel values can
be found in the lights, that is in the upper range.
The black point is set to the value „120“, i.e. this and all lower values will be set to
the value „0“.
(The dialog fields „input“ (A2) and „output“ (A3) indicate, which exact target value
is assigned to which exact initial value, when the cursor is placed appropriately).
110
Image processing tools
The other target values „1“ up to „255“ are assigned then to all other values.
If this graduation curve is used and the filter „graduation curve“ is opened again
then, the resulting gaps can be seen in the new histogram.
Figure 82: Graduation curve „red“ with histogram after black point has been used
2. Set gray point
After the button „set gray point“ (B2) has been clicked to, the mouse cursor turns
to a pipette as soon as it is in the original cutout.
If the right mouse key is being clicked to then, the point on the top of the pipette
will be the gray point.
As many as you like gray points can be set.
The setting of a gray point means the following:
a) An average value is being determined from the pixel values of the selected
point and from those of the direct surroundings. This average value is the common
target value of all individual values, which the individual color channels of the
selected gray point have, i.e., the selected point turns gray ( = identical values for
red, green and blue), independent of the color it has had before. This adaptation of
the graduation curve is also only visible in the graduation curves of the individual
color channels.
b) The graduation curves of the individual color channels will be adapted in such a
way, that little jumps are made by the new resulting allocations of initial values and
target values, if possible. The used tonal value range remains nearly constantly
with that, but also here little gaps are being produced in the histogram.
An example:
A pixel with the RGB-values (140, 144, 150) is selected as gray point.
This gray point, obviously with a certain blue cast, is automatically set to the
values (145, 145, 145).
The resulting graduation curves are as follows:
111
Image processing tools
Figure 83: Graduation curves after the gray point has been set
The red value is raised slightly, correspondingly the resulting curve has a very flat
loop to the left above. The green value remains nearly constantly, the curve
remains nearly a straight line. The blue value is corrected downwards a little bit,
the curve shows a loop downwards.
The stronger the adaptation is, the stronger the resulting gaps in the histogram will
be.
Figure 84: Graduation curves with histogram after the gray point has been used
3. Set white point
After the button „set white point“ (B1) has been clicked tow, the mouse cursor
turns to a pipette, as soon as it is in the original cutout.
If the right mouse key is being clicked to then, the point on the top of the pipette
turns to the white point.
This means the following:
a) An average value is being determined from the pixel values of the selected and
those of the direct surroundings. All pixel values, which have exactly this average
value or which are higher as the value of this point, are set to the value „255“. This
is done individually for each color channel. Therefore the adaptation of the
graduation curve is also only visible in the graduation curves of the individual color
channels.
b) The pixel values, which are smaller than those of the white point, are stretched
to the complete tonal value range. Therefore gaps are produced in the new
histogram.
112
Image processing tools
An example:
Figure 85: Graduation curve „red“ with set white point
On the x-axis (horizontal line) of the coordinate system the initial value and on the
y-axis (vertical line) the necessary target value is being recorded. In addition the
current histogram of the selected image can be seen. The white point is set to the
value „222“, i.e. this value and all higher values are set to the value „255“.
(The dialog fields „input“ (A2) and „output“ (A3) indicate, which exact target value
is assigned to which exact initial value, when the cursor is placed appropriately.)
All target values „1“ up to „255“ are then assigned to the other values.
If this graduation curve is used and then the filter „graduation curve“ is opened
again, the resulting gaps can be seen in the new histogram.
Figure 86: Graduation curve „red“ with histogram after „white point“ has been used
B) Automatic tonal value correction
The automatic tonal value correction indepedently sets a black and white point.
These points are individually determined with each color channel for the
„automatic tonal value correction (RGB)“ (D1), for the “automatic tonal value
correction (contrast)“ (D2) this is done with the general RGB gradation curve.
113
Image processing tools
The setting of the black and white points can be influenced by the values for the
shadow and the light treshold. (D3 and D4).
The starting point for the setting of the points is the tonal value which is most
highly occuring in the histogram. The shadow and light treshold influence the
calculation of the points in relation to this value. How the setting of the shadow and
light treshold effects the points to be found can be noticed directly in the
corresponding gradation curve and in the preview any time.
C) Graphical or manual correction of the graduation curve
The graduation curve can take any form desired by the user in principle, i.e. each
target value (0 – 255) can be assigned to each initial value (0 – 255) in each color
channel (red, green and blue).
(In practice not all extreme courses can be realized. But the courses which can not
be realized are irrelevant).
Thereby the graduation curve becomes a very mighty tool, with which very
complex image enhancements can be achieved. On the other hand it is slightly
possible to „spoil“ an image inadvertently. As an experience some time and
patience are required for the manual manipulation of the graduation curve.
To change a graduation curve, at first the graduation curve which is to be changed
must be selected from the selection field (A1).
There is a RGB-graduation curve, which has an effect to all color channels, and a
graduation curve for each color channel, which only has an effect to the
appropriate color channel.
As an example the RGB-graduation curve is selected.
Figure 87: RGB-graduation curve
The initial value of a pixel is recorded on the x-axis (horizontal line) and the
necessary target value is recorded on the y-axis (vertical line) of the coordinate
system.
In the lower part of the coordinate system the histogram of the current image can
be seen. It shows the frequency of appearance of pixel values. The height of a
114
Image processing tools
column stands for the frequency of appearance of the pixel value the column
stands upon.
The exact x- and y-values can be read by moving the mouse cursor to the desired
place and the values can be read then with „input“ (A2) and „output“ (A3).
The initial form of the graduation curve is a straight line from (0,0) up to (255, 255),
i.e. the own value is assigned to each value and the image remains as it is.
It is now possible to move the curve to arbitrary support points.
For this purpose it is just necessary to move the mouse cursor to the position
where the support point is to be inserted, and to click to the left mouse key then.
Already available support points can be held in place and moved with the left
mouse key.
Starting out from this new support point and by considerating all already available
supporting points, the curve will be calculated again.
Figure 88: RGB-graduation curve with 3 supporting points
The example curve is a typical contrast-increasing gradation curve with three
supporting points.
The deep tones become darker, the medium tones remain constantly and the light
tones become even brighter.
The supporting points can be removed with the right mouse key.
Furthermore it is possible to bring all graduation curves to the neutral „normal
position” again by using the button (C1). The last change of setting can be
cancelled by using the button (C2) respectively.
115
Image processing tools
8.1.15 Graduation curve (gray level)
The graduation curve for gray level images has the same functionality as the
graduation curve for the color images (see 8.1.14 Graduation curve (color)). But
since there are no color channels, the graduation curves for the individual color
channels and the gray balance are dropped.
8.1.16 Include color correction
8.1.16.1 Purpose
OS 12 offers the option to provide images with a scanner color profile (see 6.3
Color management). This is called a „loose binding“ of the color profile to the
image.
The filter „include color correction“ additionally offers the option to include a color
profile to the scanned image. With that a „fixed binding“ between profile and image
is being realized. This makes possible an approximate color-true representation of
images also within applications which do not support any color management,
provided that other basic conditions are met.
8.1.16.2 Mode of operation
An image is converted to a target color space using the scanner profile and a
target profile. Profiles will not be attached to the image. The color space, to which
the image has been converted, must be known for the application, in which such
an image can be used appropriately.
In practice this will usually be „sRGB“. „sRGB“ is a relatively small standard color
space, which however includes the colors to be displayed on a screen.
Therefore a color space converted to „sRGB“ can be displayed on screens with a
good color fastness, in which the displayed application must not take into account
a special „profile for creation“.
But colors, which can not be displayed on screens or only bad, and which could be
printed easily, are lost with the conversion to sRGB.
8.1.16.3 Set-up options
Figure 89: Set-up dialog „Include color correction“
116
Image processing tools
8.1.16.3.1
Scanner Profile
Here the profile of the device must be selected, with which the image has been
created.
8.1.16.3.2
Target Profile
Here the profile must be selected, with which the image can be converted to the
desired target color space.
The “rendering intent” can be set using the small button next to the search button.
This setting should only be changed by experts.
8.1.16.4
Corresponding setting in the section color management
If the image has been converted to another color space with the help of a filter,
then either the color profile of this target color space or no color profile at all must
be attached to the image. The second option can only be recommended if the
target color space is definite with the further processing.
To achieve this, the check mark automatic must be deleted with the setting color
management and the target profile used here (or nothing) must be entered instaed
of the scanner profile in the corresponding entry field.
8.1.17 Read barcode
8.1.17.1
Purpose
Automatic reading of a barcode on a scan original.
8.1.17.2
Mode of operation
All barcodes available on an image are identified and read.
8.1.17.3
Set-up options
Bild 90: Set-up dialog „Read barcode“
8.1.17.3.1
Read only on the first image
The barcode will only be read from the first scan of a job.
117
Image processing tools
8.1.17.3.2
Display barcode for correction
The read barcodes will be displayed after the reading and the user has the
possibility to confirm it or to correct it.
8.1.17.3.3
Title of the correction dialog
Here the title of the „correction dialog“ can be determined, which allows the
confirming or correcting of the read barcode.
8.1.17.3.4
Plausibility check
Here several conditions can be determined, which will be followed by error
messages if they are not met.
8.1.17.3.5
Configure
Here the indications for the specification of the barcode to be read are made.
Figure 91: Configure set-up dialog „read barcode“
8.1.18 Scale
8.1.18.1
Purpose
Change of the resolution or size of an image while keeping the aspect ratio.
8.1.18.2
Mode of operation
Depending on the selected interpolation method.
118
Image processing tools
8.1.18.3
Set-up options
Figure 92: Set-up dialog „Scale”
8.1.18.3.1
Fit into / Limit size / adjust resolution = adjust image size
The cooperation of this three checkboxes and the result to the image is explained
here on an example.
If “Limit size” is selected a change of the image occurs only if the pixelvalues of
the input image are bigger than the max. width or max. height (possibly incuding
resolution) values.
Figure 93: Input image for the example
119
Image processing tools
1.
Figure 94: Settings Example - 1
The resolution of the image remains unchanged. All other values change
(aspect ratio is keept).
Figure 95: Result for example – 1
2.
Figure 96: Settings for example - 2
The geometrical values of the image stay the same (including aspect ratio), all
other values .
120
Image processing tools
Figure 97: Result for example – 2
3.
Figure 98: Settings for example - 3
The resolution and aspect ratio of the image is keept unchanged, all other
values change.
Figure 99: Result for example – 3
121
Image processing tools
4.
Figure 100: Settings for example - 4
The pixel values (and the aspect raio) of the image remain unchanged, all
other values change.
Figure 101: Result for example – 4
5.
Bild 102: Settings for example - 5
The resolution amd the pixel values of the image change, the geometrical
values (including aspect ratio) stay he same.
Figure 103: Result for example – 5
122
Image processing tools
6.
Figure 104: Settings for example - 6
The resolution and the geometrical values are changed the pixel values and
the aspect ratio remain unchanged.
Figure 105: Result for example - 6
NOTE: The ratio between this indication and the actual geometry of the image will
be lost possibly.
8.1.18.3.2
Maximum width
The width to which the image will be adapted, if necessary.
8.1.18.3.3
Maximum height
The height, to which the image will be adapted, if necessary.
8.1.18.3.4
Resolution
The resolution of the image after the filter has been used. If the image is not
„adapted“, i.e. if “Fit into” ist not checked, the geometry of the image will be kept.
8.1.18.3.5
Interpolation method
The method according to which the interpolation will be carried out.
8.1.18.3.6
Minimum pixel deviation
If the given value of the deviation between the initial image and the target image is
not reached, the scaling won`t be applied.
123
Image processing tools
8.1.19 Cut/add border
8.1.19.1
Purpose
Adaptation to required target sizes, e.g. for printing.
8.1.19.2
Mode of operation
According to the specification a corresponding big frame is added to the image or
a corresponding big area will be cut off.
8.1.19.3
Set-up options
Figure 106: Set-up dialog „Cut/Add border”
8.1.19.3.1
All borders same size
If a check mark has been set here, all borders of the image will be treated in the
same way. I.a., a border of the same width is added to the image at the top, at the
bottom, left and right or an area with the same width will be cut off from the image
at the top, at the bottom, left and right.
8.1.19.3.2
Cut off border
If a check mark has been set here, a corresponding area will be cut off from the
image. Otherwise a corresponding area will be added to the image.
8.1.19.3.3
Fixed image size
If this is checked a fixed size can be choosen as result according to the selected
unit. Borders will be added according to all the other selections. If the image is too
big to fit into the selected size it will be clipped.
8.1.19.3.4
Border color
Here a color may be allocated to the border, which shall be added to the image.
8.1.19.3.5
Image size
8.1.19.3.5.1 Width
Fixed width according to the selected unit.
8.1.19.3.5.2 Height
124
Image processing tools
Fixed height according to the selected unit.
8.1.19.3.5.3 Horizontal centered
Is this checked the left and right borders added will be of the same size. If the
source image is too big it is clipped left and right the same.
8.1.19.3.5.4 Vertikal centered
Is this checked the upper and lower borders added will be of the same size. If the
source image is too big it is clipped on top and bottom the same.
8.1.19.3.6
Border size
8.1.19.3.6.1 top
Width of the upper border corresponding to the selected unit. If „all borders same
size“ (s. 8.1.19.3.1 All borders same size) has been set, the width is valid for all
borders. If a fixed size is selected (s. 8.1.19.3.3 Fixed image size) and vertical
centerd (s. 8.1.19.3.5.4 Vertikal centered) is not selected the lower border will be
computed (may be negative) to achive the selected height (s. 8.1.19.3.5.2 Height).
8.1.19.3.6.2 left
Width of the left border corresponding to the selected unit, when „all borders same
size“ (s. 8.1.19.3.1 All borders same size) has not been set.
If fixed image size (s. 8.1.19.3.3 Fixed image size) is selected and horizontal
centered (s. 8.1.19.3.5.3 Horizontal centered) is not selected the right border will
be computed (may be negative) to achive the selected fixed (s. 8.1.19.3.5.1 Width)
erzielt wird.
8.1.19.3.6.3 right
Width of the right border corresponding to the selected unit, when, „all borders
same size“ (s. 8.1.19.3.1 All borders same size) has not been set.
If fixed image size (s. 8.1.19.3.3 Fixed image size) is selcted and horizontal
centered (s. 8.1.19.3.5.3 Horizontal centered) is not selected the border size is
computed (may be negative) to achive the fixed width (s. 8.1.19.3.5.1 Width).
8.1.19.3.6.4 bottom
Width of the border below corresponding to the selected unit, when „all borders
same size“ (s. 8.1.19.3.1 All borders same size) has not been set.
If fixed image size (s. 8.1.19.3.3 Fixed image size) is selcted and vertical centered
(s. 8.1.19.3.5.4 Vertikal centered) is not selected the border size is computed (may
be negative) to achive the fixed height (s. 8.1.19.3.5.2 Height)
8.1.20 Add ruler
8.1.20.1
Purpose
The ruler offers the option to display graphically the original size of a cutout.
8.1.20.2
Mode of operation
A scale will be added to the image according to the specification at the edge below
and/or at the edge on the right side.
125
Image processing tools
8.1.20.3
Set-up options
Figure 107: Set-up dialog „Add scale”
8.1.20.3.1
Ruler color
Here a color can be assigned to the scale, which is to be added to the image.
8.1.20.3.2
Sign color
Here a color can be assigned to the type on the scale.
8.1.20.3.3
Scale
Here it can be selected whether the scale shall be displayed in cm or inch.
8.1.20.3.4
Horizontal correction factor
If the displayed horizontal resolution and the actual resolution of the image do not
comply, a correction factor can be entered here.
8.1.20.3.5
Vertical correction factor
If the displayed vertical resolution and the actual resolution of the image do not
comply, a correction factor can be entered here.
8.1.20.3.6
Ruler on the bottom edge
If a check mark has been set here, a scale will be added on the bottom edge of the
image.
8.1.20.3.7
Ruler on the right side
If a check mark has been set here, a scale will be added on the right edge of the
image.
8.1.21 Optical character recognition (OCR)
8.1.21.1
Purpose
The optical character recognition offers the option to recognize a text within an
image and to save it in a file. For doing optical character regocnition (OCR) there
is a limit in size for each image to 22,75 inches (577,85 mm) in height and width.
126
Image processing tools
8.1.21.2
Set-up options
Figure 108: Set-up dialog „Optical character recognition”
8.1.21.2.1
Language
Here a dialog will be opened, from which the language of the document and the
code page can be selected.
Figure 109: Set-up dialog „Language information”
127
Image processing tools
8.1.21.2.2
File format
All supported file formats are displayed in this pulldown menu for the display of the
recognized characters. One of these file formats can be selected.
8.1.21.2.3
Subdirectory for OCR files
The name of a subdirectory can be entered here for the saving of OCR files
created for the individual images. If no directory is indicated, “OCR” will be used as
a default.
8.1.21.2.4
Output characteristics
If “no special output characteristics” has been set, only the text will be evaluated. If
“issue style information if supported by the format” has been set, then in addition
information as underline, bold type, etc. will be evaluated and added to the output
file, as far as it is possible there (e.g. with doc.). If “issue images if available and
supported by the format” has been set, then the areas, which have been
recognized as image areas by the OCR, will be added to to the output file as an
image, if it is possible there.
8.1.21.2.5
Devide image into zones
If this is selected the image will be devided into zones (Graphics, text, tables, etc.)
before processing character recognition and the character recognition is only done
on text zones.
8.1.22 Command
8.1.22.1
Purpose
The possibilities of Omniscan are limited. To make it possible to use arbitrary
applications for the processing of an image the image processing tool “command”
is available.
8.1.22.2
Mode of operation
The desired application is invoked with the image as a parameter.
8.1.22.3
Set-up options
Figure 110: Set-up dialog „Command”
128
Image processing tools
8.1.22.3.1
Command line
Here the name and the path of the application will be named. If the image shall be
processed by the application, this may be achieved by the dummy ’%f’. The file
path may either be entered or be selected by the “browser” using the button
“search”.
An example:
"C:\Programs\example program\example program.exe" %f
Is the command containing a meta data placeholder in the form %m<name>% this
placeholder will be replaced by the current value of this meta data entry.
The file format of the temporäry file can be selected with the drop down file format.
If a lossy compression is selected the quality value (JPEG) or compression factor
(JPEG 2000) can be selected like in the clip settings (s. 7.1.27Compression
factor).
8.1.23 Trim to print space
8.1.23.1
Purpose
The type area (print space) is often limited by type area edges (bars) with a
scanned image. These edges may be removed by using this image processing
tools.
Figure 111: Image before the type area is being cut
8.1.23.2
or after it is being cut
Mode of operation
At first the black edge is removed from the initial image as described under. The
white (bright) edge is then cut off from the received image to cut off the real
content of the image. It may also be set here that a part of the edge may remain
as it is with the image processing tool Cut.
129
Image processing tools
8.1.23.3
Set-up options
A1
A2
Figure 112: Set-up dialog „Cut type area”
The set-up dialog offers the option to set the individual thresholds with two
different pipettes (function buttons) besides the direct entry of thresholds.
A) Function button
Small pipette (A1)
Big pipette (A2)
In detail
1. Set threshold with small pipette
After the button “small pipette” (A1) has been clicked to, the mouse cursor
changes to a pipette with a small square selection area, as soon as it is in the
original image cutout.
If there is a click to the left mouse key, the pixels within the selection area are
used for the determination of the threshold then.
2. Set threshold with big pipette
After the button “big pipette” has been clicked to, the mouse cursor changes to a
pipette with a big square selection area, as soon as it is in the original image
cutout.
If there is a click to the left mouse key, the pixels within the selection area are
used for the determination of the threshold then.
Determination of the threshold means the following:
130
Image processing tools
a) Document threshold for the black edge:
From the pixel values of the selected selection area the pixel with the highest level
of brightness will be used for the threshold, and it will be typed in the dialog after
having been converted to a one-per-thousand value (in relation to the level of
brightness 255).
b) Edge threshold for the black edge:
From the pixel values of the selected selection area the pixel with the lowest level
of brightness will be used for the threshold, and it will be typed in the dialog after
having been converted to a one-per-thousand value (in relation to the level of
brightness 255).
c) Document threshold for the type area:
From the pixel values of the selected selection area the pixel with the lowest level
of brightness will be used for the threshold, and it will be typed in the dialog after
having been converted to a one-per-thousand value (in relation to the level of
brightness 255).
d) Edge threshold for the type area:
From the pixel values of the selected selection area the pixel with the highest level
of brightness will be used for the threshold, and it will be typed in the dialog after
having been converted to a one-per-thousand value (in relation to the level of
brightness 255).
8.1.23.3.1
Black edge
The image processing tool type area starts from the assumption that the scanned
original is surrounded by a black edge. This black edge can be defined here
together with “configuration of the black edge around the image”.
8.1.23.3.1.1 Automatic deskew
To deskew the document one edge is searched for and the image is rotated so
that this edge is horizontal. You can choose whether you want to use the top or
bottom of the page.
8.1.23.3.1.2 Document threshold
Threshold which determines when a pixel is considered as a possible part of the
document. The threshold is indicated in one per thousand in relation to the level of
brightness white. Therefore the image is divided into 256 levels of brightness (0
corresponds with black; 255 corresponds with white).
Can be set from 100 to 1000. If an ideal value is searched for, it is recommended
to start with a value of 300. This value corresponds with the level of brightness of
76 (300 0/00 of the level of brightness of white = 255).
If “set document threshold” has been activated, there is the possibility to
determine a threshold above one of the two pipettes.
131
Image processing tools
8.1.23.3.1.3 Edge threshold
Threshold which determines when a pixel is considered as a possible part of the
edge. The threshold is indicated in one per thousand in relation to the level of
brightness white. Therefore the image is divided into 256 levels of brightness (0
corresponds with black; 255 corresponds with white).
Can be set from 100 to 1000. If an ideal value is searched for, it is recommended
to start with a value of 200. This value corresponds with the level of brightness of
51 (200 0/00 of the level of brightness of white = 255).
If “set document threshold” has been activated, there is the possibility to determine
a threshold above one of the two pipettes.
This dialog entry is only activated when the option “automatic deskew” (see ) has
been selected.
8.1.23.3.1.4 Document pixel
Number of pixels within a line or column, which must meet the threshold indicated
above (brightness of the pixel must be greater than or be equivalent to the
document threshold), so that the line or column is considered as the start of the
original.
Can be set from 1 to 100. If an ideal value is searched for, it is recommended to
start with a value of 20.
8.1.23.3.1.5 Edge pixel
Number of pixels within a column, which, laying directly among each other, must
meet the threshold indicated above (brightness of the pixel must be greater than or
be equivalent to the edge threshold), so that an edge is considered as the start of
the original.
Can be set from 1 to 100. If an ideal value is searched for, it is recommended to
start with a value of 4.
This dialog entry is only activated, if the option “automatic deskew” (see
8.1.23.3.1.7 Automatic deskew) has been selected.
8.1.23.3.1.6 Leave edge (mm)
Leave edge as with the image processing tool (see 8.1.6 Cut).
If a negative number is indicated here, more will be removed as determined by the
edge finding. So dark spots on the edge caused by book covers, book cut or edge
printing, which are not part of the type area, can be removed.
8.1.23.3.1.7 Automatic deskew
If a check mark has been set here, the image processing tool “deskew” (see 8.1.7
Deskew) will be carried out with the values “document threshold”, “document
pixel”, “edge threshold” and “edge pixel”.
132
Image processing tools
8.1.23.3.2
Type area
The image processing tool type area starts from the assumption that the scanned
document original has a white (bright) edge around the used area. This white edge
may be defined here altogether with “configuration of the type area”.
8.1.23.3.2.1 Document threshold
Threshold which determines when a pixel is considered as a possible part of the
white (bright) edge of the document. The threshold is indicated in one per
thousand in relation to the level of brightness white. Therefore the image is divided
into 256 levels of brightness (0 corresponds with black; 255 corresponds with
white).
Can be set from 100 to 1000. If an ideal value is searched for, it is recommended
to start with a value of 550. This value corresponds with the level of brightness of
114 (550 0/00 of the level of brightness of white = 255).
If “set document threshold” has been activated, there is the possibility to determine
a threshold above one of the two pipettes.
8.1.23.3.2.2 Edge threshold
Threshold which determines when a pixel is considered as a possible part of an
edge of the used area of the document. The threshold is indicated in one per
thousand in relation to the level of brightness white. Therefore the image is divided
into 256 levels of brightness (0 corresponds with black; 255 corresponds with
white).
Can be set from 100 to 1000. If an ideal value is searched for, it is recommended
to start with a value of 450. This value corresponds with the level of brightness of
114 (450 0/00 of the level of brightness of white = 255).
If “set document threshold” has been activated, there is the possibility to determine
a threshold above one of the two pipettes.
8.1.23.3.2.3 Document pixel
Number of pixels within a line or column, which must meet the threshold indicated
above (brightness of the pixel must be greater than or be equivalent to the
document threshold), so that the line or column is considered as the start of the
used area.
Can be set from 1 to 100. If an ideal value is searched for, it is recommended to
start with a value of 10.
8.1.23.3.2.4 Leave edge (mm)
Similar to the image processing tool it is defined here how much of the white
(bright) edge around the content shall still be left.
8.1.23.3.2.5 Upper edge, lower edge, left edge, right edge
If the check mark has been set here, the image processing tool “type area” starts
from the assumption that a white (bright) edge exists on the corresponding side of
the document. Only in this case it is searched for an edge on this side of the
document. If a side is selected to crop a white border, but this border doesn’t exist
then the result for this side and the flanking sides may not be satisfactory.
133
Image processing tools
8.1.23.3.3
Suggest thresholds from this image
By pressing the button thresholds for the displayed image will be suggested.
These values may be manually corrected any time.
8.1.23.3.4
Extract thresholds automatically from the images
If this image processing tool is used in the filterstack, it can be reached that the
thresholds will be determined and used again for each scanned document by
setting of this check mark.
8.1.23.3.5
Split pages
If Omniscan recognizes a vertical white (bright) middle bar it separates the image
into two halfes and processes them further as two images.
8.1.23.3.6
Page split only if landscape
If this is activated the page splitting only occurs if the source is wider than tall.
8.1.23.3.7
Deskew text
If this box is checked Omnscan tries to deskew the image from the text. Otherwise
the image is deskewed from the top or bottom border (see section 8.1.7.3.1 Use
top/bottom of the page).
8.1.24 Add clip
8.1.24.1 Purpose
If two or more clips are defined, the clips with a smaller number can be assembled
to the current clip.
8.1.24.2 Method of operation
A clip with number 2 or higher will be added to the current clip. The number of the
clip to be added always has to be smaler as the number of the current clip.
Colordepth and resolution is addapted as necessary.
8.1.24.3 Possible settings
Bild 113: Settings dialog „Add clip“
8.1.24.3.1
Clip to be added
Here you can select from all the clips having a smaller number than the current
clip. (s. 5.6 Cutouts.)
134
Image processing tools
8.1.24.3.2
Side at which the clip is to be added
8.1.24.3.2.1 Left/right respectively top/bottom
Here you can choose wether the clip is added horizontaly (left/right) or vertically
(top/bottom).
8.1.24.3.2.2 Left, right
If „left/right“ is active you can check left and/or right. The selected clip will be
added than at the left and/or right side of the current clip.
8.1.24.3.2.3 Top, bottom
If „top/bottom“ is active you can check top and/or bottom. The selected clip will be
added than at the top and/or bottom side of the current clip.
8.1.24.3.3
adapt
If „adapt“ is selected the clip to be added is stretched or compressed to fit the size
of the current clip.
8.1.24.3.4
Fill/cut
If fill/cut is selected the clip to be added is cut or filled with the selected color to
meet the size of the current clip.
8.1.24.3.5
Interpolation method
If adapt is selected and the clip to be added needs to be streched or compressed
this is the method with which this is done.
8.1.25 Paper white
8.1.25.1 Purpose
Paper white is like the gradation curve (8.1.14 Graduation curve (color) bzw.
8.1.15 Graduation curve (gray level)) a means to correct brightness and contrast.
It aims to change a brightgray background into a white one.
8.1.25.2 Method of operation
Depending on the settings for the shadow and highlight threshold this filter detects
two points for a gradationcurve. This gradation is then applied to the image.
135
Image processing tools
8.1.25.3 Possible settings
Figure 114: Dialog „Paper white“
136
Image processing tools
8.1.25.3.1
Buttons
The buttons having the same meaning for all filters are allready described in (see
section 5.7.5 Set-up dialog for image processing tools). Here only the buttons with
additional functionality are described.
Waste paper basket (Color): To scan color images this button switches to a
basic setting optimized for that.
8.1.25.3.2
Channel
Figure 115: Differences between the dialog for a color or gray scale image
„Channel“ is for displaying information only. If the main window contains a color
image „Luminanz“ and otherwise „Gray“ will be displayed.
8.1.25.3.3
Input
„Input“ is for displaying information only. It shows the current value of the
coordinates of the mouse cursor in the gradation curve. This can be used to
determine the exact value of a point shown in the gradation curve.
8.1.25.3.4
Output
„Output“ is for displaying information only. It shows the current value of the
coordinates of the mouse cursor in the gradation curve. This can be used to
determine the exact value of a point shown in the gradation curve.
137
Image processing tools
8.1.25.3.5
Use as black point
Figure 116: Use the point determined by the shadow threshold as blackpoint.
The point determined from the shadow threshold is used as blackpoint (8.1.14.3
Set-up options).
8.1.25.3.6
Use as white point
Figure 117: Use the point determined from the highlight threshold as white point.
The point determined from the highlight threshold is used as whitepoint (8.1.14.3
Set-up options).
8.1.25.3.7
Shadow threshold
The shadow threshold influences the determination of the points in the darker
area. This point is located near the first “bump” in the shadow area, that is in the
left side of the histogram.
To see what the shadow threshold does have a look at the gradation curve of the
preview.
138
Image processing tools
8.1.25.3.8
Highlight threshold
The highlight threshold influences the determination of the points in the brighter
area. This point is located near the first “bump” in the brighter area, that is in the
right side of the histogram.
To see what the highlight threshold does have a look at the gradation curve of the
preview.
8.1.25.3.9
Output shadow threshold
The output value of the point determined by the shadow threshold can be modified
in the range of [0, Input value of the point]. A bigger value doesn’t lead to any
more changes of the gradation curve.
8.1.25.3.10 Ausgabe highlight threshold
The output value of the point determined by the highlight threshold can be
modified in the range of [0, Input value of the point]. A bigger value doesn’t lead to
any more changes of the gradation curve.
139
Image processing tools
8.1.26 Saturation
8.1.26.1 Purpose
This filter can change the color intensity of a image.
8.1.26.2 Mode of operation
The image is converted from RGB into another colorspace consisting of
brightness, color value and color saturation. Then the color saturation is changed
according to the given factor and then the image is converted back to RGB.
8.1.26.3 Possible settings
Figure 118: Dialog „Saturation“ with a factor of 0,5 (left) and 2,0 (right)
The factor for the color saturation change can be modified in a range from 0.5 to
2.0 in 1/1000 steps. A factor smaller than 1.0 makes the colors more pale (left), a
factor bigger than 1.0 makes the colors more strong (right).
140
Image processing tools
8.2
Optional image processing modules
8.2.1
Orthoscan
8.2.1.1 Purpose
Orthoscan is a function for the automatic book fold equalization.
If a book is not scanned lying under the glass plate or it is pressed flatly in another
way, the book pages are scanned bent. The distortion of the writing resulting from
that makes reading and the use of a OCR software for the automatic text
recognition more difficult.
Orthoscan glazes the copy, so that the resulting image appears as if it would have
been scanned flatly.
Additionally the image is centered automatically, deskewed and the black border is
cut off.
Both book pages can be separated automatically and they can be saved in one
own file each. It could happen that caused by the booksides these two sides are
not equally sized. Orthoscan uses the smaller side in this case as size for both
pages.
Should the book be held at its borders with the thumbs and they are also scanned,
the images of the thumbs can be removed automatically.
CAUTION: Orthoscan is not available for OS12000 Scanners. Instead that you can
use Perfect Book (see section 11.1.8 Perfect Book).
141
Image processing tools
Figure 119: Picture before the use of „orthoscan“
Figure 120: Picture after the use of „orthoscan“ with automatic thumb removing. (The gray
background is the background of the screen. The borders of the picture are the
white limitations. )
142
Image processing tools
8.2.1.2 Boundary conditions
1. 8 bit gray level and 24 bit color images are possible.
(If an image shall be saved as a 1 bit black/white image, the most effective
prodedure will be to scan the image with 8 bit gray level at first, and then carry
out automatically „orthoscan“ and the conversion to 1 bit color depth. For the
automatic use of image processing tools see 7.1 Cutout settings)
2. The image must be taken in front of a black background
(black means here, that the pixel values do not exceed the value of 50.)
3. The black border must be visible around the book. I.a. the book must not touch
the border of the image. The border must have a minimum of 2 pixels.
143
Image processing tools
Figure 121: WRONG! The black border around the book must be continuous
Figure 122: An inserted piece of paper, which interferes with the
contour of the book, may result in such an error
4. The brightness of the side borders of the book must be at least 50% of the
maximal brightness. I.a. the pixel values must be at least 128.
144
Image processing tools
Figure 123: Dark/black copies can not be recognized by Orthoscan
Figure 124: Tattered and fringed borders without a clear contrast can not
be recognized by Orthoscan
145
Image processing tools
5. The upper border of the book must be completely in the upper part of the
image, the border of the book below must be completely in the part of the
image below.
Figure 125: WRONG! The book is put in the wrong way round
(The book must not have been scanned „standing on the side“.)
Figure 126: WRONG! A little book put in outside the center
146
Image processing tools
6. The book should be scanned in line if possible, i.a. the book fold should be
vertically in the picture, if possible. Deviations up to 20 degrees to both
directions are normally tolerated.
7. The borders of the book should not be interrupted by other contents of the
image. There is a certain tolerance for the right and the left book page, so that
it is possible to hold the book.
Figure 127: It is allowed to hold the book during the scanning operation
(particularly sensitive are the areas on the left and right side of the book fold at the
edge of book above and below up nearly to the middle of the book pages. In this
area the black area between the border of the book and the border of the image
must also absolutely remain free.)
147
Image processing tools
8.2.1.3 Set-up options
Figure 128: Set-up options „orthoscan“
8.2.1.3.1
Scanner
Orthoscan requires an indication about the scanner geometry. For selecting the
correct value here, it is necessary to indicate the scanner that has scanned the
image.
8.2.1.3.2
Minimal contrast
Sensitivity of the edge recognition for the determination of the edge of book above
and below. Can be selected between 5 and 100.
The best results can be achieved normally with values between 20 and 30.
8.2.1.3.3
Minimal contrast vertically
Sensitivity of the edge recognition for the determination of the left and right edge of
the book. Can be selected between 5 and 100.
The best results can be achieved normally with values between 20 and 30.
8.2.1.3.4
Remove shadow
Removes the shadow of the book fold.
8.2.1.3.5
Remove finger
Removes possibly scanned fingers on the border of the book and replaces them
with the image background.
8.2.1.3.6
Split pages
The image is divided into two halves at the book fold and it is saved with two files.
8.2.1.3.7
Page overlap
If the option “split pages” has been selected, it is possible to set here for how
much millimeters both halves of the image shall be overlapped to each other
respectively.
8.2.1.3.8
Landscape only
If this is checked the page separation only happens if the original image is wider
than high.
8.2.1.3.9
Right side first
148
Image processing tools
For instance arabic and chinese is written from right to left. For such material
check this box to get the correct order.
8.2.1.3.10
Leave border
If a positive value is entered here, a part of the black edge around the object will
be left similar to the image processing function 8.1.6 Cut.
8.2.1.4 Ortho plus
If Orthoscan is not able to evaluate the book edge, a deskew or removing of the
black edge may be carried out instead. To activate this emergency run check this
box and run the configuration if required.
Figure 129: Set-up options „orthoscan limp home“
8.2.1.4.1
Ortho plus
By setting this check mark the function will be activated.
If the book fold equalization does not find a book, at first a deskew and then a
cutting of the black edge will be carried out.
In addition, the resulting image (of Orthoscan or deskew/cut) will be cut in the
geometrical center, if Orthoscan is not able to find a center of page. This may be
reduced using the button “separation only with landscape format”, so that this will
only happen if the image is wider than high.
8.2.1.4.2
Document threshold
Starting from this brightness value it is assumed that it is the document to be
cut/aligned. For more details see chapter 8.1.6 Cut.
8.2.1.4.3
Document pixel
Starting from this number of pixels it is assumed that it is the document to be
cut/aligned. For more details see chapter 8.1.6 Cut.
149
Image processing tools
8.2.1.4.4
Edge threshold
Starting from this brightness value it is assumed that it is the document to be
cut/aligned. For more details see chapter 8.1.6 Cut.
8.2.1.4.5
Edge pixel
Starting from this number of pixels it is assumed that it is the document to be
cut/aligned. For more details see chapter 8.1.6 Cut.
8.2.1.4.6
Fill black edge
If this is activated possible rests of the black book seesaw, which are left after the
cutting, will be painted over white.
8.2.1.4.7
Separation only with landscape format
If this is activated, the page separation will only be carried out if the result of the
cutting procedure is a rectangle, which is wider than high. So it will be avoided that
individual pages are cut, which are scanned on end.
8.2.1.4.8
Deskew text
If this box is checked Omnican tries to deskew the text. Otherwise the top or
bottom border is used for that (see section 8.1.7.3.1 Use top/bottom of the page)
150
Jobabschlüsse
9
Job Terminations
9.1
Hermes digital
Hermes digital is a Zeutschel document delivery service system.
The first scanned image is the order sheet. From this sheet Omniscan reads a
barcode and uses it as a order number. A multipage PDF will be created from all
scanned images and it is uploaded to a web server (per ftp). In addition, an e-mail
is sent to the customer and the order will be marked as finished at hermes.
9.2
E-mail
With this job termination it is possible to send images as an e-mail.
Therefore you may use either MAPI and send the e-mail with a program or use a
SMPT server directly.
If MAPI is used, the images can be attached as an annex. There is the possibility
in any case to load the images on a web server and the e-mail may include links to
the images for an easy access. In addition, a HTML file can be created with links
to the images. Then a link to this HTML file will be included in the e-mail, which is
also be loaded.
9.3
Flyers
The purpose of this job is to read handbills of different companies to make them
available over Internet.
The images are offered as small thumbnails for a quick view and a high-quality
web image for download. In addition, the images can be saved as a PDF and in
each format defined by Omniscan.
To make the upload to the server easier each handbill gets a sticker with a
barcode before the scanning. Omniscan reads this barcode and creates the path
name of the images from it together with a provided start directory. All selected
images will then be saved in the job termination there.
The upload to the web server will then be carried out in a separate step after a
check of plausibility.
9.4
HAriel
HAriel is the document delivery system of the University of Halle. The images are
loaded to a web server either as individual JPEGs or multipage PDF. For the
individual JPEGs a HTML file with links to the images can be created which is also
uploaded. In addition, an e-mail with links to the images is created and sent to the
customer.
9.5
LEA
LEA is a german document delivery system.
The first scanned image is the order sheet. Omniscan reads the barcode on this
sheet and creates a subdirectory, in which all images will be saved in the job
termination.
151
Jobabschlüsse
9.6
Subito
Subito is a german document delivery system. The images are scanned there
black-and-white and they are saved as TIFF G4. The images are moved to a
special directory in the job termination, and they are named according to the
barcode on the first sheet, the order sheet. Instead of a file extension the images
will be numbered, and a control file with the information read from the order sheet
will be created additionally. This file has no extension and it is created as the last
file, so that a scheduler, which imports the data into the delivery system, may start
out from the assumption that all images are available.
9.7
Create multi image file
It is possible to save several images in one file. The individual image files, from
which the multi image file is gained, remain unchanged even after the creation of
the multi image file.
After the button „configure“ has been clicked to, the following dialog is displayed to
carry out the settings, which images shall be saved in which format and in which
file.
Then the current job name can be added to the file name, or Omniscan can be
instructed to ask for a file name explicitly with the job termination (with file
selection dialog).
Figure 130: Dialog „configure multi image file“
9.7.1
Cutout
Here the cutouts or images are selected that shall be saved in a file.
The selection is always valid for all cutouts or images with the corresponding
numbering, which have been created in a job.
Here it is possible to select whether all images of a job, only a particular cutout or
all cutouts, which are allovcated to a particular group, will be included in the
output. Only available cutouts may be selected there. Groups will only be offered if
several groups are available.
152
Jobabschlüsse
9.7.2
File format
Here all formats are offered, which are available for all selected cutouts.
Different formats are available for different „color depths“.
Color depth Black/white 1 bit
File formats TIFF
TIFF G3 D2
TIFF G3
TIFF G4
TIFF Huffmann
TIFF packed
TIFF LZW 7
PDF
(With PDF G4
compression is used)
Gray level 4 bit/8bit and color 24 bit
TIFF
TIFF JPEG
TIFF packed
TIFF LZW 8
PDF (JPEG)
PDF (JPEG 2000)
(With PDF a JPEG (or JPEG 2000)
compression is used, if the format is
not gray level 4 bit. Gray level 4 bit is
not compressed within a PDF)
Table 2: Multi page formats
If cutouts with different color depths are selected, then those formats are offered,
which are available for all formats.
9.7.3
JPEG quality/compression factor
For saving in a multi page PDF the data are compressed with JPEG, provided that
gray level 4 bit has not been selected.
JPEG is a lossy compression procedure with which the rate of compression and
the image quality can be adapted to the corresponding requirements. It must be
observed there that each increasing of the rate of compression and therefore the
reduction of the file size results in a deterioration of the image quality.
It is possible here to set the JPEG quality from 0 – 100 when JPEG has been
selected as file format. Higher values result in a better image quality, lower values
on the other hand result in a higher rate of compression.
With JPEG the compression factor predefines the factor for which the amount of
data will be deteriorated. The indication of the factor “0” results in a loss-free
compression.
(Depending of the image content this results in a deterioration of the amount of
data with factor 2). Generally the settings between 10 and 20 have been proven.
In addition, the filters for the discrete wave transformation and the wavelet level
can be selected. For this purpose the following dialog must be opened with the
small button right beneath the window for the setting of the compression rate.
7
8
Only with option LZW
Only with option LZW
153
Jobabschlüsse
Figure 131: Extended settings „JPEG 2000“
9.7.4
File name
Here the file name is entered, with which the multi image file will be saved. If only
one file name is entered, the file is saved in the job directory.
The file can be saved at an arbitrary place using a complete path indication, which
is directly entered or can be selected after having clicked to the button „search“.
By integrating a meta datum in the file name the multipage file can be split up into
parts. If e.g. a chapter-specific meta datum is used there, each chapter will be
typed into a new file then.
Example:
A chapter-specific meta datum “chapter” exists. With the first 20 images it is set to
“a boy survives”, with the next 15 images to “a window disappears”, with the next
16 images to “letters from nobody” etc. The file name is: “The stone of the wise
men_%mchapter%”.
File names:
For the first 20 images the name will be: The stone of the wise men_a boy
survives
For the next 15 images: The stone of the wise men_a window disappears
For the next 16 images: The stone of the wise men_letters from nobody
Etc.
154
Jobabschlüsse
9.8
Print all images
Here the printing of the images can be carried out according to the settings in the
“config dialog”.
Figure 132: Dialog „print settings for images“ (“Fit to paper” activated)
155
Jobabschlüsse
Figure 133: Dialog „print settings for images“ (“Fit to paper” deactivated)
9.8.1
Cutout
A selection is possible here, whether all images of a job, only a particular cutout or
all cutouts which are allocated to a particular group shall be printed. Only available
cutouts may be selected there. Groups will only be offered if several groups are
available.
9.8.2
Printer
Selection of the printer.
156
Jobabschlüsse
9.8.3
Fit to paper
The images will be printed with maximum size by keeping the aspect ratio and with
consideration of the selected edge. If no check mark has been set here the
desired zoom factor can be selected freely. Activating “use fit to paper if to large”
limits the size of the printed image to the paper size. The aspect ratio remains
unchanged.
This function may be switched on or off with a control which is displayed with the
activation of “print all images”.
Figure 134: Controller for switched on function „adapt to paper“ with an edge of 10 mm.
Figure 135: Controller for switched off function „adapt to paper“.
9.8.4
Double first image
The first image is printed twice.
9.8.5
Quick mode
If no check mark has been set here the images will be rescaled, dithered, etc.,
before they are passed on to the printer driver/printer. If the check mark has been
set, this will be left to the corresponding printer driver/printer.
9.8.6
Footer line
It is possible to add a text on the lower edge of the printout.
This text can be configured in two sections.
The first section may contain an arbitrary number of lines, the second one only
one line.
9.8.7
Paper alignment
Here the alignment of the paper can be set. This setting will be taken over with a
replacing of the printer. If the own configuration dialog belonging to the printer is
displayed (see 9.8.8 Options), the setting or alignment entered there will be taken
over.
Automatic
The alignment will be adapted to the image to be printed. If the image is wider than
its height, then landscape format will be set; otherwise portrait format will be
selected.
Portrait format
All images will be printed with portrait format.
Landscape format
All images will be printed with landscape format.
157
Jobabschlüsse
9.8.8
Options
By pressing the button “options” the own configuration dialog belonging to the
selected printer will be displayed. The settings entered here will be saved with the
job, so that they must not be entered again each time when the job is opened. But
only those parameters will be used there which can be used with all printers.
If another printer is selected from the list of the available printers after the settings
of the printer have been made, then the printer settings entered before will not be
taken over.
Only the parameters of a printer will be saved with a job (the parameters of the
printer whose setting dialog has lately been finished with “OK”).
9.9
Copy files to
The scanned images are copied to the chosen directory. It is possible to set with
„configure“, in which file format the images will be saved. (The file format
„Omniscan“ means that the current file format will be kept).
Further it can be selected whether all images of a job, only a particular cutout or all
cutouts, which are allocated to a particular group will be copied. Only available
cutouts can be selected there. Groups will only be offered if several groups are
available.
The numbering is done with an attached number, whose number of digits, start
value and increment can be set in the same way as the renaming. If the number
shall not be attached, but be inserted, this can be done with a dummy %n.
If the option „add job name“ has been selected, a folder with the name of the job
will be created. The job files are copied to this folder then.
If the option “ask for directory” has been selected, then during the job termination
the target directory will be queried and the user has the option to select another
target directory at this moment without having to open the job settings.
Meta data
With the copying of the scanned images the meta data may be used as a part of
the file name. For this purpose the token %m<Metaname>% must be included to
the file name. There <Metaname> stands for the name of the meta datum. The
complete token will be replaced then by the value of this meta datum which is
belonging to the corresponding image. It is possible to also insert „\“ symbols. This
results in the creation of new directories. In this way it is possible to distribute the
corresponding files also to different (sub) directories.
If the automatic numbering shall be switched off completely, this may be done by
using the digit value 0. Then this value must be entered into the entry filed. It must
be made sure by entering the meta datum, which is used for the naming, that the
same file name will not be created twice.
158
Jobabschlüsse
Figure 136: Dialog „copy settings for images“
In the example above the dummy %mchapter%is replaced by the chapter name
respectively.
9.10
FTP transmission
The images will be transmitted to a ftp server after an URL, i.e. an Internet
address (the protocol information „ftp“ is automatically preceded), a user name
and a password have been entered.
9.11
User-defined command
The images scanned and processed with Omniscan can be brought to a further
processing with a number of job terminations. The job termination “user-defined
command” is available to allow the use of arbitrary applications for the postprocessing. Here a command for the command line is generated and carried out.
9.11.1 Settings
Token
To carry out the command once the token %d will be inserted to the command.
Then the name of the job directory is inserted at this place and the command is
started once.
To carry out the command once for each file the token %f will be inserted. Then
the name of an image file is inserted at this place and the command is started
once for each file.
If a meta data entry in the form %m<Name>% is supplied within the command this
placeholder will be replaced with the data of the respective image.
Pre-command
Particularly with the execution of such a command for each file individually (token
%f) it may be necessary to carry out a particular command before the beginning of
these work, which possibly requires some preparation. This command is then be
entered to the main command and it is separated from the main command with the
separator #=#. There is no replacement done with the pre-command.
159
Jobabschlüsse
Post-command
As it is with the pre-command it may be necessary to initiate something after the
termination of the processing. This will be done with the post-command. The postcommand is then defined to the pre-command and it is also separated with the
token #=#.
9.11.2 Special cases
8. No %f in the main command, but pre- and post-command are defined:
Omniscan starts out from the assumption that a pre- and/or post-command is
only useful if the main command is carried out individually for each file.
Otherwise this can be carried out by a simple batch file (.cmd). To simplify the
application the file name of each image file (separated with a blank) is attached
to the available main command and the main command is carried out once
repectively. Naturally the defined pre-command and then the defined postcommand will be carried out before.
9. No %d, no %f and neither pre-command nor post-command defined: The main
command will be carried out once, the name of the job directory (separated
with a blank) is attached to the command there.
9.12 Searchable PDF
The images scanned and processed with Omniscan will be transfered to a optivcal
character recognition. The found characters will be saved line by line together with
the images in a multipage PDF. The individual images the text is extracted from
remain unchanged in the job. The size of images in the PDF is limited to 22,75
inches (577,85 mm) in width and height.
After clicking the configure button the following dialog shows up to change the
settings which images is saved in which file.
The current jobname can be added to the file path or Omniscan can explicitly ask
for the filename in the job completion (via a select file dialog).
Figure 137: Dialog „Searchable PDF“
9.12.1 Clip
160
Jobabschlüsse
Here the clips and images to be saved in the file are selected. The selection refers
always to all the clips and images with the coresponding number that are inside a
job.
You can select all the images of a job, just a spezial clip or all images of a clip
group. In the dropdown you will only see the existing clips. Groups are only visible
if more than one group exists.
9.12.2 Skip images
In this entry field you can specify how many images at the beginning of the job are
skipped and so not included into the PDF. This is used to omit barcode images
used to identify the job.
9.12.3 File name
This is the filename under which the resulting multi-page-PDF is saved. If you give
just a filename this file will be located in the job directory. If you specify a complete
path this path is used. This can be done with the browse button.
9.12.4 Create PDF/A-1b compatible file
If this is checked a PDF-file is created according to ISO PDF/A-1b. Such mages
are used for long time preservation.
9.12.5 Add job name
If the option „Add job name“ is selected, in the above selected directory a
subdirectory with the jobname is created. The multi-page–PDF is saved inside this
directory.
9.12.6 Ask for filename
If the option „Ask for filename“ is selected during the job completion Omniscan
asks the operator for filename and path with a file selection dialog. So another
target can be used without changing the job settings.
9.12.7 Use image resolution (otherwise 72 dpi)
If this checkbox is checked the resolution of the multi-page-PDF is set to the
resolution of the supplied images. If it is not checked the resolution is changed to
72 dpi.
9.12.8 Create text file
If this is checked a text file with the results from the OCR is created. It has the
same name and lies in the same directory as the PDF file, except the extension is
.txt.
9.12.9 Interaktive correction mode
Checking this box activates the interactive correction mode. This is used to correct
possible recognition errors from the OCR before storing that into the PDF.
Show lines
If this is checked not only the word with a possible recogniton error is showed, but
161
Jobabschlüsse
the whole line.
Show all
If this is checked not only the words or line containing suspect characters are
shown, but the whole text. With this it is possible to correct the complete text.
For doing that the following dialog appears during the job completion.
Figure 138: Dialog "Interactive correction mode" (words)
162
Jobabschlüsse
Figure 139: Dialog "Interactive correkton mode" (lines)
9.12.9.1 Image
The area marked as „Image“ shows the position in the image where a suspect
character was found. This character is highlighted in the image and in the entry
field below where you can modify/correct the text.
9.12.9.2 Zoom (%)
With this you can enlarge or shrink the display of the image. The image in the PDF
file is not changed in any way.
Fit image into window vertical.
Fit image into window horizontal.
Fit image into window in both directions (show whole image).
9.12.9.3 Next character
With this button you can advance to the next suspect character in this word/line. If
the shown charcter is the last on this page this button is gray.
9.12.9.4 Reset word / reset line
With this button you can revoke all changes in the current word/line.
163
Jobabschlüsse
9.12.9.5 Next word / Next line
If one line/word is finished this advances to the next word/line. If this is the last
word/line of this page this button is grayed out.
9.12.9.6 Previous word / previous line
This steps back to the last corrected item. If you are editing the first line/word this
button is grayed out.
9.12.9.7 Next page
If the correction of this page is finished you can advance to the next page with this
button. After that going back to the last word or line is not possible any longer. If it
is the last page the interactive mode is closed with this button and the PDF is
created with all the corrections done.
9.12.9.8 Cancel interactivity
Manual correction can be stopped at any time by clicking this button. The PDF is
created then without further corrections.
9.12.9.9 Cancel correction
Clicking this button stops the correction and the creation of the PDF. If you want to
resume with other settings restart the job completion.
164
Jobabschlüsse
9.12.10 Details
This button shows the dialog below where specific settings for the OCR can be
done.
Figure 140: Dialog "OCR Details"
9.12.10.1 Case sensitifity
With this you can decide whether OCR tries to detect capital and lowercase
letters.
9.12.10.2 Detect style of lettering automatically
The image is seperated into zones. For each zone the used font is detected. This
can lead to a better recognition quality. Zones classified as pictures are not
OCRed.
9.12.10.3 Quality level
Here you can choose between quality and speed of the OCR. More quality means
less speed and vice versa.
9.12.11 Language
Here a dialog will show up in which the code page to use and the language(s) of
the document can be selected.
165
Jobabschlüsse
Bild 141: Einstelldialog „Sprachinformationen“
9.13
OCR
This job completion processes all the images with a OCR and writes the result into
a text file. The settings available in the OCR filter are available here too (see
section 8.1.21 Optical character recognition (OCR)). Additionally there are some
settings here only relevant for use in a job completion.
Figure 142: Dialog „OCR“
9.13.1 Clip
Here you can choose which clips are processed with OCR. Default is „everything“.
9.13.2 Skip images
166
Jobabschlüsse
Here you can select how many images at the beginning of the job will not be
processed for OCR. This can be used for instance to not process the title of a
scanned book.
9.13.3 Filename
This is the filename for the result of the OCR.
9.13.4 Header
This field contains text that is output before the text from the OCR. Here you can
use meta data too (see 7.3 Meta data) .
9.14
XML
The XML job completion creates a special XML-file that can configured here.
Figure 143: Dialog „XML“
9.14.1 XML source file name
Here you should enter the same value as in the index export if the index export
should be used as input (see section 7.3.14.9 Create XML Output). Relative path
are always created in the job directory.
9.14.2 Target directory
The target directory is the directory where the image manger expects the files.
There the images are copied to (subdirectory), the XML file and the ready file is
created there. The file extension for this ready file is specified in the last entry field.
Please also enter the point so that by completely leaving this field empty a ready
file without any extension can be created.
167
User interface
10
User Interface
10.1
Menu commands
10.1.1 Menu file
10.1.1.1
New...
Creating of a new job (see paragraph 5.2 Create new job)
10.1.1.2
Open...
Opening of an existing job (see paragraph 5.3 Open job)
10.1.1.3
Close
Terminates the job without having carried out the job termination (see paragraph
7.4 Job ).
10.1.1.4
Delete last cutout
Deletes the last cutout respectively on demand.
10.1.1.5
Delete selected image(s)
Deletes all selected images on demand.
10.1.1.6
Save job settings with
Saves the job parameters of the current job in a file, which makes it possible to
take over the parameters once set for other jobs (see paragraph 5.2.3 Job
parameter).
10.1.1.7
Save as default job
Saves the job parameters of the current job (see paragraph 5.2.3 Job parameter)
as default parameters. These default parameters are offered as a „default“ each
time when a new job has been created (see 5.2 Create new job).
10.1.1.8
Factory settings
Resets the default parameters to the factory settings. Then a restart of
OMNISCAN 12 will be necessary.
10.1.1.9
Terminate
Terminates a job. The index card „job termination“ is automatically opened (see
paragraph 7.4 Job ).
168
User interface
Figure 144: Dialog "Job completion settings"
This dialog is identically to the „job completion settings“ (see section 7.4 Job
completion) except for the buttons „OK“, „Close“, „Abort job“ and „Cancel“.
10.1.1.9.1
Button „OK“
This button starts the job completion with the current settings.
10.1.1.9.2
Button „Close“
This button closes the current job. The job together with all the data and settings
stays stored on disk.
10.1.1.9.3
Button „Abort job“
This completely deltes the job together with all data and settings. If there are
already images in the job you wil be warned.
10.1.1.9.4
Button „Cancel“
This cancels the job completion. This means only this dialog is closed, the job
stays loaded.
169
User interface
10.1.1.10
Print...
Opens the print dialog.
Figure 145: Print dialog
10.1.1.10.1 Print selected image(s)
Prints all selected images.
10.1.1.10.2 Side view
Here the image is displayed as it will be printed with the current settings.
If due to the „zoom factor“ the complete image can not be displayed or printed, it is
possible to move the image with the scroll bars being displayed then.
170
User interface
10.1.1.10.3 Printer
Display of the printer, which has currently been selected, and whose settings can
be changed after having clicked to the button „adapt“.
10.1.1.10.4 Zoom %
The zoom factor indicates, how the size of the printed image performs in relation
to its original size. Three set-up variants are available.
User-defined
The zoom factor can be entered directly to the field „zoom %“ or it can be changed
using the small cursor keys.
Fit to paper size
The image is printed with the maximal size, in which it completely fits to the
printout.
100 %
The image is printed with the original size.
10.1.1.10.5 Fast mode
If no check mark has been set here, the images will be rescaled, dithered, etc.,
before they will be passed on to the printer driver/printer. If the check mark has
been set, this will be left to the corresponding printer driver/printer.
10.1.1.10.6 Print
Starts the printing operation.
10.1.1.10.7 Options
Opens the set-up dialog for the currently selected printer.
For more details see in the printer manual.
10.1.1.10.8 Cancel
Finishes the operation without printing.
10.1.1.11
Exit
Exits the program. A job, which was opened with the exit, can be opened again
and it is always in the same state, in which he has been at the time of exit.
171
User interface
10.1.2 Menu image processing function
10.1.2.1
Use the image processing dialog
If the check mark of this menu entry has been set, the set-up dialog of this tool is
displayed at first with the selection of an image processing tool in this menu (see
paragraph 5.7.5 Set-up dialog for image processing tools ). The filter is used only
after the dialog has been left with „OK“.
If the check mark has not been set, the selected image processing tool is
immediately used with the parameters lately set (also see paragraph
5.7.1...individually and manually after the scanning).
The check mark is set and removed by clicking to the menu entry.
10.1.2.2
Back
Cancels the last image processing operation.
10.1.2.3
Deskew manually
Deskew means the moving in line of images. That means, that the borders of a
scan copy are being parallelized with the borders of the image.
This can be done automatically (see 8.1.7 Deskew) or manually.
With the manual variant the user provides, which straight line shall be parallelized
with the edge of the image.
After having clicked to „deskew manually“ the mouse cursor changes to a
magnifying glass with cross-lines , as soon as it is being moved over the image.
By clicking the left mouse key a copy of this symbol is fixed to the current position.
This is the first point of the straight line, which is parallelized with the border of the
image.
If a second point is determined on the image in the same way, the image is moved
in line due to the straight line between the two points.
The recognition whether it is a horizontal line, which shall be parallellized with the
upper side of the image, or it is a vertical line, which shall be parallelized with the
border of the picture, is done automatically.
10.1.2.4
Erase
„Erase“ offers the possibilities to replace an arbitrary rectangle in the scan or
image by „white“. After this menu item has been clicked to and the mouse cursor
has been moved over the image, the mouse cursors takes the form of an eraser
with an arrow. The rectangle can then be formed by continuous pressing of the left
mouse key, which after letting off the left mouse key is replaced by a white
rectangle.
10.1.2.5
Erase once
Like „erase“, but the functionality is only maintained for a one-time execution.
10.1.2.6
Cut
Enables the cutting of the image by drawing a rectangle with the target size using
the mouse cursor.
172
User interface
10.1.2.7
Cut once
Like „cut“, but the functionality is only maintained for a one-time execution.
10.1.2.8
Rotate left
This rotates the current image 90 degrees clockwise.
10.1.2.9
Rotate right
This rotates the current image 90 degrees clockwise.
10.1.2.10
Upside down
This rotates the current image 180 degrees and puts it so upside down.
10.1.2.11
Sharpen
By clicking to this menu entry the image processing tool is applied to the current
image, that is the image that is just displayed in the main window, either
immediately or after the set-up dialog has been left with „OK“ (see 10.1.2.1 Use
the image processing dialog).
For a description of the filter see paragraph 8.1.2 Sharpen.
10.1.2.12
Smooth
By clicking to this menu entry the image processing tool is applied to the current
image, that is the image that is just displayed in the main window, either
immediately or after the set-up dialog has been left with „OK“ (see 10.1.2.1 Use
the image processing dialog).
For a description of the filter see paragraph 8.1.3 Smooth.
10.1.2.13
Median filter
By clicking to this menu entry the image processing tool is applied to the current
image, that is the image that is just displayed in the main window, either
immediately or after the set-up dialog has been left with „OK“ (see 10.1.2.1 Use
the image processing dialog).
For a description of the filter see paragraph 8.1.1 Median filter.
10.1.2.14
Rotation
By clicking to this menu entry the image processing tool is applied to the current
image, that is the image that is just displayed in the main window, either
immediately or after the set-up dialog has been left with „OK“ (see 10.1.2.1 Use
the image processing dialog).
For a description of the filter see paragraph 8.1.4 Rotation.
10.1.2.15
Orthoscan
By clicking to this menu entry the image processing tool is applied to the current
image, that is the image that is just displayed in the main window, either
immediately or after the set-up dialog has been left with „OK“ (see 10.1.2.1 Use
the image processing dialog).
For a description of the filter see paragraph 8.2.1 Orthoscan.
173
User interface
10.1.2.16
Unsharp masking
By clicking to this menu entry the image processing tool is applied to the current
image, that is the image that is just displayed in the main window, either
immediately or after the set-up dialog has been left with „OK“(see 10.1.2.1 Use
the image processing dialog).
For a description of the filter see paragraph 8.1.5 Unsharp masking.
10.1.2.17
Cut
By clicking to this menu entry the image processing tool is applied to the current
image, that is the image that is just displayed in the main window, either
immediately or after the set-up dialog has been left with „OK“(see 10.1.2.1 Use
the image processing dialog).
For a description of the filter see paragraph 8.1.6 Cut.
10.1.2.18
Deskew
By clicking to this menu entry the image processing tool is applied to the current
image, that is the image that is just displayed in the main window, either
immediately or after the set-up dialog has been left with „OK“ (see 10.1.2.1 Use
the image processing dialog).
For a description of the filter see paragraph 8.1.7 Deskew.
10.1.2.19
Despeckle
By clicking to this menu entry the image processing tool is applied to the current
image, that is the image that is just displayed in the main window, either
immediately or after the set-up dialog has been left with „OK“ (see 10.1.2.1 Use
the image processing dialog).
For a description of the filter see paragraph 8.1.8 Despeckle.
10.1.2.20
Flip
By clicking to this menu entry the image processing tool is applied to the current
image, that is the image that is just displayed in the main window either
immediately or after the set-up dialog has been left with „OK“ (see 10.1.2.1 Use
the image processing dialog).
For a description of the filter see paragraph 8.1.9 Flip.
10.1.2.21
Inverting
By clicking to this menu entry the image processing tool is applied to the current
image, that is the picture that is just displayed in the main window either
immediately or after the set-up dialog has been left with „OK“ (see 10.1.2.1 Use
the image processing dialog).
For a description of the filter see paragraph 8.1.10 Inverting.
10.1.2.22
Stamp
By clicking to this menu entry the image processing tool is applied to the current
image, that is the image that is just displayed in the main window, either
immediately or after the set-up dialog has been left with „OK“ (see 10.1.2.1 Use
the image processing dialog).
For a description of the filter see paragraph 8.1.11 Stamp.
174
User interface
10.1.2.23
Automatic print
By clicking to this menu entry the image processing tool is applied to the current
image, that is the image that is just displayed in the main window, either
immediately or after the set-up dialog has been left with „OK“ (see 10.1.2.1 Use
the image processing dialog).
For a description of the filter see paragraph 8.1.12 Automatic print.
(The filter „automatic print“ is also mentioned with the menu only for the sake of
completeness. If an individual image shall be printed, the normal print dialog (see
10.1.1.10 Print...) is the right choice. „Automatic print“ is favorably used if it is
taken to the choice of image processing tools for a cutout (see 7.1.30 Image
processing). The OMNISCAN 12 works as a „copier“).
10.1.2.24
Binarization
By clicking to the menu entry the image processing tool will be applied to the
current image, i.e. the image which is just displayed in the main window, either
immediately or after the set-up dialog has been left with „OK“ (see 10.1.2.1 Use
the image processing dialog).
For a description of the filter see 8.1.13 Binarization.
10.1.2.25
Graduation curve
By clicking to the menu entry the image processing tool will be applied to the
current image, i.e. the image which is just displayed in the main window, either
immediately or after the set-up dialog has been left with „OK“ (see 10.1.2.1 Use
the image processing dialog).
For a description of the filter see 8.1.14 Graduation curve (color).
10.1.2.26
Include color correction
By clicking to the menu entry the image processing tool will be applied to the
current image, i.e. the image which is just displayed in the main window, either
immediately or after the set-up dialog has been left with „OK“ (see 10.1.2.1 Use
the image processing dialog).
For a description of the filter see 8.1.16 Include color correction.
10.1.2.27
Read barcode
By clicking to the menu entry the image processing tool will be applied to the
current image, i.e. the image which is just displayed in the main window, either
immediately or after the set-up dialog has been left with „OK“ (see 10.1.2.1 Use
the image processing dialog).
For a description of the filter see 8.1.17 Read barcode.
10.1.2.28
Scale
By clicking to the menu entry the image processing tool will be applied to the
current image, i.e. the image which is just displayed in the main window, either
immediately or after the set-up dialog has been left with „OK“ (see 10.1.2.1 Use
the image processing dialog).
For a description of the filter see 8.1.18 Scale.
175
User interface
10.1.2.29
Add/cut border
By clicking to the menu entry the image processing tool will be applied to the
current image, i.e. the image which is just displayed in the main window, either
immediately or after the set-up dialog has been left with „OK“ (see 10.1.2.1 Use
the image processing dialog).
For a description of the filter see 8.1.19 Cut/add border.
Command
By clicking to this menu entry the image processing tool is applied to the current
image, i.e. the image, which is just displayed in the main window. Either
immediately or after the set-up dialog has been left with “OK” (see 10.1.2.1 Use
the image processing dialog).
For a description of the filter see chapter
Add scale
By clicking to this menu entry the image processing tool is applied to the current
image, i.e. the image, which is just displayed in th main window. Either
immediately or after the set-up dialog has been left with “OK” (see 10.1.2.1 Use
the image processing dialog).
For a description of the filter see chapter
Optical character recognition (OCR)
By clicking to this menu entry the image processing tool is applied to the current
image, i.e. the image, which is just displayed in th main window. Either
immediately or after the set-up dialog has been left with “OK” (see 10.1.2.1 Use
the image processing dialog).
For a description of the filter see chapter
Cut type area
By clicking to this menu entry the image processing tool is applied to the current
image, i.e. the image, which is just displayed in th main window. Either
immediately or after the set-up dialog has been left with “OK” (see 10.1.2.1 Use
the image processing dialog).
For a description of the filter see chapter
10.1.2.30
Paper white
By clicking to the menu entry the image processing tool will be applied to the
current image, i.e. the image which is just displayed in the main window, either
immediately or after the set-up dialog has been left with „OK“ (see 10.1.2.1 Use
the image processing dialog).
For a description of the filter see section 8.1.25 Paper white.
10.1.2.31
Saturation
By clicking to the menu entry the image processing tool will be applied to the
current image, i.e. the image which is just displayed in the main window, either
immediately or after the set-up dialog has been left with „OK“ (see 10.1.2.1 Use
the image processing dialog).
For a description of the filter see section 8.1.26 Saturation.
176
User interface
10.1.3 Menu overview
10.1.3.1
Current scan
The current scan with the cutout frames is displayed in the main window.
10.1.3.2
First image
The first image of the thumbnail bar is displayed in the main window.
10.1.3.3
Last image
The last image of the thumbnail bar is displayed in the main window.
10.1.3.4
All
The image displayed in the main window is displayed completely.
10.1.3.5
Maximize
The image displayed in the main window is displayed larger step by step.
If the image does not fit completely to the main window, then automatically scroll
bars are displayed on the border of the image for the movement of the cutout.
10.1.3.6
Minimize
The image displayed in the main window is displayed smaller step by step.
10.1.3.7
1 to 1
The image displayed in the main window is displayed in the size, in which a pixel
of the image complies exactly with one pixel of the screen mode.
If the image does not fit completely to the main window, then automatically scroll
bars are displayed on the border of the image for the movement of the cutout.
10.1.3.8
Maximize rectangle
Makes possible the display of a particular cutout of an image in the main window
by drawing a rectangle with the target size using the mouse cursor.
10.1.3.9
Symbol bar
Makes appear and disappear the symbol bar (toolbar).
10.1.3.10
Status bar
Makes appear and disapperar the status bar.
177
User interface
10.1.3.11
Navigator
Makes appear and disappear the navigator.
The navigator is a minimized display of the image displayed completely in the
main window. If the image in the main window cannot be displayed completely due
to the selected maximizing, then the displayed cutout is highlighted invertedly in
the navigator.
Figure 146: Navigator
This inverted cutout can be moved with the left mouse key kept pressed. The
cutout displayed in the main window changes correpondingly.
The navigator can be switched on and off with the menue entry “View, Navigator”
or with the navigator button in the toolbar.
10.1.3.12
Cutout settings
Opens the index card „cutout settings“ in the dialog „settings“.
For more details see paragraph 7.1 Cutout settings.
10.1.3.13
Express mode dialog
Opens the express mode dialog. With that it is possible to select a set of settings
with one click.
For more details see chapter 5.1 Express mode.
10.1.3.14
Image processing settings
Opens the dialog “filter settings”.
178
User interface
For more details see chapter 7.1.30 Image processing.
10.1.3.15
Omniscan settings
Opens the index card „omniscan“ in the dialog „settings“.
For more details see paragraph 6.1 Omniscan.
10.1.3.16
Meta data settings
Opens the index card „meta data“ in the dialog „settings“.
For more details see paragraph 7.3 Meta data.
10.1.3.17
Job Settings
Opens the index card „Job Settings“ “ in the dialog „settings“.
For more details see paragraph 7.5 Job Settings.
10.1.3.18
Job termination settings
Opens the index card „job termination“ in the dialog „settings“.
For more details see paragraph 7.4 Job .
10.1.3.19
Digital watermark settings
Omniscan can apply a digital watermark to a scaned image. This changes the
pixel just in a slight (invisible) way to add a encrypted code to the image. The key
to this code is located in the dongle.
There are two different kind of digital watermarks, a robust and a fragile
watermark. A image can contain both kinds.
10.1.3.19.1 Robust watermark
If this is checked every image that omniscan saves is applied a watermark to. This
watermark can survive changes to the image without getting lost.
179
User interface
The robustness of this mark is influnced with the corresponding value of this
dialog. The higher this value is the more insensitive is the image against
manipulation. If the robustness is too high the watermark leads to visual artefacts
int the image.
Also a arbitrarily text can be added to the watermark as „watermark info“.
10.1.3.19.2 Fragile watermark
If this is checked a fragile watermark is added to each image Omnsican saves. A
fragile watermark detects any manipulation to the image.
10.1.3.19.3 Add on program: VerifyWatermark
Detection of the invisible watermark is done by the program VerifyWatermark
belonging to Omnsican. This program also uses the dongle to get the key for the
watermark. Checking a image has to be done with the same dongle as the saving
(or with a dongle with the same key).
Figure 147: Add on program "VerifyWatermark"
Choose the image to check with the browse button. The result is displayed in the
list box below the filename. This list can be cleared with the “Clear list” button, the
close button closes the program.
10.1.3.20
Color management settings
Opens the index card „color management“ in the dialog „settings“.
For more details see paragraph 6.3 Color management.
10.1.3.21
Correct colors
Deactivation and activation of the color management for the screen display.
Corresponds with the settings of the index card „color management“
(see 6.3.6 Color management active).
180
User interface
10.1.4 Menu scanner
10.1.4.1
Scan
Initiates a scan operation.
10.1.4.2
Rescan
Initiates a rescan operation. A rescan is a scanning operation, with which the last
scan is typed over.
10.1.4.3
Continuous scan
Initiates a series of scans without any other user action being necessary in the
meantime. The continuous scanning is stopped by pressing the escape key or the
option between the scanning operations is deactivated again.
It is possible to enter a period of time in the Omniscan settings, for which the
starting of the next scan operation will be delayed (see 6.1.16).
10.1.4.4
Zeutschel Scanner
Switchover to a Zeutschel Scanner if one is available.
10.1.4.5
TWAIN scanner
Switchover to a scanner connected with TWAIN (s.11.3 TWAIN scanner).
10.1.4.6
Virtual scanner
Switchover to the virtual scanner (s. 11.4 Virtual scan).
10.1.4.7
Empty book seesaw
Results in the display of the empty book seesaw in the main window again at the
starting of a new job. Changes of the cutout settings will be only applied with the
next scan then.
10.1.4.8
„Linked together scan“ („interleave mode")
If for example the left pages of a book are being scanned at first and then the right
pages, it is useful to save them correspondingly to their page counting and not to
the sequence of scanning.
This is made possible with the mode „linked together scan“.
In the thumbnail bar (see 5.8 Thumbnail bar) the position can be determined, to
which the next images are being inserted (see 5.8.1 Placing of the thumbnails).
The option „linked together scan“ results in the fact, that starting out from the
placing of the new scan selected lately with all further scans one scan is always
skipped.
If e.g. the left pages of a book of 256 pages have been scanned one after the
other, they now appear in the thumbnail bar numbered from 1 to 128. If now the
position for the next scan is set to the beginning of the thumbnail bar, the next
scan, that is the first right page (page 1) is set to the beginning of the scanning job.
With activated „linked together scan“ one scan is skipped for the next positioning.
The second right page (page 3) is correspondingly inserted to the third place,
181
User interface
since the first left page (book page 2) has been skipped. If the right book pages
are scanned in this way one after the other, all pages of the book are displayed
then in order of their page counting.
10.1.4.9
Glass plate
Makes possible the setting to scan with or without glass plate.
10.1.4.10
Settings
Opens the dialog „settings“, which includes all the index cards for the program
settings as well as for the job settings (see paragraphs 6 Program Options and 7
Job Options).
10.1.5 Select
10.1.5.1
New chapter
Makes possible the “opening” of a new chapter for chapter-specific meta data. For
more details to meta data s. 7.3 Meta data.
10.1.5.2
Left page/right page
Makes possible the specific activation of a color mode separately for the left and
the right page of a book. For more details see 7.1.3 Page.
10.1.5.3
Group A – E
The cutouts, which belong to the corresponding cutout group, will be activated. All
others will be deactivated. For more details of the cutout groups see 7.1.2 Cutout
group.
With the selection “activate all cutouts” all defined cutouts may be activated with
one keystroke (shortcut = “0”).
10.1.5.4
Adjust trackers
In all clips where the „automatic adaption“ (7.1.8 Automatic Adaption) is activated
jump to the size and position Omnsican has detected by using Perfect Book,
Orthoscan or Cut. Also these clips are reactivated for automatic adaption which
was switched of after moving the frames with the mouse.
10.1.5.5
Color, gray, Photo, black/white
Switches all cutouts to the corresponding color mode.
10.1.5.6
Renew all clips
All clips are created a new and stored to disk.
10.1.5.7
Increase/reduce numerator
Enables the entry of a difference for the images which are really in the job. Can be
applied for purposes of accounting, if not all scans are with costs.
182
User interface
10.1.5.8
Brighter, darker
Here the brightness of the main scan can be set (s. 7.2.6 Brightness).
10.1.5.9
Increase/decrease threshold
Leads to a increas or decrese of the binarisation threshold. Changes are visible at
the Threshold slider in the toolbar (if enabled).
10.1.5.10 Set Threshold and brightness
This opens a dialog to modify binarisation threshold, brightness and contrast. This
is intended to use together with a programmable keyboard.
Figure 148: Dialog " Set Threshold and brightness "
10.1.5.10.1 Switch to set number:
You can save up to five different sets of values. They are stored and activated with
OK.
10.1.5.10.2 New binarisation threshold, brightness and contrast
This is the same as using the sliders in the toolbar (see section 10.5 Symbol bar
(toolbar)).
10.1.5.10.3 Use this values as offset
If this is checked the values in the dialog are not used as new values, but as offset
to the current value. To leave the settings unchanged a value of 0 has to be
entered. For instance to increase the value for the brightness from 2 to 6 enter the
value 4 into the corresponding entry field and enter 0 for all others.
10.1.5.11
Couple cutouts
The coupling of the cutouts 1 and 2 is switched on or off.
183
User interface
10.1.5.12
Flip cutouts
There is the option for the cutouts 1 and 2 to flip the geometry of one cutout on the
other one. The geometry of the active cutout is always flipped onto the other one
there.
10.1.5.13
Previous image, next image
The previous or next image in the thumbnail bar is selected and it is displayed in
the main window.
10.1.5.14
Add next scan behind
The position on which newly scanned images will be inserted is laid to the lower
end of the thumbnail bar.
10.1.5.15
Add next scan before the current
The next scan will be inserted bofore the image currently visible in the main
window. This can be used if the mouse should not (or can not) be used. This may
be interesting using a programmable keyboard.
10.1.5.16
Adapt printout to the size of the page
If print has been activated in the job termination, then the adaptation of the printout
to the size of the page can be switched on or off here (s. 9.8 Print all images).
10.1.5.17
Maximize print edge, minimize print edge
If print has been activated in the job termination and the adaptation of the printout
to the size of the page has been switched on, then the edge to be considered can
be maximized or minimized with the printing here (s. 9.8 Print all images).
184
User interface
10.1.5.18
Activate/deactivate cutout
To activate some cutouts there is an affiliated number key on the keyboard
available as a shortcut. For deactivation this key must be combined with „Strg“.
The key „2“ activates cutout 2, the key „Strg-2“ deactivates cutout 2.
There is a special option to respond cutouts, which number is bigger than 9, for
the use with a programmable keyboard. Using the shortcut „Strg-E“ activates an
arbitrary cutout. Only its number must be entered in the following dialog, then
„Enter“ must be pressed. The same is valid for the shortcut „Strg-D“ for
deactivation.
10.1.5.19
Select filterstack
Here the filterstack of a clip that shall be used can be selected. This is the same
as using the drop down „Use filter from“ of the „clip settings“ (see section 7.2.5
Use filter of). This is intended to use with a programmable keyboard.
10.1.5.20
New clip
This creates a new clip and opens the „clip settings“ afterwards.
10.1.6 Menue Book Mode
This menue point is only activ if Omniscan is in the book mode which can be
switched on in the Omnsican settings (see section 6.1.15.1 Mod). Also another
toolbar is visible with which you can quickly switch the most important settings
while scanning a book (10.5 Symbol bar (toolbar)).
10.1.6.1
Orthoscan
This switches the use of the book curve correction filter „Orthoscan“ (see section
8.2.1 Orthoscan). This filter is applied directly to the scan before the clip specific
filters.
10.1.6.2
Configure Orthoscan
Opens the „filter settings“ dialog (see section 7.1.30 Image processing).
10.1.6.3
Cut
This switches the use of the „cut“ filter (see section 7.1.30 Image processing). This
filter is applied directly to the scan before the clip specific filters.
10.1.6.4
Configure cut
Opens the „filter settings“ dialog (see section 7.1.30 Image processing).
10.1.6.5
Configure none
If neither „Orthoscan“ nor „Cut“ should be applied to the scan, so you can define
here which filters will be applied (see section 7.1.30 Image processing).
10.1.6.6
Left Side
Deactivates the clip for the right side and enables the clip for the left side.
185
User interface
10.1.6.7
Right Seite
Deactivates the clip for the left side side and enables the clip for the right side.
10.1.6.8
Both Sides
Activates both
10.1.6.9
Full
Creates a clip embracing both clips and activates this clip.
10.1.7 Menu “?”
10.1.7.1
Help
Opens the OMNISCAN 12 manual with the PDF format
(provided that Acrobat Reader is installed on the PC.)
10.1.7.2
Start remote maintenance
After selecting this menue entry a mesage box appears saying: “This function is
intended to get help from the Zeutschel customer support. Please call Zeutschel
by phone first.“ Please take that serious and click on “Cancel” until you are not
directed from a Zeutschel employe to press “OK”.
To use this function a working internet connection is necessary.
After clicking to „OK“ the DeskShare Client opens and asks you for a one time PIN
you can get from the Zeutschel employe by phone.
10.1.7.3
Information about Ominscan ...
Figure 149: „Information omniscan“
Displays the version of OMNISCAN 12.
186
User interface
10.1.7.4
Dongle information
Figure 150: „Dongle information“
Displays the options which are released by the dongle and which are therefore
available currently with OMNISCAN 12.
In addition it is possible with this dialog to extend the quantity of the released
options by a license file.
This must be done as follows:
1. The dialog “licence input” will be opened after the button “add license” has
been clicked to.
187
User interface
Figure 151: Dialog „License input"
2. Select the license file with the ending “.zlf” with the “browser” button. This must
be a license file, which has been generated exactly for the dongle, which shall
be “extended”.
3. Click to “OK”.
4. The new options will be available and will be displayed in the “dongle
information” after a restart of OMNISCAN 12.
10.1.7.5 Create diagnostic info
This is for diagnostic purposes from the software development. Omniscan creates
a zip file containing all settings of the current job, the current installation and the
log files. This file is saved as OS12Diag_<YYYYMMTT>_<HHMMSS>.zip in c:\.
This file can be sent to the Zeutschel customer support together with a description
of the failure and a description what was done as the failure occurred. If c:\ is not
writable Omniscan tries to save the file in the Omniscan installation directory. If
that is not possible, too, Omnsican uses the directory where the jobs are created.
10.2
Image view in the main window / mouse usage
The image displayed in the main window can be zoomed with the scroll wheel of
the mouse. “Pulling” the wheel will enlarge the view, pushing will diminish the view.
Is the view to large to fit into the window it can be moved around with the middle
mouse button (normaly the scroll wheel). Is the view (nearly) small enough to be
completely visible the middle mouse button activates a magnifier glas at the
position of the mouse cursor. In this area the image is displayed 1:1. If the mouse
is moved the new area under the mouse cursor will be displayed, similar to a real
magnifier glas. In oposite to a screen magnifier not the screen contents is
enlarged, but the corresponding part of the image is shown in original size.
If you click with the right mouse button a context menue appears with more
functions. The content of this menue depends on wheter a scan or a clip is
displayed. (s. 10.3 Context menu main window)
Is the scan displayed in the main window the clip frames are displayed too. The
appearance is changed depending on where the cursor is located. Is the cursor
over a frame a four way arrow symbolizes that the complete clip can be moved
(with holded left mouse button). Is the cursor above a tracker handle this can be
188
User interface
moved. The cursor symbolizes the respective size change. If more than one frame
is visible there is always one of them with a solid line. This is the active tracker. In
doubt (overlapping frames) all mouse actions are with respect to this frame.
Clicking into a frame activates it. If a frame is on top of another selection changes.
Normally there is a region where just one frame is, clicking there instantly shows
the desired result.
If the mouse cursor is above the thumbnail window the scroll wheel moves the
thumbnails up and down if there are more thumbnails than the window can hold.
The thumbnail window has a contexct menue too. (s. 10.4 Context menu
thumbnail bar).
If the mouse is over the navigator the image displayed can be moved with a
pressed left mouse button. (s. 10.1.3.11 Navigator).
10.3
Context menu main window
By clicking to the main window with the right mouse key a context menu is
displayed.
Figure 152: Contextmenu „Scan in main window“
Here a new cutout can be defined (see 5.6.1 Insert cutouts), an available cutout
definition can be deleted (see 5.6.2 Delete cutouts) or the settings of the cutouts
can be changed (see 7.1 Cutout settings). After a click to the image processing
settings the set-up dialog of the active cutout at the moment will be displayed (see
7.1.30 Image processing).
The currently active clip can be switched of and on directly (s. 7.1.4 Create
cutout).
In addition, the display of the image can be changed in the main window, as it is
the same with the corresponding commands of the main menu (see 10.1.3.4 up to
10.1.3.8).
189
User interface
Figure 153: Contextmenu „Clip in main window“
Here the current cutout in the main window can be saved in a file (see 5.8.3.5
Save this image), and the current image can be deleted from the job (see 5.8.3.3
Delete this image).
In addition, there are the same options to have an influence on the display as
there are in the scan (see above).
10.4
Context menu thumbnail bar
By clicking to a thumbnail with the right mouse key a context menu will be
displayed.
Figure 154: Context menu „Thumbnail“
Here information as file name, size... of the corresponding image can be retrieved.
Delete one image (or several) from the job. Save an image to a file or display it in
an own window. Furthermore it is possible to move several images or to print them
(see 5.8.3 Context menu).
190
User interface
10.4.1 Image information
Figure 121: Bild information
Here information of the corresponding image will be displayed. In addition to the
technical meta data as width, height, file name... the meta data entered by the
user will be displayed. The meta data above the line are saved with each
individual image and they can be edited with a double click to the corresponding
line. The indications below the line are part of the complete job and they can be
changed in the meta data set-up dialog (view, meta data settings...).
191
User interface
10.5
Symbol bar (toolbar)
The symbol bar can be made appear or disappear in the menu “view ->symbol
bar“.
Job functions
Creates a new job (see paragraph 5.2 Create new
job)
Opens a new job (see paragraph 5.3 Open job)
Opens the index card „job termination“. After the OK
button has been pressed the job will be terminated
(see paragraph 7.4 Job )
Image display functions
Show or hide the navigator.
The image displayed in the main window is displayed
maximized step by step.
If the image does not longer fit completely to the main
window, then scroll bars are automatically displayed
on the border of the image for the movement of the
displayed cutout.
The image displayed in the main window is displayed
minimized step by step.
The image displayed in the main window is displayed
in the size, in which one pixel of the image
corresponds exactly to one pixel of the screen
display.
If the image does not completely fit to the main
window, then scroll bars are automatically displayed
on the border of the picture for the movement of the
displayed cutout.
The image displayed in the main window is
completely displayed.
192
User interface
Makes possible the display of a particular image
cutout in the main window by drawing a rectangle with
the target size using the mouse cursor.
The empty book seesaw is displayed in the main
window, and the changes of the settings carried out
then are only used with the next scanning.
The current main scan will be deleted.
Color management
Deactivation and activation of the color management
for the screen display.
Corresponds with the setting of the index card „color
management“ (see 6.3.6 Color management active)
Cutout settings
Opens the set-up dialog of the current cutout
Opens the set-up dialog for the image processing
tools of the current scan
Opens the dialog for the specific setting options of the
currently connected scanner or for the virtual scanner
or the TWAIN scanner.
Scan mode
If this function is activated, the scans are inserted
„linked together“ to the job (see paragraph
10.1.4.8„Linked together scan“)
Scanner settings
Displays the setting to scan with or without glass
plate.
Controller
Threshold value for the creating of 1 bit
black/white images.
Setting of the brightness (is only displayed, if
this setting is supported from the respective
scanner)
193
User interface
Setting of the contrast (is only displayed, if this
setting is supported from the respective
scanner)
Switched off function „adapt to paper“ (Will only
be displayed if the „printing of all images“ is
activated in the job termination.)
Switched on function „adapt to paper“ including
the indication of the print edge. (Will only be
displayed if the „printing of all images“ is
activated in the job termination.)
Switch on/off the white reference. If the white
reference is switched on clicking on the right
button a new white reference can be forced at the
next scan.
This is only visible using a scanner that supports
this function (OS10000, OS12000).
Image proessing toolbars
Undo last manual image change
(like in the filter menue)
Rotate image 90 degrees counter clockwise
Rotate image 90 degrees clockwise
Rotate image 180 degrees to turn it upside down
Start manual deskew
(like in the filter menue)
Start erase
(like in the filter menue)
Start cut
(like in the filter menue)
Buch Modus
Switch „Orthoscan“ on/off
(like in the book scan menue)
194
User interface
Switch „Cut“ on/off
(like in the book scan menue)
Deactivates the right clip
(like in the book scan menue)
Deactivates the left clip
(like in the book scan menue)
Activates both clips
(like in the book scan menue)
Creates a clip embracing both and activates it
(like in the book scan menue)
Switches to 24 Bit Color
Switches to 8 Bit Grayscale
Switches to B/W Photomode
Switches to B/W
195
User interface
10.6
Status bar
On the right side of the status bar some information about the current cutout and
the pixel the cursor is pointing to can be found:
Pixelcoordinates (x, y)
Width (mm)
RGB-Values
Zoom factor
Height (mm)
Bild 155: Cutout status bar
196
Scanner-specific settings
11
Scanner-specific Options
After the button „extended“ (see 7.2.4 Extended) has been clicked to, the specific
setting options for the currently connected scanner are displayed.
11.1
OS10000-R2/OS12000
Figure 156: Adjustments Dialog "OS10000-R2/OS12000"
11.1.1 Speed
The OS12000 and OS10000 is optimzed for the best relation between quality and
speed. If it is ok to reduce the scan speed to improve the quality you can decrease
the scan speed here. The decreased speed is used to scan each pixel many times
and use an average value. This reduces noise and improves image quality.
You can choose between four speed settings 1/1, 1/2, 1/4 and 1/8.
11.1.2 Book thickness (OS12000 only)
Here you can enter the book thickness in mm. If the automatic is checked the
integrated laser sensor does that. This is used to adjust the level of focus to the
material on the book cradle.
11.1.3 Mode
Here you can choose the color mode used for scanning.
197
Scanner-specific settings
11.1.4 White reference
If the automatic white reference should be used check this.
(At the upper edge of the scan area there is a white reference object. With that an
automatic brightness correction is done.)
CAUTION: The automaic white reference can be used only if you scan under or
without glass plate. Scanning on the glass plate leads to undesired results.
11.1.5 Max. scans without white reference
The white reference is located above the scan area. So it is necessary to position
the scan line to this position if doing a white reference. If you do a fullscreen scan
this is done automatically. If you scan with a region of interest (ROI, see 7.2.1.2
Circumscribing rectangle / ROI frame) this option limits the amount of scans done
without positioning to the top of the scan area.
The bigger this value is the more time you save while doing ROI scans.
11.1.6 Resolution
This sets the resolution used for scanning.
11.1.7 Scan bidirektional
If this is checked the scanline doesn’t position back to the top of the scan area, but
stays in the end position. The next scan is then done in the other direction. This
can increase the scan speed.
11.1.8 Perfect Book
Perfekt Book is a technologie aiming at the same target like the filter „Orthoscan“,
but in a totally different way. With a built in matrix camera that scans the book
while the main scan is running a 3D Modell of the book is created. With this model
it is possible to unwrinkled the book in a high quality way. Using the 3D model
instead of the contour (like Orthoscan) this approach has no problems with notes
sticking in the book. To use the full functionality at least two clips have to be
defined. One for the left side and one for the right side. Both should have the
automatic tracker adaption active (see 7.1.8 Automatic Adaption). This automatic
is valid until the trackers are adpted with the mouse. User input has highr priority
than automatic. To reactivate the automatic the menue item “Adjust trackers“ (s.
10.1.5.4 Adjust trackers) can be used. In the job settings it is possible to tune the
border that is used additionally to the edges that Perfect Book finds. Perfect Book
can only be applied to the scan, so it can only be switched here.
CAUTION: Perfekt Book is only available for the OS12000 at the moment and
replaces the Orthoscan there.
11.1.9 Use finger removal
If checked the image of the fingers holding a page at the edge is removed.
11.1.10 Brightness/Gamma/Threshold
The settings for Brightness, Gamma and Threshold used while scanning can be
modified here.
198
Scanner-specific settings
11.1.11 Output raw image
If checked the image is output without any manipulations increasing the image
quality to the Omniscan.
11.1.12 Glass plate
If scanning a object under the glass plate this has to be checked. If you use a
OS12000 book cradle with USB connection this is done automatically.
199
Scanner-specific settings
11.2
OS14000
Figure 157: Adjustments Dialog "OS14000"
11.2.1 Speed
The OS14000 is optimzed for the best relation between quality and speed. If it is
ok to reduce the scan speed to improve the quality you can decrease the scan
speed here. The decreased speed is used to scan each pixel many times and use
an average value. This reduces noise and improves image quality.
You can choose between four speed settings 1/1, 1/2, 1/4 and 1/8.
11.2.2 Book thickness
Here you can enter the book thickness in mm. If the automatic is checked the
integrated laser sensor does that. This is used to adjust the level of focus to the
material on the book cradle.
11.2.3 Mode
Here you can choose the color mode used for scanning.
11.2.4 Do white reference
If the automatic white reference should be used check this.
(At the upper edge of the scan area there is a white reference object. With that an
automatic brightness correction is done.)
CAUTION: The automaic white reference can be used only if you scan under or
without glass plate. Scanning on the glass plate leads to undesired results.
11.2.5 Max. scans without white reference
The white reference is located above the scan area. So it is necessary to position
the scan line to this position if doing a white reference. If you do a fullscreen scan
200
Scanner-specific settings
this is done automatically. If you scan with a region of interest (ROI, see 7.2.1.2
Circumscribing rectangle / ROI frame) this option limits the amount of scans done
without positioning to the top of the scan area.
The bigger this value is the more time you save while doing ROI scans.
11.2.6 Resolution
This sets the resolution used for scanning.
11.2.7 Scan bidirektional
If this is checked the scanline doesn’t position back to the top of the scan area, but
stays in the end position. The next scan is then done in the other direction. This
can increase the scan speed.
11.2.8 Brightness/Gamma/Threshold
The settings for Brightness, Gamma and Threshold used while scanning can be
modified here.
11.2.9 Output raw image
If checked the image is output without any manipulations increasing the image
quality to the Omniscan.
11.2.10 Use Gamma
If
this
option
is
checked,
the
adjusted
Gamma
(11.2.8
Brightness/Gamma/Threshold) value will be applied to the image. If this option is
not checked an specific 10-bit linearization will be applied to each scan. The
linearization table is stored in the scanner and can be adjusted (11.2.12
Calibration).
11.2.11 Glass plate
If scanning an object under the glass plate this has to be checked. If you use an
OS14000 book cradle with USB connection this is done automatically.
201
Scanner-specific settings
11.2.12 Calibration
By clicking to the button „calibration“ the service area is reached.
It should only be used by specialist staff and it is protected by a password.
After having clicked to the button the mask for the entry of the password is
displayed.
Figure 158: Entry password
After the service password has been enetered, the calibration dialog is opened, in
which the calibration data are being created.
202
Scanner-specific settings
11.3
TWAIN scanner
Figure 159: Set-up dialog „TWAIN Scanner“
11.3.1 Select data source
All available TWAIN-conforming data sources are displayed in this pulldown menu.
One of these data sources can be selected.
11.3.2 Display user interface
Each TWAIN-conforming data source makes one user interface available. If the
check mark has been set here, the user interface of the selected TWAINconforming data source will be displayed after the scan operation has been
started. In this case all Omniscan settings will be ignored for the actual scan.
203
Scanner-specific settings
11.4
Virtual scan
It is possible to insert an arbitrary number of available image files to a job with the
virtual scanner.
Figure 160: Set-up dialog „virtual scanner“
11.4.1 Scanner size, width, height, use original size
It is possible to determine the size of the image (dimensions) with this parameters,
which is passed on from the virtual scanner to the Omniscan application.
If the original image has smaller dimensions than the selected size of the scanner,
it will be maximized with a black edge to the size of the scanner. If the original
image has bigger dimensions than the selected size of the scanner, an image with
the selected size of the scanner will be cut off from the center of the original
image.
If the check mark for „use original size“ has been set, the dimensions of the
original image will not be changed.
11.4.2 Resolution, use original value
With these parameters the resolution of the image can be determined, which is
passed on from the virtual scanner to the Omniscan application.
If the check mark for “use original value” has been set, the resolution of the
original image will not be changed.
11.4.3 Color depth
Color depth of the image, which is passed on from the virtual scanner to the
Omniscan application. If “selected as in Omniscan” is selected, the color depth of
the original image will be adapted, if necessary.
204
Scanner-specific settings
11.4.4 Image source
With “image source” there is a distinction made whether all images of a directory
or only individual images of a directory shall be scanned.
If directory selection is activated you can decide about the order the images are
fetched. You can sort the images depending on the time of creation (chronolocical
order) or alphabetical order (case sensitive or case insensitive). The oldest or first
in the alphabet respectively comes first.
205
Kopierschutz
12
Copy Protection
OMNISCAN 12 is supplied with a copy protection plug (dongle). At present there
are two types used, a USB version (new) and a parallel version for the connection
to the printer port. The parallel dongle must be connected to the parallel interface
of the computer. The used interface can furthermore be used for other purposes,
e.g. the connection of a printer. The cable can easily be connected to the port of
the dongle. The USB dongle may simply be plugged to an USB connection of the
PC.
To recognize the dongle the installation of a driver is necessary. The installation
file of this driver is on the product CD. For more details see in the document
„IA_OS12.x_software installation_.pdf, which can also be found on the OS 12
software CD. This will be usually done automatically with the installation of
Omniscan.
Which functions are currently be released by the dongle can be seen in the
„dongle information“ (see menu entry 10.1.7.4 Dongle information).
Furthermore it is possible to use all functions of OMNISCAN 12 for 1000 scans or
30 days with any dongle, regardless of which function are released by the current
dongle. This trial period starts when a function is used, that is not released.
Without dongle OMNISCAN 12 is started with the demonstration mode. Saving
and printing are then not possible.
206
Manufacturer and Service
13
Manufacturer and Service
13.1
Manufacturer
ZEUTSCHEL GMBH
Heerweg 2
D-72070 Tübingen
Tel: + 49 – (0)7071 – 9706 0
Fax: + 49 – (0)7071 – 9706 44
e-mail: [email protected]
http: www.zeutschel.com
13.2
Service
Of course it is possible to get help from us, if there is a handling problem with one
of our products or other problems occur. Please also contact us with general
questions any time.
Please contact your local ZEUTSCHEL dealer or the ZEUTSCHEL customer
service in such cases by indicating the device number (see nameplate) or, in the
case of a software, by indicating the software version (see figure below).
Figure 161: Information window
Subject to technical changes without notice
207
Manufacturer and Service
208
Anhang
14
Appendix
14.1
Shortcuts
Taste
F1
F2, „S“
F3, Alt-R
F4
F5
F6
F7
Spacebar
Key „*“ , Home
Key „+
Key „Arrowkey ↑
Arrowkey ↓
Arrowkey →
Arrowkey ←
F4
F5
F6
F7
F8
1 to 9
0
Befehl
Get help
Start a scan.
Start a rescan.
Show the current scan in the main window
Open the clip settings dialog
Open the filter settings dialog for the current active clip
Empty book cradle
Show the complete image in the main view.
Show the image in the main view so that one pixel in
the image is one pixel on the screen.
Zoom in (enlarge)
Zoom out (reduce)
Scroll up
Scroll down
Scroll right
Scroll left
Show the current scan with the clipmarks.
Open the clip settings for the active clip.
Open the Filterstack for the active clip.
Delete the scan.
Deletes (after confirm) the last image in the
thumbnailbar.
Aktivates the respective clip.
That’s the same as setting „make clip“ in the clip
settings.
(s. 6.1.2 Make clip)
Activates all defined cutouts.
Strg-1 bis Strg- Deaktivates the respective clip.
9
Thats the same as resetting „make clip“ in the clip
settings.
(s. 6.1.2 Make clip)
Alt-1 bis Alt-9
Use the filter stack of the respective clip for filtering the
scan.
Alt-0
Use the filter stack of the scan.
A, B, C, D, oder Aktivate all clips belonging to the respective group and
E
deactivate all others.
M
Manual deskew
209
Anhang
Shift-Q
Q
Shift-W
W
L
R
U
Z
Alt-+
Alt-Alt-A
Alt-S
Alt-W
Alt-F
Alt-N
Alt-M
Alt-C
Cut
Cut once
Erase
Erase once
Rotate left
Rotate right
Upside down
Undo last manual filter
Increase threshold
Decrease threshold
Adjust trackers
Select filter stack
New clip
Switch off the coupling of trackers 1 and 2.
Switch on the coupling of trackers 1 and 2.
Mirror the geometrie of tracker 1 to tracker 2 or vice
versa.
Do nothing.
(Break barcode reading)
Select a new chapter for chapter-specific meta data.
Entf
Ende
Alt-Ende
Delete the current image.
Start the job finalisation
Silent (Subito-) jobfinalisation.
ESC
Shift-+
Stop the continous scan.
or stop as soon as posible.
One step brighter
Shift--
One step darker
Shift-B
Switch (all clips) to black & white.
Shift-P
Switch (all clips) to b/w photo mode
Shift-G
Switch (all clips) to gray.
Shift-C
Switch (all clips) to color.
Shift-D
Reduce print edge for printing in the job termination.
Shift-F
Adapt printout to the page size (Fit2Page) for printing in
the job termination.
Increase print edge for printing in the job termination.
Alt-B
Shift-I
210
Anhang
Shift-R
Renew all clips
Shift-F1
Help
Shift-F2
Page up after scan
Shift-F3
Page up after rescan
Strg-+
Strg- A
Increase counter (Subito, amount of none payed
images).
Decrease counter (Subito, amount of none payed
images).
Position insert marker at the end of the job.
Strg-C
Carry out job termination.
Strg-D
Deactivate cutout.
Strg-E
Activate cutout.
Strg- F
Show first image.
Strg-I
Insert next scan before current image
Strg- L
Show last image.
Strg-N
New job
Strg-O
Opens an available job
Strg-P
Prints the image in the main window
Strg-T
Set threshold and brightness
Bild ↓
Show next image (go down in the thumbnailbar).
Bild ↑
Show previous image (go up in the thumbnailbar).
Strg--
211
Anhang
14.2
Stamp creation with „imaging“
OMNISCAN 12 offers the possibility to insert a TIFF file to an image as a stamp
(see 8.1.11 Stamp).
For this purpose it is possible e.g. to create a TIFF file with an arbitrary text using
the tool „imaging“, which is part of the Windows operating system.
14.2.1 How to create a text file in the TIFF format?
Image processing programs are suitable in principle to create texts in the TIFF
format. The dimensions must be selected in such a way that the stamp fits into the
image.
14.2.2 Create example file with imaging
•
•
Start imaging with „start/programs/accessories/imaging“.
Open new document with “file -> new“.
Figure 162: „Imaging“ open new document
•
Define the desired size of the stamp field with the index “size“ and “user
defined size“ – in this example 20 mm height and 210 mm width.
212
Anhang
Figure 163: Create new document
•
•
Confirm the settings with “OK“.
The opened document can be edited now. Click to the desired annotation tool
in the menu annotation, for example: “entry of text“.
Figure 164: Select entry of text from the menu
or in the symbol bar:
213
Anhang
Figure 165: Select entry of text from the symbol bar
To indicate standard characteristics for annotation tools, e.g. line thickness, color
or type, click to the desired button of the symbol task annotation and then to
characteristics with the right mouse key.
Figure 166: Selection text characteristics
214
Anhang
Figure 167: Text characteristics
•
Click into the page to create the annotation, a frame will be displayed then.
Create the annotation by entering an arbitrary text in this frame, for example
“Zeutschel“.
Figure 168: Create annotation
•
Fix the entered text now in the menu “annotations“ with “define annotations
as permanent“
215
Anhang
Figure 169: Define annotations as permanent
•
•
14.3
Save the document (image) with the stamp data in an arbitrary directory as a
TIFF file by giving a suitable name.
The image or the stamp can now be selected with the stamp dialog.
Verso Recto numbering
14.3.1 Introduction:
Particularly with handwriting it is necessary to number the images, which are made
with the scanning of a bound work, not continuously, but separated in front page
and rear page. A sheet number is given there respectively and also an indication
for the front page (recto) and rear page (verso).
14.3.2 Settings
14.3.2.1 Meta data
For each cutout being concerned a cutout-specific entry must be made here,
which is neither counted nor queried (remove both check marks in the set-up
dialog). Such an entry may be made repeatedly for various cutouts, if it refers to a
particular cutout (not to all).
216
Anhang
Figure 170: The entry „page“ has been made twice, once for cutout 1 (verso) and once for
cutout 2 (recto) respectively. The check marks with „ask for each cutout“ and
„count“ have not been set.
14.3.2.2 Job termination (copy)
These information must be included then to the names of the images in the job
termination. For this purpose the entry %mPage% must be indicated with the file
name with the copying of the images. This string will be replaced then by the value
of the appropriate meta datum „page“ with each occuring (other meta data
appropriately). This means in the case above by verso or recto. In addition the
check mark must absolutely be set with „count only if there is no change in the
name“.
Figure 171: Dialog: „copy settings for image file“
14.3.3 Result
If the job termination is carried out (and the check mark is set with „copy files to“),
the images will be copied to the directory indicated there and with that they will be
numbered again. The first image of cutout 1 will then become Bild_Verso_001.tif,
217
Anhang
the second image of cutout will then become Bild_Verso_002. tif, the first image
of cutout 2 will then become Bild_Recto_001. tif, the second image of cutout 2 will
then become Bild_Recto_002. tif. etc.
The counting is carried out separately for each file name (exclusive numbering),
controlled by the check mark „count only if there is no change in the name“. The
numbering starts again with the indicated initial value respectively and it will be
carried out with the indicated increment.
14.3.4 Special features
Some critical is the naming of the first cutouts. It must be observed here that the
empty image in cutout 1 shall be deleted by the first scan, if necessary, or even
shall just not be deleted, depending on the desired numbering. With a sheet
number the image of cutout 1 must be deleted with the first scan (or alternatively it
must be observed that with the first scan the cutout is deactivated, but will be
activated for the second scan in time). Empty pages should absolutely also be
scanned and numbered, since otherwise the complete numbering will naturally be
mixed up at such a place.
14.3.5 Alternative
There is the option to define a cutout-specific meta datum „sheet number“, which
will be queried with each cutout. Here the user has full control of the usage then,
but also full responsibility and the work associated with that to increment the sheet
number with each cutout, if necessary.
Subject to technical changes without notice
218