1
IP-011
User's Guide
IP Series
Print
Controller
Thank you very much for purchasing the IP-011.
This User’s Guide includes instructions for making prints, correct handling of the machine, and precautions for
safety. Please read this manual before printing.
In order to maintain a satisfactory printing performance, please keep this Guide readily available for reference.
© 2002 by Konica Business Technologies, Inc.
MAINTENANCE AGREEMENT
The KONICA IP-011 Workgroup Document System™ will give you many years of trouble-free service. To
ensure high quality copying performance and to prevent premature wear and failure of precision parts and
components, periodic cleaning and routine adjustments should be scheduled.
We recommend that you contact your service center to discuss the benefits and advantages of Konica's
Customer Service Maintenance Agreement and to be shown how a maintenance plan can be tailored to your
individual copying needs.
NOTICE:
Konica Business Technologies, Inc. has made every effort to ensure that the information in this manual is
complete and accurate. However, constant efforts are also being made to improve and update the product.
Therefore, Konica Business Technologies, Inc. shall not be liable for errors in this manual or for any
consequential damages resulting from the use of this manual. The information contained herein is subject to
change without notice.
FEDERAL OR STATE STATUTES MAY PROHIBIT THE COPYING OF CERTAIN DOCUMENTS OR
INFORMATION, RESULTING IN FINES OR IMPRISONMENT FOR VIOLATORS.
MANUAL PART NUMBER:
OP-IP011-04
WEB SITE ADDRESS
http://www. konicabt. com
CORRESPONDENCE:
Correspondence regarding this manual may be mailed to the address shown below.
Konica Business Technologies, Inc.
Corporate Publications
500 Day Hill Road
Windsor, CT 06095
Contents
Read before using the equipment
Thank you very much for purchasing the Konica Print Controller IP-011.
Konica Corp. ("Konica") allows you to use the software attached to the IP-011 only when you agree to its "Software License Agreement." If you do not agree to terms of this agreement, return the software to the distributor
from which you purchased it.
Software License Agreement
Carefully read all terms and conditions of the agreement which will be shown during the software installation.
Printed in Japan KONICA CORPORATION
IP-011 Print Controller i
Contents
Contents
■ Contents ............................................................................................................................... ii
■ Introduction .......................................................................................................................... v
■ About Supplied Items .......................................................................................................... vi
■ About this Manual .............................................................................................................. vii
■ System Requirements ....................................................................................................... viii
● Windows ................................................................................................................................. viii
● Parallel Port ............................................................................................................................ viii
■ Conventions Used in this Manual ........................................................................................ ix
Chapter 1 Overview ...................................................................................... 1-1
■ Contents of This Chapter ................................................................................................. 1-2
■ Overview of the Print Controller ....................................................................................... 1-3
● IP-011 and Print Engine ........................................................................................................ 1-3
● IP-011 Hardware Configuration ............................................................................................ 1-4
● I/O Interface .......................................................................................................................... 1-4
● Data Flow .............................................................................................................................. 1-5
● How to Use Memory ............................................................................................................. 1-6
● General View ......................................................................................................................... 1-7
■ About the Printer Tools ..................................................................................................... 1-8
● About the Printer Tools .......................................................................................................... 1-8
● About the Status Monitor ...................................................................................................... 1-8
● About the Control Panel ........................................................................................................ 1-8
■ About the Printer Driver ................................................................................................... 1-9
● Compliant OS ........................................................................................................................ 1-9
Chapter 2 Setup ............................................................................................ 2-1
■ Contents of This Chapter ................................................................................................. 2-2
■ Installation of the Printer Driver ........................................................................................ 2-3
● Before Installation ................................................................................................................. 2-3
● Files to be Installed ............................................................................................................... 2-3
● Installing to Windows 95/98/Me ............................................................................................ 2-4
● Installing to Windows NT 4.0 ................................................................................................ 2-7
● Installing to Windows 2000 ................................................................................................. 2-10
● Installing to Windows XP .................................................................................................... 2-14
● Uninstalling the Printer Driver ............................................................................................. 2-17
■ Test Print ........................................................................................................................ 2-18
■ Print from Applications ................................................................................................... 2-19
● Execution of Printing ........................................................................................................... 2-19
● Print Settings ...................................................................................................................... 2-19
Chapter 3 Printer Driver ............................................................................... 3-1
■ Contents of This Chapter ................................................................................................. 3-2
■ Working Environment ....................................................................................................... 3-3
● Compliant OS ........................................................................................................................ 3-3
■ Property of Printer Driver ................................................................................................. 3-3
ii IP-011 Print Controller
Contents
■ Printer Driver Function List .............................................................................................. 3-5
■ Description of Printer Driver Functions ............................................................................ 3-8
● Alphabetic Order ................................................................................................................... 3-8
Chapter 4 Control Panel Setup .................................................................... 4-1
■ Contents of This Chapter ................................................................................................. 4-2
■ About the Control Panel ................................................................................................... 4-3
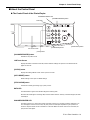
● The Control Panel of the Printer/Copier ................................................................................ 4-3
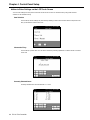
● How to Enter Settings on the LCD Touch Screen ................................................................. 4-4
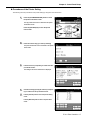
● Printer Mode Basic Screen ................................................................................................... 4-5
● Printer Menu Screen ............................................................................................................. 4-5
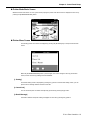
● Printer Setting Screen ........................................................................................................... 4-6
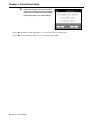
● Procedures of the Printer Setting .......................................................................................... 4-7
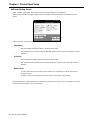
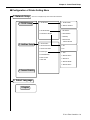
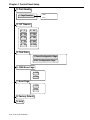
■ Configuration of Printer Setting Menu .............................................................................. 4-9
■ Functions of the Printer Setting ...................................................................................... 4-11
● Network Setup .................................................................................................................... 4-11
● Select Language ................................................................................................................. 4-11
● Print Quality ........................................................................................................................ 4-12
● I/O Timeout ......................................................................................................................... 4-12
● Test Print ............................................................................................................................. 4-13
● CMD Error Page ................................................................................................................. 4-13
● Error Page ........................................................................................................................... 4-13
● Factory Default .................................................................................................................... 4-14
● Help ..................................................................................................................................... 4-14
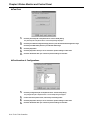
Chapter 5 Status Monitor and Control Panel ............................................. 5-1
■ Contents of This Chapter ................................................................................................. 5-2
■ Status Monitor and Control Panel .................................................................................... 5-3
● About the Status Monitor ...................................................................................................... 5-3
● About the Control Panel ........................................................................................................ 5-3
■ Working Environment ....................................................................................................... 5-4
● Compliant OS ........................................................................................................................ 5-4
● Interface ................................................................................................................................ 5-4
■ How to Install .................................................................................................................... 5-4
■ How to Operate the Status Monitor .................................................................................. 5-5
● Starting the Status Monitor ................................................................................................... 5-5
● Finishing the Status Monitor ................................................................................................. 5-5
● Restarting the Status Monitor ............................................................................................... 5-5
● Show/Hide the Status Monitor .............................................................................................. 5-6
● Display Change ..................................................................................................................... 5-7
■ How to Operate the Control Panel ................................................................................... 5-8
● Starting the Control Panel ..................................................................................................... 5-8
● Finishing the Control Panel ................................................................................................... 5-8
● Buttons of the Control Panel ................................................................................................. 5-9
● Settings of Paper ................................................................................................................ 5-10
● Printer Setting ..................................................................................................................... 5-11
● Test Print ............................................................................................................................. 5-12
● Confirmation of Configurations ........................................................................................... 5-12
IP-011 Print Controller iii
Contents
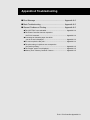
Appendix A Troubleshooting .................................................... Appendix A-1
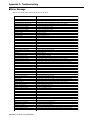
■ Error Message ................................................................................................. Appendix A-2
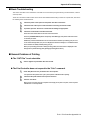
■ Basic Troubleshooting ...................................................................................... Appendix A-3
■ General Problems of Printing ........................................................................... Appendix A-3
● The “OHT Film” is not selectable. .......................................................................... Appendix A-3
● The Print Controller does not respond to the “Print” command. ............................ Appendix A-3
● A message to demand a paper size which you do not use is displayed. .............. Appendix A-4
● You can not print the test print. .............................................................................. Appendix A-4
● The print setting of a job does not correspond to the result of printing. ................ Appendix A-5
● The “Duplex” option is not displayed. .................................................................... Appendix A-5
● Memory Error / Memory Overflow / Overrun ......................................................... Appendix A-5
Appendix B Product Specifications .......................................... Appendix B-1
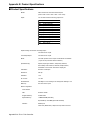
■ Product Specifications ..................................................................................... Appendix B-2
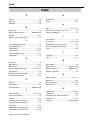
Index ........................................................................................................ Index-1
iv IP-011 Print Controller
Introduction
■ Introduction
The IP-011 Print Controller is an option of the following copier.
Konica 7020 / 7022 / 7025 / 7030 / 7130 / 7035
In this manual, the above copier is described as 7020 series.
The IP-011 Print Controller works as an interface between the Konica 7020 series Printer/Copier and a workstation, and
enables direct printing from the workstation environment.
The print engine on the printer side and the optional network interface card include separate operating manuals, namely,
the 7020 series User’s Manual and the KN-304 USER’S GUIDE (on CD), respectively.
For detailed operations of Windows 95/98/Me, Windows NT, Windows 2000 and Windows XP, refer to the operating
manuals for each operating system. For applications operations, refer to the operating manuals provided with each
application.
FCC Regulations
This equipment has been tested and found to comply with limits for a Class B digital device, pursuant to part 15 of FCC rules. These limits are designed to provide reasonable protection against
harmful interference in a residential installation. This equipment generates, uses and can radiate
radio frequency energy and, if not installed and used in accordance with the instructions, may cause
harmful interference to radio communications. However, there is no guarantee that interference will
not occur in a particular installation. If this equipment does cause harmful interference to radio or
television reception, which can be determined by turning the equipment off and on, the user is
encouraged to try to correct the interference by one or more of the following measures:
• Reorient or relocate the receiving antenna.
• Increase the separation between the equipment and the receiver.
• Connect the equipment to an outlet on a circuit different from the circuit to which the receiver is connected.
• Consult the dealer or an experienced radio/TV technician for help.
Canadian Department of Communications Regulations
Cet appareil numérique de la classe B est conforme à la norme NMB-003 du Canada.
This Class B digital apparatus complies with Canadian ICES-003
About Registered Trademarks
Microsoft, MS and MS-DOS are registered trademarks of Microsoft Corporation in the United States.
IBM is a registered trademark of International Business Machines, Inc. in the United States.
WindowsTM is a trademark of Microsoft Corporation.
Destiny® is a registered trademark of Destiny Technology Corporation.
LaserAct® is a registered trademark of Destiny Technology Corporation.
DPOS® is a registered trademark of Destiny Technology Corporation.
WinStyler®-Nozomi™ is a registered trademark of Destiny Technology Corporation.
WinPane® is a registered trademark of Destiny Technology Corporation.
Other company names and product names written in this manual are the registered trademarks or trademarks of
their respective companies.
IP-011 Print Controller v
Introduction
Copyright
LaserAct® 6 Copyright©1992-1999, Destiny Technology Corp.Ver.2.0. All Rights Reserved.
WinStyler®-NozomiTM Copyright©1995-1999, Destiny Technology Corp.Ver.2.0. All Rights Reserved.
WinPanel® Copyright©1995-1999, Destiny Technology Corp.Ver.1.0. All Rights Reserved.
● A part or all of this operating manual shall not be used or copied without permission.
● Konica shall have no liability for any influences caused by using the 7020 series Printer/Copier + IP-011 system
and this manual.
● Information written in this operating manual is subject to change without notice.
● Konica Corp. shall have the copyright of this printer driver.
● This printer driver shall not be copied except for the purpose of backup.
● Konica shall have no liability for any influences caused by using this printer driver and the User’s Guide.
■ About Supplied Items
The following items are supplied to the IP-011 Print Controller:
User Software CD
• Printer Driver
• User’s Guide(this manual)
• Release Note (The latest information and limits of the system and the user software are written.)
vi IP-011 Print Controller
Introduction
■ About this Manual
This manual describes the printing operations of the Konica 7020 series Printer/Copier when it is connected to the Konica
IP-011 Print Controller.
An optional Network Interface Card (KN-304) is required to use the Konica 7020 series Printer/Copier as
printer connected to a network. To learn more about printer operations on the network, refer to the “7020
series User’s Manual” and the “KN-304 USER’S GUIDE” which are provided with the Print Engine (7020
series) on the printer side and the optional Network Interface Card (KN-304), respectively.
This manual is composed of the following five chapters and Appendix:
Chapter 1 Overview
Chapter 1 describes the Print Controller's hardware and the overview of its functions, and briefly explains
how to connect the parallel ports of computers to the Print Controller and the Printer (7020 series).
Chapter 2 Setup
Chapter 2 describes how to install the user software which is supplied in the user software CD to the
Windows-compliant computers. Installing the user software enables printing from each application of the
Windows-compliant computers to the Printer (7020 series) by way of a network/parallel port.
Chapter 3 Printer Driver
Chapter 3 describes the corresponding environment and various functions of the Printer Driver installed to
the Windows-compliant computers.
Chapter 4 Control Panel Setup
Chapter 4 describes the layout of the Control Panel of the Printer (7020 series) and explains how to operate
and set functions on the Control Panel.
Chapter 5 Status Monitor and Control Panel
Chapter 5 describes the layout of the Status Monitor and the Control Panel shown on the Windows-compliant computers and how to operate and set functions on the Status Monitor or the Control Panel.
Appendix
Appendix describes error messages, troubleshooting tips for the Print Controller and product specifications.
IP-011 Print Controller vii
Introduction
■ System Requirements
● Windows
The following are required to print from the Windows-compliant computers to the Print Controller.
• Computers on which Windows 95/98/Me, Windows NT 4.0, Windows 2000 or Windows XP can run
• CD-ROM drive (necessary to install the user software)
Using Windows 95/98/Me
• Microsoft Windows 95/98/Me
• 32 MB RAM or more
Using Windows NT 4.0
• Microsoft Windows NT 4.0 (Service Pack 3 or later)
• 32 MB RAM or more
Using Windows 2000
• Microsoft Windows 2000
• 32 MB RAM or more
Using Windows XP
• Microsoft Windows XP
• 32 MB RAM or more
● Parallel Port
The following are required to print to the Print Controller by way of the parallel port.
• Windows-compliant computers
• Minimum RAM capacity suitable for computers (Refer to the section of each operation system described
above.)
• IEEE 1284 parallel cable
One end of the cable is required to have an amphenol 36 pin male connector (connected to the Print
Controller).
viii IP-011 Print Controller
Introduction
■ Conventions Used in this Manual
• Notation of the name of each section in this manual is written within quotation marks e.g., “Chapter 1 Outline.”
• Notation of names shown on the screen are written within square brackets e.g., click the [OK] button.
• Notation of cautions in this manual are shown with the caution symbol.
Each mark used in this manual has the following meaning.
Precautions and limits at the time of operating hardware or software are written.
Hints, advice, confirming items, etc. at the time of operating hardware or software are written.
• Notation of sub-folders
Sub-folders are written in a logical string as, for example, “\route level folder\sub folder 1\sub folder 2.”
For example, instructions for double-clicking the [Setup.exe] icon in the [WIN_95] folder in the [PS_DRVR] folder in the
[INTALRS] folder of the User Software CD, are written as
Double-click the [Setup.exe] icon in the “\INTALRS\PS_DRVR\WIN_95” folder of the User Software CD.
IP-011 Print Controller ix
Chapter 1 Overview
■ Contents of This Chapter ............................................................ 1-2
■ Overview of the Print Controller .................................................. 1-3
● IP-011 and Print Engine .............................................................................. 1-3
● IP-011 Hardware Configuration ................................................................... 1-4
● I/O Interface ................................................................................................. 1-4
● Data Flow .................................................................................................... 1-5
● How to Use Memory .................................................................................... 1-6
● General View ............................................................................................... 1-7
■ About the Printer Tools ................................................................ 1-8
● About the Printer Tools ................................................................................ 1-8
● About the Status Monitor ............................................................................. 1-8
● About the Control Panel ............................................................................... 1-8
■ About the Printer Driver .............................................................. 1-9
● Compliant OS .............................................................................................. 1-9
IP-011 Print Controller 1-1
Chapter 1 Overview
■ Contents of This Chapter
This chapter describes the outline of the Konica IP-011 Print Controller, which is attached to the Konica 7020 series
engine. For copier functions, refer to the Konica 7020 series User’s Manual.
1-2 IP-011 Print Controller
Chapter 1 Overview
■ Overview of the Print Controller
● IP-011 and Print Engine
The Konica IP-011 is the Print Controller (IP-011) used to connect the Konica 7020 series Printer/Copier to
computers or to a network on which the Konica 7020 series can function as a printer from applications on
Windows 95/98/Me, Windows NT, Windows 2000 or Windows XP. The optional Konica KN-304 Network
Interface Card is required for connecting to a network.
When the command for printing is executed from applications on Windows 95/98/Me, Windows NT, Windows
2000 or Windows XP, print data is sent to the IP-011 by way of a parallel cable (IEEE 1284) or a network.
Then, the IP-011 rasterizes the print data to image data, which is sent to the Konica 7020 series Print
Engine by way of the PCI bus.
The IP-011 can receive the command for printing from applications even while the Print Engine is printing
the previous print jobs or receiving data.
The 7020 series + IP-011 system supports the duplex function and the finisher function which enables the
use of four paper trays, alternate printing and stapling.
Conceptual Connection
For use as a networked printer
*The Konica KN-304 is required.
For use as a local printer
E-RDH (Electronic Recirculating Document Handler)
The Konica 7020 series E-RDH is used to print from the IP-011. The E-RDH system temporarily stores in
memory the print data you select from available options. The E-RDH memory is 32 MB (standard) and
optional memory can be added.
In the IP-011, the E-RDH is used in the 1 bit mode. Data of approximately 180 pages of Letter/A4-size paper
can be saved in the 32 MB (standard) E-RDH memory.
Copy Mode and Printer Mode
The Control Panel of the Konica 7020 series can be used either in the copy mode or the printer mode.
Even while the Konica 7020 series is printing or copying, the IP-011 can receive the next job, and while the
IP-011 is receiving a print job, you can execute copying.
IP-011 Print Controller 1-3
Chapter 1 Overview
● IP-011 Hardware Configuration
Basic Configuration
Configuration of the IP-011 is as follows:
Control board
CPU:
Power PC 401 GF
Program memory:
FLASH ROM
System memory:
16 MB SD-RAM
Memory
The IP-011 is equipped with 16 MB memory as standard and can be expanded to 80 MB.
● I/O Interface
Parallel
Centronics (IEEE1284)/amphenol 36 pin male connector
PCI Bus
Card Edge Type/20MHz/32bit
Ethernet (option)
100BaseTX and 10BaseT
The optional KN-304 Network Interface Card is used to connect to the Ethernet. The KN-304 is the internal
network interface card which supports multiple protocols on the Ethernet. This card includes a CPU and
flash memory with an upgradable program.
The KN-304 supports the following network protocols.
• IPX/SPX (NetWare)
• LPD/LPR (TCP/IP)
• Peer-to-Peer (TCP/IP)
Refer to the corresponding operating manual for connection to the KN-304.
1-4 IP-011 Print Controller
Chapter 1 Overview
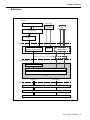
● Data Flow
Computer
Printer Tools
Application
Status Monitor
Control Panel
Browser
HTML
IEEE1284
Network
(TCP/IP, IPX/SPX)
Printer Driver
Spooler
Interface
IEEE1284
Network (TCP/IP, IPX/SPX)
NIC
Print Controller
IEEE1284
Intermediate Language Interpreter
Memory
IP-011
Command for Printing
Image Data
Engine Status
Print Engine
PCI Bus
E-RDH Memory
Engine
IP-011 Print Controller 1-5
Chapter 1 Overview
● How to Use Memory
Most of the IP-011 memory is used for rasterizing images only a small part of it is used for the system operation. The ERDH memory of the Konica 7020 series is used for print processing.
The basic memory setting of the IP-011 is 16 MB, which allows 1 bit mode (600 dpi) printing for all sizes of paper. The
memory of the IP-011 can be expanded to 80 MB maximum. For the E-RDH memory of the Konica 7020 series, optional
memory can be added.
The more memory in the IP-011, the more pages can be rasterized while waiting for the previous job to print. When a A4size paper is used, approximately 4,345 KB memory is used to print 1 bit data in 600 dpi.
Memory Upgrading
To obtain optimum printer performance, memory expansion is recommended.
Contact the nearest Konica service provider for details.
1-6 IP-011 Print Controller
Chapter 1 Overview
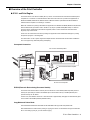
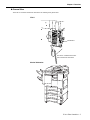
● General View
The IP-011 is mounted to the Konica 7020 series. The following is the general view.
IP-011
Parallel Port
The IP-011 is attached to the back
side of the Konica 7020 series.
Konica 7020 series
IP-011 Print Controller 1-7
Chapter 1 Overview
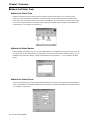
■ About the Printer Tools
● About the Printer Tools
Install the printer driver into the computer system connected to the Konica 7020 series + IP-011 system by using
"Setup.exe" on the CD-ROM. During installation of the printer driver, you may simultaneously select installation of the
Printer Tools, which is the generic name of two programs, "Status Monitor" and "Control Panel." The Printer Tools enable
you to monitor the printer status from computers and to change printer settings. Refer to “Chapter 5 Status Monitor and
Control Panel” (p. 5-1) for details of the Printer Tools.
● About the Status Monitor
During installation of the Printer Tools, you can set the Status Monitor to automatically start up when the 7020 series + IP011 system starts up. The Status Monitor is a program that monitors printer status. Refer to “Chapter 2 Setup” (p. 2-1) for
installation of the printer driver. Refer to “Chapter 5 Status Monitor and Control Panel ” (p. 5-1) for details of the Status
Monitor.
● About the Control Panel
The Control Panel enables you to view and change Printer Settings. To access the Control Panel from the Status Monitor
Screen, click [Setup] then click [Printer Settings] from the menu. Refer to “Chapter 5 Status Monitor and Control Panel” (p.
5-1) for details of Control Panel.
1-8 IP-011 Print Controller
Chapter 1 Overview
■ About the Printer Driver
● Compliant OS
The printer driver can be used on the following OS:
Windows 95
Windows 98
Windows Me
Windows NT 4.0 (Service Pack 3 or later)
Windows 2000
Windows XP
Refer to “Chapter 2 Setup” (p. 2-1) for how to install the printer driver.
Refer to “Chapter 3 Printer Driver” (p. 3-1) for detailed functions of the printer driver.
IP-011 Print Controller 1-9
Chapter 2 Setup
■ Contents of This Chapter ............................................................ 2-2
■ Installation of the Printer Driver ................................................... 2-3
● Before Installation ........................................................................................ 2-3
● Files to be Installed ...................................................................................... 2-3
● Installing to Windows 95/98/Me ................................................................... 2-4
● Installing to Windows NT 4.0 ....................................................................... 2-7
● Installing to Windows 2000 ........................................................................ 2-10
● Installing to Windows XP ........................................................................... 2-14
● Uninstalling the Printer Driver .................................................................... 2-17
■ Test Print ................................................................................... 2-18
■ Print from Applications .............................................................. 2-19
● Execution of Printing .................................................................................. 2-19
● Print Settings ............................................................................................. 2-19
IP-011 Print Controller 2-1
Chapter 2 Setup
■ Contents of This Chapter
To use the 7020 series + IP-011 system, connect the 7020 series + IP-011 system to computers by way of the parallel port
and install the printer driver on the computers. This chapter describes how to install the printer driver and shows how to
print from applications.
Refer to “Chapter 3 Printer Driver” (p. 3-1) for functions of the printer driver.
2-2 IP-011 Print Controller
Chapter 2 Setup
■ Installation of the Printer Driver
● Before Installation
Models and Environment of Computers
The Konica 7020 series Print Controller with the IP-011 can be used with most computers ranging from
personal computers to workstations.
The IP-011 includes the printer driver for Windows 95/98/Me, Windows NT, Windows 2000 and Windows XP.
The printer driver can be installed to computer model as long as Windows 95/98/Me, Windows NT, Windows
2000 or Windows XP have been installed on them.
About Windows 95/98/Me, Windows NT, Windows 2000 and Windows XP
Since the ways to manage the user interface and the printer are different on Windows 95/98/Me, Windows
NT, Windows 2000 or Windows XP, the method of installing the printer driver and the ways to print with the
printer will vary. Therefore, the Konica IP-011 includes the specific printer driver for each Windows environment.
Please keep the “User Software CD” on hand since it is required to install the printer driver.
Ways to install the printer driver in each Windows environment are explained in “Installing to Windows 95/98/
Me”, “Installing to Windows NT 4.0”, “Installing to Windows 2000” and “Installing to Windows XP”. Please
read the section that is appropriate for your Windows environment.
● Files to be Installed
When the printer driver is installed with the “User Software CD”, the following files are installed to your computer.
The files to be installed vary, depending on the ways to install. Select an appropriate way.
OS Name
Ways to Install
Files to be Installed
Installing to Windows 95/98/Me
Setup.exe
(User Software CD)
Add Printer
Plug & Play
Installing to Windows NT
Setup.exe
(User Software CD)
Add Printer
Installing to Windows 2000
Setup.exe
(User Software CD)
Add Printer
Installing to Windows XP
Setup.exe
(User Software CD)
Add a printer
Printer Driver for
95/98/Me
Printer Driver for NT
Printer Driver for 2000
Printer Driver for XP
Konica IP-011
Printer Tools
Konica IP-011 Help
Uninstaller
IP-011 Print Controller 2-3
Chapter 2 Setup
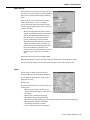
● Installing to Windows 95/98/Me
To install the Konica IP-011 Printer Driver to Windows 95/98/Me perform the following steps.
Please keep the “User Software CD” on hand since it is required to install the printer driver.
Installation with the “User Software CD”
Turn on the computer and start Windows.
Exit from all active Windows applications, if required.
Set the “User Software CD” on the CD-ROM drive.
Double-click the [My Computer] icon of the desktop to open the [My Computer] window. Then,
double-click the active CD icon (User Software CD).
Opening from the [Start] menu
Right-click the [Start] button of the task bar to click [Explorer]. Then, you can select the active CD icon
(User Software CD) from [Address].
Double-click the [95nozomi] folder to double-click [Setup.exe] in the folder.
The [Konica IP-011 Setup] screen will appear. Then, click the [Next] button.
The [Konica IP-011 Software License Agreement] screen will appear. Then, click the [Yes]
button.
To use the Konica IP-011 Printer Driver, you are required to agree to the license.
When you agree to the license, click the [Yes] button to proceed.
2-4 IP-011 Print Controller
Chapter 2 Setup
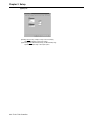
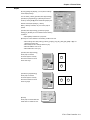
The [Type of Connection] screen will appear. Then, select [Local] and click the [Next] button.
When the Konica 7020 series Printer/Copier (IP-011) is directly connected to a computer to which the
printer driver will be installed, select [Local].
When selecting [Network]
When personal computers or workstations are connected to the network and you want to print via the
network, connect to the optional Network Interface Card (KN-304) and select [Network].
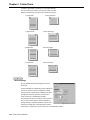
The screen to select a port will appear. Then, select the port to which the Konica 7020 series
Printer/Copier is connected and click the [Next] button.
The [Printer Name] screen will appear. Then, specify the printer name and click the [Next]
button.
Default: [Konica IP-011]
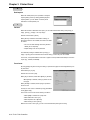
The [Select Destination Path] screen will appear. Enter the location where you would like to
install the component and click the [Next] button.
Default: [C:\Program Files\Konica IP-011]
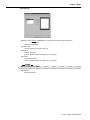
The [Select Components] screen will appear. Select the components you would like to install
and click the [Next] button.
Choice is made initially to install only the printer driver. To install Printer Tools together, put the check
mark of Printer Tools additionally.
When you print via the network, Printer Tools can not be operated. Remove the check mark of the Printer
Tools.
If you have selected to install Printer Tools, The [Status Monitor Option] screen will appear.
Click either [Yes] or [No] button.
When the [Yes] button is clicked, the Status Monitor of the printer will automatically start when starting
PC. When the [No] button is clicked, it will not automatically start.
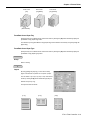
The [Confirm Setup] screen will appear. Confirm the installed components and click the [Next]
button.
The [Setup Complete] screen will appear. Select the way to complete the setup and click the
[Finish] button.
The printer driver of the Konica IP-011 becomes available without restarting your computer.
The Konica IP-011 Printer Tools become available after restarting your computer.
IP-011 Print Controller 2-5
Chapter 2 Setup
Installation by using [Add Printer]
In this method, only the printer driver is installed.
Turn on the computer and start Windows.
Exit from all active Windows applications, if required.
Click the [Start] button of the task bar. Then, select [Settings] of the [Start] menu to click
[Printers] from the sub-menu.
The [Printers] window will open.
Opening from [My Computer]
To open the [Printers] window, double-click the [Printers] folder after double-clicking the [My Computer]
icon on the desktop.
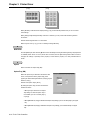
Double-click the [Add Printer] icon of the [Printers] window.
The [Add Printer Wizard] will appear. Then, follow the [Add Printer Wizard] to install the printer driver.
Installation by Using the Plug & Play
In this method, only the printer driver is installed.
Connect the IP-011 to a computer with the computer turned off.
Turn on the computer and start Windows
Devices compliant with the Plug & Play are automatically detected, and [Add New Hardware Wizard] will
appear.
.
Click the [Next] button.
The wizard to select the method of searching for the printer driver will appear.
Select [Search for the best driver for your device] and click the [Next] button.
The wizard to select the location to search for the printer driver will appear.
Set the “User Software CD” on the CD-ROM drive. Then, select [Specify a location] and click the
[Browse] button.
Click “\Installer\95nozomi\English” folder of the “User Software CD” and click the [OK] button.
Click the [Next] button.
Click the [Next] button.
Specify your printer's name and click the [Next] button.
Default: [Konica IP-011]
The print test confirmation screen will appear. Select whether you will perform the print test or
not and click the [Finish] button.
Select [Yes (recommended)] to perform the print test, while select [No] not to perform it.
Click the [Finish] button.
Necessary files will be copied from the “User Software CD” to finish the installation.
2-6 IP-011 Print Controller
Chapter 2 Setup
● Installing to Windows NT 4.0
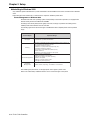
Only authorized system administrators or printer administrators should install the Konica IP-011 Printer Driver to Windows
NT 4.0.
Please keep the “User Software CD” on hand since it is required to install the printer driver.
Printer Management on Windows NT
Since Windows NT is an operating system made specially for the network operation, it is equipped with
heavier security functions than Windows 95/98/Me.
According to the security level (access rights) of the user, the range of operations and settings of the
installed printer driver allowed to the user is limited.
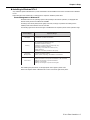
The following figure shows the access rights of the Windows NT compliant printers and its operation range.
Access Rights
No Rights
Printing
Document
Management
Full Control
Operation Range
No operations of printers are allowed.
Execution of document printing and the following print conditions of
each document are allowed to be set.
• Operations related to printing
(selection of a paper size and paper tray, etc.)
• Operations related to graphics
(processing of resolution and halftone, etc.)
• Printer functions
(selection of functions peculiar to the copier)
• Control of document setting
• Pause, restart, reprinting, and deletion of documents
•
•
•
•
•
All of "Printing" and "Document Management"
Pause and restart of the printer and deletion of all documents
Settings and changes of printer information
Deletion of the printer
Settings and changes of printer access rights
After installing the printer driver, set the appropriate access rights to printer users.
Refer to the “System Guide” of Windows NT for how to set access rights of the printer.
IP-011 Print Controller 2-7
Chapter 2 Setup
Installation by Using the “User Software CD”
Turn on the computer to start Windows NT 4.0.
Exit from all active Windows applications, if required.
Log on as an administrator (or a user entitled to install the Power User, etc.).
Set the “User Software CD” on the CD-ROM drive.
Double-click the [My Computer] icon of the desktop to open the [My Computer] window, and
double-click the active CD icon (User Software CD).
Opening from the [Start] menu.
Right-click the [Start] button of the task bar to click [Explorer]. Then, you can select the CD icon (User
Software CD) from [All Folders].
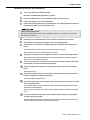
Double-click the “\Installer\NTnozomi” folder to double-click [Setup.exe] in the folder.
The [Konica IP-011 Setup] screen will appear. Then, click the [Next] button.
The [Konica IP-011 Software License Agreement] screen will appear. Then, click the [Yes]
button.
To use the Konica IP-011 Printer Driver, you are required to agree to the license.
When you agree to the license, click the [Yes] button to proceed.
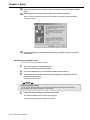
The [Type of Connection] screen will appear. Then, select [Local] and click the [Next] button.
When the Konica 7020 series Printer/Copier (IP-011) is directly connected to a computer to which the
printer driver is to be installed, select [Local].
When selecting [Network]
When installing Konica IP-011 printer driver to Windows NT 4.0 that does not conduct print service,
select [Network]. When the optional Network Interface Card (KN-304) is used, refer to the KN-304
USER’S GUIDE to select the appropriate port.
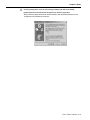
The [Select the Local Port] screen will appear. Then, select the port to which the Konica 7020
series Printer/Copier is connected and click the [Next] button.
2-8 IP-011 Print Controller
Chapter 2 Setup
The [Printer Name] screen will appear. Then, specify the printer name and click the [Next]
button.
Default: [Konica IP-011]
The [Select Destination Path] screen will appear. Select the location where you would like to
install the component and click the [Next] button.
Default: [C:\Program Files\Konica IP-011]
The [Select Components] screen will appear. Select the components you would like to install
and click the [Next] button.
Choice is made initially to install only the printer driver. To install Printer Tools together, put the check
mark of Printer Tools additionally.
When you print via the network, Printer Tools can not be operated. Remove the check mark of the Printer
Tools.
If you have selected to install Printer Tools, The [Status Monitor Option] screen will appear.
Click either [Yes] or [No] button.
When the [Yes] button is clicked, the Status Monitor of the printer will automatically start when starting
PC. When the [No] button is clicked, it will not automatically start.
The [Confirm Setup] screen will appear. Confirm the installed components and click the [Next]
button.
The [Setup complete] screen will appear. Select the way to complete the setup and click the
[Finish] button.
Installation by Using [Add Printer]
In this method, only the printer driver is installed.
Turn on the computer and start Windows NT 4.0.
Exit from all active Windows applications, if required.
Log on as an administrator (or a user entitled to install the Power User, etc.).
Click the [Start] button of the task bar. Then, select [Settings] of the [Start] menu and click
[Printers] from the sub-menu.
The [Printers] window will open.
Opening from [My Computer]
You can open the [Printers] window by double-clicking the [Printers] folder after double-clicking the [My
Computer] icon of the desktop.
Double-click the [Add Printer] icon of the [Printers] window.
The [Add Printer Wizard] to install the printer driver will appear.
Then, follow [Add Printer Wizard] to install the printer driver.
IP-011 Print Controller 2-9
Chapter 2 Setup
● Installing to Windows 2000
Only authorized system administrators or printer administrators should install the Konica IP-011 Printer Driver to Windows
2000.
Please keep the “User Software CD” on hand since it is required to install the printer driver.
Printer Management on Windows 2000
Since Windows 2000 is an operating system made specially for the network operation, it is equipped with
heavier security functions than Windows 95/98/Me.
According to the security level (access rights) of the user, the range of operations and settings of the
installed printer driver allowed to the user is limited.
The following figure shows the access rights of the Windows 2000 compliant printers and its operation
range.
Access Rights
No Rights
Printing
Printer Management
Document
Management
Operation Range
No operations of printers are allowed.
Execution of document printing and the following print conditions of
each document are allowed to be set.
• Operations related to printing
(selection of a paper size and paper tray, etc.)
• Operations related to graphics
(processing of resolution and halftone, etc.)
• Printer functions
(selection of functions peculiar to the copier)
•
•
•
•
•
•
All of "Printing" management
Pause and restart of the printer
Changes of settings of printer spooling
Share of the printer
Settings of printer access rights
Changes of printer property
• Control of document setting
• Pause, restart, reprinting, and deletion of documents
After installing the printer driver, set the appropriate access rights to printer users.
Refer to the “Online Help” of Windows 2000 for how to set access rights of the printer.
2-10 IP-011 Print Controller
Chapter 2 Setup
Installation by Using the “User Software CD”
Turn on the computer to start Windows 2000.
Exit from all active Windows applications, if required.
Log on as an administrator (or a user entitled to install the Power User, etc.).
Set the “User Software CD” on the CD-ROM drive.
Double-click the [My Computer] icon on the desktop to open the [My Computer] window, and
double-click the active CD icon (User Software CD).
Opening from the [Start] menu.
Right-click the [Start] button of the task bar to click [Explorer]. Then, you can select the CD icon (User
Software CD) from [Folders].
Double-click the “\Installer\2knozomi” folder to double-click [Setup.exe] in the folder.
The [Konica IP-011 Setup] screen will appear. Then, click the [Next] button.
The [Konica IP-011 Software License Agreement] screen will appear. Then, click the [Yes]
button.
To use the Konica IP-011 Printer Driver, you are required to agree to the license.
When you agree to the license, click the [Yes] button to proceed.
The [Type of Connection] screen will appear. Then, select [Local] and click the [Next] button.
When the Konica 7020 series Printer/Copier (IP-011) is directly connected to a computer to which the
printer driver is to be installed, select [Local].
The screen to select a port will appear. Then, select the port to which the Konica 7020 series
Printer/Copier is connected and click the [Next] button.
The [Printer Name] screen will appear. Then, specify the printer name and click the [Next]
button.
Default: [Konica IP-011]
The [Select Destination Path] screen will appear. Select the location where you would like to
install the component and click the [Next] button.
Default: [C:\Program Files\Konica IP-011]
The [Select Components] screen will appear. Select the components you would like to install
and click the [Next] button.
Choice is made initially to install only the printer driver. To install Printer Tools together, put the check
mark of Printer Tools additionally.
When you print via the network, Printer Tools can not be operated. Remove the check mark of the Printer
Tools.
If you have selected to install Printer Tools, The [Status Monitor Option] screen will appear.
Click either [Yes] or [No] button.
When the [Yes] button is clicked, the Status Monitor of the printer will automatically start when starting
PC. When the [No] button is clicked, it will not automatically start.
IP-011 Print Controller 2-11
Chapter 2 Setup
The [Confirm Setup] screen will appear. Confirm the installed components and click the [Next]
button.
[Digital Signature Not Found] window will appear. Then, Click the [Yes] button.
When you click the [Yes] button, the printer driver is installed. If you click the [No] button, the installation will not be done.
The [Setup Complete] screen will appear. Select the way to complete the setup and click the
[Finish] button.
Installation by Using [Add Printer]
In this method, only the printer driver is installed.
Turn on the computer and start Windows 2000.
Exit from all active Windows applications, if required.
Log on as an administrator (or a user entitled to install the Power User, etc.).
Click the [Start] button of the task bar. Then, select [Settings] of the [Start] menu and click
[Printers] from the sub-menu.
The [Printers] window will open.
Opening from [My Computer]
You can open the [Printers] window by double-clicking the [Printers] folder after double-clicking the
[Control Panel] folder in [My Computer] icon of the desktop.
Double-click the [Add Printer] icon of the [Printers] window.
The [Add Printer Wizard] to install the printer driver will appear.
Then, follow [Add Printer Wizard] to install the printer driver.
2-12 IP-011 Print Controller
Chapter 2 Setup
Click the [Finish] button on the window showing [Completing the Add Printer Wizard].
[Digital Signature Not Found] window will appear. Then, Click the [Yes] button.
When you click the [Yes] button, the printer driver is installed to open the [Printers] window. If you click
the [No] button, the installation will not be done.
IP-011 Print Controller 2-13
Chapter 2 Setup
● Installing to Windows XP
Only authorized system administrators or printer administrators should install the Konica IP-011 Printer Driver to Windows
XP.
Please keep the “User Software CD” on hand since it is required to install the printer driver.
Printer Management on Windows XP
Since Windows XP is an operating system made specially for the network operation, it is equipped with
heavier security functions than Windows 95/98/Me.
According to the security level (access rights) of the user, the range of operations and settings of the
installed printer driver allowed to the user is limited.
The following figure shows the access rights of the Windows XP compliant printers and its operation range.
Access Rights
No Rights
Printing
Printer Management
Document
Management
Operation Range
No operations of printers are allowed.
Execution of document printing and the following print conditions of
each document are allowed to be set.
• Operations related to printing
(selection of a paper size and paper tray, etc.)
• Operations related to graphics
(processing of resolution and halftone, etc.)
• Printer functions
(selection of functions peculiar to the copier)
•
•
•
•
•
•
All of "Printing" management
Pause and restart of the printer
Changes of settings of printer spooling
Share of the printer
Settings of printer access rights
Changes of printer property
• Control of document setting
• Pause, restart, reprinting, and deletion of documents
After installing the printer driver, set the appropriate access rights to printer users.
Refer to the “Online Help” of Windows XP for how to set access rights of the printer.
2-14 IP-011 Print Controller
Chapter 2 Setup
Installation by Using the “User Software CD”
Turn on the computer to start Windows XP.
Exit from all active Windows applications, if required.
Log on as an administrator (or a user entitled to install the Power User, etc.).
Set the “User Software CD” on the CD-ROM drive.
Click the [Start] button of the task bar. Then, click the [My Computer] of the [Start] menu to open
the [My Computer] window, and double-click the active CD icon (User Software CD).
Opening from the [Start] menu.
Right-click the [Start] button of the task bar to click [Explorer]. Then, you can select the CD icon (User
Software CD) from [Folders].
Double-click the “\Installer\xpnozomi” folder to double-click [Setup.exe] in the folder.
The [Konica IP-011 Setup] screen will appear. Then, click the [Next] button.
The [Konica IP-011 Software License Agreement] screen will appear. Then, click the [Yes]
button.
To use the Konica IP-011 Printer Driver, you are required to agree to the license.
When you agree to the license, click the [Yes] button to proceed.
The [Type of Connection] screen will appear. Then, select [Local] and click the [Next] button.
When the Konica 7020 series Printer/Copier (IP-011) is directly connected to a computer to which the
printer driver is to be installed, select [Local].
The [Select the Local Port] screen will appear. Then, select the port to which the Konica 7020
series Printer/Copier is connected and click the [Next] button.
The [Printer Name] screen will appear. Then, specify the printer name and click the [Next]
button.
Default: [Konica IP-011]
The [Select Destination Path] screen will appear. Select the location where you would like to
install the component and click the [Next] button.
Default: [C:\Program Files\Konica IP-011]
The [Select Components] screen will appear. Select the components you would like to install
and click the [Next] button.
Choice is made initially to install only the printer driver. To install Printer Tools together, put the check
mark of Printer Tools additionally.
When you print via the network, Printer Tools can not be operated. Remove the check mark of the Printer
Tools.
If you have selected to install Printer Tools, The [Status Monitor Option] screen will appear.
Click either [Yes] or [No] button.
When the [Yes] button is clicked, the Status Monitor of the printer will automatically start when starting
PC. When the [No] button is clicked, it will not automatically start.
IP-011 Print Controller 2-15
Chapter 2 Setup
The [Confirm Setup] screen will appear. Confirm the installed components and click the [Next]
button.
When [Software Installation] window appears, click the [Continue Anyway] button.
When you click the [Continue Anyway] button, the printer driver is installed. If you click the [STOP
Installation] button, the installation will not be done.
The [Setup Complete] screen will appear. Select the way to complete the setup and click the
[Finish] button.
Installation by Using [Add a printer]
In this method, only the printer driver is installed.
Turn on the computer and start Windows XP.
Exit from all active Windows applications, if required.
Log on as an administrator (or a user entitled to install the Power User, etc.).
Click the [Start] button of the task bar. Then, click [Printers and Faxes] of the [Start] menu.
The [Printers and Faxes] window will open.
Double-click the [Add a printer] icon of the [Printers and Faxes] window.
The [Add Printer Wizard] to install the printer driver will appear.
Then, follow [Add Printer Wizard] to install the printer driver.
Click the [Finish] button on the window showing [Completing the Add Printer Wizard].
[Hardware Installation] window will appear. Then, Click the [Continue Anyway] button.
When you click the [Continue Anyway] button, the printer driver is installed to open the [Printers and
Faxes] window. If you click the [STOP Installation] button, the installation will not be done.
2-16 IP-011 Print Controller
Chapter 2 Setup
● Uninstalling the Printer Driver
Exit from all active Windows applications.
Click the [Start] button of the task bar to select [Programs] of the [Start] menu and then,
selecting [Konica IP-011] to click [Uninstaller].
For Windows XP, click the [Start] button of the task bar to select [All Programs] of the [Start] menu and
then, selecting [Konica IP-011] to click [Uninstaller].
Click the [OK] button.
The screen to confirm uninstallation will appear.
When the [OK] button is displayed, click the [OK] button.
The printer driver will be uninstalled.
When uninstalling the printer driver from Windows 2000/XP, a part of printer driver information remains.
To learn on complete uninstallation of the printer driver, refer to the operation manual for Windows 2000/
XP.
IP-011 Print Controller 2-17
Chapter 2 Setup
■ Test Print
You can check whether the printer driver functions properly by performing a test print after the printer driver has been
installed.
Click the [Start] button of the task bar. Then, select [Settings] of the [Start] menu and click
[Printers] in the sub menu.
The [Printers] window will open.
Using Windows XP
Click the [Start] button of the task bar. Then, select [Printers and Faxes] to open the [Printers and Faxes]
window.
Opening from [My Computer]
Using Windows 95/98/Me/NT4.0
To open the [Printers] window, double-click the [Printers] folder after double-clicking the [My Computer]
icon on the desktop.
Using Windows 2000
To open the [Printers] window, double-click the [Printers] folder after double-clicking the [Control Panel]
folder in [My Computer] icon on the desktop.
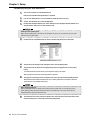
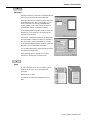
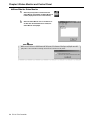
Right-click [Konica IP-011] and click [Properties].
[Konica IP-011 Properties] will appear.
Select [General] of [Konica IP-011 Properties] and click the [Print Test Page] button.
A test print will start and a screen to confirm print end will appear.
Click the [Yes] button (from Windows 95/98/Me/NT) or the [OK] button (from Windows 2000/XP).
A test print will end.
2-18 IP-011 Print Controller
Chapter 2 Setup
■ Print from Applications
● Execution of Printing
Click the [File] menu of each application and click [Print].
Check that [Konica IP-011] is shown on [Printer Name] and click [OK].
When [Konica IP-011] is not shown, select it from the list box.
Setting the [Print] dialog box
Refer to the user’s manual of each application.
Print settings of the printer driver
Refer to “Print Settings” (p.2-19) for print settings of the printer driver.
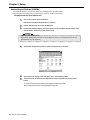
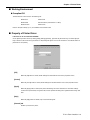
● Print Settings
Perform various settings at the time of printing on the printer driver setup screen.
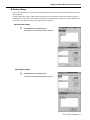
Click the [File] menu of each application and click [Print].
Check that [Konica IP-011] is shown on [Printer Name] and click [Properties].
When [Konica IP-011] is not shown, select it from the list box.
[Konica IP-011 Properties] will appear.
IP-011 Print Controller 2-19
Chapter 2 Setup
Contents of Settings
Details of each setting are described as follows:
Items and their setting ranges shown on the screen and their descriptions are explained in detail. The
underlined setting ranges indicate the default settings.
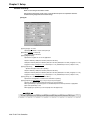
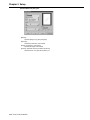
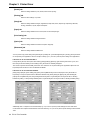
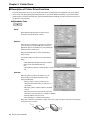
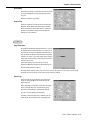
[Setup] tab
[Copies] (Pages): 1 to 999
Specifies the number of copies of the print job.
[Orientation]: Portrait or Landscape
Specifies the print orientation.
[Paper]-[Original Paper]:
Specifies the original size set on the application.
A3(297 x 420 mm), A4R(210 x 297 mm), A4(210 x 297 mm),
A5R(148 x 210 mm), B4(257 x 364 mm), B5(182 x 257 mm), B5R(182 x 257 mm), Ledger(11 x 17 in),
Legal(8.5 x 14 in), Letter(8.5 x 11 in), Letter R(8.5 x 11 in), Statement(5.5 x 8.5 in), F4(8.5 x 13 in)
[Paper]-[Paper Size]:
Specifies the paper size used for printing.
A3(297 x 420 mm), A4R(210 x 297 mm), A4(210 x 297 mm),
A5R(148 x 210 mm), B4(257 x 364 mm), B5(182 x 257 mm), B5R(182 x 257 mm), Ledger(11 x 17 in),
Legal(8.5 x 14 in), Letter(8.5 x 11 in), Letter R(8.5 x 11 in), Statement(5.5 x 8.5 in), F4(8.5 x 13 in)
[Paper]-[Zoom]: 25 % to 400 % (default value: 100 %)
Specifies the enlargement or reduction rate at the time of printing.
[Paper]-[Paper Tray]: Auto Select, Tray 1, Tray 2, Tray 3, Tray 4 or Bypass
Specifies the paper tray which holds the paper to be used for printing.
When [Auto Select] is specified, papers are automatically fed from the tray that has a appropriate
paper size specified by a user.
When [Bypass] is specified, you can feed paper from the bypass tray.
In order to specify [Tray 3] or [Tray 4], the DB (optional Paper Tray) must be attached to the copier.
2-20 IP-011 Print Controller
Chapter 2 Setup
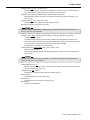
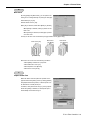
[Image]-[Layout]: 1-up, 2-up, 4-up, 8-up or 9-up
Specifies how many pages of documents are gathered on one piece of paper. The default value, [1up], indicates that an one-page document is printed on one piece of paper.
[Image]-[Print Page Borders]: Default value (not printing: without a check mark)
Specifies whether borders are printed or not between documents when they are gathered on one
piece of paper.
[Image]-[Staple]: Off, 1-left, 1-right, 2-left, or 2-top
Specifies the number of staples to be used and their positions.
When [Off] is selected, documents are not stapled.
The staple function is available when [2 Trays], [3 Trays] or [4 Trays] are not selected in the Finisher
setting, or when they are not installed.
[Image]-[Duplex]: 1 Sided, 2 Sided (long edge binding), 2 Sided (short edge binding) or Booklet
[1 Sided] prints only one side.
[2 Sided (long edge binding)] prints both sides so that the document appears correctly when the
document is bound at the long edge while [2 Sided (short edge binding)] prints both sides so that the
document appears correctly when the document is bound at the short edge.
[Booklet] prints in consideration of making booklets.
[Output]-[Output Tray]: Printer’s default, Tray 1, Tray 2, Tray 3 or Tray 4
Specifies the way to output.
When [Printer’s default] is selected, the output tray specified on [Paper] of the Control Panel will be
used for output.
To specify [Tray 2], [Tray 3] and [Tray 4], a finisher or Inner Tray must be attached to the Printer/Copier
and the [Finisher] option must be selected.
[Output]-[Alternate]: On or Off
Effective only when [2 Trays], [3 Trays] or [4 Trays] are not installed in the finisher. The output direction
of paper is changed every set of copy.
[Output]-[Sorting]: Sort or Group
Specifies how to output the multiple pages and multiple copy jobs.
[Engine Display]:
Shows the external view of the copier system.
[About] button:
Shows information on the version of the printer driver.
[Default] button:
Returns to the default value.
IP-011 Print Controller 2-21
Chapter 2 Setup
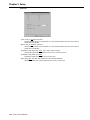
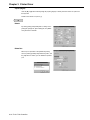
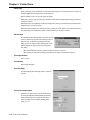
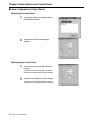
[Paper] tab
[Front Cover]: On, Off, Blank or Printed
Specifies whether a front cover is attached or not. Also specifies whether the front cover is blank or
printed when it is attached.
[Back Cover]: On, Off, Blank or Printed
Specifies whether a back cover is attached or not. Also specifies whether the back cover is blank or
printed when it is attached.
[Front/Back Cover]-[Paper Tray]: Tray 1, Tray 2, Tray 3, Tray 4 or Bypass
Specifies the output tray where paper for a front cover or a back cover is set.
[Front/Back Cover]-[Paper Type]: Plain
Specifies the paper type of a front cover or a back cover.
[Paper Type]: Plain, OHT Film, OHT Interleaved or OHT Printed-Interleaved
Specifies the paper type of other paper than a front cover or a back cover.
2-22 IP-011 Print Controller
Chapter 2 Setup
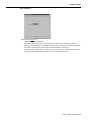
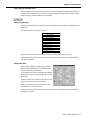
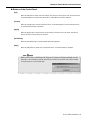
[Print Quality] tab
[Page Protection]: Auto or On
Specifies how to protect page data.
The page protection is a function to secure memories required to print complicated characters or
image documents in advance, and completely create one-page print data before actual printing starts.
This function secures printing of each page and avoids the memory overrun error.
Normally, set this setting to [Auto]. If any errors occur, try to set it to [On]. Setting it to [On] decreases
the printing speed and requires more memories, but may reduce printing errors.
IP-011 Print Controller 2-23
Chapter 2 Setup
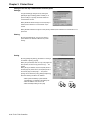
[Option] tab
[Finisher]: None, 2 Trays, 3 Trays, 4 Trays or IT-101(2 Trays)
Specifies the Finisher of the copier option.
[Option Tray]: None, DB-209/210(2 Trays) or DB-409/410(1 Tray)
Specifies the Option Tray of the copier option.
2-24 IP-011 Print Controller
Chapter 2 Setup
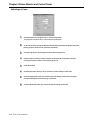
[Watermark] tab
[Watermark String]: (None), CONFIDENTIAL, COPY, DRAFT, FILE COPY, FINAL, PROOF or
TOP SECRET
Specifies the watermark.
[First Page Only]:
Prints the watermark on the first page only.
[Edit] button:
Edits the watermark.
(Refer to “[Edit/Add Watermark] dialog box” on 2-26 page.)
[Add] button:
Adds new watermarks.
(Refer to “[Edit/Add Watermark] dialog box” on 2-26 page.)
You can add up to 50 watermarks.
[Delete] button:
Deletes watermarks.
IP-011 Print Controller 2-25
Chapter 2 Setup
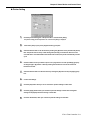
[Edit/Add Watermark] dialog box
[Edit text]:
Specifies [Text], [Font], [Size] and [Style].
[Darkness]:
Specifies the darkness of the edit text.
[Angle]: -90 degrees to +90 degrees
Specifies the angle of the edit text.
[Position]: Automatic centering or Manual positioning
Specifies where on a page the edit text is put.
2-26 IP-011 Print Controller
Chapter 3 Printer Driver
■ Contents of This Chapter ............................................................ 3-2
■ Working Environment .................................................................. 3-3
● Compliant OS .............................................................................................. 3-3
■ Property of Printer Driver ............................................................ 3-3
■ Printer Driver Function List ......................................................... 3-5
■ Description of Printer Driver Functions ....................................... 3-8
● Alphabetic Order .......................................................................................... 3-8
IP-011 Print Controller 3-1
Chapter 3 Printer Driver
■ Contents of This Chapter
This chapter fully describes the functions of the Printer Driver installed in computers connected to the Konica 7020 series +
IP-011 system. The Printer Driver functions are presented in two parts, first listed, then described individually.
Refer to “Chapter 2 Setup” (p. 2-1) for installation of the Printer Driver.
3-2 IP-011 Print Controller
Chapter 3 Printer Driver
■ Working Environment
● Compliant OS
The Printer Driver can be used on the following OS:
Windows 95
Windows 98
Windows Me
Windows NT4.0 (Service Pack 3 or later)
Windows 2000
Windows XP
Refer to “Chapter 2 Setup” (p. 2-1) for installation of the Printer Driver.
■ Property of Printer Driver
If the driver in use is for Windows 95/98/Me:
On the [Printers] window shown by clicking [Start]-[Settings]-[Printers], right-click the [Konica IP-011] icon. When [Properties] is clicked on the shown menu, [Konica IP-011 Properties] will appear. You can set all functions of the Printer Driver on
[Konica IP-011 Properties].
[OK]
When the [OK] button is clicked, all tab settings are saved with the close of the properties screen.
[Cancel]
When the [Cancel] button is clicked, all tab settings are canceled with the close of the properties screen.
[Apply]
When the [Apply] button is clicked, the present tab settings are saved. This button is used when settings
continue to be performed by using other tabs, and the present tab settings are registered before using other
tabs.
[Help]
When the [Help] button is clicked, Help of each tab will appear.
[General] tab
Enables a print test of a printer.
IP-011 Print Controller 3-3
Chapter 3 Printer Driver
[Details] tab
Performs settings related to ports, drivers, timeout and spooling.
[Sharing] tab
Performs share settings of a printer.
[Setup] tab
Performs settings related to Pages, Original Size, Paper Size, Zoom, Paper Tray, Output Tray, Alternate,
Sorting, Orientation, Layout, Staple and Duplex.
[Paper] tab
Performs settings related to Front Cover, Back Cover and Paper Type.
[Print Quality] tab
Performs settings related to Page Protection.
[Option] tab
Performs settings related to Finisher and Option Tray (DB).
[Watermark] tab
Performs settings related to Watermark.
You can perform any printer settings but [General] tab / [Details] tab / [Color Management] tab / [Sharing] tab of [Konica IP011 Properties] from applications. Refer to “Chapter 2 Setup” (p. 2-1) for how to perform printer settings from applications.
If the driver in use is for Windows NT4.0:
In the [Printers] window, which opens when clicking [Start]-[Settings]-[Printers], right-click the [Konica IP-011] icon, and
then click [Document Defaults] on the resulting menu. [Konica IP-011 Default] will appear.
The content of [Konica IP-011Default] is the same as is offered for use in printer setting from applications (Konica IP-011
Properties) when the driver in use is for Windows 95/98/Me.
If the driver in use is for Windows 2000/XP:
[Setup] tab, [Paper] tab, [Print Quality] tab, [Option] tab and [Watermark] tab are not displayed on the [Konica IP-011
Properties]. To set up the printer driver for Windows 2000/XP using these [Setup] tab, [Paper] tab, [Print Quality] tab,
[Option] tab and [Watermark] tab, click [Printing Preferences] button on [General] tab to show [Konica IP-011 Printing
Preferences] dialog, or click [Printing Defaults] button on [Advanced] tab to show [Konica IP-011 Printing Defaults] dialog.
Additionally, refer to “Chapter 4 Control Panel Setup” (p. 4-1) for how to perform printer settings from the 7020 series
Control Panel and “Chapter 5 Status Monitor and Control Panel” (p. 5-1) for how to perform printer settings from the Printer
Tools.
3-4 IP-011 Print Controller
Chapter 3 Printer Driver
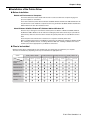
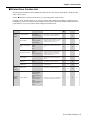
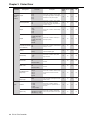
■ Printer Driver Function List
The following list summarizes functions (Setting items) which can be set by using the Printer Driver of the Konica 7020
series + IP-011 system.
Refer to “■ Description of Printer Driver Functions” (p. 3-8) for setting items of each function.
In addition, refer to “Chapter 2 Setup” (p. 2-1) for how to perform printer settings from applications, “Chapter 4 Control
Panel Setup” (p. 4-1) for how to perform printer settings from the LCD Touch Screen and “Chapter 5 Status Monitor and
Control Panel” (p. 5-1) for how to perform printer settings from the Printer Tools.
Classification
Port related
Matters
Settting Items
Set Value
XP
Not selected
Transmission retry
This function is used to set timeout of
the parallel port and resending time.
O
O
O
O
Port Settings
Spool MS-DOS print
jobs,
Check port state
before printing
This function is used to set whether the
MS-DOS print job is spooled or not and
whether the status of the LPTx: port is
checked before printing or not.
O
-
-
-
Print to the following
port
COM1
COM2
FILE
LPT1
This function is used to set the printing
port.
O
O
O
O
Capture Printer Port
Device
Path
Reconnect at log-on
This function is used to set the device
name and path of the printer at the time
of printing by way of a network and
whether reconnection is performed or
not at the time of log-on.
O
-
-
-
This function is used to unallocate the
network paths of unnecessary network
printers.
O
-
-
-
This function is used to add a port.
O
O
O
O
Add Port
Spoolingrelated
Matters
95/98
NT 4.0 2000
/Me
Timeout settings
End Capture
Driverrelated
Matters
Description
Network
Other
Delete Port
-
This function is used to delete an
unnecessary port.
O
O
O
O
New Driver
-
This function is used to add a driver.
O
O
O
O
This function is used to set spooling and
bi-directional communication functions.
O
O
O
O
Spool Settings
Spool print jobs so
program finishes
printing faster.
Print directly to the
printer.
Enable bi-directional
support for this
printer.
Disable bi-directional
support for this
printer.
IP-011 Print Controller 3-5
Chapter 3 Printer Driver
Classification
Setting Items
Set Value
95/98
NT 4.0 2000
/Me
XP
1-up
2-up
4-up
8-up
9-up
This function is used to print two pages,
four pages, eight pages or nine pages of
documents on one piece of paper.
O
O
O
O
Print Page Borders
On
Off
This function is used to specify whether
borders are printed or not between
documents when they are gathered on
one piece of paper.
O
O
O
O
Staple
Off
1-left
1-right
2-left
2-top
This function is used to select the staple
position.
O
O
O
O
Duplex
1 Sided
2 Sided (long edge
binding)
2 Sided (short edge
binding)
Booklet
This function is used to set the way of
the Duplex printing.
O
O
O
O
This function is used to set the Alternate
printing to on or off.
O
O
O
O
Konica
7020 series
Layout
special
functions
Alternate (available
On
only when the finisher
Off
is not attached)
Option
Description
Sorting
Sort
Group
This function is used to specify how to
output the multiple pages
O
O
O
O
Print Quality
Page Protection
Auto
On
This function is used to specify about
Page Protection.
O
O
O
O
Front Cover
On
Off
Printed or Blank
This function is used when front covers
are used.
O
O
O
O
Back Cover
On
Off
Printed or Blank
This function is used when back covers
are used.
O
O
O
O
Front/Back Cover
Paper Tray
Tray 1
Tray 2
Tray 3
Tray 4
Bypass
This function is used to select an output
tray used for front covers and back
covers.
O
O
O
O
Front/Back Cover
Paper Type
Plain
This function is used to specify the
paper type used for printing front covers
or back covers.
O
O
O
O
Finisher
None
2 Trays
3 Trays
4 Trays
IT-101(2 Trays)
This function is used to select the
Finisher which is an optional device of
the copier.
O
O
O
O
Option Tray
None
This function is used to select the DB
DB-209/210 (2 Trays) which is an optional device of th copier.
DB-409/410 (1 Tray)
O
O
O
O
3-6 IP-011 Print Controller
Chapter 3 Printer Driver
Specification
Paperrelated
Matters
Setting Items
Set Value
Description
This function is used to specify the
number of copies to be printed.
Copies (Pages)
1 to 999
Original Paper
A3, A4, A4R, A5R,
The original paper you can set differs
B4, B5, B5R, F4,
depending on specifications in the
Ledger, Legal, Letter , country and trays.
LetterR, Statement
Paper Size
The same as Original depending on specifications in the
country and trays. Refer to operating
Paper
95/98
NT 4.0 2000
/Me
XP
O
O
O
O
O
O
O
O
O
O
O
O
The paper sizes you can set differ
manual of the copier for details.
Watermark
Others
Zoom
25% to 400%
This function is used to specify the
enlargement or reduction rate of image
in percentage.
O
O
O
O
Paper Tray
Auto Select
Tray 1 to 4
Bypass
This function is used to specify the
paper tray.
O
O
O
O
Output Tray
Printer's default,
Tray 1 to 4
This function is used to specify the
output tray.
O
O
O
O
Orientation
Portrait
Landscape
This function is used to specify the
orientation.
O
O
O
O
Paper Type
Plain
OHT Film
OHT Interleaved
OHT PrintedInterleaved
This function is used to specify the
paper type to be printed.
O
O
O
O
Watermark
(None)
CONFIDENTIAL
COPY
DRAFT
FILE COPY
FINAL
PROOF
TOP SECRET
This function is used to specify a
watermark.
O
O
O
O
First Page Only
-
This function is used to print a
watermark on the first page only.
O
O
O
O
Edit
-
This function is used to edit a
watermark.
O
O
O
O
Add
-
This function is used to add a
watermark.
O
O
O
O
Delete
-
This function is used to delete a
watermark.
O
O
O
O
About
-
This function is used to show version
information of the Printer Driver.
O
O
O
O
Default
-
This function is used to return the
settings to default settings.
O
O
O
O
Print Test Page
-
This function is used to perform a test
print.
O
O
O
O
IP-011 Print Controller 3-7
Chapter 3 Printer Driver
■ Description of Printer Driver Functions
Functions (setting items) which can be set with the Printer Driver are summarized in the alphabetic order. These settings
can be set by using [Start]-[Settings]-[Printers]-[Konica IP-011] properties (Windows 95/98/Me), or [Document Defaults]
(Windows NT4.0) and [Printing Preferences] / [Printing Defaults] (Windows 2000/XP). The tabs in this section are those in
the [Konica IP-011] properties.
● Alphabetic Order
A
About
When [Setup] tab-[About] button is clicked, version
information of the Printer Driver is shown.
Add Port
When the port you would like to connect to is not shown
on the list shown by clicking the [▼] button beside the
[Details] tab-[Print to the following port], click [Details] tab[Add Port] button to add the port.
When the [Add Port] button is clicked, the [Add Port]
dialog is shown.
The following settings are performed on the [Add Port]
dialog:
• When [Network] is selected to set a path to a network
printer, you can add a network printer to a
port
• When [Other] is selected to select the type of a port to be added, you can add the port selected from
a list
Alternate
When the following conditions are satisfied, you can
perform settings of the alternate printing by using
[Setup] tab-[Alternate]:
• When [2 Trays], [3 Trays] or [4 Trays] are not
selected in the Finisher setting, or when they are
not installed
• When [A4], [Letter] or [B5] is selected in the Paper
settings
• When the same size of paper for both portrait and
landscape is set to the copier (e.g., A4/A4R, or B5/B5R)
• When Front/Back Cover are not set
• When [Booklet] is not selected in the [Duplex]
When [On] is selected in the Alternate printing, every set of copies are output in a direction at right angles
to the previous set of copies.
e.g.
1st copy
2nd copy
On
3-8 IP-011 Print Controller
3rd copy
2nd copy
1st copy
Off
Chapter 3 Printer Driver
B
Back Cover
By using [Paper] tab-[Back Cover], you can perform the
setting to use a designated tray for printing the last page.
Select either [On] or [Off].
Default of Back Cover is [Off].
When [On] is selected, select either [Blank] or [Printed].
When [Blank] is selected, nothing is printed on the
back cover.
When [Printed] is selected, the last page is printed
on a back cover.
The tray for the back cover is selected by using [Front/Back Cover]-[Paper Tray].
Back Cover [Off]
Back Cover
Back Cover
[On] [Blank]
[On] [Printed]
[Not indicated]
Back Cover can not be set in the following conditions:
• When [B6R] is selected as a paper size
• When Alternate is set to [On]
• When Duplex is set to [Booklet]
• When Sort is set to [Group]
C
Capture Printer Port
When the device name and path are specified on the
[Capture Printer Port] dialog shown by clicking [Details]
tab-[Capture Printer Port] button, a network printer can
be allocated as a virtual printer port.
In addition, when [Reconnect at log-on] of the [Capture
Printer Port] dialog is selected, a virtual printer port is
automatically reconnected at log-on.
IP-011 Print Controller 3-9
Chapter 3 Printer Driver
Copies (Pages)
Click the [▲] or [▼] button beside [Setup] tab-[Copies] (Pages) or directly enter the number of copies from
the keyboard.
Default of the number of copies is [1].
D
Default
By clicking [Setup] tab-[Default] button, settings of the
[Setup] tab, [Paper] tab, [Print Quality] tab, and [Watermark] tab return to defaults.
Delete Port
When a port is specified on the [Delete Port] dialog
shown by clicking [Details] tab-[Delete Port] button, and
the [OK] button is clicked, you can delete the specified
port.
3-10 IP-011 Print Controller
Chapter 3 Printer Driver
Duplex
By using [Setup] tab-[Duplex], you can perform settings
of the Duplex printings.
You can select [1 Sided], [2 Sided (short edge binding)],
[2 Sided (long edge binding)] or [Booklet] from the list
shown by clicking the [▼] button beside the [Duplex] box.
Default of the Duplex printing is [1 Sided].
When [1 Sided] is selected, only one side of paper is
printed.
[2 Sided (short edge binding)], [2 Sided (long edge
binding)] or [Booklet] can not be selected in the following
conditions:
• When [B6R] is selected as a paper size
[Booklet] can not be selected in the following conditions as well:
• When settings other than [Letter], [Letter R], [Ledger], [A3], [A4], [A4R], [B4], [B5R] or [B5] are
selected as a paper size
• When Staple is set to settings other than [Off]
• When Front/Back Cover is set
• When Alternate is set to [On]
[2 Sided (short edge binding)]
Prints paper so that the
document appears correctly
when the document is bound
at the short edge.
A
A
B
[2 Sided (long edge binding)]
Prints paper so that the
document appears correctly
when the document is bound
A
A
B
at the long edge.
[Booklet]
Prints paper so that booklets are
made when it is folded into two.
IP-011 Print Controller 3-11
Chapter 3 Printer Driver
E
End Capture
When the virtual printer port is specified on the [End
Capture] dialog shown by clicking [Details] tab-[End
Capture] button, you can delete a network printer
allocated as a virtual printer port.
F
Finisher
When the Finisher is attached to the copier, you can select the Finisher setting from [None], [2
Trays], [3 Trays], [4 Trays] or IT-101(2 Trays).
Default of the Finisher is [None].
When [None] is selected in the Finisher settings, or
when the Finisher is not installed, the function has limits
as follows:
• You can not select settings other than [Printer’s
default] as an output tray
• Staple settings can not be performed
The Alternate printing is available when [2 Trays], [3
Trays] or [4 Trays] are not selected in the Finisher setting, or when they are not installed.
In this case, it is required that the same size of paper for both portrait and landscape is set to the
copier. (e.g., A4/A4R, or B5/B5R)
Front Cover
By using [Paper] tab-[Front Cover], the setting to print the first page from the designated tray can
be performed.
Select either [On] or [Off].
Default of Front Cover is [Off].
When [On] is selected, select either [Blank] or [Printed].
When [Blank] is selected, nothing is printed on the
first page.
When [Printed] is selected, the first page is printed on
the front cover.
The tray for front covers is selected by using [Front/Back
Cover]-[Paper Tray].
Front Cover can not be set in the following conditions:
• When [B6R] is selected as a paper size
• When Alternate is set to [On]
• When Duplex is set to [Booklet]
• When Sorting is set to [Group]
When Front Cover is set to [On], you can not use the Alternate printing and Sorting.
3-12 IP-011 Print Controller
Chapter 3 Printer Driver
Front Cover
Front Cover
Front Cover
[Off]
[On] [Blank]
[On] [Printed]
[Not indicated]
Front/Back Cover-Paper Tray
Specify the tray for Front/Back Cover from the list shown by clicking the [▼] button beside the [Paper] tab[Front/Back Cover]-[Paper Tray] button.
The selection by using [Front/Back Cover]-[Paper Tray] must be different from that by using the [Setup] tab[Paper Tray].
Front/Back Cover-Paper Type
Specify the tray for Front/Back Cover from the list shown by clicking the [▼] button beside the [Paper] tab[Front/Back Cover]-[Paper Type] button.
G
Group
Refer to Sorting.
L
Layout
By using [Setup] tab-[Layout], you can set how many
pages of documents are printed on one piece of paper.
You can select 1-up, 2-up, 4-up, 8-up or 9-up from the list
shown by clicking the [▼] button beside the [Layout] box.
Default of Layout is [1-up].
The layout is made as follows:
[1- up]
[2-up]
[4-up]
IP-011 Print Controller 3-13
Chapter 3 Printer Driver
[8-up]
[9-up]
When [Booklet] is selected in the Duplex printing, [2-up] is automatically selected and you can not select
other settings.
When [Setup] tab-[Print Page Borders] check box is selected, you can print borders between gathered
documents.
Default of Print Page Borders is no check mark.
When Layout is set to [1-up], you can not select [Print Page Borders].
N
New Driver
Click the [Details] tab, then click the [▼] button next to the field [Print using the following driver] to display the list
of available printer drivers. To use a printer driver not listed, click the [New Driver] button. When a driver is
changed, the settings of presently shown property is saved and the property of a newly selected driver is
shown.
O
Option
Refer to Finisher and Option Tray (DB).
Option Tray (DB)
When the Option Tray is attached to the Konica 7020
series, it is required to set the [Option Tray] in the
[Option] tab. Select either [DB-209/210 (2 Trays)] or [DB409/410 (1 Tray)].
Default of the Option Tray is [None].
By setting the Option Tray, functions are limited or
enabled as follows:
• When [None] is selected in the Option
Tray settings or when the Option Tray is
not installed, you can not select [Tray 3]
or [Tray 4].
• When [DB-409/410 (1 Tray)] is selected in the Option Tray settings, you can not select [Tray 4] as a paper
tray.
• When [DB-209/210 (2 Trays)] is selected in the Option Tray settings, you can select all trays as a paper
tray.
3-14 IP-011 Print Controller
Chapter 3 Printer Driver
Orientation
Select either [Portrait] or [Landscape] from the list shown
by clicking the [▼] button beside [Set up] tab-[Orientation] box.
Default of Orientation is [Portrait].
Output Tray
Select an output tray from the list shown by clicking the
[▼] button beside [Setup] tab-[Output Tray] box. When
[None] is selected in the Finisher settings, or When the
Finisher is not installed, settings other than [Printer’s
default] can not be selected.
P
Page Protection
By using [Print Quality] tab-[Page Protection] box, you can
set Page Protection. Page Protection is a function to secure memory for printing complicated characters and image documents in advance. Page Protection completely
develops one page of print data before actual printing
starts. This secures printing of each page and avoid the
memory overrun error.
Select either [Auto] or [On] from the list shown by
clicking the [▼] button beside the [Page Protection] box.
Default of Page Protection is [Auto].
Normally, set this setting to [Auto]. If an error occurs, set it to [On]. When it is set to [On], the print speed
decreases and more memory is used, but a print error may be reduced.
Paper Tray
Select a paper tray you would like to use from the list
shown by clicking the [▼] button beside [Setup] tab[Paper Tray] box.
When [Auto Select] is selected, a paper tray with paper
which a user specified from an application by using
[Konica IP-011Properties] is automatically selected.
In order to use [A5], [B6R], set to [Bypass].
In addition, when the bypass tray is selected, you can
select [OHT Film] from Paper Type of the [Paper] tab.
IP-011 Print Controller 3-15
Chapter 3 Printer Driver
Paper Type
[Plain], [OHT Film], [OHT Interleaved] or [OHT Printed-Interleaved] can be selected from the list shown by
clicking the [▼] button beside [Paper] tab- [Paper Type] box.
When Front/Back Cover is set, you can select only [Plain].
When [Tray 1], [Tray 2], [Tray 3] or [Tray 4] is selected by using [Setup] tab-[Paper]-[Paper Tray], [OHT Film] is
not shown on the list.
When Paper Tray is set to [Bypass] and when [Sorting] is set to[Group], [OHT Interleaved] and [OHT PrintedInterleaved] are not shown on the list.
When the Duplex printing is set to settings other than [1 Sided], and when Staple is set to settings other than
[Off], [OHT Film], [OHT Interleaved] or [OHT Printed-Interleaved] is not shown on the list.
Port Settings
Click [Details] tab-[Port Settings] button to perform settings
of the port selected on the [Print to the following port] box.
When the “LPT” is selected, the [Configure LPT Port]
dialog is shown by clicking the [Port Settings] button. The
following settings are performed on the [Configure LPT
Port] dialog.
When [Spool MS-DOS print job] is selected, a MS-DOS print job is spooled.
When [Check port state before printing] is selected, the port status is checked before printing.
Print Page Borders
Refer to Layout.
Print Quality
Refer to Page Protection.
Print Test Page
Click [General] tab-[Print Test Page] button to performa
test print.
Print to the following port
Select the port name of the IP-011 from the list shown
by clicking the [▼] button beside [Details] tab-[Printing
to the following port] box to change the printing port.
Select a printing port from [COM1], [COM2], [FILE],
[LPT1] or so on.
3-16 IP-011 Print Controller
Chapter 3 Printer Driver
Print using the following driver
Select the driver used for printing from the list shown by clicking the [▼] button beside [Details] tab-[Print
using the following driver] box. When a driver is changed, settings of presently shown property are saved
and the property of the newly selected driver will appear.
S
Setup-Original Paper
Select the original paper from the list shown by clicking the [▼] button beside [Setup] tab-[Paper]-[Original
Paper] box.
The original paper you can select is as follows:
Paper Sizes to Be Selected
A3
(297 x 420 mm)
A4
(210 x 297 mm)
A4R (210 x 297 mm)
A5R (148 x 210 mm)
B4
(257 x 364 mm)
B5
(182 x 257 mm)
B5R (182 x 257 mm)
Ledger(11 x 17 in)
Legal (8.5 x 14 in)
Letter (8.5 x 11 in)
LetterR (8.5 x 11 in)
Statement (5.5 x 8.5 in)
F4
(8.5 x 13 in)
Refer to the operating manual of the copier for paper sizes which can be used on each tray.
[**R] indicates feeding the short edge of the paper. Document sizes not including “R” indicate feeding the
long edge of the paper.
Setup-Paper Size
When [Setup] tab-[Paper]-[Original Paper] is changed,
[Setup] tab-[Paper]-[Paper Size] is automatically set to
the same settings as [Original Paper].
You can select other paper sizes than that automatically
set from the list shown by clicking the [▼] button beside
[Paper Size].
Paper sizes which you can select are the same as those
in the above-mentioned Paper-Original Paper.
Refer to the operating manual of the copier for paper
sizes which can be used on each tray.
[**R] indicates feeding the short edge of the paper. Document sizes not including [R] indicate feeding the
long edge of the paper.
IP-011 Print Controller 3-17
Chapter 3 Printer Driver
Settings of the two-way communication function (Spool
Settings)
The [Spool Settings] dialog shown by clicking the
[Details] tab-[Spool Settings] button enables you to
perform settings of spooling and the bi-directional
communication function.
When [Enable bi-directional support for this printer] is
selected, the bi-directional communication is performed.
When [Disable bi-directional support for this printer] is selected, the bi-directional communication is not
performed.
Sharing
By using the [Sharing] tab, you can set to share a
printer. Refer to the manual of Windows for printer
sharing.
Sorting
By using [Setup] tab-[Sorting], the method of sorting is
set. Default of [Sorting] is [Sort].
When [Sort] is selected, after one copy of all pages has
been printed, the second copy, the third copy, .... are
printed.
When [Group] is selected, first, the required pieces of
the first page are printed. Then, the required pieces of
the second page, the third page, ..... are printed.
[Group] can be selected by using [Setup] tab-[Sorting]
when the following conditions are satisfied:
• When [OHT Interleaved] or [OHT PrintedInterleaved] is not selected in the [Paper] tab
• When Front/Back Cover are not set
• When the Staple setting is set to [Off]
3-18 IP-011 Print Controller
Sort
Group
Chapter 3 Printer Driver
Spool Settings
Set the method of spooling (temporary saving) the print
data when it is sent to the printer on the [Spool Settings]
dialog shown by clicking [Details] tab-[Spool Settings]
button.
When [Spool print jobs so program finishes printing
faster] is selected, Spool is set to on by default.
You may select either [Start printing after last page is
spooled] or [Start printing after first page is spooled] as
a method of spooling.
When [Start printing after last page is spooled] is
selected, it is possible to edit other documents and
start up other applications while printing, since
print data is sent to a printer after the printing
process of applications has been completed.
When [Start printing after first page is spooled] is
selected, print data is spooled one page by one
page and sent to a printer. Although it takes more
time that an application is released from the
printing process, this method is suitable in the case
that free space for spooling in your hard disk is
small.
Select [Spool data format] from among EMF or RAW.
When [Print directly to the printer] is selected, a print job is directly sent to a printer without spooling it.
You can also perform settings of the bi-directional communication function when setting spooling.
Staple
Set the position of staples from the list shown by
clicking the [▼] button beside [Setup] tab-[Staple] box.
You can select the staple setting from [Off], [1-left], [1right], [2-left],or [2-top].
Default is [Off].
However, the staple setting can not be performed in the
following cases:
• When [2 Trays], [3 Trays] or [4 Trays] are not
selected in the Finisher setting, or when they are
not installed
• When [Group] is selected in the [Sorting]
• When [B6R] is selected in the [Paper Size]
• When [OHT Film], [OHT Interleaved] or [OHT Printed-Interleaved] is selected in the [Paper Type]
• When [Booklet] is selected in the [Duplex]
• The following combination is selected:
e.g., A3-size paper (Portrait) and 2-left stapling
IP-011 Print Controller 3-19
Chapter 3 Printer Driver
In addition, when Staple is specified, you can’t select Alternate.
You can’t staple at two positions for the paper of B5R or smaller.
Stapling is performed in accordance with orientations as follows:
1- left (Portrait)
1- left (Landscape)
1- right (Portrait)
1-right (Landscape)
2-left (Portrait)
2-left (Landscape)
2- top (Portrait)
2-top (Landscape)
T
Timeout settings
By using [Details] tab-[Timeout settings], the timeout
value is set.
The [Not selected] box indicates the number it will take in
seconds for a printer to become available for printing,
from the time the computer starts outputting print data. If
the waiting time exceeds value set, a printer error is
shown and the job is automatically cancelled.
The [Transmission retry] box is used to set the amount of
time in seconds until a printer to become available for
printing allowing a computer that failed to output once to
output the print data again. If the waiting time exceeds
this set value, a printer error is shown and the job is automatically cancelled.
3-20 IP-011 Print Controller
Chapter 3 Printer Driver
W
Watermark
Selecting a watermark from the list of the [Watermark] tab
enables you to print documents with a watermark.
When the Printer Driver is installed, the basic watermarks
are installed at the same time. In this condition, you can
select a watermark from [(None)], [CONFIDENTIAL],
[COPY], [DRAFT], [FILE COPY], [FINAL], [PROOF] or
[TOP SECRET]. Default of watermark is [(None)].
On the [Edit/Add Watermark] dialog shown by clicking the
[Add] button, you can create up to 50 watermarks with
characters a user specifies.
If the number of watermarks exceeds 50, the [Add] button
becomes disable. In addition, the number of characters a
user can specify to create one watermark is 72 or less.
On the [Edit/Add Watermark] dialog shown by clicking the
[Edit] button, you can edit existing watermarks.
You can delete watermarks by selecting them from the list
and clicking the [Delete] button.
When [First Page Only] is selected, you can print a
watermark on the first page of documents only.
Z
Zoom
In order to change the print size of documents, you can
select the size of print in 1% by using [Setup] tab[Zoom] box.
Default of Zoom is [100]%.
The value can be specified from between 25% and
400%.
IP-011 Print Controller 3-21
Chapter 4 Control Panel Setup
■ Contents of This Chapter ............................................................ 4-2
■ About the Control Panel .............................................................. 4-3
● The Control Panel of the Printer/Copier ....................................................... 4-3
● How to Enter Settings on the LCD Touch Screen ........................................ 4-4
● Printer Mode Basic Screen .......................................................................... 4-5
● Printer Menu Screen .................................................................................... 4-5
● Printer Setting Screen ................................................................................. 4-6
● Procedures of the Printer Setting ................................................................ 4-7
■ Configuration of Printer Setting Menu ......................................... 4-9
■ Functions of the Printer Setting ................................................ 4-11
● Network Setup ........................................................................................... 4-11
● Select Language ........................................................................................ 4-11
● Print Quality ............................................................................................... 4-12
● I/O Timeout ................................................................................................ 4-12
● Test Print .................................................................................................... 4-13
● CMD Error Pape ........................................................................................ 4-13
● Error Page ................................................................................................. 4-13
● Factory Default .......................................................................................... 4-14
● Help ........................................................................................................... 4-14
IP-011 Print Controller 4-1
Chapter 4 Control Panel Setup
■ Contents of This Chapter
In this chapter describes the printer mode basic screen and the setup menu of the Control Panel of the Printer/Copier. Refer
to the operating manual of the copier for other functions and screens of the Control Panel.
Refer to “Chapter 2 Setup ■ Print from Applications” (p. 2-19) for how to use the Printer Driver from applications, “Chapter 3
Printer Driver” (p. 3-1) for how to set the printer from the Printer Driver and “Chapter 5 Status Monitor and Control Panel”
(p. 5-1) for how to set the printer from the Printer Tools.
4-2 IP-011 Print Controller
Chapter 4 Control Panel Setup
■ About the Control Panel
● The Control Panel of the Printer/Copier
SCANNER/PRINTER LED
[SCANNER/PRINTER] button
DATA LED
SCANNER/PRINTER
FAX
COPY
HELP
1
2
3
INTERRUPT
CHECK
4
5
6
7
8
9
APPLICATION
STOP/
CLEAR
OUTPUT
0
START
CLEAR QTY
AUTO RESET
[STOP/CLEAR] button
LCD Touch Screen
[AUTO RESET] button
[Check] button
[SCANNER/PRINTER] button
Switches to the printer mode.
LCD Touch Screen
Displays the status of the Print Controller, menus related to settings and options to be selected are displayed on the LCD.
[CHECK] button
Displays the setting CHECK screen of the copier on the LCD.
[AUTO RESET] button
Resets settings of the copier to default settings.
[STOP/CLEAR] button
Cancels the currently processing copy or print process.
DATA LED
This LED flashes in green when the Print Engine is receiving data.
Not when the Print Engine is receiving data, but when data is saved in memory of the Print Engine, this LED
is steadily lit.
SCANNER/PRINTER LED
This LED is turned on in green in the printer mode and is turned on in red when a warning message or an
error message is issued. In such a case, the print process is interrupted. Operations by an operator or a
service is required. Check the error information on the LCD. When the cause of the error is removed, the
print process starts again.
IP-011 Print Controller 4-3
Chapter 4 Control Panel Setup
● How to Enter Settings on the LCD Touch Screen
You can enter settings from the printer mode basic screen shown on the LCD Touch Screen by using either the item
selection or the information entry.
Item Selection
In this method, various settings are performed by selecting a button with a number which corresponds to the
item you would like to select on the LCD.
Information Entry
In this method, a printer name or a set value is entered by selecting alphabets or numbers shown on buttons
of the LCD.
Currently Selected Items
Currently selected items are indicated with a "+" mark.
4-4 IP-011 Print Controller
Chapter 4 Control Panel Setup
● Printer Mode Basic Screen
When the Konica 7020 series + IP-011 system starts properly, the printer mode basic screen is displayed on the LCD by
pressing the [SCANNER/PRINTER] button.
● Printer Menu Screen
The following printer menu screen is displayed by pressing the [SETTING] key on the printer mode basic
screen.
When the [SCANNER/PRINTER] button is pressed again, the LCD is changed to the copy mode basic
screen, and the normal copy settings becomes available.
[1. Setting]
The Printer Setting screen is displayed by pressing the [1] button. On the Printer Setting screen, you can
perform various settings related to the Print Controller.
[2. Cancel Job]
You can cancel the print command currently being processed by pressing the [2] button.
[3. Detail Message]
Information related to the printer setting is displayed on the LCD by pressing the [3] button.
IP-011 Print Controller 4-5
Chapter 4 Control Panel Setup
● Printer Setting Screen
When “1. Setting” on the printer menu screen is selected, the printer setting screen is displayed.
When an item is selected on the printer setting screen, each setting screen corresponding to the selected item is displayed.
Buttons commonly used among setting screens are as follows:
[Main Menu]
Pressing the [Main menu] button returns to the printer menu screen.
After settings have been changed, when the [Main Menu] button is pressed, the save confirmation screen is
displayed.
[Previous]
Pressing the [Previous] button returns to the previous setting screen.
After settings have been changed, when the [Previous] button is pressed, the save confirmation screen is
displayed.
Numeric keys
In order to select an item on the screen, press a numeric key corresponding to a number of the item you
would like to select.
In addition, when you are required to enter a value, press numeric keys to enter the value.
Press the [Main Menu] or [Previous] button to show the save confirmation screen. Then, press the [Yes] button to save the
settings. Press the [No] button not to save the settings.
4-6 IP-011 Print Controller
Chapter 4 Control Panel Setup
● Procedures of the Printer Setting
The following show the procedures of the printer setting by using the LCD Touch Screen:
Press the [SCANNER/PRINTER] button to show
the printer mode basic screen.
The copy mode basic screen is switched to the printer
mode basic screen.
Press the [SETTING] key to show the printer
menu screen.
Press the numeric key [1] to select [1.Setting].
The printer mode basic screen is switched to the printer
menu screen.
Press the numeric key corresponding to a number of the item
you would like to select.
The setting screen of the selected item is displayed.
Continue the setting by pressing the numeric key corresponding to a number of the item you would like to select.
Press the [Previous] button to return to the previous setting
screen.
Press the [Main Menu] button to return to the printer menu
screen.
IP-011 Print Controller 4-7
Chapter 4 Control Panel Setup
Press the [Yes] button on the save preservation
confirmation screen show by pressing the [Main
Menu] or [Previous] button to save new settings.
Press the [No] button not to save the settings.
Refer to “ ■ Configuration of Printer Setting Menu ” (p. 4-9) for configuring the printer setting menu.
Refer to “ ■ Functions of the Printer Setting ” (p. 4-11) for the printer setting details.
4-8 IP-011 Print Controller
Chapter 4 Control Panel Setup
■ Configuration of Printer Setting Menu
1. Network Setup
*This menu is displayed only when the KN-304 is attached.
1. TCP/IP Setup
1. Set IP Mode
1. Enable DHCP
2. Static IP Address
2. Set IP Manually
1. IP Address
3. LPD Banner Enable
2. Subnet Mask
3. Gateway
4. Persistent IP
Address Enable
2. NetWare Setup
1. Server Name
2. Server Password
1. Yes
3. Queue Scan Rate
2. No
4. Frame Type
1. Auto
5. Disable Bindery
2. Ethernet 802.3
6. NDS Context
3. Ethernet II
7. NDS Tree
4. Ethernet SNAP
5. Ethernet 802.2
3. Password Protection
2. Select Language
1. English
IP-011 Print Controller 4-9
Chapter 4 Control Panel Setup
3. Print Quality
1. Auto
1. Page Protection
2. On
4. I/O Timeout
1. 5
6. 60
2. 10
7. 120
3. 15
8. 180
4. 20
9. 240
5. 30
10. 300
5. Test Print
1. Demo/Configuration Page
2. NIC Configuration Page
6. CMD Error Page
1. Off
2. On
7. Error Page
1. Off
2. On
8. Factory Default
9. Help
4-10 IP-011 Print Controller
Chapter 4 Control Panel Setup
■ Functions of the Printer Setting
● Network Setup
Select [1. Setting]-[1. Network Setup] on the Printer Setting screen to display the network setup screen. [1. Network Setup]
is displayed only when the KN-304 is attached.
Items of the network setup screen are as follows: Refer to the operating manual of the KN-304 for details of the network
connection.
[1. TCP/IP Setup]
Press [1] to display the TCP/IP Setup screen. IP Address, Subnet Mask, Gateway, Enable DHCP and
Enable LPD Banner can be set on the TCP/IP Setup screen.
[2. NetWare Setup]
Press [2] to display the NetWare Setup screen. Server Name, Server Password, Queue Scan Rate, Frame
Type, Disable Bindery, NDS Context and NDS Tree can be set on the NetWare Setup screen.
[3. Password Protection]
Press [3] to display the Password Protection screen. A password used for the network setup can be set and
changed.
● Select Language
Select [1. Setting]-[2. Select Language] on the Printer Setting screen to display the Select Language screen.
[1. English]
Press [1] to set the system language to English.
IP-011 Print Controller 4-11
Chapter 4 Control Panel Setup
● Print Quality
Select [1. Setting]-[3. Print Quality] on the Printer Setting screen to display the Print Quality Setup screen.
Items of the Print Quality Setup screen are as follows:
[1. Page Protection]
Press [1] to display the Page Protection Setup screen. You can set to [1. Auto] or [2. On] on the Page
Protection Setup screen. The factory default is [1. Auto].
● I/O Timeout
Select [1. Setting]-[4. I/O Timeout] on the Printer Setting screen to display the I/O Timeout Setup screen. The
factory default is [5. 30].
Items of the I/O Timeout Setup screen are as follows:
[1. 5]
Press [1] to set the I/O Timeout value to 5 seconds.
[2. 10]
Press [2] to set the I/O Timeout value to 10 seconds.
[3. 15]
Press [3] to set the I/O Timeout value to 15 seconds.
[4. 20]
Press [4] to set the I/O Timeout value to 20 seconds.
[5. 30]
Press [5] to set the I/O Timeout value to 30 seconds.
[6. 60]
Press [6] to set the I/O Timeout value to 60 seconds.
[7. 120]
Press [7] to set the I/O Timeout value to 120 seconds.
[8. 180]
Press [8] to set the I/O Timeout value to 180 seconds.
[9. 240]
Press [9] to set the I/O Timeout value to 240 seconds.
[10. 300]
Press [10] to set the I/O Timeout value to 300 seconds.
4-12 IP-011 Print Controller
Chapter 4 Control Panel Setup
● Test Print
Select [1. Setting]-[5. Test Print] on the Printer Setting screen to display the Test Print Setup screen.
Items of the Test Print Setup screen are as follows:
[1. Demo/Configuration Page]
Press [1] to print the Demo/Configuration Page immediately.
Items of the Demo/Configuration Page are as follows:
• Version information (Printer Driver/Network card: only when the KN-304 is attached)
• Current settings (Engine Destination / Resolution / Print Speed / Default Paper Size / Default
Paper Tray / Finisher / Optional Paper Tray / Timeout Setting)
• Paper (Tray 1 / Tray 2 / Tray 3 / Tray 4 / Bypass Tray)
• Device status (Controller Memory / Free Memory)
• Miscellaneous (Total Page count / Printer page count)
[2. NIC Configuration Page]
Press [2] to print the NIC Configuration Page immediately. [2. NIC Configuration Page] is displayed only
when the KN-304 is attached.
Refer to the operating manual of the KN-304 for details of the NIC Configuration Page.
● CMD Error Page
Select [1. Settings]-[6. CMD Error Page] on the printer mode basic screen to display the CMD Error page Setup menu.
Items of the CMD Error page Setup menu are as follows and the factory default is [1.Off].
[1. Off]
When [1] is selected, a CMD error page is not printed in the case that the printer command error occurs.
[2. On]
When [2] is selected, a CMD error page is automatically printed in the case that the printer command error occurs.
● Error Page
Select [1. Settings]-[7. Error Page] on the printer mode basic screen to display the Error page Setup menu.
Items of the Error page Setup menu are as follows and the factory default is [1.Off].
[1. Off]
When [1] is selected, an error page is not printed in the case that the I/O timeout error occurs.
[2. On]
When [2] is selected, an error page is automatically printed in the case that the I/O timeout error occurs.
IP-011 Print Controller 4-13
Chapter 4 Control Panel Setup
● Factory Default
Select [1. Setting]-[8. Factory Default] on the printer mode basic screen to return various settings to the factory default.
Items of the Factory Default are as follows:
[Language]:
English
[Smoothing]:
Off
[Page Protection]:
Auto
[I/O Timeout]:
30
*Refer to the operating manual of the KN-304 for details of Factory Default of the Network Setup.
● Help
Select [1. Setting]-[9. Help] on the printer mode basic screen to display the help screen.
[<<][>>]
Press [<<][>>] to display the previous or the next Help screen on the LCD.
4-14 IP-011 Print Controller
Chapter 5
Status Monitor and Control Panel
■ Contents of This Chapter ............................................................ 5-2
■ Status Monitor and Control Panel ............................................... 5-3
● About the Status Monitor ............................................................................. 5-3
● About the Control Panel ............................................................................... 5-3
■ Working Environment .................................................................. 5-4
● Compliant OS .............................................................................................. 5-4
● Interface ....................................................................................................... 5-4
■ How to Install ............................................................................. 5-4
■ How to Operate the Status Monitor ............................................ 5-5
● Starting the Status Monitor .......................................................................... 5-5
● Finishing the Status Monitor ........................................................................ 5-5
● Restarting the Status Monitor ...................................................................... 5-5
● Show/Hide the Status Monitor ..................................................................... 5-6
● Display Change ........................................................................................... 5-7
■ How to Operate the Control Panel ............................................. 5-8
● Starting the Control Panel ........................................................................... 5-8
● Finishing the Control Panel .......................................................................... 5-8
● Buttons of the Control Panel ........................................................................ 5-9
● Settings of Paper ....................................................................................... 5-10
● Printer Setting ............................................................................................ 5-11
● Test Print .................................................................................................... 5-12
● Confirmation of Configurations .................................................................. 5-12
IP-011 Print Controller 5-1
Chapter 5 Status Monitor and Control Panel
■ Contents of This Chapter
Printer Tools is the generic name for two programs, "Status Monitor" and "Control Panel." This chapter describes how to
use these programs on computers connected to the 7020 series + IP-011 system. These programs enable you to monitor
printer status and change printer settings.
Refer to “Chapter 2 Setup” (p. 2-1) for instructions on setting the printer from applications, “Chapter 3 Printer Driver” (p. 3-1)
for instructions on installing the printer from the Printer Driver and “Chapter 4 Control Panel Setup” (p. 4-1) for instructions
on setting the printer from the Control Panel.
5-2 IP-011 Print Controller
Chapter 5 Status Monitor and Control Panel
■ Status Monitor and Control Panel
The Printer Tools is the generic name of two programs, “Status Monitor” and “Control Panel” which are used on computers
connected to the Konica 7020 series + IP-011 system.
● About the Status Monitor
The Status Monitor is a program which enables you to monitor the printer status from computers connected to the Konica
7020 series + IP-011 system.
If, at the time of installing the Printer Tools, Status Monitor is set to automatically start, the Status Monitor automatically
starts and the Status Monitor icon is displayed on the task bar when a computer is started.
The Status Monitor displays information about the printer status which has been received from the IP-011 in the form of
easy-to-understand images and messages. Additionally, in the event that any problems occur on the printer side, the
method of recovery is displayed on the Status Monitor.
Moreover, background colors of the Status Monitor icon on the task bar change in accordance with the printer status.
• Printer is ready / Printing / Canceling printing / Setting printer: Blue
• Error: Red
• No paper, Warming up: Yellow
● About the Control Panel
The Control Panel is a program to set the printer and used on computers connected to the Konica 7020 series + IP-011
system.
Select [Printer Setting] by clicking it on the [Setup] menu of “Status Monitor” to start the Control Panel.
The Control Panel is made of the [Paper] tab, [Printer Setting] tab, [Test Print] tab and [Configuration] tab.
[Paper] tab
Sets Paper Size, Paper Tray, Output Tray, Orientation (Portrait / Landscape) and Copies.
[Printer Setting] tab
Sets Page Protection, I/O Time Out, Line/Page, Language and Smoothing.
[Test Print] tab
Prints the Demo/Configuration Page or the NIC Status.
[Configuration] tab
Check the setting status of the printer name, free memory, option, etc.
IP-011 Print Controller 5-3
Chapter 5 Status Monitor and Control Panel
■ Working Environment
● Compliant OS
The Status Monitor and the Control Panel can be used on the following OS:
Windows 95
Windows 98
Windows Me
Windows NT4.0 (Service Pack 3 or later)
Windows 2000
Windows XP
● Interface
The interface which the Status Monitor and the Control Panel use is as follows:
IEEE 1284 (Compatible mode, Nibble or ECP)
■ How to Install
When executing “Setup.exe” held in the CD-ROM to install the printer driver, you can make a choice to install Status
Monitor and Control Panel simultaneously with the printer driver.
Refer to “Chapter 2 Setup” (p. 2-1) for installation of the Printer Driver.
5-4 IP-011 Print Controller
Chapter 5 Status Monitor and Control Panel
■ How to Operate the Status Monitor
● Starting the Status Monitor
If, at the time of installing the Printer Tools, Status
Monitor is set to automatically start, the Status
Monitor automatically starts when a computer
starts.
Immediately after the [Konica IP-011 Status Monitor]
window has been displayed, the printer status is
checked.
● Finishing the Status Monitor
Click [View] menu-[Exit] on the [Konica IP-011
Status Monitor] window.
● Restarting the Status Monitor
Click [Start]-[Program]-[Konica IP-011]-[Konica IP011 Printer Tools] to start the Status Monitor
again after you have exited from the Status
Monitor.
Immediately after the [Konica IP-011 Status Monitor]
window has been displayed, the printer status is
checked.
IP-011 Print Controller 5-5
Chapter 5 Status Monitor and Control Panel
● Show/Hide the Status Monitor
When the [Close] button is clicked when the
Status Monitor is displayed, the Status Monitor is
hidden (displayed as an icon on the task bar.).
When the Status Monitor icon on the task bar is
clicked when the Status Monitor is hidden, the
Status Monitor is displayed.
When an error occurs in communication with the printer, a confirmation message is displayed. Click the
[OK] button of the confirmation message and check the connection to the printer.
5-6 IP-011 Print Controller
Chapter 5 Status Monitor and Control Panel
● Display Change
Display of the Status Monitor can be selected from either [Expand] or [Reduce]. Normally, the Status Monitor starts in the
[Reduce] display.
In the [Expand] display, when a problem related to the printer occurs and information related to the problem is shown on
the Status Monitor, the position of the problem is indicated by using an image and a method of recovery is displayed in the
How to Recover list. Switch the display of the Status Monitor if necessary.
Expanding the Display
Select [Expand] from the [View] menu.
The [Konica IP-011 Status Monitor] window is expanded.
Reducing the Display
Select [Reduce] from the [View] menu.
The [Konica IP-011 Status Monitor] window is reduced.
IP-011 Print Controller 5-7
Chapter 5 Status Monitor and Control Panel
■ How to Operate the Control Panel
● Starting the Control Panel
Select [Printer Setting] from the [Setup] menu of
the Status Monitor window.
The [Konica IP-011 Control Panel] dialog is
displayed.
● Finishing the Control Panel
Click the [OK] button to send data of settings to
the printer.
The [Konica IP-011 Control Panel] dialog is closed and
the [Konica IP-011 Status Monitor] window is displayed.
Click the [Cancel] button not to perform settings.
The [Konica IP-011 Control Panel] dialog is closed and
the [Konica IP-011 Status Monitor] window is displayed.
5-8 IP-011 Print Controller
Chapter 5 Status Monitor and Control Panel
● Buttons of the Control Panel
[OK]
When the [OK] button is clicked, data of all settings of the tab is sent to the printer. Then, the [Konica IP-011
Control Panel] dialog is closed and the [Konica IP-011 Status Monitor] window is displayed.
[Cancel]
When the [Cancel] button is clicked, the [Konica IP-011 Control Panel] dialog is closed and the [Konica IP011 Status Monitor] window is displayed.
[Apply]
When the [Apply] button is clicked, data of present settings of the tab is sent to the printer. This button is
used to continue to perform settings of other tabs.
[Set Default]
When the [Set Default] button is clicked, default settings are displayed.
[Help]
When the [Help] button is clicked, Help of the [Konica IP-011 Control Panel] dialog is displayed.
When an error occurs in communication with the printer, a confirmation message is displayed. Click the
[OK] button of the confirmation message and check the connection to the printer. Then, perform settings
on the [Konica IP-011 Control Panel] again.
IP-011 Print Controller 5-9
Chapter 5 Status Monitor and Control Panel
● Settings of Paper
Click the [Paper] tab of the [Konica IP-011 Control Panel] dialog.
The [Paper] tab of the [Konica IP-011 Control Panel] dialog is displayed.
On the list shown by clicking the [▼] button beside [Size], [Input Tray] and [Output Tray] of the
[Paper] group box, select an item you desire respectively.
Click either [Portrait] or [Landscape] from the [Orientation] group box.
Set the number of copies you desire to print by clicking the [▲] or [▼] button or directly
entering the number on the box of the [Copies] group box.
Check the settings.
Click the [OK] button when you do not continue to perform settings of other tabs.
Click the [Apply] button when you continue to perform settings of other tabs and register
settings of the [Paper] tab before moving to other tabs.
Click the desired tabs, when you continue to perform settings of other tabs.
5-10 IP-011 Print Controller
Chapter 5 Status Monitor and Control Panel
● Printer Setting
Click the [Printer Setting] tab of the [Konica IP-011 Control Panel] dialog.
The [Printer Setting] tab of the [Konica IP-011 Control Panel] dialog is displayed.
Click either [Auto] or [On] of the [Page Protection] group box.
Select the desired item on the list shown by clicking the [▼] button of the [I/O Time Out] Group
Box. The printer waits for entry of data during time (second) you selected in this box. In the
case that data is not entered within the set I/O Time Out time, the printer automatically cancels
a job.
Set the number of lines you desire to print on one page in the box of the [Line/Page] group by
clicking the [▲] or [▼] button or directly entering the number. You can set the value from
between 5 and 128.
Select the desired item from the list shown by clicking the [▼] button of the [Language] group
box.
Confirm the settings.
Click the [OK] button when you do not continue to perform settings of other tabs.
Click the [Apply] button when you continue to perform settings of other tabs and register
settings of the [Paper] tab before moving to other tabs.
Click the desired tabs, when you continue to perform settings of other tabs.
IP-011 Print Controller 5-11
Chapter 5 Status Monitor and Control Panel
● Test Print
Click the [Test Print] tab of the [Konica IP-011 Control Panel] dialog.
The [Test Print] tab of the [Konica IP-011 Control Panel] dialog is displayed.
Click the [Print Demo/Configuration Page] button to print the Print Demo/Configuration Page.
Click the [Print NIC Status] button to print the NIC Status Page.
Click the [OK] button.
Click the [OK] button when you do not continue to perform settings of other tabs.
Click the desired tab when you continue to perform settings of other tabs.
● Confirmation of Configurations
Click the [Configuration] tab of the [Konica IP-011 Control Panel] dialog.
The [Configuration] tab of the [Konica IP-011 Control Panel] dialog is displayed.
Confirm the shown printer name, free memory and setting status.
Click the [OK] button when you do not continue to perform settings of other tabs.
Click the desired tab when you continue to perform settings of other tabs.
5-12 IP-011 Print Controller
Appendix A Troubleshooting
■ Error Message ........................................................... Appendix A-2
■ Basic Troubleshooting ................................................ Appendix A-3
■ General Problems of Printing ..................................... Appendix A-3
● The “OHT Film” is not selectable. ................................................. Appendix A-3
● The Printer Controller does not respond to
the “Print” command. .................................................................. Appendix A-3
● A message to demand a paper size which
you do not use is displayed. ....................................................... Appendix A-4
● You can not print the test print ..................................................... Appendix A-4
● The print setting of a job does not correspond to
the result of printing. ................................................................... Appendix A-5
● The “Duplex” option is not displayed. ........................................... Appendix A-5
● Memory Error / Memory Overflow / Overrun ............................... Appendix A-5
IP-011 Print Controller Appendix A-1
Appendix A Troubleshooting
■ Error Message
The error messages shown on the Status Monitor are as follows:
Error Message
How to Recover
Mishandled paper in ADU
Please remove paper according to the message screen of printer
DB Upper Tray is not ready
DB Lower Tray is not ready
Please insert DB Upper Tray
Mishandled paper in DB Lower Tray
Please insert DB Lower Tray
Please remove paper according to the message screen of printer
No paper in DB Lower Tray
Please load paper in DB Lower Tray
DB Lower Tray is not available
Please confirm the printer setting
No paper in DB Upper Tray
Please load paper in DB Upper Tray
DB Upper Tray is not available
Please confirm the printer setting
DB door is open
LCT is not ready
Please close DB door
Mishandled paper in LCT
Please insert LCT
Please remove paper according to the message screen of printer
No paper in LCT
Please load paper in LCT
LCT is not available
Mishandled paper in RADF
RADF Failure
RADF Communication Error
OverRun
System Failure
System Communication Error
Finisher Front door is open
Stapler cartridge is not loaded
There are no staples
No Toner
Low Toner
Toner bottle does not exist
NIC I/F Error
Mishandled paper in Finisher
Finisher conveyance door is open
Finisher does not work correctly
Mishandled paper in Finisher
Printing Paused due to some interuptions.
Printer Controller NVRAM Error
Printer Controller SIMM Error
Printer Controller Memory Error
Printer Memory OverFlow
Printing Paused Due to No Paper
Main Lower Tray is not ready
No paper in DB Lower Tray
DB Lower Tray is not available
Optics Failure
Optics Communication Error
Mishandled paper
Bypass Tray is not ready
No paper in Bypass Tray
Bypass Tray is not available
Main Upper Tray is not ready
No paper in Main Upper Tray
Main Upper Tray is not available
Side door is open
PM required
Please confirm the printer setting
Please remove original according to the message screen of the printer
Please dispose the trouble according to the message screen of the printer
Please dispose the trouble according to the message screen of the printer
Please dispose the trouble according to the User Reference Guide.
Please dispose the trouble according to the message screen of the printer
Please dispose the trouble according to the message screen of the printer
Please close Finisher Front door
Please confirm the stapler cartrigde
Please replace staple cartridge
Please add toner
Please add toner
Please install the Toner bottle
Please dispose the trouble according to the User Reference Guide.
Please remove paper according to the message screen of printer
Please close Finisher Conveyance Door
Please dispose the trouble according to the message screen of the printer
Please remove paper according to the message screen of printer
Please wait. If this situation continues, please check printer.
Please dispose the trouble according to the User Reference Guide.
Please dispose the trouble according to the User Reference Guide.
Please dispose the trouble according to the User Reference Guide.
Please dispose the trouble according to the User Reference Guide.
Please load paper
Please insert Main Lower tray
Please load paper in DB Lower Tray
Please confirm the printer setting
Please dispose the trouble according to the message screen of the printer
Please dispose the trouble according to the message screen of the printer
Please remove paper according to the message screen of printer
Please open Bypass tray
Please load paper in Bypass tray
Please confirm the printer setting
Please insert Main Upper tray
Please load paper in Main Upper Tray
Please confirm the printer setting
Please close Side door
Please call service for PM
Please replace the Fixing unit
Please solve the trouble according to the User Reference Guide
Remove copies from the Output Tray 1
Remove copies from the Output Tray 2
Remove copies from the Output Tray 3
Remove copies from the Output Tray 4
Remove copies from the Exit Tray
Please dispose the trouble according to the message screen of the printer
Please dispose the trouble according to the message screen of the printer
Please confirm the paper
Printing Paused due to the limit of Fixing-unit-counter
Density declines
Output Tray 1 is overloaded
Output Tray 2 is overloaded
Output Tray 3 is overloaded
Output Tray 4 is overloaded
Exit Tray is overloaded
Printer Failure
Printer Communication Error
Actual paper size is different from setting
Appendix A-2 IP-011 Print Controller
Appendix A Troubleshooting
■ Basic Troubleshooting
This section describes how to troubleshoot. If troubles are not removed by using the following countermeasures, contact a
service provider.
There are some basic conditions which cause various abnormalities. Before taking a trouble as a special case, first refer to
the following basic countermeasures.
Check the power of the copier and computers and cable connections.
Check the LCD of the copier to find information concerning the current trouble.
If possible, print the “Test Print” to check that the settings are appropriate.
Check the current status of the Print Controller.
Check the current status shown on the LCD of the Control Panel.
Press the [SCANNER/PRINTER] button and press [3. Detail Message] of the printer mode basic screen
to check the job status.
Additionally, check the Status Monitor. You can find if the Print Controller is processing your job or not
on the status message. When your job is not displayed on the status message, it is considered that the
Print Controller has already finished printing your job.
When your job is being processed or waiting for being printed, the current status is displayed on the
dialog shown by double-clicking [Start]-[Settings]-[Printers]-[Konica IP-011].
■ General Problems of Printing
● The “OHT Film” is not selectable.
Select a bypass tray with which OHT can be used.
● The Print Controller does not respond to the “Print” command.
Check that [Konica IP-011] is selected as a current printer.
It is required to select [Konica IP-011] as a present printer on Windows before printing.
Check that the power switch of the copier is turned on.
Print the “Test Print”.
When you can not print a job from a computer even though you can print a test print, contact a system
administrator or a service provider.
IP-011 Print Controller Appendix A-3
Appendix A Troubleshooting
● A message to demand a paper size which you do not use is displayed.
Cancel the job to change the paper size of “Page (Paper) Setup” dialog on an application.
● You can not print the test print.
Check the LCD of the copier Control Panel.
When “Ready to copy” is displayed on the LCD, go to the Step 3.
When a diagnosis message or an error message is displayed on the LCD, refer to the operating manual
of the copier.
When the LCD is blank, go to the Step 2.
Press the sub power sw on the Control Panel.
When the copier is used in the Power Save mode, press this switch to show the LCD in the Display
mode.
Try to make a copy.
When copy is available, go to the Step 4.
Turn off the copier and restart it. Print the test print again after the Print Controller is ready.
Contact a service provider when you can not print the test print after taking the above-mentioned
procedures.
Appendix A-4 IP-011 Print Controller
Appendix A Troubleshooting
● The print setting of a job does not correspond to the result of printing.
Check that the printer setting is not changed.
Refer to “Chapter 5 Status Monitor and Control Panel ● Printer Setting”(p. 5-11) or “Chapter 3 Printer
Driver ■ Printer Driver Function List”(p. 3-5) for the printer setting.
● The “Duplex” option is not displayed.
Check that, [B6R] is not selected as a paper size.
● Memory Error / Memory Overflow / Overrun
Set the Page Protection.
Refer to “Chapter 3 Printer Driver ■ Printer Driver Function List” (p. 3-5) or “Chapter 4 Control Panel
Setup ● Print Quality” (p. 4-12) for the page protection.
Expand memory.
Memory of the IP-011 can be expanded up to 80 MB. Contact a service provider for details of the
memory expansion.
IP-011 Print Controller Appendix A-5
Appendix B Product Specifications
■ Product Specifications ............................................... Appendix B-2
IP-011 Print Controller Appendix B-1
Appendix B Product Specifications
■ Product Specifications
Model:
built in the Konica 7020 series Printer/Copier
(Konica 7020 / 7022 / 7025 / 7030 / 7130 / 7035)
Paper:
You can select from the following paper sizes:
Paper Sizes to Be Selected
A3
(297 x 420 mm)
A4
(210 x 297 mm)
A4R (210 x 297 mm)
A5R (148 x 210 mm)
B4
(257 x 364 mm)
B5
(182 x 257 mm)
B5R (182 x 257 mm)
Ledger(11 x 17 in)
Legal (8.5 x 14 in)
Letter (8.5 x 11 in)
LetterR (8.5 x 11 in)
Statement (5.5 x 8.5 in)
F4
(8.5 x 13 in)
Paper Feeding and Amount of Feeding Paper:
The same as the copier
Load Output Paper:
The same as the copier
Mode:
The dual operation of the Copier and the Printer is available.
(5 jobs can be processed at the maximum.)
Special Printing:
Duplex, Paper Type selection, Output Tray selection,
Print Quality mode selection, Alternate, Staple function,
Front/Back Cover function and Version display, etc.
Orientation:
Portrait or Landscape.
Resolution:
600 dpi
Gradation:
1 bit
No. of Print:
1 to 999
Printable Area:
Head Margin: 2.5 mm, Foot Margin: 4 mm and Right and Left Margins: 1 mm
Warm-up:
the same as the copier
Basic Configuration
Control Board
CPU:
PowerPC 401GF
Program Memory:
FLASH ROM
System Memory:
16 MB SD-RAM (Standard),
Expandable up to 80 MB (Option:MU-403/404)
Interface:
Parallel port
Centronics (IEEE 1284) / amphenol 36 pin male connector
Appendix B-2 IP-011 Print Controller
Appendix B Product Specifications
Network Interface (Option):
KN304:
Ethernet (100BaseTX / 10BaseT)
Protocol:
IPX/SPX (NetWare)
LPD/LPR (TCP/IP)
Peer-to-Peer (TCP/IP)
IPP (Internet Printing Protocol)
Compliant OS:
Windows 95/98/Me
Windows NT4.0 (Service Pack 3 or later)
Windows 2000
Windows XP
Printer Language:
Destiny WinStyler-Nozomi Version 2.0
Printer Driver:
Printer Driver for Windows 95/98/Me
Printer Driver for Windows NT
Printer Driver for Windows 2000
Printer Driver for Windows XP
Compliant Host Computer:
A Windows-based computer
Compliant Finisher:
FS-107 and IT-101
Compliant DB:
DB-209/210 and DB-409/410
Dimension:
240 mm (W) * 160 mm (H) * 37 mm (D)
9.44 inches (W) * 6.3 inches (H) * 1.46 inches (D)
Weight:
Approx. 1.1 kg (2.43 pounds)
Power:
AC 100V 50/60 Hz (maximum)
(when using 16 MB SD-RAM and KN-304)
Working Environment:
Temperature:
5 degree °C to 55 degree °C
41 degree °F to 131 degree °F
Humidity:
5 % to 95 %RH (non-condensing)
Restrictive Conditions
• In the Printer mode, the ECM (Electric Copy Monitor) of the Konica 7020 series is not available.
• Although the Weekly Timer function of the Konica 7020 series is available in the Printer mode,
the power is not turned Off until the data output is finished when print data remains in the E-RDH.
Notice: Specifications are subject to change for improvements without notice.
IP-011 Print Controller Appendix B-3
Index
Index ........................................................................................ Index-2
IP-011 Print Controller Index-1
Index
Index
A
About .............................................................. 3-8
Add Port ......................................................... 3-8
Alternate ......................................................... 3-8
B
Back Cover ..................................................... 3-9
Basic Troubleshooting .................... Appendix A-3
Booklet ......................................................... 3-11
Buttons of the Control Panel .......................... 5-9
C
[Color Management] tab ................................. 3-4
[Configuration] tab .......................................... 5-3
Confirmation ................................................. 5-12
Control Panel ......................................... 4-3, 5-3
Control Panel are install ................................. 5-4
Copy Mode ..................................................... 1-3
D
Data Flow ....................................................... 1-5
DB-209/210 .................................................. 3-14
DB-409/410 .................................................. 3-14
Demo/Configuration Page .................. 4-10, 4-13
[Details] tab .................................................... 3-4
Display of the Status Monitor ......................... 5-7
Driver used for printing ................................. 3-17
E
E-RDH ............................................................ 1-3
End Capture ................................................. 3-12
Error Message ................................ Appendix A-2
F
Factory Default ................................... 4-10, 4-14
Files to be Installed ........................................ 2-3
Finisher ........................................................ 3-12
Finishing the Control Panel ............................ 5-8
Finishing the Status Monitor........................... 5-5
Front Cover .................................................. 3-12
Front/Back Cover-Paper Tray ....................... 3-13
Front/Back Cover-Paper Type ...................... 3-13
Index-2 IP-011 Print Controller
G
[General] tab .................................................. 3-4
Group ........................................................... 3-13
H
Help .................................................... 4-10, 4-14
How to Enter Settings on the LCD ................. 4-4
How to Use Memory ...................................... 1-6
I
I/O Interface ................................................... 1-4
I/O Timeout......................................... 4-10, 4-12
Installation of the Printer Driver ...................... 2-3
IP-011 Hardware Configuration ...................... 1-4
IT-101 ........................................................... 3-12
L
Language ....................................................... 4-9
LCD ................................................................ 4-3
M
[Main Menu] ................................................... 4-6
Memory Error ................................. Appendix A-5
Memory Overrun ............................ Appendix A-5
Memory Upgrading ........................................ 1-6
N
Network Setup...................................... 4-9, 4-11
New Driver ................................................... 3-14
NIC Configuration ............................... 4-10, 4-13
Numeric keys ................................................. 4-6
O
[Option] tab ........................................... 2-24, 3-4
Orientation ................................................... 3-15
Overview of the Printer Controller .................. 1-3
Output Tray ................................................... 3-15
Overrun .......................................... Appendix A-5
Index
P
Page Protection .................................. 4-10, 4-12
Paper Type ................................................... 3-16
Paper-Original Paper .................................... 3-17
Port settings ................................................. 3-16
Print Page Borders ....................................... 3-16
Print Quality ............................. 3-16, 4-10, 4-12
[Print Quality] tab ................................. 2-23, 3-4
Printer Driver Function List ............................. 3-5
Printer Engine ................................................ 1-3
Printer Menu Screen ...................................... 4-5
Printer Mode .................................................. 1-3
Printer Setting screen .................................... 4-6
[Printer Setting] tab ........................................ 5-3
Printing port .................................................. 3-16
Procedures of the Printer Setting ................... 4-7
Property of Printer Driver ............................... 3-3
[Test Print] tab ...................................... 5-3, 5-12
Timeout settings ........................................... 3-20
U
Uninstaller .................................................... 2-17
W
[Watermark] tab .................................... 2-25, 3-4
R
Reset .............................................................. 4-3
Restarting the Status Monitor ........................ 5-5
S
[SCANNER/PRINTER] button ........................ 4-3
Select Language .......................................... 4-11
[Setup] tab .................................................... 2-20
[Sharing] tab ................................................... 3-4
Sharing ......................................................... 3-18
Show/Hide the Status Monitor ........................ 5-6
Sorting .......................................................... 3-18
Staple ........................................................... 3-19
Starting the Control Panel .............................. 5-8
Starting the Status Monitor ............................ 5-5
Status Monitor ................................................ 5-3
Status Monitor install ...................................... 5-4
Status Monitor working environment .............. 5-4
[STOP/CLEAR] button .................................... 4-3
T
Test Print ............................................ 4-10, 4-13
IP-011 Print Controller Index-3
Konica Business Technologies, Inc.
500 Day Hill Road Windsor, CT 06095
Telephone: (860)683-2222
OP-IP011-04
2002.4
IP011_US_v110