1
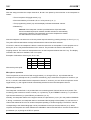
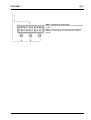
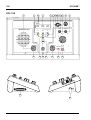
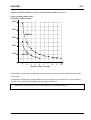
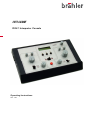
INFRACOM®
DOL7 Interpreter Console
Operating Instructions
Ver. 1.51
DOL7
INFRACOM®
Printed in Germany
If you have any questions about this manual please contact:
Brähler ICS Konferenztechnik
International Congress Service AG
P.O. Box 32 64
53627 Königswinter, Germany
Wahlfelder Mühle 3
53639 Königswinter, Germany
T +49 (0)2244 930-0
E [email protected]
You will find further information about our products on the internet at:
www.braehler.com
© 2009
BRÄHLER ICS AG, Königswinter
All rights reserved, especially (also partly) the translation, reprint, reproduction through copying or other
similar methods.
BRÄHLER ICS reserves the right to make changes without notice.
INFRACOM®, AUTOMIC® and DIGIMIC® are registered trademarks
Operating instructions DOL7, BGE-DOL7_1.x.DOC
Nov 2009
2
Copyright by Brähler ICS
INFRACOM®
DOL7
Content
About this manual ............................................................................................. 4
Symbols ..................................................................................................................4
Introduction...................................................................................................... 7
Description ....................................................................................................... 7
Operating and Adjustment.................................................................................. 7
Microphone operation ................................................................................................8
Monitoring position ...................................................................................................8
Hearing Guard ..........................................................................................................9
Locking Mode...........................................................................................................9
Select the Locking Mode............................................................................................9
Menu, Short description...........................................................................................10
Booth locking .........................................................................................................16
Length of cable in relation to number of interpreter consoles in one line .........................17
List of language symbols according to ISO639............................................................18
SERVICE FORM .............................................................................................. 19
Contact information......................................................................................... 21
Copyright by Brähler ICS
3
DOL7
INFRACOM®
About this manual
Symbols
The following symbols and fonts are used in this manual:
Indicates an important note, which has to be followed to guarantee that the functions of the unit, the
security of any data or your health are not put at risk
Indicates additional information, remarks and tips
Describes activities that must be performed in the shown order
Words in bold letters require your special attention
4
Copyright by Brähler ICS
INFRACOM®
DOL7
CAUTION
DANGER OF ELECTRIC SHOCK
DO NOT OPEN DEVICES
Do not open housing with mains cable connected.
Maintenance operations may only be executed by
qualified personnel.
Our equipment and installations have been built and tested according to the latest state of the art. Under
normal conditions, they do not require any special maintenance.
However, please be aware of the following:
• secure and stable position of the installation
• sufficient ventilation - never operate equipment near heat sources such
as heating radiators etc.
• power connection - install all power cables to avoid damaging
• connecting cables - avoid trip-traps
• liquids - avoid penetration of liquids into the housing
• exclusively operate equipment via wall sockets that are connected to
ground according to the relevant specifications and regulations
Warning: Never expose equipment to rain or humidity.
Rough handling of the equipment, such as strong shocks or vibrations, may result in damages. Inappropriate
handling and storage, which does not conform to the operating instructions, may also lead to equipment
damages
Copyright by Brähler ICS
5
DOL7
6
INFRACOM®
Copyright by Brähler ICS
INFRACOM®
DOL7
Introduction
The interpreter consoles DOL7/1 and DOL7/2 can be used by one (/1) or two (/2) interpreters. They offer
transmission of 1 + 6 channels and can be integrated into our simultaneous interpreter systems
INFRACOM® or MULTICOM.
Description
The interpreter consoles are interconnected and linked to the control console with one single cable. This
means that each single interpreter console is provided with a 3,5m cable and a plug connector A36K (26).
The plug connector of the first console is linked to the control console or to an additional power supply unit
(via an extension cable). The plug of the second interpreter console is hooked to the socket of the first
console (25) etc. The console is usually operated with combined headsets that are connected to the
connector D7-CB (electret) (23). You can also use microphones and separate headphones. In this case the
microphone is connected to the connector D5-BS (electret) (22); the headset can be plugged into the
connector D7-CB (23) or K2-CN (24).
The single interpreter console DOL7/1 offers the possibility to connect the microphone to the bayonet
connector socket R7 (8a). Instead of a second monitoring panel on the left side of the console, DOL7/1 is
provided with a loud-speaker (3) with volume control (14). The loudspeaker is on when all the microphones
of a booth are switched off. To make sure that this functions work perfectly, the technician needs to assign
the consoles to a booth ("booth lock"). This is done via two sliding switches situated at the bottom of the
DOL7 consoles (see annex). The technician can thus also guarantee for the DOL7/2 console that in a booth
only one microphone can be switched on at a time.
Operating and Adjustment
During normal operation, a display (5) situated above the keys A, B and C (4, 6, 7) indicates the preset
channels and the language symbols assigned to each channel. Above this line, the status of the respective
channel is displayed:
OFF = not available
OCC = channel occupied
LIVE = occupied by own desk
MUTE = Cough-key pressed
A channel is free if no message is displayed above the channel code. Prior to the start of the conference, the
technician must program channels and languages via the console (see annex). Prior to the start of the
conference, the „Hearing Guard” function must be adapted to the headphone or headset used.
As an option, the DOL7 console can be equipped with a ChipCard reader. With a ChipCard you can save all
settings made for a console and transfer them to another console New ChipCards are automatically
formatted.
Copyright by Brähler ICS
7
DOL7
INFRACOM®
After the setup procedure the output channels A, B and C are preset by the technician or the interpreter as
follows:
• Turn microphone off (toggle switch (17)).
• Press and hold key of channel A, B or C to be pre-set (4, 6, 7).
• Turn programming switch (10) until the display indicates the desired channel.
• Release key.
Remark: If the interpreter console is provided with a ChipCard reader
and a formatted ChipCard is inserted, the ABC selection is automatically
saved to the ChipCard. The interpreter can use this ChipCard to transfer
the ABC selection to other DOL7 consoles.
Now the interpreter can select one of the two preset output channels by pressing the keys A, B or C (4, 6, 7).
The yellow LED situated above the keys indicates which channel has been selected.
Via a CALL channel, the interpreter is able to contact the technician or the speaker. For this purpose one of
the keys A, B or C may be determined as CALL channel. The procedure is similar to the selection of
outgoing channel. The contact is interrupted as soon as the interpreter releases the CALL key. The display
indicates if the channel is available, free or occupied.
Examples of allocations of the keys A, B or C are:
A
B
C
a)
1:DE
6:FR
2:EN
b)
2:EN
6:FR
8 CH
c)
6:FR
1:DE
CALL
All three keys are equal.
Microphone operation
The microphones are turned on/off with a toggle switch (17). A large LED (15, 18) indicates that the
microphone is on ("Microphone On"). Press the COUGH key (16) to mute the microphone for a while. If you
do so, no sound is transmitted via the interpreter's channel. If, however, you turn off the microphone via the
toggle switch (17), the original channel automatically switches to the muted interpreter channel.
Monitoring position
The interpreter console DOL7/1 is provided with one monitoring panel, DOL7/2 has two such panels. The
monitoring panel consists of volume controls (14, 19), BASS (1, 8) and TREBLE controls (3, 11) as well as
input channel selectors (2, 9) and RELAY pre-selectors (12, 21).
Normally, the interpreter listens to the original channel, the pre-selector (12, 21) is in the position ORIGINAL.
If, during a conference, an interpreter does not understand the language of the speaker, he can switch to a
channel that transmits the voice of another interpreter speaking in another language. The RELAY channel
corresponding to the desired language can be pre-selected via the input channel selector (2, 9). When
required, the interpreter can switch between the ORIGINAL channel and the RELAY channel via the RELAY
pre-selector (12, 21) being set in RELAY position.
8
Copyright by Brähler ICS
INFRACOM®
DOL7
Hearing Guard
Via the Hearing-Guard function the interpreter's attention is drawn to the fact that the volume of his
headphones is too high. The LED (13, 20) alongside the volume control of the headphones light up if the
sound pressure level of the headphones is putting the interpreter's hearing under too much strain.
Locking Mode
There are now three different locking modes selectable concerning the outgoing channel interlocking
function.
Standard (This is the standard interlocking mode)
If the selected outgoing channel is occupied (“OCC.”) by another console and you
move the microphone switch to the ON position, then the microphone will remain
OFF. If the microphone switch remains in the ON position and sometimes the
selected channel will change to free state, then the microphone is not switched on.
You need to move the switch again to activate the microphone.
This is the conservative locking mode compatible to firmware version V02.0x. If
your microphone switch is in ON position unintentionally on an occupied channel,
then nothing happens automatically.
Take-over
In this locking mode you can take over a channel automatically.
If the selected outgoing channel is occupied and you move the microphone switch
to the ON position, then the microphone is inactive firstly. In the moment the
outgoing channel changes to free, then your DOL7 console automatically takes
over this channel and activates your microphone.
Remark: In the case, that more than one DOL7 console has prepared for
take over (set microphone switch in ON position) and the selected
channel changes to free, then in all probability only one of the prepared
DOL7 consoles will take the free channel.
No-Lock!
This mode allows switching on a microphone independent from the channel state.
You can switch on the microphone on the DOL7 console although if the selected
channel is occupied.
Select the Locking Mode
You can select the desired locking operating mode in the DOL7 set-up menu similar to the set-up of the
channel-language assignment or the phone type selection. The entry for the locking mode appears after the
channel-language assign menu. The following messages you can see in the display:
“LOCKING=Standard” or
“LOCKING=TakeOver” or
“LOCKING=NoLock!”
You can change the mode while pressing “Mode” and turning the “PRGM” rotary switch. Finally press “OK”.
The selected locking mode is stored on the chipcard with the other set-up data, if the set-up is saved on the
chipcard via the card menu.
Copyright by Brähler ICS
9
DOL7
INFRACOM®
Menu, Short description
OF F
OCC .
EN : 1
DE : 4
A
B
NL : 5
C
Alle gleichzeitig drücken
* *
DOL 7 - SE TUP
Me n u
C a r d
* *
Ca n c e l
1 = E n g l i s h
EN+
C h a n
o k
L a n g
L OC K I NG =S t a n d a r d
Mo d e
o k
Standard display, normal DOL operation (example of
display)
OFF = channel currently not available (turned off)
OCC. = channel currently occupied
LIVE = occupied by yourself
MUTE = “Cough” key pressed
EN:1 = channel code and language symbol according to
ISO639 for A, B and C
A-C output channel selection
To change A-C channel, press and hold A, B or C and turn
programming switch
Main menu for DOL7 setup
Menu = Press this key to implement menu-driven setup. The
user can modify all settings.
Card = (option) Press this key to go to the ChipCard menu
and save the setup to the ChipCard or load it from the
ChipCard. (In this case, manual settings only need to be
made once at one console.)
Cancel = Press this key to return to normal operation (if all
three keys were simultaneously pressed by mistake).
Setup: Assign languages to channel codes (ISO list see
annex)
Chan = Press and hold this key, then turn rotary switch to
set channel code. The language assigned to this code is displayed.
Lang = Press and hold this key, then turn the rotary switch
to select another language to be assigned to the channel
selected (ca. 140 language symbols defined according to
ISO639 can be selected). If a language has already been
assigned to another channel, a "+" is displayed behind the
language symbol.
ok = Press this key to move to the next item of the menu.
Setup automatische Übernahme (Verriegelung)
Mode = You can change the mode while pressing “Mode”
and turning the “PRGM” rotary switch. Finally press “OK”.
Standard = take not over a channel automatically
Take-over = can take over a channel automatically
No-lock! = no lock at all
ok = Press this key to move to the next item of the menu.
PHONE =K 1 0
T y p e
10
o k
Setup: Headphone type used
(to adapt headphone to the Hearing Guard function)
Type = Press and hold this key, then turn the rotary switch
to select the headphone used (headset). Selection can be
made from our readily sold models, general values can be
set.
ok = Press this key to return to normal operation.
Copyright by Brähler ICS
INFRACOM®
DOL7
I NS ERT
L o a d
Copyright by Brähler ICS
CH I PCARD !
S av e
Ca n c e l
Setup: Load from or save to Chip
Load = Press this key to load setup from the ChipCard
to DOL7.
Save = Press this key to save setup to the ChipCard.
Cancel = Press this key to cancel (without loading or
saving).
11
DOL7
INFRACOM®
DOL7/1E
3
4
4A
5
6
7 7A 8A
8
9
10
11
BRÄHLER ICS
INTO
LIVE
1:DE..
OCC
OFF
6:FR.. CALL
PRGM
BASS
BRÄHLER ICS
A
B
TREBLE
C
5
MIC
6
4
3
2
1
RELAY
HEARING
GUARD
COUGH
14
15
16
ORIGINAL
17
19
20
21
22
23
24
25
26
12
Copyright by Brähler ICS
INFRACOM®
DOL7
Interpreter Console DOL7/1E
Dolmetscherpult DOL7/1E
3 Loudspeaker
Lautsprecher
4 OUTPUT channel selector A-C
Ausgangswahlschalter Kanal A-C
4a LED „Output channel A selected“
LED „Ausgangskanal A gewählt“
5 LC-Display for output channel, language,
channel status
LC Display für die Anzeige von Ausgangskanal,
Sprache und Kanalstatus
6 LED „Output channel B selected“
LED „Ausgangskanal B gewählt“
7 OUTPUT channel selector C
Ausgangswahlschalter Kanal C
7a LED „Output channel C selected“
LED „Ausgangskanal C gewählt“
8 BASS control
BASS-Steller
8a connector socket MIC
Anschlußbuchse MIC
9 channel selector floor channel OR....6
Sprachenwahlschalter OR...6
10 programming switch
Programmierschalter
11 TREBLE control
HÖHEN-Steller
14 monitoring panel volume control (interpreting
channel)
Lautstärkesteller Abhörfeld
15 LED Microphone ON/OFF
LED Mikrofon ein/aus
16 key COUGH
Räuspertaste
17 MICROPHONE ON/OFF toggle switch for
interpreter microphone
Kippschalter MIKROFON EIN/AUS für
Dolmetschermikrofon
19 monitoring panel volume control (interpreting
channel)
Lautstärkesteller Abhörfeld
20 LED HEARING GUARD, indicates danger for
ears
LED HEARING GUARD, zeigt eine zu hohe
Lautstärke für das Gehör an
21 RELAY preselector
Relais-Vorwahlschalter
22 DIN 5-pole connector for microphones
5-Pol-DIN Buchse für den Anschluß von
Mikrofonen
23 DIN 7-pole connector for headphones or
headsets
7-Pol-DIN Buchse für den Anschluß von
Kopfhörern oder Hörsprechgarnituren
24 6.3mm-jack socket for headphones
6,3mm-Klinkenbuchse für Kopfhöreranschluß
25 socket for hooking up to the next interpreter
console DOL7
Buchse zur Verbindung mehrerer
Dolmetscherpulte DOL7
26 connection cable with A36 plug
A36-Verbindungskabel
Copyright by Brähler ICS
13
DOL7
INFRACOM®
DOL7/2E
1
2
3
4
4A
5
6
7 7A
8
9
10
11
BRÄHLER ICS
BRÄHLER ICS
INTO
LIVE
1:DE..
BASS
PRGM
TREBLE
BASS
A
5
OCC
........
6:FR.. CALL
B
TREBLE
C
6
5
4
6
4
MIC L
3
MIC R
3
2
2
1
1
RELAY
RELAY
HEARING
HEARING
GUARD
GUARD
COUGH
ORIGINAL
12
13
14
15
16
ORIGINAL
17
18
19
20
21
22
22
23
23
24
24
25
26
14
Copyright by Brähler ICS
INFRACOM®
DOL7
Interpreter Console DOL7/2E
Dolmetscherpult DOL7/2E
1 BASS control (left)
BASS-Steller (links)
2 channel selector floor channel OR...6 (right,
left)
Sprachenwahlschalter OR...6 (links)
3 TREBLE control (left)
HÖHEN-Steller (links)
4 OUTPUT channel selector A-B-C
Ausgangswahlschalter Kanal A-B-C
4a LED „Output channel A selected“
LED „Ausgangskanal A gewählt“
5 LC-Display for output channel, language,
channel status
LC Display für die Anzeige von Ausgangskanal,
Sprache und Kanalstatus
6 LED „Output channel B selected“
LED „Ausgangskanal B gewählt“
7 OUTPUT channel selector C
Ausgangswahlschalter Kanal C
7a LED „Output channel C selected“
LED „Ausgangskanal C gewählt“
8 BASS control (right)
BASS-Steller (rechts)
9 channel selector floor channel OR....6 (right)
Sprachenwahlschalter OR...6 (rechts)
10 programming switch PRGM
Programmierschalter PRGM
11 TREBLE control (right)
HÖHEN-Steller (rechts)
12 RELAY preselector (left)
Relais-Vorwahlschalter (links)
13 LED HEARING GUARD (left), indicates
danger for ears
LED HEARING GUARD, zeigt eine zu hohe
Lautstärke für das Gehör an (links)
14 monitoring panel volume control (interpreting
channel, left)
Lautstärkesteller Abhörfeld (links)
15 LED MICROPHONE ON/OFF (left)
LED Mikrofon ein/aus (links)
16 key COUGH, to mute the microphone for the
time you hold the key
Räuspertaste, unterbricht das Mikrofon solange
die Taste gedrückt bleibt
17 MICROPHONE ON/OFF toggle switch for left
& right interpreter microphone
Kippschalter MIKROFON EIN/AUS für rechtes
und linkes Dolmetschermikrofon
18 LED MICROPHONE ON/OFF (right)
LED Mikrofon ein/aus für rechtes
Dolmetschermikrofon
19 monitoring panel volume control (interpreting
channel)
Lautstärkesteller Abhörfeld rechts
20 LED HEARING GUARD (right), indicates
danger for ears
LED HEARING GUARD (rechts), zeigt eine zu
hohe Lautstärke für das Gehör an
21 RELAY preselector (right)
Relais-Vorwahlschalter (rechts)
22 DIN 5-pole connector for microphones (right
and left)
5-Pol-DIN Buchse für den Anschluß von
Mikrofonen (links und rechts)
23 DIN 7-pole connector for headphones or
headsets (right and left)
7-Pol-DIN Buchse für den Anschluß von
Kopfhörern oder Hörsprechgarnituren (links und
rechts)
24 6.3mm-jack socket for headphones (right and
left)
6,3mm-Klinkenbuchse für Kopfhöreranschluss
(links und rechts)
25 socket for hooking up to the next interpreter
console DOL7
Buchse zur Aufnahme des Steckers vom
nächsten Dolmetscherpultes DOL7
26 connection cable with A36 plug to next
interpreter console DOL7
A36-Verbindungskabel zum letzten DOL7
Dolmetscherpult
Copyright by Brähler ICS
15
DOL7
INFRACOM®
Booth locking
The
boothlocking
function
controles all loudspeakers of the
DOL7/1 in each booth. All loudspeakers in one booth will be
switched off, if one microphone
is switched on. Further on only
one
microphone
can
be
activated at a time in one booth.
The DIP-switches on the DOL7
bottom must be set as listed:
„first console“ is the first console in one booth
input
from console
before
output
to next
console
single console
OFF
OFF
„middle console“ are all consoles between first
first console
OFF
ON
and last console in one booth
middle console
ON
ON
last console
ON
OFF
„last console“ in the last console in one booth
interpreter booth
A36
A36
input
output
first console
input
middle console
ON
OFF
16
output
input
last console
ON
OFF
output
ON
OFF
Copyright by Brähler ICS
INFRACOM®
DOL7
Length of cable in relation to number of interpreter consoles in one line
Length of supply cable per line,
incl. DOL7 connection cable
500m
400m
DOL7/2
300m
200m
100m
DOL7/1
1
2
3
4
5
6
7
8
9
10
Number of DOL7 consoles
It is possible to connect up to 10 Interpreter consoles DOL7/2 or DOL7/1 to each additional power supply
unit DNT-02.
10 Interpreter consoles DOL7/2 are possible in one line, whereas only 5 consoles DOL7/1 are possible in
one line, when connected to the additional power supply unit DNT-02.
)
DNT01A can only drive 5 DOL Units overall (DNT01A is a modificated DNT01)
Copyright by Brähler ICS
17
DOL7
INFRACOM®
List of language symbols according to ISO639
AB Abkhazien
DE German
MO Moldavian
TT Tater
AA Afar
EL Greek
MN Mongolian
TE Telugu
AF Afrikaans
KL Greenlandic
NA Nauru
TH Thai
SQ Albanian
GN Guarani
NE Nepali
BO Tibetan
AM Amharic
GU Gujarati
NO Norwegian
TI Tigrinya
AR Arabic
HA Hause
OC Occitan
TO Tonga
HY Armenian
IW Hebrew
OR Oriya
TS Tsonga
AS Assamese
HI Hindi
OM Oromo
TR Turkish
AY Aymara
HU Hungarian
PS Pashto, Pushto
TK Turkmen
AZ Azerbaijani
IS Icelandic
FA Persian
TW Twi
BA Bashkir
IN Indonesian
PL Polish
UK Ukrainian
EU Basque
IA Interlingua
PT Portuguese
UR Urdu
BN Bengali, Bangla
IE Interlingue
PA Punjabi
UZ Uzbek
DZ Bhutani
IK Inupiak
QU Quechua
VI Vietnamese
BH Bihari
GA Irish
RM Rhaeto-Romance
VO Volapük
BI Bislama
IT Italian
RO Romanian
CY Welsh
BR Breton
JA Japanese
RU Russian
WO Wolof
BG Bulgarian
JW Javanese
SM Samoan
XH Xhosa
MY Burmese
KN Kannada
SG Sangho
JI Yiddish
BE Byelorussian
KS Kashmiri
SA Sanskrit
YO Yoruba
KM Cambodian
KK Kazakh
TN Satswana
ZU Zulu
CT Cantonese
RW Kinyarwanda
GD Scots Gaelic
CA Catalan
KY Kirghiz
SR Serbian
ZH Chinese
RN Kirundi
SH Serbo-Croatian
CO Corsican
KO Korean
ST Sesotho
HR Croatian
KU Kurdish
SN Shona
CS Czech
LO Laothian
SD Sindhi
DA Danish
LA Latin
SI Singhalese
NL Dutch
LV Latvian, Lettish
SS Siswati
EN English
LN Lingela
SK Slovak
EO Esperanto
LT Lithuanian
SL Slovenian
ET Estonian
MK Macedonian
SO Somali
FO Faroese
MG Malagasy
ES Spanish
FJ Fiji
MS Malay
SU Sundanese
FI Finnish
ML Malaysiam
SW Swahili
FR French
MT Maltese
SV Swedish
FY Frisian
MA Mandarin
TL Tagaiog
GL Galician
MI Maori
TG Tajik
KA Georgian
MR Marathi
TA Tamil
18
Copyright by Brähler ICS
SERVICE FORM
Material return shipments for repair-, service-, or guaranty purposes please send to:
BRÄHLER ICS Konferenztechnik AG, Auf der Alten Burg 6, D-53639 Königswinter, Germany
Phone +49 (0)2244 930-0, Fax +49 (0)2244 930-450
Dear customer,
Please ask our sales staff for the RMA number (Return of Material Authorization).
Without RMA number a treatment is not possible!
Please always include this service form, fully completed, with any complaint or repair wish you may have. Please note that only returns
with the proper and complete paperwork can be dealt within time.
A detailed fault description will reduce costs and period of repair.
Please contact us before you return equipment in order to find the most efficient way of sending.
RMA number: _________________________________________________________________________
Article description: _____________________ Serial no.: _____________ Code: ____________________
Delivery note no.: ___________________ Invoice no.: _________________________________________
Reason for return/Fault description:
______________________________________________________________________________________
______________________________________________________________________________________
______________________________________________________________________________________
Company: _____________________________________________________________________________
Contact person: ________________________________________________________________________
Phone: __________________________________ Fax: ________________________________________
Notes/Comments:
______________________________________________________________________________________
______________________________________________________________________________________
______________________________________________________________________________________
Transport damages have to be reported immediately to the responsible forwarding agent.
Remarks for Non-EU customers:
Please add to each return a delivery note or a proforma invoice, addressed to Brähler ICS AG, Königswinter,
with following statements:
Reason for return (repair or credit note)
Exact declaration of the goods, exact no. of pieces, article no. / model, serial no.
Price which was invoiced by us, better our invoice no. with date
Return shipments from Non-EU countries have to be sent either by air freight to Cologne airport, to the attention of:
Calenberg Oversea Logistics, Mrs. Taxacher, Welser Str. 8, 51449 Köln, Tel: +49 2203 3592-838
or by the following courier services:
DHL Express, Federal Express, TNT Worldwide Express, UPS Express
Please do not use any other courier service, because only the four companies mentioned above perform return shipments.
To enable quick and cost efficient customs clearance, kindly take care that the airway bill mentions
a) 'return for repair' as well as
b) the customs tariff code number of the goods (which will be advised by us together with the return of material authorization number)
Any expenses (duties and taxes) incurred by deviant handling will be charged to the sender.
Copyright by Brähler ICS
19
INFRACOM®
IRad
Contact information
Head Office
BRÄHLER ICS Konferenztechnik
International Congress Service AG
P.O.Box 3264
D-53627 Königswinter, Germany
Auf der Alten Burg 6
D-53639 Königswinter, Germany
T
+49 (0) 2244 930-0
F
+49 (0) 2244 930-490
www.braehler.com
Rental Service
T
+49 (0) 2244 930-200
F
+49 (0) 2244 930-430
E [email protected]
Sales Department
T
+49 (0) 2244 930-0
F
+49 (0) 2244 930-450
E [email protected]
Copyright by Brähler ICS
21
www.braehler.com
Tel.: 02244 930-0
DOL7
04.2530.07