1
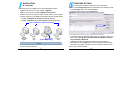
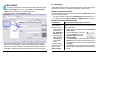
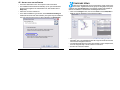
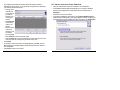
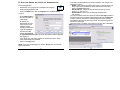
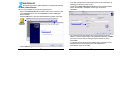
Liebert® Nform™
Ensuring The High Availability
0f Mission-Critical Data And Applications.
Technical Support / Service
Web Site
www.liebert.com
Monitoring
800-222-5877
[email protected]
Outside the US: 614-841-6755
Single-Phase UPS
800-222-5877
[email protected]
Outside the US: 614-841-6755
Three-Phase UPS
800-543-2378
[email protected]
Environmental Systems
800-543-2778
Outside the United States
614-888-0246
Quick-Start Guide - Version 4.0
Locations
United States
1050 Dearborn Drive
P.O. Box 29186
Columbus, OH 43229
Europe
Via Leonardo Da Vinci 8
Zona Industriale Tognana
35028 Piove Di Sacco (PD) Italy
+39 049 9719 111
Fax: +39 049 5841 257
Asia
7/F Dah Sing Financial Centre
108 Gloucester Road, Wanchai
Hong Kong
852 2572 2201
Fax: 852 2519 9210
While every precaution has been taken to ensure the accuracy and completeness of this literature, Liebert Corporation assumes no
responsibility and disclaims all liability for damages resulting from use of this information or for any errors or omissions.
© 2008 Liebert Corporation
All rights reserved throughout the world. Specifications subject to change without notice.
® Liebert is a registered trademark of Liebert Corporation. All names referred to are trademarks or registered trademarks of their
respective owners.
SL-29004_REV02_04-09
Business-Critical Continuity, Emerson Network Power and the Emerson Network Power logo are trademarks and service marks of
Emerson Electric Co.
©2008 Emerson Electric Co.
Monitoring
For Business-Critical Continuity™
INSTALLATION
CONFIGURE ACTIONS
A - OVERVIEW
Determine the type of installation, then see the appropriate section:
• Upgrade from version 2.0 or later: see A1 - Upgrades.
• Install on one computer: see A2 - Installation on the Server.
• Install on two or more computers: install a server version on one computer
and client versions on any additional computers (see the example below):
• See A2 - Installation on the Server (install full package).
• See A3 - Installation on a Client Computer (install remote client).
Client computers (install remote client)
Server
(install full package)
• For complete details on installation and upgrades, see the user manual in
the /docs directory of the CD.
2
To configure the software to respond to events and alarms:
• Click on the Configure Actions icon at the bottom of the window (or click
on the Configure menu, then choose Actions).
• In the Action Sets window, click the Add button.
• Enter a name and description, then click Add.
• In the Select Action Type window, above right, click the type of action you
wish to create: E-mail, Run command, Write file, Shutdown, Forward
trap, Read data or Write data.
• Configure the action, then add other actions to the set as desired.
• When finished, click the Map button in the Action Sets window to define
which alarms will trigger an actions set to be executed for which devices.
See the user manual for details.
15
ADD AREAS
A1 - UPGRADES
An area may be added to organize devices or add graphic floor plans.
Liebert Nform devices, licenses, shutdown clients and e-mail actions can be
exported from version 2.0 or later, then imported to the new version.
• Click on the Configure menu, then choose Views. Choose Add, Edit or
Copy to open the Navigation View Properties window.
• In the Area section, choose Add, Edit or Copy.
EXPORT CONFIGURATION DATA
Be sure to save the export files in the default location (the Export folder in the
version 2.X program folder).
• For version 2.5.002 or later, choose Import/Export from the File menu, or
• For older versions, run export_utility.exe (in Upgrade folder on the CD).
IMPORT CONFIGURATION DATA FROM:
• In the Area Properties window, enter a name that will appear in the tree.
Optionally, add a description, a graphic image and info links. Click OK.
• See the user manual for details on using areas and floor plans in the tree.
• Click OK in the Navigation View Properties window to save the changes.
14
SAME SERVER
If the new version is
to be installed on
the same server:
• Install version 4.0
as described in
A2 - Installation
on the Server.
• The export files
will be detected
automatically (if
in the default
folder).
If the import fails,
follow the steps at
right for using
Import 2.5 Data.
DIFFERENT SERVER (WITH IMPORT 2.5 DATA)
If upgrading to a different server, create a temporary
folder on the Nform 4.0 server and copy the exported
files to that folder.
• Install version 4.0 as described in A2 - Installation
on the Server.
• On the Liebert Nform 4.0 server,
click on the Start menu, then
Programs, Nform and finally
Import 2.5 Data.
• In the Directory box, enter the full path or click the
Browse button to locate the folder containing the
exported files, then click on one of the text files and
click Open.
• Click Import. The import utility will stop the Nform
service, import the appropriate files and restart the
service.
3
A2 - INSTALLATION ON THE SERVER
• Insert the Liebert Nform CD in the computer’s CD or DVD drive.
• The Installation Wizard starts automatically. (If not, open the Windows
Explorer and navigate to the Liebert Nform CD, then double-click on
Setup.exe.)
• Follow the on-screen instructions.
• In the Select Installation Type window, choose Nform Full Package to
install both the server and client software. (This option may be installed on
only one computer per license; for client computers, see Section A3.)
CONFIGURE VIEWS
Views in the Navigate tab may be customized to create views for different users, organize devices into groups or add graphic floor plans.
A default view called All Devices is automatically created and updated as
devices are added to or deleted from the Managed Devices list.
• Click on the Configure menu, then choose Views. Choose Add, Edit or
Copy to open the Navigation View Properties window.
• The Navigation View Tree at left shows how devices will appear in the
Navigation view. The Available Devices list at right shows all devices that
have not been assigned to the tree.
• Use standard shift-click and control-click methods to select multiple items,
then use drag-and-drop or arrow buttons to move items.
• See the user manual for details.
4
13
• The Add Discovered Devices window shows all supported devices
detected during the search. You may add as many devices as allowed by
your license. Review the list and:
• Place a check
mark ; next
to each device
you want to
add to the list
of managed
devices.
• Click Select all
to add check
marks to all
devices.
• Remove check
marks from
devices you do
not want to
have managed.
• Click Clear all to remove all check marks.
• Click the Edit button to view all properties or make changes, then refer
to the user manual. Changes may be made at any time.
• Click Finish.
• A message confirms the device was added properly. Click OK, and the
Managed Devices window displays all devices that have been added to
the configuration.
• Click Close to return to the viewer.
12
A3 - INSTALLATION ON A CLIENT COMPUTER
• Insert the Liebert Nform CD in the computer’s CD or DVD drive.
• The Installation Wizard starts automatically. (If not, open the Windows
Explorer and navigate to the Liebert Nform CD, then double-click on
Setup.exe.)
• Follow the on-screen instructions.
• In the Select Installation Type window, choose Nform Remote Client to
install the client software only. (This option applies to a client computer, but
the full package must be installed on another computer—see Section A2.)
5
B - START THE VIEWER AND LOG ON AS “ADMINISTRATOR”
To start the application:
• Double-click on the program icon (if added to the computer
desktop during installation) OR
• Click on the Start button, then on Programs, then on Nform Viewer.
To log on:
• Enter Administrator in
the User name box on
initial startup.
By default, the
Administrator account
has full access to all
software features
including configuration.
• Leave the Password
box blank on initial
startup. No password
is required for the first login. You will be prompted to create a password
after logging in.
• In the Server box, enter the IP address or domain name of the server
where Liebert Nform was installed.
• Click on the Login button.
• In the Discover Managed Devices window, below left, enter ranges of IP
addresses to search:
• Enable - Place a check mark ; for each range you wish to search now.
Each range remains available for future searches until removed by
clicking the Delete row button.
• Start IP address - Click in the box and enter the lower end of the
range—e.g., 198.162.0.10.
• End IP address - Click in the box and enter the upper end—
198.162.0.50.
Two columns display results from previous searches: Not mgd (number of
devices found but not yet added to Managed Devices list) and Unknown
(number of devices found but not currently supported by the software).
• Click Next to start the Auto Discovery process. The Search Progress window opens, below right.
• When the search is complete, the progress bar shows 100%. Click Next.
NOTE: If you have trouble logging in, click the About button for technical
support information.
6
11
B - DETECT DEVICES ON A NETWORK
C - ENTER THE LICENSE KEY
The auto discovery feature speeds up configuration with automatic detection
of multiple devices within a range of IP addresses on a network.
A Liebert Nform license key must be installed before any configuration is
possible. If you purchased additional licenses, repeat the following steps to
install each license.
To install a Liebert Nform license key:
• Click on the Configure Licenses icon at the bottom of the window (or click
on the Configure menu, then choose Licenses).
To use Auto Discovery to detect devices on the network:
• Click on the Configure Devices icon at the bottom of the window (or click
on the Configure menu, then choose Devices) to open the Managed
Devices window.
• Click the Add button to open the Nform Add Devices wizard, below right.
Configure
Licenses
Configure
Devices
• Click on Discover new devices to add.
10
• In the Licenses window, click the Add button at the top right.
• Read the license agreement, and click I accept to continue.
• In the Add License window, enter the 35-character license key including
hyphens (-) from the sticker on the CD case or the certificate provided by
Emerson, then click OK.
After installation, the license key numbers appear in the Licenses window or
may be viewed through the Help menu. See the user manual.
7
ADD DEVICES
Network devices may be added separately or automatically detected.
A - ADD A SINGLE DEVICE
Devices may be added one at a time through this feature.
• Click on the Configure Devices icon at the bottom of the window (or click
on the Configure menu, then choose Devices) to open the Managed
Devices window.
• Click the Add button to open the Nform Add Devices wizard, below right.
• In the Add a Single Device window, below left, enter the hostname or IP
address of the device you wish to add.
• Check ; the Obtain settings from device box to automatically detect
device characteristics—description, device type and protocol.
• Click Next.
Configure
Devices
• The Customize Properties window, above right, displays key device
details. (To view or make changes to the properties at this time, click Edit,
then refer to the user manual. Changes may be made at any time.)
• Click Finish.
• A message confirms the device was added properly. Click OK, and the
Managed Devices window displays the newly added device.
• Click Close to return to the viewer.
• Click on Add a single device.
8
9