1
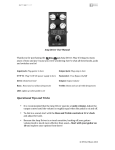
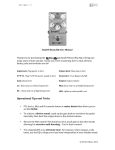
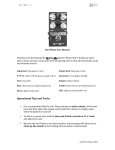
RT ElecTRonix.com The “Other” Tone Controls User Manual Thank you for purchasing the RT ElecTRonix OTC. May it bring you many years of tone and joy! Incase you were wondering: here’s what all these knobs, jacks and switches are for! Input Jack: Plug guitar in here : Plug 9-‐18V DC power supply in here Sub: Boosts very low frequencies Air: Boosts very high frequencies LED: Lights up when pedal is on! Operational Tips and Tricks Output Jack: Plug amp in here Footswitch: True Bypass On/Off Touch: Boosts or cuts “hands” or “pick attack.” Output: Output volume • When Sub and Air are set fully counterclockwise, they are inactive. • The Touch control has a center detent that allows you to set it flat. • Dial Touch back to smoothen your sound or dial it up for more percussive tones. • It is recommended that you place the OTC after overdrives, fuzzes, and distortions in your signal chain. This allows the OTC to shape your distorted signal rather than your guitars dry input. © RT ElecTRonix 2013 RT ElecTRonix.com Power Info For optimal performance, RT ElecTRonix recommends that you power your pedal with a Center Negative 9V DC Power Supply (Boss Barrel-‐Style Connector). Recommended power supplies include the Visual Sound 1 Spot and Voodoo Lab’s Pedal Power systems. For increased headroom, you can safely run your pedal on up to 18V DC! You can also power your pedal with a 9V battery. To change the battery, remove the four screws on the back of the pedal and flip the lid up towards the top (as pictured). Wires will be attached, so be careful not to pull on them. Remove the 9V battery clip from below the footswitch, insert a new 9V battery, and slide the battery between the footswitch and the bottom of the case. NOTE: BATTERY NOT INCLUDED. Troubleshooting Guide If your pedal is not working properly, please work through this guide before contacting RT ElecTRonix. • Guitar and Amplifier o Start by plugging your guitar directly into your amp and verify that they are both functioning properly. • Cables o Test each cable individually by plugging them directly into your amp. • Power o If you are using a power supply, verify that your supply is operating properly by testing it with another pedal. o If you are powering your pedal with a battery, replace the old battery with a new one. Should this guide fail to solve your problem, contact [email protected] for repair and warranty claim information. Warranty Information RT ElecTRonix products carry a 5 year limited warranty, applicable from the pedal purchase date. Proof of purchase will be required and warranty service will only be extended to the original owner. The 5 year warranty only covers manufacturing defects and applies only to the circuit board and original wiring. Footswitches and potentiometers are covered for 1 year. Knobs, feet, and battery clips are not covered. Warranty repairs will cover parts and labor. Owner will pay shipping to RT ElecTRonix and personal drop offs and pick-‐ups will not be accepted. Any damage caused by misuse, mishandling, or accidental damage will not be covered under warranty. Any user modifications or user-‐attempted service will void the warranty. © RT ElecTRonix 2013