1
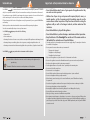
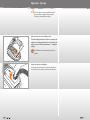
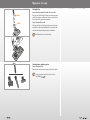
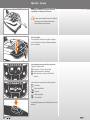
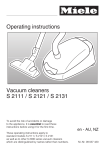
USER MANUAL Plus Plus Plus Contents Should vacuum cleaning be fun?.................................................................................................................2 Intended use...............................................................................................................................................3 Important safety instructions to observe.......................................................................................................3 Your THOMAS CROOSER...............................................................................................................................4 Operation – it’s easy............................................................................................................................ 5–10 Step-by-step cleaning and maintenance.............................................................................................11 – 15 Malfunctions – if a problem occurs............................................................................................................ 16 Doing your part for the environment......................................................................................................... 17 Customer service...................................................................................................................................... 17 Technical data.......................................................................................................................................... 17 Warranty.................................................................................................................................................. 17 Should vacuum cleaning be fun? Sure! And we are glad that you have chosen your very own THOMAS . Compact, lightweight and agile, it will prove a welcome support in everyday cleaning while protecting both you and your furniture. Please read the user manual through carefully. In doing so you will quickly become familiar with your THOMAS . Discover the versatility it offers – from carpet to hard flooring, or for sensitive material such as upholstery and curtains. The bumper in one of your favourite colours also protects your furniture as you vacuum. Smart design of nozzle, wand, rollers, cable and suction head make vacuuming easy and spares your back. Your THOMAS was produced in the Siegerland region in the heart of Germany and is a high-quality product. Proper handling and care will contribute to ensuring that your THOMAS provides many years of enjoyment. Have fun vacuuming and “croosing” in your very own style! Your THOMAS 2 team Intended use Important safety instructions to observe Your THOMAS is a vacuum cleaner to be used exclusively for vacuuming dry materials. It is intended solely for use in private households. Only use the vacuum cleaner according to the instructions in this manual. •D o not allow children under 8 years of age to operate this appliance unless they The manufacturer accepts no liability for any damage due to incorrect operation or for use other than that for which it was designed. For this reason, be sure to observe the following instructions. Efficient cleaning and the function of the appliance can only be guaranteed if you use genuine THOMAS filters and dustbags. Make sure you have read and understood the entire user manual before operating the appliance. Store the user manual safely and pass it on to any future owners. Your THOMAS may not be used for the following: • Commercial use • Use in outdoor areas • Vacuuming fine dusts such as toner or soot, since these can impair the filter performance and damage the unit • V acuuming burning or smouldering objects such as cigarettes, seemingly extinguished ashes or coal • V acuuming toxic materials and solvent-containing liquids such as paint thinner, oil, petrol and caustic fluids Your THOMAS may not be used in environments at risk of explosion. Important! F ailure to follow these instructions can lead to damage to the appliance and/or personal injury. Information. Follow these instructions to make optimum use of the appliance. are under constant supervision. • Children from 8 years of age and persons with impaired physical, sensory or mental capacities, or lack of experience and/or knowledge, may only use the vacuum cleaner without supervision if they have been instructed on using the appliance safely as wells as the dangers involved, and have understood this instruction. • Do not allow children to play with the appliance. • Do not allow children to perform cleaning or maintenance without supervision. • Keep the batteries of the CleanLight floor nozzle and of the remote control on the handle of the suction hose out of reach of children. • The voltage specified on the nameplate must match the mains supply voltage. The nameplate is located on the underside of the appliance. • Do not operate the vacuum cleaner under any circumstances if: – The power cord is damaged – The appliance is visibly damaged – The appliance has been dropped • O nly connect the appliance to a power socket with a 16 A automatic circuit breaker. • Never use the appliance in areas where flammable materials or gases are stored or may have formed. • Never leave the appliance switched on and running unattended. • Put the appliance down on a firm, stable surface – particularly when vacuuming stairs. • Do not stretch or kink the suction hose. • Do not stand or sit on the appliance. • Do not hold the nozzles and tubes near your head during operation – injuries could result. • Do not use the appliance directly on people or animals. • B efore cleaning, care and servicing, or in the event of malfunction, turn off all switches and unplug the power cord. • D o not leave the appliance outdoors and do not expose it directly to moisture or submerge it in liquids. • Do not expose the appliance to heat or chemical fluids. • Never unplug the appliance from the socket by pulling on the cord. Always pull on the plug. • Do not pull the power cord over sharp edges or surfaces. • Other types of usage, conversions or modifications are prohibited. • Never attempt to repair damage to the appliance, its accessories or the power cord yourself. Always have the appliance inspected and repaired by an authorised customer service facility. Modifying the appliance can pose a danger to your health. Ensure that only genuine THOMAS replacement parts and genuine THOMAS accessories are used. 3 Your THOMAS 22 1 Housing cover 2 Unlock button for housing cover 3 Carry handle 4 Suction port 5 Bumper 6 Wheels 7 Mains plug and power cord 8 Main On/Off switch 9 Cable winder 10 Touch display 11 Dustbag change indicator 12 Suction hose 13Handle 14 Auxiliary air slide/remote control* 15 Unlock button 16 Extendible telescopic wand 17 CleanLight floor nozzle with footswitch* 18 Turn-around parquet nozzle* 19 Combination animal hair/floor nozzle* 20 Turbo nozzle for carpets 21MicroPor® dustbag 22 Dustbag holder 23 Blue CleanAir filter 24 Motor protection filter 25 Upholstery nozzle* 26 Animal hair nozzle for upholstery* 27 Crevice nozzle 28 Dust brush, turnable 29 Varioclip accessory holder 13 14 21 12 15 4 10 11 1 9 8 7 23 6 24 2 5 25 26 3 27 16 28 18 17 29 4 19 20 Application Carpet or hard flooring Upholstery, car etc. Crevices, corners, car, other hard-to-reach areas Nozzle / Accessory Floor nozzles Upholstery nozzle Furniture, keyboards, books etc. Dust brush, adjustable Parquet and other easily-scratched surfaces Parquet nozzle Crevice nozzle * D epending on the model, the indicated equipment features may differ in version or no longer be available Operation – it’s easy D o not use appliance to vacuum any liquids or damp dirt. Allow steam-cleaned or shampooed rugs and carpeted flooring to dry completely before vacuuming. Make sure the unit rests securely on all three wheels. Check that a dustbag has been inserted. If there is no dustbag in the appliance or the dustbag change indicator shows that the bag is full, replace it (see section “Cleaning and maintenance” – Changing the dustbag). When delivered, there is already a dustbag inserted in the appliance. Connect the suction hose to the appliance. To do this, plug the suction hose connector into the suction port. Turn the suction hose connector until you see and hear it latch into place. »click« 5 Operation – it’s easy Cleaning the floor Connect the telescopic wand to the handle of the suction hose. »click« »click« Gently press the handle and twist it sideways into the telescopic wand until the lock mechanism audibly latches. You release the handle from the telescopic wand by pressing the unlock button. Connect the required floor nozzle. Gently press the floor nozzle and twist it sideways into the telescopic wand until the lock mechanism audibly latches. You release the floor nozzle from the telescopic wand by pressing the unlock button. Not all floor nozzles have a lock mechanism. Cleaning furniture, upholstery and car Connect the required nozzle. Gently press the nozzle and twist it sideways directly onto the handle. To select the proper nozzle for the task, see the section “Your THOMAS ”. 6 Operation – it’s easy Hold the plug of the power cord. Pull the power cord out to the required length. Insert the plug into the mains socket. T he power cord must be pulled out of the unit to its full length if operating time exceeds 30 minutes. Otherwise there is a danger of damage caused by overheating. Switch on the appliance. Do this by pressing the main switch on the appliance. The appliance starts in ECO mode, which is shown by the middle pictogram lighting up on the touch display. 1 Select an appropriate suction power level for the respective task. Depending on the appliance model: 1 2 3 2 – by pressing the +/- buttons on the touch display – by pressing a pictogram on the touch display – a nd/or by pressing the +/- buttons on the handle of the suction hose Select one of the five suction power levels for different applications: - Hard flooring - Rugs and carpeted floors - Energy saver - Upholstery and pillows - Curtains and fabrics 3 The respectively lit pictogram on the touch display indicates the selected power level. 7 Operation – it’s easy Perform cleaning. In addition to selecting the suction power level, you can reduce the suction power mechanically if necessary by opening the auxiliary air slide on the handle of the suction hose. Close the auxiliary air slide to return to the full suction power of the previously selected level. If the dustbag change indicator shows that the bag is full, replace it (see section “Cleaning and maintenance” – Changing the dustbag). As the dustbag fills and the suction power gradually decreases, a red marking appears in the viewing window. The dustbag must then be changed when this marking fills the entire length of the viewing window, at the latest. Switching off and on during brief work interruptions Touch the currently lit pictogram on the touch display or – depending on model – press the button on the handle. Switching off when done vacuuming Do this by pressing the main switch on the appliance. Remove the plug from the mains socket. Press the button for automatic cord rewinding. The cord rewinds automatically. 8 Operation – it’s easy 1 1 F or brief pauses in vacuuming, use the parking aid on the back of the unit to fasten the suction pipe in the holder. 2 F or compact storage of the unit until next use, fasten the suction pipe in the parking aid on the underside of the unit. Slide the parking hook into the recess provided on the back. 2 Detach the suction hose if necessary. To do this, press the button on the suction hose connector. Turn the connector a quarter turn sideways. Pull the suction hose off the suction port. »click« To keep the accessories of your vacuum cleaner always handy, store the nozzles in the separate Varioclip accessory holder which you can fasten conveniently to the telescopic wand, handle or on the rear parking aid. 9 Operation – it’s easy Changing the bumper You will find bumpers in other attractive colours in your THOMAS accessories. To change the bumper, proceed as follows: a) Remove the plug from the mains socket. b) Detach the suction hose. c) Place the unit in an upright position. d) Stretch the bumper starting in the front on the carry handle and remove it over the underside of the unit. e) Set the new bumper on the wide rear side and pull it over the circumference of the entire appliance. 10 Step-by-step cleaning and maintenance Only use genuine THOMAS spares and accessories. This is the only way to guarantee proper functioning and effective cleaning. No maintenance other than that described here is necessary. To replace defective components, contactTHOMAS customer service (see “Customer service”). You can obtain THOMAS dustbags and filters at your specialist dealer or from THOMAS customer service as well as under www.robert-thomas.net Remove the power plug from the socket before performing cleaning and maintenance work! Changing the dustbag If the dustbag change indicator shows that the bag is full, replace it. Open the housing cover. Do this by grasping the grip recess in the housing cover under the carry handle. Press the housing cover unlocking mechanism. Open up the housing cover until it audibly latches in place. hen delivered, there is already a dustbag inserted in the W appliance. Remove the dustbag holder with dustbag by pulling it up out of the appliance. 11 Step-by-step cleaning and maintenance Remove the dustbag laterally from the dustbag holder. Pull the dustbag to the side by the coloured grip tab. Overcome the lock on the dustbag holder by pressing the plastic surface upward slightly. When you insert a dustbag into the holder, leave the dustbag folded up as it was when you removed it from the packaging. Insert the new dustbag into the dustbag holder. Insert the dustbag holder with dustbag down into the appliance. Do this by sliding the dustbag holder into the guide in the dust chamber. Push the dustbag holder downward until it reaches the limit stop in the guide provided in the dust chamber. Close the housing cover. Do this by pushing the housing cover down. Gently press the housing cover level with the unlocking mechanism until you hear the cover latch into place. A catch prevents closing the housing cover if no dustbag holder with dustbag is inserted. Do not use force! 12 Step-by-step cleaning and maintenance Cleaning the Blue CleanAir filter The unit has a high-quality Blue CleanAir filter, which can be cleaned repeatedly as necessary, depending on the type of household dust. Clean the Blue CleanAir filter as required, depending on usage and decreasing suction power, every 6 months at the latest. Press the side catches together and remove the Blue CleanAir filter by pulling it upward out of the unit. Knock it against a firm base. Rinse out the filter with clean water if heavily soiled. When cleaning, do not use any brushes or implements which could damage the filter ribs. Allow the filter to dry before putting it back into the unit. With the housing cover opened, place the cleaned Blue CleanAir filter into the unit from above. Changing the Blue CleanAir filter After approximately 50 hours of operation, the Blue CleanAir filter is worn out and must be replaced with a new one. The filter change indicator will then light up. Replace the Blue CleanAir filter with a new one if cleaning it does not substantially increase the suction power, if the filter shows heavy soiling or damage, or if the filter change indicator has lit up (depending upon the model). Insert a new Blue CleanAir filter and hold the indicator pressed for 3 seconds to reset it. 13 Step-by-step cleaning and maintenance Cleaning the motor protection filter The unit is equipped with a motor protection filter made of foam, which is located in the dust chamber of the unit. The motor protection filter can, depending on requirements and the type of household dust, be reused multiple times by washing it out. Clean the motor protection filter according to the usage demands, such as when dirt (dust, hair, etc.) is visible. With the housing cover open and the dustbag removed, fold down the filter frame in front of the motor protection filter. Take out the motor protection filter toward the front to remove it fromthe unit. Knock it out against a firm base. Rinse out the filter with clean water if heavily soiled. When cleaning, do not use any brushes or implements which could damage the foam. Allow the filter to dry completely before reinserting it in the unit. Place the cleaned (or new) motor protection filter in the filter frame and fold up the filter frame until it audibly latches. Ensure that the motor protection filter is fully extended over the filter holder. Exchanging the motor protection filter Always exchange the motor protection filter for a new one if you are breaking open a new pack of THOMAS dustbags. Each pack of THOMAS dustbags includes a new motor protection filter. Exchange the motor protection filter for a new one if it is heavily soiled or shows signs of damage. Cleaning the appliance housing, dust chamber and accessories Use a soft, slightly damp cloth to clean the housing of the appliance as well as the housing cover and dust chamber, and to remove dirt on the suction port and on the nozzles. 14 Step-by-step cleaning and maintenance Changing the battery of the remote control on the handle of the suction hose (dependent on model) If your THOMAS can no longer be controlled by the remote control unit on the handle, the remote control unit battery must be replaced. + Knop fzelle Open the housing of the remote control and take out the board. Use a coin to press the lock of the remote control housing downward. Lift off the housing of the remote control unit. Carefully take out the board. Remove the battery laterally from the battery holder. Dispose of the used battery through your local collection system. Replace the battery with one of the same type (round cell CR 1632 / 3 V). Insert the new battery from the side all the way into the battery holder. The minus pole of the battery must face up. Changing the batteries of the CleanLight floor nozzle (dependent on model) + + - If the LED illumination fails to automatically switch on when lighting conditions dictate and with simultaneous movement of the floor nozzle, the batteries must be replaced. Open the battery compartment lid of the floor nozzle. To do so, turn the floor nozzle so that its underside faces up. Press the locking catch of the battery compartment lid and open the lid. Remove the two batteries by pulling them up out of the battery compartment. Dispose of used batteries through your local collection system. Exchange the batteries for two new ones of the same type (micro / AAA / LR03). Place the new batteries into the battery compartment. Pay attention to the polarity (+/– poles) when inserting! 15 Malfunctions – if a problem occurs Problems / malfunctions Reason / remedy The appliance will not start • A re the power cord, plug and socket intact? • B efore inspecting, unplug the power cord; have all repairs carried out by authorised specialists • Is the appliance switched on? ➔ Check this Dust comes out of the appliance during vacuuming • A re the dustbag, Blue CleanAir filter and motor protection filter installed as specified in the user manual? ➔ Check this Suction power gradually decreases • Is the Blue CleanAir filter clogged? ➔ Clean or replace the Blue CleanAir filter • A re the nozzles, suction pipe or hoses blocked by coarse dirt? ➔ Stretch the hose during operation to loosen the blockage; remove the blockage • Is the housing cover properly shut? ➔ Check this Insufficient suction power • Is the filter bag full? ➔ Insert a new filter bag • Is the Blue CleanAir filter clogged? ➔ Clean or replace the Blue CleanAir filter • A re the nozzles, suction pipe or hoses blocked by coarse dirt? ➔ Disassemble and clean • Is the electronic suction power control set to MIN? ➔ Set the suction power to MAX • Is the mechanical suction power control on the handle open? ➔ Close the sliding button on the handle 16 Doing your part for the environment | Customer service | Warranty Doing your part for the environment Warranty • Packaging The packaging protects the vacuum cleaner from damage in transit. It is made of environmentally friendly materials and is therefore recyclable. Dispose of any packaging material you no longer need at your local recycling centre. • O ld units If your THOMAS has reached the end of its service life, deliver the unit to your dealer or a recycling centre for waste recovery. It still contains valuable recyclable materials. For the current disposal options, please ask your dealer or local authorities. • Batteries Dispose of used batteries through your local collection system. • Dustbags and filters Dustbags and filters are manufactured from environmentally compatible materials. You can dispose of the filters as regular household waste. This also includes the dustbag, providing it contains no pollutants that are prohibited in household waste. Independently of the warranty obligations of the dealer arising from the sales contract, we offer the following guarantee on the appliance according to the conditions below: 1.The warranty period is 24 months from the day of delivery to the first end user. This period is limited to 12 months for commercial use or equivalent operational demands. To pursue a claim, proof of purchase must be submitted. 2.Within the warranty period we will rectify all substantial, verifiable functional inadequacies due to faulty design or material defects by either repairing the defective parts or replacing them at our discretion; the exchanged parts then become our property. The guarantee does not extend to easily broken parts such as glass, plastic or lights. Defects must be reported to us immediately upon detection within the warranty period. During the warranty period, the cost of labour and of spare parts needed to rectify the malfunctions will not be billed. In the case of unwarranted claims against our customer service centre, the costs incurred will be charged to the customer. Repair work at the customer’s location or installation site can only be requested in the case of large appliances. Other appliances must be sent to our nearest customer service centre, authorised repair shop, or to the factory. 3.There is no warranty obligation in the case of minor deviations from product specifications caused by chemical or electro-chemical effects, or by water, or damage generally resulting from abnormal ambient conditions, which do not affect the value or usability of the product. In addition, no warranty claims are accepted for damage resulting from normal wear and tear, or from non-observance of the user manual or inappropriate use. 4.Any claim under warranty is also void if persons not authorised by us undertake any modifications or repairs to the appliance. 5.Warranty services neither extend nor renew the warranty period for the appliance or any installed replacement parts: the warranty period for installed replacement parts ends along with the warranty period for the entire appliance. 6.Additional or other claims, particularly those for compensation for damage caused outside of the appliance – providing there is no legally stipulated liability for this – are excluded. We also offer you our customer service beyond the expiry of your warranty period. Please consult your dealer or contact our customer service department directly. Customer service Ask you dealer for the THOMAS customer service centre in your area. Please also provide the information on the nameplate of your THOMAS on the underside of the unit. . The nameplate is located To maintain the safety of the appliance, have repairs, particularly those on live components, performed only by qualified electricians. In the event of a malfunction, consult your specialist dealer or contact the factory customer service directly. Technical data THOMAS eco Plus animal Plus parquet Plus Type designation: 784/A 1 784/A 2 784/A 3 Power supply: 230 V / 50 Hz 230 V / 50 Hz 230 V / 50 Hz Power consumption: 1000 W 1200 W 1200 W Power cord length (diameter): 10 m (2 x 1 mm2) 10 m (2 x 1 mm2) 10 m (2 x 1 mm2) Appliance dimensions (L×W×H): 425×251×231 mm 425×251×231 mm 425×251×231 mm 4.7 kg 4.7 kg Appliance weight (without accessories): 4.7 kg 17 18 19 Customer service centres www.robert-thomas.net Robert Thomas Metall- und Elektrowerke GmbH & Co. KG Postfach 1820, 57279 Neunkirchen, Germany Hellerstraße 6, 57290 Neunkirchen, Germany Phone +49 (0) 2735 - 788 - 0 Fax +49 (0) 2735 - 788 - 519 E-mail: [email protected] www.robert-thomas.de GERMANY Part no. 188 322 - GA 12/13 United Kingdom: Premier Aftercare Ltd. Armstrong Buildings The Green, Darlaston West Midlands WS10 8JS Phone 0044 (0)121 568 6660 Mobile 0044 (0)7538 050 56 [email protected]