1
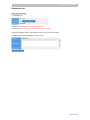
Installation Manual
Version 2.1
Copyright 2003-2007
Table of Contents
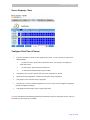
PrintUsage Print Monitoring System Introduction
Running Environment
Main Features
Printer Compatibility
PrintUsage Object Properties Configuration
Add Printer
List All Printers Information
Basic Properties Configuration for Printer
Configure Printer Charge Properties
Configure Printer File Type
Configure Print Time of Printer
Configure User Properties
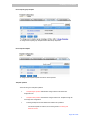
Add Print Server to Manager site
Server Group - Server List
Basic Properties Configuration for Server
Server Property – Charging
Server Property - File Type
Server Property – Time
Server Property – Users
Add Group
Group List
Quota Reset
Group Setup
Group File Type
Configure Printer Properties of User Group
Configure User Group Quota
Configure User Group Time
Add user
Configure User Basic Information
Configure User File Types
Configure User Printer
Configure User Quota
Report List
Simple Report
Ranks
Task Analysis
Paper Size Analysis
Color/Mono Analysis
Pages Analysis
Printer Analysis
Server Analysis
User Analysis
Time Analysis
12 Month Analysis
Quarter Analysis
1
1
1
2
3
5
7
8
10
12
15
17
19
21
22
23
25
28
29
31
32
33
34
35
38
40
41
45
48
50
52
54
58
60
62
84
87
89
90
96
98
100
101
103
105
Week Analysis
Year Analysis
24 Hour Analysis
31 Day Analysis
Weekday Analysis
107
109
111
113
115
Customization of report detail pages
120
Definition for Report Type
126
Options
131
Registration Info
Monitor Mode
Notification
Template
Language
Administrator
Roles
File Types
Paper Types
Data Maintenance
133
134
135
137
141
142
144
148
149
152
Print Log
153
System Log
156
Advanced Setup
158
Auto Configuration
161
PrintUsage Data Upgrading Tool
167
Run Setup Wizard
169
Q&A
173
PrintUsage 2.1 User Manual
PrintUsage Print Monitoring System Introduction
Running Environment
Hardware Requirement
Intel Pentium III CPU or above, 20GB of free hard drive space, minimum of 128MB system memory (512MB
is recommended).
Software Requirement
•
Supported Operating System: Windows 2000/XP/2003
•
Supported Database: MS Access, MS SQL Server 7.0/2000, MySQL 3.23 or newer.
PrintUsage 2.1 also support Oracle Database 8i and newer.
Attention
•
Starting from PrintUsage 2.0, Windows NT is no longer supported as the print server.
•
Monitoring service and web management service require Microsoft database access
component MDAC 2.6 or above. Systems administrators are recommended to install the
Latest MDAC database component to obtain the best performance.
•
MyODBC is required when MySQL is used. MyODBC, 3.51 and MySQL Database 3.23 /
4.01 have been tested to be compatible with PrintUsage 2.x.
•
Internet Explorer 5.0 or above is required for PrintUsage Web management. Internet
Explorer 6.0 or newer is recommended. Other browsers are not supported. Note:
PrintUsage 2.0 and earlier require Internet Explorer 6.0 to be installed on the server.
Main Features
Print job recording (Enterprise Version only)
Contents of printing jobs are saved in TIFF format. Administrator can turn on or turn off
image capturing and set the capture image resolution for each printer. Free TIFF image
viewers are available for download.
Reprint Capability (Enterprise Version only)
Contents of print jobs saved on the server can be reprinted by the administrator via the web
management interface.
Selective User Monitoring (Enterprise Version only)
The administrator can select which users are monitored by PrintUsage..
WEB Interface Management
Page 1 of 246
PrintUsage 2.1 User Manual
•
PrintUsage management functions and reports are accessed through the WEB interface.
Administrator can manage print resources at any workstation without the need of additional
management software.
•
The software is installed on the print server and does not require changes on user
workstations or the existing printing configuration.
Centralized Management and Authentication Charging
•
Multiple printers can be added to PrintUsage to achieve centralized management and cost
accounting, thus make print resources management and cost control an easy task.
•
Flexible monitoring modes allow distributed monitoring by geographical decentralization and
logical centralization.
•
Multiple administrators can share related PrintUsage administrator tasks.
•
Multi-roles enable different administrators with different management role to have
associated privileges.
Detailed Web Reporting
•
Administrators can view report from any workstation via a web browser.
•
More than 20 graphical reports are included for print job and print cost analysis.
•
User-defined report functions provide maximum flexibility.
•
Reports can be exported to Microsoft Excel Spreadsheet format.
Flexible Charge Logging Mode
•
Cost accounting can be managed by user name or by computer name. Both Domain and
peer-to-peer networks are supported.
•
User accounts can be imported from multiple domains.
•
Print cost per page can be adjusted to reflect on different paper type and color prints.
•
User printing quota can be set in various time periods such as per year, quarter, month,
week, day, fixed time period or no limit.
Simple Structure, Flexible Operation & Easy To Scale
•
There are three modules including the manager site, central database and monitor service,
which can be installed on a single machine or multiple machines to satisfy printing control
needs. (Access database is not suitable for large user base).
Support of Multiple Databases To Suite Different Environments
•
Support for Microsoft Access, Microsoft SQL Server 7.0/2000, MySQL and Oracle database.
User accounts can be exported from and imported to the database.
Printer Compatibility
Page 2 of 246
PrintUsage 2.1 User Manual
•
Simple monitoring: All printers used on Windows 2000/XP/2003 including multi-function machine or graph
plotter are compatible.
•
Known problems and restriction:
1. When Epson Stylus series printers are used, there is task pause problem and the user intervention is need
to continue.
2. To use printers in not running PCL5c, PCL5e, PCL6 drivers or using Epson and PostScript language under
Windows 9x or with Microsoft Word, the page number and copy number are not always correct. Because of
the difference in paper types, color, paper properties and printer drivers, we cannot assure all printers are
100% compatible.
•
Job recording and reprinting: Supports printer using drivers in PCL and PostScript languages. HP, Lexmark,
Xerox, Samsung, Sharp, Ricoh laser printers are supported. But HP LaserJet 1000 and 1010 series are
exception, and cannot work with content saving. If your printer is not included in the brands mentioned above,
or the printer is connected through the USB interface, it is possible the content saving function will not work
correctly. Since it is not possible for us to test all printers of brand and model for compatibility, we recommend
you to install the trial version of PrintUsage to verify your printer is compatible. If the content captured is not
correct or you receive a "saving failure" error, then your printer is not supported by PrintUsage. If your printer
is not mentioned in the compatible brand and models listed above and the print capture function is not working
correctly, then please contact us. We will help you to resolve the problem ASAP.
Page 3 of 246
PrintUsage 2.1 User Manual
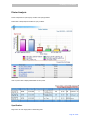
PrintUsage Object Properties Configuration
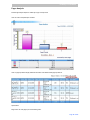
PrintUsage has four components including user, user group, printer and server.
User group is the father object of user and server is printer’s. One user only belongs to certain group and one
printer only belongs to one server.
Four basic objects can configure self print monitoring properties and the relation among the objects is similar
to the privilege of Windows NTFS.
User can inherit the properties configuration of user group and also cover group properties configuration by
individual properties configuration.
The configuration of printer is prior to user's.
The print process can be simply described as user printing a document to printer.
Page 4 of 246
PrintUsage 2.1 User Manual
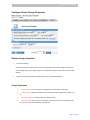
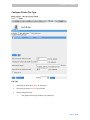
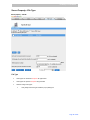
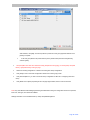
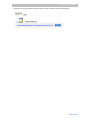
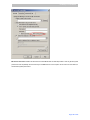
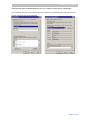
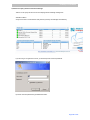
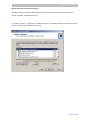
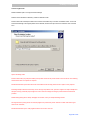
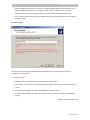
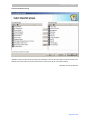
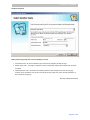
Add Printer
Two ways to add printers
•
[Total printer]->[Add server]->[Add printer], add new printers from selected server
•
[Server properties]->[Add printer], add non-monitored printers of server or new added printers
Note: necessary condition of adding printer: object server has installed print monitoring service and configured
"dominated server" as server of manager site. HTTP service of object server should be in running. (Check HTTP service
status by tray icon->[System configuration]->[Advanced])
Select the server to add printers:
If to monitor certain printer, only select the monitored option box
before the printer; if not, please unselect.
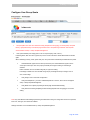
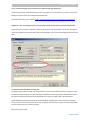
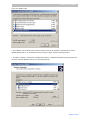
V2.1 or later version, there are four choice to save print content, including image format only, image + reprint
document save, reprint document save only and not save. It will be in effect after changing the saving mode.
Enterprise Version Only.
The difference among four saving modes:
Page 5 of 246
PrintUsage 2.1 User Manual
1. Image format only: when choosing this function, user's print document will be saved as image
and viewed in print log. Click
to view the print content by image.
2. Image + reprint document save: when choosing this function, the print content will be saved as
reprint document while failed to save as imge. Click
or image; click
to download or re-open reprint document
to send reprint command to printer. For instance, user A ever printed document D
on shared printer P connected with print monitoring server S. After clicking
, the document D will
be sent to shared printer P connected with print server S to print.
3. Reprint document only: it is similar to "image + reprint document save" mode, but only to create
reprint document without image.
4. Not save: user's print content will not be saved but there will record in print log.
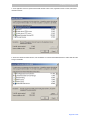
If the printer number exceeds the license number, the system will add the printers by order till there is no
license. If printer number do not exceed license number, it will return to server printer list. After printer adding,
default configuration will inherit all configuration of server, except that user made some setting for specific
printer.
If there needs no any change, please click [Back] button.
Page 6 of 246
PrintUsage 2.1 User Manual
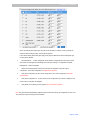
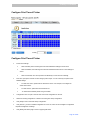
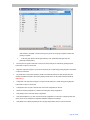
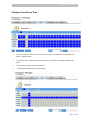
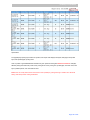
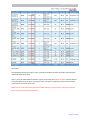
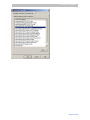
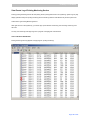
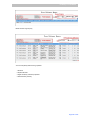
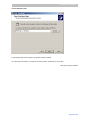
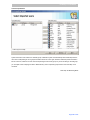
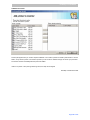
List All Printers Information
All printers included information:
•
Click [Add] to enter Add Printer page to add printer into monitored queue.
•
Click [Remove] to remove selected monitored printer from print monitoring list. If user wants to remove one
printer, please select that printer and then click [Remove] button. The printer will be removed. If user wants to
remove all printers in list, please select the option box after [Remove] on the top and then click [Remove]
button. All printers will be removed.
•
Click [Reset] to clear all selected printers.
•
Click [Refresh] to reload the present page.
•
Monitored: if the option box before printer is not selected, the printer will not be monitored; otherwise, select
monitored option box before printer to monitor printer, and then click [Refresh] button at the bottom.
•
Save print content: user can chooses if to save print content during monitoring, save print content as Tiff
image or reprint document. (This function is not available in versions before V2.1).
•
Printer name: click name link to check properties of printer. Printer basic information.
•
Server name: the server name the printer connected with. Click server name link to check Server properties.
•
Total tasks: task sum the server totally processed. Click link to view all print tasks information in Print log.
•
Total pages: printed pages sum the server totally processed. Click link to view all print tasks information in
Print log.
•
Total cost: print cost sum the server totally processed. Click link to view all print tasks information in Print log.
Page 7 of 246
PrintUsage 2.1 User Manual
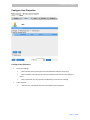
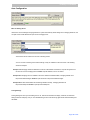
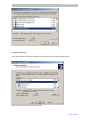
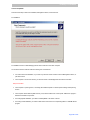
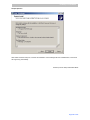
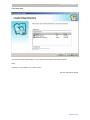
Basic Properties Configuration for Printer
Printer basic properties
•
General information shows printer's basic information including printer name, type, total tasks, total pages,
total charge, server load, monitored or not, save print content or not, resolution ratio and start time.
•
Printer name: printer name on print monitoring server.
•
Type: printer type.
•
Total print tasks: print tasks sum. Click Print log to review.
•
Total pages: printed pages sum. Click Print log to review.
•
Total charge: print charge sum.
•
Load: printer work percent.
•
Print tasks, pages, charge and load concern not only server, printer, user group and user setting but also
print log.
•
Server load describes the ratio between print tasks of printer and that of server:
Load = (Print pages printer processed/Total print pages on server) * 100%
•
If the monitored option box is selected, it indicates that the printer is monitored. Selecting or unselecting
option box and click [Update] button to change monitored status.
Page 8 of 246
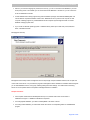
PrintUsage 2.1 User Manual
•
[Save print content] indicates if the printer saves print content or not. How to save print content, please refer
to Four differences amount four save modes of Add Printers
•
[Saved Image Resolution] determines saved images resolution ratio. there are 75, 100, 150, 200, 300 and
600DPI optional. Low resolution leads to low definition but saves disk space. On the contrary, high resolution
brings high definition images but needs more disk spaces. The default setting is 300DPI.
•
Click [Update] to save current setting.
•
Click [Reset] to restore initialized status.
Note: Only when Monitor Mode Setting is [Monitoring and Advanced Control], the configuration of User, Print Time,
Document Type and Charge can be available.
Configuration information can be managed in Configuration Template Management of Settings.
Page 9 of 246
PrintUsage 2.1 User Manual
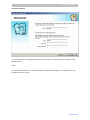
Configure Printer Charge Properties
Printer charge properties:
•
Inherit server settings:
Under selected status, all settings inherits server charge settings and cannot be modified. If clear [Inherit
server settings] option, printer charge setting can be individually configured. Please refer to Server Charge
Settings.
•
Select from existing configuration templates. Please refer to Template Management.
Charge Explanation
•
Simple charge mode: same charge for each page, either single page or double page.
•
Charge by area: charge as per different color and exact area, either single page or double, A4 or
A3.
•
Advanced charge mode: different paper type, different charge.
•
Advanced mode: makes unit price for each paper type and every paper can use B/W price and
color price. One can set price default for all paper type.
Page 10 of 246
PrintUsage 2.1 User Manual
When user doesn't select paper type, the print will be rejected. For example, if user prints with A3
paper but doesn't select A3 paper, the print will be rejected.
If user doesn't select [Allow other paper type], when paper is different from above listed paper type,
the print will be rejected.
•
Save template as... : current configuration will be saved as configuration file which can be used
when need. The management and Settings can be done by Settings--->Configuration Template
Management--->Server Templates.
•
Select from existing template: select from existing server templates and reuse original
configuration. The current configuration is template finger quotation.
•
Click [Save configuration] to save current configuration. The current configuration is template
value quotation.
•
Click [Save configuration as...] to save current server configuration. Input name in dialog box and
press confirm to complete new template.
•
Click [Reset all son objects] to return page to last successful saving status.
Note: Only when Monitor Mode Setting is [Monitoring and Advanced Control], the configuration of User, Print
Time, Document Type and Charge can be available.
Page 11 of 246
PrintUsage 2.1 User Manual
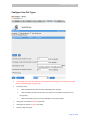
Configure Printer File Type
File Type
•
All file types are authorized: except for file types listed.
•
All file types are rejected: except for file types listed.
•
Selection usage of file types:
•
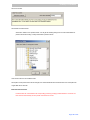
Click [Add] to select file types needed in pop-up dialog box.
Page 12 of 246
PrintUsage 2.1 User Manual
After selection, click [Add]. You will find file types in type list of user group properties and then click
[Save] to complete.
•
If the user group doesn't use file types listed any more, please select file types and click
[Remove] and then [Save].
•
File size limit: max upper limit file size in one print to avoid printer jam or waste during printing large file.
Leave blank or input 0 to cancel limit.
•
Page limit: upper limit of page in one print to avoid printer jam or waste during printing large file. Leave blank
or input 0 to cancel limit.
•
Key words limit: to input some special key words such as Resume and Sex to reject the print when file
printed is included such words in the name by filtering the file name. The key words should be divided by
semicolon (;) .
•
Charge limit: max upper limit of charge in one print to avoid printer jam or waste during printing large file.
Leave blank or input 0 to cancel limit.
•
Configuration name: to input a name to save current user configuration for late use.
•
Select from existing configuration: to select form existing User Group configuration.
•
Click [Save] to save current User Group configuration.
•
Click [Save template as...] to save current User Group configuration. For late use or configuring other User
Group, which can be managed in Configuration template management of Settings.
•
Click [Reset all sun objects properties] to return to page original status, that is to return to last save.
Page 13 of 246
PrintUsage 2.1 User Manual
Note: Only when Monitor Mode Setting is [Monitoring and Advanced Control], the configuration of User, Print Time,
Document Type and Charge can be available.
Page 14 of 246
PrintUsage 2.1 User Manual
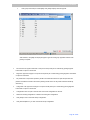
Configure Print Time of Printer
Configure Print Time of Printer
•
Inherit server settings:
•
When selected, printer monitoring time will inherit related time settings from the server.
•
When unavailable, the monitoring time cannot be selected because there is no time settings on
server.
•
•
When not selected, user can set printer time individually to cover server time settings.
Print allow, print reject: blue refer to allow and grey refer to reject. You can choose by two option boxes.
Detailed settings:
•
To select one column, please click the head of the column. For example, to click digit 2 will
select whole column.
•
To select one line, please click the head of the line.
•
To select whole timetable, please click grid of Week.
•
Configuration name: to input a name to save current user configuration for late use.
•
Select from existing configuration: to select form existing User Group configuration.
•
Click [Save] to save current User Group configuration.
•
Click [Save as...] to save a modified configuration as a new one, which can be managed in Configuration
template management of Settings.
•
Click [Reset] and refresh page to return to page original status.
Page 15 of 246
PrintUsage 2.1 User Manual
Note: Only when Monitor Mode Setting is [Monitoring and Advanced Control], the configuration of User, Print Time,
Document Type and Charge can be available.
Page 16 of 246
PrintUsage 2.1 User Manual
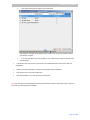
Configure User Properties
Configure User Properties
•
Inherit server settings:
•
When selected, printer monitoring time will inherit related time settings from the server.
•
When unavailable, the monitoring time cannot be selected because there is no time settings on
server.
•
•
When not selected, user can set printer time individually to cover server time settings.
Custom selection:
•
Add user in list. Click [Add] to select user name needed in pop-up dialog box.
Page 17 of 246
PrintUsage 2.1 User Manual
Select user needed to be added and click [Add] and [Save] to add user into list.
•
Remove user from list. Select user need to be removed and Click [Remove] [Save] to remove
user from list.
•
•
Click [Save] to save current print settings.
Click [Save template as...] to save current printer settings as a new one, which can be modified in
Configuration template management of Settings.
Note: Only when Monitor Mode Setting is [Monitoring and Advanced Control], the configuration of User, Print Time,
Document Type and Charge can be available.
Page 18 of 246
PrintUsage 2.1 User Manual
Add Print Server to Manager site:
Setp one: Select server
•
In draw-down box of [Server Nme], select print server name, click select button "<", and then click [Next].
•
IP address and description are optional.
•
Server list in draw-down box refers to the servers that have been successfully installed print monitoring
service.
Note: necessary condition that server names is displayed in right side list of [Add Server]
1. The server has installed PrintUsage monitoring service.
2. Specific dominating server should install Web site management.
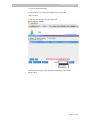
Step Two: Add printers monitored by server
Page 19 of 246
PrintUsage 2.1 User Manual
Select printers monitored by server:
Enter printers list of the server and select printers need to be monitored.
Select [Save print content] option box
if wish to monitor print content, and then click [Submit] at the bottom.
If printer can be monitored, user can select if saving print content or not.
Note: Not all types of printers support print content save. If you find the print content saved is in confusing codes or are
notified not be saved, most possible issue is your printers or drivers used are not supported by system. If you need to
obtain print content, please set save mode as any mode except for [Not Save]
Page 20 of 246
PrintUsage 2.1 User Manual
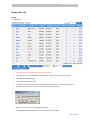
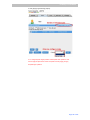
Server Group--Server List
Litst the information of all servers:
•
Find server name: finds server list by server name. Supports inkling Inquiry.
•
Click [Add] to add print monitoring server.
•
Click [Update] to submit.
•
Click [Remove] to remove selected print monitoring server. If remove certain server, please select the option
box of [Remove] column and then click [Remove] button at the bottom.
•
•
Click [Reset] to clear selected print monitoring server.
Monitored: if not select [Monitored] option box before the server, the server would not be monitored; if
monitor the server, please select [Monitored] option box and then click [Update] button at the bottom.
•
Monitored server name: server name. Click link of server name to view Properties of server, such as server
basic information and configuration properties.
•
Control server: manage print monitoring service by Web interface. The monitoring service on print monitoring
server can be control by Web mode, such as print monitoring, monitoring pause and service restart.
•
Printer quantity: two types: one is the number of monitored printers connected with the server and added into
system, the other is all printers connected with the server, i.e. 2/11 shows the server is connecting 11 printers
and two is monitored. Click 2, the information of two printers can be displayed. The first number of the printers
number is less than equal to your license number. For example, if current monitored printers are 100, the
license number is 100.
•
Tasks: the number of all print tasks the server is processing. Click the link to check all print task information
in print log.
•
Pages: the number of all print pages the server is processing. Click the link to check all print task information
in print log and queue by print pages of each task in default.
•
Cost: total cost refers to all print tasks cost sum the server is processing. Click the link to check all print task
information in print log and queued by print cost of each task in default.
•
Total tasks, pages and cost are not only related with print server configuration but also log. Please refer
Configuration-->Data Maintenance
•
Letter in red bold shows the sum of printer relevant item on the server.
Page 21 of 246
PrintUsage 2.1 User Manual
Basic Properties Configuration for Server
General Information
•
General information shows server's basic information including server name, IP, total tasks, total pages, total
charge, printer numbers, load, monitored or not, and server monitoring service status.
•
Server name: print monitoring server name is the server ID in system, which is unchangeable.
•
IP: only description for print monitoring server.
•
Total print tasks: print tasks sum. Click digit to view Print Log.
•
Total printed pages: printed pages sum. Click digit to view Print Log.
•
Total charge: print charge sum. Click digit to view Print Log.
•
Printer numbers: printers sum. Click digit to view monitored printers by the server.
•
Load describes the ratio between print tasks server processed and total print tasks:
Load = (Print pages server processed/Total printed pages) * 100%
Note: Only when Monitor Mode Setting is [Monitoring and Advanced Control], the configuration of User, Print Time,
Document Type and Charge can be available.
Page 22 of 246
PrintUsage 2.1 User Manual
Server Property---Charging
Charge Explanation
•
Simple charge mode: same charge for each page, either single page or double page.
•
Charge by area: charge as per different color and exact area, either single page or double, A4 or A3.
•
Advanced charge mode: different paper type, different charge.
•
Advanced mode: makes unit price for each paper type and every paper can use B/W price and color price.
One can set price default for all paper type.
Page 23 of 246
PrintUsage 2.1 User Manual
When user doesn't select paper type, the print will be rejected. For example, if user prints with A3 paper but
doesn't select A3 paper, the print will be rejected.
If user doesn't select [Allow other paper type], when paper is different from above listed paper type, the print
will be rejected.
•
Save template as... : current configuration will be saved as configuration file which can be used when need.
The management and Settings can be done by Settings--->Configuration Template Management--->Server
Templates.
•
Select from existing template: select from existing server templates and reuse original configuration. The
current configuration is template finger quotation.
•
Click [Save configuration] to save current configuration. The current configuration is template value
quotation.
•
Click [Save configuration as...] to save current server configuration. Input name in dialog box and press
confirm to complete new template.
•
Click [Reset all son objects] to return page to last successful saving status.
Note: Only when Monitor Mode Setting is [Monitoring and Advanced Control], the configuration of User, Print Time,
Document Type and Charge can be available.
Page 24 of 246
PrintUsage 2.1 User Manual
Server Property---File Type
File Type
•
All file types are authorized: except for file types listed.
•
All file types are rejected: except for file types listed.
•
Selection usage of file types:
•
Click [Add] to select file types needed in pop-up dialog box.
Page 25 of 246
PrintUsage 2.1 User Manual
After selection, click [Add]. You will find file types in type list of user group properties and then click
[Save] to complete.
•
If the user group doesn't use file types listed any more, please select file types and click
[Remove] and then [Save].
•
File size limit: max upper limit file size in one print to avoid printer jam or waste during printing large file.
Leave blank or input 0 to cancel limit.
•
Page limit: upper limit of page in one print to avoid printer jam or waste during printing large file. Leave blank
or input 0 to cancel limit.
•
Key words limit: to input some special key words such as Resume and Sex to reject the print when file
printed is included such words in the name by filtering the file name. The key words should be divided by
semicolon (;) .
•
Charge limit: max upper limit of charge in one print to avoid printer jam or waste during printing large file.
Leave blank or input 0 to cancel limit.
•
Configuration name: to input a name to save current user configuration for late use.
•
Select from existing configuration: to select form existing User Group configuration.
•
Click [Save] to save current User Group configuration.
•
Click [Save template as...] to save current User Group configuration. For late use or configuring other User
Group, which can be managed in Configuration template management of Settings.
•
Click [Reset all sun objects properties] to return to page original status, that is to return to last save.
Page 26 of 246
PrintUsage 2.1 User Manual
Note: Only when Monitor Mode Setting is [Monitoring and Advanced Control], the configuration of User, Print Time,
Document Type and Charge can be available.
Page 27 of 246
PrintUsage 2.1 User Manual
Server Property---Time
Configure Print Time of Server
•
Print allow, print reject: blue refer to allow and grey refer to reject. You can choose by two option boxes.
Detailed settings:
•
To select one column, please click the head of the column. For example, to click digit 2 will
select whole column.
•
To select one line, please click the head of the line.
•
To select whole timetable, please click grid of Week.
•
Configuration name: to input a name to save current user configuration for late use.
•
Select from existing configuration: to select form existing User Group configuration.
•
Click [Save] to save current User Group configuration.
•
Click [Save as...] to save a modified configuration as a new one, which can be managed in Configuration
template management of Settings.
•
Click [Reset] and refresh page to return to page original status.
Note: Only when Monitor Mode Setting is [Monitoring and Advanced Control], the configuration of User, Print Time,
Document Type and Charge can be available.
Page 28 of 246
PrintUsage 2.1 User Manual
Server Property---Users
User
-- All users are authorized to use, except for those listed.
-- All users are rejected to use, except for those listed.
Custom Selection:
•
Add user in list. Click [Add] to select user name needed in pop-up dialog box.
Page 29 of 246
PrintUsage 2.1 User Manual
Select user needed to be added and click [Add] and [Save] to add user into list.
•
Remove user from list. Select user need to be removed and Click [Remove] [Save] to remove user from list.
Note: Only when Monitor Mode Setting is [Monitoring and Advanced Control], the configuration of User, Print Time,
Document Type and Charge can be available.
Page 30 of 246
PrintUsage 2.1 User Manual
Add Group
•
User/group name can be treated as department.
•
Description is for group name or group detailed explanation.
•
Click [Add] to save user information into database. Group name is required.
•
Click [Add], it will display Group Setup.
•
Click [Reset] to clear all tables.
•
Click [Return] to return to Group List.
•
After successful group adding, the new group will display in Group List.
Page 31 of 246
PrintUsage 2.1 User Manual
Group List
•
•
List displays all groups of system. Group can be treated as department.
Click [Delete] to remove selected
groups. The users belong to the group will be removed at the same
time.
•
Click [Add] to enter Add Group.
•
Click [User List] to enter User List.
•
Click [Group Name] to enter Group Setup.
•
Click user number link to enter Group User List. It shows user number of group, which can be treated as user
sum of the department.
•
Click total jobs link to view group Print Log. It shows all print tasks since Install and start print monitoring
service.
•
Click total pages link to view group Print Log. It shows all print pages since Install and start print monitoring
service.
•
Click total cost link to view group Print Log. It shows all print charges since Install and start print monitoring
service.
•
After user recalculate the amount according to log, print jobs, pages and cost will cumulate based on the
amount.
Page 32 of 246
PrintUsage 2.1 User Manual
Quota Reset
•
User's quota: available print charge given to user in unit period (day, week, month...).
•
Allow printing over quota, Max usage over quota: the value input must be plus. User can properly overdraft
print charge according to overdraft type selection.
Ration: user can overdraft charge as per upper limit setting.
Percentage: user can overdraft charge as per percentage of total print charge, such as 20% of total charge.
•
Click [Save] to save current settings.
•
Click [Reset] to load the default settings.
Page 33 of 246
PrintUsage 2.1 User Manual
Group Setup
•
User/Group name can be treated as company, department and office.
•
Total user refers to group user number. Click digit link to enter Group User List.
•
Quota refers to max. printing charges allowed for user in one period such as one year, one month, one week
and one day. User group quota can be set in Quota. The quota setting of user group will influence user Quota
and balance.
•
Total jobs refer to all print tasks since Install and start print monitoring service. Click digit link to view group
Print Log.
•
Total pages refer to all printed pages since Install and start print monitoring service. Click digit link to view
group Print Log.
•
Total cost refer to all print charges since Install and start print monitoring service. Click digit link to view
group Print Log.
•
Description is the explanation of group.
•
Click [Update] to modify group information such as group name and description.
•
Click [Reset] to load default setting.
•
Click [Add User] to Add New User for group.
•
Only when Monitor Mode Setting is [Monitoring and Advanced Control], the configuration of User Group
Printer, Print Time, File Type, User Quota are available.
Page 34 of 246
PrintUsage 2.1 User Manual
Group File Type
•
All file types are authorized: except for those listed.
•
All file types are rejected: except for those listed.
•
Setup template name: after user select the existing template and click [Apply], he will see [Setup Template
Name]-->[Template Name] in File Type page.
•
Selection usage of file types:
•
Click [Add] to select file types needed in pop-up dialog box.
Page 35 of 246
PrintUsage 2.1 User Manual
After selection, click [Add]. There display file types in type list of user group properties and then
click [Save] to complete.
•
If the user group doesn't use file types listed any more, please select file types and click
[Remove] and then [Save].
•
File size limit: max upper limit file size in one print to avoid printer jam or waste during printing large file.
Leave blank or input 0 to cancel limit.
•
Page limit: upper limit of page in one print to avoid printer jam or waste during printing large file. Leave blank
or input 0 to cancel limit.
•
Key words limit: to input some special key words such as Resume and Sex to reject the print when file
printed is included such words in the name by filtering the file name. The key words should be divided by
semicolon (;).
•
Charge limit: max upper limit of charge in one print to avoid printer jam or waste during printing large file.
Leave blank or input 0 to cancel limit.
•
Configuration name: to input a name to save current user configuration for late use.
•
Select from existing configuration: to select form existing User Group configuration.
•
Click [Save] to save current User Group configuration.
•
Click [Save template as...] to save current User Group configuration. For late use or configuring other User
Group, which can be managed in Configuration template management of Settings.
•
Click [Reset all sun objects properties] to return to page original status, that is to return to last save.
Page 36 of 246
PrintUsage 2.1 User Manual
Note: Only when Monitor Mode Setting is [Monitoring and Advanced Control], the configuration of User Group Printer,
Print Time, File Type, User Quota are available.
Settings information can be modified in Setup-->Setup Template Management.
Page 37 of 246
PrintUsage 2.1 User Manual
Configure Printer Properties of User Group
•
All printers are authorized to use: except for those listed.
•
All printers are rejected: except for those listed.
•
Printer selection usage:
•
Click [Add] to select printers needed in pop-up dialog box.
Page 38 of 246
PrintUsage 2.1 User Manual
After selection, click [Add]. You will find printers in printer list of user group properties and then click
[Save] to complete.
•
If the user group doesn't use printer listed any more, please select printer and click [Remove]
and then [Save].
•
Setup template name: after user select the existing template and click [Apply], he will see [Setup Template
Name]-->[Template Name] in File Type page.
•
Select from existing configuration: to select form existing User Group configuration.
•
Click [Save] to save current User configuration used for late or other group printer.
•
Click [Save template as...] to save current User Group configuration for late use or configuring other User
Group
•
Click [Reset all sun objects properties] to return to page original status, that is to return to last save.
Note: Only when Monitor Mode Setting is [Monitoring and Advanced Control], the configuration of User Group Printer,
Print Time, File Type, User Quota are available.
Settings information can be modified in Setup-->Setup Template Management.
Page 39 of 246
PrintUsage 2.1 User Manual
Configure User Group Quota
•
Setup template name: after user select the existing template and click [Apply], he will see [Setup Template
Name]-->[Template Name] in User Quota page. Please refer to Template Finger Quotation and Template
Value Quotation in Setup-->Setup Template Management.
•
User quota: available print charge given to user in unit period (day, week, month...).
If selecting None, after user uses up quota, the print can not be continued. It needs administrator to allocate
again.
When selected type of day, week, quarter and year, user quota will be automatically renewed after one period.
•
Overdraft allowed, upper limit: the value input must be plus. Overdraft allowed, upper limit: the
value input must be plus. User can properly overdraft print charge according to overdraft type
selection.
Ration overdraft: user can overdraft charge as per upper limit setting.
Percentage overdraft: user can overdraft charge as per percentage of total print charge, such as
20% of total charge.
•
•
Click [Save] to save current User configuration.
Click [Save template as...] to save a modified template as a new one, which can be managed in
Setup-->Setup Template Management.
•
•
Click [Reset all sun objects properties] to refresh page and load default setting.
Click [Select from existing templates] to select existing template and click [Apply] to use current
setting.
Note: Only when Monitor Mode Setting is [Monitoring and Advanced Control], the configuration of User Group Printer,
Print Time, File Type, User Quota are available.
Settings information can be modified in Setup-->Setup Template Management.
Page 40 of 246
PrintUsage 2.1 User Manual
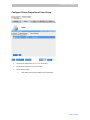
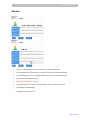
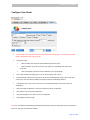
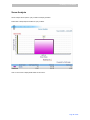
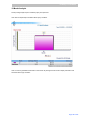
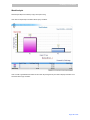
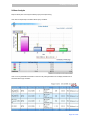
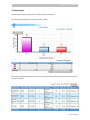
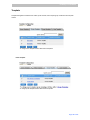
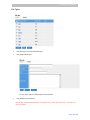
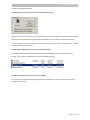
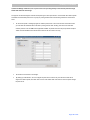
Configure User Group Time
•
Print allow, print reject: blue refer to allow and grey refer to reject. Two option boxes are available for color
selection. Detailed settings:
•
To select one column, please click the head of the column. For example, to click digit 2 will select whole
column.
•
To select one line, please click the head of the line.
•
To select whole timetable, please click grid of Week.
Page 41 of 246
PrintUsage 2.1 User Manual
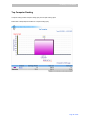
The figure shows that only the time of 3:00 to 3:59 on Wednesday is allowed to print. Other time period is
rejected.
•
Setup template name: after user select the existing template and click [Apply], he will see [Setup Template
Name]-->[Template Name] in User Quota page. Please refer to Template Finger Quotation and Template
Value Quotation in Setup-->Setup Template Management.
•
Click [Save] to save current User Group configuration.
•
Click [Save as...] to save a modified configuration as a new one, which can be managed in of Settings of
Configuration template management.
•
Click [Reset all sun objects properties] to refresh page and load default setting.
•
Click [Select from existing templates] to select existing template
Note: Only when Monitor Mode Setting is [Monitoring and Advanced Control], the configuration of User Group Printer,
Print Time, File Type, User Quota are available.
Settings information can be modified in Setup-->Setup Template Management.
Page 42 of 246
PrintUsage 2.1 User Manual
Group User List
•
Input user name to query related user and support inkling query.
•
Click [Remove] to remove selected users. After removing, the print log of user will not be removed.
•
Click [Reset] to load default page.
•
Click [Add] to enter Add User page.
•
Click [Move to Group] to move selected user to specific group. When user is moved to specific group, it is
optional to move print charge count to new group but leave print log in old group.
When user is moved to new group, the balance will change.
•
Click [Add Balance] to add balance for all users. The balance can be negative.
Page 43 of 246
PrintUsage 2.1 User Manual
•
•
Click [Reset all user balance] to enter Reset all users balance page.
Click table heading such as user name, full name, quota, current balance, overdraft upper limit, total tasks,
total pages and total charges to sort items in ascending or descending.
•
Click user name link to setup user properties.
•
Click total tasks, total pages, total charges to enter Print Log page.
Page 44 of 246
PrintUsage 2.1 User Manual
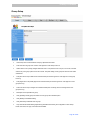
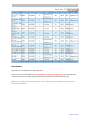
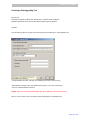
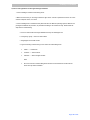
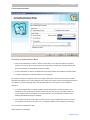
Add User
•
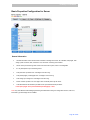
Figure 1 is to add user from user group and figure 2 is to add from whole users.
•
Input user added domain account name or computer name (based on Authentication Mode).
•
Input Email address to use Email reminding of Print Reminding. User name must be unique.
•
[Full name] is used to distinguish users.
•
Single user cannot belong to multi-group.
•
Click [Add] to add user to group user list. After adding, it will turn to whole group user list.
•
Click [Reset] to load default page.
•
Click [Back] to return to User List.
Page 45 of 246
PrintUsage 2.1 User Manual
User List
•
Click [Remove] to remove selected users. For Enterprise Version, to remove user will not remove user
print content at the same time.
•
Click [Reset] to clear all selection.
•
Click [Add] to enter Add User page.
•
Click [Refresh] to clear selection and retrieve user list.
•
Click [Move to Group] to move selected user to specific group. Refer to Group User List.
•
Click [Add Balance] to add balance for all users whether user is selected or not. The balance of user cannot
be decreased by negative.
•
Click [Reset all user balance] to enter Reset all user balance.
•
Click [User name] to enter User Setup page.
•
Click total tasks, total pages, total charges link to enter Print Log page.
•
Click [Affiliated group] to enter relevant Group setup page.
Page 46 of 246
PrintUsage 2.1 User Manual
All User List
•
Click [Remove] to remove selected users.
•
Click [Reset] to clear all selection without page reloading.
•
Click [Add] to enter Add User page.
•
Click [Move to Group] to move selected user to specific group. Refer to Group User List.
•
Click [Add Balance] to add balance for all users whether user is selected or not. The balance of user cannot
be decreased by negative..
•
Click [Reset all user balance] to enter Reset all user balance.
•
Click total tasks, total pages, total charges link to enter Print Log page.
•
Click table heading such as user name, Email address, quota, current balance, overdraft upper limit to sort
listed items in ascending
•
or descending
.
Click [Affiliated group] to enter relevant Group setup page.
Page 47 of 246
PrintUsage 2.1 User Manual
Configure User Basic Information
•
User name: only symbol for user/computer in system.
•
Full name: detailed description of the user.
•
Email: used for sending reminding email to user.
•
Save print content: to save print content or not.
•
Monitoring: to record user print information or not. If not, user print will not be recorded in log and charged.
•
Quota: user quota.
•
Balance: remained charge user can use.
•
Overdraft upper limit: max. amount of overdraft such as quota percentage and exceedance.
•
User/computer group name: group or department user or computer belongs to.
•
Total tasks: printed tasks sum.
•
Total pages: printed pages sum.
•
Total charges: print charges amount
•
Click [Update] to save modified user information.
•
Click User/computer group name link to view or change Group Setup.
Page 48 of 246
PrintUsage 2.1 User Manual
•
Click the clickable digits after total tasks, total pages and total charges to view user Print Log, which can be
customized.
•
If the user data is renewed, the print pages, tasks and charges will be changed. Please refer to Setup-->Data
Maintenance.
Note: Only when Monitor Mode Setting is [Monitoring and Advanced Control], the configuration of User Group Printer,
Print Time, File Type, User Quota are available.
Page 49 of 246
PrintUsage 2.1 User Manual
Configure User File Types
•
Setup template name: after user select the existing template and click [Apply], he will see [Setup Template
Name]-->[Template Name] in File Type page.
•
Inherit group setup:
•
When selected, file type setup will inherit related settings from the group.
•
When unavailable, file type cannot be setup. The option box is unavailable when group has no
file type setup.
•
When not selected, file type can be setup individually to cover group settings.
•
All file types are authorized: except for those listed.
•
All file types are rejected: except for those listed.
•
Selection usage of file types:
Page 50 of 246
PrintUsage 2.1 User Manual
•
Clear group inherit setup to enable [Add]. Click [Add] to display whole file type list.
After selection, click [Add]. the display file types in type list of user group properties and then click
[Save] to complete.
•
File size limit: max upper limit file size in one print to avoid printer jam or waste during printing large file.
Leave blank or input 0 to cancel limit.
•
Page limit: upper limit of page in one print to avoid printer jam or waste during printing large file. Leave blank
or input 0 to cancel limit.
•
Key words limit: to input some special key words such as Resume and Sex to reject the print when file
printed is included such words in the name by filtering the file name. The key words should be divided by
semicolon (;).
•
Charge limit: max upper limit of charge in one print to avoid printer jam or waste during printing large file.
Leave blank or input 0 to cancel limit.
•
Configuration name: to input a name to save current user configuration for late use.
•
Select from existing configuration: to select form existing user configuration.
•
Click [Save] to save current User Group configuration.
•
Click [Save template as...] to save current User Group configuration.
Page 51 of 246
PrintUsage 2.1 User Manual
Note: Only when Monitor Mode Setting is [Monitoring and Advanced Control], the configuration of User, Print Time,
Document Type and Charge can be available.
Page 52 of 246
PrintUsage 2.1 User Manual
Configure User Printer
•
Setup template name: after user select the existing template and click [Apply], he will see [Setup Template
Name]-->[Template Name] in File Type page.
•
Inherit group setup:
•
•
When selected, printer setup will inherit related settings from the group.
When unavailable, printer cannot be setup. The option box is unavailable when group has no
printer setup.
•
When not selected, printer can be setup individually to cover group settings.
•
All printers are authorized: except for those listed.
•
All printers are rejected: except for those listed.
•
Selection usage of printer:
Page 53 of 246
PrintUsage 2.1 User Manual
•
Click [Add] to select printers needed in pop-up dialog box.
After selection, click [Add]. There display printers in printer list of user group properties and then
click [Save] to complete.
•
If the user group doesn't use printers listed any more, please select printers and click [Remove]
and then [Save].
•
Configuration name: input a name to save current user modified information for late use of other user
configuration.
•
Select from existing configuration: to select form existing User Group configuration.
•
Click [Save] to save current User configuration.
•
Click [Save template as...] to save current User configuration.
Note: Only when Monitor Mode Setting is [Monitoring and Advanced Control], the configuration of User, Print Time,
Document Type and Charge can be available.
Page 54 of 246
PrintUsage 2.1 User Manual
Configure User Quota
•
Setup template name: after user select the existing template and click [Apply], he will see [Setup Template
Name]-->[Template Name] in File Type page.
•
Inherit group setup:
•
When selected, quota setup will inherit related settings from the group.
•
When unavailable, quota cannot be setup. The option box is unavailable when group has no
quota setup.
•
When not selected, quota can be setup individually to cover group settings.
•
User quota: available print charge given to user in unit period (day, week, month...).
•
Overdraft allowed, upper limit: the value input must be plus. Overdraft allowed, upper limit: the value input
must be plus. User can properly overdraft print charge according to overdraft type selection.
•
Configuration name: input a name to save current user modified information for late use of other user
configuration. ;
•
elect from existing configuration: to select form existing User Group configuration.
•
Click [Save] to save current User configuration.
•
Click [Save template as...] to save current User configuration.
•
Click [Reset] to refresh the page.
Note: Only when Monitor Mode Setting is [Monitoring and Advanced Control], the configuration of User Group Printer,
Print Time, File Type, User Quota are available.
Page 55 of 246
PrintUsage 2.1 User Manual
Settings information can be modified in Setup-->Setup Template Management.
Page 56 of 246
PrintUsage 2.1 User Manual
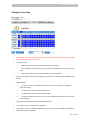
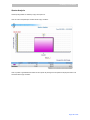
Configure User time
•
Setup template name: after user select the existing template and click [Apply], he will see [Setup Template
Name]-->[Template Name] in File Type page.
•
Inherit group setup:
•
When selected, time setup will inherit related settings from the group.
•
When unavailable, time cannot be setup. The option box is unavailable when group has no time
setup.
•
•
When not selected, time can be setup individually to cover group settings.
Print allow, print reject: blue refer to allow and grey refer to reject. Two option boxes are available for color
selection.
•
Detailed settings:
•
To select one column, please click the head of the column. For example, to click digit 3 will
select whole column.
•
To select one line, please click the head of the line.
•
To select whole timetable, please click grid of Week.
•
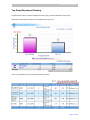
The figure shows that only the time of 3:00 to 3:59 on Wednesday is allowed to print. Other time
period is rejected.
•
Click [Select from existing templates] to select existing template.
•
Click [Save] to save current User Group configuration.
•
Click [Save as...] to save a modified configuration as a new one, which can be managed in of Settings of
Configuration template management.
Page 57 of 246
PrintUsage 2.1 User Manual
Note: Only when Monitor Mode Setting is [Monitoring and Advanced Control], the configuration of User Group Printer,
Print Time, File Type, User Quota are available.
Settings information can be modified in Setup-->Setup Template Management.
Page 58 of 246
PrintUsage 2.1 User Manual
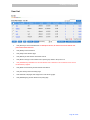
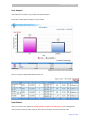
Report List
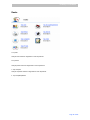
1. Ranks
Ranks can be divided by Top User, Top Group/Department , Top Printer, Top Server, Top Computer and Top Task. Top
User Ranks. The ranks statistic report according to pages printed, charges, print amount from one user in certain period.
It's similar to several other types.
2. Summary
Analyze print jobs by year, month, date or other period. There are two kinds of reports including Cross Tab Usage
Analysis and Master/Detail Usage Analysis .
3. Task Analysis
Get the graphic report forms from the number of the printing bytes and printing pages according to the different tasks of
the printers. Reports includes File Types Analysis , Pages Analysis , Paper Size Analysis , Color/Mono Analysis and so
on.
4. Loading Analysis
Get the loading by servers, printers and users in a certain period according to the user's printing situation, divided into
Printer Analysis , Server Analysis , Computer Analysis , User Analysis.
5. Time Analysis
Statistic report based on print time including 24 hour analysis, week analysis , 31 day analysis , quarter analysis, 12
month analysis , yearly analysis and weekday analysis.
Note:
Page 59 of 246
PrintUsage 2.1 User Manual
Click on
top right corner to hide the type of the report. Click
on top right corner to display the type of the
report.
Each type includes Simple report and Advanced report to form reports according to needs.
Page 60 of 246
PrintUsage 2.1 User Manual
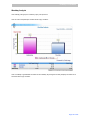
Simple Report
Specification:
Page displays default graphic report according to user default settings. Refer to Advanced Settings for detailed.
Click [Close query condition] to hide report option to expand report visual space.
The simple report is a little different from Summary.
Steps:
1.Style Select List
The drop list got under this condition: bar, horizontal, line, pie, point, area.
Default is bar. View/Hide Style Select List
2.Value Display
The drop list got under this condition: total bytes, total printing pages, total printing cost. Default is total pages.
View/Hide Value Display Method
Page 61 of 246
PrintUsage 2.1 User Manual
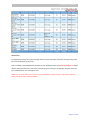
3.Print Status
The drop list got under this condition: all, printed, denied.
Default is all. View/Hide Print Status
4. Time Range
The drop-down list includes custom, year, month, week and day. If choosing custom, you can choose preferred time in
time selection box; if choosing year, month, week and day, the time selection box will be unavailable.
Default is current year and month. View/Hide Time Selection
5.Submit
Click the button of "Create a report form", it displays different graphs and content datum according to the different
selection of user. Create a graph as Report Model.
Click the button of "Reset", the option back to the last setting.
Click the button of "Print Preview", can preview the current created report form that can be printed by user.
Click the button of "Import" to import report as Excel file.
Click the button of "Return", back to the last submitted page.
6.Advanced Settings
Click this link, the report condition will be complicatedly matched, creating Advanced Report
Note: user can change default value in Report\Type_Top.xml of installation directory. Please read “Advanced Settings”
carefully and make backup before modification. You can change report model by changing settings of xml file. Please
refer to Advanced—>Report Options
Page 62 of 246
PrintUsage 2.1 User Manual
Ranks
1.Top User
Analyze users maximum usage base on user requirement.
2.Top Printer
Analyze printers maximum usage base on user requirement.
3. Top Computer
Analyze computers maximum usage base on user requirement.
4. Top Group/Department
Page 63 of 246
PrintUsage 2.1 User Manual
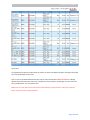
Top Computer Ranking
Computer ranking includes computer ranking query and computer ranking report.
Please refer to Simple Report Condition for computer ranking query.
Page 64 of 246
PrintUsage 2.1 User Manual
Click on computer name to display statistic of each computer.
Specification:
Page shows 10 most usage computers in descending order.
Click on computer name to view statistic with satisfying statistic conditions of ranking report, including printer name,
print server name, print date, pages, file name, bytes, print charge, user name and user full name.
Note: user can change default value in Report\Type_Top.xml. Please refer Advanced Settings and make backup before
making modification.
Page 65 of 246
PrintUsage 2.1 User Manual
Top Group/Department Ranking
Group/department ranking includes Group/department ranking query and Group/department ranking report.
Please refer to Simple Report Condition for Group/department ranking query.
Click on group/department name to display detail statistic information.
Page 66 of 246
PrintUsage 2.1 User Manual
Specification:
Page shows 10 most usage group/department in descending order.
Click on group/department name to display statistic with satisfying statistic conditions of ranking report, including
printer name, print server name, print date, pages, file name, bytes, print charge, user name and user full name.
Note: user can change default value in Report\Type_Top.xml. Please refer Advanced Settings and make backup before
making modification.
Page 67 of 246
PrintUsage 2.1 User Manual
Top Printer Ranking
Printer ranking includes printer ranking query and printer ranking report.
Please refer to Simple Report Condition for printer ranking query.
Click on printer name to display detail statistic.
Specification:
Page 68 of 246
PrintUsage 2.1 User Manual
Page shows 10 most usage printers in descending order..
Click on printer name to display statistic with satisfying statistic conditions of ranking report, including printer name,
print server name, print date, pages, file name, bytes, print charge, user name and user full name.
Note: user can change default value in Report\Type_Top.xml. Please refer Advanced Settings and make backup before
making modification.
Page 69 of 246
PrintUsage 2.1 User Manual
Top Print Server Ranking
Print server ranking includes print server ranking query and print server ranking report.
Please refer to Simple Report Condition for print server ranking query.
Click on server name to display statistic of each printer.
Specification:
Print server is a managed computer after installing printer and print monitor service.
Page 70 of 246
PrintUsage 2.1 User Manual
Monitoring server
and print server
are two different meanings. Of hardware, print-monitoring server
is a computer, but print server is a king of hardware configuration; of software, monitoring server installed print
monitoring software, but print server din't install any programs related with print monitor.
Page displays top 10 servers printing most and in order from most to least.
Click server name to view statistic information satisfying statistic conditions of ranking report, including printer name,
print server name, print date, pages, file name, bytes, print charge, user name and user full name.
Note: user can change default value in Report\Type_Top.xml of installation directory. Please read “Advanced Settings”
carefully and make backup before modification.
Page 71 of 246
PrintUsage 2.1 User Manual
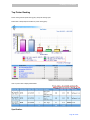
Top Task Ranking
Task ranking includes user ranking query and user ranking report.
Please refer to Simple Report Condition for user ranking query.
Click on user name to display detail statistic.
Page 72 of 246
PrintUsage 2.1 User Manual
Specification:
Page shows 10 most usage printing user in descending order.
Click on user name to view statistic with satisfying statistic conditions of ranking report, including printer name, print
server name, print date, pages, file name, bytes, print charge, user name and user full name.
Note: user can change default value in Report\Type_Top.xml. Please refer Advanced Settings and make backup before
making modification.
Page 73 of 246
PrintUsage 2.1 User Manual
Top User Ranking
User ranking includes user ranking query and user ranking report.
Please refer to Simple Report Condition for user ranking query.
Click on user name to display detail statistic.
Page 74 of 246
PrintUsage 2.1 User Manual
Specification:
Page shows 10 most usage user print shown in descending order..
Click on user name to view statistic with satisfying statistic conditions of user ranking report, including printer name,
print server name, print date, pages, file name, bytes, print charge, user name and user full name.
Note: user can change default value in Report\Type_Top.xml. Please refer Advanced Settings and make backup before
modification.
Page 75 of 246
PrintUsage 2.1 User Manual
Summary
1.Cross tab Usage Analysis
Base on your searching condition, get statistic report by year, month, and date.
2.Master/Detail Usage Analysis
Base on your searching condition, ranking series and ranking orientation, get statistic report within different category. If
report includes department and department's members, it can also display department usage and department's members
usage separately.
Note: user can change default value in Report\Type_Top.xml. Please refer Advanced Settings carefully and make
backup before modification.
Page 76 of 246
PrintUsage 2.1 User Manual
Cross tab Usage Analysis
Cross tab Usage analysis includes Query Condition and Report Generation.
Cross tab usage report can be view by style list, data displaying method, print status, time range, sort type.
Style List : setup report style:
Data displaying method: setup basic of report display, which is sorted by cost, pages total prints:
Print Status: setup data displaying condition. If choosing denied, all denied print would be displayed.
Time Range: setup time period of query.
Generate Report
Page 77 of 246
PrintUsage 2.1 User Manual
First line displays time period user selected and first column displays user ID, which could clearly reflect user print of
every month.
Subtotal is a general statistics according to user's query.
Page 78 of 246
PrintUsage 2.1 User Manual
Master/Detail Usage Analysis
Master/Detail Usage analysis includes Master/Detail Report Query Condition and Master/Detail Report Generation
Master/detail usage report can be view by style list, print status, master report sort, time range, and detail report sort.
Style List : setup report style:
Print Status: setup data displaying condition. If choosing denied, all denied print would be displayed.
Master report sort: setup sort type for master report
Time range: set time period of query
Page 79 of 246
PrintUsage 2.1 User Manual
Detail report sort: set user print charge type
Generate report to display user's print
Relevant operation:
1.Generate Report
Choose report style. This list can be added or reduced by users randomly. See Report Setting for detail. Default is the
first one in the list. Then choose other conditions. If not choose, all items are default ones. The time range is: "month
statistic", then, click "Creating report" button, detail information will be shown below:
If the visual space is too small, click the above "close finding condition", the finding condition was hidden and enlarges
the visual space.
2.Report Preview
When previewing report, can be previewing the present created report, also can be previewing the newly created report
according to new conditions.
If preview the existing report, click "preview" button. If preview newly created report, first choose report condition. The
operating is the same as "creating report", but the difference is to click "preview" button not "creating report" button.
3.Report Export
If to re-edit report data, can export the report to Excel. Only to choose condition or the present condition, then, click
"export" button. The interface skip to "file save as" page. Click to open the file directly. Right click to choose "save as",
can save the report-exporting file as the local file and edit it randomly. At present, the format of report exporting only is
xls format of Excel.
Page 80 of 246
PrintUsage 2.1 User Manual
Note: According to user's choosing the unlimited value of N, can process setting( Advanced Setting )through INI file.
If users want to modify report style, can go to the style directory in the report folder to modify XML( XML Specification )
Page 81 of 246
PrintUsage 2.1 User Manual
<Root>
<CrossTab ID="Style1">
<StyleName>StyleName1</StyleName>
<ColumnType>M</ColumnType>
<RowType>GroupName</RowType>
<RecordPerPage>0</RecordPerPage>
<Table>
<BorderWidth>1</BorderWidth>
<BorderColor>black</BorderColor>
<Width>100%</Width>
</Table>
<Guard>
<MaxValue>0</MaxValue>
<BgColor>red</BgColor>
<FontColor>white</FontColor>
<FontSize></FontSize>
<FontStyle>3</FontStyle>
</Guard>
<Title>
<BgColor></BgColor>
<FontColor></FontColor>
<FontSize>14pt</FontSize>
<FontStyle>1</FontStyle>
</Title>
<Head>
<BgColor></BgColor>
<FontColor>black</FontColor>
<FontSize>12pt</FontSize>
<FontStyle>1</FontStyle>
</Head>
<Left>
<BgColor></BgColor>
<FontColor></FontColor>
<FontSize>10pt</FontSize>
<FontStyle>0</FontStyle>
</Left>
<Main>
<BgColor></BgColor>
<FontColor></FontColor>
<FontSize>10pt</FontSize>
<FontStyle>0</FontStyle>
<AlternateBgColor>#EEEEEE</AlternateBgColor>
<AlternateFontColor></AlternateFontColor>
<AlternateNum>5</AlternateNum>
</Main>
Page 82 of 246
PrintUsage 2.1 User Manual
<Summation>
<BgColor></BgColor>
<FontColor></FontColor>
<FontSize>10pt</FontSize>
<FontStyle>1</FontStyle>
</Summation>
<SubTotal>
<BgColor></BgColor>
<FontColor></FontColor>
<FontSize>10pt</FontSize>
<FontStyle>0</FontStyle>
</SubTotal>
<Query>
<StartDttm></StartDttm>
<EndDttm></EndDttm>
<Status></Status>
<Filter></Filter>
</Query>
</CrossTab>
</Root>
1.Costant specification
ID stands for the only mark of cross tab
StyleName stands for the name of cross tab
RowType stands for the showing data type on the left of the list. It can be all the existing fields such as User: user,
Group: group/department etc.
ColumnType stands for the showing data type over the list. There are three kinds: Y stands for year; M stands for month;
D stands for day; W stands for week; Q stands for Quarter.
MaxValue stands for the maximal value
Headr stands for the top of the list.
Left stands for the left of the list
Main stands for data showing district
Summation stands for total
SubTotal stand for subtotal
AlternateBgColor stands for the alternating background color. Default is blank.
AlternateFontColor stands for the alternating font color. Default is blank.
AlternateNum stands for the alternating record number.
FontColor stands for front color. Default is blank.
BgColor stands for background color of font. Default is blank.
FontSize stands for font size
FontStyle stands for font style. 0 is normal, 1 is bold, 2 is italic, 3 is bold italic.
Page 83 of 246
PrintUsage 2.1 User Manual
RecordPerPage stands for record number per page. 0 stands for showing all the records.
2.Related Settings
Path to XML file: in the Report directory in installation directory, if it is the cross report, the directory is CrossTab. If it is
the principal and subordinate report, the directory is MasterDetail. When modify XML, only modify Config. xml in the
current directory.
If the above file was updated, it will take effective next time open the program, i.e. when open the report next time, the
new setting will be applied.
If you modify the above setting, it will not be effective immediately. There must be a chs_Report.ini in the installation
directory.
[Report_CrossTab]
Style1=Month-department statistic
Style2=Monthe-user statistic
[Report_MasteDetail]
Style1=Department-user statistic
Style2=User-file type statistic
Style3=Server-printer statistic
If it is the cross report, modify "Report_CrossTab". If it is principal and subordinate report, modify "Report_MasterDetail".
If a principal and subordinate report is added, add a line of "Style4=XXXXX" under Report_MasterDetail. Please pay
attention to that here "Style4" must accord with the added ID number by user, otherwise it is no effective. Finally, the
naming rule for "XXXX" is "ColumnType-RowType" statistic in setting.
Page 84 of 246
PrintUsage 2.1 User Manual
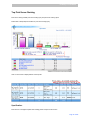
Task Analysis
1.File Type Analysis
Analyze print by document type. For example, doc, txt, wps.
2.Pages Analysis
Analyze print by total page print out. For example, one to three pages, four to six pages.
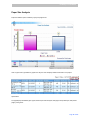
3.Paper Size Analysis
Analyze print by paper size.
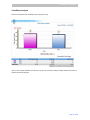
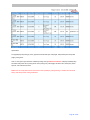
4.Color/Mono Analysis
Analyze print by print color type.
Notice User can modify default value from Report\Report_Top_User\Config.ini. Please refer Advance Setting and backup
before making modification.
Page 85 of 246
PrintUsage 2.1 User Manual
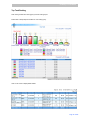
File Type Analysis
Report with different file type.
User can refer to Simple Report Condition
Click on document type to get statistic of each document type. By clicking on doc to display information of all .doc printed
files.
Page shows 10 most usage document types in descending order.
Page 86 of 246
PrintUsage 2.1 User Manual
Click on document type to get its statistic information with statistical conditions. It displays all related printing
information with printer name, printing server name, printing time, printed page, document name, total bytes, printed
expense, user name and full name.
Notice user can modify default value of document from R eport\Report_FileType\Config.ini. Please refer" advanced
setting" and backup before making modification.
Page 87 of 246
PrintUsage 2.1 User Manual
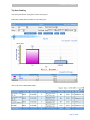
Paper Size Analysis
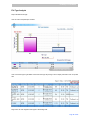
Paper size statistic report is created by inquiry and page format.
Click on paper size to get statistic by papers size. By click onA4 to display statistical information of A4 papers.
Specification:
The page displays all different paper types, statistic report with total bytes, total pages, total printed bytes, total printed
pages, printing times.
Page 88 of 246
PrintUsage 2.1 User Manual
Click on paper type to get related statistical information with different paper type statistical conditions. It displays
related printing information with printer name, printing server name, printing time, printed page, document name, total
bytes, printed expense, user name and full name.
Notice user can modify default value of document from R eport\Report_FileType\Config.ini. Please refer "advanced
setting" and backup before making modification.
Page 89 of 246
PrintUsage 2.1 User Manual
Color/Mono Analysis
Printed color statistical report createdby inquiry and report forming.
Click on color to display statistical information by color type. By click black and white to display statistical information of
all black and white printing task.
Page 90 of 246
PrintUsage 2.1 User Manual
Specification:
The page displays all printing by colors, graphical chart with total bytes, total pages, total printed bytes, total printed
pages, printing times.
Click on color types to get information of different printing color type statistical conditions. It displays related printing
information with printer name, printing server name, printing time, printed page, document name, total bytes, printed
expense, user name and full name.
Notice user can modify default value of document from R eport\Report_FileType\Config.ini. Please refer "advanced
setting" and backup before making modification.
Page 91 of 246
PrintUsage 2.1 User Manual
Pages Analysis
Printed Page Analysis Report is created by inquiry and report form
User can refer to Simple Report Condition
Click on pages printed to display statistical information of all different total pages printed out.
Specification:
Page shows 10 most pages print in descending order.
Page 92 of 246
PrintUsage 2.1 User Manual
Click on printed pages to get related statistical information with statistical conditions. It displays related printing
information with printer name, printing server name, printing time, printed page, document name, total bytes, printed
expense, user name and full name.
Notice user can modify default value of document from Report\Report_FileType\Config.ini. Please refer "advanced
setting" and backup before making modification.
Page 93 of 246
PrintUsage 2.1 User Manual
Loading Analysis
1.Printer Analysis
Analyzing printing status by printer.
2.Server Analysis
Analyzing printing status by printer server.
3.Computer Analysis
Analyzing printing status by computer.
4.User Analysis
Analyzing printing status by each user.
Page 94 of 246
PrintUsage 2.1 User Manual
Computer Analysis
Computer analysis has two options: query condition and report generation.
Please refer to Simple Report Condition for query condition.
Click on computer name to display detail statistic of each print client.
Page 95 of 246
PrintUsage 2.1 User Manual
Specification:
Page shows 10 most usage users in descending order.
Click on printer name to view statistic with satisfying statistic conditions of ranking report, report including printer
name, print server name, print date, pages, file name, bytes, print charge, user name and user full name.
.
Note: user can change default value in Report\Type_Top.xml. Please refer Advanced Settings and make a backup
before making modification.
Page 96 of 246
PrintUsage 2.1 User Manual
Printer Analysis
Printer analysishas two options,query condition and report generation.
Please refer to Simple Report Condition for query condition.
Click on printer name to display detail statistic of each printer.
Specification:
Page shows 10 most usage printers in descending order.
Page 97 of 246
PrintUsage 2.1 User Manual
Click on printer name to view statistic with satisfying statistic conditions of ranking report, report including printer
name, print server name, print date, pages, file name, bytes, print charge, user name and user full name.
Note: user can change default value in Report\Type_Top.xml. Please refer Advanced Settings and make aback up
before making modification.
Page 98 of 246
PrintUsage 2.1 User Manual
Server Analysis
Server analysis has two options: query condition and report generation.
Please refer to Simple Report Condition for query condition.
Click on server name to display detail statistic of each server.
Page 99 of 246
PrintUsage 2.1 User Manual
Specification:
Page shows 10 most usage servers in descending order.
Click on server name to view statistic with satisfying statistic conditions of ranking report, report including printer
name, print server name, print date, pages, file name, bytes, print charge, user name and user full name.
Note: user can change default value in Report\Type_Top.xml. Please refer Advanced Settings and make a backup
before making modification.
Page 100 of 246
PrintUsage 2.1 User Manual
User Analysis
User analysis has two options: query condition and report generation.
Please refer to Simple Report Condition for query condition.
Click on user name to display detail statistic of each user.
Specification:
Click on user name to view statistic with satisfying statistic conditions of ranking report, report including printer
name, print server name, print date, pages, file name, bytes, print charge, user name and user full name.
Page 101 of 246
PrintUsage 2.1 User Manual
Note: user can change default value in Report\Type_Top.xml. Please refer Advanced Settings and make a backup
before making modification.
Time Analysis
1. 24 Hour Analysis
Analysis printing job in last 24 hrs.
2. Weekday Analysis
Analysis printing job in last week.
3. 31 Day Analysis
Analysis printing job from 1st day to 31st days.
4. Quarter Analysis
Analysis printing job from last quarter.
5. 12 Month Analysis
Analysis printing job from 1st month to12th months.
6. Year Analysis
Analysis printing job yearly.
7. Week Analysis
Page 102 of 246
PrintUsage 2.1 User Manual
Analysis printing job weekly.
Page 103 of 246
PrintUsage 2.1 User Manual
12 Month Analysis
Twelve printing analysis report is created by inquiry and report form.
User refers to Simple Report Conditions about inquiry conditions.
Click on month to get statistical information of each month. By clicking the tenth month to display information of all
documents with inquiry conditions.
Page 104 of 246
PrintUsage 2.1 User Manual
Specification:
The page displays printing report within twenty-four months, the simple chart display total bytes, total pages, total printed
bytes, total printed pages, printing times.
Click on month to get related statistical information of given month according with statistical conditions. It displays
different printing information with printer name, printing server name, printing time, printed page, document name, total
bytes, printed expense, user name and full name.
Notice user can modify default value of document from Report\Report_FileType\Config.ini. Please refer "advanced
setting" and backup before making modification.
Page 105 of 246
PrintUsage 2.1 User Manual
Quarter Analysis
Quarter printing statistic is created by inquiry and report form.
User can refer to Simple Report Condition about inquiry conditions.
Click on quarter to get statistical information of each quarter. By clicking the fourth quarter to display information of all
documents with inquiry conditions.
Page 106 of 246
PrintUsage 2.1 User Manual
Specification:
The page displays printing report within four quarters, the simple chart displays total bytes, total pages, total printed
bytes, total printed pages, printing times.
Click on quarter to get related statistical information of given quarter according with statistical conditions. It displays
different printing information with printer name, printing server name, printing time, printed page, document name, total
bytes, printed expense, user name and full name.
Notice user can modify default value of document from R eport\Report_FileType\Config.ini. Please refer "advanced
setting" and backup before making modification.
Page 107 of 246
PrintUsage 2.1 User Manual
Week Analysis
Week analysis Report is created by inquiry and report forming.
User refers to Simple Report Conditions about inquiry conditions.
Click on week to get statistical information of each week. By clicking the forty-two week to display information of all
documents with inquiry conditions.
Page 108 of 246
PrintUsage 2.1 User Manual
Specification:
The page displays printing report within twenty four weeks, the simple chart display total bytes, total pages, total printed
bytes, total printed pages, printing times.
Click on week to get related statistical information of given week according with statistical conditions. It displays different
printing information with printer name, printing server name, printing time, printed page, document name, total bytes,
printed expense, user name and full name.
Notice user can modify default value of document from Report\Report_FileType\Config.ini. Please refer "advanced
setting" and backup before making modification.
Page 109 of 246
PrintUsage 2.1 User Manual
Year Analysis
Year Analysis Statistic is created by inquiry and report form.
User refers to Simple Report Conditions about inquiry conditions.
Click on year to get statistical information of each year. By clicking the year 2005 to display information of all documents
with inquiry conditions.
Page 110 of 246
PrintUsage 2.1 User Manual
Specification:
The page displays printing report within one year, the simple chart display total bytes, total pages, total printed bytes,
total printed pages, printing times.
Click on year to get related statistical information of given year according with statistical conditions. It displays different
printing information with printer name, printing server name, printing time, printed page, document name, total bytes,
printed expense, user name and full name.
Notice user can modify default value of document from Report\Report_FileType\Config.ini. Please refer "advanced
setting" and backup before making modification.
Page 111 of 246
PrintUsage 2.1 User Manual
24 Hour Analysis
Report of twenty-four hour analysis created by inquiry and report forming.
User refers to Simple Report Conditions about inquiry conditions.
Click on hour to get statistical information of each hour. By clicking the fifteen hour to display information of all
documents with inquiry conditions.
Page 112 of 246
PrintUsage 2.1 User Manual
Specification:
The page displays printing report within twenty-four hours, the simple chart display total bytes, total pages, total printed
bytes, total printed pages, printing times.
Click on hour to get related statistical information of given hour according with statistical conditions. It displays different
printing information with printer name, printing server name, printing time, printed page, document name, total bytes,
printed expense, user name and full name.
Notice user can modify default value of document from Report\Report_FileType\Config.ini. Please refer "advanced
setting" and backup before making modification.
Page 113 of 246
PrintUsage 2.1 User Manual
31 Day Analysis
Analysis Report of Thirty-one Day Printing is created by inquiry and report form.
User can refer to Simple Report Condition about inquiry condition
Click on day to get statistical information of each day. By clicking the twelve day to display information of all documents
with inquiry conditions.
Page 114 of 246
PrintUsage 2.1 User Manual
Specification:
The page displays printing report within thirty-one days, the simple chart display total bytes, total pages, total printed
bytes, total printed pages, printing times.
Click on day to get related statistical information of given day according with statistical conditions. It displays different
printing information with printer name, printing server name, printing time, printed page, document name, total bytes,
printed expense, user name and full name.
Notice user can modify default value of document from Report\Report_FileType\Config.ini. Please refer
"advanced setting" and backup before making modification.
Page 115 of 246
PrintUsage 2.1 User Manual
Weekday Analysis
User weekday printing report is created by inquiry and report form.
User can refer to Simple Report Condition about inquiry conditions.
Click on weekday to get statistical information of each weekday. By clicking the Thursday to display information of all
documents with inquiry conditions.
Page 116 of 246
PrintUsage 2.1 User Manual
Specification:
The page displays printing report within forty-eight weeks, the simple chart display total bytes, total pages, total printed
bytes, total printed pages, printing times.
Click on weekday to get related statistical information of given weekday according with statistical conditions. It displays
different printing information with printer name, printing server name, printing time, printed page, document name, total
bytes, printed expense, user name and full name.
Notice user can modify default value of document from Report\Report_FileType\Config.ini. Please refer "advanced
setting" and backup before making modification.
Page 117 of 246
PrintUsage 2.1 User Manual
Advanced Settings
1. Definition of Report Types
2. Property Setting of Report Types
3. Customization of Report Detailed pages
4. Customization of Report Form
5. Advanced Report Interface
Page 118 of 246
PrintUsage 2.1 User Manual
Property Settings of Report Types
Use "Type_Task.xml" as example. Select "Graph_FileType" in report folder of installation directory. The code is as
following:
<Graph_FileType Name="Graph_FileType" Type="Graph" GroupBy="FileType" OrderBy="" OrderDirect=""
PrinterStatus="A" ShowByTime="M">
<Chart MaxInChart="0">
<A_3D Is3D="1" Percent3D="10"></A_3D>
<Axis Width="580" Height="300" HLabelStyle="1" VLabelStyle="3"></Axis>
<Marks IsShowMarks="1" MarksStyle="1"></Marks>
<Legend IsShowLegend="1" LegendAlign="1" LegendStyle="1"></Legend>
</Chart>
<List IsShowList="1" MaxInList="0"></List>
<ListDetail style="DetailStyle.pnt" MaxInDetail="1000">
<ColName Name="PrinterName" Align="1" CountFun="Count" Formater="S"></ColName>
<ColName Name="PrinterServer" Align="1" CountFun="" Formater="S"></ColName>
<ColName Name="SubmitTime" Align="1" CountFun="" Formater="D:MM/dd/YYYY"></ColName>
<ColName Name="PagesPrinted" Align="3" CountFun="SUM" Formater="F:0"></ColName>
<ColName Name="Document" Align="1" CountFun="" Formater="S"></ColName>
<ColName Name="TotalBytes" Align="3" CountFun="SUM" Formater="F:0"></ColName>
<ColName Name="TotalCost" Align="3" CountFun="SUM" Formater="C:-1"></ColName>
<ColName Name="User" Align="1" CountFun="" Formater="S"></ColName>
<ColName Name="UserFullName" Align="1" CountFun="" Formater="S"></ColName>
</ListDetail>
</Graph_FileType>
Code listed above is a sub node of XML file.
1. Name is the name of node and system will automatically search in language package. Type indicate the report is
graphical report.;
2. Group By shows the report statistics as X axis. Order Direct is sort by direction. Blank is the default value for
descending order. "ASC" for ascending order.
3. Printer Status is default print status. A for all, S for print successfully, D for print denied.
4. Show By Time is default date.
5. In Chart sub node, MaxInChart= "0". 0 to display all records.
Page 119 of 246
PrintUsage 2.1 User Manual
6. <A_3D Is3D="1" Percent3D= "10"></A_3D> display 3D graphical report. 1 to use 3D effect and Percent3D enable, 0
no 3D effect and Percent3D disable. Percent3D is the proportion size of 3D effect.
7. <Axis Width="580" Height="300" HLabelStyle="1" VLabelStyle= "3"></Axis> the draw size of graphical report.
8. <Marks IsShowMarks="1" MarksStyle= "1"></Marks> the mark of graphical report. 1 is to display and 0 is not display.
If 0, Marks Style will be disable.
9. <Legend IsShowLegend="1" LegendAlign= "1" LegendStyle= "1"></Legend> the legend of graphical report. 1 to
display and 0 not display. If 0, below units will be disable.
10. <List IsShowList= "1" MaxInList= "0"></List> the list displayed or not, the list number under graphical report. If there
is no list, the view detailed information of record will not display. IsShowList shows if list is displayed . 1 to display and 0
not display. If not, MaxInList will be disabled.
11. <ListDetail style="DetailStyle.pnt" MaxInDetail= "1000"> shows whole configuration of detailed information, listed of
information. The style of list will be described in Customizaton of report detail pages. Style is the model of detail page
and there is only one which is DetailStyle.pnt.
12. <ColName Name="PrinterName" Align="1" CountFun="Count" Formater= "S"></ColName>the column description of
detail page.The first column PrinterName must be match with field name of database; otherwises, report error will occur.
If first column is user full name, only set toName= "UserFullName" is work. Align is arranged type: 1 is flush left, 2 is
center, 3 is flush right. CountFun set tostatistics function. Formater shows data output format.
Page 120 of 246
PrintUsage 2.1 User Manual
Customization of report detail pages
Find "Report\DetailStyle.pnt" in installation directory and open" DetailStyle.pnt " filewith wordpad.
Divided into chart head and chart end
<PrintUsage_ReportTitle> stand for report title
<PrintUsage_ReportDate> stand for report date
<PrintUsageLabel></PrintUsageLabel> stand for the title of the report head.
Because this system supports multi-language, the wording in the report cannot be written directly. It must be translated
by the language packfile. The ruleof <PrintLabelField_filed name>, such as:<PrintLabelField_PrinterName>, You can set
ranking, by clicking on field, such as :GetOrderBy('PrinterName')
Circulation:<PrintUsageLoop></PrintUsageLoop> stand for the begin and end of the circulation. The rule for circulation
content is "<PrintTextField_filed name>", such as:<PrintTextField_PrinterName>
The code as following:
<style>
.std{
FONT-WEIGHT: normal;
FONT-SIZE: 12px;
COLOR: #000000;
LINE-HEIGHT: normal;
FONT-STYLE: normal;
FONT-VARIANT: normal;
TEXT-DECORATION: none
}
</style>
<table width="90%" border="0" align="center" cellpadding="0" cellspacing="0" class="std">
<tr>
<td class="std"><div align="right"></div></td>
</tr>
<tr>
<td class="std"><div align="center"><font size="6"><strong><PrintUsage_ReportTitle></strong></font></div></td>
</tr>
<tr>
<td class="std"> </td>
</tr>
<tr>
<td class="std"><div align="right"><font size="2"><PrintUsage_ReportDate></font></div></td>
Page 121 of 246
PrintUsage 2.1 User Manual
</tr>
<tr>
<td class="std" align="right"><PrintUsage_ReportInfo></td>
</tr>
</table>
<table width="90%" border="0" align="center" cellpadding="0" cellspacing="0" bgcolor="#000000">
<tr>
<td ><table width="100%" border="0" align="center" cellpadding="2" cellspacing="1">
<PrintUsageLabel><tr align="center" bgcolor="#569CE1" class="std">
<FieldLoop>
<td align="<PrintUsage_Align>" nowrap><font color="white" style="cursor:hand"
onClick="javascript:GetOrderBy('<PrintUsage_LabelID>');"><PrintUsage_LabelValue></font></td>
</FieldLoop>
</tr></PrintUsageLabel>
<PrintUsageLoop>
<bgColorProperties>#F0F9FE_#FFFFFF_#D3EDFF</bgColorProperties>
<tr bgcolor="<PrintUsage_bgColor>" class="std">
<FieldLoop>
<td align="<PrintUsage_Align>" title="<PrintUsage_FullFieldValue>" ><PrintUsage_FieldValue></td>
</FieldLoop>
</tr>
</PrintUsageLoop>
<PrintSummation>
<tr bgcolor="#569CE1">
<FieldLoop>
<td class="std" nowrap align="<PrintUsage_Align>"><font color="white"><PrintUsage_FieldValue></font></td>
</FieldLoop>
</tr>
</PrintSummation>
</table></td>
</tr>
</table>
Page 122 of 246
PrintUsage 2.1 User Manual
Customization of Report Form
Use"Graph_FailRate"as example. Find "Report\Graph_FailRate" in installation directory and open"Style6.ini".
The code is as following:
[Graph_FailRate_Style6]
;Set description for X axis
;If it is vacant, it shows the following language translation of the definition field, such as Status, is translated to "printing
status".
X=
;The grouping base of setting the X axis. The value of XFieldName is the name of the field.
XFieldName=Status
;Set description for Y axis(default). If the user chooses the condition, then it shows the corresponding condition
description.
Y=
;Set chart length
W=700
;Set chart height
H=300
;Set background color
BG=FFFFFF
;Set gradually changing property. If start gradually changing, then the background is of no effect.
IsGradientColor=false
GradientColorStyle=1
GradientColorStart=E28E32
GradientColorEnd=EBDA7C
;Whether to set 3D effect. If there is then it is True. If there isn't it is False.
3D=1
;The size of chart 3D( If View3D is false, then this property is of no effect)
Percent3D=10
;Set the scale mark and gridding of the horizontal axis and vertical axis. The scale mark types: 1name, 2static chart
mark, 3value, 4blank.
HLabelStyle=1
VLabelStyle=3
;SeriesStyle Show cutline types and cutline names. Cutline types:1bar chart, 2horizontal bar chart, 3line chart, 4pie chart,
5point chart, 6area chart.
SeriesName=
SeriesType=6
;BarStyle
;Set shape, filling in pattern, and the color of filling in parttern for the bar.
;Bar shape:1square, 2area gradually changing, 3triangle, 4inversed triangle, 5ellipse,6arrow.
;Filling in pattern:1transparent, 2transverse line, 3vertical line, 4right-inclined line, 5left-inclined line, 6tartan, 7inclined
tartan
;(Note:this method only can be applied in Series 1 or 2 charts, i.e.1bar chart, 2transverse bar chart. There is of no effect
Page 123 of 246
PrintUsage 2.1 User Manual
in other chart types.)
BarStyleSharp=2
BarStyleFill=1
BarStyleColor=2C672D
;PointStyle
;Set shape of value point
;Shape of value point: 1square, 2round, 3upside triangle, 4downside triangle, 5cross, 6error mark(X),7star(*), 8diamond,
9small dot
;(Note:this method only can be applied in Series 3, 5 or 6 charts, i.e.3line chart, 5point chart, 6area chart. There is of no
effect in other chart types.)
PointStyleSharp=1
;MarksStyle
;Set report style
;1value, 2percentage, 3mark name, 4mark name and percentage, 5relative sum percentage
MarksStyle=3
;Output is the output quality of picture
Output=100
Page 124 of 246
PrintUsage 2.1 User Manual
Advanced Report Interface
Function Options
The setting pages of the advanced report. Systems will create a new report according to the user has chosen and filled.
1. Choose a pre-defined report and showing style
1. Choose report type, use "Ranking Statistic" as example, showing as the following chart:
2. Choose report by name, use "Printer Ranking" as example, showing as the following chart:
Page 125 of 246
PrintUsage 2.1 User Manual
3. Choose style list, use "transverse bar" as example, showing as the following chart:
4. Choose the showing value. The system default is "total printing cost". User can go to Advanced Setting to reset.
5. Input reasonable condition base on user's demand.
6. Choose correct time. Click
on the right of "Time Range". Then input the year and corresponding contents. Or click
icon, it will pop up the following interface:
Choose the year, month, and date. The chose dates will appear on the left of
icon.
7. Click "Creating Report" button, the new report will be created and pop up a new page.
8. Showing report, see Advanced Report
Page 126 of 246
PrintUsage 2.1 User Manual
Definition for Report Type
Use for configuring summary report, Cross Tab report and Master/Detail report.
1.Cross Tab Report
Cross Tab report is the relationship between two different linking data such as the monthly charge for each user.
Currently it supports comparison by User&Time and Department&Time. It can be sort by day, week, month, quarter and
year. Here, Style1indicates User&Time and Style2 for Department&Time.
Configuration: open Type_CrossTab.xml with NotePad. Use User&Time for example. The code is as following:
<CrossTab ID="Style1">
<StyleName>StyleName1</StyleName>
<ColumnType>M</ColumnType>
<RowType>GroupName</RowType>
<CalculateType>5</CalculateType>
<RecordPerPage>0</RecordPerPage>
<Table>
<BorderWidth>1</BorderWidth>
<BorderColor>black</BorderColor>
<Width>100%</Width>
</Table>
<Guard>
<MaxValue>0</MaxValue>
<BgColor>red</BgColor>
<FontColor>white</FontColor>
<FontSize></FontSize>
<FontStyle>3</FontStyle>
</Guard>
<Title>
<BgColor></BgColor>
<FontColor></FontColor>
<FontSize>14pt</FontSize>
<FontStyle>1</FontStyle>
</Title>
<Head>
<BgColor></BgColor>
<FontColor>black</FontColor>
<FontSize>12pt</FontSize>
<FontStyle>1</FontStyle>
</Head>
<Left>
<BgColor></BgColor>
<FontColor></FontColor>
<FontSize>10pt</FontSize>
Page 127 of 246
PrintUsage 2.1 User Manual
<FontStyle>0</FontStyle>
</Left>
<Main>
<BgColor></BgColor>
<FontColor></FontColor>
<FontSize>10pt</FontSize>
<FontStyle>0</FontStyle>
<AlternateBgColor>#EEEEEE</AlternateBgColor>
<AlternateFontColor></AlternateFontColor>
<AlternateNum>5</AlternateNum>
</Main>
<Summation>
<BgColor></BgColor>
<FontColor></FontColor>
<FontSize>10pt</FontSize>
<FontStyle>1</FontStyle>
</Summation>
<SubTotal>
<BgColor></BgColor>
<FontColor></FontColor>
<FontSize>10pt</FontSize>
<FontStyle>0</FontStyle>
</SubTotal>
<Query>
<StartDttm></StartDttm>
<EndDttm></EndDttm>
<Status></Status>
<Filter></Filter>
</Query>
</CrossTab>
CrossTab is cross table
ID is unique mark of cross table
StyleName is name of cross table
CalculateType is value types. 4 is total pages, 5 for total cost, 6 for print count
MaxValue is max alert value
Headr is style of top of table
Left is style of the right of table
Main is style of display area
Summation is style of Summation
SubTotal style of subtatol
AlternateBgColor is background color of alternate item.
AlternateFontColor is font color of alternate item
Page 128 of 246
PrintUsage 2.1 User Manual
AlternateNum is records number of alternation
FontColor is font color
BgColor is background color of font
FontSize is font size
FontStyle is font style. 0 is for normal, 1 for bold, 2 for italic and 3 for bold italic
RecordPerPage is records per page
2.Master/Detail Report
The reportshow the relationship between master report and detail report.
Configuration: open Type_MasterDetail.xml with notepad. Take Department&User for instance. The code is as following:
<MasterDetail ID="Style1">
<StyleName>MasterDetail_StyleName1</StyleName>
<RecordPerPage>0</RecordPerPage>
<Table>
<BorderWidth>1</BorderWidth>
<BorderColor>Black</BorderColor>
<Width>100%</Width>
</Table>
<Title>
<BgColor></BgColor>
<FontColor></FontColor>
<FontSize>14pt</FontSize>
<FontStyle>1</FontStyle>
</Title>
<Head>
<BgColor></BgColor>
<FontColor>black</FontColor>
<FontSize>12pt</FontSize>
<FontStyle>1</FontStyle>
</Head>
<Left>
<BgColor></BgColor>
<FontColor></FontColor>
<FontSize>10pt</FontSize>
<FontStyle>0</FontStyle>
</Left>
<Main>
<BgColor></BgColor>
<FontColor></FontColor>
<FontSize>10pt</FontSize>
<FontStyle>0</FontStyle>
Page 129 of 246
PrintUsage 2.1 User Manual
<AlternateBgColor>#EEEEEE</AlternateBgColor>
<AlternateFontColor></AlternateFontColor>
<AlternateNum>1</AlternateNum>
</Main>
<Summation>
<BgColor></BgColor>
<FontColor></FontColor>
<FontSize>10pt</FontSize>
<FontStyle>1</FontStyle>
</Summation>
<SubTotal>
<BgColor>#569CE1</BgColor>
<FontColor>white</FontColor>
<FontSize>10pt</FontSize>
<FontStyle>0</FontStyle>
</SubTotal>
<Master>
<Field>GroupName</Field>
<Order>1</Order>
<Direction>1</Direction>
</Master>
<Detail>
<Field>User</Field>
<Order>1</Order>
<Direction>1</Direction>
</Detail>
<List>
<Type>SUM</Type>
<Field>PagesPrinted,TotalCost,Count</Field>
</List>
</MasterDetail>
<RecordPerPage>0</RecordPerPage> shows how many master records is displayed and 0 is to display all master
report records.
The configuration describes the format of master report and detail report.
<Master>
<Field>GroupName</Field>
<Order>1</Order>
<Direction>1</Direction>
</Master>
It shows property of master report. The master report is group/department name indicated by <Field></Field>; Order
shows sort field is print pages. 1 is for pages, 2 for charge, 3 for print count, 0 for name. Direction is sort in order, 1 for
descending, 0 for ascending.
Page 130 of 246
PrintUsage 2.1 User Manual
<Detail>
<Field>User</Field>
<Order>1</Order>
<Direction>1</Direction>
</Detail>
It shows the property of detail report.
Page 131 of 246
PrintUsage 2.1 User Manual
Options
1.Registration
List user name, licensed printer number and valid time.
2.Monitor Mode
There are three Monitoring Mode: Monitoring and print fee charging, Monitoring with simple control and Monitoring with
advanced control. Only one type is available.
3.Notification
Setup user print notification including Windows Message service and sending E-mail.
4.Template
Manage the templates user defined such as server templates, printer templates, user/computer group templates and
user/computer templates.
5.Language
Supports multi-language.
6.Administrator
Setup administrator info.
7.Roles
Add /remove user role and assign different roles for different administrators.
Page 132 of 246
PrintUsage 2.1 User Manual
8.Paper Type
Setup paper types, which can be user-defined in name and size.
9.File Type
Setup File Types.
10.Data Maintenance
Remove print log and system log.
Page 133 of 246
PrintUsage 2.1 User Manual
Registration Info
Registration info includes user name and registration code.
Licensed printer is monitored printer number authorized by the software.
Click [Imput registration code] to input registration code in pop-up box and click submit.
The registration info will be displayed if the code is correct.
Page 134 of 246
PrintUsage 2.1 User Manual
Monitor Mode
Description for different monitoring modes:
Mode 1: Monitoring and print fee charging
All users can use printer resource without any limit. But users' print records will be recorded in
database for statistic and report. By defining the cost for different paper type and estimate the print
cost.
This mode is good for users who want to know the printing cost.
Mode 2: Monitoring with simple control
Mode 2 adds a quota control feature.
User can not print if reach the quota.
Periodical quota, user cannot print until next period if reach current quota.
This mode is good for users who want print cost control without limitation.
Mode 3: Monitoring with advanced control
Mode 3 enables user to make advance setup in user, user group, printer, server, print time, file
type, paper type and quota, and define the detailed cost for different paper type.
This mode is good for advanced users who want to control print task in multi aspects.
The advanced setting for Mode 3 only.
Page 135 of 246
PrintUsage 2.1 User Manual
Notification
•
•
During processing print tasks, setup notification when print start, complete or occurring error.
Notify when printing starts: select this option to notify user when print start. There are three
ways: WINPOPUP, EMAIL and printing a blank page. Select preferred notification type-->input
notification message in editing box_-->select notification items form custom options from right hand
side-->double click to locate cursor position in the editing box of the left hand side. The wording
cannot be changed.
•
Notify when printing ends: select this option to notify user when print completed. The step is as
same as notify when print start.
•
Notify when error: select this option to notify user when error occurring. The step is as same as
notify when print start.
•
Mail subject: it is the mail subject.
•
Sender: email send from address.
•
SMTP server: SMTP is short for Simple Mail Transfer Protocol. SMTP server is to specify the
mail server name.
•
SMTP user name: sender SMTP account.
•
SMTP password: sender SMTP password.
Note:
Page 136 of 246
PrintUsage 2.1 User Manual
Double click notification items at the right side to add notification.
When setup WinPopup, please make sure the Messenger service of print client is running. Otherwise, user will
not receive the system notification message.
Page 137 of 246
PrintUsage 2.1 User Manual
Template
Template management includes server module, printer module, user/computer group module and user/computer
module.
To change server template will also affect Server Properties
Printer template
To change printer template will also affect Printer Properties
Page 138 of 246
PrintUsage 2.1 User Manual
User/computer group template
To change user/computer group template will also affect Group Properties
User/computer template
To change user/computer template will influence User Properties
Template quotation
There are two types of template quotation:
•
Template finger quotation administrator configure within a file without selfconfiguration info.
•
Template value quotation administrator configure within a file. Template change will
not change other configuration.
•
Following example shows main differences between two quotations.
Use server template for instance, the monitoring mode is monitoring with
advanced control
Page 139 of 246
PrintUsage 2.1 User Manual
1. Log on as system administrator.
2. In server group, click a server name to display basic info from print
monitoring server.
3. Click user name, file type or charge to display info.
Server has itself own property and will not follow Server Setup or Server_Mod
settings change.
Page 140 of 246
PrintUsage 2.1 User Manual
4. Click [Apply] to get following property.
5. To change template finger quotation and template value quotation. Click
save to apply template value. Select a template and click [Apply] to apply
template finger quotation.
Page 141 of 246
PrintUsage 2.1 User Manual
Language
Select user language
Click [Submit] to change language.
Page 142 of 246
PrintUsage 2.1 User Manual
Administrator
•
Setup administrator's user name, password, role and password modification.
Note:
o
Administrator cannot be removed.
o
When user is not administrator, the default role is empty. New added administrator can log on manager
site but without administration right.
•
o
When adding role for administrator, the administrator will have the right of management.
o
Click role management to manage user right.
Click change password to pop up the password change dialog box.
After you successfully change the password, it will display change success notice.
Page 143 of 246
PrintUsage 2.1 User Manual
•
Click role to pop up user role setup dialog box.
Select related roles and click [Setup] to enable the right of the role to administrator. It is by Setup-->Role
Management to setup.
•
Click [Remove] to remove selected administrators.
•
Click [Add] to add administrator.
•
Click [Reset] to clear selection.
Page 144 of 246
PrintUsage 2.1 User Manual
Roles
Role management lists all roles' names
•
Click [Add] to add role.
Add correct role name and description and then click [Submit] to complete. Role name is required. Click [Back]
to return to the list.
•
Select role and click [Remove] to remove selected role, which will influence Administrator right.
•
Click [Setup right] to configure, change and update the right of roles. To change the role's right will lead to
the change of the right of related Administrator.
Page 145 of 246
PrintUsage 2.1 User Manual
Following is an example of role application:
•
In Options--->Administrator option, add an administrator--Admin_Role_Test.
Page 146 of 246
PrintUsage 2.1 User Manual
•
In Options-->Role management, add a role--Admin_Role_Test_Role.
•
Click [Setup Right] after Admin_Role_Test_Role to assign right.
Click [Setup] to complete role setup of Admin_Role_Test.
Page 147 of 246
PrintUsage 2.1 User Manual
•
In Options---> Administrator Setup, click [Affiliated Role] after Admin_Role_Test to set user role.
User will own the role's right.
•
Log out system and log on with Admin_Role_Test.
•
Click Group to obtain following list.
Click All Printers to obtain following statistics.
Page 148 of 246
PrintUsage 2.1 User Manual
File Types
•
Click [Remove] to remove all selected file types.
•
Click [Add] to add file types.
File type name, suffix, icon and description can be specified.
•
Click [Reset] to clear all selection.
Note: file type change will influence Server---File Types, Printer----File Types, User Group----File Types and
User---File Types.
Page 149 of 246
PrintUsage 2.1 User Manual
Paper Types
•
Click [Add] to add new paper types.
File type includes all common paper types.
When selecting a common paper type such as A4, paper width and height will change automatically.
Page 150 of 246
PrintUsage 2.1 User Manual
User can self define the paper size, for example user defines a paper size as 200x300, name Custom Paper
and grade M.
Click [Add] to return to paper type list.
Page 151 of 246
PrintUsage 2.1 User Manual
•
Click [Remove] to remove paper types selected by user.
•
Click [Reset] to clear all selection.
Note: Adding paper types will also affect printer charge. Please refer to Server Charge Setup, Printer Charge
Setup and Paper Type of Print Log.
Page 152 of 246
PrintUsage 2.1 User Manual
Data Maintenance
This function is for removing print log, system log, recorded print content images, and recalculating the
amount.
Note:
•
•
Before removing, please confirm operation and the time period.
When clicking [Recalculating amount according to current log], the user print charge, pages and
tasks amount will be changed.
Page 153 of 246
PrintUsage 2.1 User Manual
Print Log
•
Print log records all printing history by system.
•
View report from selected date range.
•
Click on user name and computer name to see print log from user and computer.
•
Click on document to see detail.
•
Click [Refresh] to reload the page.
•
Click [Delete log] to delete listed log.
•
After remove log file, the Recalculating amount according to current log in Data Maintenance, the total
charge of User group/Department, User, Server and Printer status will be changed.
Log Query
Search by file name, user name or computer name.
File name, user name or computer name supports linking match.
Page 154 of 246
PrintUsage 2.1 User Manual
Click [Advanced Options] to pop up advanced options dialog window.
Advanced options enables user to search log by user name, computer name, document, time range, server,
printer and group.
Note:
•
User must click
•
The relationship with all conditions use as "and". If blank, the condition will be ignored.
•
If page is displayed Printer, User, Server and Group link,the search box will disable.
•
Click [Delete log] to remove all logs.
•
Click
to save print content into image file in Tiff format.
Click
to transfer print task to printer. If user A print task B of 5 pages on Prtinter_1 of PrintServer_A three
•
to confirm the drop-down box.
month ago, now he clicks
and confirms print, and task B of 5 pages will be re-transferred to Prtinter_1 of
PrintServer_A to print.
Export print log
Page 155 of 246
PrintUsage 2.1 User Manual
Click on export records as xls file for download.
Page 156 of 246
PrintUsage 2.1 User Manual
System Log
View System Log
System log records system data change history monitored by system, including adding, changing and removing of
datum and administrator logon.
It is available to view period system record.
Click [Remove current log] button to remove all records up to inquiry condition.
Page 157 of 246
PrintUsage 2.1 User Manual
Click [Export current log to] button to export records up to inquiry condition as Xls file for downloading.
Page 158 of 246
PrintUsage 2.1 User Manual
Advanced Setup
Database Type. Compatible with four types of databases: MS Access, MS SQL Server, MySQL and Oracle. MS Access
is recommended for trial version. The registered user can have different databases option.
Database Connection String. Input database connection string in the connection box. You may also click "connection
string", system will help you create new database connection wizard. Click on "test connection" after connection string
created. If connection "failure", it could be database username or password error.
Notice: Please check "Allow save password" in the data connection attribute, otherwise database connection string will
not run normally.
Page 159 of 246
PrintUsage 2.1 User Manual
MS Access User Notice: Please use Microsoft Jet 4.0 OLE/DB Provider as OLE DB provider in order to get best system
performance and compatibility. We recommend you use MDB files from local computer. Do not use it from the network, it
will decrease system performance.
Page 160 of 246
PrintUsage 2.1 User Manual
Page 161 of 246
PrintUsage 2.1 User Manual
Auto Configuration
Main Controlling Server:
Install server from PrintUsage managing webserver. System automatically obtain settings from managing webserver, the
computer name and IP address will input into the managing server.
The list shows server names from the main controlling servers.
You can use main controlling server without settings, if they are installed on the same server. The following
cases are exception:
Example one. Managing website is installed on the server under default circumstance, computer using Server as
its name can not visit managing server. Solution input IP address, such as 192.168.0.1
Example two. Managing server is installed on the server rather than default website, managing website url as
http://Server:88/PrintUsage/. Solution: input Server:88 or http://Server:88/PrintUsage/.
Example three. When administrator sets PrintUsage website manually, managing websiteurl as
http://server:888/print/. Solution: input http://server:888/print/.
Testing Settings
Testing settings will show your test setting work or not, and test result will also be display. If test fail, the advanced
setting button will be display, here you can set database type and connection string again. Refer advanced settings for
the details.
Page 162 of 246
PrintUsage 2.1 User Manual
Startup
Auto-start Printing Monitoring Service
If you choose the item, auto-start printing monitoring service will auto start when windows operating system starts. The
function of printing monitoring service is to monitor printing task of local computer, control start or stop of printing task
according to its settings and record printing task into database.
Auto-start Program of Printing Monitoring Taskbar
If you choose the item, program of printing monitoring taskbar will operate with user's logging. Program of printing
monitoring taskbar is the one to help user set managing monitoring service, and automatically runs after user's logging
under default circumstance.
Start after MS SQL Server's Operation on the Local Computer
Startup of printing monitoring service rely on database support. Printing monitoring service fails if without linking with
database, because startup of MS SQL Server is behind printing monitoring service when system start up. Therefore, if
you encounter this problem, you can tick off corresponding choice to guarantee startup of printing monitoring service
after database startup and avoid mistake. There is no need to setup if you are using MS Access or on the remote
computer.
Start after Mysql Startup on the Local Computer
Startup of printing monitoring service rely on database support. Printing monitoring service fails without linking with
database, because startup of Mysql Server is behind monitoring service when system start up. Therefore, if you
encounter this problem, you can tick off corresponding choice to guarantee startup of printing monitoring service after
database startup and avoid mistake. There is no need to setup if you are using MS Access or on the remote computer.
Page 163 of 246
PrintUsage 2.1 User Manual
View Events Log of Printing Monitoring Service
Running printing monitoring service will write printing events, printing task and error into system log. System log may fully
display operation history from printing monitoring service. Events log offer the most effective way to trace system error.
View Events Log of Printing Monitoring Service
After right click icon in the system tray, you will see pop-up view window of events log, then choosing "events log" from
the menu.
You may view events log from beginning menu->program->managing tool->events viewer.
Users of Windows 2000/XP/2003
Printing monitoring event log appears on single page of " printing monitoring".
Page 164 of 246
PrintUsage 2.1 User Manual
License
You may see " the software is licensed to " after right clicking managing program of system tray --> system settings. You
may also see the name of registered company or individual. The ending trial date will be indicated on the " the software
is licensed to ", if user does not buy the software license.
Page 165 of 246
PrintUsage 2.1 User Manual
Save Print Content
Saved Path of Printed Content
Saved file to folder for user printed content. You will get the following dialog box to choose saved address of
printed content after clicking " modify saved index of printed content".
User saved content can be modified if need.
Saved path of user printed content will be changed, user historical data will also be transferred to new saved path and
original data will be removed.
Eliminate Printed Content:
Printed content will not be deleted until corresponding printed log managing website deleted or removed. Set
time interval to automatically remove printed content files from server.
Page 166 of 246
PrintUsage 2.1 User Manual
Start/Stop Printing Monitoring Service
Start/stop printing monitoring service from the printing monitoring tray
Double click on the icon in the system tray to open system setup page. You can start, stop and restart printing monitoring
service in the service control panel. Signal light on the left indicates the running state of current monitoring service.
You can also right click icon on the system tray and choose "start service", " stop service", " restart service " on the menu
to start/stop/restart monitoring service.
Start/Stop Printing Monitoring Service from System Control Panel:
For Windows 2000/xp/2003 user: printing monitoring service can be started, stopped and restarted from service
manager, menu->program->managing tools->service->PrintUsage Pro Service.
Start/Stop Printing Monitoring Service from Program Menu:
You can start, stop and restart printing monitoring service on the program menu, menu->program->printing monitor>printing monitoring service.
Page 167 of 246
PrintUsage 2.1 User Manual
PrintUsage Data Upgrading Tool
Main function:
PrintUsage compatible with MS Access, MS SQL Server 7.0/2000, Oracle and MySQL.
Database upgrade tool help you transfer data between different types of database.
Operation
Open the following page from program menu PrintUsage Version Pro/Enterprise -> Data Upgrading Tool.
"Current Database Information" indicates current database type and its connection string.
"New Database Information" setup new database type and server, user name and password
"Test" use to test the database connection.
Notice: Don't use source data and destination data in one database, it may cause data lost!
After you press "Confirm" button, the system warning message appear if old database exist.
Page 168 of 246
PrintUsage 2.1 User Manual
Click "Yes", it will create the new database and old database will be delete.
Page 169 of 246
PrintUsage 2.1 User Manual
Run Setup Wizard
Begin --> Program--> PrintUsage 2.1 Enterprise Edition --> Run setup wizard.
Next Step: Database Type and Connecting Setting
Page 170 of 246
PrintUsage 2.1 User Manual
PrintUsage Data Upgrading Tool
Main function:
PrintUsage compatible with MS Access, MS SQL Server 7.0/2000, Oracle and MySQL.
Database upgrade tool help you transfer data between different types of database.
Operation
Open the following page from program menu PrintUsage Version Pro/Enterprise -> Data Upgrading Tool.
"Current Database Information" indicates current database type and its connection string.
"New Database Information" setup new database type and server, user name and password
"Test" use to test the database connection.
Notice: Don't use source data and destination data in one database, it may cause data lost!
After you press "Confirm" button, the system-warning message appear if old database exist.
Page 171 of 246
PrintUsage 2.1 User Manual
Click "Yes", it will create the new database and old database will be deleted.
Page 172 of 246
PrintUsage 2.1 User Manual
User Synchronous Tool
Begin-->Program-->PrintUsage 2.1 Enterprise Edition --> User Synchronous Tool.
Next Step: Choose Inputted User Groups
Page 173 of 246
PrintUsage 2.1 User Manual
FAQs:
Q: Print monitoring service couldn't start.
Several reasons could lead to the Print Monitoring Service startup failure and the common reasons are incorrect
installation, database connection failure, trial version expiration or software dog detection failure. Please follow the steps
below to find the solutions:
All operations will be recorded in the Event Log. To check log can find the main error reasons mostly. Right click on the
tray icon
on the bottom right of the screen-->Event Log.
1. Right click on the tray icon on the bottom right of the screen-->select system settings-->test settings. If the
testing could success, that means database connection is OK; if it fails, the possible reasons could be:
Reason
Fail to connect to
the main server is
caused by the
firewall on the print
server or the
dominating server
which blocks the
communication.
Diagnosis
Solutions
Test Settings displays failure.
Turn off the firewall, or open the TCP
port 8100, 8200
Check Event Log to see if there is a
following Error No. 5020:
UDP port 8201-8209
An unknown error occurs in system
module
CommonU.GetConfigFromMasterServer,
error message is
AppUrl=http://JAMES:8200/setup
Socket Error # 10061
PrintUsage
Start the Webmanager server
Application Service Connection refused.
PrintUsage Application service
on Web manager
site does not start
Dominating
server's computer
name cannot be
recognized.
There are
problems
connecting to the
database server.
Input dominating server's IP address,
or add the corresponding IP address
of the dominating server to HOST
file.
Test settings displays failure.
Make sure database service started
If database is MSSQL, make sure
authorization mode is SQL Server
Check Event Log to see if there is an
error No. 4330 and analyze the problem and Windows mode
according to the error message.
Database server
Use IP address as the database
name could not be
server name when installing manager
correctly resolved.
server.
Add the corresponding IP address of
the dominating server to local HOST
file.
2. Check for error No. 204 in the Event Log:
It is caused by connection failure between Print Monitoring Service and database. Please follow step 1 to find
the solution.
3. Check for error No. 200 in the Event Log
The error is related to software license and the possible reasons are:
Reason
Diagnosis
Solutions
Page 174 of 246
PrintUsage 2.1 User Manual
Trial version
expiration
License displays trial version expired.
No. 200 log information is:
TRIAL_USE_EXPIRED or
LICENSE_EXPIRED_REGCODE
Purchase the full version.
Incorrect
installation
Trial version Date/Time displayed in license
area is some date of 2002 or 2003. It will
randomly change to another date after clicking
Apply button.
Reinstall the system and make
sure the installation is
successful. It takes about 10 to
30 minutes to import users for
large domain. Don't cancel
during the process.
Message of error No. 200 in Event Log is:
CANNOT_GET_REGCODE_FROM_DB
Software dog
detection failure
Only occurs in office version
Message of error No. 200 in Event Log is:
NO_DONGLE_DETECTED
Make sure software dog is
plugged into the USB port. You
can plug the USB software dog
in and restart PrintUsage
Application service
Page 175 of 246
PrintUsage 2.1 User Manual
Q: What is the difference between professional version and enterprise version? Which version should I choose?
Professional version focuses on printing cost control, and enterprise version focuses on not only printing cost control, but
also security management of the printing information.
Comparison
Professional
Enterprise
Monitoring and recording
</span>
</span>
Printing charges and control
</span>
</span>
Web report and event log
</span>
</span>
Multi database type support Access, MSSQL, MYSQL, Oracle
</span>
</span>
Monitoring print content and save as image for review
</span>
Save print content and reprint
</span>
Multilevel administration privilege and roles definition
</span>
Automatic synchronization between user accounts and domain
accounts
</span>
Manual print sign function
</span>
User account balance report and history record printing
</span>
Group statistic collection
</span>
Page 176 of 246
PrintUsage 2.1 User Manual
Q: How to deal with "Test configuration" failure after installation of print server?
Reason
Fail to connect to
the main server is
caused by the
firewall on the print
server or the
dominating server
which blocks the
communication.
Diagnosis
Solutions
Test Settings displays failure.
Turn off the firewall, or open the TCP
port 8100, 8200
Check Event Log to see if there is a
following Error No. 5020:
UDP port 8201-8209
An unknown error occurs in system
module
CommonU.GetConfigFromMasterServer,
error message is
AppUrl=http://JAMES:8200/setup
Socket Error # 10061
PrintUsage
Start the Web manager server
Application Service Connection refused.
PrintUsage Application service
on Web manager
site does not start
Dominating
server's computer
name cannot be
recognized.
There are
problems
connecting to the
database server.
Input dominating server's IP address,
or add the corresponding IP address
of the dominating server to HOST
file.
Test settings displays failure.
Make sure database service started
If database is MSSQL, make sure
authorization mode is SQL Server
Check Event Log to see if there is an
error No. 4330 and analyze the problem and Windows mode
according to the error message.
Database server
Use IP address as the database
name could not be
server name when installing manager
correctly resolved.
server.
Add the corresponding IP address of
the dominating server to local HOST
file.
Page 177 of 246
PrintUsage 2.1 User Manual
Q: My manager server, print server and network printer do not belong to the same subnet. How do I install?
The networking requirement for PrintUsage is only TCP and database access and theoretically it does not matter if it's
overcross network installation. PrintUsage can be installed and operate as long as TCP/IP and database access ports
are not blocked. The following should be noticed during the installation over different subnet
•
When installing print server, if Web dominating server is in another network segment, print monitoring service
would not find the dominating server. You should enter the machine name or IP address for the dominating
server in system configuration.
Page 178 of 246
PrintUsage 2.1 User Manual
Q: I have manager site running on machine A. On machine B, I enter A as the master server, but "Test
Configuration" always fails. Why?
1. Please first make sure the manager site on A is running and can be visited from http://A/printusage
2. If you have manually configured the manager site running on a different port, say http://A:800/printusage, you should
use the full URL in the Master Server, that is http://A:800/printusage
3. If you have specified another name of printusage virtual directory, say http://A/print, you should use the full URL in the
Master Server, that is http://A/print
4. Please make sure you are using MS SQL Server or MySQL as database on A. MS Access is not supported in this
distributed environment.
Page 179 of 246
PrintUsage 2.1 User Manual
Q: I insert the licensed USB software dog, but why Windows cannot find driver?
USB software dog only needs to be installed on PrintUsage manager server.
•
Firstly check if computer BIOS disabled the USB controller.
•
Make sure you are using USB software dog in console, not the end service.
•
USB software dog driver will install automatically along with PrintUsage installation. If you insert USB
software dog without PrintUsage installed, system will pop up error "Can't find hardware driver". So please
install PrintUsage first and then insert USB software dog according to the wizard notice.
•
If Windows doesn't find hardware driver, an unknown equipment UMC(5.3) will be added. Please remove the
equipment first, and install PrintUsage package.
•
After installing driver correctly, a USB MicroDog Device will display under the Universal Serial Bus Controller
option and it will work normally.
•
Manually install software dog driver. Start-->Run-->cmd-->Enter-->cd C:\Program Files\PrintUsage\bin.
Executive dogDrv.exe /uninstall to remove old driver and executive dogDrv.exe /install to install new driver.
Page 180 of 246
PrintUsage 2.1 User Manual
Q: My operating system is Windows English version, can I install the Chinese version of PrintUsage?
Yes. Considering some users will print document files with Chinese name, the following setup must be done to make
sure the Chinese file name can be recognized.
Page 181 of 246
PrintUsage 2.1 User Manual
Q: Can I install PrintUsage on the Terminal service? What should I pay attention to?
Yes. But at the beginning, USB software dog cannot be recognized by the Terminal service. Only after you log onto the
Desktop, the system can find new hardware and install the driver.
About USB software dog, please refers to I insert licensed USB software dog, but why Windows cannot find driver?
Q: My drive C has no enough space, how can I save print content on other drives or network shared folder?
Right click tray icon-->System configuration-->Advanced to change the print content folder. You can click "Change print
content saving folder" to choose other folder. After changing the folder, system will move existing backup files to the new
folder.
To setup network shared folder as saving path:
PrintUsage supports UNC format path such as \\Server\share, so you can save different print server contents to central
file server or network storage for convenient management and backup and security purposes. Shared folder should be
setup with sharing access privilege to avoid unauthorized user to view print content saved in the shared folders.
Shared folder NTFS privilege should be set up with Administrators: complete control; Print server account: Complete
control. It is the machine account but not user account. So general user would have no right to access the shared folder,
but print monitoring service can still work normally.
Refer to Saving print content
Page 182 of 246
PrintUsage 2.1 User Manual
Q: I want to monitor the printer status, such as offline, out of paper and toner low. Can PrintUsage do this?
PrintUsage only focuses on usage and control of print resource without the function of monitoring hardware. If you use
HP network printer or print server, there is excellent management software called HP Web JetAdmin which would satisfy
your requirement. You can download it from HP for free.
Page 183 of 246
PrintUsage 2.1 User Manual
Q: When I run the setup program, it says it needs IIS installed. What does this mean?
PrintUsage requires IIS to be running. IIS is a windows components, the installation process will remind you if it finds out
that the current server doesn't have IIS installed. IIS is not installed by default, so you need to install it before you can
continue to install PrintUsage.
For Win2000/XP users:
Control Panel->Add/Remove Programs->Add/Remove Windows Components->Select Internet Information Service (IIS).
Internet Information Service Snap-In and World Wide Web Server is required, please select.
Page 184 of 246
PrintUsage 2.1 User Manual
For Windows 2003 Users:
Control Panel->Add/Remove Programs->Add/Remove Windows Components->Select Application Server.
Select Internet Information Services (IIS). Click Details.
Page 185 of 246
PrintUsage 2.1 User Manual
Choose at least Internet Information Services Manager and World Wide Web Service. Click Details:
Page 186 of 246
PrintUsage 2.1 User Manual
Make sure you select Active Server Pages, Server Side Includes and World Wide Web Services.
Page 187 of 246
PrintUsage 2.1 User Manual
Q: After installing the PrintUsage, the software is still a trial version. What should I do?
It is because Print Monitoring Service cannot obtain the software registration information, which is caused by incorrect
installation, incomplete initialization of database, or software dog unavailable. Solutions: uninstall and reinstall the
program. If the domain is large, it will take 10 to 30 minutes to import users.
Page 188 of 246
PrintUsage 2.1 User Manual
Q: How to correctly install MSDE as database server?
MSDE is a free desktop SQL Server published by Microsoft, which has most functions of SQL Server.
Free download at Microsoft official website: http://www.microsoft.com/downloads/details.aspx?FamilyId=413744D1A0BC-479F-BAFA-E4B278EB9147&displaylang=zh-cn#filelist.
Run CHS_MSDE2000A.exe to decompress files to the hard disk. Default folder is C:\MSDERelA.
Open DOS prompt window. Use command cd to enter folder MSDE 2000 Release A
Executive command:
Setup DISABLENETWORKPROTOCOLS=0 SAPWD="666666" SECURITYMODE=SQL
DISABLENETWORKPROTOCOLS=0 indicates to accept application programs connection from other computers.
SAPWD="666666" indicates 666666 is a powerful password specified for sa
SECURITYMODE=SQL indicates to configure installation with complex modes
Page 189 of 246
PrintUsage 2.1 User Manual
Q: Could PrintUsage be installed on WAN and monitor remote printers?
Theoretically, as long as manager server, database server and print server can implement IP communication by VPN or
other network techniques, the PrintUsage can be installed. But in real application, whether it will work smoothly is
determined by WAN speed. At least 2Mbps connection speed is required for smooth work, or print task has to wait for a
long time in task queue.
Page 190 of 246
PrintUsage 2.1 User Manual
Q: After installing PrintUsage, I can monitor the print of local machine, but I cannot monitor other computers.
Why?
This problem happens because the other machines print directly to the network printer through the TCP/IP port while not
printing through the shared network printer connecting to the print server where PrintUsage is installed. So the other
machines can be monitored only when these machines print through the shared network printer connecting to the print
server.
Page 191 of 246
PrintUsage 2.1 User Manual
Q: How to prevent user exiting PrintUsage program and hiding from the monitoring?
PrintUsage print service runs as a system service, so the monitoring service runs normally even if there is no user logon.
After user logon, there will be a printer icon in the system tray. This icon is for the configuration tool of print monitoring
service but not for the monitoring function. Even if user exits the program, the monitoring service will not stop.
For those printers shared on individual workstations, we should prevent user from stopping print monitor service or
uninstalling PrintUsage to hide from the monitoring. SO only Administrators or Power Users have the privilege to stop the
service or uninstall PrintUsage.
Page 192 of 246
PrintUsage 2.1 User Manual
Q: After PrintUSage installation, how to prevent users from printing directly to the network printers through
TCP/IP and hide from monitoring?
The purpose to use PrintUsage on network shared printing is to allow print server to communicate with network printer
and make sure the shared printer is the only way for printing. Please refer to the following solutions to fix the above
issue:
•
On the control panel or manager program of network printer, there is an Access Control List function where
you can enter the IP address which has ONLY printing service. Note: Usually, print server also has other
network protocols such as NetBios and AppleTalk installed. So please make sure all print protocols except for
TCP/IP must be disabled so that the Access Control IP List can function correctly.
•
•
IP restriction can be done on exchanger.
By setting up VLAN division, we can configure the print server to be the only one that can access the IP
segment of network printer, but other users can not. That makes other users have no choice but print through
the print server.
Page 193 of 246
PrintUsage 2.1 User Manual
Q: The recorded pages and copies count, using HP1320 is not correct.
The older driver for HP1320 causes the problem. Please download the driver PCL5 from http://www.hp.com. After
upgrading, uncheck the "Enable advanced printing features" in advanced option.
Page 194 of 246
PrintUsage 2.1 User Manual
Q: Fail to read registration info during PrintUsage installation
1. Check if softdog is installed on dominating server.
2. Make sure the license you are using matches the right version. License of professional version can not be
used for enterprise version; vice versa.
3. Check if softdog driver is installed correctly. Because there are different operating systems, different user
privileges and different file protection, it's possible that softdog is not installed correctly. Please follow the
steps below to install softdog:
a. Go to bin folder under PrintUsage installation directory and find DogDrv.exe
b. Click [Start]-->[Run]--> enter cmd and hit Enter
c. Drag DogDrv.exe to DOS window
d. Type the following character string in Dos window to install softdog driver
•
/install------- Install driver
•
/uninstall--------Remove driver
•
/interface-------Enter manager interface
Note:
•
Don't use Terminal to install softdog driver because Terminal thread has conflict with the
driver and may fail the installation.
Page 195 of 246
PrintUsage 2.1 User Manual
Common log error ID and meaning
Error ID
Meaning
Solution
204
Print monitoring service startup
failure because of database
connection problem
Make sure system installed successfully.
Make sure database server is accessible and service in
running
If the print server is a stand alone server, please make
sure the dominating server is specified and configured
successfully
If we need to test the SQL Server 2000 installed on
Win2003, SP3 is required.
200
Print monitoring service startup
failure because of license issue
The problem may be caused by trial version expiration or
the USB software dog detection failure. Please check the
event log for detailed information
Terminating the wizard during installation process will lead
to error also.
201/202
Print monitoring service stop
because of license issue
Same solutions as 200
1000
Print monitoring service starts up in
order
1006
Print monitoring service stops in
order
2091
Detailed information of printing task
It includes all the detailed information of each print task
being monitored.
2071
List of printers being monitored is
added when print service startsTh
up
This log shows the list of printers being monitored when
print service starts up.
3460/3470/3480
Error of print monitoring service
The sporadic error can be ignored. Continued errors can
occured when controlling print tasks be resoved by restarting ther monitoring service.
3560/3570/3580
Error of print monitoring service
The problem is caused by database connection failure.
occured when monitoring print tasks
The sporadic error can be ignored. Continued errors can
be resoved by restarting service.
2500/12004
Error in service update
The problem is caused by database connection failure or
configuration error. The sporadic error can be ignored.
4330
Database connection testing failure
Refer ID 200 and ID 204 soluctions
20102
Fail to read registration info from
USB software dog
Make sure USB software dog connects to USB ports
correctly.
Page 196 of 246
PrintUsage 2.1 User Manual
About Operator: Set Font error
When printer uses driver PCL6, there is following information:
PCL Error
subsystem: GRAPHICS
Error: internal error 0xffffffff
Operator: Set Font
Position: 6365
If you are not able to print the correct content, page number won't be correct either. We recommend you to change
printer driver to PCL5E or PS, and the problem should be resolved.
Page 197 of 246
PrintUsage 2.1 User Manual
Q: When adding a printer in the manager site, it cannot find the shared printer attached to another WinXP
machine.
PrintUsage Pro manager site is running under IUser_[server], which is restricted to be a guest account. WinXP by default
disabled the Guest account so that it won't have access to the shared printer. Two solutions to fix this problem:
1. Specify a domain user account to run the PrintUsage manager site in IIS. This needs to be done on the machine that
has the PrintUsage Manager site installed.
2. Enable the Guest Account in the Local User and Groups
This should be done on the WinXP machine which shares the printer
Page 198 of 246
PrintUsage 2.1 User Manual
Open Administrative Tools->Local Security Policy->User rights assignment, delete the Guest from the "Deny access to
this computer from the network".
Page 199 of 246
PrintUsage 2.1 User Manual
Go to Administrative Tools->Local Security Policy->Security Options. Enable the "Network access: Let Everyone
permission apply to anonymous users"
Go to Local Security Policy, Security Settings, reload to take effect.
Page 200 of 246
PrintUsage 2.1 User Manual
Page 201 of 246
PrintUsage 2.1 User Manual
Q: Web manager site couldn’t open.
PrintUsage manager site relies on IIS, but IIS might work abnormally because of some problems such as incomplete
installation, purview and port conflict. If Web manager site can not open, it might result from one of the following two
errors: (Refer to IIS Installation Manual)
1. Page displays HTTP 500 - Internal server error
This means IIS has been running but error occured. Follow the instruction below to get detailed
infromation.
Open IE->Tools->Internet option->Advanced tab, uncheck Friendly display HTTP error and refresh the
manager site to view detailed error information.
Common errors:
•
Parent paths disabled. Solution: Startup->Administration Tools->Internet Service Manager->Default
site->PrintUsage virtual directory->Properties->Virtual directory ->Application configuration->Setup,
check on "Enable parent paths."
Page 202 of 246
PrintUsage 2.1 User Manual
•
Session not defined: On the screenshot above, check the "Enable Session State".
•
HTTP 403.1 access denied: Execute Permission denied. Solution: Startup->Administration Tools>Internet Service Manager->Default site->PrintUsage virtual directory->Properties->Virtual directory
->Application Settings, set Execute Permissions to Script Only.
•
Directory Listing Denied. Solution: Startup->Administration Tools->Internet Service Manager>Default site->PrintUsage virtual directory->Properties->document, add "default.asp" in Default
Document.
Please check IIS Help file to look for other errors.
2. Page can't display. Couldn't find server or DNS error.
•
•
•
•
•
•
IIS is installed, but WWW service is not.
IIS service doesn't startup or default website is stopped in Internet Web server.
Other Web server is installed, and default Port 80 is occupied. You can bind IIS to other port such as
8080 and visit http://localhost:8080/PrintUsage.
Virtual directory was not created during installation for some reasons. Please check if there is
PrintUsage virtual directory under default site. If there is not, please create virtual directory and
have it point to ASP folder under installation directory (C:\Program Files\PrintUsage\). Script
execute privilege is required.
If you can not open http://localhost/PrintUsage, please try http://127.0.0.1/PrintUsage.
If there are many WEB sites created in the server, PrintUsage folder would be created under certain
site, but this site is not the default site that can be visited as Local host or by computer name. You
need to change the access path or manually create PrintUsage virtual directory on default site.
Page 203 of 246
PrintUsage 2.1 User Manual
Q: How to choose authorization mode?
PrintUsage is a complete print management system. The key of management is to monitor who prints and to monitor the
user authorization. PrintUsage provides two authorization modes:
Authorization by user name
Management and control are based on user name sending the print order. If user logs on with domain
account, user name is the domain user name; otherwise, it would be the local computer user name. The
authorization mode is PrintUsage's default mode and is the recommended mode which fits for domain or
active directory network.
Authorization by computer name
Management and control are based on computer name sending print order. The mode fits for equal
network. User logs on with local user name, but print server doesn't recognize the local user name. So all
print tasks are recorded as Guest printing. Computer name is the only symbol to distinguish from the
user. With this authorization mode, PrintUsage can satisfy print monitoring for equal network users.
Conclusion
LAN using domain or active directory, authorization by user name is adopted.
LAN using equal network, authorization by computer name is adopted.
Page 204 of 246
PrintUsage 2.1 User Manual
Q: I have to wait for a long time to print after installing print monitoring service? What's the problem?
This problem is caused by PCL6 driver language. You can speed up printing using the following methods:
•
1.Change printer driver language to non PCL6, that is PCL5E/PS
•
2.Use reprint mode
Page 205 of 246
PrintUsage 2.1 User Manual
Q: About user inquiry entrance and relevant settings
There is an user query entrance link on the homepage of the PrintUsage manager site.
Available condition:
Anonymous access is not allowed for Query Directory Security of PrintUsage virtual directory.
If you don't log on using domain account, you should input user name and password.
Input user name and password to get related information.
Page 206 of 246
PrintUsage 2.1 User Manual
Define the time range of query
You can setup Query folder security properties.
1. Enter IIS
2. Expand IIS folder
3. Right click Query and select properties.
4. Select Directory Security
Page 207 of 246
PrintUsage 2.1 User Manual
5.Click [Edit]
Uncheck [Anonymous access]
Page 208 of 246
PrintUsage 2.1 User Manual
Q: How to deal with "Fail to save print content as image"?
If it pops up this message, which means your printer driver is not compiled by PCL or Postscript language. PrintUsage
only supports drivers complied by these two languages to convert print tasks to images. Please contact your printer
supplier and check if your printer uses PCL or Postscript language driver, or consult us.
Laser printers of HP, Lexmark, Xerox, Samsung, Sharp and Ricoh support this function except for HP LaserJet 1000 and
1010 series. Laser printers of Epson and Canon do not support this function.
If your printer doesn't support to save print as image, you can save the print as reprint file and print the file later.
Procedures: Web manager site-->Printer list-->select save print as "Image + reprint file" or "reprint file".
Page 209 of 246
PrintUsage 2.1 User Manual
Q: How to deal with "Specified file doesn't exist on print server or Fail to retrieve file from print server"?
Open IE on manager server to diagnose. Enter http://print:8100 (suppose print server name is print). If the page doesn't
display "PrintUsage Http(App) Server is Running..."the possible reasons are:
•
Remote or local PrintUsage HTTP service doesn't startup. To restart the corresponding HTTP service can
solve problem.
•
Manager server cannot resolve print server's IP through computer name, so it cannot connect to HTTP
service to retrieve the print content. This occurred often because print server and manager server don't belong
to the same subnet or domain. Currently communication between PrintUsage servers is based on computer
name, so an entry should be added into HOSTS file of manager server in order to correctly access print server
by computer name. Open Hosts file in C:\Winnt\System32\drivers\etc\Hosts and add a line xxx.xxx.xxx.xx
print. Here xxx.xxx.xxx.xx refers to IP address of the print server, prints refers to the computer name of the
print server, and then save and exit.
If page can open normally and displays PrintUsage Http(App) Server is Running..., that means the
communication with print server is OK. Then the problem may result from retrieving the print image file. The
possible diagnoses are:
•
Firstly to make sure print content file was not removed;
•
Secondly to make sure path of saving print in system settings is correct.
•
If path has been changed ever, after reinstallation, the path should point to the correct folder for
saving print content and restart HTTP service to get previous saved files.
Page 210 of 246
PrintUsage 2.1 User Manual
Q: What should I pay attention to when installing PrintUsage management server on Win2003?
For PrintUsage, the operation system needs the server included files and needs to support ASP script language. But the
default option of Windows 2003 disables these two functions. So you need to change some settings in order to run
PrintUsage on Windows 2003:
•
Start->Programs->Administrative Tools ->Internet Information Services (IIS) Manager->Web Service
Extensions. Allow Active Server Pages and Server side includes.
•
Start->Programs->Adminitrative Tools ->Internet Information Services (IIS) Manager-->Website->Default
Website->PrintUsage->Properties->Virtual Directory->Options, check the Start parent path and Start
conversation status and then click OK.
Page 211 of 246
PrintUsage 2.1 User Manual
Q: Print monitoring service has started, but why print tasks cannot be recorded in system?
The monitoring service would run only if the monitoring service is added into Web manager site and a printer is added.
The above problem may be caused by:
1 Print monitoring service doesn't strat. You can check print service status in print monitoring service manager. Note: If
you are in the Terminal Service window, the displayed status of monitoring service manager might not be correct. You
should check the status of PrintUsage Service in Windows Administrative Tools->Service and make sure it's started.
2 Print server is not added to the Web manager site. Please log on Web manager site and make sure the Print Server is
listed.
3 Printer is not being monitored. If it's the case, please add printer from the printer list page.
4 After adding printer to the Web manager site, print monitoring service was not restarted. After adding printer, print
monitoring service would not work until you restart the program.
5 Windows printer name changed. Changing the printer name could disable the monitoring service. PrintUsage would
assume that this is another printer and it doesn't need to be monitored. To solve this problem, you need to add the print
server again or change the printer name back to the original one. Note: PrintUsage will treat this added printer as a new
printer and the new printer account does not have any relationship with the old printer account.
By checking the event log of ID=2071, you can confirm the above problems from 2 to 5. Please make sure the printer
you are monitoring is in the list.
Page 212 of 246
PrintUsage 2.1 User Manual
Q: What is default user name and password of PrintUsage?
Password of PrintUsage manager site can be set on the last step of installation wizard. If you don't set password, the
default user name is "admin". The user has the full control.
Page 213 of 246
PrintUsage 2.1 User Manual
Q: I forget the password of PrintUsage manager site, how to reset it?
You can log on with other user name with the administrator right to reset password. If there isn't any other administrator
account, please follow the instructions below:
•
Open C:\Program Files\PrintUsage\bin\PrintUsage.ini and change line "WizardDone=Y" to "WizardDone=N"
•
Run the Configuration Wizard in PrintUsage program group. Select the same type of database as the
previous installed one, the system will recognize the previous database and ask if you want to overwrite the
data or not. Please make sure you select "NO".
•
Skip the next pages if there is a skip option.
•
To finish, please enter the password for the Admin.
Page 214 of 246
PrintUsage 2.1 User Manual
PrintUsage Setup Wizard
PrintUsage Setup Wizard is used to set up system required parameters. The wizard will start automatically during
installation.
Setup Wizard includes following several items:
•
IIS Installation
•
Installation Preparation
•
Welcome Page
•
User Agreement
•
Select Target Folder
•
Select Installation Mode
•
Select Beginning Folder
•
Setup Preparation
•
Select Language
•
Select License Mode
•
Database Mode & Connection Settings
•
Select Authentication
•
Select Imported User Group
•
Select Imported User
•
Set Monitoring Mode
•
Add Monitored Printers
•
Create Virtual Directory
•
Administrator Setting
•
Restart Wizard
Page 215 of 246
PrintUsage 2.1 User Manual
IIS (Information Internet Information Services)
Installation procedures of IIS under different Operating Systems are different. Now we take Windows 2000 as an
example to install IIS. The installation steps are:
1. Click Start--> Settings--> Control Panel--> Add/Remove Programs--> Add/Remove Windows Components. Select the
check box next the Internet Information Services (IIS).
Page 216 of 246
PrintUsage 2.1 User Manual
2.Then click "Details" button.
3. The installation of IIS on Windows XP is similar to Windows 2000, but the installation on Windows Server 2003 is
different Windows 2000. If you are Window 2003 user, please go to step 4; otherwise, please go to step 8.
4. Click Start--> Settings--> Control Panel-->Add/Remove Programs--> Add/Remove Windows components. Select the
check box next to the Application Server. Then click "Details & quote”.
Page 217 of 246
PrintUsage 2.1 User Manual
5. In the Application Server list, please select Enable network COM+ access, Application Server Console, and Internet
Information Service.
6. Check the Internet Information Service, and click Details. You will see World Wide Web Service. Select that check box
and go to the details.
Page 218 of 246
PrintUsage 2.1 User Manual
7. Make sure you select Active Server Pages, and World Wide Web Service.
8. Click [OK] to finish the installation. During the installation, system disk will be required.
9. After IIS was installed, you can find Internet Information Services (IIS) Manager from the Administrator Tools. Click
Start--> Settings--> Control Panel--> to verify.
Page 219 of 246
PrintUsage 2.1 User Manual
Prepare to install
1. Uninstall the foregone PrintUsage edition or testing edition
Please uninstall the foregone or testing PrintUsage edition before install the PrintUsage 2.0. The program will detect itself
and remove the existing PrintUsage automatically. However the database and printed files of the previous Printusage will
be kept. The following will be kept if they were setup by default:
•
C:\Program Files\PrintUsage\Data\PrintUsage.mdb, which is the database of preexistence edition, if
something has been written on it.
•
•
The Database will be remain on database server
The index C:\Program Files\PrintUsage\Content will be kept if preexistence edition is V2.X corporation edition.
Please don't remove the indexes if you want to keep the foregone data and printed files, because it deposited
all saved printed files. When installing new edition, you just need to transfer the indexes (installation program
will transfer the existence of the index to PrintUsage, confirm and go on )
•
The whole index C:\Program Files\PrintUsage or C:\Program Files\PrintUsage Pro can be removed if you are
going to have complete installation. You can drop database of PrintUsage in Database Manager if your
database is MSSQL or MYSQL.
[Notice] Default installing path of PrintUsage V1.3 is C:\Program Files\PrintUsage Pro, different from the one of V2.x.
Therefore, if your foregone edition is PrintUsage V1.3 and it run Access database, database file path is C:\Program
Files\PrintUsage Pro\Data\PrintUsage.mdb after uninstallation. Installation program will not detect foregone database if
you install V2.0 edition according to default installing path after Uninstalling PrintUsage V1.3. Installation of V2.x may
begin after you rename the index C:\Program Files\PrintUsage Pro to PrintUsage, if you want to keep down the original
database. (Please refer to How to Install New Edition in Case of Dropping Original Database)
2. Confirm that selected server has been installed and run smoothly
•
Access: No need installation, installation program will automatically install for you.
•
MSSQL: Installation need select blended mode of user authentication. You may download it from PrintUsage
website.
•
MySQL: Please use the default path during the installation.
You may free download it from MySQL office website or PrintUsage website.
•
Oracle: Example is needed, please select UTF-8 coding mode
3. Install program offered by corresponding database according to selected database
•
MyODBC is installed, if you choose MySQL, You may free download it from MySQL office website
http://dev.mysql.com/downloads/ or PrintUsage website.
•
Client Server of corresponding Oracle edition is installed or download corresponding edition OLEDB Provider
from Oracle office website
•
MySQL and Access have no requirements.
Page 220 of 246
PrintUsage 2.1 User Manual
4. IIS components need be installed firstly before installation of Managing Server.
•
IIS will be installed by default in Windows 2000 ServerWindows 2003 Server Web Edition, but not Windows
2000 Pro, XP and Win2003 Standard and Enterprise Edition,so you need add IIS components. Please see IIS
INSTALLATION
5. Please don't plug immediately, if you have USB Software Dog
•
USB Software Dog needs driver needs to be installed. Windows cannot find the correct driver and mark it as
unknown device, if you plug in the USB software dog before installing PrintUsage. In the Setup Wizard, there
is a special step showing the installation of USB software dog.
Next step: Welcome Page
Page 221 of 246
PrintUsage 2.1 User Manual
Welcome Page
Administrator Right of the computer is required for the installation. Please take our strong advice closing all other running
programs before start. After double click the Setup.exe, you will see the following Welcome Page.
Next step: User Agreement
Page 222 of 246
PrintUsage 2.1 User Manual
User Agreement
Please read carefully on the License Agreement, select accept and click Next to continue.
Next step: Choose Target Folder
Page 223 of 246
PrintUsage 2.1 User Manual
Choose Target Folder
Default installation path is C:\Program Files\PrintUsage
Data file will be installed to subdirectory of data of installation index.
Printed content files of Enterprise edition will be saved to the subdirectory of Content of installation index. You should
install the PrintUsage to the largest partition of the hard disk, because the space of the two indexes is often crammed
soon.
Space calculating mode
Printed content files (only enterprise edition) save printed content as Tiff picture format in the Print Server. The following
formula shows how much space we required:
Demanded hard disk space=amounts/month x demanded months to keep printed content x bytes of every kept file.
PrintUsage adopts Tiff G4 format to keep, which has high compression ratio, precision ranges from 75dpi to 600dpi and
file bytes of every printed A4 paper ranges from 10k to 200k on average according to printed contend and reserved
precision.
Default distinguishing rate is 300dpi, 30k/page can be taken, when you adopt estimating method.
We suppose that a printing server has 100,000 pages to be printed every month and their content need reserving for
three month. Therefore,
Demanded hard disk space =100k pages/month X three month X 30k =9G
Page 224 of 246
PrintUsage 2.1 User Manual
If user needs to keep the files for reprint, the value will be 200k/page. If User's reprinted files, the size of the driver of the
printer and user's task require space. We need larger space for printing pictures, but it needs smaller space for text.
User's reprinted files range from 20k to 1M, usually several hundred K. The foregoing formula also needs demanded
space.
Conclusion: Basically, there is no need to consider your saving space layout, 1G saving pace is enough, if you use
professional edition.
1G saving space of database and web server is enough, as for user of enterprise edition. The largest demanded space is
for the printing server, you can reserve the space in advance after estimation according to the foregoing method.
next step:choose setup mode
Page 225 of 246
PrintUsage 2.1 User Manual
Choose Setup Mode
There are three setup modes: Full Installation, Management Server, and Print server
Full Installation
Full Installation refers to install Managing Server and Print Server to the same computer.
You should choose this method under the following two circumstances:
•
You need choose Full Installation, if you have only one Print Server and want it to be a Management Server, or
just want to test it.
•
This computer is one of Print Servers; you want the server to be Management server at the same time.
Setup Precondition:
•
This computer is a printing server, connecting with traditional printer or network printer offering shared printing
service.
•
This computer needs install IIS (Web Service), if not, Please install it from control panel--add/remove program-add/remove windows components.
•
If choosing MySQL database, you need to install MyODBC 3.51 edition or above.
•
If choosing Oracle database, you need to install Oracle client server of corresponding edition or OLEDB offered
program.
Page 226 of 246
PrintUsage 2.1 User Manual
• Notice: if you have the foregoing two problems, that is to say, you can not choose Access database, if you have
other printing server to be installed, you can choose other three databases. If the first one, you can choose one
of the four databases at random.
• Access database has its setup program along with its installation package, other MSSQL,MSDE,MySQL and
Oracle need the completed installation and be online. Database server may use the local computer or other
computer. Installing program only creates database structure required by PrintUsage and does not contain
database managing system itself.
• If you use XP or Win2003 operating system or installed firewall, please open at least TCP port 80,8100,and
8200, or disable the firewall
Managing Server Setup
Management Server Setup makes management server to adopt single compute installation method, host computer will
not be used as Print server. You just need one program for Management Server installation. Installation Wizard will guide
you to create database structure, user group, initializing settings and other settings. You need at least one Printing
Server for normal operation after the completion of Management Server installation.
Setup Precondition:
• Host computer needs have IIS installed (Web Service). If not, Please install it from Control Panel-->
Add/Remove Program--> Add/Remove Windows Components.
• If choosing MySQL database, you need to install MyODBC 3.51 edition or above.
• If choosing Oracle database, you need install Oracle client server of corresponding edition or OLEDB offered
program
Page 227 of 246
PrintUsage 2.1 User Manual
• Notice: Management Server Setup can choose one of MSSQL,MSDE,MySDE and Oracle rather than Access
database. Database server may use host computer or other computer. Installing program only creates
database structure required by PrintUsage and does not contain Database Management System itself.
• If you use XP or Win2003 operating system or installed firewall, please open at least TCP port 80, and 8200, or
disable the firewall
Print Server Setup
Print Server Setup installs Printing and Monitoring Server separately to the computer and accept the uniform
management of managing server.
Setup Precondition:
• Managing server to completed installation and setting is in the running state.
• Host computer is a printing server, connecting with traditional printer or network printer offering shared printing
services.
• If choosing MySQL database, you need to install MyODBC 3.51 edition or above.
• If choosing Oracle database, you need install Oracle client server of corresponding edition or OLEDB offered
program.
Next step: Choose Start Menu folder
Page 228 of 246
PrintUsage 2.1 User Manual
Choose Start Menu folder
The PrintUsage folder will be created in the Start Menu folder as default.
If you want to put it elsewhere, or change the name of the folder, click Browse for new location.
Next step: Preparing Installation
Page 229 of 246
PrintUsage 2.1 User Manual
Setup Preparation
After double clicked the Setup.exe, it will start the installation. If the PrintUsage has been installed before, it will remove
the original copy automatically.
Next step: Choose Setup Authorization Mode
Page 230 of 246
PrintUsage 2.1 User Manual
Choose Authentication Mode
Choosing of Authentication Mode
• Select "User Authentication", if there is a domain or active index. You can also choose Domain Controller if
there are more than one DC. It reduces response time if the Domain is Global, Asia, or Europe as distributed
domains. This feature is not available if it is below V2.1 edition.
• If "User Authentication" is selected, the default User Group and User Name will be added to the active indexes.
• "Computer Authentication" should be selected if it is in a Workgroup.
For computers working as a Workgroup, users still can logon by their names. However, the Print Server is unable to
distinguish local logging name. It's hard to distinguish who printed. Only computer name can be distinguished under this
circumstance. As a result, PrintUsage offers Computer Authentication to monitor users who are connected as
Workgroup.
•
If "Computer Authentication" is selected, installation program will detect all of network connections, treat
Workgroups as user groups and import those computer names as user names into the system. Notice: the
running computer only can be imported. As any other computers, you should add them manually from the
Managing website after finishing the installation.
•
If it is imported from file, file format needs one line for every user name, permitting three columns: user name,
user full name and user group. We have to use "," as separator between columns. Example is the following:
John, John Smith, Human Resource Dept.
William, William Perry, Sale Dept.
Page 231 of 246
PrintUsage 2.1 User Manual
George, George Bush, Sale Dept.
After TXT or CSV file has been imported, system will create two user groups: Human Resource Department and Sale
Department, and three users: John to Human Resource Department, William and George to Sale Department. User
names can be exported from Sale Department or Human Resource Department to PrintUsage.
Next Step:Choose Input User Group
Page 232 of 246
PrintUsage 2.1 User Manual
Database Mode and Connecting Settings
Access Installation
Please choose Microsoft Access 2000/XP. The installation program will create a database named PrintUsage, and Data
subdirectory indexes.
MSSQL/MSDE Installation
Page 233 of 246
PrintUsage 2.1 User Manual
If you choose Microsoft SQL Server 7.0/2000, the Server Name is the computer name or IP address, which has installed
MSSQL or MSDE. User name and password is the one you have right to logon to that computer. Password is case
sensitive.
After finished, you can click "test" button. You may click "next step", if the test is passed. If not, you should confirm your
input and normal operation of MSSQL server. You should ensure that computer name can be parsed to the target
computer if you use computer name.
If your input was correct, but you still can not pass the test, it's possibly caused by MSSWL authentication mode. Default
authentication mode of SQL Server is 'Only windows integrated authentication" , but PrintUsage requires to adopt SQL
Server authentication mode. You can take the following settings: SQL Server Enterprise Managing Server, choose target
server, right click attribute, safe mode page, change authentication into SQL Server and Windows, just as the following
picture, and restart.
MSDE modification is relative complicated because of no managing page. If the default installation has problem, you
should input setting parameter during the installation as 10.13 mentioned.
Installation program will set up a PrintUsage database, which does not affect other existed databases and their
applications.
MySQL Setup
Page 234 of 246
PrintUsage 2.1 User Manual
Server name is the same as computer or IP address which installed MYSQL, and user name in possession of
administrator jurisdiction generally uses "root" to logon. Password is case sensitive. We recommend modifying the
password, because password of MYSQL root is empty by default. Generally, there is no need to modify port number and
drivers unless you know exactly what you do.
After finished, you can click "test" button. You may click "next step", if the test is passed. If not, you should check your
input and the MySQL server. You should ensure that computer name can be correctly parsed to the target computer if
you use computer name.
Notice: It is not too late to install MyODBC when test does not pass, if MyODBC has not been installed.
Installation program will create a PrintUsage database in the MySQL, which will not affect other existed databases and
their applications
Page 235 of 246
PrintUsage 2.1 User Manual
Oracle Installation
The software is currently applicable to 8i,9i and 10g of Oracle edition.
Rules of server name: server name SID; user name needs the name in possession of DBA privilege, case sensitive for
password
After finished, you can click "test" button. You may click "next step", if the test is passed. If not, you should check your
input and the Oracle server. You should ensure that computer name can be parsed to the target computer if you use
computer name.
Installation program will create a PrintUsage user pointed by Oracle, which will not affect other existed databases and
their applications.
Upgrading Installation requirement:
No matter what kind of databases you use, you will be asked if you want to overwrite the existed database or not, if
installation program detects existed original database. If you choose "Yes", installation program will drop the original
database and run Full Installation. If "No" is selected, system will keep the original database. Installation program will
automatically upgrade to the latest edition without losing any data.
Page 236 of 246
PrintUsage 2.1 User Manual
After "No" button is selected, the installation wizard will start.
Choose Authentication Mode
Page 237 of 246
PrintUsage 2.1 User Manual
Choose Setup Authorization Mode
If you are going to install the trial usage, please choose "Limited Trial Usage Authorization"
If you obtained the softdog, please choose "Normal Authorization".
If you have serial no. but no softdog, please choose "Limited Trial Usage Authorization" and input your serial no. into
Settings-- > Registered Information
Next step: Database Mode and Connection Settings
Page 238 of 246
PrintUsage 2.1 User Manual
Choose Imported User Group
Installation program will seek for all user groups and organization units from the active indexes. It will take a while, which
depends on the active index size, and the network traffic. Inset Group of domain is excluded by default.
Next Step: Choose Imported User
Page 239 of 246
PrintUsage 2.1 User Manual
Choose Imported User
System will list all of user names from selected groups. Installation system will automatically select relationship that one
user name corresponding to one of groups and add it into list box on the right, and other relationship will be excluded in
list box on the left, if there is one user name corresponding to several user groups. If you do not belong to the real group,
you can adjust it from homepage in order to distribute every user to respective group and then click "Next Step" to be
continued.
Next Step: Set Monitoring Mode
Page 240 of 246
PrintUsage 2.1 User Manual
Set Monitoring Mode
Different monitoring mode offer users the flexibility of control.
• Uncontrolled mode - All users are allowed to print, which will be charged by flat rate per page.
• Simple control mode - The usage is controlled by quota. All the printing requests will be denied when the quota
is reached.
• Advanced Control mode - All features are enabled by default. It offers comprehensive control by charging
schemes, which are based on user, printer, time, file size, file type, paper size, quota, and other parameters. It
also records user printing log.
Next Step: Add Monitored Printer
Page 241 of 246
PrintUsage 2.1 User Manual
Add Monitored Printer
This step will appear when you choose complete installation. The number of printers is limited by authorization. If it's trial
edition, it only allows 3 printers. The number of printers you can monitor is related to the type of License you purchased.
The monitor will start immediately after the printer was added.
If there is no printer in user printing monitoring server, this step can be skipped.
Next Step: Create Virtual Index
Page 242 of 246
PrintUsage 2.1 User Manual
Create Virtual Index
If you need to manage multiple websites, you may define the virtual index location of those websites.
Notice:
This feature is only available on V2.1 edition or above.
Next Step: Administrator Settings
Page 243 of 246
PrintUsage 2.1 User Manual
Administrator Settings
You can input the Site ID, and assign the administrator name / password. The default user name is "admin" and the
password is blank.
Notice:
If you have multi-administrators, you can add them after the first administrator logged on. No "website ID”, and multiadministrator below V2.1 edition.
Page 244 of 246
PrintUsage 2.1 User Manual
Restart Wizard
If you need to restart the Wizard:
1. Please modify the installed index (/bin/PrintUsage.ini), from WizardDone=Y to WizardDone=N, Then save and exit.
2. Start the Wizard again by running the (/bin/Wizard.exe).
Page 245 of 246
PrintUsage 2.1 User Manual
Copyright Info
PrintUsage is print monitoring software developed by AMAX Information Technologies Inc. and any organization,
company and individual have no right to
1. Re-transfer the license of the system
2. Make reversed engineering, programming or disassembly
3. Install one license on several computers
4. Publish registration code or impart others
After purchasing, you will have following rights:
1. Permanently own and use the software
2. Obtain the registration code
3. One year free unlimited Email, telephone, telnet technical support
4. Upgrade free to latest version in one year
5. New version notification
Page 246 of 246