1
FACULTY OF INFORMATION TECHNOLOGY
DEPARTMENT OF COMPUTER SCIENCE
Master’s Thesis
Gesture Based PC Interface with Kinect Sensor
Author
:
Samet ERAP
Supervisor
:
Dr. Sven Nõmm,
Institute of Cybernetics at Tallinn University of Technology, Estonia
Reviewer
:
Dr. Kitaro Yoshimitsu,
Tokyo Women’s Medical University, Japan
TALLINN 2012
Declaration:
I hereby declare that this master’s thesis, my original investigation and achievement,
submitted for the master’s degree at Tallinn University of Technology, has not been submitted for any degree or examination.
Samet ERAP
.......................
.......................
(Date)
(Signature)
ii
Contents
Abstract - Kokkuvõte
viii
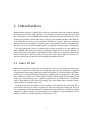
1 Introduction
1.1 State Of Art . . . . . . . . . . . . . . . . . . . . . . . . . . . . . . . . . .
1.2 Motivation . . . . . . . . . . . . . . . . . . . . . . . . . . . . . . . . . . .
1.3 Acknowledgment . . . . . . . . . . . . . . . . . . . . . . . . . . . . . . .
1
1
2
2
2 Problem Statement
2.1 Hardware and Software . . . . . . . . . .
2.2 Architecture . . . . . . . . . . . . . . . .
2.2.1 Communication With Application
2.2.2 Limitations . . . . . . . . . . . .
2.2.3 Requirements . . . . . . . . . . .
.
.
.
.
.
3
3
4
5
5
5
.
.
.
.
.
.
.
.
7
8
8
8
9
11
12
13
15
.
.
.
.
.
.
.
.
.
16
19
20
21
22
23
26
27
29
29
3 Solution
3.1 PC Control . . . . . . . . . . . . . . .
3.1.1 Cursor Movement . . . . . . .
3.1.2 Selecting Process . . . . . . . .
3.1.3 Opening and Drop Down Menu
3.1.4 Dragging Operation . . . . . .
3.1.5 Resizing Operation . . . . . . .
3.2 Presentation Control . . . . . . . . . .
3.3 Acquiring The Joint Coordinates . . . .
.
.
.
.
.
.
.
.
.
.
.
.
.
.
.
.
.
.
.
.
.
.
.
.
.
.
.
.
.
.
.
.
.
.
.
.
.
.
.
.
.
.
.
.
.
.
.
.
.
.
.
.
.
.
.
.
.
.
.
.
.
.
.
.
.
.
.
.
.
.
.
.
.
.
.
.
.
.
.
.
.
.
.
.
.
.
.
.
.
.
.
.
.
.
.
.
.
.
.
.
.
.
.
.
.
.
.
.
.
.
.
.
.
.
.
.
.
.
.
.
.
.
.
.
.
.
.
.
.
.
.
.
.
.
.
.
.
.
4 Methodology of Implementation
4.1 Setting Skeletal Tracking Parameters . . . . . . . . . . . . .
4.2 Initiating Skeletal Tracking For The Joints . . . . . . . . .
4.3 Assigning The Cursor To The Hand and Moving The Cursor
4.4 Immobilism Detection Of The Hand . . . . . . . . . . . . .
4.5 The Method To Model Mouse Clicks . . . . . . . . . . . . .
4.6 The Positioning Of Click Event Menu Window . . . . . . .
4.7 The Method Of Resizing . . . . . . . . . . . . . . . . . . .
4.8 Inspired Applications From Clickless Interface . . . . . . .
4.8.1 Presentation Control . . . . . . . . . . . . . . . . .
iii
.
.
.
.
.
.
.
.
.
.
.
.
.
.
.
.
.
.
.
.
.
.
.
.
.
.
.
.
.
.
.
.
.
.
.
.
.
.
.
.
.
.
.
.
.
.
.
.
.
.
.
.
.
.
.
.
.
.
.
.
.
.
.
.
.
.
.
.
.
.
.
.
.
.
.
.
.
.
.
.
.
.
.
.
.
.
.
.
.
.
.
.
.
.
.
.
.
.
.
.
.
.
.
.
.
.
.
.
.
.
.
.
.
.
.
.
.
.
.
.
.
.
.
.
.
.
.
.
.
.
.
.
.
.
.
.
.
.
.
.
.
.
.
.
.
.
.
.
.
.
.
.
.
.
Contents
4.8.2
4.8.3
Acquiring The Joints Coordinates . . . . . . . . . . . . . . . . . . 30
Robot Control . . . . . . . . . . . . . . . . . . . . . . . . . . . . 31
5 Conclusion
41
Bibliography
42
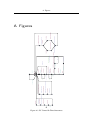
A Figures
44
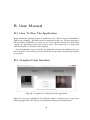
B User Manual
B.1 How To Run The Application . . . . .
B.2 Graphical User Interface . . . . . . .
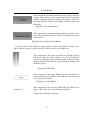
B.3 Usage Of Gestures and Application .
B.3.1 Usage Of Clickless Interface .
B.3.2 Usage Of Presentation Control
46
46
46
48
49
53
iv
.
.
.
.
.
.
.
.
.
.
.
.
.
.
.
.
.
.
.
.
.
.
.
.
.
.
.
.
.
.
.
.
.
.
.
.
.
.
.
.
.
.
.
.
.
.
.
.
.
.
.
.
.
.
.
.
.
.
.
.
.
.
.
.
.
.
.
.
.
.
.
.
.
.
.
.
.
.
.
.
.
.
.
.
.
.
.
.
.
.
.
.
.
.
.
.
.
.
.
.
List of Figures
2.1
2.2
2.3
Communication Of Kinect Sensor With Application. . . . . . . . . . . . .
Kinect XBOX 360, Skeleton Joints and Skeleton Space. . . . . . . . . . . .
Joint Confusion . . . . . . . . . . . . . . . . . . . . . . . . . . . . . . . .
3.1
3.2
3.4
3.3
3.5
3.6
3.7
3.8
3.9
3.10
PC Control In Timed Automata . . . . . . . . . . . . . . . .
Mouse Capturing In Timed Automata . . . . . . . . . . . .
Click Event Menu Window . . . . . . . . . . . . . . . . . .
Selecting An Event In Timed Automata . . . . . . . . . . .
Drag Event In Timed Automata . . . . . . . . . . . . . . . .
Gesture To Activate Dragging An Object (Sliding Left Hand)
Gesture To Resize Window . . . . . . . . . . . . . . . . . .
Gesture To Open A Browser . . . . . . . . . . . . . . . . .
Presentation Control In Timed Automata . . . . . . . . . . .
Gestures For Presentation Control . . . . . . . . . . . . . .
.
.
.
.
.
.
.
.
.
.
.
.
.
.
.
.
.
.
.
.
.
.
.
.
.
.
.
.
.
.
.
.
.
.
.
.
.
.
.
.
.
.
.
.
.
.
.
.
.
.
.
.
.
.
.
.
.
.
.
.
.
.
.
.
.
.
.
.
.
.
.
.
.
.
.
.
.
.
.
.
8
9
9
10
11
12
13
13
14
14
4.1
4.2
4.3
4.4
4.5
4.6
4.7
4.8
4.9
4.10
4.11
4.12
4.13
4.14
4.15
4.16
4.17
4.18
4.19
Flow Chart Of The Clickless Interface . . . . . . . . . . . . .
Understanding The Methodology Of Clicks . . . . . . . . . .
The Solution For Different Clicks . . . . . . . . . . . . . . .
Click Event Menu Window At Different Location On Desktop.
Server Application . . . . . . . . . . . . . . . . . . . . . . .
Application For Robot Control . . . . . . . . . . . . . . . . .
Communication Method For Robot Control . . . . . . . . . .
Gesture To Move Robot Forward . . . . . . . . . . . . . . . .
Gesture To Move Robot Backward . . . . . . . . . . . . . . .
Gesture To Move Robot Right . . . . . . . . . . . . . . . . .
Gesture To Move Robot Left . . . . . . . . . . . . . . . . . .
Gesture To Grab An Object With Robot Arm . . . . . . . . .
Gesture To Release Grabbed Object With Robot Arm . . . . .
Gesture To Move Robot Arm Forward . . . . . . . . . . . . .
Gesture To Move Robot Arm Backward To The Initial State .
Server Application GUI . . . . . . . . . . . . . . . . . . . . .
Graphical Simulation Of The Movements . . . . . . . . . . .
Kinect Sensor Datas . . . . . . . . . . . . . . . . . . . . . . .
Command Buttons . . . . . . . . . . . . . . . . . . . . . . .
.
.
.
.
.
.
.
.
.
.
.
.
.
.
.
.
.
.
.
.
.
.
.
.
.
.
.
.
.
.
.
.
.
.
.
.
.
.
.
.
.
.
.
.
.
.
.
.
.
.
.
.
.
.
.
.
.
.
.
.
.
.
.
.
.
.
.
.
.
.
.
.
.
.
.
.
.
.
.
.
.
.
.
.
.
.
.
.
.
.
.
.
.
.
.
.
.
.
.
.
.
.
.
.
.
.
.
.
.
.
.
.
.
.
.
.
.
.
.
.
.
.
.
.
.
.
.
.
.
.
.
.
.
17
18
25
27
32
33
34
35
35
35
36
36
36
37
37
37
38
39
39
v
4
4
6
List of Figures
4.20 Communication Panel . . . . . . . . . . . . . . . . . . . . . . . . . . . . . 40
A.1 PC Control In Timed Automata . . . . . . . . . . . . . . . . . . . . . . . . 45
B.1
B.2
B.3
B.4
B.5
B.6
B.7
B.8
B.9
B.10
B.11
B.12
B.13
B.14
B.15
B.16
B.17
Graphical User Interface Of The Application . . . . . . . .
Pc Control Button . . . . . . . . . . . . . . . . . . . . . . .
Presentation Control Button . . . . . . . . . . . . . . . . .
Slider Bar . . . . . . . . . . . . . . . . . . . . . . . . . . .
Set Tilt Button . . . . . . . . . . . . . . . . . . . . . . . . .
Tilt Degree Text Box . . . . . . . . . . . . . . . . . . . . .
End Control Button . . . . . . . . . . . . . . . . . . . . . .
Status Field . . . . . . . . . . . . . . . . . . . . . . . . . .
Depth Stream . . . . . . . . . . . . . . . . . . . . . . . . .
RGB Stream . . . . . . . . . . . . . . . . . . . . . . . . . .
Click Event Menu Window. . . . . . . . . . . . . . . . . . .
Gesture To Activate Dragging An Object (Sliding Left Hand)
Drag Mode On . . . . . . . . . . . . . . . . . . . . . . . .
Gesture To Resize Window . . . . . . . . . . . . . . . . . .
Gesture To Open A Browser . . . . . . . . . . . . . . . . .
Browser Mode On . . . . . . . . . . . . . . . . . . . . . . .
Gestures For Presentation Control . . . . . . . . . . . . . .
vi
.
.
.
.
.
.
.
.
.
.
.
.
.
.
.
.
.
.
.
.
.
.
.
.
.
.
.
.
.
.
.
.
.
.
.
.
.
.
.
.
.
.
.
.
.
.
.
.
.
.
.
.
.
.
.
.
.
.
.
.
.
.
.
.
.
.
.
.
.
.
.
.
.
.
.
.
.
.
.
.
.
.
.
.
.
.
.
.
.
.
.
.
.
.
.
.
.
.
.
.
.
.
.
.
.
.
.
.
.
.
.
.
.
.
.
.
.
.
.
.
.
.
.
.
.
.
.
.
.
.
.
.
.
.
.
.
46
47
47
47
47
47
48
48
48
48
49
50
51
51
52
52
53
List of Tables
3.1
Process and Controls . . . . . . . . . . . . . . . . . . . . . . . . . . . . .
4.1
4.2
4.3
4.4
4.5
4.6
4.7
4.8
4.9
4.10
4.11
4.12
4.13
4.14
4.15
4.16
4.17
4.18
Parameters For Filtering and Smoothing Incoming Data . . . . . .
Parameters For Skeletal Smoothness [6] . . . . . . . . . . . . . .
Borders Of Hand Movement . . . . . . . . . . . . . . . . . . . .
Definition Of Joints To Be Tracked . . . . . . . . . . . . . . . . .
How To Start Tracking Right Hand . . . . . . . . . . . . . . . . .
Library For Mouse Events and Movement . . . . . . . . . . . . .
Assigning The Hand To The Screen . . . . . . . . . . . . . . . .
Assigning The Cursor To The Hand . . . . . . . . . . . . . . . .
Sending The Parameters . . . . . . . . . . . . . . . . . . . . . .
Immobilism Detection Of The Cursor . . . . . . . . . . . . . . .
Triggering Particular Code By Detection Of Immobile Cursor . . .
Library For Mouse Events and Movement . . . . . . . . . . . . .
Methods For Mouse Events . . . . . . . . . . . . . . . . . . . . .
Solution For Reducing The Jitter At The Moment Of Immobilism
The Method To Resize Window . . . . . . . . . . . . . . . . . .
The Method For Performing Presentation Gestures . . . . . . . .
The Method For Opening A Text File and Writing . . . . . . . . .
The Method For Acquiring The Coordinates and Writing . . . . .
vii
.
.
.
.
.
.
.
.
.
.
.
.
.
.
.
.
.
.
.
.
.
.
.
.
.
.
.
.
.
.
.
.
.
.
.
.
.
.
.
.
.
.
.
.
.
.
.
.
.
.
.
.
.
.
.
.
.
.
.
.
.
.
.
.
.
.
.
.
.
.
.
.
.
.
.
.
.
.
.
.
.
.
.
.
.
.
.
.
.
.
7
19
19
20
20
21
21
22
22
22
23
23
23
24
26
28
30
31
31
Abstract - Kokkuvõte
Present research targets development and implementation of the clickless interface on the
basis of Kinect Sensor. The idea behind this work is to allow user to explore full functionality of Windows PC equipped with Kinect sensor, using just gestures and eliminating necessity to use any mechanical devices such as mouse or keyboard. Main result of the work
are three standalone applications. First implements clickless interface to control Windows
Desktop. Second application has purely scientific role and allows to acquire key coordinates of the human skeleton joints in real-time. Third application implements gesture based
control of the Pioneer robot with robotic arm. Results of present research belong to the area
of human-machine interaction and may found their applications in such areas where usage
of mechanical interface elements may be impossible or complicated, for example surgical
medicine, where surgeon gloves should be sterile.
Käesoleva töö eesmargiks on puutevaba kasutajaliidese loomine Kinect sensori alusel.
Töö põhimõtte seisneb selles et eemaldada kasutaja ja arvuti vahelisest suhtlusest klaviatuuri, hiirt ja muid mehaanilisi lüliteid võimaldades juhtida arvutit vaid käeliigutustega. Töö
tulemuseks on väljatöötatud kolm tarkvara rakendust. Esimise programmi ettemääratus
seisneb selles et juhtida Windows Operatsioon Süsteemi Töölaua kasutades vaid käeliigutusi (ehk zeste). Süsteemil on olemas (ettenähtud) erireziim presentatsiooni juhtimiseks.
Teine programm on loodud puhtalt teaduslike eesmärkidega et võimaldada inimkeha
luukere liigeste koordinaatide salvestamist reaalajas. Kolmas programm võimaldab juhtida
"Pioneer"-roboti ja manipulaatori käeliigutuste abil. Töö kuulub inimese ja masina vahelisse koostoime alale ja võib leida oma rakendust sellistel aladel, kus mehaaniliste lülitite
peal baseeruva liidese kasutamine on võimatu või raskendatud (näiteks, kirurgiline meditsiin, kus arsti kindad peavad olema steriilsed).
viii
1 Introduction
Human motion analysis is gaining more and more attention in the field of human machine
interaction. On one side, such popularity is caused by the fact that, existing devices become
more sophisticated and combined with growing computational power has allowed to solve
complicated problems. On the other side, recently appeared number of more affordable devices which may be used as a part of relatively inexpensive systems. Main areas of human
motion analysis are surveillance, medicine, games, man-machine interface and animation.
The major areas of research are human gesture recognition, motion analysis, tracking.[16]
Present work mainly focuses on human body tracking and aims to use the abilities of
Kinect XBOX 360 sensor to develop an application which allows to operate Windows 7
Operating System in a touchless and clickless manner. Whereas, no physical contact to the
mouse or keyboard. Allowed vision of no physical contact with peripheral devices, it is
aimed to model mouse behaviors and recognizing predefined gestures.
1.1 State Of Art
Human motion analysis and gesture recognition have received considerable attention in recent years. Some of the works done are recognizing people by their walk [10], recognition
of human movement using temporal of pattern recognition [2], reconstruction of 3D figure
motion [5], perception of biological motion [4], automatic gate recognition [1]. The tracking problem was addressed as the problem of whole body tracking, limb tracking in 2D
image space and 3D image space. Action recognition was also addressed in several ways
such as input which can be either 2D tracking data, 3D tracking data or motion features
extracted directly from the image [12].
From the perspective of human action recognition, novel solutions are increasing. Relevant works in the area of action recognition are that recovering and tracking the 3D position, orientation and full articulation of a human hand from markerless visual observations
obtained by a Kinect sensor [13], that hand gesture recognition system with Kinect sensor,
which is insensitive to hand variations and distortions. [14].
1
1 Introduction
1.2 Motivation
Computers take part and replaces with humans in many areas, consequently, computers are
involved in human life. Inspired by applications which may be used in the area of medicine,
i.e where in many cases touching anything in the room is not allowed, for instance, where
controlling any device remotely is necessary. Inspired by applications which may be used
in the area of real time controlled systems, i.e robotic arms, medicine robotic arms, robots,
medicine robots and adaptive robots, home automation systems, gesture recognition systems obtained with markers.
Main objective focuses on exploring the ability of Kinect sensor and the fundamental
research on human action recognition with Kinect sensor.
1.3 Acknowledgment
I owe my deepest gratitude to my supervisor, Dr. Sven Nõmm, whose encouragement,
guidance and support from the initial to the final level enabled me to develop an understanding of the subject, how to increase the personal limits and use these limits. Also, I
would like to thank to Mark Baranin from SOA Trader OÜ. He has made available his
support in a number of ways.
Special thanks to Estonian Government who doesn’t begrudge their support to study in
Estonia and supported present thesis through the ETF Grant 8365.
Lastly, I offer my regards and blessings to all of those who supported me in any respect
during the completion of the project.
2
2 Problem Statement
The developed application intends to achieve the requirements as follows;
• Clickless and touchless control of a PC.
• Simplifying the presentations by allowing gesture commands.
• Acquiring the coordinates of human body for further research.
The first required result is to be able to use features of the operating system without physical
touch to any peripheral devices such as keyboard and mouse. Utilized features of the
operating system are;
• Mouse events
• Initiating an application with pre-defined gestures.
The second required result is to be able to track movements of the human body in order to
simplify presentations with gestures.
The third required result is to deliver the tracked human body points’ coordinates to the
application to be used in the research.
2.1 Hardware and Software
Initially, Kinect XBOX 360 was developed for playing games with XBOX game console.
However, recently Kinect SDK ( Software Development Kit ) was released to use Kinect
sensor in Windows applications. In addition, Kinect SDK comes with NUI ( Natural User
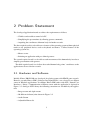
Interfaces ) library. Communication of Kinect sensor with the application is depicted in
Figure 2.1. Owing to NUI Library, the following extractions are reachable by the application;
• Image stream and depth stream
• 20 different skeleton joints shown in Figure 2.2
• Audio Stream
• Adjustable Kinect tilt.
3
2 Problem Statement
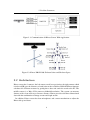
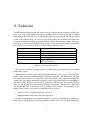
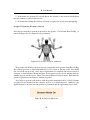
Figure 2.1: Communication Of Kinect Sensor With Application.
Figure 2.2: Kinect XBOX 360, Skeleton Joints and Skeleton Space.
2.2 Architecture
Kinect sensor has 3 cameras, the left camera sends laser projection, the right camera which
is infra-red(IR) gets the distances of each joints at the resolution 320x240. Kinect firmware
calculates the skeleton structure by getting these datas and sends the result to the PC. The
middle camera is a 30fps VGA camera at 640x480 resolution. The system can measure
distance with a 1cm accuracy at 2 meters distance. Kinect provides with three-dimensional
data with the combination of image stream and depth stream.
In addition, Kinect sensor has four microphones and a motor mechanism to adjust the
Kinect tilt up and down.
4
2 Problem Statement
2.2.1 Communication With Application
The communication with application is provided by Kinect SDK and NUI library. When
human stands at the appropriate distance from the sensor, skeleton of human is tracked by
Kinect. Once the skeleton is tracked, positions of the joints are returned by NUI library
in the format of X, Y and Z coordinates shown in Figure 2.2. The coordinates of the
joints can be used with event which is raised by NUI library and these three coordinates
are expressed in meters.
Problems such as smooth skeleton tracking, prediction of skeleton, correction of skeletal
tracking are confronted with the skeletal tracking feature of NUI library.Finally, the NUI
library provides an algorithm for filtering and smoothing incoming data from the sensor.
Indeed, by default, the skeletons data are sent without smoothing or filtering. However, the
Kinect depth sensor has not sufficient resolution to ensure consistent accuracy over time.
Thus, the data seem to vibrate around their positions.
The algorithm parameters, that, the Kinect SDK allows you to set the parameters along
with their default values. There is no set of best values to use for these parameters. Experimentation is required on each developed application basis in order to provide the required
level of filtering and smoothing for desired user experience [6].
2.2.2 Limitations
Architecture of Kinect caused some limitations on its applicability.
• The user should stand in front of the Kinect sensor in the distance between 1m and
3m for the best result in the sense of skeletal tracking.
• Present version of SDK does not allow to track only upper body, so sitting human
can not be recognized.
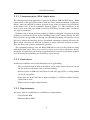
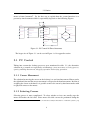
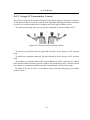
• If the joints are on the same line as depicted in Figure 2.3, Kinect is unable to decide
which joint to track.
• Kinect can not recognize finger motions.
2.2.3 Requirements
Necessary software requirements to reach Kinect’s functionalities;
• Visual Studio 2010
• Microsoft Kinect SDK
5
2 Problem Statement
Necessary programming languages to develop an application;
• C++
• C# ( C Sharp )
• Visual Basic
Figure 2.3: Joint Confusion
In developed application, C# programming language is chosen. The reason of choosing
C# is that C# attempts to simplify the syntax to be more consistent and more logical while
also removing some of the more complex features of C++ and also C# is closer to human
readable code.
The Microsoft Kinect SDK for Windows provides APIs ( Application Programming Interface ) to develop Kinect for Windows Applications. It is possible to create rich experiences by using Microsoft Kinect sensor technology on computers running Windows 7 OS
[9] .
In the presence of hardware and software section;
Hardware Requirements
Software Requirements
32-bit (x86) or 64-bit (x64) processor
Microsoft® Visual Studio® 2010 Express or later editions
Dual-core 2.66-GHz or faster processor .NET Framework 4.0
Dedicated USB 2.0 bus
Microsoft Kinect SDK
2 GB RAM
Kinect XBOX 360 Sensor
6
3 Solution
Usually human-desktop interaction involves usage of the keyboard and mouse which provides user with a full control over all the desktop features. Such interaction is usually
happening in the following way: by moving the mouse, user controls the cursor movement
on the screen. Mouse clicks are used to select objects like icons, windows and menu bars
and activate different methods to perform on those objects like opening, closing, choosing,
resizing so on and a keyboard which allows to type, select, deselect etc. One may formalize
the set of necessary controls on the user behalf in the following way:
Desktop Process
Cursor Movement
Selecting
Opening
Drop Down Menu
Drag and Resize Operations
Control Action
Controlled By The Movement Of The Mouse
Controlled By The Mouse Left Click
Controlled By The Mouse Double Left Click
Controlled By The Mouse Right Click
Controlled By Holding Left Button Pressed and
Moving The Mouse
Table 3.1: Process and Controls
Since proposed clickless interface targets to eliminate keyboard and mouse, one should
model those events.
Modeling of the mouse clicks and holding the button pressed is one of the main difficulties of the design and implementation of clickless interface. Psychologically one who
was using mouse and have to control the cursor movements by the right hand movements
would expect that finger movements would be used to control the actions corresponding to
the mouse clicks. However, present (first) generation of Kinect does not provide possibilities to track the both body movements and finger movements simultaneously. Therefore
one should think out an alternative way to perform control actions corresponding to the
mouse clicks in such a way that two conditions will be satisfied;
• Actions will be acceptable from the user part
• Implementation would not slow down operations
In other words number of predefined gestures or gesture combinations is required to
model mouse clicks, mouse movement and other actions. First, the idea was modeled by
7
3 Solution
means of timed automata1 . So, the best way to explain how the system functions is to
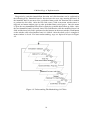
present by timed automata which is sequentially depicted on the following Figures.
pc_section?
pc_section_finished!
IdleState
LeftHandSlide
slidingLeftHand = true
CursorStops
DefinedShapeForResizePerformed
DefinedShapeForDragPerformed
DragEventInitiated
mouseStops?
definedGestureOccured=true
SecondsActivated
definedGestureOccured = true
left_down_click=true, slidingLeftHand = false
sec<2
sec++
LeftClick=false
ResizeStarted
WindowsSendsInterrupt
GoToDragDetails
MakeLeftClick
definedGestureOccured=false, interruptSent=true
drag!
DragFinished
sec == 2
sec = 0, LeftClick = true
HandsCloser
HandsAway
BrowserIsOpen
MenuSecondsActivated
interruptSent=false
sec<3
sec++
dragDone?
sec==2 || buttonclicked ==true
sec=0, buttonclicked=false
LeftClick=false
WindowResizedToSmaller
OpenMouseMenu
sec == 3
sec = 0
Cursor_Stops
MenuIsOpen
CloseMenuSecondsActivated
CloseMenu
definedGestureOccured=false
WindowResizedToBigger
definedGestureOccured=false
mouseStops?
sec++
sec<2
GoToMenuDetails
menuAvailable!
InMenu
menuFinished?
buttonclicked=true
Figure 3.1: PC Control In Timed Automata
The larger size of Figure 3.1 can be seen in Figure A.1 in appendix section.
3.1 PC Control
Taking into account the desktop processes were mentioned in table 3.1, the alternative
solutions in pc control are respectively as following; cursor movement, selecting process,
opening and drop down menu, dragging operation and resizing operation.
3.1.1 Cursor Movement
The solution for moving the cursor on the desktop is to use hand movement. Kinect tracks
the right hand joint and the cursor movement is assigned to the hand movement. By dint of
assigning the cursor to the hand, it is possible to move the cursor by hand movements with
no physical contact to the mouse.
3.1.2 Selecting Process
Selecting process is more complicated. To select window or icon, one usually stops the
mouse and makes the left click. Since mouse left click can not be performed during the
1 Timed
Automata is the formal framework to model and to analyze the behavior of real-time systems. [17]
8
3 Solution
mouse movement in action - which means that one can not press on the button to click at
the same time with moving the cursor. Necessary action is to stop moving the cursor and
then performing the click -, the immobilism detection of the cursor is utilized to model this
attribution. The immobilism detection ( shown as automata in Figure 3.2 ) is approached
by detecting the immobile hand gesture. For all that, Windows OS should distinguish how
to perform mouse clicks out of there is no physical contact to the mouse. On account of
this, using Windows OS user library is necessary.
mouseStops!
Figure 3.2: Mouse Capturing In Timed Automata
Immobile hand gesture means that the cursor is immobile at the current position. So,
the first circumstance for the left click is immobile cursor. Once the cursor is immobile,
the application generates Windows interrupt corresponding to the mouse left click and the
cursor performs the left click at the current cursor position after predefined time period
passed. The left click is triggered each time the cursor stops moving.
3.1.3 Opening and Drop Down Menu
The solution is to use additionally designed click events menu window. The event selection
from menu window is also modeled in timed automata as shown in Figure 3.3.
As seen in timed automata, the user has three options to perform mouse events. Double
Left Click, Right Click and Drag.
To perform Double Left Click and Right Click, a gesture which is immobile hand and a
menu ( shown in Figure 3.4 ) which is controlled by the gesture are utilized.
Figure 3.4: Click Event Menu Window
9
3 Solution
MenuIsStillOpen
menuAvailable?
UserChoosesAction
DoubleLeftClick
sec<2
sec++
RightClick
sec<2
sec++
sec == 2
LeftClick=true,sec=0
sec==2
LeftClick=true,sec=0
DoubleClickPerformed
Drag
sec<2
sec++
sec==2
LeftClick=true,sec=0
RightClickPerformed
DragPerformed
menuFinished!
LeftClick=false
LeftClick=false
menuFinished!
menuFinished!
LeftClick=false
Figure 3.3: Selecting An Event In Timed Automata
From the perspective of the menu window, it is inactive until the cursor is immobile and
the first left click occurs. So, pre-requisites are the first left click and immobile cursor.
After pre-requisites satisfy and predefined time period is completed, menu window pops
up.
If the cursor is still immobile, menu window is closed after predefined time period
passed. If the cursor is moved by the user, menu window remains until either the cursor
stops or left click occurs on one of the buttons on the menu window.
From the perspective of mouse clicks, performing the clicks in action is carried out on
the following way: When the menu window pops up, the cursor is moved on one of the
buttons on the menu window. To click on buttons, inner left click attribution for menu
window is performed by holding the hand immobile on one of the buttons.
Double Left Click and Right Click attributions are utilized the Windows OS user library.
Double left click is triggered by performing mouse left click twice at the current cursor
position. In the present implementation, once the user stops moving the cursor over the
Double Left Click Button, application generates Windows interrupt corresponding to the
mouse left click two times. Right click is triggered by performing mouse right click at
10
3 Solution
the current position. In the present implementation, once the user stops moving the cursor
over the Right Click Button, application generates Windows interrupt corresponding to the
mouse right click.
3.1.4 Dragging Operation
The solution is performed in two ways in the present implementation and also modeled in
timed automata as shown in Figure 3.5.
• With Click Event Menu Window
• With Performing A Predefined Gesture
DragIsActive
drag?
DragObject
left_down_click == true
mouseStops?
ReleaseSecondActivated
sec<2
sec++
ReleaseObject
sec==2
sec=0, left_down_click=false
dragIsDone
dragDone!
Figure 3.5: Drag Event In Timed Automata
11
3 Solution
Considering the actual control for dragging, it is required to hold the mouse left button
pressed ( corresponding Left Down Click ) until releasing the object ( corresponding Left
Up Click ). Both way mentioned above are similar, however, initiations are different. The
first way is to initiate dragging attribution from mouse menu window: Assuming the menu
window is open, one stops moving the cursor on Drag Button and the inner left click
occurs and initiates the drag event. For the event, application generates Windows interrupt
corresponding to the mouse left down click which is one part of the complete left click
in order to move the chosen object. The second way is to initiate dragging attribution by
performing the predefined gesture which is sliding the left hand as shown in Figure 3.6.
Figure 3.6: Gesture To Activate Dragging An Object (Sliding Left Hand)
After dragging the object is begun, object is required to be released after a while. The
way of releasing the chosen object is the same for both initiators. Once the cursor movement is stopped by the user, application generates Windows interrupt corresponding to the
mouse left up click which is one part of the complete left click in order to release the chosen
object after predefined time period passed.
3.1.5 Resizing Operation
The solution is the predefined gesture which is Hands Closer and Hands Away. The gesture
shown in Figure 3.7 is performed by holding two hands in predefined distance from each
other. Once the user brings the hands closer, the current window is resized to smaller size.
Once the user makes the hands diverge, the current window is resized to bigger size.
12
3 Solution
Figure 3.7: Gesture To Resize Window
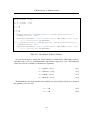
While the present implementation is being used by the user, it is thought that one may
require shortcut for desktop applications. Considering everybody connects to the internet,
the most eligible shortcut to provide flexibility for the user would be such opening browser
with the gesture except clicking on the browser icon with cursor.
The gesture is performed by drawing a circle shape with two hands from head to hip as
shown in Figure 3.8. Once the gesture is completed by the user, application generates an
interrupt to open the defined browser in the system.
Figure 3.8: Gesture To Open A Browser
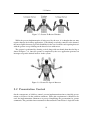
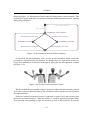
3.2 Presentation Control
On the consequence of clickless control, present implementation aims to simplify presentations as discussed in the problem statement. When this requirement is intended to be
used, the implementation commences to proceed simplifying the presentations by gesture
commands. The particular inner automata for Presentation Control State is depicted on the
13
3 Solution
following Figure 3.9. Presentation Control stands for independence on presentations. This
section of the application aims to control presentations without physical touch to anything
during the presentation.
prsnt_section_finished!
prsnt_section?
Presentation_Control_Started
definedGestureOccured=true
definedGestureOccured=true
Presentation_Forward
Presentation_Backward
definedGestureOccured=false
definedGestureOccured=false
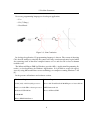
Figure 3.9: Presentation Control In Timed Automata
As shown on the timed automata, there are two gesture commands which control the
presentation. Considering the presentations are changed by left or right arrow on the keyboard, these attributions are modeled in thought of sliding the left and right hand as shown
in Figure 3.10.
Figure 3.10: Gestures For Presentation Control
The idea behind the presentation control is that head, right hand and left hand positions
are the base points for skeletal tracking. The coordinates of these points are used to perform
the implementation.
To turn the current presentation forward , right hand is required to be moved away from
the head in predefined distance. When the distance is reached, application generates Windows interrupt corresponding to right arrow button pressed on the keyboard. To turn the
14
3 Solution
current presentation backward, left hand is required to be moved away from the head in predefined distance. When the distance is reached, application generates Windows interrupt
corresponding to left arrow button pressed on the keyboard.
3.3 Acquiring The Joint Coordinates
The present implementation aims to acquire joint coordinates for further research. Since
this section is mostly designed for research, the application is considered to be designed as
a separate application. The way how the application functions is that once the user stands
in front of the Kinect, all 20 joints of the human skeleton are tracked by Kinect. X, Y
and Z coordinates of tracked joints are delivered to the application. Such algorithm for
writing and saving the retrieved coordinates into .txt file is designed in the application. The
algorithm is designed to erase all the data from the file each time the application starts and
save new retrieved data into the file. On the result of this application, one may take the file
and utilize the data for evaluation in the research.
15
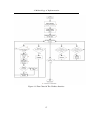
4 Methodology of Implementation
Implementation of the proposed clickless interface is spanned around skeleton tracking
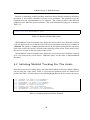
and gesture recognition functions. Present section explains how the application works
in general, describes implementation of tracking and recognition functions and positions.
Those functions is depicted on the flow chart in Figure 4.1. Clickless interface is formed
by conjunction of following methods. These methods are sequentially as following;
• Setting skeletal tracking parameters
• Initiating skeletal tracking for the joints
• Assigning the cursor to the hand and moving the cursor
• Immobilism detection of the hand
• The method to model mouse clicks
• The positioning of click event menu window
• The method of resizing
Before starting application, preliminary requirements such as setting the parameters for
skeletal tracking, setting the borders of the screen for the hand movement and defining the
joints which will be tracked have to be set.
Once the applications starts, respectively, all the joints of human skeleton and defined
joints are tracked. The right hand which is the first defined joint is tracked and then the
cursor is assigned to the right hand in order to move the cursor by hand movement. After
all these steps, gestures such as resizing the window, dragging object, opening browser,
immobilism detection of the cursor are ready to be operated.
16
4 Methodology of Implementation
Figure 4.1: Flow Chart Of The Clickless Interface
17
4 Methodology of Implementation
Respectively, particular immobilism detection and click functions can be explained in
the following ways: Immobile hand is detected once the user stops moving the hand. If
the immobile hand is not moved for a predefined time period, the function calls a method
to perform the left click. After the left click occurs, click event menu window timer is
triggered and menu window pops up after predefined time period passes. Once the menu
is open, the next immobilism detection is required to perform other follow up clicks. After
the next immobile hand is detected, inner left click function calls the method of inner left
click and the inner left click is performed on the buttons on the menu window. Each button
on the window calls related method once it is clicked. After the whole cycle is completed,
menu window is closed. For better understanding, steps are depicted in layers in Figure
4.2.
Figure 4.2: Understanding The Methodology Of Clicks
18
4 Methodology of Implementation
4.1 Setting Skeletal Tracking Parameters
Since problems such as smooth skeleton tracking, prediction of skeleton, correction of
skeletal tracking are confronted with the skeletal tracking feature of NUI library, an algorithm for filtering and smoothing incoming data from the sensor is provided as discussed in
problem statement chapter. Indeed, by default, the skeletons data are sent without smoothing or filtering. Thus, the data seem to contain some noise. Therefore, the Kinect SDK
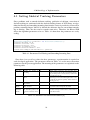
allows the algorithm parameters to be set. Table 4.1 shows how the parameters are set by
coding.
_runtime . SkeletonEngine . TransformSmooth = t r u e ;
T r a n s f o r m S m o o t h P a r a m e t e r s parameters = new T r a n s f o r m S m o o t h P a r a m e t e r s ( ) ;
parameters . Smoothing = 0 . 1 f ;
parameters . Correction = 0 . 9 f ;
parameters . Prediction = 0 . 4 f ;
parameters . JitterRadius = 0 . 5 f ;
parameters . MaxDeviationRadius = 0 . 4 f ;
_runtime . SkeletonEngine . SmoothParameters = parameters ;
Table 4.1: Parameters For Filtering and Smoothing Incoming Data
Since there is no set of best values for these parameters, experimentation is required on
each developed application. The parameters shown in Table 4.1 are the most convenient
parameters for the present application. The meaning of the parameters are explained on the
following table.
Parameter
Smoothing
Description
Specifies the
smoothing
Correction
Specifies the amount of correction
0.5
Prediction
Specifies the number of predicted frames
Specifies the jitter-reduction
radius, in meters
Specifies the maximum radius that filter positions can
deviate from raw data, in meters
0.5
Jitter
Radius
Maximum
Deviation
Radius
amount
of
Default Value
0.5
0.05
Comments
Higher values correspond to more smoothing and a
value of 0 causes the raw data to be returned. Increasing smoothing tends to increase latency. Values must
be in the range [0, 1.0]
Lower values are slower to correct towards the raw
data and appear smoother, while higher values correct
toward the raw data more quickly. Values must be in
the range [0, 1.0]
The default value of 0.05 represents 5cm. Any jitter
beyond the radius is clamped to the radius
Filtered values that would exceed the radius from the
raw data are clamped at this distance, in the direction
of the filtered value
0.04
Table 4.2: Parameters For Skeletal Smoothness [6]
19
4 Methodology of Implementation
Besides of smoothing skeletal tracking, hand movement which is bound to the mouse
movement is necessarily adjustable for each screen resolution. The parameters for this
requirement needs experimentation to be adjusted. The reason for this is that different
computers have different screen resolutions. The code behind of this purpose is shown in
Table 4.3.
p r i v a t e c o n s t f l o a t SkeletonMaxX = 0 . 4 5 f ;
p r i v a t e c o n s t f l o a t SkeletonMaxY = 0 . 3 5 f ;
Table 4.3: Borders Of Hand Movement
SkeletonMaxX value determines how distant the cursor moves once the hand is moved
on X axis between the screen border. 0.45 is the most convenient value for the resolution of
1600x900. For instance, assuming that the hand is on the farthest point which it can reach,
if the value is 0.45, the cursor is located on the right edge of the screen. If the value is 0.65,
the cursor is located on the last quarter of the screen.
SkeletonMaxY value determines how distant the cursor moves once the hand is moved
on Y axis between the screen border. Different values are the same as SkeletonMaxX
functions.
4.2 Initiating Skeletal Tracking For The Joints
From the perspective of coding, unless the joints which will be tracked are initiated, Kinect
can not track any of the joints. Table 4.4 presents how different joints are defined to be
tracked and Table 4.5 shows how to start tracking Right Hand in order to move the cursor.
Joint
Joint
Joint
Joint
Joint
Joint
Joint
Joint
jointRight = sd . Joints [ J o i n t I D . HandRight ] ;
jointLeft = sd . Joints [ J o i n t I D . HandLeft ] ;
jointHipRight = sd . Joints [ J o i n t I D . HipRight ] ;
jointHipLeft = sd . Joints [ J o i n t I D . HipLeft ] ;
jointHead = sd . Joints [ J o i n t I D . Head ] ;
jointHip = sd . Joints [ J o i n t I D . HipCenter ] ;
jointRightWrist = sd . Joints [ J o i n t I D . WristRight ] ;
centerShoulder = sd . Joints [ J o i n t I D . ShoulderCenter ] ;
Table 4.4: Definition Of Joints To Be Tracked
20
4 Methodology of Implementation
i f ( sd . Joints [ J o i n t I D . HandRight ] . TrackingState == J o i n t T r a c k i n g S t a t e . Tracked )
Table 4.5: How To Start Tracking Right Hand
4.3 Assigning The Cursor To The Hand and
Moving The Cursor
Initially, Windows OS has the infrastructure to operate all the interfaces. This means that
Windows has the data of cursor in the OS. To assign and move the cursor, retrieving the
data is involved from the operating system. The way of retrieving the data is to interact with
the OS. The interaction is approached by coding in Microsoft Visual Studio environment.
The way of assigning and moving the cursor is as following;
1. The particular code of movement ( provided by Windows OS ) for the cursor is
reached from the mouse flags user library in Windows OS ( shown in Table 4.6 ). This
particular code is necessary to be sent to the mouse input section in the code.
[ DllImport ( " user32 . d l l " ) ]
s t a t i c e x t e r n v o i d mouse_event ( i n t dwFlags , i n t dx , i n t dy , i n t dwData , i n t dwExtraInfo ) ;
[ Flags ]
p u b l i c enum M o u s e E v e n t F l a g s
{
MOVE = 0 x00000001 ,
LEFTDOWN = 0 x00000002 ,
LEFTUP = 0 x00000004 ,
RIGHTDOWN = 0 x00000008 ,
RIGHTUP = 0 x00000010
}
Table 4.6: Library For Mouse Events and Movement
2. After the right hand joint is initiated to be tracked, the tracked right hand joint is
required to be scaled to the primary screen width and height ( shown in Table 4.7 ). This
provides the usability area to the user for moving the right hand in the border of the screen
size.
21
4 Methodology of Implementation
J o i n t scaledRight = jointRight . ScaleTo ( ( i n t ) S y s t e m P a r a m e t e r s . PrimaryScreenWidth ,
( i n t ) S y s t e m P a r a m e t e r s . PrimaryScreenHeight ,
SkeletonMaxX , SkeletonMaxY ) ;
Table 4.7: Assigning The Hand To The Screen
3. Once the scaling is succeeded, X and Y positions of the cursor should be assigned to
the scaled right hand as shown in Table 4.8.
cursorX = ( i n t ) scaledRight . Position . X ;
cursorY = ( i n t ) scaledRight . Position . Y ;
Table 4.8: Assigning The Cursor To The Hand
4. The last step to see the results on the screen is to send the parameters to Windows OS
as shown in Table 4.9.
N a t i v e M e t h o d s . SendMouseInput ( cursorX , cursorY , ( i n t ) S y s t e m P a r a m e t e r s . PrimaryScreenWidth ,
( i n t ) S y s t e m P a r a m e t e r s . PrimaryScreenHeight ) ;
Table 4.9: Sending The Parameters
On the result of these steps, once the user moves the right hand, the cursor moves to the
point of hand.
4.4 Immobilism Detection Of The Hand
Immobilism detection of the cursor ( hand ) is the most crucial spot for the mouse clicks and
click event menu window. Most of the triggers are initiated from the immobilism detection
of the cursor. Immobilism detection is captured by the code shown in Table 4.10 and this
particular code triggers another particular code shown in Table 4.11 to execute required
operation.
22
4 Methodology of Implementation
mouse . MouseMove += ( sd , args ) =>
{
movingShowCount = 0 ;
movingHideCount = 0 ;
dragTimerTicksCount = 0 ;
menukeeping = t r u e ;
mouseLeft = args . X ;
mouseTop = args . Y ;
};
Table 4.10: Immobilism Detection Of The Cursor
timer . Tick += ( sd , args ) =>
{
LeftClick ( System . Windows . Forms . C u r s o r . Position . X , System . Windows . Forms . C u r s o r . ←Position . Y ) ;
}
Table 4.11: Triggering Particular Code By Detection Of Immobile Cursor
4.5 The Method To Model Mouse Clicks
Since there is no physical contact to the mouse, Windows OS should distinguish the modeled clicks from the actual mouse clicks. The method used for distinguishing mouse clicks
is to utilize the user library in Windows OS as shown in Table 4.12. In the code, each
mouse event is defined as a separate method as shown in Table 4.13.
[ DllImport ( " user32 . d l l " ) ]
s t a t i c e x t e r n v o i d mouse_event ( i n t dwFlags , i n t dx , i n t dy , i n t dwData , i n t dwExtraInfo ) ;
[ Flags ]
p u b l i c enum M o u s e E v e n t F l a g s
{
MOVE = 0 x00000001 ,
LEFTDOWN = 0 x00000002 ,
LEFTUP = 0 x00000004 ,
RIGHTDOWN = 0 x00000008 ,
RIGHTUP = 0 x00000010
}
Table 4.12: Library For Mouse Events and Movement
23
4 Methodology of Implementation
p u b l i c s t a t i c v o i d RightClick ( i n t X , i n t Y )
{
System . Windows . Forms . C u r s o r . Position = new System . Drawing . P o i n t ( X , Y ) ;
mouse_event ( ( i n t ) ( M o u s e E v e n t F l a g s . RIGHTDOWN ) , 0 , 0 , 0 , 0 ) ;
mouse_event ( ( i n t ) ( M o u s e E v e n t F l a g s . RIGHTUP ) , 0 , 0 , 0 , 0 ) ;
}
p u b l i c s t a t i c v o i d LeftClick ( i n t X , i n t Y )
{
System . Windows . Forms . C u r s o r . Position = new System . Drawing . P o i n t ( X , Y ) ;
mouse_event ( ( i n t ) ( M o u s e E v e n t F l a g s . LEFTDOWN ) , 0 , 0 , 0 , 0 ) ;
mouse_event ( ( i n t ) ( M o u s e E v e n t F l a g s . LEFTUP ) , 0 , 0 , 0 , 0 ) ;
}
p u b l i c s t a t i c v o i d LeftDownClick ( i n t X , i n t Y )
{
System . Windows . Forms . C u r s o r . Position = new System . Drawing . P o i n t ( X , Y ) ;
mouse_event ( ( i n t ) ( M o u s e E v e n t F l a g s . LEFTDOWN ) , 0 , 0 , 0 , 0 ) ;
}
p u b l i c s t a t i c v o i d LeftUpClick ( i n t X , i n t Y )
{
System . Windows . Forms . C u r s o r . Position = new System . Drawing . P o i n t ( System . Windows . Forms←. C u r s o r . Position . X , System . Windows . Forms . C u r s o r . Position . Y ) ;
mouse_event ( ( i n t ) ( M o u s e E v e n t F l a g s . LEFTUP ) , 0 , 0 , 0 , 0 ) ;
}
p u b l i c s t a t i c v o i d DoubleLeftClick ( i n t X , i n t Y )
{
System . Windows . Forms . C u r s o r . Position = new System . Drawing . P o i n t ( X , Y ) ;
mouse_event ( ( i n t ) ( M o u s e E v e n t F l a g s . LEFTDOWN ) , 0 , 0 , 0 , 0 ) ;
mouse_event ( ( i n t ) ( M o u s e E v e n t F l a g s . LEFTUP ) , 0 , 0 , 0 , 0 ) ;
mouse_event ( ( i n t ) ( M o u s e E v e n t F l a g s . LEFTDOWN ) , 0 , 0 , 0 , 0 ) ;
mouse_event ( ( i n t ) ( M o u s e E v e n t F l a g s . LEFTUP ) , 0 , 0 , 0 , 0 ) ;
}
Table 4.13: Methods For Mouse Events
Each method is called when that method is required to be used and each method has
different triggering options. These options are as following;
• LeftClick: Once the cursor movement stops, timer starts to tick and Left Click is
triggered after 2 seconds pass.
• RightClick: Right Click is triggered once the left click is performed on the Right
Click Button on the event menu window.
• DoubleLeftClick: Double Left Click is triggered once the left click is performed on
the Double Click Button on the event menu window.
• LeftDownClick: Left Down Click is triggered either the left click is performed on
the Drag Button on the event menu window or Sliding Left Hand gesture is performed.
24
4 Methodology of Implementation
• LeftUpClick: Left Up Click is triggered after 2 seconds pass from the moment of
the cursor movement stops. The pre-requisite for this is that Left Down Click should
be performed.
However, there are some difficulties which were encountered because of using the menu
window. One of the difficulties is that each click event is performed at the current cursor
position in actual mouse usage. Because of using click event menu, non of the clicks
except Left Click occurs at the current position. The reason for this is that once the cursor
stops moving, left click is performed on the icon at the current cursor position. However,
one may intend to perform double left click, right click or drag on the icon. To perform
these requirements, clicks should be triggered from the click event menu window. So, the
current cursor position always changes in order to click from the menu window. Therefore,
the solution is to save the current cursor position once the first left click occurs, then use
the saved cursor position on the other click events. The solution is depicted in Figure 4.3.
Figure 4.3: The Solution For Different Clicks
Since the cursor is moved by the hand movement, it has to be stopped by the hand
movement. The other difficulty which is detecting the moment of the immobile cursor
comes up at this point. The solution is to compare the current cursor position and the last
cursor position. On the consequence of comparison, it is aimed to reduce jitter of the cursor
when it attempts to be immobile. The solution is shown in Table 4.14.
25
4 Methodology of Implementation
i f ( Math . Abs ( cursorX − lastCursorX ) > 2 | | Math . Abs ( cursorY − lastCursorY ) > 1 )
{
offset = 0 ;
}
e l s e { offset = 3 ; }
i f ( Math . Abs ( cursorX − lastCursorX ) >= offset | | Math . Abs ( cursorY − lastCursorY ) >= ←offset )
{
N a t i v e M e t h o d s . SendMouseInput ( cursorX , cursorY , ( i n t ) S y s t e m P a r a m e t e r s . ←PrimaryScreenWidth , ( i n t ) S y s t e m P a r a m e t e r s . PrimaryScreenHeight ) ;
}
lastCursorX = cursorX ;
lastCursorY = cursorY ;
return ;
Table 4.14: Solution For Reducing The Jitter At The Moment Of Immobilism
The figure above represents that once the hand movement is fast ( presented by offset
), which means that there is no attempt to stop moving the cursor, the mouse input is sent
to the system in order to move the cursor smoothly. Once the hand movement is slow (
presented by offset ), which means that there is an attempt to stop moving the cursor, the
mouse input is not sent to the system. Thus, the cursor stays immobile and does not jitter.
Therefore, immobilism detection occurs and the clicks can be performed.
4.6 The Positioning Of Click Event Menu Window
Owing to the fact that menu window is positioned according to the cursor, it pops up by
the cursor. Since the cursor location on the desktop is always changeable, the idea ( shown
in Figure 4.4) here is to divide the screen into four square and position the menu window
according to these squares. Positions are respectively as following;
• 1st Square: The menu window pops up on the bottom right corner of the cursor.
• 2nd Square: The menu window pops up on the bottom left corner of the cursor.
• 3rd Square: The menu window pops up on the top right corner of the cursor.
• 4th Square: The menu window pops up on the top left corner of the cursor.
26
4 Methodology of Implementation
Figure 4.4: Click Event Menu Window At Different Location On Desktop.
4.7 The Method Of Resizing
In order to initiate resizing, both hands are required to be held for predefined time period
between the distance of 10 cm and 60 cm from each other. By bringing the hands closer or
making them diverge maintains resizing the window. In order to resize, the open window
must be top most. If the window is not top most, it is brought to top most by selecting the
window.
The way of resizing is to add pixels to the actual size of the window or subtract pixels
from the actual size of the window. Adding or subtracting is implied to the both left and
top edge. The top and left edge of the window are the base points for resizing. If it is
required to enlarge the size, the idea is to find the actual size and assign it to the variable,
then increase the variable. The reverse way is valid for diminishing the size of the window.
Table 4.15 shows how resizing is performed from the code perspective.
27
4 Methodology of Implementation
i n t cx = r . Right − r . Left ;
i n t cy = r . Bottom − r . Top ;
i n t ix = r . Right − r . Left ;
i n t iy = r . Bottom − r . Top ;
cx −= 1 0 ;
cy −= 1 0 ;
ix += 1 0 ;
iy += 1 0 ;
i f ( jointLeft . Position . X < jointRight . Position . X − 0 . 0 1 && jointLeft . Position . X > ←jointRight . Position . X − 0 . 2 5 )
{
SetWindowPos ( windowHandle , ( I n t P t r ) S p e c i a l W i n d o w H a n d l e s . HWND_TOPMOST , r . Left , r . Top , ←cx , cy , S e t W i n d o w P o s F l a g s . SWP_SHOWWINDOW ) ;
}
e l s e i f ( jointLeft . Position . X < jointRight . Position . X − 0 . 4 0 && jointLeft . Position . X > ←jointRight . Position . X − 0 . 5 5 )
{
SetWindowPos ( windowHandle , ( I n t P t r ) S p e c i a l W i n d o w H a n d l e s . HWND_TOPMOST , r . Left , r . Top , ←ix , iy , S e t W i n d o w P o s F l a g s . SWP_SHOWWINDOW ) ;
}
Table 4.15: The Method To Resize Window
As seen on the figure, actual size of the window is retrieved by subtracting vertical (
left,right ) edges (4.1), (4.3) and horizontal ( top,bottom ) edges (4.2), (4.4). The subtracted
values are saved in a variable as shown in the equations.
cx = r.Right − r.Le f t
(4.1)
cy = r.Bottom − r.Top
(4.2)
ix = r.Right − r.Le f t
(4.3)
iy = r.Bottom − r.Top
(4.4)
To diminish the size of the window, the variables are decreased by 10 pixels as shown in
the equation (4.5) and (4.6).
cx− = 10
(4.5)
cy− = 10
(4.6)
28
4 Methodology of Implementation
To enlarge the size of the window, the variables are increased by 10 pixels as shown in
the equation (4.7) and (4.8).
ix+ = 10
(4.7)
iy+ = 10
(4.8)
The last step is to send the new size of the window to the event handler for windows on
the desktop. To see the result in action, if the distance of both hands is between 1 cm and
25 cm, window starts to be resized to smaller size. If the distance of both hands is between
40 cm and 55 cm, window starts to be resized to bigger size.
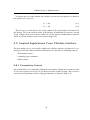
4.8 Inspired Applications From Clickless Interface
The first attempt was to successfully complete the clickless interface and then use it as a
prototype. Once the clickless interface functioned well, such ideas as following came up.
• Presentation control
• Acquiring joint coordinates
• Robot control
4.8.1 Presentation Control
One would wish to act comfortably during the presentation. Taking into account the idea
of ease, hand gestures are used as it was discussed in the solution section. This section is
devoted to the explanation of how coding part functions as shown in Table 4.16.
29
4 Methodology of Implementation
p r i v a t e v o i d ProcessForwardBackGesture ( J o i n t head , J o i n t rightHand , J o i n t leftHand )
{
i f ( rightHand . Position . X > head . Position . X + 0 . 4 5 && presentationActive )
{
i f ( ! isBackGestureActive && ! isForwardGestureActive )
{
isForwardGestureActive = t r u e ;
System . Windows . Forms . SendKeys . SendWait ( " { R i g h t } " ) ;
}
}
else
{
isForwardGestureActive = f a l s e ;
}
i f ( leftHand . Position . X < head . Position . X − 0 . 4 5 && presentationActive )
{
i f ( ! isBackGestureActive && ! isForwardGestureActive )
{
isBackGestureActive = t r u e ;
System . Windows . Forms . SendKeys . SendWait ( " { L e f t } " ) ;
}
}
else
{
isBackGestureActive = f a l s e ;
}
}
Table 4.16: The Method For Performing Presentation Gestures
As seen from the code, defined joints to be tracked are head, right hand and left hand.
Once the right hand is diverged 45 cm from the head, application generates interrupt called
"Right" corresponding to the Right Arrow on the keyboard. Once the requirement is satisfied, presentation is set forward. Once the left hand is diverged 45 cm from the head,
application generates interrupt called "Left" corresponding to the Left Arrow on the keyboard. Once the requirement is satisfied, presentation is set backward.
isForwardGestureActive and isBackGestureActive expressions are used to separate left
hand and right hand gesture from each other.
4.8.2 Acquiring The Joints Coordinates
Once the skeletal tracking was successfully completed in the implementation of clickless
interface, the thought of acquiring the joint coordinates would be an idea for further research. In this purpose, additional application is designed. Functionality of this application
is to track all the joints and acquire the X, Y and Z coordinates of those joints. After acquisition the coordinates, values are written in a text file and saved to be evaluated by other
applications.
30
4 Methodology of Implementation
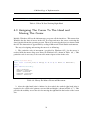
The Table 4.17 shows how text file is opened from the perspective of code and Table
4.18 shows how the coordinates of joints are acquired and saved.
S t r e a m W r i t e r fileWriter = new S t r e a m W r i t e r ( " p o s i t i o n s . t x t " ) ;
fileWriter . WriteLine ( "
Head X" + "
Head Y" + "
Head Z" ) ;
fileWriter . Write ( " " ) ;
fileWriter . Close ( ) ;
Table 4.17: The Method For Opening A Text File and Writing
S t r e a m W r i t e r fileWriter = new S t r e a m W r i t e r ( " p o s i t i o n s . t x t " , t r u e ) ;
fileWriter . WriteLine ( skeleton . Joints [ JointID . Head ] . Position . X + " | " + skeleton . Joints←[ JointID . Head ] . Position . Y + " | " + skeleton . Joints [ JointID . Head ] . Position . Z ) ;
fileWriter . Close ( ) ;
Table 4.18: The Method For Acquiring The Coordinates and Writing
Steps for writing and saving the data into the file are as following;
1. The text file is created and the content in the file is erased under the root directory of
the application.
2. Skeletal tracking begins.
3. The coordinates are acquired. Acquiring the coordinates of the joints lasts as long as
skeletal tracking is in process.
4. Values of the coordinates are written into the file. Writing the values into the file lasts
as long as skeletal tracking is in process.
5. Once the skeletal tracking is over - which means that the user abandons the angle of
Kinect vision - the file is saved and closed.
These steps are repeated each time the user gets in the angle of Kinect vision.
4.8.3 Robot Control
Once previous applications were completed, the thought of controlling the pioneer robot
with gestures ( meaning without touching any device ) by using Kinect sensor would be an
idea for the further improvements of pioneer robot. Since the pioneer robot was developed
before and already running, the idea was to integrate Kinect usage to the robot.
31
4 Methodology of Implementation
Briefly, there is a mini computer which is located on the robot and commands the robot.
The computer on the robot is using the Wi-Fi protocol to communicate with the desktop
computer by using Remote Desktop Protocol. This means that the robot is independently
moving around in the area. The robot has functions such as moving forward, moving
backward, turning right and left, using its arm to reach some object and grab it, releasing
the grabbed object and setting its arm to the initial state. All these functions are sent to
the robot by typing the commands on the keyboard from the desktop computer. Kinect is
used to substitute typing the commands on the keyboard. For this purpose, two different
applications were implemented in the sense of client-server application.
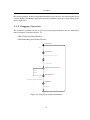
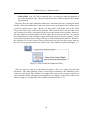
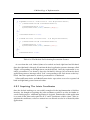
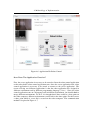
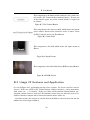
The first application is the server application ( shown in Figure 4.5 ) which is designed
to run on the computer that is located on the robot. The server application is to provide the
connection between robot control application ( using Kinect ) and robot application.
Figure 4.5: Server Application
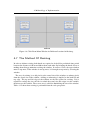
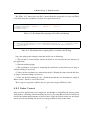
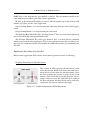
The second application is the robot control application with Kinect ( shown in Figure
4.6 ) which sends the commands to the robot.
32
4 Methodology of Implementation
Figure 4.6: Application For Robot Control
How Does The Application Function?
First, the server application is necessary to be started to listen the robot control application
on the robot before robot control application runs. Once the server application runs, robot
control application is necessary to be started to connect to the server application. The
reason of using two different applications is that the robot application was designed in
different environment and in different programming language ( Java ). Since the robot
control application runs on C# language and in different environment, one should think to
merge different environments. To do so, it is thought that if there could be a share point on
the robot computer, different environments could reach to the share point. For this reason,
a share point which is a text file is created on the robot computer. The communication
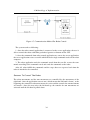
method is depicted in Figure 4.7.
33
4 Methodology of Implementation
Figure 4.7: Communication Method For Robot Control
The system works as following:
1. Once the robot control application is connected to the server application, the user is
able to control the robot with either predefined gestures or buttons on the GUI.
2. Once the commands from robot control application are sent to the server application,
the server application creates a text file which includes single command words on the robot
computer.
3. The robot application reads the command words from the text file, creates the commands according to the command words and sends the commands to the robot.
After all, robot fulfills the commands and the steps above are repeated each time the
robot is intended to be controlled.
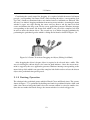
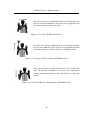
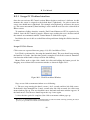
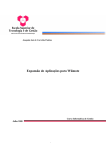
Gestures To Control The Robot
The robot movements and the arm movements are controlled by the movements of the
right hand. Once the application starts to run ( which means that left hand is down ), at the
beginning, the controls for robot movements are active and the controls for arm movements
are inactive. Once the user raises the left hand up, the controls for arm movements are
activated until the left hand is pulled down.
34
4 Methodology of Implementation
Once the user raises the right hand up, the relevant command
is sent to the server application and the robot attempts to move
forward.
Figure 4.8: Gesture To Move Robot Forward
Once the user pulls the right hand down, the relevant command
is sent to the server application and the robot attempts to move
backward.
Figure 4.9: Gesture To Move Robot Backward
Once the user moves the right hand away from the head to the
right, the relevant command is sent to the server application and
the robot attempts to move to the right.
Figure 4.10: Gesture To Move Robot Right
35
4 Methodology of Implementation
Once the user moves the right hand away from the head to the
left, the relevant command is sent to the server application and
the robot attempts to move to the left.
Figure 4.11: Gesture To Move Robot Left
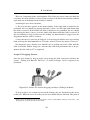
Once the user raises the right hand up in case of raised left hand,
the relevant command is sent to the server application and the
robot arm attempts to grab the object by closing the holder.
Figure 4.12: Gesture To Grab An Object With Robot Arm
Once the user pulls the right hand down in case of raised left
hand, the relevant command is sent to the server application
and the robot arm attempts to release the object by opening the
holder.
Figure 4.13: Gesture To Release Grabbed Object With Robot Arm
36
4 Methodology of Implementation
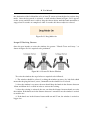
Once the user moves the right hand away from the head to the
right in case of raised left hand, the relevant command is sent to
the server application and the robot arm attempts to start moving
forward.
Figure 4.14: Gesture To Move Robot Arm Forward
Once the user moves the right hand away from the head to the
left in case of raised left hand, the relevant command is sent
to the server application and the robot arm attempts to move
backward which is the initial state of the arm.
Figure 4.15: Gesture To Move Robot Arm Backward To The Initial State
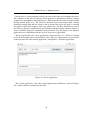
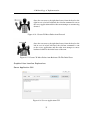
Graphical User Interface Explanations
Server Application GUI
Figure 4.16: Server Application GUI
37
4 Methodology of Implementation
PORT field: is the field that the port number is entered. The port number should be the
same with the port number from robot control application.
IP field: is the field that IP number is entered. The IP number can be the local host IP
number (127.0.0.1) for the server application.
Start Listening Button: is to start listening the connection from the robot control application.
Stop Listening Button: is to stop listening the connection.
The Rich Text Box Which Has The "Listening Started" Text: is to show what commands
are received from the robot application in order.
The Text Box Which Has The "robot goes forward" Text: is to show the last command
which comes from the robot application. The server application creates the text file according to the last commands and the robot fulfills the commands from the last command from
this field.
Application For Robot Control GUI
Robot control application GUI consists of four main separated sections as following;
Graphical Simulation Of The Movements:
This section of GUI represents the movements of the
robot and the arm. Black circle shows the robot movements and red circle shows the arm movements. Once
the user performs the gesture or clicks on one of the
buttons, related circle moves on that direction. For example, if the user raises the right hand up or clicks on
the Forward button, the black circle moves to the Forward arrow direction as shown on the figure.
Figure 4.17: Graphical Simulation Of The Movements
38
4 Methodology of Implementation
Data For Kinect Sensor:
In this section of GUI, Kinect image stream, Kinect
depth stream are shown and Kinect’s tilt can be set up
or down by changing the position of the slider bar. The
text field next to the slider bar shows the degree of the
tilt ( min: -27, max: +27) . By clicking on the Set
Kinect Tilt button, the degree is implied to the Kinect
motor.
Figure 4.18: Kinect Sensor Datas
Command Buttons Panel:
Figure 4.19: Command Buttons
Figure 4.19 represents the button control panel on GUI. This section of GUI is designed
for safety reasons.
39
4 Methodology of Implementation
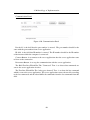
Communication Panel:
Figure 4.20: Communication Panel
Port field: is the field that the port number is entered. The port number should be the
same with the port number from server application.
IP field: is the field that IP number is entered. The IP number should be the IP number
of the internet which the computer is connected.
Connect Button: is to connect to the server application after the server application starts
to listen to the connection.
Disconnect Button: is to stop the communication with the server application.
The Rich Text Box Which Has The "Connected" Text: is to show what commands are
sent to the server application in order.
The Text Box Which Has The "robot goes forward" Text: is to show the last command
which is sent to the server application. The server application creates the text file according
to the last commands and the robot fulfills the commands from the last command from this
field.
40
5 Conclusion
Present research belongs to the area of human-machine interaction. The main goal of the
thesis was to develop and implement gesture based interface which allows the user to interact with a computer equipped with Kinect sensor and avoiding the usage of keyboard,
mouse or any other device requiring physical contact. The developed application as a main
part of the present thesis provides an ability to control the computer in a click- and touchless manner, which may find its applications in many areas from the entertainment industry
to such a delicate field like medicine. Achieved results has demonstrated that proposed ideology not only guarantees the same level of interaction as keyboard and mouse but also may
be adjusted for the specific needs of different application areas. For example, three specific
applications were developed within the present research frameworks. The first one allows
switching slides during the presentation, the second one provides possibility to control pioneer robot and the third one collects information about position of human body in real time
providing necessary data for further research related to human motion analysis and gesture
recognition. On the basis of conducted experiments one may conclude that Kinect sensor
provides valuable alternative to more expensive motion capture systems. Possible future
research may be directed to develop number of more specific applications satisfying needs
of some specific areas. Obviously easiness of usage may be developed including the both
aid from the psychologists and more hybrid approach to the control of cursor movements
on the screen. The main strength of the results achieved within the previous work is that
stable running application implementing the goal stated in the beginning is provided.
41
Bibliography
[1] J.P. Foster, M.S. Nixon, A. Prugel-Bennet New area based metrics for automatic gate
recognition Proceedings of BMVC (2001).
[2] J.W. Davis, A.F. Bobick The representation and recognition of human movement using
temporal template Proceedings of IEEE Computer Vision and Pattern Recognition
(1997).
[3] M. Shah Motion-based recognition: a survey Image C. Cedras and 129 155 Vision Computing, 13 (2) (1995).
[4] W.H. Dittrich Action categories and pp. 15 22 the perception of biological motion
Perception, 22 (1993).
[5] J.M. Rehg Reconstruction of 3D figure motion from 2 (2001) pp. 307 314
D.E. DiFranco, T.J. Cham.
[6] http://cm-bloggers.blogspot.com/2011/07/kinect-sdk-smoothing-skeleton data.html.
[7] http://msdn.microsoft.com/en us/.
[8] http://msdn.microsoft.com/en us/library/aa970268.aspx.
[9] http://www.microsoft.com/en-us/kinectforwindows/develop/release notes.aspx.
[10] 9 (5) (1977) pp. 353 356 J.E. Cutting, L.T. Kozlowski Recognizing friends by their
walk: Gait perception without familiarity cues Bulletin Psychonometric Society.
[11] D. Kammer, M. Keck, G. Freitag, and M. Wacker. Taxonomy and overview of multitouch frameworks: Architecture, scope and features. In Proc. of Workshop on Engineering Patterns for Multi-Touch Interfaces, Berlin, Germany, 2010.
[12] O. Masoud and N. Papanikolopoulos. A method for human action recognition. Image
and Vision Computing, 21(8):729–743, 2003.
[13] I. Oikonomidis, N. Kyriazis, and A. Argyros. Efficient model-based 3d tracking of
hand articulations using kinect. Procs. of BMVC, Dundee, UK (August 29–September
10 2011)[547], 2011.
[14] Z. Ren, J. Meng, J. Yuan, and Z. Zhang. Robust hand gesture recognition with kinect
sensor. In Proceedings of the 19th ACM international conference on Multimedia,
pages 759–760. ACM, 2011.
42
Bibliography
[15] D.M. Gavrila The visual analysis of human movement: a survey Computer Vision
and pp. 82 98 Image Understanding, 73 (1) (1999).
[16] C.Y. Yam, M.S. Nixon, and J.N. Carter. Automated person recognition by walking
and running via model-based approaches. Pattern Recognition, 37(5):1057–1072,
2004.
[17] S. Yovine. Model checking timed automata. Lectures on Embedded Systems, pages
114–152, 1998.
43
44
45
Figure A.1: PC Control In Timed Automata
dragDone?
drag!
DragFinished
GoToDragDetails
left_down_click=true, slidingLeftHand = false
DragEventInitiated
slidingLeftHand = true
LeftHandSlide
interruptSent=false
BrowserIsOpen
definedGestureOccured=false, interruptSent=true
WindowsSendsInterrupt
definedGestureOccured=true
DefinedShapeForDragPerformed
sec++
sec<3
sec == 3
sec = 0
sec++
pc_section?
InMenu
mouseStops?
sec<2
buttonclicked=true
sec++
CloseMenuSecondsActivated
sec=0, buttonclicked=false
sec==2 || buttonclicked ==true
LeftClick=false
Cursor_Stops
menuFinished?
menuAvailable!
GoToMenuDetails
MenuIsOpen
OpenMouseMenu
LeftClick=false
MenuSecondsActivated
MakeLeftClick
SecondsActivated
mouseStops?
CursorStops
IdleState
sec == 2
sec = 0, LeftClick = true
sec<2
pc_section_finished!
WindowResizedToBigger
HandsAway
definedGestureOccured=false
WindowResizedToSmaller
CloseMenu
definedGestureOccured=false
HandsCloser
ResizeStarted
definedGestureOccured = true
DefinedShapeForResizePerformed
A Figures
A Figures
B User Manual
B.1 How To Run The Application
Before running the application, there are preliminary steps. The first step is to install Kinect
SDK on the computer. The SDK version is important in this case. For this application,
Microsoft Kinect SDK Beta 1 version is used. If one intends to install one of the other
versions, the application will not run and give errors. The second step is to ensure that
.NET Framework 4 is installed on the computer.
After all preliminary steps are satisfied, the application can be run by clicking on the .exe
file in the folder. One crucial spot is that all the files in the folder should be kept together
in one folder.
B.2 Graphical User Interface
Figure B.1: Graphical User Interface Of The Application
Figure B.1 presents the Graphical User Interface which is designed to ease usage of the
following application. GUI consists of 9 following components described below.
46
B User Manual
This component is the button which activates clickless interface
( mouse click behaviors, mouse movement control, resizing the
window, dragging operation, opening web browser ) of the application when it is clicked. Presentation Control is inactive in
this mode.
Figure B.2: Pc Control Button
This component is the button which activates presentation control of the application when it is clicked. PC Control is inactive
in this mode.
Figure B.3: Presentation Control Button
By default, none of the controls is active until one of the control button is clicked. Besides of inactive control sections, main GUI allows the user to set Kinect tilt.
This component is the slider bar which sets the Kinect tilt up
and down. Slider bar range is between -27 and +27 which are
respectively minimum and maximum angle of Kinect motor.
Positive numbers tilts the Kinect up and negative numbers tilts
the Kinect down.
Figure B.4: Slider Bar
This component is the button which sends the value that is set
from the slider bar to the Kinect. Thus, Kinect motor is initiated
to be tilted by this button.
Figure B.5: Set Tilt Button
This component is the text box which shows the Kinect’s tilt
degree. The values are retrieved from the slider bar.
Figure B.6: Tilt Degree Text Box
47
B User Manual
This component is the button which terminates the current control section ( PC Control or Presentation Control ). To start one
of the controls again, one of the control buttons is required to
be clicked.
Figure B.7: End Control Button
This component is the status text field which shows the current
active control. If none of the controls is active, it shows "None
Of The Control Is Active At The Moment.
Figure B.8: Status Field
This component is the field which shows the depth stream of
Kinect.
Figure B.9: Depth Stream
This component is the field which shows RGB stream of Kinect.
Figure B.10: RGB Stream
B.3 Usage Of Gestures and Application
As seen in Figure B.1, application consists of two sections. PC Control and Presentation
Control. If the user clicks on PC Control button, clickless interface ( cursor movement,
click events etc. ) is activated. If the user clicks on Presentation Control button, presentation control section is activated. Presentation section does not allow the user to use
clickless interface controls such as mouse movement, mouse clicks etc.
For both sections, the user has to stand in front of the Kinect sensor between 1m and 3m
which is the vision angle of Kinect.
48
B User Manual
B.3.1 Usage Of Clickless Interface
Once the user activates PC Control section, Kinect begins to track user’s skeleton. At this
moment, the cursor is assigned to the default hand ( right hand ). In order to move the
cursor, one should move right hand. For example, moving hand up will move the cursor
up. The cursor movement by hand tracking is active until the user leaves the vision field of
Kinect sensor.
To terminate clickless interface controls, End Control Button on GUI is required to be
clicked. Once the PC Control is inactive, Kinect stops tracking the user’s skeleton and all
the controls are terminated until PC Control button is clicked once again.
In addition, the user is able to set the Kinect tilt up and down during the clickless interface
is active.
Usage Of Click Events
Click events are separated into two groups. Left Click and Menu Clicks.1
Left Click is performed by detecting the immobile hand. The user should stop moving
the hand for 2 seconds. Once the time period is completed, left click is occurred. Immobilism detection of the hand is always used for left clicking.
Menu Clicks such as right click, double left click and holding the button pressed for
dragging are used from click event menu window as shown in Figure B.11.
Figure B.11: Click Event Menu Window.
Steps to use click event menu window are as following:
1. The user stops moving the hand ( cursor ) for 2 seconds and first left click occurs.
If the hand is kept immobile for 3 more seconds after left click occurred, the click event
menu window pops up. The user shouldn’t move the hand until menu window appears. If
the hand moves a bit, the user should repeat the step 1 once again.
2. Once the time period is completed, the click event menu window pops up.
1
The reason of naming Menu Clicks is that Right Click, Double Left Click and Drag ( Holding the button
pressed ) are performed from click event menu window.
49
B User Manual
There are 2 important points at this moment. First, If the user doesn’t move the hand for
2 seconds, the menu window is closed. If the user moves the hand, menu window remains
open until one of the button on the window is clicked.
Assuming the user moves the hand;
3. The user has three options on the menu window. If the right click is intended to be
performed, the user should stop moving the hand ( cursor ) over the right click button until
the click is occurred. If the double left click is intended to be performed, the user should
stop moving the hand ( cursor ) over the double click button until the click is occurred. If
the user demands to drag an object on the desktop, the hand should be stopped over the
drag button until the click is occurred.
4. Once the object is started to be dragged, it can be dragged until the user stops moving
hand and keeps the hand immobile for 2 seconds. After 2 seconds, the object is released.
One important spot is that the user shouldn’t try to perform any of the clicks until the
click event menu window disappears. It means that each click performance has to be performed after the click cycle2 is completed.
Usage Of Dragging Gesture
Once the user intends to drag an object except using the click event menu window, the
gesture " Sliding Left Hand To The Left " as shown in Figure B.12 is required to be
performed.
Figure B.12: Gesture To Activate Dragging An Object (Sliding Left Hand)
To drag an object, for example an icon on the desktop, the user should hover the cursor
on the icon. While the cursor is on the icon, the user should slide the left hand. The point of
2
Click cycle is the duration between the left click ( occurs by immobilism detection of the cursor ) and
disappearance of the click event menu window.
50
B User Manual
the destination of the left hand has to be at least 55 cm away from the head to activate drag
mode. Once the drag mode is activated, a small window shown in Figure B.13 appears
on the screen and then user is able to drag the chosen object until the hand movement is
stopped and 2 seconds are completed. After 2 seconds, the chosen object is released.
Figure B.13: Drag Mode On
Usage Of Resizing Gesture
Once the user intends to resize the window, the gesture " Hands Closer and Away " as
shown in Figure B.14 is required to be performed.
Figure B.14: Gesture To Resize Window
To resize the window, the steps below are required to be followed;
1. The window should be selected ( to bring the window top most ) by left click which
means that keeping the hand ( cursor ) immobile on the window for 2 seconds.
2. Once the window is top most, the user should keep the hands in the distance between
10 cm and 60 cm for 3 seconds in order to activate the resizing.
3. Once the resizing is activated, the user can alter the distance between hands to resize
the window. If the hands are in the distance between 1 cm and 25 cm, the window is resized
to smaller size.
4. If the hands are in the distance between 40 cm and 55 cm, the window is resized to
bigger size.
51
B User Manual
5. If the hands are between 25 cm and 40 cm, the window is not resized which means
that the window is stable at the last size.
6. To deactivate resizing the window, left hand is required to be put down through hip.
Usage Of Opening Browser Gesture
Once the user intends to open the web browser, the gesture " Circle From Head To Hip " as
shown in Figure B.15 is required to be performed.
Figure B.15: Gesture To Open A Browser
To open the web browser, the user starts to perform the circle gesture from Head to Hip.
The crucial spot here is that both hands have to be closer to the hip center and should
not exceed 10 cm up to hip. Once these requirements are satisfied and browser mode is
activated, a small window shown in Figure B.16 appears on the screen and then browser
window appears on the screen. There is no deactivation for browser mode. Each time the
gesture is performed, the browser window is opened.
To be able to open the web browser with the gesture mentioned above, Google Chrome
is required to be installed on the computer and set as a default browser. Otherwise, the
application gives an error once the gesture is performed and the application closes itself.
Figure B.16: Browser Mode On
52
B User Manual
B.3.2 Usage Of Presentation Control
Once the user activates Presentation Control section, Kinect begins to track user’s skeleton.
At this moment, Kinect tracks the joints of head, right hand and left hand. Kinect continues
to track user’s skeleton until the user abandons the vision angle of Kinect sensor.
To control presentation, there are two gesture commands as shown in Figure B.17.
Figure B.17: Gestures For Presentation Control
To turn the presentation forward, right hand should be in the distance of 45 cm from
head.
To turn the presentation backward, left hand should be in the distance of 45 cm from
head.
To terminate presentation control, End Control Button on GUI is required to be clicked.
Once the Presentation Control is inactive, Kinect stops tracking the user’s skeleton and all
the controls are terminated until Presentation Control button is clicked once again.
In addition, the user is able to set the Kinect tilt up and down during the presentation
control is active.
53