1
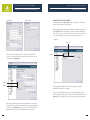
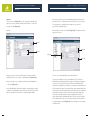
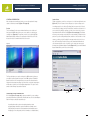
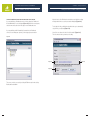
USER MANUAL
Accordent Capture Station v4.3
For more information,
please visit: www.accordent.com
To speak to a representative about how Accordent can help
your business, please contact us at: 310 .374 .7491
or [email protected]
Accordent Capture Station v4.3
USER MANUAL
ACCORDENT CAPTURE STATION VERSION 4.3
Table of Contents
CHAPTER ONE – Introducing Accordent Capture Station
Accordent Capture Station Overview
2
CHAPTER TWO – Getting Started
Launching Accordent Capture Station
4
CHAPTER THREE – Configuring Accordent Capture Station
Configuring The Administrator Settings
IMPORTANT NOTICE
This User Manual is delivered subject to the following conditions and restrictions:
• This documentation contains proprietary information of Accordent Technologies, Inc.
(“Accordent”). Such information is hereby supplied solely for the purpose of assisting
explicitly authorized users in the proper operation of Accordent products.
• Without the express prior written permission of Accordent, no part of the contents
hereof may be used for any other purpose, disclosed to any person or firm, or
reproduced by any means.
• The text and drawings herein are for the purposes of illustration and reference only.
The specifications on which they are based are subject to change without notice.
Accordent invites comments on its manuals. Please feel free to send your comments
and suggestions via e-mail to [email protected] and indicate which manual you
are commenting on.
© 2000-2009 Accordent Technologies, Inc. All rights reserved. All other company brand and product
names are trademarks of their respective owners.
8
General
Screen Capture
8
Project Options
15
Interface Options
17
Web Content
19
Completing The Real And Windows Media Screens
24
Completing The Podcast Screens
27
Security
30
Accordent Blackboard Add-In
33
Using Configuration Files
35
CHAPTER FOUR – Starting a Presentation
Customizing Your Presentation Details
38
Starting Your Presentation
40
Starting Your Presentation With Prepublishing Enabled
43
Starting A Presentation That Will Be Published To Blackboard
46
Accessing Your Presentation
48
chapter
chapter
1
1
Introducing
Capture Accordent
Station Overview
Capture Station
ACCORDENT CAPTURE STATION V4.3 USER MANUAL
Introducing Accordent Capture Station
Accordent Capture Station Overview
Accordent Capture Station is a software-hardware appliance that enables virtually
anyone to create professional, multimedia presentations around live and on-demand
streaming media and to publish those presentations locally or to the web.
The Accordent Capture Station workflow comprises three easy steps:
1
Selecting an Interface: Use the drop-down menu to select an interface, then
customize the interface with presentation-specific information such as the
presentation title, speaker and description.
2
Starting a Presentation: After selecting and customizing an interface, click
“Start” to begin capturing a presentation.
3
Stopping & Archiving a Presentation: When you have finished recording,
simply click “Stop” and your presentation will automatically be updated on your
configured server and any designated content management servers for on-demand
viewing.
This User Manual will explain how the Accordent Capture Station will help
you create, manage, and publish superior presentations with unprecedented
ease and efficiency.
P2
ChAPTER 2
Getting Started
ACCORDENT CAPTURE STATION V4.3 USER MANUAL
ChAPTER 2 - Getting Started
Launching Accordent Capture Station
Launching Accordent Capture Station
Getting Started
After completing the fields on the registration page, click “Register.” Immediately
after clicking “Register,” the Configure Screen will appear (Figure 2.3).
LAUNCHING ACCORDENT CAPTURE STATION
Figure 2.3
To launch the Accordent Capture Station, first click the desktop “Start” menu.
Next, click “Programs,” “Accordent,” and then “Capture Station.”
If the Accordent Capture Station is being launched for the first time, the Accordent
“End User License Agreement” will appear (Figure 2.1). Click “I Agree.”
Immediately after clicking “I Agree,” the product registration page will appear
(Figure 2.2). Required registration fields are denoted with red lettering.
Figure 2.1
Figure 2.2
The Configure Screen is used to accomplish four primary tasks:
1
Configuring the Accordent Capture Station to capture and publish streaming and
web content
P4
2
Customizing the text in the presentation interface
3
Previewing the VGA capture source
4
Starting a presentation
P5
chapter 3
Configuring Accordent Capture Station
ACCORDENT CAPTURE STATION V4.3 USER MANUAL
Configuring The Administrator Settings
Configuring Accordent Capture Station
CONFIGURING THE ADMINISTRATOR SETTINGS
It is only necessary to configure the Accordent Capture Station when it is initially
implemented and, thereafter, if content capture and publishing settings need to be
changed. If the Accordent Capture Station has already been configured, please skip
to Chapter 4.
To begin the process of configuring the Accordent Capture Station, on the Configure
screen, click the “Edit” drop-down menu and select “Administrator Settings”
(Figure 3.1).
Figure 3.1
ChAPTER 3 - Configuring Accordent Capture Station
General Settings
The "Enable Signal Detection" allows you to determine whether or not you will require
a live VGA signal. With this option checked, in order for you to begin a presentation,
you will need to have a live VGA signal coming into the Accordent Capture Station.
With this option unchecked, you will be able to begin a presentation without a VGA
signal present. The Accordent Capture Station will continue to scan for a VGA signal
and, once a signal is detected, it will revert back to automatic screen capture detection
(Figure 3.7).
Motion Detection
The Motion Detection section is used to configure your settings for capturing images
via motion detection. As an alternative to the Capture Interval, you can check “Motion
Detect Screen Changes” to configure the Accordent Capture Station to capture the
screen only when motion is detected (e.g. the PowerPoint slide changes). (Figure 3.8).
This option will over-ride the specified “Capture Interval.” If this box is not selected,
a screen capture will be taken at the specified time intervals.
The “Capture Delay” allows you to specify and amount of time the system will wait
before capturing another motion triggered image (Figure 3.8).
If the Accordent Blackboard Add-in has been purchased, and the “Publish to
Blackboard” option is selected, the “Blackboard Content Admin” will appear
under the Edit menu bar.
SCREEN CAPTURE
Capture Device (Figures 3.2-3.12 on page 10)
The Administrator Settings screen will appear. These settings are used to define
the quality and characteristics of the image capturing process. (Figure 3.2).
The “Device” field is used to designate the device from which screen images will be
grabbed (i.e. the device that will have the images that will be combined with the
audio/video). The drop down menu will show the supported devices (Figure 3.3).
Once the device is selected, select the desired screen resolution using the
“Resolution” drop-down menu (Figure 3.4).
The “Capture Interval” is set up so you can adjust the amount of time between
automatic screen captures. The higher the time increment, the fewer captures
you will have (Figure 3.5).
The “Motion Detection Profile” allows you to configure your motion detection
sensitivities. The Accordent Capture Station is bundled with four different profiles
including profiles optimized for high, medium, and low sensitivities. These profiles
can not be edited or removed, but can be used as a starting place for creating new,
custom profiles (Figure 3.10).
To add a new, edit an existing, or remove a profile, click on the buttons below
the drop down menu respectively. This feature is described on page 11.
Image Output Type & Compression Quality
The “Image Output Type & Compression Quality" section (Figure 3.11) allows you to
specify the image type of the screen captures. If you specify “JPG” you have the ability
to change the compression quality of the image. As you increase the image
compression quality, the image becomes clearer and the file size increases. You also
have the option of converting the captured images into the GIF file format.
The “Allow Thumbnail Generation” checkbox allows you to determine if you would
like the Accordent Capture Station to automatically generate chaptered thumbnails
which will be available in your On-Demand presentation.
The "Manual Capture" option is to allow you to disable the automatic screen captures
so you can manually decide when to take a screen capture (Figure 3.6). This feature
is described in further detail on page 40.40
P8
P9
ACCORDENT CAPTURE STATION V4.3 USER MANUAL
ChAPTER 3 - Configuring Accordent Capture Station
General Settings
General Settings
Trim Screen Lines
The “Trim Screen Lines” feature (Figure 3.12 allows you to crop out a specified
.
number of lines from all sides of the input source before it displays the image. This
can be beneficial if, for example, you do not wish to show the task bar in your output
image. To use this option, change the defaulted value of zero to the number of lines
you wish to trim on any of the sides of the screen.
When you click on “Add” or “Edit,” the “Add Motion Detection Profile” window
(Figure 3.13) will appear. This window is where you can change the sensitivity
of the motion detection.
Figure 3.13
Figure 3.17
Figure 3.18
Figure 3.2
Figure 3.14
Figure 3.19
Figure 3.15
Figure 3.3
Figure 3.5
Figure 3.4
Figure 3.6
Figure 3.16
Figure 3.20
Figure 3.7
Figure 3.21
Figure 3.8
Figure 3.9
Figure 3.11
Figure 3.10
Figure 3.22
Figure 3.12
Figure 3.23
The “Motion Sensitivity” (Figure 3.14) slide bar allows you to adjust the motion
detection sensitivity. For example, with the sensitivity set at a higher rate, it will
be sensitive enough to pick up the movement of your mouse. If you set it at a
lower rate, it will take a more significant change to detect the motion.
The check box below “Motion Sensitivity” (Figure 3.15) enables the comparison
of a new screen capture against the “Last Captured Image.” This option is used
to analyze two consecutive image captures (the most recently published and the
most recently captured) to ensure sufficient motion has occurred between the
two to warrant publishing a new image. This will help reduce publication of nearly
identical images and, as a consequence, reduce bandwidth consumption.
The “Minimum Number of Objects” slider bar (Figure 3.16) specifies the number
of objects needed to change for a capture to occur. An object is defined as a
number of pixels, as set by the “Object Size Level” (Figure 3.18). The fewer
objects you have set, the more “sensitive” the screen capture is.
P 10
P 11
ACCORDENT CAPTURE STATION V4.3 USER MANUAL
ChAPTER 3 - Configuring Accordent Capture Station
General Settings
The “Object Color Difference Level” (Figure 3.17) allows you to set the amount of
change in colors that will trigger a screen capture. When dealing with computers
there are the three primary base colors: Red, Green and Blue (a.k.a. RGB). Each
of these colors can have a numerical value of 0 to 255. If you have “Any Color”
selected, any of these three colors meeting the numerical value you specified
will meet the criteria for a screen capture. If you have “All Colors” selected, then
all three colors need to meet the numerical value that was specified in order to
meet the criteria for a screen capture. With this in mind, selecting the "Any Color"
option with a lower color difference will make the screen capture more
“sensitive.”
The “Object Size Level” (Figure 3.18) allows you to manage motion-sensitivity by
the size of an object i.e., the minimum amount of change, as defined by an amount
of screen area calculated in pixels. The smaller the object size specified, the smaller
the movements that will register motion.
General Settings
detection. The scan speed is best when it says fast or very fast. If your settings are
too sensitive and your processor speed is not sufficient, you may see the speed go
to slow or very slow. If this occurs, it is highly recommended that you lower some of
your sensitivity settings. To turn the test off, select the “Off” radio button.
Properties
To set the properties for the Capture Card click the Properties button (Figure 3.23).
This properties page (Figure 3.24) allows you to modify the input image of the
device connected to the RGB card. You can modify color levels and image
positioning, if your input image needs adjustment.
If you modify any of these options, you can click the Restore Defaults button to get
back to the original settings. The Properties window can also be accessed from the
Motion Detection tab as well as the main Accordent Capture Station screen.
Figure 3.24
The “Motion Resizing Options” (Figure 3.19) enables you to alter the screen resolution
of the input device. This can be used to narrow the amount of screen area that is
analyzed for motion during a presentation. It should be noted, however, that the
image captured will reflect the full screen area of the input device and will not be
cropped as a result of using this feature.
The “Motion Ignore Area” allows you to “cut out” the bottom portion of the screen
(Figure 3.20). This can be beneficial if, for example, you would not like to scan the
task bar. The reason you may not want to scan the task bar is because, depending
on the sensitivity settings you have set, the motion detection can potentially pick
up the time changing on the task bar. To enable this option, check the box next
to “Ignore Bottom of Screen” and then specify the amount of lines you would
like to exclude.
If the task bar has not been altered, excluding 30 lines will generally be sufficient to
exclude the task bar. Keep in mind that the output image will still show the excluded
portion of the screen, but will not analyze it for motion.
Once you finish configuring the capture settings, you can test the result by using the
“Capture Test” (Figure 3.21). To turn the test on, click the “On” radio button under
the “Capture Test.” While this is running, you will be able to see the actual input
device and what is being captured. This will allow you to adjust settings to configure
the motion detection perfectly for what you are doing. With the “Capture Test,” you
can set the “Capture Timer” (Figure 3.22) to the time increment you would like it to
scan for motion. The “Capture Test” cannot be changed while the test is running.
The test will also show you the scan speed and the status of the motion
P 12
P 13
ACCORDENT CAPTURE STATION V4.3 USER MANUAL
ChAPTER 3 - Configuring Accordent Capture Station
General Settings
Horizontal Position
The horizontal Position control allows you to move the image in the RGB window
left and right. The number displayed is the number of pixels from the horizontal sync
to the point at which capturing starts.
Horizontal Size
The horizontal Size control allows you to change the width of the image in the RGB
window.The number displayed is the total number of pixels on one line (horizontal total).
General Settings
PROJECT OPTIONS
Since you can have multiple Accordent Capture Stations, the "Station ID" will help you
keep track of which presentations came from which station. This number will appear
in the final link to view the presentation as well (Figure 3.26).
On the publish folder name settings, select automatic if you would like to have the
Accordent Capture Station automatically generate a project name or select manual if
you would like to enter a custom name. Selecting manual will also enable you to
pre-publish a presentation link prior to initiating a presentation (Figure 3.27).
Phase
If the image displayed in the RGB window is distorted, it may be that the RGB signal
is being sampled close to the transition between pixels. The Phase control allows
you to alter the point at which the RGB signal is sampled.
You can also start and stop a presentation from the Accordent Capture Station
remotely. To enable this feature, check “Web Controller Enabled” (Figure 3.28).
Next, enter the port number you wish to use for remote access.
Vertical Position
The Vertical Position control allows you to move the image in the RGB window up
and down. The number displayed is the number of lines from the vertical sync to the
line at which capturing starts.
If you have a Crestron or AMX, device you can enable the Telnet Controller in order
to tie into your existing room control system and control the Accordent Capture
Station from either of these devices. To enable this feature, make sure the check
box next to "Telnet Controller Enabled," is selected (Figure 3.29).
Black Level
At the beginning of each line, the RGB source must be sampled to measure the
black level. This sample is used as a reference for determining the brightness of the
pixels on the line. The Black Level control allows you to specify the position at which
the black level of the RGB signal is sampled. It is unlikely that you will need to modify
this option.
Next, enter the port which will be used for the line of communication with either of
these devices.
Brightness
The Brightness control allows you brighten or darken the image.
Finally, enter a username and password which has access to use this functionality
from your device.
The project “Work Folder” is used to specify the location of the locally saved
project. You can either browse for the location or create a new folder for your
presentations (Figure 3.30).
Figure 3.25
Contrast
The Contrast control allows you to alter the difference between the light parts of the
image and the dark parts of the image.
Sample Rate
The Sample Rate allows you to set how often the RGB card will scan the input
source and send the data to the computer. This is loosely similar to the scan rate on
your monitor. The lower the number, the higher the CPU consumption.
When you are completely finished, click “Save” to save your newly created profile
or “Cancel” to cancel out of this screen.
P 14
Figure 3.27
Figure 3.26
Figure 3.28
Figure 3.29
Figure 3.30
P 15
ACCORDENT CAPTURE STATION V4.3 USER MANUAL
ChAPTER 3 - Configuring Accordent Capture Station
General Settings
This is what the Accordent Capture Station main screen will look like when accessed
remotely (Figure 3.31).
Figure 3.31
General Settings
INTERFACE OPTIONS
Interface (Figures 3.32-3.40 on page 18)
The “Load Interface” drop down (Figure 3.33) allows you to automatically load a
specifc interface when you launch the Accordent Capture Station or load a specifc
settings file. If you select “Last Selected Interface” then which ever interface was last
used will be loaded.
The “Interface Folder” option is used to browse to the directory where your
interfaces reside. If you have a central network location for your interfaces, then
you can point to that directory. This allows you to manage one set of interfaces
for all users if you have multiple Accordent Capture Stations (Figure 3.34).
chaptering
There are a few options for producing chapters. The “Automatic (Screen
Capture)” check box will create a chapter point for every image (Screen Capture)
that is taken (Figure 3.35). The “Timed Interval” allows you to specify a certain
amount of time between each chapter being created (Figure 3.36). Finally, the
“Allow Manual Chaptering" function (Figure 3.37) is used if you do not want to have
the Accordent Capture Station automatically create any chapter points. Instead
you will be able to enter in a chapter name and manually create chapter points
from the Show Capture window during an event (please note that if this feature is not
enabled you will not see the manual chapter section on the Show Capture window).
Auto Chapter Format
If you set up the Accordent Capture Station to automatically create your chapter
points, you have a few options for how those chapter points are named. The
chapter name will consist of either an incremented number, time value or blank
field. In addition, you can add a prefix or suffix to that value by simply checking the
box next to prefix or suffix. This prefix/suffix can consist of alphanumeric values
(Figure 3.38).
Break Options
The Break In/Out feature allows you to place points in your presentation in order to
remove the segments inbetween those points for On Demand viewing. For instance,
if you add a Break In marker at 5:00 minutes in your presentation and then a Break
Out marker at 5:30, you will be able to have those 30 seconds automatically removed
from your On Demand presentation. In order to enable this feature, select the "Enable
Break In/Out (Main Screen)" check box (Figure 3.39). Once selected, you will see a
new section on the main screen (Figure 3.40). During your live presentation, you will
be able to click the Break In and Break Out buttons to add break points for the
Accordent PresenterPLUS project file. Please note that the actual removal of video
segments takes place in the Accordent PresenterPLUS tool.
P 16
P 17
ACCORDENT CAPTURE STATION V4.3 USER MANUAL
ChAPTER 3 - Configuring Accordent Capture Station
General Settings
Web Content
Figure 3.32
WEB CONTENT
The “Web Content” screen (Figure 3.41) is used to specify where web content, such
as the html files, will be published.
Figure 3.41
Figure 3.33
Figure 3.34
Figure 3.35
Figure 3.38
Figure 3.36
Figure 3.42
Figure 3.37
Figure 3.43
Figure 3.39
Figure 3.40
Once the Web Content screen is displayed, the fields should be completed
as follows:
In the “Web Server URL” field, enter the URL that will link the audience to the
interface graphics (Figure 3.42).
Once the “Web Server URL” field is completed, complete the “Upload Type”
field. The “Upload Type” field is used to designate whether the presentation
will be uploaded to a web server using an FTP/SFTP server or Universal
Naming Convention (UNC).
There are a few things to note about the chaptering functionality. In the event
you have more than one of the chaptering types selected at the same time, the
following priorities will stand true. First priority is the Manual Chaptering, second is
Timed Interval and last priority is the Automatic (Screen Capture) method. Also,
if you leave the manual chaptering text box blank (if the Allow Manual Chaptering
is enabled) and click the add chapter button, the Accordent Capture Station will
use the automatic chaptering format for the name of the chapter. If you have
manual capture on and you click capture an image while having the automatic
chaptering option enabled, the Accordent Capture Station will automatically
create a chapter point.
P 18
An FTP/SFTP server is the more common upload method, particularly if the web
server is off-site and/or managed by a third-party. A UNC path is typically used
only when the web server is on-site and managed internally.
To use an FTP/SFTP upload server, select “FTP” or “SFTP.” To use a UNC path,
select “UNC” (Figure 3.43).
P 19
ACCORDENT CAPTURE STATION V4.3 USER MANUAL
ChAPTER 3 - Configuring Accordent Capture Station
Web Content
Web Content
Password Field
In the “Password” field (Figure 3.47), enter the password for the FTP/SFTP Server.
If FTP/SFTP is selected, the “FTP/SFTP Upload Settings” menu will appear
containing several FTP/SFTP-related fields (Figure 3.44).
Figure 3.44
Directory Field
The “Directory” field (Figure 3.48) gives the presenter the option of putting a
presentation in a pre-existing FTP/SFTP directory. To put a presentation in
an FTP/SFTP directory, enter the directory in the Directory field.
Port Field
The “Port” field (Figure 3.49) is used to specify on which port you would like your
content to be transferred to your server.
Figure 3.45
Figure 3.46
Figure 3.47
Figure 3.48
Figure 3.49
Figure 3.50
Figure 3.51
Connect Type
The connect type (Figure 3.50) allows you to specify whether your server has
a “Passive” or “Active” connection type.
Once the “FTP/SFTP Upload Type” fields have been completed, the user has
the option of testing the FTP/SFTP settings. To test the FTP/SFTP settings, click
“Test FTP/SFTP Connection” (Figure 3.51).
If FTP/SFTP is the selected upload type, complete the FTP/SFTP Server,
User Name, Password, Directory, and Port fields as follows:
If the FTP/SFTP settings have been correctly entered, an “OK” message will
appear (Figure 3.52). If the FTP/SFTP settings have been incorrectly entered,
an “Error” message will appear (Figure 3.53).
Figure 3.52
Figure 3.53
FTP/SFTP Server Field
In the “FTP/SFTP Server” field (Figure 3.45), enter the IP address for the FTP/SFTP
Server that will be used to publish the presentation.
User Name Field
In the “User Name” field (Figure 3.46), enter the User ID for the FTP/SFTP Server.
P 20
P 21
ACCORDENT CAPTURE STATION V4.3 USER MANUAL
ChAPTER 3 - Configuring Accordent Capture Station
Web Content
Web Content
If UNC is the selected upload type, it is necessary to complete the “Upload Path”
(Figure 3.54).
Figure 3.56
To create a UNC upload path, simply enter the UNC path in the “Upload Path”
field (Figure 3.55).
Figure 3.54
Figure 3.57
Figure 3.58
Figure 3.59
Figure 3.60
Figure 3.61
Figure 3.62
Figure 3.55
Off/On Fields:
The “On” and “Off” fields (Figure 3.57) are used to enable and disable firewall
support. If firewall support is required, select “On.”
Firewall Type Fields:
The “Firewall Type” field (Figure 3.58) is used to select the type of firewall being used.
Use the “Firewall Type” drop-down menu and highlight the desired firewall type.
UNC names consist of three parts: a server name, a share name, and an
optional file path that are combined using backslashes as follows:
\\server\share\file_path
If an FTP/SFTP connection has been selected, the “FTP/SFTP Firewall
Support” fields can be used to designate a proxy server that will be used to
FTP/SFTP through the firewall (Figure 3.56).
Firewall Host Field:
The “Firewall host” field (Figure 3.59) is used to specify the IP address for the firewall.
Firewall Port Field:
The “Firewall Port” field (Figure 3.60) is used to specify the port address for the firewall.
Firewall Logon Name Field:
The “Firewall LogonName” field (Figure 3.61) is used to input the user logon.
Depending on the configuration and firewall being used, it may not be necessary
to complete this field.
Firewall Password Field:
The “Firewall Password” field (Figure 3.62) is used to input the user password.
Depending on the configuration and firewall being used, it may not be necessary
to complete this field.
P 22
P 23
ACCORDENT CAPTURE STATION V4.3 USER MANUAL
ChAPTER 3 - Configuring Accordent Capture Station
Completing The Real And Windows Media Screens
Completing The Real And Windows Media Screens
COMPLETING THE REAL AND WINDOWS MEDIA SCREENS
The Real and Windows Media screens are used to configure the encoder used to
capture the streaming content, the upload information, and the servers used to
publish the presentation Live and/or On-Demand (Figure 3.63).
Figure 3.63
Once this information has been entered, click “Configure” to launch the encoder
controller settings window for either Real or Windows (Figures 3.66-3.71).
The Microsoft and RealNetworks encoders should be completed in the same
way they would if standalone streaming content was being produced. The only
exception is that script commands must be enabled for Microsoft.
For more information on configuring the Microsoft encoder, please see the help
file within the Microsoft encoder application.
Now, you can specify the name you would like to appear in the links page your
viewer will first see to launch the presentation.
Figure 3.64
Figure 3.65
Multiple Streams and Multiple Publishing points are displayed in Figure 3.63 above.
This option may not be visible if you do not have the Multiple Streams add-on.
If you do have this add-on, you can configure Real or Windows to publish
multiple streams to multiple servers. Each stream and publishing point is
configured as described below.
Figure 3.66 (RN)
Figure 3.67 (RN)
Figure 3.68 (RN)
Figure 3.69 (MS)
If the presentation will be published “Live,” first check “Enable.” This enables the
use of the “Encoder Controller,” which is required to capture a “Live” presentation
(Figure 3.64).
If this option is not enabled, none of the settings options will appear. For example,
if you wish to create a presentation utilizing Real but not Microsoft, then enable
the “RealNetworks” tab, but not the Microsoft and vice versa.
Once the “Encoder Controller” has been enabled, enter the IP address and
port used for the encoder controller (Figure 3.65). The default port used for
the “Encoder Controller” is 9000.
P 24
P 25
ACCORDENT CAPTURE STATION V4.3 USER MANUAL
ChAPTER 3 - Configuring Accordent Capture Station
Completing The Real And Windows Media Screens
Figure 3.70 (MS)
Figure 3.71 (MS)
Completing the Podcast Screens
COMPLETING THE PODCAST SCREENS
The Podcast Media screen (Figure 3.74) is used to configure the encoder settings
used to capture the MP3 on-demand content.
If the presentation will be published with on-demand Podcast/MP3 audio, first check
“Enable” (Figure 3.75). This will enable the use of the Accordent Encoder Controller
which, in turn, is used to control the Podcast Encoder. If this option is not enabled,
none of the settings options will appear and no Podcast recording will occur.
Figure 3.74
Figure 3.76
Next, complete the “Live Stream URL” link. This link will be the URL that is
used to access the stream from your streaming server for both your Live and
On-Demand version (Figure 3.72).
Figure 3.75
Figure 3.72
Figure 3.73
The Podcast/MP3 media file will be published to each of the Web Content
publishing points that you have configured.
Once the Podcast Media Encoder Controller has been enabled with the enable
checkbox, enter the IP address and port used for the Accordent Encoder Controller
(Figure 3.76). The default port used for the Accordent Encoder Controller is 9000.
After the Live and On-Demand links have been established, select the upload
type that will be used to upload the streaming file (similar to the upload type used
for the web content) (Figure 3.73). These options are “FTP/SFTP” and “UNC or
Mapped Network Drive” (refer to the Web Content section on page 19).
P 26
P 27
ACCORDENT CAPTURE STATION V4.3 USER MANUAL
ChAPTER 3 - Configuring Accordent Capture Station
Completing the Podcast Screens
Completing the Podcast Screens
Once the Encoder Address field has been completed, click “Configure” to configure
the Podcast Encoder Settings. Immediately after clicking "Configure," the Podcast/
MPEG Encoder Settings screen will appear (Figure 3.77).
File Name
In the File Name field, enter the mp3 archive file name. The file name is automatically
generated when an Accordent Capture Station presentation is started.
Figure 3.77
Path
Enter the full path where the local archive on-demand media file is to be stored.
Once the Encoder Output settings have been completed, click the Audience tab to
access the Audience Settings screen (Figure 3.79).
Figure 3.79
Capture Audio Device
The Audio Source is specified in the Capture Audio Device dropdown list.
Audio Pin
Select the Audio Pin recording source for the selected Audio Device.
Once the Encoder Input settings have been completed, click the Output tab to
access the Output Settings screen (Figure 3.78).
Bitrate
In the Bitrate field, select the desired kilobit/sec (kbps) rate from the dropdown list.
This is the bitrate that is used to record the Podcast/MP3 file.
Figure 3.78
Click “OK” to return to the Podcast Media screen.
Once the Podcast Media screen has been completed, click “Save.”
P 28
P 29
ACCORDENT CAPTURE STATION V4.3 USER MANUAL
ChAPTER 3 - Configuring Accordent Capture Station
Security
Security
SECURITY
Once you have entered a user, the Accordent Capture Station will automatically
prompt the user for a “User Name” and “Password.” If there are no users entered
in the security table, no authorization will be required to access both the
presenter and configuration features.
The "Security" screen (Figure 3.80) is used to create new Accordent Capture
Station user accounts, including User Names and Passwords. To add a new
user, first click "Add" (Figure 3.81).
After selecting the user type, click “Update” (Figure 3.84). The added user will now
appear in the users list.
Figure 3.80
Figure 3.81
Figure 3.84
Figure 3.82
Figure 3.83
Figure 3.85
Next, type in the name of the “User Name” and the “Password” that will be
required for that user to access the Accordent Capture Station (Figure 3.82).
Next, select the type of access that the user will be provided: “Administrator”
or “Presenter” (Figure 3.83).
A user with “Administrator” rights has the ability to create presentations and also
configure the Accordent Capture Station. A user with “Presenter” rights can start
and stop a presentation, but is not able to configure the Capture Station.
P 30
To remove a user, simply highlight the name and click “Remove.”
Users can have Settings Files (.set) associated with their login. This allows all
Administrative Accordent Capture Station settings to be loaded by just logging in as
a specific user. For example, if User A logs into the Accordent Capture Station
software (from the Application or Web Console), all settings associated with that user
will be automati-cally loaded. These settings include: custom web publishing folders,
specific media servers, Blackboard Server/Login Info, Motion Detection configuration,
Screen Capture settings, project work folders, Encoder Controller settings, etc. If
User B logs into the same machine, the same would apply and all of User B’s
specific settings would be loaded automatically. If a user does not have a settings
file associated with their login or if no users are specified in the Security Tab, then
the Default Settings are applied (Figure 3.85). These setting files are also encrypted
for added security.
P 31
ACCORDENT CAPTURE STATION V4.3 USER MANUAL
ChAPTER 3 - Configuring Accordent Capture Station
Security
Accordent Blackboard Add-In
ACCORDENT BLACKBOARD ADD-IN
After selecting “Blackboard,” the Blackboard Settings screen will appear
(Figure 3.87).
After you have associated a settings file with a user, you will be able to see that user
and all other users created with the settings file tied to their account (Figure 3.86).
The Login Screens (Application or Web Console) now include a dropdown username
selection instead of the plain textbox. This allows the user name to be selected by
simply opening the list and selecting a user. With this added feature, you can use
profile names instead of user names, enabling the Login Screen to be used as a
profile selection screen. For example, you might have users named: “External,”
“Local,” “On-Demand Only,” etc.
A license is required for the Accordent Blackboard Add-In to be installed on a
Blackboard server.
Figure 3.85
Figure 3.88
Figure 3.89
Figure 3.90
Figure 3.86
If you plan to publish your presentations to your Blackboard system, check
“Publish to Blackboard” (Figure 3.88). If you do not check this box, the rest
of the settings will not be available.
If you are publishing to the Blackboard server, the next step is to select
“Live & On Demand” or “On-Demand Only” (Figure 3.89).
P 32
•
Select “Live & On-Demand” if you want to publish a link to the
live and on-demand versions of the presentation.
•
Select “On-Demand Only” if you want to publish a link for the
on-demand version only.
P 33
ACCORDENT CAPTURE STATION V4.3 USER MANUAL
ChAPTER 3 - Configuring Accordent Capture Station
Accordent Blackboard Add-In
If you select “On-Demand Only,” the link will be created on the Blackboard site only
after the presentation is completed. If you select “Live and On-Demand,” you will be
prompted to insert the location and name of the link so that the link can be made
accessible on the Blackboard server for your live broadcast.
USING SETTINGS FILES
Once the Accordent Capture Station has been configured, these settings can be
saved in a configuration file. This is accomplished by highlighting the "File"
drop-down menu and selecting “Save Settings File.”
On the Blackboard screen, first enter the “Web Server URL” for Blackboard in
the “Web Server URL” field (Figure 3.90). This is the URL that is used to browse to
your Blackboard server.
Once a configuration file is saved, it can be loaded on this or any other Accordent
Capture Station that has access to the configuration file. This provides a
shortcut for swapping configurations on the same Accordent Capture Station and
for getting additional Accordent Capture Stations configured very quickly. To load
a configuration file, simply highlight the “File” drop-down menu and select "Load
Settings File” (Figure 3.91).
After completing the “Web Server URL” field, complete the Blackboard Login
settings with your Blackboard “User Name” and “Password” information
(This is the same User Name and Password used to log directly into your
Blackboard server). This information is used to determine who is creating
the presentation and to authorize the user’s ability to publish new content
to the Blackboard server.
P 34
Using Settings Files
Figure 3.91
P 35
CHAPTER 3
Using Configuration Files
chapter 4
Starting a Presentation
ACCORDENT CAPTURE STATION V4.3 USER MANUAL
ChAPTER 4 - Starting a Presentation
Starting a Presentation
Starting a Presentation
Starting a Presentation
Once the Options page is open, you will see the preview of the skins on the left
(Figure 4.3).
CUSTOMIZING YOUR PRESENTATION DETAILS
On the main screen of the Accordent Capture Station (Figure 4.1), first select the
interface (or skin) in which the presentation will be displayed. The “Options” button
to the right of the skin selection dropdown box allows you to preview the skin you
wish to select (Figure 4.2).
Figure 4.3
Figure 4.5
Figure 4.1
Figure 4.2
Figure 4.6
Figure 4.4
Figure 4.7
Below the skin selection is the "Zoom-In" button. This will give you a larger preview
of the skin you have selected (Figure 4.4).
In the upper right hand corner, you have the same presentation details that
are available on the main page. These options allow you to enter descriptive
information, including the title of the presentation, speaker and a description
of the presentation (Figure 4.5).
Once you are satisfied with the selection, click “OK” (Figure 4.6).
There are a number of interfaces that are included with the Accordent Capture Station.
For details of a complete list of interfaces, as well as the functionality available in each by
media type and browser combination, please refer to the latest "Accordent Default
Interfaces Compatibility Chart," available through the Accordent Customer Portal under
the Web Technologies section.
P 38
P 39
ACCORDENT CAPTURE STATION V4.3 USER MANUAL
ChAPTER 4 - Starting a Presentation
Starting a Presentation
STARTING A PRESENTATION
After selecting and customizing an interface, you can either preview the image
capture or start the presentation (Figure 4.7 on page 38).
Preview
The “Show Capture” button opens a window that allows you to view the real
time input of the RGB card as well as your screen captures, according to your
sensitivity levels (Figure 4.8). This preview can also be accessed through Edit >
Administrative Settings > General > Screen Capture > Motion Detection Profile
discussed in Section 3 under the Motion Detection section.
Figure 4.8
Starting a Presentation
Capture Status
During a presentation, you will see a red or green icon in the lower right hand corner
(Figure 4.9). This is the status of the encoding process. If your encoding session
is working properly, the icon will say “Encoding” and show a green circle. If there is
an error with the encoding, it will say “Encoding Error” and have a solid red circle. If
you receive the Encoding Error message, you can click on the red circle to open a
new window titled Encoder Error Details (Figure 4.10 on next page). This window
will show you any messages received by the encoder and help you troubleshoot the
problem. If you are encoding multiple streams, and there is an issue with one of the
streams, you will receive the Encoding Error message and a red circle. In this scenario, the Encoding Error Details will show you the stream that failed but the rest
of the streams may still be active. You will also notice, in red text, a message on
this image that says (Manual Capture Enabled) (Figure 4.11). If you have the Manual
Capture disabled then you will not see this message.
The Properties button opens up the settings for the RGB card which allows you
to modify the positioning and other aspects of the RGB input feed. The Manual
Capture check box in the lower right allows you to turn off the interval-based or
image motion-based capture settings. If you have this box checked, image capture
will take place only when you click the Capture Image button. This option can be
turned on and off during a presentation if desired.
Figure 4.9
STARTING AND STOPPING A PRESENTATION
Figure 4.11
Click “Start” (Figure 4.7 on page 38) to start a presentation. If you are creating a
presentation that will not be published to a Blackboard server, the Accordent Capture
Station will begin recording the presentation, by:
• Launching the media encoders and capturing streaming content
• Capturing images that will be synchronized with the streaming content
• Publishing the presentation to the designated web and streaming servers
• Notifying you of encoding status (for more information, see Capture Status)
P 40
P 41
ACCORDENT CAPTURE STATION V4.3 USER MANUAL
ChAPTER 4 - Starting a Presentation
Starting a Presentation
Starting a Presentation With Pre-Publishing Enabled
Figure 4.10
STARTING YOUR PRESENTATION WITH PRE-PUBLISHING ENABLED
The following information is relevant if you selected the manual pre-pubilsh setting
on the Project Options tab of the General Settings screen (Figure 3.27 on
page 15). Enter a folder name, select an interface then , click “Pre-Publish” (Figure
4.16) to publish the presentation to your servers without actually starting the
presentation itself.
Once you have clicked the "Pre-Publish" button, the Accordent Capture Station will
begin to upload the necessary files to the location on the server that you specified.
When you are ready to begin a Pre-Published presentation, you can click the
Pre-Publish List button (Figure 4.15).
Figure 4.14
At the conclusion of your presentation, simply click “Stop Presentation” (Figure 4.12).
Figure 4.16
Figure 4.15
Figure 4.12
After you have clicked on the Stop Presentation button, it will take a few moments
for the Accordent Capture Station to convert the web server links and transfer the
media file to your streaming server. During this time, please do not close the Accordent
Capture Station as it may affect your presentation. After the Accordent Capture Station
has finished transferring all the necessary files, you are finished creating your rich
media presentation.
P 42
P 43
ACCORDENT CAPTURE STATION V4.3 USER MANUAL
ChAPTER 4 - Starting a Presentation
Starting a Presentation That has Been Pre-Published
Starting a Presentation That has Been Pre-Published
If you click Start, you will be prompted to accept the starting of the presentation,
to ensure you do not accidentally start a presentation which should not have been
started (Figure 4.19).
When you click the Pre-Publish List button you will be prompted to select
the project you want to actually start (Figure 4.18).
Figure 4.17
Figure 4.19
Figure 4.18
You can also start a presentation without Pre-Publishing, even if you have enabled
the Pre-Publishing option in the Administrative Settings. If you do click Start you
must enter a folder name (Figure 4.20).
Once you have highlighted one of the Pre-Published presentations, you can
load a presentation back into the Accordent Capture Station in order to change
any of the publishing information or metadata. If you do, make sure to click the
Pre-Publish button again after the changes have been made and then accept
the message to overwrite the project.
Figure 4.20
Also in the “View Pre-Published Presentations” screen, you can delete a
Pre-Published presentation, open the URL for the presentation to preview
the launch page, and actually start the presentation you have selected.
To Cancel the View Pre-Published Presentations page without performing
any action, click the Cancel button.
P 44
P 45
ACCORDENT CAPTURE STATION V4.3 USER MANUAL
ChAPTER 4 - Starting a Presentation
Starting a Presentation That Will Be Published to Blackboard
Starting a Presentation That Will Be Published to Blackboard
After the location of the Blackboard content has been specified, the encoding
will begin and the link to access the presentation will appear (Figure 4.22).
STARTING A PRESENTATION THAT WILL BE PUBLISHED TO BLACKBOARD
If you are publishing to a Blackboard server for a live broadcast, the “Blackboard
Content Administration” screen will appear (Figure 4.21). When this screen appears,
enter the name and location of the link to appear on the Blackboard server.
To the right of the link you will find a button which allows you to automatically
copy the link to your clipboard (Figure 4.23).
If you are publishing an “On-Demand Only” presentation to the Blackboard
server, this screen will appear only after you have stopped your presentation.
You will also see a timer to the left of “Stop Presentation” (Figure 4.24).
This is the amount of time you have been encoding.
Figure 4.21
Figure 4.22
Figure 4.23
Figure 4.24
This screen can also be accessed by selecting the Edit menu option and selecting
Blackboard Content Admin.
P 46
P 47
ACCORDENT CAPTURE STATION V4.3 USER MANUAL
ChAPTER 4 - Starting a Presentation
Accessing Your Presentation
Accessing Your Presentation
ACCESSING YOUR PRESENTATION
An alternative way to access your presentations, both live and on-demand, is by
launching the Accordent Capture Station Lite Portal. This Portal is included with the
installation of the Accordent Capture Station. In order to use it, you must first copy
six items onto the web server where you are publishing your content.
To prepare the Lite Portal for use, open up “My Computer” and browse to the
installation directory of the Accordent Capture Station
(C:\Program Files\Accordent\Capture Station). Once you are in that directory, you
will see a folder called Search Site. Open the search site folder. Within this folder you
will see six items; a folder called images, and files called default.asp, inc.asp,
incdef.asp, rss.asp, and v.css. These are the three things you need to copy into
the directory on your web server which you are publishing your content to. To
access this page you will open a web browser and type in the base URL to access
your presentations and add a default.asp to the end of the URL (for example: http://
mywebserver/presentationfolder/default.asp).
P 48
You can give this URL to your viewers so they can access your presentations.
Within the Search Site, you will be able to arrange all of your presentations by date,
name, etc. All of the information visible in the search portal is the descriptive
information entered into the main page of the Accordent Capture Station prior to
starting an event. All of this information is searchable, so your viewers can search
by keywords and see all of the presentations which have the search term
associated with it (Figure 4.25).
Figure 4.25
P 49