1
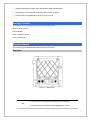
SIP PoE IP Phone
VIP-255PT
User’s manual
Version 3.0
1
Copyright
Copyright (C) 2010 PLANET Technology Corp. All rights reserved.
The products and programs described in this User’s Manual are licensed products of PLANET Technology, This
User’s Manual contains proprietary information protected by copyright, and this User’s Manual and all
accompanying hardware, software, and documentation are copyrighted.
No part of this User’s Manual may be copied, photocopied, reproduced, translated, or reduced to any electronic
medium or machine-readable form by any means by electronic or mechanical. Including photocopying, recording,
or information storage and retrieval systems, for any purpose other than the purchaser's personal use, and without
the prior express written permission of PLANET Technology.
Disclaimer
PLANET Technology does not warrant that the hardware will work properly in all environments and applications,
and makes no warranty and representation, either implied or expressed, with respect to the quality, performance,
merchantability, or fitness for a particular purpose.
PLANET has made every effort to ensure that this User’s Manual is accurate; PLANET disclaims liability for any
inaccuracies or omissions that may have occurred.
Information in this User’s Manual is subject to change without notice and does not represent a commitment on the
part of PLANET. PLANET assumes no responsibility for any inaccuracies that may be contained in this User’s
Manual. PLANET makes no commitment to update or keep current the information in this User’s Manual, and
reserves the right to make improvements to this User’s Manual and/or to the products described in this User’s
Manual, at any time without notice.
If you find information in this manual that is incorrect, misleading, or incomplete, we would appreciate your
comments and suggestions.
CE mark Warning
The is a class B device, In a domestic environment, this product may cause radio interference, in which case the
user may be required to take adequate measures.
Energy Saving Note of the Device
This power required device does not support Stand by mode operation.
For energy saving, please remove the DC-plug or push the hardware Power Switch to OFF position to disconnect
the device from the power circuit.
Without remove the DC-plug or switch off the device, the device will still consuming power from the power circuit. In
the view of Saving the Energy and reduce the unnecessary power consuming, it is strongly suggested to switch off
or remove the DC-plug for the device if this device is not intended to be active.
WEEE Warning
To avoid the potential effects on the environment and human health as a result of the presence of
hazardous substances in electrical and electronic equipment, end users of electrical and electronic
equipment should understand the meaning of the crossed-out wheeled bin symbol. Do not dispose of
2
WEEE as unsorted municipal waste and have to collect such WEEE separately.
Trademarks
The PLANET logo is a trademark of PLANET Technology. This documentation may refer to numerous hardware
and software products by their trade names. In most, if not all cases, their respective companies claim these
designations as trademarks or registered trademarks.
Revision
User’s Manual for PLANET SIP PoE IP Phone:
Model: VIP-255PT
Rev: 3.0 (2010, Jan)
Part No. EM-VIP255PTV3.0
3
TABLE OF CONTENTS
Chapter 1 Introduction........................................................................... 6
Overview............................................................................................................................6
Package Content ...............................................................................................................7
Physical Details .................................................................................................................7
Rear View ...................................................................................................................7
Front View and Keypad function................................................................................8
Icon on the LCD .........................................................................................................9
Chapter 2 Preparations & Installation .................................................11
Physical Installation ....................................................................................................... 11
Administration Interface ...............................................................................................13
Web configuration access .........................................................................................13
Chapter 3 Network Service Configurations....................................... 14
Configuring and monitoring your IP Phone from web browser ................................14
Manipulation of IP Phone via web browser .............................................................14
Network configuration via web configuration interface...........................................15
Chapter 4 VoIP IP Phone Configurations........................................... 18
General Settings..............................................................................................................18
Phone Status .............................................................................................................18
Language ..................................................................................................................18
Time and Date...........................................................................................................18
Keypad Lock ............................................................................................................21
Audio Settings .................................................................................................................22
Volume......................................................................................................................22
Ring Tone..................................................................................................................23
Codec Priority...........................................................................................................23
Contact Managemens .....................................................................................................24
Edit/Add/Delete Contact ..........................................................................................24
Import/Export Contact list........................................................................................25
Remote phone book ..................................................................................................26
Other Settings .................................................................................................................27
4
Key as Send ..............................................................................................................27
Hot Line....................................................................................................................28
Anonymous call........................................................................................................28
Auto Redial...............................................................................................................30
Auto Answer .............................................................................................................31
Missed call log..........................................................................................................32
Logo Customization .................................................................................................32
Replace Rule.............................................................................................................32
Dial Now ..................................................................................................................33
Block Out..................................................................................................................34
Chapter 5 Using the Advanced Phone Functions............................. 36
Account Setting ...............................................................................................................36
Network Setting ..............................................................................................................36
PC Port Setting .........................................................................................................36
VLAN Setting...........................................................................................................37
Maintenance Tasks .........................................................................................................38
Administrator Mode .................................................................................................38
Administrator/User Password...................................................................................39
Reboot.......................................................................................................................39
Reset to Factory ........................................................................................................39
Firmware Update ......................................................................................................40
Decryption ................................................................................................................41
System Log Export ...................................................................................................42
PCAP Trace Export...................................................................................................43
Tone Settings ...................................................................................................................43
Voice .................................................................................................................................43
Ring ..................................................................................................................................44
Appendix A Voice communications...............................................................................46
Case 1: Voice communication via IP PBX (IPX-300)..............................................46
Case 2: Call Forward Feature Example....................................................................47
Appendix B The method of operation guide ................................................................49
Call Transfer .............................................................................................................49
3-Way Conference ....................................................................................................49
Call Waiting ..............................................................................................................49
Do Not Disturb .........................................................................................................49
Mute the Call ............................................................................................................49
Appendix C Frequently Asked Questions List.............................................................50
Appendix D VIP-255PT Specifications.........................................................................52
5
Chapter 1
Introduction
1
Overview
Meeting the next-generation Internet telephony service demands, the PLANET VIP-255PT is an ideal
solution for office / home use as well as installation for Internet Telephony Service Provider (ITSP).
VIP-255PT is a SIP IP phone includes 2-voice line, 4 soft-buttons and with 802.3af Power over
Ethernet (PoE) LAN interface supported. The built-in Graphic LCD of the VIP-255PT is with blue
backlight and support multi-language on both LCD and webpage. The VIP-255PT is the delivery
platform for IP voice services that brings benefits from the VoIP technologies in your daily life. The ITSP
can diagnose and configure the phone remotely and thus reduce the cost of service.
The VIP-255PT has additional rich features including support of SMS and voice mail and etc., which
would increase ARPU for service providers. It also features self-contained, service-integrated,
intelligent phone functions, and powerful voice processing. The VIP-255PT can effortlessly deliver toll
voice quality equivalent to the regular SIP Protocol connections by utilizing cutting-edge Quality of
Service, echo cancellation, comfort noise generation (CNG) and voice compensation technology.
Meanwhile, the dual Ethernet interfaces on the IP Phone allow users to install in an existing network
location without interfering with desktop PC network connections.
Product Features
•
SIP 2.0 and 802.3af PoE
•
Multi–Language Function
•
SMS (Short Message Service) Function
•
GIPS voice engine embedded to generate stable and clear voice quality
•
Voice Codec: G.711, G.729AB, G.726, iLBC or G.723.1
•
Supports VAD, CNG, AEC, AGC and Volume adjustment.
•
Large graphic LCD with blue backlight supports
•
Call hold, call waiting, call forward, call transfer, 3-way conference, auto answer and Hotline
settings
•
Supports Caller ID/Name display and DND
•
Supports phone book, speed dial, call list, dial plan, volume adjustment and rings selection
•
Supports NAT transverse: STUN mode
•
IP Assignment: Static IP/ DHCP/PPPoE
•
Supports in-band DTMF and out-of band RFC2833 DTMF
•
Supports Proxy mode and peer-to-peer SIP link mode
6
•
Supports standard encryption and authentication (MD5 and MD5-sess)
•
The phone can be configured via keypad, web browser or remote.
•
Firmware can be upgraded through HTTP, FTP or TFTP.
Package Content
The contents of your product should contain the following items:
SIP PoE IP Phone Unit
Power adapter
Quick Installation Guide
User’s manual CD
Physical Details
The following figure illustrates the front/rear panel of IP Phone.
Rear View
Figure 1-1. Rear Panel
RJ-45 connector, to maintain the existing network structure,
PC
connected directly to the PC through straight CAT-5 cable
7
RJ-45 connector, for Internet access, connected directly to
Switch/Hub through straight CAT-5 cable.
LAN
The LAN interface also can be connected with 802.3af PoE switch or
converter for power supply.
5V DC Power input outlet
DC 5V
Handset
LNote
RJ-11 connector, connected directly to the Handset.
Please don’t connect PoE injector and AC adapter to
VIP-255PT at the same time, this may make the effect of
current pulse and then cause device damage. Be noted to power
the SIP IP phone either from 802.3af PoE or AC adapter.
Front View and Keypad function
Figure 1-2. Front Panel
Keypad Description
LCD Display
Message LED
Power LED
Menu and all status shall be displayed for users.
The LED will be lighted when it receives new message.
It will show the power status, it will be on if the phone is powered, off
8
if the phone is not powered.
The screen will display labels for these keys, to identify their
Hot Key
functions.
Navigation Keys
Use the navigation keys to navigate in the display menus and confirm
and cancel actions.
1. If you have set the voicemail number, clicking this button when
you have new voice mails on the server, it will call out
MESSAGE
automatically. Or it will turn to the Voice Mail setting page.
2. Turn the cursor left in the menu status.
1. During a conversation, press this button to mute the active call.
Press it again to resume the conversation.
MUTE
2. Turn the cursor right in the menu status.
3. Switch the default line when the phone is idle.
CONF
TRAN
RD
Press this button can make conference function.
To transfer an active call (incoming call answered or outgoing call
accepted) to another devices.
Press to dial the last dialed number when the IP Phone is off-hooked.
To switch between the usage of the handset and the speaker
Handfree
devices.
Icon on the LCD
When the phone is in different mode, the LCD display shows different icons.
Graphic Icon Description
Network status icon: Flash in the case of Ethernet linking failure.
Account registering
Fail to register to the server
9
Account register successful
Missed calls
Call in
Call out
Input method: all letters and numbers
Input method: numbers
Input method: letters in lower case
Input method: letters in upper case
Mute microphone
Call held
Voice mail
SMS
Call Fforward
DND (Don’t disturb)
Auto Answer
In handset mode
In speaker mode
10
Chapter 2
Preparations & Installation
2
Physical Installation
VIP-255PT: 802.3af PoE SIP IP Phone (2 x RJ-45, 1 x PoE for LAN interface)
Step 1: Connecting Handset
Handset
Figure 2-1 handset installation
Step 2:
Connecting Power AC Power and Network
Plug the Ethernet cable into the back of the base station.
Plug the other end of the Ethernet cable into your already
prepared network connection.
Figure 2-2 LAN/PC port installations
11
Power Adapter (5V DC)
NOTE: Use only the power adapter shipped with the
unit to ensure correct functionality.
Figure 2-3 power adapter installations
LNote
Please don’t connect PoE injector and AC adapter to
VIP-255PT at the same time, this may make the effect of
current pulse and then cause device damage. Be noted to power
the SIP IP phone either from 802.3af PoE or AC adapter.
Step 3:
Adjust the stand angle.
Press and hold the button of right side to change the
stand mount angle.
Figure 2-4 stand angle adjustment
12
Administration Interface
The IP Phone provides GUI (Web based, Graphical User Interface) for machine management and
administration. Key pad administration also available for simple configuration.
Web configuration access
To start IP Phone web configuration, you must have one of these web browsers installed on computer
for management
•
Microsoft Internet Explorer 6.0.0 or higher with Java support
Default IP address of IP Phone is 192.168.0.1. You may now open your web browser, and insert
http://192.168.0.1 in the address bar of your web browser to logon IP Phone web configuration page.
IP Phone will prompt for logon username/password, please enter: root / null (no password) to continue
machine administration.
ÍNote
In order to connect machine for administration, please
locate your PC in the same network segment (192.168.0.x)
of IP Phone. If you’re not familiar with TCP/IP, please refer
to related chapter on user’s manual CD or consult your
network administrator for proper network configurations.
13
Chapter 3
Network Service Configurations
3
Configuring and monitoring your IP Phone from web browser
The IP Phone integrates a web-based graphical user interface that can cover most configurations
and machine status monitoring. Via standard, web browser, you can configure and check machine
status from anywhere around the world.
Manipulation of IP Phone via web browser
Log on IP Phone via web browser
After TCP/IP configurations on your PC, you may now open your web browser, and input
http://192.168.0.1 to logon IP Phone web configuration page.
IP Phone will prompt for logon username/password: root / null (without password)
Figure 3-1. Login prompt page
When users login the web page, users can see the IP Phone system information like firmware version,
company…etc in this main page.
14
Figure 3-2 main page
Network configuration via web configuration interface
Execute your web browser, and insert the IP address (default: 192.168.0.1) of VIP-255PT in the
address bar. After logging on machine with username/password (default: root / no password), browse
to “Network” --> “LAN Settings” configuration menu:
Figure 3-3. LAN port setting page
LAN Parameter Description
IP address
LAN IP address of IP Phone
Default: 192.168.0.1
15
Subnet Mask
LAN mask of IP Phone
Default: 255.255.255.0
Default Gateway
Gateway of IP Phone
Default: 192.168.0.254
After confirming the modification you’ve done, please click on the Confirm button to apply settings and
the machine will be reboot to make the settings effective.
Connection Type
Data required.
Obtain an IP Address Automatically
The ISP will assign IP Address, and related information.
In most circumstances, it is no need to configure the
Use the Following IP Address
DHCP settings.
The ISP will assign PPPoE username / password for
Behind xDSL Modem (PPPoE)
Internet access,
PC Port Parameter Description
Figure 3-4. PC port setting page
Field Type
Bridge
Router
Description
If you select the Bridge mode, then the two fast enternet port will be
transparent.
If you select the Router mode, the SIP phone will work as a router.
16
After confirming the modification you’ve done, Please click on the Confirm button to apply settings and
the machine will be reboot to make the settings effective.
L Hint
Please consult your ISP personnel to obtain proper PPPoE/IP
address related information, and input carefully.
If Internet connection cannot be established, please check
the physical connection or contact the ISP service staff
for support information.
17
Chapter 4
VoIP IP Phone Configurations
4
General Settings
Phone Status
You can view the status of your phone using the Phone interface or the Web interface.
This option allows you to review: IP, MAC, Firmware version, etc.
To check the Phone Status via Phone interface:
Press Menu and Enter to check the phone status.
To view the Phone Status via Web interface:
Open the web browsers and input the IP Address http://LAN IP Address, enter the account and
password (default account is root, no password), choose the Status directly to check the status.
Language
The default Phone interface language is English. The Web interface language will depend on your
computer OS. It will automatically match the language of your computer.
It also supports multi-languages. You can change the language for the phone user interface and the
web user interface separately.
To change the language via Phone interface:
1. Press Menu->Settings->Basic Settings->Language.
2. Scroll through the list of available languages.
3. Press the Save hot key when the desired language is highlighted. The language appears on the
graphic display will be changed to the one you chosen.
Time and Date
The time and date appears on the idle screen of the IP phone. If the phone can not obtain a time and
date from the call server, please contact your system administrator if the time or date is incorrect. You
can set the time via the SNTP server which is used to synchronize the time.
To change the Time and Date via the Phone interface:
18
1.
Press Menu->Settings->Basic Settings->Time & Date.
2.
If SNTP Settings is chosen, the phone will automatically get the time from the specific NTP Server.
Use the navigation keys to highlight the specific option and the relating changes. You can set the
Time Zone, NTP Server1/Server2, Daylight Saving respectively.
3.
If Manual Setting is chosen, the time can be set manually. Use the navigation keys to highlight the
option and enter the specific date and time.
4.
Press Save hot key, the time appears on the idle screen will be changed. Press Back hot key to
return to the previous screen.
To set the time format via the Phone interface:
1. Press Menu->Settings->Basic Settings->Time & Date-> Time & Date Format.
2. Use the Switch hot key to choose a preferred time format: 12 hour or 24 hour.
3. Press the navigation keys to choose Date Format, use the Switch hot key to choose a preferred
date format, the IP phone can support 7 kind of date display format.
4. Press the Save hot key to save the changes and return to the previous screen.
To change the Time and Date via Web interface:
Choose Phone->Preference to do the relating changes. You can also change the Update Interval
which specifies the time frequency that the phone refreshes the time automatically. Please refer to the
19
instruction above for the parameters’ detail.
To change the Daylight Saving Time via the Phone interface:
1. Press Menu->Settings->Basic Settings->Time & Date->SNTP Settings->Daylight Saving.
2. Press the Switch hot key to choose Off/On/Automatic options.
3. Press the Save hot key to save the changes.
To change the Daylight Saving Time Settings via the Web interface:
1. Choose Phone->Preference->Daylight Saving Time to do the relating changes.
2. Choose Enable option, then you can set the Daylight Saving Time automatically.
3. Choose Automatic. There is a table named as AutoDST.xml has been saved in the configuration file,
If the table includes daylight saving time of your time zone, it will show the Fixed Type: By Date or
By Week. And the daylight saving time is unchangeable, unless to update the AutoDST.xml via auto
provision.
ÍNote
By default the time zone is +8 China (Beijing), Daylight
Saving Time is Automatic.
20
Keypad Lock
You can lock the keypad of your phone when you are temporarily not using it. This function helps you to
protect your phone from unauthorized use. You can lock the following specific keys:
Field
Description
The Menu hot key can not be used until unlocked. You can not access
Menu Keys
the menu of the phone.
The hard function keys can not be used until unlocked. You can not
Function Keys
access the function keys, such as History, Addr, DND, Menu,
MESSAGE, MUTE, CONF, TRAN, RD Keys, etc.
All of the keys can not be used until unlocked. You can only use the
All keys
phone to answer the incoming calls.
You can only use the phone to answer the incoming calls(But can not
Lock&Answer
hung up the call by your party. Or enter the menu pages to do some
configurations.
To enable keypad lock via Phone interface:
1.
Press Menu->Settings->Advanced Settings, enter the password, and then press Enter hot key
to enter.
2.
Use the navigation keys to choose Keypad Lock option.
3.
Use the Switch hot key to highlight the one you want to lock.
4.
Press Save hot key to active the change, and Back hot key to return to the previous screen.
5.
The icon
6.
If you choose Lock&Answer, it will show the icon
will be disappeared on the top right corner of the idle screen.
and
on the user interface.
To unlock the phone via Phone interface:
1.
Press Menu hot key, you are prompted for the password.
2.
Enter the password, then press Confirm hot key, the phone is unlocked.
3.
The icon will be disappearing from the idle screen.
4.
If you choose Lock&Answer, you have to enter Menu->Settings->Advanced Settings->Keypad
Lock to disable this option.
To enable keypad lock via Web interface:
Choose Phone->Preference->Keyboard Lock to do the relating changes. Please refer to the
21
instruction above for the parameters’ detail.
ÍNote
1. The default password for unlock is null (no password).
2. Users can make emergency calls when the phone is locked.
Audio Settings
Volume
You can adjust the volume of handset/speaker/Ring.
To adjust the ring volume when you are in idle status:
1.
Press Menu-> Settings->Basic Settings->Phone Volume.
2.
Scroll to Ring Volume, and press Enter hot key, use the MUTE/MESSAGE key to adjust the
volume.
3.
Press Ok hot key to save the change and get back to the Basic Setting page.
To adjust the volume when you are in an active call:
When Handset/Hands-free mode is activated, press up/down navigation keys to a comfortable level.
ÍNote
The volume can only be adjusted via Phone interface.
You can also adjust the ring tone volume by the following way:
When the phone is in idle status, press the Volume Adjustment Bar to a comfortable level.
When you adjust the ring volume to 0, or press the Silence hot key when there is incoming call, the icon
will be shown on the LCD. Press the Volume Adjustment Bar to adjust the volume, and the icon will
disappear.
22
Ring Tone
You can adjust the type and volume of the ring tone.
To adjust the Ring Style via Phone interface:
1. Press Menu->Settings–>Basic Settings->Ring Tone->Enter.
2. Use the up/down navigation keys to highlight the specific one.
3. Press Save hot key to save the change or Back to cancel.
To change the Ring Tone Type via Web interface:
Choose Phone->Preference->Ring Type, highlight the specific one in the pull-down menu, then click
the Confirm button to save the changes.
Codec Priority
The IP phone supports the following voice Codecs:
PCMU, PCMA, G723_53, G723_63, G729, G722, G726-16, G726-24, G726-32 and G726-40.
To set the priority of the support Codecs:
1. Choose Account-> Codecs.
2. Use the navigation keys to highlight the desired one in the Enabled/Disable Codecs list, and press
the
/
to move to the other list.
3. Click Confirm to save the change.
ÍNote
Codec Selection can only be set via Web interface.
23
Contact Managemens
Edit/Add/Delete Contact
You can store a large number of contacts in your phone's directory. You can add, edit, delete, dial, or
search for a contact in this directory.
To add a contact via Phone interface:
1. Press Menu->Directory->Contacts->Enter.
2. Press the Add hot key to enter the add contact page; enter Name, Office/Mobile number, Account,
and other information of the contact from the keypad. Use the 2aB hot key to switch between
numeric and upper/lower case alphanumeric modes.
3. Press Save hot key to save the change or Cancel hot key to exit.
To edit/delete a contact via Phone interface:
1. Press Menu->Directory->Enter->Contacts->Enter.
2. Use the navigation key to highlight the one you want to delete, press Option.
3. Use the navigation key scroll to Delete,press OK to pop up the following window:
4. Press OK hot key to confirm, or Cancel to cancel the option.
To move a contact in History to Contacts via Phone interface:
1. Press History hot key to enter the call history list.
2. Use the navigation keys to highlight a record, then press the Option hot key to pop up the frame,
highlight Add to Contacts option, then press the OK hot key to enter the edit interface.
24
3. Press the 2aB hot key to switch the input mode.
4. After the edition, press the Save hot key to save the change. Then you can go to Contact list to
check the record.
5. You can also choose to move a contact in call history list to blacklist by the same way.
ÍNote
If the contact is moved to the blocklist, then the call from
this contact can not get through.
To edit a contact record in History via Phone interface:
1. Press History hot key to enter the call history list.
2. Choose a record, press the Option hot key, choose Detail option, and press Ok hot key to enter.
3. Press Edit hot key to edit the number, then press the Send hot key to call out.
To add/delete/edit the contact list via the Web interface:
Choose Contacts->Local Phone Book to do the relating changes. Please refer to the instruction
above for the parameters’ detail.
Import/Export Contact list
Import/Export Contact List via Web interface:
1. Choose Contacts->Local Phone Book option.
25
2. Browse the specific contact list file in .XML format, and then click Import button. The imported
contact lists will be shown in the directory.
3. You can also press the
button behind the special number to dial out via web interface.
4. Click the Export button to export the contact list.
ÍNote
Import/Export Contact List can only be set via Web
interface.
Remote phone book
The IP phone has directory itself, but in the enterprise applications where there are a need for a
common directory. For the maintenance and the update of it, the common directory are usually carried
out on the server or IPPBX to maintain up-to-date public directory, terminal users need to have remote
directory function. When the users browse the remote directory, the terminal will check and download
26
the latest information released on the server in time, and display on the terminal for the user.
To set the Remote phone book via Web interface:
1. Choose Contacts-> Remote Phone Book.
2. Input the Phone book URL and the phone book name, then click the Confirm button to save the
change.
3. After the setting, press Dir hot key to check the first remote phone book you just added:
4. Choose a special one, and press the Enter hot key, it will go to the corresponding URL address to
download the contact information for you.
ÍNote
1. This IP phone can support 5 remote phone books at most.
2. Every contact in the remote phone book can set several
phone numbers.
Other Settings
Key as Send
Users can set a specific button (“#” or “*”) to active as the send button.
To set the send key via the IP phone interface:
1. Press Menu->Features->Key as send->Enter to enter the configuration page.
27
2. Press the Switch hot key to choose a button that you want to use as the send key: “#”, “*”, or
disable this option.
3. Press the Save hot key to save the changes.
To set the send key via the Web interface:
1. Choose Phone->Features->Key As Send.
2. Highlight the specific one in the pull-down menu, then click the Confirm button to save the change.
Hot Line
To set the hot line number via the IP phone interface:
1. Press Menu->Features->Hot Line->Enter to enter the configuration page.
2. Enter the hot line number and press the Save hot key to save the changes.
3. When you pick up the handset or press the speaker button, it will dial out the number automatically.
To set the Hot Line via the Web interface:
1. Choose Phone->Features.
2. Input the Hotline Number, then click the Confirm button to save the change.
Anonymous call
To set the anonymous call via the IP phone interface:
1. Press Menu ->Features->Anonymous Call ->Enter to enter the configuration page.
2. By the Switch hot key, you can choose the Line ID.
3. Press the navigation keys to enter and choose whether to enable the anonymous call function. This
feature allows the subscriber to make a call with the display of their calling identification information
blocked.
28
4. If you want to realize this function by server, please choose and enter the Call On Code and Call
Off Code. When you choose to enable the anonymous call function on your IP phone, it will send
information to the server, and the server will open the anonymous call function for your IP phone
automatically.
5. Press the navigation keys to enter and choose whether to enable the anonymous rejection function.
The feature allows the subscriber to reject all calls from callers who have blocked the display of
their calling identification information (calling number and calling name).
6. If you want to realize this function by server, please choose and enter the Reject On Code and
Reject Off Code. When you choose to enable the rejection function on your IP phone, it will send
information to the server, and the server will open the anonymous rejection function for your IP
phone automatically.
7. Press the Save hot key to save the changes.
To set anonymous call via Web interface:
1. Choose Account->Basic.
2. Choose Anonymous Call/ Anonymous Call Rejection option to do the configuration.
3. Click the Confirm button to save the change.
29
Auto Redial
Auto redial is a telephone feature that redials a busy number a fixed number of times before giving up.
To set auto redial via the IP phone interface:
1. Press Menu->Features->Auto Redial Settings->Enter to enter the configuration page.
2. By the Switch hot key, you can choose whether to enable the auto redial function.
3. Press the navigation keys to choose and set the redial interval. It is measured by seconds.
30
4. Press the navigation keys to choose and set the redial times.
5. Press the Save hot key to save the changes.
To set auto redial via the Web interface:
1. Choose Phone->Features->Auto Redial.
2. Choose Enabled or Disabled in the pull-down menu, then click the confirm button to save the
change.
ÍNote
If you enable the auto redial function, then without
operations for 5 seconds in the auto redial interface, it
will turn to the idle interface automatically.
Auto Answer
Auto-answer allows an incoming call to be answered without requiring any action by the user. This is a
useful feature for people who have difficulty using their hands or fingers, who have a visual impairment,
or who have a cognitive impairment. You can set this function to a special account.
To set Auto Answer via the IP phone interface:
1. Press Menu->Settings->Advanced Settings->Accounts->Line X->Enter, then use the
navigation keys to choose Auto Answer option.
2. Press the Switch hot key to enable or disable the auto answer function. The default is Disabled.
3. Press the Save hot key to save the changes.
To set Auto Answer via Web interface:
1. Choose Account->Basic->Auto Answer.
2. Choose Enabled or Disabled in the pull-down menu, then click the Confirm button to save the
change.
31
Missed call log
Defines whether to save the missed calls to the call history record. This function can only be set via the
Web interface:
1. Choose Account->Basic->Missed call log.
2. Choose Enabled or Disabled in the pull-down menu, click confirm button to save the change.
Logo Customization
You can upload your own logo which will be shown in the idle screen.
1. Prepare the desired the logo file which is
--in BMP format
--max pixels: 132*64
-- It can be black and white, or only be monochrome with 2 gray scales at most.
2. Run PictureEXDemo.exe, choose Add button->choose the specific logo file->click Convert,
and then close the software.
3. A new-built folder named adv with a .dob file will be created.
4. Choose Phone->Features->Logo via the Web interface, press Browse button, and choose
the .dob file just created by the software.
5. Press Upload button to complete the Logo Customization. You will find the desired logo shown on
the idle screen.
ÍNote
1. Please contact with your system administrator or service
provider for the software with PictureEXDemo.exe.
2. You can also upload the Logo by AUTO PROVISION.
Replace Rule
A dial plan establishes the expected number and pattern of digits for a telephone number. This includes
country codes, access codes, area codes and all combinations of digits dialed. For example if you set
the Prefix as 0 and Replace as 008 (Taiwan country code), when you dial 05702000 out, the number
will be replaced by 0085702000 automatically.
To set a Dial Plan via the Web interface:
1. Choose Phone->Dial Plan->Replace Rule.
32
2. Enter the desired Prefix and Replace.
3. Click Add/Del button to save the changes.
4. You can also delete a specific one from the dial plan list.
ÍNote
Please contact with your system administrator for the
country/area code if you want to set the Area Code.
Dial Now
Dial-now enables you to define the specific length
of any number/letter in advance(for example xxx),
next time when users dial out the 123 whose length matches the Dial-now rule, the phone will dial out
123 immediately without pressing Send button.
To set a Dial Plan via the Web interface:
1. Choose Phone->Dial Plan->Dial Now.
33
2. Enter the desired “x/.”.
3. Click Add button to save the changes.
4. You can also delete a specific one from the dial plan list by clicking Del button.
ÍNote
x represents any numbers; . represents any letters.
Block Out
The specific phone numbers can be forbidden to be called out from your IP phone.
1. Choose Phone->Dial Plan->Block Out.
2. Enter the phone number and click Add button to save the changes, or choose the specific one in
34
the list, click Del button to delete the record.
3. You can not dial out the number from your IP phone unless it is removed from the Forbidden List.
ÍNote
The numbers set in Emergency can not use the dial plan rule.
35
Chapter 5
Using the Advanced Phone Functions
5
Account Setting
Please refer to the previous part “Configuration and Registration” for the basic Account setting
information. The following table lists the instruction of the field about the advanced Account Setting.
Field Name
Description
UDP Keep-alive
Defines whether to active the phone UDP Keep-alive mechanism.
The default is Enabled.
Message
UDP Keep-alive
Interval
This parameter specifies how often the phone will send a packet to
the SIP server. Default is 30 seconds.
Login Expire
This parameter specifies the time frequency that phone refreshes
its registration. The default interval is 3600 seconds.
Local SIP Port
Local SIP port. The default min value is 5060.
RPort
The parameter allows you configuring the proxy to send responses
back to a particular address and port. The default is disabled.
SIP Session Timer
This document defines an extension to the Session Initiation
Protocol (SIP). This extension allows for a periodic refresh of SIP
sessions through a re-INVITE or UPDATE request. The refresh
allows both user agents and proxies to determine if the SIP session
is still active.
You can only configure these settings via Web interface.
1.
Choose Account.
2.
Choose Advanced to do the relating settings.
Please consult your system administrator for more information.
Network Setting
PC Port Setting
Please refer to the previous part “Configuration and Registration” for the basic Network LAN setting
information. The following table lists the instruction of the field about the Network PC Port Setting.
36
Field Name
Description
As an Bridge
If you select the Bridge mode, then the two Fast Ethernet ports will
be transparent.
As an Router
If you select the Router mode, the SIP phone will work as a router.
IP address
User could configure the PC port IP address.
DHCP Server
If you set the DHCP server on, the device connected to the PC port
will get the IP address automatically between the start IP address
and the end IP address. But if you select the bridge mode, the
DHCP server can not work.
Start IP Address
Indicate the range of the IP address.
End IP Address
Indicate the range of the IP address.
To configure PC settings via Phone interface:
1. Press Menu->Settings->Advanced Settings->Network->Enter.
2. Scroll to PC Port option, press Enter.
3. If you choose Bridge, it will return to the previous menu.
4. If you choose Router, you will be prompted to enter the IP, Subnet Mask, and DHCP Server.
5. Press Save hot key to save the changes, or Back to return to the previous menu.
To configure PC Port settings via Web interface:
Choose Network->PC Port to do the relating configuration. You can consult your system administrator
for more information.
VLAN Setting
VLAN is a group of hosts with a common set of requirements that communicate as if they were
attached to the Broadcast domain, regardless of their physical location. The following table lists the
instruction of the field about the VLAN Setting.
Field Name
Description
QoS
When the network capacity is insufficient, QoS could provide
priority to users by setting the value.
37
Local RTP Port
Define the port for voice transmission.
IP address
User could configure the PC port IP address.
WebServer
Users can choose the WebServer type: Disable, HTTP, HTTPS, or
HTTPS & HTTP.
To configure VLAN settings via Phone interface:
1. Press Menu->Settings->Advanced Settings.
2. Enter the password required, scroll to Network option, press Enter hot key, select VLAN option,
then press Enter hot key again.
3. Choose WAN Port, press Enter hot key.
4. Set the VLAN Status, and input the VID Number, Priority.
5. Press Save hot key to save the settings, or Back hot key to return to VLAN menu.
6. Follow the same way to set the PC Port option.
To configure VLAN settings via Web interface:
Choose Network->Advanced to do the relating configuration. You can consult your system
administrator for more information.
Maintenance Tasks
Administrator Mode
The phone allows two modes to configure the phone:
z
User Mode
z
Administrator Mode
Administrator mode grants unlimited access to the phone configuration on both Web and Phone
interface. User Mode can not set the parameters such as: Accounts, Network, Reset to Factory and
38
some other phone settings by the Phone interface.
Administrator/User Password
Administrator mode grants unlimited access to the phone configuration on both web and phone user
interface. The administrator/user password is used to access:
Web interface along with user name.
the advance settings of the phone such as Network, Account, Reset to Factory
Settings via the Phone interface.
The default administrator password is admin. Meanwhile the user name for Web interface access is
admin.
To change the administrator password via Phone interface:
1. Press Menu->Settings->Advanced Settings->Set admin password->Enter.
2. Enter the Current PWD, New PWD and Confirm PWD, then press the Save hot key to save the
change.
To change the administrator password via Web interface:
Choose Security, choose User Type, enter the Current Password, New Password and Confirm
Password, then click the Confirm button to save the changes, or Cancel button to cancel the changes.
Reboot
You should reboot the phone when you are challenged, e.g. after applying changes to the phone
configuration.
To reboot via Web interface:
1. Choose Upgrade->Basic.
2. Choose Reboot button.
ÍNote
You can only reboot from Web interface. Please do not power
off during reboot, or it will lead to the flash memory error.
Reset to Factory
You should reset the phone only in this case: the phone configuration was changed and the phone is
39
not functioning anymore. To maintain the configuration of the phone, you need your system
administrator or service provider’s advice.
To reset to factory via phone interface:
1. Press the Menu->Settings->Advanced Settings->Reset to factory.
2. Press the Enter hot key, you are prompted to confirm the change, press OK to reset to factory
settings, or Cancel to cancel the operation and return to previous menu.
3. It will take a few minutes to reset, please do not power off during resetting, or it will cause flash
memory error.
To reset to factory via Web interface:
1. Choose Upgrade->Basic.
2. Click Reset button.
ÍNote
If you confirm all current setting changes including contact
list, call history, account settings, etc will be lost, you
need to export the configuration first if you still want
to import the old configurations after reset. Or your phone
must be configured anew manually unless mass provisioning
is used!
To Export/Import the old configuration file via Web interface:
1. Choose Upgrade->Advanced, choose Export button to export the file to your local computer.
2. Choose Upgrade->Advanced, click Browse button, select the specific configuration file in your
local computer, choose Import button.
3. It will take a few minutes to reset, please do not power off during resetting, or it will cause flash
memory error.
Firmware Update
The phone is delivered with pre-installed firmware which allows to operate your phone flawlessly. If you
require updating the phone’s firmware please contact your system administrator. You can only update
the firmware via Web interface.
To update the firmware manually via Web interface:
1. Choose Upgrade->Basic->Browse, select the firmware file in your local computer.
40
2. Click Upgrade button to update the new firmware.
3. Please do not power off during the updating.
To update the firmware automatically via Web interface:
1. Choose Upgrade->Advanced.
2. Choose Click here to Autoprovision Now option, Click autoprovision button to update the firmware
immediately.
The parameters of the Auto-provision:
Field Name
Description
Update Protocol
The phone can be updated via TFTP, FTP or HTTP.
TFTP Server
If you choose TFTP as protocol TFTP, you need to enter the TFTP
server IP address and port.
Check new config
You can specific the period that your phone checks the new
firmware from the server: Power on, Scheduling, Disable and both.
Scheduling
You can specific the period in days which the phone checks and
updates the new firmware, the range is 1-30 days.
ÍNote
Any power interruption during the following process will
most likely lead to a flash memory error. As a result the
system cannot boot up anymore. The procedure can be only
conducted in Administrator Mode.
Decryption
This IP phone can support y000000000000.cfg and mac.cfg files encryption and decryption for user
authentication to realize security usage. If there are any encrypted y000000000000.cfg or mac.cfg files
on the server, uses can open the webpage of your IP phone. Go to Upgrade->Advanced, choose and
fill in the Specified AES Key (for y000000000000.cfg and Per-phone AES Key (for mac.cfg) option, then
click the Confirm button to decryption the files and upgrade to the new version. Shown as below:
41
ÍNote
You can ask your system administrator for the decrypt
password.
Set AES Key via phone interface:
1. Go to Menu->Settings->Advanced Settings->Set AES Key.
2. Enter the Common AES and the MAC-oriented AES.
3. Press the Save hot key to save the changes.
System Log Export
If there is any errors happened to your phone, you can export the system log and send it to your system
administrator for diagnosis.
To export the System Log:
Choose Upgrade->Advanced, select Export System Log, choose Export button to export the file to
your local computer or the assigned server.
42
PCAP Trace Export
The PCAP Trace used to record the date transport of your IP phone. If there are any errors happened in
your phone, you can export the PCAP trace and send to your system administrator for diagnosis.
To export the PCAP Trace:
Choose Upgrade->Advanced, select PCAP Trace option, click Export button to export the file to your
local computer.
Tone Settings
You can define the frequency and time period of all the following tones:
z
Dial
z
Ring Back
z
Busy
z
Congestion
z
Call Waiting
z
Dial Recall
z
Record
z
Info
z
Stutter
z
Message
z
Auto Answer
To edit the tone filed via Web interface:
1. Choose Phone->Tones.
2. Enter the frequency and time period(in ms) as the following format:
Frequency /Time Period (for example 400/200).
3. Press Confirm button to save the changes, Cancel to cancel the change.
ÍNote
1. Please contact your system administrator for more
information about the frequency and time period
parameters. You can enter up to 8 groups for each tone.
2. If the frequency is set as 0, it means silence.
Voice
To edit the Voice filed via Web interface:
1. Choose Phone->Voice.
43
2. Set the following parameters shown in the table.
Field Name
Description
Echo canceller
Defines whether to enable the echo canceller.
Voice activity detection (VAD), also known as speech activity detection
VAD
or speech detection, is a technique used in speech processing in
which the presence or absence of human speech is detected.
A comfort noise generator (CNG) is a program used to generate
CNG
background noise for voice communications during periods of silence
that occur during the course of conversation.
JITTER BUFFER
It is a shared data area where voice packets can be collected, stored,
and sent to the voice processor in evenly.
Type
To choose the type of JITTER BUFFER, adaptive or Fixed.
Delay
To set the Min Delay, Max Delay and Normal Delay parameter.
3. Press Confirm button to save the changes, Cancel to cancel the changes.
Ring
Users can group your contacts, and then set the ringing tone for each group.
To edit the Ring option via Web interface:
1. Choose Phone->Ring.
44
2. Internal Ringer Text: To set group name. For example, family.
3. Internal Ringer File: To choose a special ring tone for the group.
4. Click the Confirm button to save the changes.
45
Appendix A Voice communications
There are several ways to make calls to desired destination in IP Phone. In this section, we’ll lead you
step by step to establish your first voice communication via keypad and web browsers operations.
Case 1: Voice communication via IP PBX (IPX-300)
VIP-255PT-A
Number: 100
Number: 200
VIP-255PT-B
LAN IP Address
LAN IP Address
(192.168.0.1)
(192.168.0.2)
IPX-300
WAN IP Address
(192.168.0.50)
Figure 26.. Installation example with IPX-300
Machine configuration on the VIP-255PT:
STEP 1:
Log in IPX-300 and create two testing accounts/password: 100 / 123 (for VIP-255PT-A), and
200 / 123 (for VIP-255PT-B) for the voice calls.
STEP 2:
Please log in VIP-255PT-A via web browser, browse to the Account setting menu and. In
the setting page, please insert the Account / Password and SIP Server information
obtained from your service provider (in this sample, we’re using PLANET IPX-300 as the IP
PBX system for SIP account, call authentications), and then the sample configuration screen
is shown below:
Figure 27. Web page of VIP-255PT
46
STEP 3:
Repeat the same configuration steps on VIP-255PT-B, and check the machine registration
status, make sure the registrations are completed.
STEP 4:
To verify the VoIP communication, please pick up the telephone. Dial the destination number
to make call between SIP clients. For example, VIP-255PT-A (with number 100) with keypad
number 200 to VIP-255PT-B, or reversely makes calls from SIP client (VIP-255PT-B) to the
number 100 (VIP-255PT-A).
Case 2: Call Forward Feature Example
In the following samples, we’ll introduce the Call Forward Feature applications.
In this example, there are three VIP-255PT register to IPX-300 and VIP-255PT_A had set Call Forward
function to VIP-255PT_B. (The detail registration settings of IPX-300 and VIP-255PT please refer to the
instruction of Case 3)
VIP-255PT_A
VIP-255PT_B
VIP-255PT_C
Figure 29. Installation example with IPX-300
Machine configuration on the VIP-255PT:
STEP 1:
Please log in VIP-255PT_A via web browser, browse to the Phone -> Features setting
menu. In the setting page, please enable the Always Forward function and fill in the
Number of VIP-255PT_B, then the sample configuration screen is shown below:
47
Figure 30. Web page of VIP-255PT
STEP 2:
After set up completed, it will show the always forward icon
on the LCD screen.
Test the scenario:
VIP-255PT_C pick up the telephone and dial the number 1001(VIP-255PT_A), because VIP-255PT_A
had set up All Forward function to the number 2002(VIP-255PT_B), so the number
2002(VIP-255PT_B) will ring up then it pick up the telephone and communication with the number
3003(VIP-255PT_C).
48
Appendix B The method of operation guide
In this section, we’ll introduce the features method of operation, and lead you step by step to establish
these features.
Call Transfer
A. Blind Transfer
1. B call to A and they are in the process of conversation.
2. A carry the transfer function out (Press “TRANSFER” button) to hold the conversation with B.
3. A will be hear the dial tone then input the number of C (Follow by the “Tran” hot key).
4. A will be hear the ring back tone then hung up the handset
5. C will ring up
6. C picks up the handset and conversation with B.
B. Blind Transfer
1. B call to A and they are in the process of conversation.
2. A carry the transfer function out (Press “TRANSFER” button) to hold the conversation with B,
3. A will be hear the dial tone then input the number of C (Follow by the “#” key).
4. C will ring up.
5. C picks up the handset and conversation with A.
6. A press “Tran” hot key and hang up, then C conversate with B.
3-Way Conference
1. A and B are in the process of conversation.
2. A want to invite C to join their conversation.
3. A press “CONFERENCE” button to hold the conversation with B, and input the number of C
(Follow by the “#” key).
4. C will be ring and entry into the 3-Way conference after C pick up the handset.
Call Waiting
1. A and B are in the process of conversation.
2. C call to A and A will hear the “Be” prompt sounds.
3. A press “Answer” hot key to hold the conversation with B, and switch to conversation with C.
4. A could press “Switch” -> “Resume” hot key to switch the talking to another side.
Do Not Disturb
All incoming calls will be rejected.
1. Press “DND" hot key to enable this function.
2. Press “DND" hot key again, or hang up to cancel this function.
Mute the Call
During a call, press “MUTE" key to mute your microphone. To cancel the Mute function, press the
“MUTE" key again.
49
Appendix C Frequently Asked Questions List
Q1 : I can not register to the server?
A1 : 1. Check the IP address. If you set your LAN port in DHCP mode, please make sure that your
DHCP server is on.
2. Check your gateway.
3. Check your DNS server.
4. Make sure your account information is the same as you have got from your ISP.
5. Check whether the SIP server is on.
6. Check the SIP register port, the default value is 5060.
Q2 : I can’t get the IP address?
A2: 1.Make sure you have plugged the Ethernet cable into the LAN port.
2. Make sure that the DHCP server is on, and there are available IP addresses in the server.
3. Try to set your LAN port to static IP client mode.
Q3 : During a call, I can not hear any voice?
A3 : 1.Make sure Your handset is tightly connected with the phone.
2. Check whether you have muted the conversation or not.
3. Consult the outbound server details with your ISP.
Q4 : Have DTMF problem?
A4 : 1.Check which kind of DTMF you are using, and whether it is compatible with the server
2.Consult the payload value with your ISP
Q5 : How to change the time?
A5 : Select the time zone on the webpage.
Note: You can’t change the time manually because that our phone will automatically get the time from
the SNTP server.
Q6 : How to answer the incoming calls during a call?
A6 : If a call comes in when you are in a conversation, press the HOLD button to answer the incoming
call.
Q7 : How to refuse incoming calls during a call?
A7 : You can turn off the function of call waiting, and then our phone will refuse all the incoming calls
when you are in a conversation.
Q8 : How to send SMS?
A8 : You could edit the SMS in the MENU-> Messages->Text Messages.
Note: Make sure that the SIP server you have registered supports SMS function.
50
Q9 : How to update the firmware?
A9 : 1. Update the firmware on the webpage Upgrade-> Select and Upgrade Firmware.
2. Select the correct file you want to download to the IP Phone then click the “Upgrade” button.
Q10 : How to auto provision?
A10 : Consult the auto provision server address with your ISP.
Q11 : How to adjust volume?
A11 : During a call, press VOL+▲/ VOL-▼ key to adjust the volume of earpiece or speaker.
Q12 : How to select ring?
A12 : 1.There are eight kinds of ring styles to choose.
2. Press the VOL+▲/ VOL-▼ key on the phone to choose the ring type.
51
Appendix D VIP-255PT Specifications
Product
Model
Hardware
LAN
PC
LCD display
Speaker
Protocols and Standard
Standard
Voice codec
Voice Standard
Supplementary services
Call history
Protocols
SIP PoE IP Phone
VIP-255PT
1 x 10/100Mbps RJ-45 port
Power Over Ethernet 802.3af compliant
1 x 10/100Mbps RJ-45 port
132 x 64 dot matrix graphic LCD
Full duplex hands free speaker phone
SIP 2.0 (RFC3261), MD5 for SIP authentication (RFC2069/ RFC 2617), SIP
outbound proxy, SIP NAT Traversal Support STUN (RFC3489)
G.711: 64k bit/s (PCM)
G.723.1: 6.3k / 5.3k bit/s
G.726: 16k / 24k / 32k / 40k bit/s (ADPCM)
G.729A: 8k bit/s (CS-ACELP)
G.729B: adds VAD & CNG to G.729
Voice activity detection (VAD)
Comfort noise generation (CNG)
Acoustic echo canceller (AEC)
G.165: Line echo canceller (LEC)
Jitter Buffer
Caller ID
3-way conference
Immediate (unconditional) call forwarding
Busy call forwarding
No answer calls forwarding
Call Hold/Waiting/Transferring
Record incoming call
Outgoing call
Missed (not accepted) call history
SIP v1 (RFC2543), v2(RFC3261), TCP/IP, UDP/RTP/RTCP, HTTP, ICMP, ARP,
RARP, DNS, DHCP, SNTP, PPPoE
Network and Configuration
Access Mode
Static IP, PPPoE, DHCP
Management
Web, LCD menu keypad, auto-provision by TFTP/FTP/HTTP
Dimension (W x D x H)
184 mm x 200 mm x 48 mm
Operating Environment
0~50 degree C, 0~90% humidity
Power Requirement
5V DC, 1A
EMC/EMI
CE, FCC Class B
52
EC Declaration of Conformity
For the following equipment:
*Type of Product
*Model Number
: Multi–Language PoE IP Phone
: VIP-255PT
* Produced by:
Manufacturer‘s Name :
Manufacturer‘s Address:
Planet Technology Corp.
11F, No 96, Min Chuan Road,
Hsin Tien, Taipei, Taiwan, R.O.C.
is hereby confirmed to comply with the requirements set out in the Council Directive on the
Approximation of the Laws of the Member States relating to Electromagnetic Compatibility
Directive (2004/108/EC), For the evaluation regarding the Electromagnetic Compatibility
(2004/108/EC), the following standards are applied:
EN 60950-1
EN 55022
CISPR 16-1-1
CISPR 16-2-1
CISPR 16-2-3
EN 55024
EN 61000-4-2
EN 61000-4-3
EN 61000-4-4
EN 61000-4-5
EN 61000-4-6
EN 61000-4-8
EN 61000-4-11
(2006 + A11: 2009)
(2006 + A1: 2007, Class B)
(2007)
(2005)
(2006)
(1998 + A1: 2001 + A2: 2003)
(1995 + A1: 1998 + A2: 2001)
(2006)
(2004)
(2006)
(2007)
(1993 + A1: 2001)
(2004)
Responsible for marking this declaration if the:
⌧ Manufacturer
Authorized representative established within the EU
Authorized representative established within the EU (if applicable):
Company Name:
Planet Technology Corp.
Company Address:
11F, No.96, Min Chuan Road, Hsin Tien, Taipei, Taiwan, R.O.C
Person responsible for making this declaration
Name, Surname
Jonas Yang
Position / Title :
Product Manager
Taiwan
Place
19 Mar., 2010
Date
Legal Signature
PLANET TECHNOLOGY CORPORATION
e-mail: [email protected]
http://www.planet.com.tw
11F, No. 96, Min Chuan Road, Hsin Tien, Taipei, Taiwan, R.O.C. Tel:886-2-2219-9518 Fax:886-2-2219-9528