1
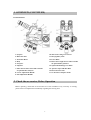
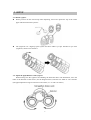
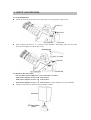
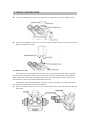
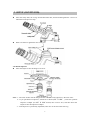
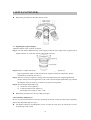
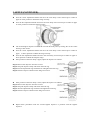
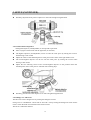
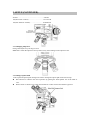
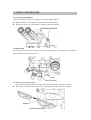
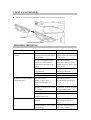
PRECAUTIONS
User Manual
To obtain the best possible performance and maximum service life from the Motic Microscope
PSM1000 (hereinafter referred to as “the PSM1000”), please read this manual thoroughly.
This manual describes all of the components available for the PSM1000 system, including
optional components available for purchase.
Avoid impacts
Do not allow any part of the microscope unit to be subjected to stress or blows during
installation and operation.
Carrying the microscope unit
Carefully carry the microscope unit by supporting its base. Do not touch any moving parts on
the microscope unit.
Installation
Place the microscope unit on a sturdy and level desk, where it will not be subjected to dust,
direct sunlight, high-temperature, high-humidity, or excessive vibration.
Keep the lenses clean
Dirty optical parts reduce image clarity. Always keep the lenses, mirrors, filters, and the bulb
free from stains, fingerprints, and dust. If the objectives and/or ocular lenses become dirty, wipe
softly in a circular motion from the center towards the outside using lens paper moistened with
alcohol.
Do not apply excessive force to the focusing knobs
Do not over-rotate the focusing knobs located at side of the main body.
Do not disassemble
Do not attempt to disassemble the microscope unit unless absolutely necessary for replacement
of specified consumable parts. Disassembly of this microscope unit may result in damage or
deterioration in performance.
Don’t insert anything into open spaces.
This may cause the microscope to perform poorly and/or invalidate your warranty.
Laser safety and use optimization
If you plan to use your PSM-1000 for laser work , you need a laser safety filter. To operate the
laser safely and properly, please see the laser and/or laser filter manufacturer’s documentation.
Motic Instruments assumes no responsibility whatsoever for the performance and/or safety of
the laser and/or laser filter used with the PSM-1000 microscope.
The PSM-1000 microscope is optimized for 355nm,532nm and 1064nm wavelength lasers.
1
WARRANTY
In the event that the Microscope PSM1000 series should prove defective in
workmanship or material, within 5 years from date of purchase, it will be repaired or
replaced, at our option, free of charge upon its return to us prepaid.
The following cases will void the warranty.
1、 Defects caused by improper usage or invalid modification.
2、 Defects caused by moving of installation, fall, and transfer after original
purchase.
3、 Defects caused by disaster, earthquake, lighting, and other force majeure
cases.
4、 Case of no warranty sheet presented upon return.
5、 No proof of date of purchase, the name of customer, and/or improper
rewriting of the required information.
6、 Changing of the consumer parts with non-registered parts.
2
1. OVERVIEW
1.1 Outline
Innovative ergonomic design, leading edge optical systems and a host of unique advanced
features make this Motic metallurgical/industrial microscope ideally suited to the needs of
manufacturing and research & development in the fields of metallurgy, semiconductors and
electronics.
(1) The PSM-1000 provides a 3-lens turret with 1X, NIR tube lens; 1X, NUV tube lens; and 2X,
visible. These lenses cover wavelengths from 355nm to 1064nm and are designed around
the new range of Wave Research Lasers. A laser safety pin is provided.
(2) The optical system has adopted a combination of ultra-long working distance objectives,
which are capable of independent correction of lateral chromatic aberration, and eyepieces
with an ultra-wide field of view.
(3) The quadruple forward facing, spring-loaded nosepiece, with adjustments located on the
side along with the turret can be easily centered using the tools provided. The turret is
placed on a dovetail mount for easy access and removal. The turret comes with colored
stickers to indicate the position of objectives.
(4) The body incorporates polarizing filter slots for easy adaptation.
(5) Various peripherals (optional), including CCD or CMOS camera adapter, Polarizer and
Analyzer are available to broaden applications.
1.2 System Configuration
The PSM-1000 Microscope unit consists of a main body, objectives, a pair of eyepieces, standard
accessories, and other optional peripheral units.
Parts list of microscope PSM-1000
Part Name
Part No.
WF10X/24
Eyepiece
Qty.
Note
2
Field number: φ24
WF15X/17
2
Field number: φ16
○
WF20X/13
2
Field number: φ12
○
SG02S0142
with eyeguard
●
Binocular: Siedentopf infinity, Erect image
Binocular Tube
SP100243
1
Interpupillary Distance: 55~75mm
Optical Path: 50:50 simultaneous observation or 100:0
●
Optical path system
Trinocular Head
SW0199BD
1
Body
SW0199BE
1
Quadruple Nosepiece
SW011715
1
Turret change over system:
2X(for visible)/ 1X(for visible and NIR) / 1X NUV
●
●
Parcenterable for each hole
●
Stroke: 50mm
Focus Block
SW0199BG
1
Operation: Coaxial system, Coarse 4mm per rotation/Fine
0.1 per rotation
Mountable Weight: 45Kg
3
●
1. OVERVIEW (CONTINUED)
Part Name
Part No.
Qty.
ELWD2X
SG01S102C3
1
N.A.:0. 055
Working Distance: 34
○
ELWD5X
SG01S162C3
1
N.A.:0. 14
Working Distance: 34
○
ELWD10X
SG01S022C3
1
N.A.:0. 28
Working Distance: 33.5
○
ELWD20X
SG01S032C3
1
N.A.:0. 42
Working Distance: 20
○
ELWD50X
SG01S122C3
1
N.A.:0. 55
Working Distance: 13
○
ELWD100X SG01S062C3
1
N.A.:0. 70
Working Distance: 6
○
ULWD50X SG01S122C5
1
N.A.:0. 42
Working Distance: 20.5
○
ULWD100X SG01S062C5
1
N.A.:0. 55
Working Distance: 13
ELWD2X
SG01S102C4
1
N.A.:0. 055
Working Distance: 34
○
Extra Long working
ELWD5X
SG01S162C4
1
N.A.:0. 14
Working Distance: 34
○
distance Plan APO
ELWD10X
SG01S022C4
1
N.A.:0. 28
Working Distance: 33.5
○
objectives (parfocality
ELWD20X
SG01S032C4
1
N.A.:0. 42
Working Distance: 20
○
adjustable)
ELWD50X
SG01S122C4
1
N.A.:0. 55
Working Distance: 13
○
ELWD100X SG01S062C4
1
N.A.:0. 70
Working Distance: 6
○
ULWD50X SG01S122C7
1
N.A.:0. 42
Working Distance: 20.5
○
ULWD100X SG01S062C7
1
N.A.:0. 55
Working Distance: 13
○
Extra Long working
distance Plan APO
objectives
Ultra Long working
distance Plan APO
objectives
Ultra Long working
Note
○
distance Plan APO
objectives (parfocality
adjustable)
1X Camera Adapter
SP100386
1
C-mount can be attached; 2/3” CCD
○
0.5X Camera Adapter
SP100363
1
C-mount can be attached; 2/3” CCD
○
0.4X Camera Adapter
SP100365
1
C-mount can be attached; 1/2” CCD
○
0.3X Camera Adapter
SP100367
1
C-mount can not be attached; 1/3” CCD
○
Analyzer
SW01991Z
1
○
Polarizer
SW01992B
1
○
Centering keys
SW0199BH
2
●
Shims
SW018880
2
Screw M3X10
SS0120594
3
Safety pin
SW010013
1
Objective Adapter
SW011840
Inspection report
SP050002
1
●
Lock Screw M5X10
SS0120225
4
●
Allen key (4mm)
SP070008
1
●
User’s manual
SP010205
1
●
Warranty card
SP160003
1
●
● Standard
For the laser safety filter
●
●
For the laser adapter
1~4 For 4/5"X1/36" thread
○ Optional
4
●
○
1. OVERVIEW (CONTINUED)
1.3 Nomenclature
1. Eyepiece
10. Tube Lens Change-over Turret
2. Binocular Tube
11. Interpupillary Scale
3. Trinocular Head
12. Focus Block
4. Body
13. Filter Slot in Light Source Side: Attaches
5. Nosepiece
an optional filter polarizer.
6. Objective
14. Optical Path Change-over Knob
7. Filter Slot in Observation Side: Attaches
15. Aperture Open and Shut Dial
an optional filter analyzer.
16. Fiber Insertion Unit
17. CCD Camera Adapter mount
8. Coarse Adjustment Handle
9. Fine Adjustment Handle
2. Check the accessories, Before Operation
Before operating, check that all accessories have been included. If any accessory is missing,
please advise our department immediately regarding the missing item.
5
3. SETUP
3.1 Mount eyepiece
When you first use this microscope after unpacking, remove the protective cap of the ocular
upper tube and mount the eyepiece.
The eyepieces use a high-eye-point system and have rubber eye cups attached. If you wear
eyeglasses, turn the rims outward.
3.2 Adjust the pupil distance of the eyepiece
While looking into the eyepieces and holding the binocular tubes with both bands, move the
tubes in the direction of the arrows (see the diagram below) until the two fields of view coincide.
(The pupil adjustment range is between 55 and 75mm, or 2.17 and 2.95 inches.)
6
3. SETUP (CONTINUED)
3.3 Set up Illumination
Loosen up the lock screw and remove the protective cap of the fiber insertion unit.
After inserting theφ0.272″or φ6.9mm (outer diameter) illuminating fiber into the fiber
insertion unit, tighten it with the lock screw.
3.4 Mount CCD Camera Unit
You can select camera adapter for your CCD camera as below:
0.5X camera adapter use for 2/3″ CCD camera
0.4X camera adapter use for 1/2″ CCD camera
0.3X camera adapter use for 1/3″ CCD camera (C-mount adapter can not be Attached)
Attach a CCD camera to the 0.5X camera adapter (option).
7
3. SETUP (CONTINUED)
Loosen up the lock screw and remove the protective cap of the CCD camera adapter mount.
Attach the assembled camera unit to the CCD camera adapter mount on trinocular head and
tighten it with the lock screws.
3.5 Mount Laser Unit
If you plan on using your PSM-1000 for laser work , you need a laser safety filter. To operate
the laser safely and properly, please see the laser and/or laser filter manufacturer’s documentation.
Motic Instruments assumes no responsibility whatsoever for the performance and/or safety of the
laser and/or laser filter used with the PSM-1000 microscope.
To install the safety filter and the laser safety pin, we have provided you with the shims and a
laser safety pin, please follow the instructions below.
With a screwdriver loosen the 3 screws (as shown below) and remove the binocular tube and
shim block.
8
3. SETUP (CONTINUED)
Insert the safety filter, the 2 rings and the binocular tube, then hold and tighten the 3 screws as
mentioned in the previous step .
With a screwdriver tighten the laser safety pin.
3.6 Mount Objective
Insert the objective into the flange of revolver.
Note: 1、The color sticker near the flange and the color line on the objective is the same color.
2、If you purchased an objective, which has a thread (4/5″X 1/36″), insert the optional
Objective Adapter (for 4/5″X 1/36″thread) into revolver first, and then insert the
objective into the Objective Adapter.
3、If the objective is parfocality adjustable; take care not to loosen the lock ring.
9
3. SETUP (CONTINUED)
Repeat this procedure for the other objective lens.
3.7 Adjusting the eyepiece diopter
Adjust the diopter of the eyepiece as follows.
Step1: Turn the diopter adjustment ring of the eyepiece until the lower edge of the eyepiece tube is
aligned with the “0” index line (white). Align both eyepieces.
Step2: Prepare a sample and set the illumination. Set the revolving nosepiece to a
high magnification (20X or 50X) and focus the sample with the focusing knobs. Set the
magnification of the tube lens to 1X.
Step3: Turn the revolving nosepiece to change the lens magnification from a high magnification
(20X or 50X) to a lower magnification (5X or 2X). Turn the diopter adjustment ring to obtain
the sharpest image for each eye, without moving the focusing knobs.
Step4: Turn the diopter adjustment ring;
a) Clockwise if near-sighted (-)
b) Counterclockwise if far-sighted (+)
The diopter has a range of –5D to +5D.
Repeat this procedure twice for even sharper images.
3.8 Parfocality of Objectives
Be sure to parfocus the objective lens after mounting the objective onto the microscope completely.
(Parfocality adjustable objective only.)
The highest objective (nonadjustable) can be set onto the work piece by turning the revolver
until hearing a click sound.
10
3. SETUP (CONTINUED)
Turn the coarse adjustment handle and move the main body of the microscope to either an
upper or lower position to obtain the image coarsely.
Turn the fine adjustment handle and move the main body of the microscope to either an upper
or lower position to obtain the sharpest image.
The second highest objective lens can be set onto the work piece by turning the revolver until
hearing a click sound.
Turn the coarse adjustment handle and move the main body of the microscope to either an
upper or lower position to obtain the image coarsely.
Turn the fine adjustment handle and move the main body of microscope to either an upper or
lower position to obtain the sharpest image.
If the position of the main body is upper, adjust the objective as follows:
Step1: Remove the objective from the revolver.
Step2: Grasp the objective body and loosen the lock ring .
Step3: Turn the adjustment ring anticlockwise and tighten the lock ring.
Step4: Insert the objective back into the flange of revolver.
If the position of the main body is lower, adjust the objective as follows:
Step1: Remove the objective from the revolver.
Step2: Grasp the objective body and loosen the lock ring.
Step3: Turn the adjustment ring clockwise and tighten the lock ring.
Step4: Insert the objective back into the flange of revolver.
Repeat these procedures until the second highest objective is parfocal with the highest
objective.
11
3. SETUP (CONTINUED)
Similarly, adjust the focal point of objective in the order of higher magnification.
3.9 Parcentration of objectives
The highest objective (nonadjustable) is not required to parcenter.
Insert a eyepiece with reticle into the right tube (or left tube).
The highest objective (nonadjustable) can be set onto the work piece by turning the revolver
until hearing a click sound.
Adjust the center of the standard point on work piece to the center of the right field of view.
The second highest objective can be set onto the work piece by turning the revolver until
hearing a click sound.
Adjust the two centering screws of the second highest objective to the position where the
standard point on the work piece is centered with centering keys.
Similarly, parcenter the other objectives in order of highest magnification.
3.10 Change over tube Lens
The tube lens can be changed over by turning the changeover turret.
Change over to 1X NIR/VIS、1X UV/VIS or 2X(VIS) lens by turning the changeover turret of tube
lenses. Check the kind of lens based on the mark on turret.
The turret is marked as follows:
12
3. SETUP (CONTINUED)
2X lens…………………………………………..2X VIS
1X(Ultraviolet / Visible)………………………..1X UV/VIS
1X(Near Infrared / Visible)…………………....1X NIR/VIS
3.11 Changing Objectives
Change the objective by turning revolver.
Note: Don’t touch the objective face by hand. It may cause damage to the objective face.
3.12 Change Optical Path
Pull or push the optical path changeover knob to change the optical path of the microscope.
Pull outward: to enhance the laser operation by pulling the beam-splitter out of the field of
view.
Push inward: to change over to the optical path for visible viewing through the eyepieces.
13
3. SETUP (CONTINUED)
3.13 Control Light Brightness
Rotate the Aperture Open and Close Dial to control the light brightness.
Rotate towards you: The aperture’s diameter narrows and darkens.
Rotate away from you: The aperture’s diameter widens and lightens.
3.14 Polarization
Insert the polarizer and analyzer all the way into the mounting slots. The analyzer has an adjuster to
rotate the plane of polarization by 360°.
3.15 Remove and mount nosepiece
The nosepiece of PSM-1000 is removable. Remove and mount the nosepiece as follows:
With the provided Allen wrench loosen the 4 locking screws and remove the nosepiece.
14
3. SETUP (CONTINUED)
Mount the nosepiece and tighten the 4 locking screws with the Allen wrench.
TROUBLE SHOOTING
Phenomenon
Causes
Measures
Visual field is insufficient or
invisible.
Revolver cannot turn to the
position where the click sound
can be heard.
Make the revolver turn to the
position where the click sound
can be heard.
Image lens changeover turret
cannot turn to the position
where the click sound can be
heard.
Make the image lens
changeover turret turn to the
position where the chick sound
can be heard.
Quantity of light of illuminator
is insufficient.
Control the quantity of light
through aperture knob.
Eyepiece is not mounted
Mount the eyepiece.
Objective lens is not mounted
Mount the objective lens.
Eyepiece is dirty.
Objective lens is dirty.
Observational objective is
dirty.
Clean the dirty area as
instructed in the Precautions
section.
Quantity of light is too much
or too little .
Control the quantity of light
through aperture knob.
Not focused.
Adjust the focus.
Observing through any
medium of glass. Etc.
Remove the medium
Observational object is
inclined.
Correct the inclination
between microscope and
object
Objective lens is not screwed
in completely.
Mount the objective lens into
the revolver correctly.
Resolution or image quality is
considerably bad.
One side of image is unclear.
15
In
observation
through
binocular microscope, right
and left visual images do not
match.
Interpupillary distance of
siedentopf is not matched to
observer’s eye.
Adjust the interpupillary
distance.
In observation, eyes feel tired .
Interpupillary distance of
siedentopf is not matched to
observer’s eye.
Adjust the interpupillary
distance.
Diopter movement of
eyepieces is not matched to
observer’s eye.
Adjust the diopter.
Illumination is too bright.
Control the quantity of light
through aperture stop knob.
16