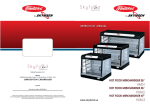
1
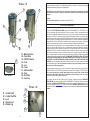
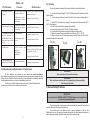
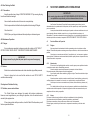
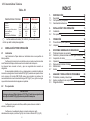
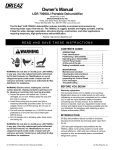
USER MANUAL
POTATO PEELER
Models:
WAREHOUSE
71 Bloomfield Ave
Newark, NJ 07104
Phone: 973 482 5070
Fax: 973 482 0725
Cell: 973 985 8239
Fax: 305 866 2704
TOLL FREE
800 445 6601
www.skyfood.us
[email protected]
OFFICE
12550 Biscayne Blvd.
Suite 800-3
North Miami, FL 33181
Phone: 305 868 1603
Fax: 305 866 2704
EL-60- WITH FEET
EL-60- WITH PEEL STRAINER
UG 0055 - April/2010
SUMMARY / INDICE
1. ENGLISH
01
2. ESPAÑOL
12
EL-60
Summary
1. Introduction
02
1.1 Safety
1.2 Main Components
1.3 Technical Characteristics
02
02
04
2. Installation and Pre Operation
04
2.1 Installation
2.2 Pre Operation
04
05
3. Operation
05
3.1 Proceeding for Operation
3.2 Cleaning
05
06
4. General Safety Rules
06
4.1
4.2
4.3
4.4
4.5
4.6
4.7
07
07
08
08
09
09
09
Basic Operation Procedures
Safey Procedures and Notes Before Switching the Machine On
Routine Inspection
Operation
After Finishing the Task
Maintenace Operation
Warnings
5. Problemas Analysis and Solutions
09
5.1 Problems, Causes e Solutions
5.2 Adjustment and Components Replacement
5.3 Electrical Diagran
09
10
11
01
1. Introduction
1.1 Safety
When misused, the Potato Peelers EL-60 can be potentially DANGEROUS.
Maintenance, cleaning or any other service on this machine must be made only by properly
trained technicians and the power plug must be disconnected. For your safety, the following
instructions must be followed in order to avoid accidents:
1.1.1 - Unplug the machine when you need to remove any removable part during
cleaning, maintenance or any other operation.
1.1.2 - Never make use of any tool or instrument that is not originally part of the
machine during any operation.
1.1.3 - Do never touch the Abrasive Disc N°07 (Pic.01) when the machine is
working, because it has abrasive surface.
1.1.4 - Keep hands away from mobile parts.
1.1.5 – When replacing the Abrasive Disc N°07 (Pic.01), check its perfect fit to the
Central Shaft Pin N°02 (Pic.02). That is a way to avoid damages to the machine.
IMPORTANT
This equipment is not to be used by persons (including children)
with any physical or mental inabilities, or without operation
experience and knowledge, only acquired by means of instruction
and supervision of a security staff.
IMPORTANT
If the Cord is not in good conditions of use, to avoid accidents
it must be replaced by the supplier, an authorized technician or
someone qualified for the service.
1.2 Main Components
All components of this machine were made of raw materials carefully selected
for each function, according to the test patterns and Siemsen experience.
02
Picture - 01
All returned goods are subject to a 20% handling/restocking fee. All returns must be returned in their original
packaging and within thirty (30) days from the shipping date.
05
01
SKYFOOD reserves the right to change the design and specifications of its equipment or any related
documentation at any time. The end user is not entitled to upgrades nor refunds resulting from these
changes.
Updates
These Terms and Conditions were last updated on February 02nd, 2010.
10
SKYFOOD'S LIMITED WARRANTY
02
03
All new products FLEETWOOD BY SKYMSEN, sold by SKYFOOD EQUIPMENT, LLC. (“SKYFOOD”), for use
only in the continental Unites States (collectively, “Products” or singularly, “Product”), are warranted to be free
from defects in materials and workmanship for a period of one (1) year from the date of purchase by the original
purchaser/user (“End User”). No warranty is given or implied to a subsequent transferee or any other third party.
This warranty is expressly conditional upon SKYFOOD being notified of any defects in materials or workmanship
within five (5) days of its occurrence, within the warranted time period. If a notice of a claim under this warranty is
timely made by the End User, SKYFOOD or a designated service company (“Service Company”), will repair the
Product or replace the part which is defective, subject to the additional conditions hereinafter described.
This warranty shall not apply if damage occurs from improper installation, wrong voltage, nor to the extent that
Products or parts have been used other than in conformance with operating and maintenance instructions,
subjected to misuse or abuse or damaged by accident, acts of God, abnormal use or stress or any other matter
unrelated to SKYFOOD, and beyond its reasonable control. In addition, this warranty does not cover normal
wear and tear of certain items, such as, but not limited to, blades, stones, chopper cutting knives, plates, slicing
knives, cutting disc, gaskets, oil changes, sealing tape, heat seal wires, worm gears, and other parts expendable
by nature and that need to be replaced frequently. THIS WARRANTY EXCLUDES ALL ORAL, STATUTORY,
EXPRESS OR IMPLIED WARRANTIES WHICH MAY BE APPLICABLE TO SKYFOOD, INCLUDING, BUT
NOT LIMITED TO, ANY IMPLIED WARRANTY OF MERCHANTABILITY AND FITNESS FOR PARTICULAR
PURPOSE. Under no circumstances shall SKYFOOD be liable for loss of use, revenue or profit or for incidental
or consequential damages. The sole and exclusive remedy for breach of any warranty is limited to the
remedies provided in the paragraph above.
06
08
09
04
01 –Water Entrance
02 – Door Base
03 – ON/OFF Switch
04 – Foot
05 – Lid
06 – Timer
07 – Abrasive Disc
08 – Door
09 – Exit Tube
10 – Housing
07
Disc Abrasive
03
01 – Central Shaft
02 – Central Shaft Pin
03 – Lock
04 – Residue exit
05 – Rubber ring
Products weighing less than seventy (70) lbs. must be taken or shipped, shipping charges prepaid, either to
SKYFOOD's facility or a SKYFOOD's designated service company (“Service Company”). SKYFOOD offers a
limited on-site warranty only for Products whose weight exceeds seventy (70) lbs., provided they are
installed in a location that is within a thirty (30) mile radius of a Service Company. In this case, warranty
services will be provided during regular business hours.
This warranty shall not take effect unless and until a properly completed and executed WARRANTY
REGISTRATION form has been received by SKYFOOD EQUIPMENT, LLC, within thirty (30) days from the date
of purchase. The WARRANTY REGISTRATION is available either in the Instruction Manual of every Product or
at SKYFOOD's website www.skyfood.us. The End User must fulfill the WARRANTY REGISTRATION form and
send it to SKYFOOD according to the instructions posted on the referred website. Failure to do so will void the
warranty.
Picture - 02
01
04
02
03
05
SKYFOOD EQUIPMENT LLC - SERVICE
1.3 Techinical Characteristcs
Parts and services are available from the address indicated herein. Parts can be combined with finished goods
order or by itself.
Table - 01
SKYFOOD EQUIPMENT LLC – Warehouse
71 BLOOMFIELD AVE - NEWARK, NJ 07104 - USA - Phone: 973 482 5070 - Fax: 973 482 0725 - TOLL FREE
800 445 6601
Technical Characteristcs
TERMS AND CONDITIONS OF SALE
Voltage
Power Rating
Cousumption
Heigth/Width/Depth
Net/Gross weight
Capacity
Terms of Sale
Purchase of any products sold by SKYFOOD shall be subject to and expressly limited by the terms and conditions
contained herein. No changes to, waiver of, or addition to any of these terms and conditions shall be effective
unless agreed to in writing and signed by SKYFOOD. Buyer acknowledges and agrees that these terms and
conditions supersede the terms and conditions of any purchase order or other documentation used by Buyer and,
except for delivery and billing addresses, and quantities prices and items ordered, any conflicting or additional
terms are void and have no effect, but that Buyer may place orders by use of purchase orders and other
documentation for its convenience purposes only. Notwithstanding the foregoing, SKYFOOD reserves the right at
any time to amend these terms and conditions, and Buyer shall be deemed to accept such amended terms and
conditions by ordering products herein offered after the date of such amendment. Additional special terms and
conditions of SKYFOOD may be applicable with respect to certain products.
Average Production
[V]
[ CV ]
[ kW/h]
[ mm ]
[ kg ]
[ kg ]
[ kg/h ]
EL-60- WITH FEET EL-60- WITH
PEEL STRAINER
110 ou 220V
1
0,73
1160x550x670
45/53
25
500
110 ou 220V
1
0,73
1370x550x670
58/66
25
500
(*) There will be a single frequency option (50 or 60 Hz), depending on machine
motor type.
Orders Acceptance
All orders from Buyers, whether solicited and written by either a SKYFOOD EQUIPMENT, LLC (“SKYFOOD”)
Sales Representative, distributor or dealer, are deemed offerings to purchase until accepted by SKYFOOD.
SKYFOOD reserves the right to accept orders in full or in part. Acceptance may be either by written confirmation or
shipment of the order, in full or in part.
2. Installation and Pre-Operation
Shipping
TERMS – All prices are FCA (Free Carrier) shipping point. Unless express instructions in writing are received from
the Buyer, SKYFOOD has complete freedom in choosing the means, route and procedure to be followed in the
handling, transportation and delivery of the goods. SKYFOOD will advance the shipping costs on behalf of the
Buyer and charge it accordingly. SKYFOOD shall under no circumstances be liable for any loss, damage,
expense or delay to the goods for any reason whatsoever when said goods are in the custody, possession or
control of third parties selected by SKYFOOD to forward, enter, clear, transport, or render other services with
respect to such goods. Please, inspect your unit upon arrival at the destination and report any transit damage to
SKYFOOD and to the shipping company, in order to initiate a claim with the latter. Claims must be reported to the
transportation company within fifteen (15) days as of the date of the invoice.
The Potatoes Peeler must be installed onto a stable working surface. Verify the
voltage of the power SOURCE it will be connected to (110V or 220V).
Free Shipping
Orders of $4,000.00 or more, with a minimum of 2 pieces (mixed or match), shipped to the same address in the
continental United States will have free shipping.
Tax Information
Any tax, duty, custom or other fee of any nature imposed upon the products, their sale, transportation, delivery, use
or consumption shall be paid by Buyer in addition to the price quoted or invoiced. If SKYFOOD is required to prepay
any such tax or fee, Buyer will reimburse SKYFOOD. Buyer must provide SKYFOOD with a resale/exemption
certificate in order to avoid the withholding of applicable taxes.
Interest
Past due balances are subject to a interest charge of 1.5% per month or the highest rate permitted by law,
whichever is lower, until paid.
Return Policy
All returns are subject to the prior authorization of SKYFOOD, in its discretion. Buyer must contact Buyer Support
at (305) 868-1603, or by fax at (305) 866-2704, or via e-mail at [email protected] in order to request a
Return Authorization number (“RA”) providing, along with the identification of the goods, a specific reason for
return. Buyer Support will either authorize or deny the request for return. Only NEW and UNUSED items are
acceptable for return. Unauthorized returns will be destroyed and no credit issued. All authorized returned goods
must be shipped freight prepaid to SKYFOOD.
2.1 Installation
The Cord brings a plug with 2 (two) flat pins and 1 (one) round pin which is for
grounding (ground wire pin). It is mandatory that the three pins are properly connected
before using the equipment.
It is recommendable to install the machine close to a sewer or to canalize the
residues , by extending the Exit Tube N°09 (Pic.01), located on the lower part of the
machine. The model EL-60- WITH PEEL STRAINER brings a peel strainer. The water
entrance Nº.01 (Pic. 01) must be connected to a tap, to allow water to run directly over the
potatoes to be peeled.
2.2 Pre-Operation
IMPORTANT
Make sure the Abrasive Disc N°07 (Pic.01) is well placed on Central
Shaft Pin N°02 (Pic.02) before switching the machine on.
Check if the Potato Peeler is firm in its position. Install the water entrance and
exit.
Check if the inner abrasive disc and walls are properly placed. Observe the link
Pic.06 attachment with the lock, Nº. 03 (Pic. 02).
04
3. Operation
5.3 Diagrama Eléctrico
3.1 Proceeding for operation
IMPORTANT
Under no circumstances touch the Abrasive Disc when it is in
movement.
Remove the lid Nº. 05 (Pic. 01) open the water tap, set the timer Nº. 06
(Pic. 01) and activate the ON / OFF Switch Nº. 03 (Pic. 01). With the machine
on, pour the product to be processed inside it, and replace the lid.
For both models EL-60 put 25 kg of potatoes at most. The working
time varies from 1 to 5 minutes. In case the product to be peeled is too
irregular, it is possible to watch when it's done through the Lid opening. To
remove the peeled product, keep the machine running and open the Door
N°01 (Pic.03), by pulling the lock Nº. 02 (Pic. 03) upwards. Lift it until the side
lock Nº. 03 (Pic. 03) keep the door Nº. 01 (Pic. 03) open. This way the
product will be expelled. To close the door release the side lock Nº. 03 (Pic.
03), by pulling it sideward.
SKYMSEN TIP
The Potato Peelers can also be used to peel carrots, chayote,
oranges and others similar.
Pic.03
03
02
Pic.04
01
01
For the model with Peel Strainer, check the volume of residue and
remove the drawer Nº. 01 (Pic. 04) on each process (25Kg).
05
22
Tabla - 02
Problemas
* La maquina no conecta,
no prende..
Causas
3.2 Cleaning
Soluciones
*Falta de corriente eléctrica * Verifique si hay energía eléctrica en
en la toma o en el local.
la toma o en el local.
* Problema en el circuito
eléctrico interno o externo
de la maquina
* Llame al Servicio Técnico
* Olor a quemado y/o humo * Problema en el circuito
eléctrico interno o externo
de la maquina.
* Llame al Servicio Técnico
* La maquina prende, pero * Correa patinando.
cuando el producto es
colocado sobre el disco, el *Problema con el motor
mismo para o gira en baja eléctrico.
rotación.
* Ruidos raros.
* Llame al Servicio Técnico
* Llame al Servicio Técnico
1 – Remove the internal lining Nº.01 (Pic.05) lifting it upwards. Clean this part with
plenty of water;
2 – Turn the empty machine on, and let it work for a few minutes, adding plenty of
water;
3 – Switch OFF the machine and unplug it, then wait until the Abrasive Disc N°01
(Pic.07) is motionless;
4 – Rub the external part of the machine with a wet cloth;
5 – Remove the abrasive disc N°01 (Pic.07) lifting it vertically ;
6 – Use a brush with nylon bristles and plenty of water to clean the disc.
7 - Replace the internal lining, minding the lock attachment Nº.01 (Pic.06)
8 – Replace the disc on the machine proceeding inversely. Make sure the disc fits
properly to the pin of the central shaft.
Pic.05
* Disco abrasivo mal * Posicionar correctamente el disco
abrasivo en el Perno del Eje Central.
posicionado.
(ver página 03, Fig.02).
* Rodamientos
damnificados.
* Llame al Servicio Técnico
* Huida de agua por el
fondo o base de la maquina. * Retenedor damnificado.
To make the proper cleaning of the machine, follow the instructions below:
* Llame al Servicio Técnico
Pic.06
Pic.07
01
01
01
5.2 Adjustments and Replacement of Components
El disco abrasivo es revestido con una camada de óxido de aluminio,
responsable por el desgaste de las cascaras y pieles de los alimentos. Después de algún
tiempo de uso, el Óxido de Aluminio se gasta y, consecuentemente la calidad del producto
final procesado disminuye, así como la capacidad de producción.
Se debe levar el Disco Abrasivo para un Servicio Técnico Autorizado más
cercano, para recibir nuevo revestimiento del abrasivo.
IMPORTANT
Never use water jet to wash the machine.
IMPORTANT
Take care of your machine and use it properly and with responsibility.
It will bring you benefits.
4. General Safety Practices
IMPORTANT
If any item from the GENERAL SAFETY NOTIONS section is not applicable to
your product, please disregard it.
The following safety instructions are addressed to both the operator of the machine
as well as the person in charge of maintenance.
The machine has to be delivered only in perfect conditions of use by the
Distributor to the user. The user shall operate the machine only after being well acquainted
with the safety procedures, and after reading carefully the entire manual.
21
06
4.4
Operación
4.1 Basic Operation Practices
4.4.1
4.1.1 Dangers
Some areas of the electric device have parts and terminals that are connected to
high voltage. These parts when touched may cause severe electrical shocks or even be
lethal.
Never touch manual commands such as switches, buttons, keys and knobs with wet
hands, wet clothes and/or wet shoes. By not following these instructions, operator could be
exposed to severe electrical shocks or even to a fatal situation
Avisos
No trabaje con pelo largo, que pueda tocar cualquier parte de la maquina, pues
el mismo podría causar serios accidentes. Amárrelo para arriba y para atrás, o cúbralo
con un pañuelo.
Solamente operadores entrenados y calificados pueden operar la maquina.
Nunca toque con las manos o de cualquier otra manera, partes girantes de la
maquina.
JAMÁS opere la maquina, sin algún de sus accesorios de seguridad.
4.5
4.1.2 Warnings
The operator has to be well familiar with the position of ON/OFF Switch to make sure
the Switch is easy to be used when necessary.
Before any kind of maintenance, physically remove the plug from its socket.
Provide space for a comfortable operation thus avoiding accidents.
Water or oil spilled on the floor will turn it slippery and dangerous. Make sure the floor
is clean and dry.
Never use a manual command (switch, buttons, lever) unadvisedly.
If any work is to be made by two or more persons, coordination signs will have to be
given for each operation step. Every step of the operation shall be taken only if a sign has
been made and responded.
4.1.3 Advices
In case of power shortage, immediately turn the machine OFF.
4.5.1
Cuidados
Siempre limpie la maquina. Para tanto, deslíguela físicamente del soquete.
Nunca limpie la maquina antes de su PARADA COMPLETA.
Recoloque todos los componentes de la maquina en sus lugares, antes de ligarla otra
vez.
Al verificar la tensión de las correas, NO coloque los dedos entre las correas y
las poleas.
4.6
Avoid penetration of water, dirt or dust into mechanical or electrical components of
the machine.
DO NOT MODIFY original characteristics of the machine.
DO NOT REMOVE, TEAR OFF OR MACULATE any safety or identification labels of
the machine. If any label has been removed or is no longer legible, contact your nearest
dealer for replacement.
4.2 Safety Procedures and Notes before Switching Machine ON
IMPORTANT
Carefully read ALL INSTRUCTIONS of this manual before turning the machine ON.
Be sure to be familiar with the instructions and that you have well understood all
information contained in this manual.
If you have any question, contact your supervisor
or your nearest Dealer.
07
Manutención
4.6.1
Peligros
Con la maquina prendida cualquier operación de manutención es peligrosa.
DESLÍGUELA FÍSICAMENTE DE LA RED ELÉCTRICA, DURANTE TODA LA
OPERACIÓN DE MANUTENCIÓN.
IMPORTANTE
Siempre retire la enchufe del soquete en cualquier caso de emergencia.
Use recommended or equivalent lubricants, oils or greases.
Avoid mechanical shocks as they may cause failures or malfunction.
Después de Terminar el Trabajo
4.7
Avisos
La manutención eléctrica o mecánica debe ser hecha por una persona
calificada para hacer el trabajo.
La persona encargada por la manutención debe certificarse que la maquina
trabaje bajo condiciones TOTALES DE SEGURIDAD.
5. Análisis y Soluciones de Problemas
5.1Problemas, Causas y Soluciones
Las Peladoras de Papas fueron proyectadas para necesitar del mínimo de
mantenimiento. Sin embargo, pueden ocurrir algunas irregularidades en su
funcionamiento, debido al desgaste natural causado por el uso del equipamiento.
Caso haya algún problema con su Peladora de Papas, verifique la Tabla 02
a seguir, donde describimos algunas posibles soluciones recomendadas.
20
NO ALTERE las características originales de la maquina.
NO SUCIE, RASGUE O RETIRE CUALQUIER ETIQUETA DE SEGURIDAD O
DE IDENTIFICACIÓN. Caso alguna esté ilegible o perdida, solicite otra al Asistente
Técnico mas cercano.
LEA ATENTAMENTE Y CON CUIDADO LAS ETIQUETAS DE SEGURIDAD Y
DE IDENTIFICACIÓN CONTENIDAS EN LA MAQUINA, ASÍ COMO LAS
INSTRUCCIONES Y LAS TABLAS TÉCNICAS CONTENIDAS EN ESTE MANUAL.
An electric cable or electric wire with damaged jacket or bad insulation could cause
electrical shocks as well as electrical leak. Before using the equipment, check conditions of
all wires and cables.
4.2
Be sure ALL INSTRUCTIONS in this manual have been thoroughly understood.
Every function and operational procedure has to be very clear to the operator.
Cuidados y Observaciones Antes de Ligar la Maquina.
IMPORTANTE
Lea con atención y cuidado las INSTRUCCIONES contenidas en este Manual,
antes de ligar la maquina. Certifíquese que entendió correctamente todas las
informaciones. En caso de duda, consulte su superior o el Revendedor.
Peligro
Cables o hilos eléctricos con aislamiento dañado, pueden provocar choques
eléctricos. Antes de usarlos verifique sus condiciones.
4.2.1 Danger
4.2.2 Advices
Any manual command (switch, button or lever) shall be given only after being sure it
is the correct one.
4.2.3 Precautions
4.2.1
4.2.2
Avisos
Esté seguro que las INSTRUCCIONES contenidas en este Manual, estén
completamente entendidas. Cada función o procedimiento de operación y de
manutención debe estar perfectamente entendido.
El accionamiento de un comando manual (botón, llave eléctrica, palanca, etc.)
debe ser hecho siempre después que se tenga la certitud de que es el comando
correcto.
4.2.3
The electric cable has to be compatible with the power required by the machine.
Cables touching the floor or close to the machine, need to be protected against
short circuits.
4.3 Routine Inspection
4.3.1 Advice
When checking the tension of the belts or chains, DO NOT introduce your fingers
between the belts and the pulleys and nor between the chain and the gears.
Cuidados
El cable de alimentación de energía eléctrica de la maquina, debe tener una
sección suficiente para soportar la potencia eléctrica consumida.
Cables eléctricos que estuvieren en el suelo cerca de la maquina, deben ser
protegidos para evitar corto circuitos.
noises.
4.3
Check the tension of the belts and chains and replace the set when belt, chain or
gears show signs of being worn out.
Inspección de Rutina
4.3.1
Aviso
Al averiguar la tensión de las correas, NO coloque los dedos entre las correas y
las poleas.
4.3.2
Cuidados
Verifique los motores y las partes deslizantes o girantes de la maquina, con
relación a ruidos anormales.
Verifique la tensión de las correas, y sustituya el conjunto, caso alguna correa o
polea tenga desgaste. Al verificar la tensión de las correas, NO coloque los dedos entre
las correas y poleas.
Verifique las protecciones y los dispositivos de seguridad para que siempre
funcionen adecuadamente.
19
4.3.2 Precautions
Check the motor and turning or sliding parts of the machine, in case of abnormal
When checking tension of belts or chain, DO NOT introduce your fingers between
belts and pulleys, nor between the chains and gears.
Check protections and safety devices to make sure they are working properly.
4.4 Operation
4.4.1 Warning
Do not operate the machine with long hair, which might touch any part of the
machine, because it may lead to serious accidents. Tie your hair up well and/or cover your
hair with a scarf.
Only trained or skilled personnel shall operate this machine. NEVER operate
machine without all original safety devices in perfect condition.
08
4.5 After Finishing the Work
4
NOCIONES GENERALES DE SEGURIDAD
4.5.1 Precautions
Keep the machine clean. Always TURN THE MACHINE OFF by removing the plug
from the socket before cleaning it.
IMPORTANTE
En el caso de algun item de las NOCIONES GENERALES DE SEGURIDAD no
ser aplicable en su producto, por favor desconsiderar el mismo.
Never clean the machine unless it has come to a complete stop.
Put all components back to their functional positions before turning it ON again.
Check level of oil.
DO NOT place your fingers in between belts and pulleys nor chains and gears.
Las Nociones Generales de Seguridad fueran preparadas para orientar y instruir
adecuadamente a los operadores de las maquinas, así como aquellos que serán responsables
por su manutención.
La maquina solamente debe ser entregue al operador en buenas condiciones de uso, al
que el operador debe ser orientado cuanto al uso y a la seguridad de la maquina por el
Revendedor. El operador solamente debe usar la maquina con el conocimiento completo de los
cuidados que deben ser tomados, después de LEER ATENTAMENTE TODO ESTE MANUAL.
4.6 Maintenance Operation.
4.1
Practicas Básicas de Operación
4.6.1 Danger
4.1.1
Every maintenance operation is dangerous when the machine is ON. TURN IT
OFF BY PULLING THE PLUG OFF THE SOCKET DURING MAINTENANCE.
IMPORTANT
Always remove the plug from the power point in any case of emergency.
Peligros
Algunas partes del accionamiento eléctrico presentan pontos o terminales con altos
voltajes. Cuando tocados pueden ocasionar graves choques eléctricos, o hasta la muerte de una
persona.
Nunca toque un comando manual (botón, llave eléctrica, etc.) con las manos, zapatos o
ropas mojadas. No obedecer a esta recomendación, también podrá provocar choques eléctricos,
o hasta la muerte de una persona.
4.1.2
4.7 Advices
Electrical or mechanical maintenance has to be undertaken by qualified personnel.
Person in charge has to be sure that the machine is under TOTAL SAFETY
conditions when working.
5 Analysis and Problems Solving
5.1 Problems, causes and solutions
The Potato Peelers were designed to operate with minimum maintenance.
However, some irregularities may occur during its operation, due to the natural wear out
caused by the equipment use.
If there is any problem with your machine, check the Table-02 bellow, where you will
find some possible solutions.
Advertencias
El local de la llave liga/desliga debe ser bien conocido, para que sea posible accionarla
a cualquier momento sin la necesidad de procurarla.
Antes de cualquier manutención desconecte la maquina de la red eléctrica.
Proporcione espacio suficiente para evitar caídas peligrosas.
Agua o aceite podrán hacer resbaloso y peligroso el piso. Para evitar accidentes el piso
debe estar seco y limpio.
Antes de accionar cualquier comando manual (botones, llaves eléctricas, palancas, etc.)
verifique siempre si el comando es el correcto, o en caso de dudas, consulte este Manual.
Nunca toque ni accione un comando manual (botones, llaves eléctricas, palancas, etc.)
por acaso.
Si un trabajo debe ser hecho por dos o más personas, señales de coordinación deben
ser dados antes de cada operación. La operación siguiente no debe ser comenzada sin que la
respectiva señal sea dada y respondida.
4.1.3
Avisos
En el caso de falta de energía eléctrica, desligue inmediatamente la llave liga/desliga.
Use solamente aceites lubricantes o grasas recomendadas o equivalentes.
Evite choques mecánicos, ellos pueden causar fallas o malo funcionamiento.
Evite que agua, suciedad o polvo entren en los componentes mecánicos y eléctricos de la
maquina.
18
09
3.2 Limpieza
Table - 02
Para hacer una buena limpieza de la maquina, proceda como
detallamos a seguir:
1. Remueva el revestimiento interno N°01(Fig.05) tirando hacia
arriba, haga la limpieza de este ítem con agua en abundancia. Utilice una
manguera.
2. Prenda la maquina en vacio y déjela trabajando por algunos
minutos, adicionando agua en abundancia. Utilice una manguera.
3. Desligue la maquina dela red eléctrica y espere la completa parada
del disco abrasivo N°07 (Fig.01).
4. Pase un paño húmedo en la parte exterior de la maquina.
5. Remueva el disco abrasivo N°01 (Fig.07) tirándolo verticalmente
hacia arriba.
6. Utilice un cepillo con cerdas de nylon y agua en abundancia para
limpiar el disco.
7. Recoloque el revestimiento interno, observando el encaje de la
traba N°03(Fig.02) con el encaje N°01(fig.06).
8. Recoloque el disco en la maquina, procediendo de manera
inversa. Tome el cuidado para que el disco encaje en el perno, existente
en el eje central.
Fig.05
Fig.06
Fig.07
01
01
Problems
* The machine does not
turn ON.
* Burnt smell or smoke
Causes
* Power outage
* Check if there is Electric Power
* Problem on the internal
or external electric circuit
of the machine.
* Call Technical Assistance.
* Problem on the internal
or external electric circuit
of the machine.
* The machine turns on, * Skidding belts
but when product is placed
upon the Disc, it stops or
spins in low rotation.
* Problems with the
Electric Motor
* Strange noises.
Solution
* Abrasive Disc misplaced
* Call Technical Assistance.
* Call Technical Assistance.
* Call Technical Assistance.
* Place the Abrasive Disc
appropriately on the Central Shaft
Pin.
* Damaged Ball Bearingss * Call Technical Assistance.
* Water leak in the bottom * Damaged retainer.
of the machine.
* Call Technical Assistance.
5.2 Adjustments and Replacement of Components
The Abrasive Disc is covered with an Aluminum Oxide layer,
responsible for the food peeling. After some time, the Aluminum Oxide
wears out and the efficiency of the machine decreases consequently.
01
IMPORTANTE
Nunca utilice chorros de agua con presión para lavar la
maquina, sea en su parte interior o exterior.
IMPORTANTE
Procure cuidar y usar su máquina correctamente y con
seguridad, eso solo le va a traer beneficios.
17
Then , the Abrasive Disc must be taken to the nearest Technical
Assistance to be recoated.
10
3.
Operación
3.1
Procedimiento para la Operación
5.3 ELECTRICAL DIAGRAN
IMPORTANTE
Bajo ninguna posibilidad colocar la mano en el Disco
Abrasivo cuando esté en movimiento.
Remueva la tapa N°05(Fig.01), abra el grifo de agua, regule el
temporizador N°06(Fig.01) y accione la llave Prende/Desliga N°03(Fig.01). Con la
maquina prendida, derrame las papas que van a ser peladas y recoloque la tapa.
Para el modelo DB-25HD y DBC-25HD la carga máxima por proceso es de
25Kg de papas. El tiempo por proceso está entre 1 y 5 minutos. Procure utilizar
papas de tamaños similares, pues eso le permite menor tiempo de procesamiento
y menor pérdida del producto.
Cuando las papas son de tamaño irregulares, elija un tiempo aproximado
y, a través de la apertura de la tapa, vaya observando el avanzo del proceso de
pelar las papas, interrumpiendo el proceso cuando las papas estén peladas.
Para retirar las papas ya listas (peladas) del interior de la maquina,
manténgala prendida y abra la Puerta N°01(Fig.03) tirando la Traba de la
Puerta N°02(Fig.03) hacia arriba, hasta que la Traba Lateral N°03(Fig.03)
mantenga la puerta N°01(Fig.03) abierta, permitiendo la salida de las papas
procesadas.
Para cerrar la puerta suelte la traba lateral N.03 (Fig.03) ..
TIPS SKYMSEN
Las peladoras de Papas, pueden también ser usadas para pelar
zanahorias, cayote, naranjas, limones y similares.
Fig.03
03
02
Fig.04
MODELO
DBC-25HD
01
01
11
Para el modelo DBC-25HD con caja colectora de residuos, es
necesario limpiar la caja de residuos N°01(Fig.04) luego del término de cada
proceso .
16
1.3 Características Técnicas
INDICE
Tabla - 01
Características Técnicas
Tensión
Poténcia
Consumo
Altura/Largo/Profundidad
Peso Neto/Bruto
Capacidad
Producción Mediana
[V]
[ CV ]
[ kW/h]
[ mm ]
[ kg ]
[ kg ]
[ kg/h ]
DB-25HD
DBC-25HD
110 ou 220V
1
0,73
1160x550x670
45/53
25
500
110 ou 220V
1
0,73
1370x550x670
58/66
25
500
(*)
La frecuencia será única ( 50 o 60 Hz ), de acuerdo con el
motor que esté la máquina equipada.
2.
INSTALACIÓN Y PRE OPERACIÓN
2.1
Instalación
Las Peladoras de Papas deben ser instaladas sobre una superficie de
trabajo estable.
Verifique si la tensión de la red eléctrica a la cual será conectado el cable
de la Peladora de Papas, está de acuerdo con la tensión de la máquina.
La máquina tiene conexión a tierra y para su seguridad esta conexión es
obligatoria.
Es aconsejable instalarla junto a un desaguadero o canalizar la salida de
los residuos, alargando el tubo de salida N°09 (Fig.01) existente en la parte inferior
de la maquina. El modelo DBC-25HD posee caja colectora de residuos. Es
necesario también conectar la entrada de agua N01 (Fig.01) a un grifo con el agua
cayendo directamente sobre las papas a ser peladas.
2.2
1.
1.1
1.2
1.3
INTRODUCCIÓN
Seguridad
Componentes principales
Características técnicas
13
13
13
15
2.
2.1
2.2
INSTALACIÓN Y PRE-OPERACIÓN
Instalación
Pre operación
15
15
16
3.
3.1
3.2
OPERACIÓN
Procedimiento para operación
Limpieza
16
16
17
4.
4.1
4.2
4.3
4.4
4.5
4.6
4.7
NOCIONES GENERALES DE SEGURIDAD
Practicas básicas de operación
Cuidados y observaciones antes de ligar la maquina
Inspección de rutina
Operación
Después de terminar el trabajo
Manutención
Avisos
18
18
19
19
19
19
19
20
5.
5.1
5.2
5.3
ANALISIS Y RESOLUCIÓN DE PROBLEMAS
Problemas, causas y soluciones
Ajuste y sustitución de componentes
Diagrama Elétrico
20
20
21
22
Pre operación
IMPORTANTE
Esté seguro de que el Disco Abrasivo N°07 (Fig.01) esté bien encajado en el
Perno Eje Central N°02 (Fig.02) antes de prender la maquina.
Verifique si la maquina está firme, estática para entonces instalar la
entrada y salida de agua.
Verifique si el revestimiento interno (canasto más goma) está
debidamente encajado (conforme Fig.06) con la traba conforme N°3 (Fig.02).
15
12
1.
Figura - 01
INTRODUCCIÓN
1.1 Seguridad
05
Cuando usadas incorrectamente, las Peladoras de Papas Mod.DB-25HD y
DBC-25HD, son máquinas potencialmente PELIGROSAS. Mantenimiento y
limpieza o cualquier otro servicio, solamente deberá ser hecho por personas
debidamente entrenadas y capacitadas y la máquina debe estar desconectada de
la toma de corriente eléctrica.
Las instrucciones a seguir, deberán ser siempre seguidas a fin de evitar
accidentes:
1.1.1
Desconecte la máquina de la toma de corriente eléctrica, cuando
necesite retirar cualquier parte amovible de la máquina, o al hacer la limpieza ó
mantenimiento.
1.1.2
Nunca utilice instrumentos que no hacen parte de la máquina para
auxiliarlo en la operación de la misma.
1.1.3
Nunca tocar el Disco Abrasivo N°07(Fig.01) con la maquina en
movimiento, pues el mismo posee superficie abrasiva.
1.1.4
Mantenga las manos alejadas de las partes móviles.
1.1.5
Cuando recolocar el Disco Abrasivo N07(Fig.01), verifique el
perfecto encaje del mismo con el Perno Eje Central N°02(Fig.02). Evitando así
daños a la maquina.
10
02
03
06
08
04
07
Disco Abrasivo
09
01 – Entrada de agua
02 – Base de la puerta
03 – Llave Prende/Desliga
04 – Pié
05 – Tapa
06 – Timer
07 – Disco Abrasivo
08 – Puerta
09 – Tubo de salida
10 – Gabinete
IMPORTANTE
Esta máquina no debe ser utilizada por personas (inclusive niños) con
capacidades físicas o mentales reducidas, o por falta de experiencia o
conocimiento, excepto que tengan recibido una capacitación
supervisada referente al uso de esta máquina
IMPORTANTE
Si el cable de alimentación no esté en buenas condiciones
de uso, deberá ser sustituido por el fabricante, su servicio autorizado
o persona calificada para que sea evitado accidentes.
1.2
Principales Componentes
Todos los componentes que incorporen la máquina, son construidos con
materiales seleccionados con criterio para cada aplicación, dentro de los
padrones de ensayos y de la experiencia SIEMSEN.
13
01
03
01 – Eje centraL
02 – Perno Eje Central
03 – Traba
04 – Salida de residuos
05 – Anillo de goma
Figura - 02
01
04
02
14
05