1
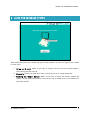
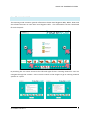
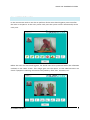
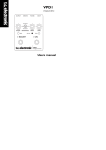
Hand Hygiene Training System User Manual GLANTA Ltd The Tower, Trinity Enterprise Centre, Pearse St, Dublin 2 IRELAND www.surewash.com +353 (0)87 162 4488 SETTING UP THE SUREWASH SYSTEM 1 Table of Contents 2 SETTING UP THE SUREWASH SYSTEM ............................................................................... 3 3 USING THE SUREWASH SYSTEM ....................................................................................... 4 3.1 TRAINING MODE ....................................................................................................... 6 3.2 ASSESSMENT MODE................................................................................................... 9 4 SUREWASH ADMINISTRATION ....................................................................................... 11 4.1 VIEW RECORDS........................................................................................................ 11 4.2 USER MANAGEMENT................................................................................................ 12 4.3 GENERATE REPORTS ................................................................................................ 14 4.4 CONFIGURATION..................................................................................................... 16 4.5 SUPPORT AND TROUBLESHOOTING ......................................................................... 17 © GLANTA Ltd 2011 2 SETTING UP THE SUREWASH SYSTEM 2 SETTING UP THE SUREWASH SYSTEM To set up the SureWash system, plug in the power supply and push the on/off button located on the right side of the system. The SureWash system will boot up automatically. Press switch here to turn the system ON or OFF To turn off the system, press and hold the on/off button until the system shuts down. When the system has completely shut down (this takes approximately 30 seconds) the unit may be unplugged from the mains power. © GLANTA Ltd 2011 3 USING THE SUREWASH SYSTEM 3 USING THE SUREWASH SYSTEM After when the system has started the login screen appears. A user can login to the system in three ways: 1. Using an ID card: When a user logs in using an ID card, all the recorded data is saved along with the user ID. 2. Manually: A user can type their name or User ID via an on screen keyboard. 3. Pushing the ‘Demo’ button: When a user logs in using the ‘Demo’ button the system can be used anonymously. That means any recorded data is not related to a particular person. © GLANTA Ltd 2011 4 USING THE SUREWASH SYSTEM When logged in, the user can chose between the two modes that are offered by the SureWash Training System: Training and Assessment © GLANTA Ltd 2011 5 USING THE SUREWASH SYSTEM 3.1 TRAINING MODE The training mode contains general information about Hand Hygiene (Why, When, How) and also allows the users to train their hand hygiene skills. This information can be customised for each hospital. By touching the on screen arrows to the left and right of the e-learning material a user can navigate through the content. Users can also touch on the images to go to training material specific to a pose. © GLANTA Ltd 2011 6 USING THE SUREWASH SYSTEM Training for one of the seven hand hygiene poses happens in two steps: At first, some information of this particular pose is presented to the user, e.g. what makes this particular pose so important. Additionally an example video of this pose is shown. By pushing the right arrow, the user has to perform this particular pose. The system camera checks if the user is doing the pose correctly. When the user is doing this pose correctly, the green progress bar shown at the bottom of the screen starts to grow. When the pose is completed the Training Mode moves to the next pose, and the same procedure begins. © GLANTA Ltd 2011 7 USING THE SUREWASH SYSTEM If a user does not manage to finish a pose within a specific time, an information box will pop up. This popup helps the user to pass this pose by showing the common mistakes for this pose. After the popup, there is still some time left to finish this pose successfully. While performing a hand hygiene pose, the hands must be placed in the box overlaid on the video. The box turns green when the hands are in the right place. Furthermore, the user must roll up the sleeves up to the elbow. If the sleeves are visible in the video, the system will stop recognizing the pose and will give a warning. © GLANTA Ltd 2011 8 USING THE SUREWASH SYSTEM 3.2 ASSESSMENT MODE In the assessment mode a user has to perform all the seven hand hygiene poses one after the other in sequence. As the user passes each pose the system moves automatically to the next pose. Before the user can start hand hygiene, the hands need to be presented within the silhouette outlined on the video screen. This image goes into the report, so that administrators can check if people are wearing accessories like jewellery, false nails, bracelets, etc. © GLANTA Ltd 2011 9 USING THE SUREWASH SYSTEM After a user has finished an assessment, a score will be presented. Additionally, all the poses images will get a green tick if the user passed this pose, or a red cross otherwise. By clicking one of the poses, a user can jump directly into the training mode for this particular pose, as described above. © GLANTA Ltd 2011 10 SUREWASH ADMINISTRATION 4 SUREWASH ADMINISTRATION ID cards can be defined as ‘Admin Users’. When logged in as an admin, the following screen appears instead of the user introduction screen. The different admin functionalities are presented on the left side: -‐ View Records -‐ User Management -‐ Change Location -‐ Generate Report -‐ Configuration 4.1 VIEW RECORDS The “View Records” functionality allows you to get an overview of the usage of the system as a spreadsheet. The columns of the tables are: -‐ User: This indicates the ID of the user -‐ # Training: The number of training sessions performed by this user -‐ # Assessment: The number of assessments performed by this user © GLANTA Ltd 2011 11 SUREWASH ADMINISTRATION -‐ Passed: A ‘Yes’ indicates that this user passed at least one assessment, while a ‘No’ means that this user did not pass an assessment yet. The user with the ID ‘000000000000’ is the demo user, which means, whenever somebody logs in using the Demo button instead of using an ID card, the records are saved with this ID. 4.2 USER MANAGEMENT The user management allows you to register another ID card as an admin user. To do so, first push ‘User Management’ and the following screen will appear. © GLANTA Ltd 2011 12 SUREWASH ADMINISTRATION Now push ‘Register new Admin ID-Card’ and what you will see is the following message box: Now just swipe the ID card you want to register as an admin card. The message box will disappear and the card is from now on registered as an admin card. © GLANTA Ltd 2011 13 SUREWASH ADMINISTRATION 4.3 GENERATE REPORTS To generate a report, first select ‘Generate Report’ from the left side of the admin interface and the following screen will appear. The ‘Create Report’ button cannot be pushed until the Surewash USB Key is connected to the system. After plugging in the Surewash USB Key, the ‘Create Report’ button can be pushed. © GLANTA Ltd 2011 14 SUREWASH ADMINISTRATION After pushing the ‘Create report’ button the following screen will appear. There are two kinds of reports that can be generated by the system: -‐ Complete Report -‐ Specific Report © GLANTA Ltd 2011 15 SUREWASH ADMINISTRATION Push ‘Complete Report’ to generate a complete report, i.e. the generated report contains all the records from the system from the beginning until now. To generate a report containing records from a specific time frame only, specify the start and end time and push ‘Specific Report’. After creating a report, the report is automatically copied onto the attached USB Key alongside with an Excel file containing all the records of the system. 4.4 CONFIGURATION It is possible to change the time users have to spend on a particular pose before they pass. The parameters can be adjusted for each pose individually using the ‘+’ and ‘-‘ buttons beside the pose. After adjusting the parameters, they need to be saved by pushing the ‘Save’ button. The parameters can also be reset to the default values by pushing ‘Reset to default’. © GLANTA Ltd 2011 16 SUREWASH ADMINISTRATION 4.5 SUPPORT AND TROUBLESHOOTING The SureWash unit are extremely reliable however if the unit becomes unresponsive then the following troubleshooting steps should be tried: 1. Power down the unit by pressing and holding the on off button. Once the unit has been shutdown for 10 seconds restart the unit by pressing the on/off button. The system should restart successfully. 2. If the screen is dark / blank please ensure that the screen has not been powered off via the screen power button by mistake. Location of screen ON/OFF button. It is not necessary to turn off the screen seperately and it should not be used in normal operations 3. If these steps fail please send an email to [email protected] with a description of the problem and we will be in contact with you within one working day. © GLANTA Ltd 2011 17