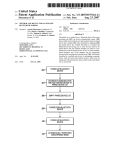
1
n
p
r
D ie
o
t
N a
o r
t y
D In
is f
t o
r r
ib m
u a
t t
e io
Guardian Offline Proofing System
P
r
o
Software
User Manual
Document Reference:
Issue: Release
Revision: 4.03
Document Date: Jun. 2011
PC Industries
176 Ambrogio Drive, Gurnee, IL 60031 – USA
Tel. +1 847 336 3300 - Fax +1 847 336 3232
http://www.pcindustries.com
n
Issue: Release
Revision : 4.03
p
r
D ie
o
t
N a
o r
t y
D In
is f
t o
r r
ib m
u a
t t
e io
Title : Guardian Offline Proofing - Software User Manual
Ref. :
Date :June 2011
P
r
o
This Page Left Intentionally Blank.
1
n
Issue: Release
Revision : 4.03
p
r
D ie
o
t
N a
o r
t y
D In
is f
t o
r r
ib m
u a
t t
e io
Title : Guardian Offline Proofing - Software User Manual
Ref. :
Date :June 2011
Table of Contents
1
Introduction ......................................................................................................................................... 4
1.1
2
Purpose and scope ..................................................................................................................... 4
Installation & Configuration ............................................................................................................... 5
2.1 Hardware and Software Requirements ........................................................................................... 5
2.2 How to configure the application. ................................................................................................... 5
2.3 Cleaning the scanner glass. ............................................................................................................ 5
2.4 Connect Scanner............................................................................................................................... 5
3
USAGE.................................................................................................................................................. 6
3.1
Introduction ................................................................................................................................. 6
3.2
Starting a New Project ................................................................................................................ 7
1.
New Project .................................................................................................................................. 7
2.
Choose Master Image Type........................................................................................................ 7
3.
Load Master Image ...................................................................................................................... 7
4.
Scan Settings............................................................................................................................... 8
5.
Scan Master Image....................................................................................................................... 8
6.
Rotate Master Image ................................................................................................................... 8
7.
Region of Interest Box ................................................................................................................ 9
8.
Position Region of Interest Box................................................................................................. 9
9.
Add Mask Button ....................................................................................................................... 10
10. Position Locate Boxes .............................................................................................................. 10
11. Train Master ............................................................................................................................... 10
12. Adjust Objects ........................................................................................................................... 11
13. Save Project ............................................................................................................................... 12
14. Master Image Window .............................................................................................................. 12
Open Project .............................................................................................................................. 12
2.
Select Project File ..................................................................................................................... 13
3.
Choose Test Image Type .......................................................................................................... 13
4.
Load Test Image ........................................................................................................................ 13
5.
Scan Test Image ........................................................................................................................ 14
6.
Rotate Test Image ..................................................................................................................... 14
7.
Auto-Find Number of Images ................................................................................................... 15
8.
Show Advance Position Button ............................................................................................... 15
P
r
1.
o
3.3 Opening an Existing Project .......................................................................................................... 12
9. Enter Number of Images............................................................................................................. 15
10.
Add Test Boxes ........................................................................................................................ 15
11. Adjust Test Box Spacing ........................................................................................................... 16
12. Objects Background Selection buttons.................................................................................... 16
2
n
Issue: Release
Revision : 4.03
p
r
D ie
o
t
N a
o r
t y
D In
is f
t o
r r
ib m
u a
t t
e io
Title : Guardian Offline Proofing - Software User Manual
Ref. :
Date :June 2011
13. Perform Inspection ..................................................................................................................... 16
14. Reset Button ................................................................................................................................ 16
15. Save Project Button .................................................................................................................... 16
16. Overview Window ....................................................................................................................... 17
17. Review Inspection Results ........................................................................................................ 18
3.4
Image Zoom Buttons ................................................................................................................ 21
1.
Zoom In ...................................................................................................................................... 21
2.
Zoom Out ................................................................................................................................... 21
3.
Zoom Fit ..................................................................................................................................... 21
3.5 Image Displayed Buttons ............................................................................................................... 21
1.
Results - 1 .................................................................................................................................. 21
2.
Test - 2 ........................................................................................................................................ 21
3.
Master - 3.................................................................................................................................... 21
3.6 System Settings .............................................................................................................................. 22
Login Button .............................................................................................................................. 22
2.
Login Popup .............................................................................................................................. 22
3.
Sensitivity Settings ................................................................................................................... 23
4.
Basic Settings............................................................................................................................ 24
5.
Advanced Option Settings ....................................................................................................... 25
6.
Advanced Object Settings........................................................................................................ 26
7.
Advanced Information Settings ............................................................................................... 27
P
r
o
1.
3
n
Issue: Release
Revision : 4.03
p
r
D ie
o
t
N a
o r
t y
D In
is f
t o
r r
ib m
u a
t t
e io
Title : Guardian Offline Proofing - Software User Manual
Ref. :
Date :June 2011
1 Introduction
1.1 Purpose and scope
The purpose of this document is to briefly describe the functionality of the Guardian Offline Proofing
software.
1.2 Problem reporting instructions
P
r
o
Record any on-screen error messages, and details on what was done to help duplicate the problem
and call PC Industries at 1-847-336-3300 for tech support.
4
n
Issue: Release
Revision : 4.03
p
r
D ie
o
t
N a
o r
t y
D In
is f
t o
r r
ib m
u a
t t
e io
Title : Guardian Offline Proofing - Software User Manual
Ref. :
Date :June 2011
2 Installation & Configuration
To install the Guardian Offline Proofing Software first uninstall (via control panel, add/remove
program) previous versions of the Guardian Offline Proofing Software.
Insert installation disk into CD reader and click on setup.exe.
The setup program will then guide you through the rest of the procedure.
2.1 Hardware and Software Requirements
Microsoft Windows with Intel or AMD-based processor.
2.2 How to configure the application.
Configuration items are not handled in this version.
2.3 Cleaning the scanner glass.
1. Disconnect the power cord from the scanner.
2. Open the scanner lid.
3. Clean the glass using a soft lint-free cloth that has been moistened with glass cleaner.
2.4 Connect Scanner
1. Connect one end of the USB / Firewire cable to your computer, and connect the other end
of the cable to the scanner’s USB / Firewire port.
2. Press the Power button on the front panel of the scanner, and wait for the lights to stop
blinking and stay on steady.
P
r
o
The scanner will be detected by your system automatically.
5
n
Issue: Release
Revision : 4.03
p
r
D ie
o
t
N a
o r
t y
D In
is f
t o
r r
ib m
u a
t t
e io
Title : Guardian Offline Proofing - Software User Manual
Ref. :
Date :June 2011
3 USAGE
3.1 Introduction
P
r
o
The Guardian Offline Proofing Software is developed by PC Industries to allow printers to automatically
inspect and compare scanned printed images to a PDF or other scanned printed images. The software
will also provide PDF to PDF comparison.
6
n
Issue: Release
Revision : 4.03
p
r
D ie
o
t
N a
o r
t y
D In
is f
t o
r r
ib m
u a
t t
e io
Title : Guardian Offline Proofing - Software User Manual
Ref. :
Date :June 2011
3.2 Starting a New Project
This section explains how to train a new master image.
1. New Project
Select the New button.
After you have selected the New button the Master Image buttons will be displayed.
2. Choose Master Image Type
The two choices are to Load Master from a file or Scan Master if there is a scanner attached to
the computer. When scanning a master, you must select the desired DPI of the scan and either
Color or Grayscale.
3. Load Master Image (Optional)
P
r
o
Click on the Load Master button (after selecting input type) at the top of the screen and the
following dialog box will appear.
Select the type of file to load. The choices are TIF, BMP or PDF format. Select the file then press
Open.
7
n
Issue: Release
Revision : 4.03
p
r
D ie
o
t
N a
o r
t y
D In
is f
t o
r r
ib m
u a
t t
e io
Title : Guardian Offline Proofing - Software User Manual
Ref. :
Date :June 2011
4. Scan Settings (Optional)
Click on the Scan Master button (after selecting input type) at the top of the screen and the
following dialog box will appear.
The recommended setting is 600 Scan DPI (dots per inch) but 400 DPI can be used for faster
speeds at a lower quality setting. There are also setting of 100 DPI and 200 DPI which can be
used for large format images. The Master Image resolution should be at the selected dpi or
higher. The software will automatically convert the resolution of the input file to match the
selected resolution.
Scan Contrast and Scan Brightness settings are used to adjust the scan to match the master
image quality. The W” width and H” height settings is provided in inches and can be set to match
the sample size.
The Test Box Mask is used to mask the edges of the region of interest. This setting can be
changed after the master setup is complete and the mask is displayed when toggling to the
master image after the inspection is complete.
Resize Image is used to adjust test images to match master images when not input at 100%
scaling.
Scanner Selection Box is used to indicate the type of Scanner. There are two selections, flatbed
and large format.
5. Scan Master Image (Optional)
Click on the Scan Master button (after selecting input type) at the top of the screen and a dialog
box from the scanner should appear indicating the scanner is acquiring the image.
6. Rotate Master Image
P
r
o
It’s recommended that the master image match the orientation of the scanned images. The
master image can’t be rotated after it’s trained but the scanned or test image can be rotated
before inspecting. Click on Rotate 90 CW to rotate the image rotate 90 degrees clockwise, click
on Rotate 180 to rotate the image 180 degrees and click on Rotate 90 CCW to rotate the image
90 degrees counter-clockwise.
8
n
Issue: Release
Revision : 4.03
p
r
D ie
o
t
N a
o r
t y
D In
is f
t o
r r
ib m
u a
t t
e io
Title : Guardian Offline Proofing - Software User Manual
Ref. :
Date :June 2011
7. Region of Interest Box
After scanning or loading a master image a position box will be centered and scaled to the size of
the image automatically.
8. Position Region of Interest Box
P
r
o
Left click the inspection box and drag the mouse until the area to be inspected is highlighted.
After releasing the mouse the box can be adjusted by left clicking and holding on the edge of the
box and moved by clicking and holding in the middle of the box.
9
n
Issue: Release
Revision : 4.03
p
r
D ie
o
t
N a
o r
t y
D In
is f
t o
r r
ib m
u a
t t
e io
Title : Guardian Offline Proofing - Software User Manual
Ref. :
Date :June 2011
9. Add Mask Button
If you want to ignore a selected area of print, press Add Mask and size it accordingly. Click Next
Step to proceed.
10. Position Locate Boxes
Left click the three Locate boxes and drag the boxes over areas of text or copy.
Locate Box General Rules:
A.
B.
C.
D.
Place locate boxes over the same color print.
Place the locate boxes as close to the corners as possible.
Use unique features to avoid confusion.
The lower locate box can be placed in either bottom corner.
Tip: Right click on the image to bring up the Zoom controls
11. Train Master
P
r
o
After positioning the locates, press the Train button to train Objects.
10
n
Issue: Release
Revision : 4.03
p
r
D ie
o
t
N a
o r
t y
D In
is f
t o
r r
ib m
u a
t t
e io
Title : Guardian Offline Proofing - Software User Manual
Ref. :
Date :June 2011
12. Adjust Objects (Optional)
After the software successfully trains, then Add or Delete any objects.
13. Save Project
P
r
o
The Master image must then be approved by pressing the Save Project button. After approving
the Project Save As dialog will automatically appear prompting the project to be saved as a file
name for future use. Enter a file name and click Save. The Guardian project files will be saved in
the OLP format, which is a SQL Database file designed for the Guardian OLP.
11
n
Issue: Release
Revision : 4.03
p
r
D ie
o
t
N a
o r
t y
D In
is f
t o
r r
ib m
u a
t t
e io
Title : Guardian Offline Proofing - Software User Manual
Ref. :
Date :June 2011
14. Master Image Window
After saving the project the master image will be displayed in the upper left window. The open
project name will also be displayed under the image. Right click to display zoom options.
3.3 Opening an Existing Project
This section will give you instructions on how to open an existing project and perform print quality
inspection.
1. Open Project
P
r
o
Select the Open button to load an existing project.
12
n
Issue: Release
Revision : 4.03
p
r
D ie
o
t
N a
o r
t y
D In
is f
t o
r r
ib m
u a
t t
e io
Title : Guardian Offline Proofing - Software User Manual
Ref. :
Date :June 2011
2. Select Project File
A file open dialog box will appear. Select the .OLP file and click on the Open button.
3. Choose Test Image Type
P
r
o
The two choices are to Load Test from a file or Scan Test if there is a scanner attached to the
computer.
13
n
Issue: Release
Revision : 4.03
p
r
D ie
o
t
N a
o r
t y
D In
is f
t o
r r
ib m
u a
t t
e io
Title : Guardian Offline Proofing - Software User Manual
Ref. :
Date :June 2011
4. Load Test Image (Optional)
Click on the Load Test button (after selecting input type) at the top of the screen and the
following dialog box will appear.
Select the type of file to load. The choices are TIF, PDF and BMP. Select the file then press
Open.
5. Scan Test Image (Optional)
Click on the Scan Test button at the top of the screen and a dialog box from the scanner should
appear indicating the scanner is acquiring the image.
6. Rotate Test Image (Optional)
P
r
o
Click on Rotate 90 CW to rotate the image rotate 90 degrees clockwise, click on Rotate 180 to
rotate the image 180 degrees and click on Rotate 90 CCW to rotate the image 90 degrees
counter-clockwise.
14
n
Issue: Release
Revision : 4.03
p
r
D ie
o
t
N a
o r
t y
D In
is f
t o
r r
ib m
u a
t t
e io
Title : Guardian Offline Proofing - Software User Manual
Ref. :
Date :June 2011
7. Auto-Find Number of Images
Enter the number of images within the Scan for inspection and click the Find button. The
software will automatically find and position as many test boxes as possible. Skip to step 11 if
all images are found and positioned correctly.
Note: If images are displayed with blue “X” through them after clicking on the find button, then
image scan was cut-off or the scanned image does not match the master image.
Only perform steps 8-12 if step 7 didn’t successfully Auto Find all of the images
8. Show Advance Position Button
Click on the show Advance Position button to manually set the number of images.
9. Enter Number of Images (Optional)
Type in the number of images across into #Across and the number of images around into
#Around. When this number is changed it will enable the Add Test Boxes button.
Add Test Boxes (Optional)
Click on the Add Test Boxes button after entering the number around and number across.
P
r
o
10.
15
n
Issue: Release
Revision : 4.03
p
r
D ie
o
t
N a
o r
t y
D In
is f
t o
r r
ib m
u a
t t
e io
Title : Guardian Offline Proofing - Software User Manual
Ref. :
Date :June 2011
11. Adjust Test Box Spacing (Optional)
Click on the Test Box Spacing sliders or enter the spacing in pixels into the text boxes. While
adjusting the sliders the test box spacing will adjust.
12. Objects Background Selection buttons (Optional)
These selection buttons are used for selecting inspection parameters. It is possible to inspect
objects only, background only, or objects and background. Objects and background is the default
setting.
13. Perform Inspection
Click on the Inspect button to perform inspection.
14. Reset Button
When the reset button is clicked the operator is allowed to reposition the region of interest boxes
before conducting another inspection.
15. Save Project Button
P
r
o
When the save project button is clicked the project is saved.
16
n
Issue: Release
Revision : 4.03
p
r
D ie
o
t
N a
o r
t y
D In
is f
t o
r r
ib m
u a
t t
e io
Title : Guardian Offline Proofing - Software User Manual
Ref. :
Date :June 2011
16. Overview Window
P
r
o
Provides a window to display the current zoom area on the main window.
17
Title : Guardian Offline Proofing - Software User Manual
Ref. :
Date :June 2011
p
r
D ie
o
t
N a
o r
t y
D In
is f
t o
r r
ib m
u a
t t
e io
n
Issue: Release
Revision : 4.03
17. Review Inspection Results
1
3
4
2
6
5
#1 Test Box Location – Displays test box location relative to other boxes.
#2 Test Box Results – Displays defect score in pixels. If this number is larger than the defect limit
the inspection failed due to defects.
#3 Defect Box – Displays blue defect boxes around defects that meet the defect size and contrast
settings. Copy defects are displayed in red and background defects are displayed in yellow. If the
mouse is hovered over the defect box the overall defect number and defect size is displayed.
#4 Zoom Menu – Right clicking inside image window will bring up the zoom settings menu.
P
r
o
#5 Defect Chart – Displays the result of the inspection. To move up through the defects click on the
move up button or press the number 4 key on the keyboard. To reject a defect click on the reject
button or press the number 5 key on the keyboard. To accept a defect click on the accept button or
press the number 6 key on the keyboard. Click on the print screen button to print a picture of the
screen and click on the PDF report button to Generate a secure PDF report for an inspection.
#6 PDF Report – Click on “Create Report” or “PDF Report”, depending on which report type was
purchased with the system to display the detailed results of the inspection. The report is automatically
saved to the hard drive and can be printed from directly from the on-screen report viewer.
18
n
Issue: Release
Revision : 4.03
p
r
D ie
o
t
N a
o r
t y
D In
is f
t o
r r
ib m
u a
t t
e io
Title : Guardian Offline Proofing - Software User Manual
Ref. :
Date :June 2011
P
r
o
Sample Report
19
n
Issue: Release
Revision : 4.03
P
r
o
p
r
D ie
o
t
N a
o r
t y
D In
is f
t o
r r
ib m
u a
t t
e io
Title : Guardian Offline Proofing - Software User Manual
Ref. :
Date :June 2011
20
n
Issue: Release
Revision : 4.03
p
r
D ie
o
t
N a
o r
t y
D In
is f
t o
r r
ib m
u a
t t
e io
Title : Guardian Offline Proofing - Software User Manual
Ref. :
Date :June 2011
3.4 Image Zoom Buttons
The image zoom buttons are used adjust the operators view of the image being inspected.
1.
2.
3.
Zoom In
When zoom in is used the main viewing area displays an enlarged view of a specific portion of
the image. The more zoomed in the smaller the portion of the main image being viewed.
Zoom Out
When zoom out is used the area being viewed becomes larger. Zoom out can will only work until
the whole image is displayed in the main viewing area.
Zoom Fit
When zoom fit is used the main viewing area displays the complete image being inspected.
3.5 Image Displayed Buttons
These buttons allow the operator to cycle through an inspected image, the master image and a displayed
image.
1. Results - 1
Clicking on this button or pressing the 1 button on the keyboard will display the inspection results.
2. Test - 2
Clicking on this button or pressing the 2 button on the keyboard will display the test image without
the inspection results.
3. Master - 3
P
r
o
Clicking on this button or pressing the 3 button on the number keyboard will display the master
image.
21
n
Issue: Release
Revision : 4.03
p
r
D ie
o
t
N a
o r
t y
D In
is f
t o
r r
ib m
u a
t t
e io
Title : Guardian Offline Proofing - Software User Manual
Ref. :
Date :June 2011
3.6 System Settings
This section gives instructions on how to adjust the sensitivity and system parameters. In order to change
system and sensitivity setting it is necessary to log into the OLP system as a manager or administrator.
There are three levels of security, operator, manager and administrator. Operators have no access to
settings. Managers have access to sensitivity settings and basic settings. Administrators have access to
all settings.
1. Login Button
Click on the Login Button to display the user login popup box.
2. Login Popup
P
r
o
In the Operator ID text box enter in a valid operator name. Next enter a valid password for the
operator. Clicking on the OK button will log the operator into the system. Clicking on the cancel
button will leave the system with the previous operators settings.
22
n
Issue: Release
Revision : 4.03
p
r
D ie
o
t
N a
o r
t y
D In
is f
t o
r r
ib m
u a
t t
e io
Title : Guardian Offline Proofing - Software User Manual
Ref. :
Date :June 2011
3. Sensitivity Settings
Allows the sensitivity to be adjusted.
P
r
o
a. Min Defect Size – Objects/Background – (in pixels) the software will filter and ignore
defects blobs smaller than this setting. The lower the number increases the sensitivity to
small defects.
b. Contrast – Objects / Background – (in grayscale levels) the software will filter and
ignore defects with a smaller contrast difference than this setting. The lower the number
increases the sensitivity to light contrast defects.
c. Edges – Object / Background – (in pixels) the software will filter and ignore defects on
the edges of graphics or characters. The lower the number increases the sensitivity to
register defects.
23
n
Issue: Release
Revision : 4.03
p
r
D ie
o
t
N a
o r
t y
D In
is f
t o
r r
ib m
u a
t t
e io
Title : Guardian Offline Proofing - Software User Manual
Ref. :
Date :June 2011
4. Basic Settings
Allows the system performance to be adjusted.
a. Test Box Mask – Select the shape of the test box; there are three choices: Rectangular,
Round Rectangular, and Ellipse.
b. Load / Save Settings – Allows the manager to load and save a set of default settings to be
used for the current or a future project.
c. Object Settings (Manager Security Level)
1. Object Search – (in pixels) Area of locate box movement. The higher the number allows
for coarser alignment of the test boxes at the expense of inspection processing time.
2. Object Accept – (percentage) Value required for a locate accept. The higher the value
the more accurate, the lower the value the higher chance of locating incorrectly.
3. Object Search – (in pixels) Area of Object box movement. The higher the number allows
for coarser alignment of the test boxes at the expense of inspection processing time.
4. Object Accept – (percentage) Value required for a locate accept. The higher the value
the more accurate, the lower the value the higher chance of locating incorrectly.
5. Object Edge – (in grayscale) Used to detect the object edge contrast value on the master
image. Set lower to detect lower contrast objects.
6. Max Object Size – (in pixels) Maximum size of an Object.
7. Auto Object Contrast – Un-check to manually control the Contrast setting for Objects.
8. High Object Sensitivity – Provides an alternate method of “Auto Object Contrast” which
will tend to be more sensitive to contrast differences between the test image object and the
master object.
P
r
o
9. High Bkgd Sensitivity – Provides an alternate method of “Auto Object Contrast” which
will tend to be more sensitive to contrast differences between the test image object and the
master object.
24
n
Issue: Release
Revision : 4.03
p
r
D ie
o
t
N a
o r
t y
D In
is f
t o
r r
ib m
u a
t t
e io
Title : Guardian Offline Proofing - Software User Manual
Ref. :
Date :June 2011
5. Advanced Option Settings
P
r
o
These settings used to adjust system performance, and are only accessible to the system
administrator. When making changes to setting re-inspection is necessary for the changes to take
effect.
a. Highlights – When this option is enabled the OLP displays defect highlighting.
b. Defect Boxes – When this option is enabled defect boxes are displayed around all image
defects.
c. Group Defects – When this option is enabled defects that are within the group defect spacing
are grouped together.
d. Locate Boxes – When this option is enabled locate boxes are displayed showing alignment
issues for an inspected image.
e. Auto Find – when this option is enabled the OLP will automatically find images from a loaded
test file or scan.
f. Auto Inspect – When this option is enabled the OLP will automatically inspect images from a
test file or scan. Should be used in conjunction with Auto Find.
g. Auto Skew – When this option is enabled the OLP will provide automatic skew adjustments.
h. X Autoscaling – Allows automatic scaling along the horizontal axis.
i. Y Autoscaling – Allows automatic scaling along the vertical axis.
j. Max Skew – The maximum distance skew is allowed in Degrees.
k. Find Accept – The minimum acceptable match percent for Find.
l. Max Defects – The maximum number of ant type of defect allowed in an Inspection. The OLP
will provide a message if this limit is exceeded.
m. Update Rate – This setting is the number of inspections plus one that will happen before a
screen is updated.
n. Group Spacing – Distance in pixels defects must be within for grouping defect boxes.
o. Locate Search – is used for adjusting the size for the locate search area (in pixels) on a test
image. Decreasing this number improves the maximum inspection speed. Increase this number if
inspections fail due to acceptable positional variations on the test image.
p. Locate Accept – sets the minimum match value for the locate image acceptance. Decrease
this number if the inspection fails because of acceptable quality variations on the test image.
Increase this number to fail unacceptable quality variations on the test image and to prevent
incorrectly locating on similar areas of print. Typical setting: 50 to 85.
25
n
Issue: Release
Revision : 4.03
p
r
D ie
o
t
N a
o r
t y
D In
is f
t o
r r
ib m
u a
t t
e io
Title : Guardian Offline Proofing - Software User Manual
Ref. :
Date :June 2011
6. Advanced Object Settings
These setting are used to define objects, and are only accessible to the system administrator.
When making changes to setting re-inspection is necessary for the changes to take effect.
P
r
o
a. Object Min – Filters objects found below this total pixel size during object training.
Decrease this number to allow for smaller objects to be trained and inspected. Increase
this number to reduce the number of small objects trained. Typical setting: 4 to 10.
b. Object Border – Sets the border area around found objects during object training.
Decrease this number to separate and inspect more objects independently. Increase this
number to enlarge the area around the object to be inspected at the object sensitivity
level. Typical setting: 0 to 3.
c. Min Contrast – is used to filter out low contrast objects. A low minimum contrast will allow
for recognition of a higher volume of objects, while a high minimum contrast will recognize
fewer objects.
d. Group Distance – The distance in pixels objects will be grouped as a single object.
e. Small Border – This is the size of the border placed around small objects in pixels.
f. Small Object Size – Objects with widths or heights less than this setting in pixels will
have the small object border placed around them.
g. Smooth Master – When checked applies a smoothing algorithm to smooth edges for
improved object training.
h. Group Objects – When enabled allows for the grouping of objects within the group
distance.
i. Ignore Inside – Removes objects trained inside other objects.
j. Objects – This displays the total number of objects found in an inspection.
k. Display Objects – This displays the object locations on the master image for the last
region inspected.
l. Repeat Train – Retrains the objects during the inspection process for all regions.
m. Pos Diff Check – Algorithm that limits the search area and locates for objects.
26
n
Issue: Release
Revision : 4.03
p
r
D ie
o
t
N a
o r
t y
D In
is f
t o
r r
ib m
u a
t t
e io
Title : Guardian Offline Proofing - Software User Manual
Ref. :
Date :June 2011
7. Advanced Information Settings
Displays System Information for the OLP, and allows for alternate advanced options. When
making changes to setting re-inspection is necessary for the changes to take effect.
P
r
o
a. Database File – When enabled a data base file (.OLP) is used to record all inspection
information.
b. Default Scanner – When unchecked will display a scanner selection dialog box. When
enabled set the last scanner used as the default scanner.
c. Scanner UI – When enabled allows access to the Scanners settings dialog box for
adjusting settings within the scanner.
d. Large Master – Displays if current master image is considered a large format image and
saves to hard drive.
e. Print Label Option – When enabled displays a print label button next to the save settings
button. Clicking on the print label button allows labels to be printed to a label printer.
f. Auto Print Report – When enabled the OLP will automatically print a text only Report?
g. No Defect/ Chart – Deletes defects to remove from reports.
h. Objects – Number of objects trained.
i. Filtered – Number of objects grouped.
27