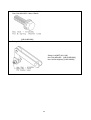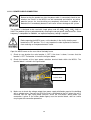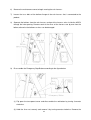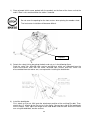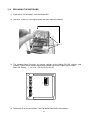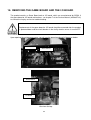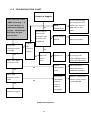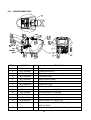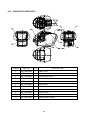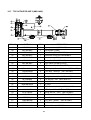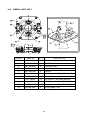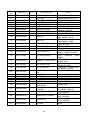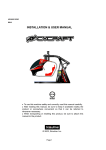
1
CYCRAFT INITIAL D VERSION 3
USER MANUAL
For your safe and correct use, read this manual carefully and understand
it thoroughly before operation.
Please keep this manual in a safe place at all times and refer to it for any
future references.
Make sure to pass this manual on to future owners of Cycraft when the
product is moved or sold.
BEFORE USING THE PRODUCT, BE SURE TO READ THE FOLLWING:
To maintain safety:
To ensure the safe operation of this product, be sure to read the following before usage.
The following instructions are intented for the users, operators and the personnel in charge of the
operation of the product. After carefully reading and sufficiently understanding the warning displays
and cautions, handle the product appropriately. Be sure to keep this manual close to the product or
in a convenient place for future reference.
Herein, explanations which requires special attention are enclosed with dual lines. Depending on
the potentially hazardous degrees, the terms of DANGER, WARNING, CAUTION, etc. are used.
Be sure to understand the contents of the displays before the text.
Indicates that mishandling the
product by disregarding this
pictograph will cause severe
injury or death.
Indicates that mishandling the
product by disregarding this
caution will cause a slight
hazardous situation which can
result in personal injury and/or
material damage.
Indicates that mishandling the
product by disregarding this
warning will cause a potentially
hazardous situation which can
result in death or serious injury.
For safe useage of this product, the following pictographs are used:
Indicates “HANDLE WITH CARE.” In order to protect the human body and
equipment, this display is attached to places where the User Manual should be
referred to.
Indicates a “Protective Earth Terminal.” Before operating the equipment, be sure to
connect it to the Ground.
(The step may be omitted for products in which a power cord with earth is used.)
● Perform work in accordance with the instructions herein stated.
Instructions for work are explained by paying attention to the aspect of accident prevention.
Failing to perform work as per the instructions can cause accidents. In the case where only those
who have technical expertise should perform the work to avoid hazardous situation, the
instructions herein state that the serviceman should perform such work.
● Be sure to turn off power before working on the machine.
To prevent electric shock, be sure to turn off power before starting the work in which the worker
touches the interior of the product. If the work is to be performed in the power-on status, the
Instruction Manual herein always states to that effect.
● Be sure to ground the Earth Terminal (this is not required in the case where a power cord with
earth is used).
This product equipped with the Earth Terminal. When installing the product, Connect the Earth
Terminal to the “accurately grounded indoor earth terminal” by using an earth wire. Unless the
product is grounded appropriately, the user can be subject to electric shock. After performing
repair, etc. for the Control equipment, ensure that the Earth Wire is firmly connected to the
Control equipment.
1
● Ensure that Power Supply used is equipped with an Earth Leakage Breaker.
This product does not incorporate the Earth Leakage Breaker. Using a power supply which is not
aquipped with the Earth Leakage Breaker can cause a fire when earth leakage occurs.
● Be sure to use fuses which meet the specified rating. (Only for the machines which use
fuses)
Using fuses exceeding the specified rating can cause a fire and electric shock.
● Specification changes (removal of equipment, conversion and additioin) not designated by
Simuline are not allowed.
The parts of the product include warning labels for safety, covers for personal protection, etc. It is
very hazardous to operate the product by removing parts and or modifying the circuits. Should
doors, lids and protective parts be damaged or lost, refrain from operating the product, and
contact where the product was purchased from or the office herein stated. Simuline shall not be
held responsible for any accidents, compensation for damage to a third party, resulting from the
specifications not designated by Simuline.
● Ensure that the product meets the reqirements of appropriate Electrical Specification.
Before installing the product, check for Electrical Specifications. Simuline products have a
nameplate on which Electrical Specifications are described. Ensure that the product is compatible
with the power supply voltage and frequency requirements of the location. Using any Electrical
Specifications different from the designated Specifications can a fire and electric shock.
● Install and operate the product in places where appropriate lighting is available, allowing
warning labels to be clearly read.
To ensure safety for the customers, labels and printed instructions describing potentially
hazardous situation are applied to places where accidents can be caused. Ensure that where
product is operated has sufficient lighting allowing the warnings to be red. If any label is peeled off,
apply it again immediately. Please place an order with where the product was purchased from or
the office herein stated.
● When handling the Monitor, be very careful. (Applies only to the product w/monitor)
Some of the monitor(TV) parts are subject to high tension voltage. Even after running off power,
some portions are still subject to high tension sometimes. Monitor repair and replacement should
be performed only be those technical personnel who have knowledge of electricity and technical
expertise.
● Be sure to adjust the monitor (projector) properly. (Applies only to the product w/monitor)
Do not operate the product leaving on-screen fleakering or blurring as it is. Using the product with
the monitor net properly adjusted may cause dizziness or a headache to an operator, a palyer, ot
the customers.
● When transporting or reselling this product, be sure to attach this manual to the product.
In the case where commercialiiy available monitors and printers are used in this product, only the
contents relating to this product are explained herein. Some commercially available equipment
has functions and reactions not stated in this manual. Read this manual together with the specific
Instruction Manual of such equipment.
・ Description herein contained may be subject to improvement changes without notice.
・ The contents described herein are full prepared with due care. However, should any question
arise or errors can be found, please contact Simuline.
INSPECTIONS IMMEDIATELY AFTER TRANSPORTING THE PRODUCT TO THE LOCATION.
Normally, at the time of shipment, Simuline products are in a status allowing for usage
immediately after transporting to the location. Nevertheless an irregular situation may occur
during transportation. Before turning on power, check the following points to ensure that the
2
product has been transported in a satisfactory status.
□ Are they any dented portions or defects(cuts, etc.) on the external surfaces of the cabinet?
□ Are Casters and Adjusters damaged?
□ Do the power sulpply voltage and frequency requirements meet with those of the location?
□ Are all wiring connectors correctly and securely connected? Unless connected in the
correct direction, connector connections can not be made accurately. Do not insert
connectors forcibly.
□ The fuses used meet specified rating? Is the Circuit Protector in an energized status?
□ Are all accessories available?
□ Can all Doors and Lids be opened with the Accessory keys? Can Doors and Lids firmly
closed?
3
TABLE OF CONTENTS
BEFORE USING THE PRODUCT, BE SURE TO READ THE FOLLOWING
TABLE OF CONTENTS
INTRODUCTION TO THE MANUAL
1. HANDLING CAUTIONS.............................................................................................................. 10
2. INSTALLATION LOCATION CAUTIONS.................................................................................... 16
3. CAUTIONS: OPERATION .......................................................................................................... 18
4. NAMES OF PARTS.................................................................................................................... 22
5. ACCESSORIES.......................................................................................................................... 24
5-1 CHECKLIST AFTER OPENING THE PACKAGE............................................................. 24
5-2 PARTS AND ACCESSORIES USED FOR PACKING ...................................................... 24
5-3 INSTALLATION ACCESSORIES ..................................................................................... 25
5-4 PACKAGE ITEMS AND QUANTITIES............................................................................. 29
5-5 ITEMS TO BE STORED FOR LATER USE ..................................................................... 30
6. INSTALLATION AND ASSEMBLY............................................................................................... 31
6-1 CAUTIONS DURING HANDLING ................................................................................... 31
6-2 CONSIDERATIONS FOR THE INSTALLATION AREA .................................................... 35
6-2-1 INSTALLATION ENVIRONMENT REQUIREMENTS ............................................. 35
6-2-2
ELECTRIC SPECIFICATIONS ............................................................................. 35
6-3 INSTALLING & ASSEMBLING TOOLS AND EQUIPMENT ............................................. 37
6-4 OUTLINE OF THE INSTALLATION PROCEDURE.......................................................... 38
6-5 INSTALLING THE REAR CASTERS AND MOVING THE PRODUCT ............................. 39
6-5-1
INSTALLING THE REAR CASTERS.................................................................... 39
6-5-2
REMOVING THE CASTERS................................................................................ 40
6-6 SECURING THE BASE TO THE FLOOR (ADJUSTING LEVEL ADJUSTERS) ............... 41
6-7
ATTACHING THE HEAVE ACTUATOR.......................................................................... 42
6-8
ATTACHING THE SAFETY LINK................................................................................... 44
6-9 ASSEMBLING THE CASTER COVERS.......................................................................... 45
6-10 SETTING THE BEAM SENSORS ................................................................................... 46
6-10-1 INSTALLING THE BEAM SENSOR ..................................................................... 46
6-10-2 BEAM SENSOR ADJUSTMENT .......................................................................... 47
6-11 POWER CABLE CONNECTION.................................................................................... 48
6-11-1 PREPARING THE POWER CABLE...................................................................... 48
6-11-2 POWER CABLE CONNECTION........................................................................... 49
6-12 ASSEMBLING THE BOARDING STEP, COIN TOWER AND FENCE POLES........... 51
6-13 ASSEMBLING THE BOARDING STEP AND THE FENCE ........................................... 52
6-14 INSTALLING THE COIN MECHANISM ........................................................................... 55
6-14-1 ASSEMBLING THE MECHANICAL PARTS OF THE COIN MECHANISM ........... 55
4
6-14-2 COIN WIRING CONNECTION............................................................................. 57
6-15 INSTALLING THE ENTRANCE ON THE OPPOSITE SIDE............................................. 58
6-16 GAME OPERATION VERIFICATION............................................................................ 62
6-17 AFTER INSTALLATION IS COMPLETE ....................................................................... 62
7. TRANSPORT & RE-INSTALLATION .......................................................................................... 63
7-1 PRECAUTIONS WHEN TRANSPORTING AND RE-INSTALLING THE PRODUCT........ 63
7-2 TOOLS FOR TRANSPORTING & RE-INSTALLING....................................................... 65
7-3 TRANSPORTING AND RE-INSTALLING THE PRODUCT OUTSIDE THE SHOP ......... 65
7-4 MOVING THE PRODUCT WITHIN THE SAME SHOP ................................................... 70
8. PLAYING THE GAME (NORMAL OPERATION) ........................................................................ 71
8-1 INSPECTION BEFORE OPERATION............................................................................. 71
8-2 GAME STORY ................................................................................................................ 71
9. TEST & DATA DISPLAY............................................................................................................ 72
9-1 FUNCTIONS OF THE OPERATION [OP] PANEL SWITCHES ....................................... 72
9-2 POWER ON/OFF............................................................................................................ 74
9-3 BOOTING IN THE RUN MODE ...................................................................................... 75
9-4 SYSTEM OFF IN RUN MODE ........................................................................................ 75
9-5 MAINTENANCE MODE .................................................................................................. 76
9-5-1 SYSTEM ON IN MAINTENANCE MODE .............................................................. 76
9-5-2
CHANGING SETTINGS BY SERVICE LCD OPERATION ................................... 77
9-6 SPEAKER VOLUME CONTROL ..................................................................................... 78
9-7 GAME DATA DISPLAY .................................................................................................... 79
10. SAFETY SYSTEM................................................................................................................... 80
11. MSCU ..................................................................................................................................... 81
11-1 REPLACING THE COMPACT FLASH MEMORY CARD ................................................. 81
11-2 CHECKING THE BOARDS INSIDE THE MSCU ............................................................. 82
11-3 REPLACING THE MOTION BD ...................................................................................... 84
11-4 COUNTERMEASURES IN CASE THE MOTION BD FAILS TO BOOT........................... 85
11-4-1 IN CASE THE MAINTENANCE LCD DISPLAYS ONLY A CURSOR EVEN AFTER 3 MINUTES ......... 86
11-4-2 IN CASE MAINTENANCE LCD SHOWS A MESSAGE STATING 「CYCRAFT KERNEL LOADING….」
EVEN AFTER 3 MINUTES WITHOUT FURTHER PROGRESS .............................................. 86
11-5 REPLACING THE FLOOR BEAM SENSOR LED............................................................ 87
12. MONITOR ............................................................................................................................... 88
12-1 SAFETY CAUTIONS: MONITOR HANDLING ................................................................. 88
12-2 CLEANING THE SURFACE OF THE CRT................................................................... 90
12-3 MONITOR ADJUSTMENT............................................................................................... 90
13. DISASSEMBLING THE HANDLE MECHANICS ASSEMBLY ................................................ 94
14. REMOVING THE PEDAL MECHANICS ASSEMBLY.............................................................. 97
15. REMOVING THE GAME BOARD AND THE I/O BOARD ........................................................ 98
15-1 REMOVING THE GAME BOARD.................................................................................... 99
5
15-1-1 REMOVING THE GD-ROM DRIVE ...................................................................... 99
15-1-2 REMOVING THE NAOMI BOARD ..................................................................... 100
15-1-3 INSTALLING THE NAOMI BOARD .................................................................... 100
15-2 DISASSEMBLING THE I/O BOARD.............................................................................. 101
16. MAINTENANCE .................................................................................................................... 102
16-1 ROUTINE MAINTENANCE ........................................................................................... 102
16-2 CHECKING MAJOR JOINTS...................................................................................... 103
16-3 CHECKING THE SNAP RING ...................................................................................... 105
16-4 CHECKING THE WELDED PARTS............................................................................... 105
16-5 TOP ACTUATOR DRIVE BELT...................................................................................... 105
16-6 CLEANING THE MSCU AIR FILTER & FAN ............................................................... 106
16-7 GREASING THE ACTUATORS .................................................................................. 106
16-8 GREASING THE JOINTS ........................................................................................... 108
17. TROUBLESHOOTING ............................................................................................................111
17-1 GAME BOARD ERROR MESSAGES..........................................................................111
17-2 HANDLE MECHANICS AND PEDAL MECHANICS ERROR MESSAGES ..................111
17-3 MSCU ERROR MESSAGES (DISPLAYED ON MAINTENANCE LCD) ..........................111
17-4 NO ERROR MESSAGES ARE DISPLAYED (ON MAINTENANCE LCD)...................... 114
17-5 NO GAME ERROR MESSAGE IS DISPLAYED ............................................................ 115
17-6 TROUBLESHOOTING CHART.................................................................................. 116
18. NETWORK SETTING ........................................................................................................... 118
19. PART LIST ............................................................................................................................ 119
19-1 FRAME ASS’Y ............................................................................................................ 120
19-2 ROCKER ARM ASS’Y ................................................................................................ 122
19-3 CABIN FRAME ASS’Y ................................................................................................ 123
19-4 CABIN FRP COVER ASS’Y ........................................................................................ 125
19-5 CABIN SEAT ASS’Y.................................................................................................... 126
19-6 HEAVE ACTUATOR ASS’Y(ADS-180) ........................................................................ 128
19-7 TOP ACTUATOR ASS’Y(ABS-180C) .......................................................................... 129
19-8 GIMBAL JOINT ASS’Y ................................................................................................ 130
19-9 SENSOR PART .......................................................................................................... 131
19-10 FENCE ASS’Y .......................................................................................................... 132
19-11 SUPPORTER PART.................................................................................................. 136
19-12 CABIN & ARM CLAMP ASS’Y .................................................................................. 138
19-13 MSCU PART............................................................................................................. 140
19-14 MAINTENANCE PANEL ........................................................................................... 143
19-15 CABIN PART ............................................................................................................ 145
19-16 ASSY HANDLE MECHA (SPG-2500)..................................................................... 147
19-17 ASSY ACCEL & BRAKE (SPG-2200) ....................................................................... 147
19-18 ASSY STEERING (SPG-2001) ................................................................................. 147
6
20. WIRE HARNESS LIST ........................................................................................................ 148
20-1 OP PANEL PART CABLE LIST .................................................................................... 148
20-2 CABIN PART CABLE LIST 1 ....................................................................................... 149
20-3 CABIN PART CABLE LIST 2........................................................................................ 151
21. GENERAL WIRING DIAGRAM ............................................................................................. 152
7
INTRODUCTION TO THE MANUAL
This manual describes the electronic assemblies, electronic mechanisms, maintenance
procedures, spare parts and the overall operation procedures for the product, “CYCRAFT”.
This manual is intended for the owners, operators and operations managers. Please read this
manual carefully and fully understand it before operation. If the product does not work as
expected, do not allow anyone except a qualified engineer touch the product, and contact the
company of the dealer from whom the product was originally purchased or the customer
service center. When you need to repair the product or purchase/request parts (expendables),
contact to supplier.
This manual also uses an 「Important」 warning mark which is surrounded with a thick double
lined box as shown below to provide information that is important but not such that there is a
danger of any serious accident or material damages.
Indicates important information that, if ignored, may result in the mishandling of the
product and will result in degraded performance leading to product shutdown.
SPECIFICATIONS
Installation Space (including fence) :
4,070 mm(W) x 2,870mm(D)
(160.236 in. x 112.992 in.)
Height
:
2,500 mm (98.425 in.)
Weight (Excluding fence)
:
1,150kg (2,535.3 lbs.)
Power consumption/Max. current
:
1.5kW 17.5A (AC 200V 50/60Hz Area)
1.5kW 16.8A (AC 208V 50/60Hz Area)
1.5kW 15.9A (AC 220V 50/60Hz Area)
1.5kW 15.2A (AC 230V 50/60Hz Area)
1.5kW 14.5A (AC 240V 50/60Hz Area)
Monitor
:
29 inch color monitor
DEFINITION OF SHOP MAINTENANCE PERSONNEL & ENGINEER (SERVICEMAN)
Any work that is instructed in this manual to be performed by a
「shop
maintenance
personnel 」 or 「 engineer 」 or any work that is not specifically described in this
manual should not be performed by personnel who do not have a full understanding
of the product or do not have the necessary technical expertise to perform the work.
Electrical shock or other serious accidents may occur.
Replacement of parts and maintenance work on the product should always be executed by the
shop maintenance personnel or a qualified engineer, who are defined below. This manual
specifically instructs that any potentially dangerous or harmful work must be performed by a
8
qualified engineer with the necessary technical knowledge. The shop maintenance personnel
and the engineer are defined as follows.
Shop Maintenance Personnel: A person who has experience in maintaining AM (amusement
machines) devices or vending machines and is engaged in maintenance activities such as
assembly and installation, regular inspection, and replacement of parts/expendables within the
AM facilities or a shop under the management of the owner or the manager of the shop.
Work scope of the shop maintenance personnel: Assembling / installing AM devices or
vending machines, maintaining and inspection, and replacing parts/expendables.
Engineer: A person who is or has been engaged in designing / manufacturing / inspecting /
maintaining the AM device with the manufacturer. A person who has a technical high school or
higher degree in the field(s) of electricity / electronics / mechanics and is normally involved in
the maintenance and repair of AM devices.
Work scope of the engineer: Assembling/installing AM devices or vending machines and
repairing/adjusting electronic/mechanic parts.
9
1. HANDLING CAUTIONS
When installing, maintaining or handling the product, the following cautions should be observed
in order to enjoy the game safely.
Failure to follow the warnings listed below and in other parts of this manual may cause physical
injuries or damage to the machine.
●
Before any installation or maintenance work, make sure to turn off the power.
Failure to do so may cause an electric shock or short-circuit. In case it is
necessary to keep the power on for a certain type of work, the manual will
explicitly state so.
● Do not suddenly pull out or insert the power plug from/into an outlet. It may
cause an electric shock or short-circuit.
● Do not attempt to touch any plug with wet hands. It may cause an accident
due to electric shock.
● Power cables/cords or grounding wires should not be exposed such as on a
passage. The exposure may cause physical injuries, possibly resulting in
short-circuit or electric shock.
● Do not place any article on power cables/cords nor damage them, for it may
cause a fire or electric shock.
● Do not pull on the power cables/cords unnecessarily during or after
installation. Damaged cords may cause a fire or electric shock.
● If any power cord is damaged, ask the manufacturer/supplier for a
replacement. Using a damaged power cord can result in a fire, electric shock
or electric leakage.
● Make sure to earth the product. Incorrect grounding may also cause an
electric shock.
● Use the rated fuse only. Using any fuse of incorrect rating may cause a fire or
electric shock.
● Firmly connect IC boards and all connectors completely. Unstable connections
may cause an electric fire.
● Do not make any unauthorized changes or modifications to the product.
・ Doing so may cause fire or an electric shock. In some cases it can hurt and
cause physical injury to the user/operator or bystander.
・ The manufacturer and/or seller will not be liable for any accidents that occur
on products that have undergone unauthorized modifications or changes
including but not limited to such modifications and changes performed by a
third party.
● Make sure to always execute the routine maintenance procedures specified in
the manual.
10
●
When cleaning the surface of the cathode-ray tube monitor, use a soft and dry
cloth. Do not use chemicals such as thinner or benzene.
● Static electricity in the human body can destroy electronic parts on IC boards.
Make sure to discharge any static electricity by measures such as setting
hands to a grounded metal plate before handling IC boards.
● There are some components/parts, which are not specially designed and
manufactured for the product. Please understand that in case the
manufacturer of such components/parts discontinues production or changes
the specifications, it may not be possible to repair or replace such products
regardless of the warranted period.
STICKER LABELS
The product contains sticker labels stating the product’s serial number (S/N) and electric
specifications. When you request repairs or have any inquiries, check your S/N first before you
contact us.
The S/N is the identification number of each product. Same models may have different parts
used depending on the production time. Also models may be improved after the manual is
issued. To deal with each case effectively, it is necessary that we are informed of the unique
S/N.
There are two types of the S/N labels attached on the product: SEGA S/N and the Manufacturer
S/N. The Manufacturer S/N is, for instance, ‘SLCY-XXXX’.
Electric Specifications
200V
50/ 60H
2.3kW z
46
Da 1
T eje-2
on-8, Jeo
Fael : +8
Ci nm
Wex : +8
b Site 2 -4ty, K orin2Dong
Sim :2ww42 -861ea
,
uline w.s
620-10 Yusun
g-Gu
10
, Inim uli-0
ne.79
,
c
com5
T
vcclhrufedin
cl,tdieno
m
m
recsau
srfgd
og
ibhvjifsd
lcpew
i2
ho)cP
,tian
fyst:hm
nta
d15em
ivocn
F
itrsh
et(w
(ea1u
n
)C
ea
thaicn
.yd
sR
O
pip
rrnfioitecnsas.ue
m
aete
e
dFup
eEvlteia
rcsn
o
Ka
H
T
AC
50/ 200/2
60 Hz 08
, 1.5/220/2
kW 30/24
0 V,
Manufacturer S/N
We
.N
o
S
A
L
IE
R
igh
t
80
0
kg
IND
OO
07
I0
09
R US
E
300
9
4
51
SA
1A
8E-25A
4039GS0
A
E
AGASAEC
RSEEN-R0o
.2NB
o. 10
70
SLCY0
017
S ER
IAL
N o.
SEGA S/N
11
01
09
94
54
WARNING LABELS
Warning labels and stickers are attached on various locations of the product to warn users and
maintenance personnel of potential dangers.
There are parts in the cabin or the MSCU such as high voltage component where simply
touching the part can cause a serious accident. Therefore, special attention to the warning
labels is required when handling the product. All work, particularly any repair/replacement work
not described in this manual should be executed by a qualified engineer with expertise in
electric and electronic circuitry.
Make sure to stop any customers who are not following the instructions of the warning signs.
The □□ mark in the sticker part number below is the indicator for the language of the sticker.
The indication for each language is as follows:
Japanese: JP, English: EN, French: FR, German: GE, Spanish: SP, Italian: IT.
Parts
1
PDS-□□-014
2
PDS-□□-015
3
PDS-□□-017F
Description
Caution
Do not lean on or pass over a fence. It may cause an
accident or injuries.
Cautions in Use
CYCRAFT is a motion simulator.
Follow the directions for your safety.
Warning
● One person only. 2 or more persons are not allowed to get
in the cabin.
● Height limit is up to 140cm or higher.
● Weight limit is up to 120kg or lower.
● For safety reason, do not use the machine if you’re one of
the followings.
· One who suffers from any disease in the back or neck
· Heart disease or hypertension
· Pregnant woman
· Frequent nausea
· One taking medicine or drunken
● Simuline Inc. is not responsible for any injuries or
damages, which are attributable to users’ carelessness or
any activities against directions/warnings.
Caution
If you’ve every experienced in convulsion or
unconsciousness due to TV game or phobic stimulation in
the past, a special attention is required before use. In
addition, if you feel uncomfortable, immediately stop using
the machine.
1Play=
Dollars
Cautions before enjoying the game
To play the game safely, read the following cautions
carefully.
Cautions
● Make sure to fasten the seat belt when you start the
game.
● Immediately press STOP button when you feel
uncomfortable during the game and take a rest.
● Do not get off the cabin after the game until 「You May
Exit Now」 is displayed on the monitor.
12
Qty.
6ea
1ea
1ea
Parts
4
PDS-□□-020
5
PDS-□□-023
6
PDS-□□-006
7
PDS-□□-019
8
PDS-□□-026
9
PDS-□□021
10
PDS-□□-022
11
PDS-□□-018
12
PDS-□□-024
13
PDS-□□-009
14
PDS-□□-005F
Description
Warning
Do not press ‘Power Cut Off’ switch in case a person or an
article is located below the cabin.
Warning
Do not touch it because you may be burn by the very hot
motor.
Mind Your Head
Warning
Do not open it if you’re not authorized except the serviceman
due to the possibility of electric shock or burn.
Caution
Do not lift it up front of the product by forklift. When any job
needs a forklift, start it from the position allowed to be
inserted.
Warning
Use the designated electric bulb only. Incorrect use may
cause a fire.
Warning
The product should be grounded to prevent any accident
from electric shock.
Warning
Make sure to turn off the main power due to any possibility of
electric shock or burn before work.
Danger
High Voltage Danger!
Do not touch the inside of the monitor because high voltage
may remain for a while after the power is turned off. The
serviceman (engineer) can handle it only.
Fasten the seat belt when enjoying the game.
STOP button
Press it when you feel uncomfortable during the game.
13
Qty.
1ea
2ea
2ea
1ea
1ea
2ea
1ea
1ea
1ea
1ea
1ea
14
15
2. INSTALLATION LOCATION CAUTIONS
The product is intended for indoor use. Therefore, do not install it outdoors.
Even when installed indoors, the following locations should be avoided. They
may cause a fire, electric shock or breakdown.
・ Places with raindrops or water leakage, or places with high humidity such as
indoor swimming pools or showers.
・ Places that have a high temperature such as places with direct sunlight or
close to heating sources.
・ Places near flammable gas, explosive chemical or dangerous substances.
・ Places that are dusty
・ Places with an incline.
・ Places with intense vibration
・ Places near anti-disaster facilities such as emergency exit or fire extinguisher
・ Any other place outside of the allowable temperature range (ambient temp.) of
5℃~30℃.
RESTRICTIONS FOR USE
●
●
●
●
●
●
Check your electric specifications.
Check whether the product conforms to the voltage, current and frequency
provided at the installation location. For the electric specifications, see the
plate (label) attached on the product.
If electric source outside of the specification is used, it can cause a fire or
electric shock.
Inside the installation location, a breaker and an earth connection for the
product are required. An independent electric source for the product should
be provided to prevent fire or electric shock.
Make sure to use the power cable in accordance with power consumption as
described below. Using power cable of other electric specifications can cause
a fire or electric shock.
Make sure to use the power with independent circuit breaker. Using any
power source without circuit breaker can cause a fire.
Do not have many electrical cords connected to a single socket. Overload
can cause the generation of heat or a fire.
If an extension cord is used, it should be rated the max current or higher as
described below. Using a cord of different specifications can cause a fire or
electric shock.
Electric Power Consumption
MAX. 17.5 A (AC 200 V 50/60 Hz)
MAX. 16.8 A (AC 208 V 50/60 Hz)
MAX. 15.9 A (AC 220V 50/60 Hz)
MAX. 15.2 A (AC230 V 50/60 Hz)
MAX. 14.5 A (AC 240 V 50/60 Hz)
16
OPERATIONAL FLOOR AREA
●
●
●
●
●
For proper operation, a floor area of 2.87 x 4.07 meters (9ft 5in. x 13ft 4in.) or
more is required. In case of interference with the motion of the cabin or if the
player falls off the cabin, serious injury can occur. Therefore, the specified
area should be secured at all times.
Ventilation area specified in this manual should be secured. In addition,
ventilation vents and ports should not be blocked by obstacles. Blocked
ventilation may cause the generation of heat or a fire.
In case any accident occurs while the product is operated on a floor area less
than specified, the manufacturer will not be responsible for any liability or
reparations.
In case the product cannot fit through the entrance of a location, do not
disassemble without proper preparations. Disassemble only the parts as
specified in this manual. Do not attempt a disassembly procedure not
described in this manual. Special tools and adjustment procedures are
required to disassemble/assemble much of the mechanical parts of the
product. Improper disassemble/assemble can lead to accident during
disassembly/assembly such as electrical shock and human injury. If the
product does not fit through the entrance even after the disassembly
specified in this manual, contact the manufacturer/supplier or the contact
provided in this manual.
Do not tilt the product or subassemblies in an attempt to pass through small
entrances. This can cause accidents during the transportation. In addition, it
can cause damage or deformation to parts and result in accidents during
operation.
To fit the product in a location, the size of the entrance should be, at least, 1.6m
(62.992 in.) wide and 2.1m (82.67 in.) high.
17
3. CAUTIONS: OPERATION
For safe operation, please obey the following warnings and instructions.
CAUTIONS: OPERATION
Check the following cautions before working hours to prevent accidents.
● To prevent any player or other customers from headache or dizziness, the
product should be installed in a well-lighted place so that warning signs can be
clearly read. Improper lighting can cause unexpected problems such as contact
between customers, collision, and other undesirable situations.
● Adjust the monitor appropriately.
If monitor blinking is detected, do not leave it un-adjusted. Inappropriate
monitor adjustment can cause dizziness or headache to players and other
customers.
● Prepare a resting facility for players to take a rest in case he (she) needs to rest
due to conditions such as motion sickness.
● Check whether the level adjusters are securely set to the ground. If not, the
product is not properly set and can result in an accident.
● Do not place any heavy article on the product. It can cause an accident if
dropped and can also damage components.
● Do not climb on the product. Accident can be caused from falling. If it is
necessary to check the top of the product, use a stepladder.
● Check whether any doors or cover sections are damaged or separated. It can
cause electric shock.
● Do not place the following articles on or inside the control panel, on top of the
seat, on the top of the product or in the vicinity of the product. Doing so may
cause short-circuit, electric shock or damage parts.
Vase, pot, cup, water bucket, cosmetics and containers containing chemicals
or water.
● Check the surroundings before turning the product on. Once it is turned on, the
product is automatically initialized. If anyone is too close to the product during
initialization, collision with the moving cabin can occur.
● For safe operation, make sure to execute a trial operation after power on. Since
the cabin moves, the product is equipped with safety devices. Please check
whether these safety devices work normally as follows.
▪ Does the seat belt secure the player properly?
▪ Is the seat belt free of damages or excessive wear?
▪ Does the motion stop automatically when the seat belt is loosened.
▪ Is the seat attached securely without looseness?
▪ Does the product stop when the STOP button is pressed?
▪ Does the product stop when the front/side beam sensors are tripped?
▪ Does the product stop when the floor beam sensor is tripped?
● In addition to checking the safety devices, make sure that the product moves
normally. Any abnormal motion can cause accidents. Do not operate the
product unless all abnormalities are resolved.
▪ Does the product move in sync with steering wheel operation?
▪ Does the product move smoothly?
▪ Does the product move securely without looseness?
▪ Is there any abnormal noise or sound when moving?
▪ Is there any abnormal vibration when moving?
▪ Does the product return to the initial standby position and stop when the
game is completed?
18
● If any abnormality in the motion system is suspected, immediately stop all
operations, turn off the product and disconnect the power cord. Then, call your
local dealer or the contact point listed in this manual. If the product is operated
abnormally, serious accidents such as electric shock, fire, collision, etc. can
occur.
● For the proper maintenance of the motion system, please contact the contact
point listed in this manual. If improperly trained personnel perform the
maintenance work, accidents can occur during the maintenance work and can
cause accidents to customers and players.
● To help prevent accidents, make sure to install the auxiliary fence and ensure
that the product operates properly within the fenced area. Failure to secure
sufficient floor space with the fence can result in accidents due to collision and
contact between players and objects.
● Make sure there is no damage to surfaces which the player touches during
play. Such damaged surfaces can cause cuts and injury.
CAUTIONS : OPERATION (TO THE PLAYER)
To prevent accidents and/or unnecessary problems, alert players or customers to be aware of
the following.
● Anyone who falls into one or more of the following should be prevented from
playing the game. It may cause an accident or injuries.
▪ Persons who need assistance when walking, and persons with high blood
pressure or heart disease.
▪ Persons who have experienced spasms/convulsions or unconsciousness’ after
playing a TV video or similar game.
▪ Persons who have neck or backbone trouble.
▪ Pregnant women or persons who are intoxicated..
▪ Persons susceptible to vomiting from amusement rides.
▪ Persons that do not follow warning signs.
● Even persons who have never experienced discomfort due to phobic stimulation
may experience dizziness, nausea, and/or headaches from playing this game.
● If discomfort becomes severe, advice a player to consult a doctor.
● Do not place any heavy articles or beverages on top of the product. Accidents from
the falling articles and accidents due to electric shock can occur.
● Do not insert your finger or any foreign substances into any open parts or doors of
the product. It may cause electric shock or short-circuit.
● Do not lean on or climb on the product. It may cause accidents from falling and
turnover of the product.
● Do not pull out the power plug recklessly. It may cause short-circuit or electric
shock.
19
● For safety reasons, persons shorter than 140cm (55.11 in.) are not permitted to
play this game. Please explain that such persons cannot be safely secured with
the provided safety belt.
● Persons whose weight is over 120kg (265lbs.) are not permitted to play this
game.
● Playing without the seat belt fastened
can cause an accident by falling from
the cabin. Make sure t h e p l a y e r
secures their body with the seat belt
before playing the game
●
This game is not to be played wit
h by two people.
The product is designed to be played
by one person only. In case two or mo
re persons play the game, injury can r
esult due to collision between players
and with moving and stationary parts o
f the game.
●. No one should hang on the cabin behi
nd the seat. This can cause serious inj
ury due to falling, jamming of body par
ts between structures, and turnover of
the product. If anyone is found hangin
g on to the cabin, make sure the perso
n gets off.
20
●. Make sure the game is not played
with a child sitting on the players lap.
Serious injury can result due to the
child being jammed between the
player and the control panel, or the
child falling from the moving cabin.
● Nobody except the player should
approach the product during play.
Injury resulting from collision and
contact with moving parts can occur.
The safety sensor senses foreign
substances on top of the base only. In
particular, since small children cannot
anticipate the potential danger, make
sure that they are properly attended to
near the product.
● Ensure that player’s feet are always inside the cabin and on the pedals. Feet that
are carelessly hung out or protruded from the cabin can be caught due to cabin
motion and serious injury such as fracturing can occur.
● Prevent potential accidents or problems by disallowing play with bags, mufflers,
and other items strapped on the players’ necks, entering the cabin with drinks,
and other player actions that are potentially dangerous.
● If any abnormal or dangerous situation with the player is observed, stop the
motion of the product by pressing the “Motion Stop” button.
● Do not handle the product recklessly such as by hitting or kicking it.
Such behavior can cause turnover of the product and material damage and
may result in injuries.
● When getting on the cabin, there is the danger of players tripping on the base
and hitting his/her head on steel structures of the product. Please make sure
players get on the product carefully.
● Ensure that nobody except the player touches
or activates the steering wheel and other
controls of the game during play. It can cause
injury due to collision between persons or with
moving parts of the product. It can also cause
trouble between the customers.
● Please alert players not to place any articles or baggage on the base floor of the
product. If the floor beam sensor does not detect them for some reason and
keeps operating, the items can be dispersed and/or projected and cause
accidents to bystanders.
● Before playing the game, have the player adjust the seat suitable for his/her
individual physical size. Playing the game in an unnatural position can cause
unexpected accidents.
21
4. NAMES OF PARTS
22
DIMENSIONS OF EACH UNIT
23
5. ACCESSORIES
5-1
CHECKLIST AFTER OPENING THE PACKAGE
The product is packed and delivered so that it can be operated immediately after
proper installation. However, unexpected problems can occur due to improper
transportation and movement during transportation. The following should be
reviewed in order to check that the product is properly and correctly transported
and moved.
●
●
●
●
●
●
●
●
●
●
5-2
Has the product surface been damaged such as scratches or disconnections?
Are the casters and level adjusters on the front of the product broken?
Do the electric specifications of the installation place conform to those of the
product?
Has the wiring been damaged in any way, and is it firmly fixed in the correct
position?
Are the connectors firmly attached?
Are the chips and other parts of the board inserted firmly and correctly?
Are the components such as a monitor, control board and game board
attached correctly?
Is the grounding wire properly attached?
Are the components and accessories fully packaged?
Can you open the maintenance panel with the key provided in the package?
The key is inserted into the steering hole of the product when it is delivered.
PARTS AND ACCESSORIES USED FOR PACKING
24
5-3
1
3.
INSTALLATION ACCESSORIES
F-Sensor Support Ass'y
(F-Mirror Bracket Ass'y)
[MET-03-236M] 2.5Kg
[MET-03-237M] 2.5Kg
1set
Caster Cover
2ea
[MET-03-228M]
Sensor support Ass'y & Mirror bracket
5 Caster Cover Bolt
Ass'y Bolt
(Truss Bolt M6X12L) 6ea+2spare
(Sems Bolt M8X20L) 8ea+2spare
[SH08-020NNP]
6
F-Mirror Bracket Ass'y
(F-Sensor Support Ass'y) 1set
(Caster Cover)
4
2
[TR06-012NNP]
Coin Chute Tower Ass'y 1set
Coin Chute Tower Ass'y [MET-03-263M]
Coin Vault Ass'y [MET-03-206M]
Coin Meter [ECG-05-024P]
Cash box [MET-03-215P]
25
7
Boarding Step Ass'y 1set
8
Gate Door
9
[MET-03-246M] (37kg)
Washer (L) 4ea
10
[MET-03-240M]
Fence Pole B - L,R Each 1ea
Secured to the Boarding Step
Boarding
washer
11
Step
+
Frame
Assembly
[MET-03-244M]
Fence Pole -F 1ea
Secured to the center of Front Floor
plate
12
[MET-03-258M]
2ea
L=[MET-03-255M] , R=[MET-03-256M]
Fence Pole -R,S 3 ea
Secured to the centre of Rear, Side Floor
plate
[MET-03-259M]
26
13
Fence Pole - C 4ea
Secured to the Corner of Floor plate
14
[MET-03-260M]
15
Boarding Step + Frame Assembly Bolt
[MET-03-262M]
16
(Hex. Bolt M8X30L) 4ea+2 Spare
17
[HB08-030HNN]
Wire Mesh Assembly Bolt
Wire Mesh 9ea
Fence Pole & Door Gate Assembly Bolt
(Hex. Bolt M8X20L) 24ea+4 Spare
18
(Wrench Bolt M8X12L) 36ea+4 Spare
[WR08-012NNN]
[HB08-020HNN]
Coin Chute Tower Assembly Nut
(Hex. Nut M8) 4ea+2 Spare
[N-HN08HNN]
27
19
20
Caster & Heave Actuator Assembly Bolt
(Hex. Bolt M12X35L) 10ea+2 Spare
[HB12-035HNN]
Safety Link Kit 1set
Safety Link [MET-03-111M]
Hex. Bolt M14x55L [HB14-055HNN]
Hex. Nut M14(Nylon) [N-NY14NNN]
28
5-4
PACKAGE ITEMS AND QUANTITIES
Before installing the product, check whether all the components and accessories are fully and
correctly present.
PACKING LIST
1
2
3
4
5
6
7
8
9
10
11
12
13
14
15
16
19
Item
CYCRAFT Main Body
Rear Caster-L Ass'y
Rear Caster-R Ass'y
Sensor Support Ass'y-F
Mirror Bracket Ass'y
Caster Cover
Coin Chute Tower Ass'y
Boarding Step Ass'y
Gate Door -L
Gate Door -R
Fence Pole B - L
Fence Pole B - R
Fence Pole -F
Fence Pole -R,S
Fence Pole - C
Wire Mesh
Installation Kit Box
Description
Hex. Bolt M14X55L
Hex. Nut M14(nylon)
Any item with * contains 2 more for Boarding Step + Frame
spare parts.
Hex. Bolt M8x30L *
Boarding Step + Frame
Accessories to install the software Washer(Φ35XΦ8.5X6t)
are included in the box.
Fence Pole & Door Gate
Hex. Bolt M8x20L *
Coin Chute Tower
Hex. Nut M8 *
Caster & Heave Actuator
Hex Bolt M12 x 35L *
Wire Mesh
Wrench Bolt M8x12L *
Caster Cover
Truss Bolt M6x12L *
F-Sensor supporter Ass'y &
Mirror bracket Ass'y
Sems Bolt M8X20L *
Clamping Noise Filter
MG610144
1ea
ST730335-3
10ea
Coin Mechanism
MG610128
1ea
Harness
MOLEX 5557
1ea
MOLEX 5556
6ea
Safety Link
※
29
Qty
1 ea
1 ea
1 ea
1 ea
1 ea
2 ea
1 set
1 set
1 ea
1 ea
1 ea
1 ea
1 ea
3 ea
4 ea
9 ea
1set
ea
6 ea
4 ea
28 ea
6 ea
12 ea
40 ea
8 ea
10ea
1 ea
1set
Item
Installation Kit Box
19
Description
Qty
Sticker
6ea
Fence Sign
1set
Plate
6ea
Accessories to install the software
Clamping Ring 12ea
are included in the box.
Cycraft
1ea
Manual
1set
Game
1ea
Game BD
1ea
GD-ROM & Key chip
1ea
Each language Sticker Kit 12 types - Option
1set
Spare Parts Box
Grease
400g
Grease Kit
1set
Grease Gun
1ea
Accessories required as spare
Grease Nipple
2ea
parts of software are included in the Paint
200ml
box.
Maintenance Cover
5 ea
Truss Bolt M4X12L
R-Beam sensor Support
4 ea
Sems Bolt M6X15L
Coin Meter
2 ea
M3X8L
Monitor Fuse (AC250V 3.15A)
2 ea
Cable Tie for trying Coin Harness
5 ea
VOL CONT B-5K OHM
1 ea
VOL CONT B-10K OHM W/BD
1 ea
SW MICRO MATSUSHITA
1 ea
Communication Cable
10 M
Signal Lamp (DC5V)
2 ea
※
20
※
5-5
ITEMS TO BE STORED FOR LATER USE
After installation, the following items should be stored for future use in case the product needs
to be moved or reinstalled.
1
2
3
4
5
Item
Heave Actuator Holding Bracket
Load Binder
Floor beam sensor Plate (L/R)
Front Caster
Rear Caster
Qty.
1 ea
1 ea
1 ea
2 ea
2 ea
30
6. INSTALLATION AND ASSEMBLY
6-1
CAUTIONS DURING HANDLING
The Product is composed of precision mechanical and electronic parts. Special care
and precautions should be observed when handling the product.
●
The product should not be lifted manually. A forklift capable of carrying
1,500kg or more, or a crane should be used to lift the product. Lifting the
product manually can cause physical injuries.
●
When loading the product by crane, a qualified person should handle the
product. Anyone who is not qualified should not be allowed to handle the
product.
●
When moving the product after unpacking, make sure that level adjusters are
retracted and the rear casters are installed.
●
When loading the product on a truck, tie it as specified in the figure on the
following page. Do not tie it any other way.
●
When transporting the product, be sure to tie it as specified. Failure to do so
may lead to cracks or broken parts that can cause physical injuries. Protect
●
the tied parts with cloth or other soft materials.
The seat should be pulled as close as possible to the front and fixed
accordingly.
31
●
●
When placing the product on top of the cargo bay or on the floor, do so slowly,
maintaining the horizontal level position. If the product is not horizontally level
when placed, the caster or level adjuster can be damaged.
Please be careful of the following when moving the product. Otherwise, the
caster or floor can be damaged.
Make sure the floor is level
Place a ramp if there is a hump more than 1cm (0.4 in.) high
Move the product at less than 2 km/hr speed
Do not severely tilt the product. Do not have the weight of the
product placed on one side only
CAUTIONS FOR USING A FORKLIFT
Use a forklift to unload the product or carry it to the entrance. The forks should not be inserted
into the front side of the product. It should be inserted from the rear or side of the product
through the location labeled ‘FORKLIFT HERE’ as shown in the figures below.
Do not insert the fork in the front of the product.
32
Fork Insertion
33
● Please follow the installation procedure specified in this manual. Failure to do
so may result in electric shock.
● Install the product as specified in this manual. The product is a technically
complex product. Incorrect assembly may cause electric shock, breakdown of
the product or malfunction.
● The product should be installed by two or more workers. Failure to comply may
result in injuries or broken parts.
● Connectors should be properly connected. Any unstable connection may result
in electric shock.
● Wiring should be protected from being damaged. Damaged wiring may cause
electric shock or a short circuit.
● The installation procedure should be executed by the shop maintenance
personnel or serviceman. If anyone who is not qualified installs the product,
accidents such as electric shock can result. A player may receive an electric
shock while playing the game unless the directions in this manual are followed
precisely.
● Secure sufficient area to install and assemble the product. Insufficient area or
ceiling height that is too low may hinder assembly and installation of the
product.
● Do not install on a slanted, uneven, or bumpy floor, as it can cause accidents
such as toppling. In addition, assembly and installation will increase in difficulty
when performed on such surfaces.
● Do not expose the power cable, earth wire or communication cable across
passages. Exposed electric wires may cause electric shock or short circuit the
product. A wiring protection cover is required in case wiring is inevitably
installed over the floor. (Wire thickness: power cable - approx. φ8,
communication cable – approx. φ5)
Communi
Electric
φ8mm
φ5mm
cation
cable
0.314 ( in. )
0.196 ( in. )
cable
● Handle the components with care. They are vulnerable to excessive load or
●
impact, which may also cause fragments or cracks, possibly resulting in
physical injuries.
Prepare a stepladder for appropriate and safe work. Working without stepladder
may cause accidents from toppling or falling.
34
6-2
CONSIDERATIONS FOR THE INSTALLATION AREA
6-2-1 INSTALLATION ENVIRONMENT REQUIREMENTS
Cycraft is for indoor use only. Area of installation must meet the following conditions.
Installation place
Operating temperature
Operating humidity
Required entrance size
(L x H)
Required installation height
Required floor area
(excl. area for a player or
customers)
Floor’s load
Cleanness
Indoor use only
5~30
10%~70% (do not allow condensation to form on the
product)
1,530 mm x 2,020 mm
60.24 in. x 79.53 in.
2,500 mm
98.425 in.
4,070 mm x 2,870 mm
160.24 in x 112.99 in.
℃
298 kg/m2
Sufficiently clean such that the operation/durability of
general precision machinery is not deteriorated by dust
or floating substances.
Do not install the product outdoors.
Even indoors, do not install the product in any of the following areas.
●
●
●
●
●
●
●
●
●
Areas near water leaks or in areas of high humidity
Areas near indoor pools or shower fittings
Areas where that are exposed to direct sunlight
Rooms with a source of high temperature or near a passage in which a sources
of high temperature are circulating
Areas near inflammable, explosive, or dangerous substances
Areas with an incline of more than 2˚
Areas beside an article that vibrates heavily.
Areas that are dusty.
Areas that are narrow and confining for people to move.
6-2-2 ELECTRIC SPECIFICATIONS
For stable operation, the following electric specifications are required.
Rated voltage/
Current
Rated frequency
Ground (earth)
Power cable
Single Phase VAC
AC 200V 17.5A Over
AC 208V 16.8A Over
AC 220V 15.9A Over
AC 230V 15.2A Over
AC 240V 14.5A Over
(Tap Conversion)
50 / 60 Hz
Required
See 6-11-1
35
● For safe operation, each product should have its own breaker, to which no
Warning
other electronic appliance is connected.
● Only a qualified electronic engineer should connect the product to any indoor
power source. Any unauthorized person should not do these tasks. It may
cause an electric shock.
● Average max current means the maximum current consumed during ordinary
operation. Instantaneous current means the peak value of the instantaneous
current or current generated for a short duration (500msec max) which occurs
under certain special conditions. Therefore, for a stable power supply, facility
engineer should understand the meanings of avg. max current and
instantaneous current and set electric supply capacity appropriately.
36
6-3
INSTALLING & ASSEMBLING TOOLS AND EQUIPMENT
No Tools
1 Forklift
Description
Capacity over 1500kg
Sufficiently long
attached fork
10 x 10 x 100 [cm]
3.937x3.937x39.370
[inch]
Qty.
1
Application
Lift and transport out of
packing crate.
4
Set under the base frame
so that fork can be
inserted and removed
easily.
2
Wood block
3
4
5
Rear Caster- L
Rear Caster- R
Installation Kit
Box
Phillips Head
Screwdriver
1
1
1
5-4 Packing List No.2
5-4 Packing List No.3
5-4 Packing List No.19
1
Tightening truss bolt
7
Crescent wrench
(19mm~27 mm)
1
Up/down adjustment of
level adjuster(22mm)
8
Crescent wrench
(27mm~40mm)
1
Adjusting the level of
Caster(30mm)
9
Ratchet
1
Attaching/Detaching
rear/front caster
10
Allen wrench
(6mm)
1
Assembling the fence
11
Spanner (22mm)
2
Installing Safety Link
12
Spanner (19mm)
2
Installing the Heave
Actuator/Load Binder
13
Spanner (17mm)
1
Attaching the Coin
Tower/Boarding Step
14
Spanner (13mm)
1
15
Spanner (10mm)
1
Assembling the Floor
Plate/Beam Sensor
Assembling the Fence
16
Spanner (7mm)
1
6
Socket 19mm /
extension bar 150mm
37
Assembling the Coin
Tower
6-4
OUTLINE OF THE INSTALLATION PROCEDURE
The product is installed according to the following procedure. To save installation time and
ensure safety, read the instructions carefully before proceeding.
STEP 1 INSTALLING THE REAR CASTERS AND MOVING THE PRODUCT(6-5)
STEP 2 SECURING THE BASE TO THE FLOOR (ADJUSTING LEVEL ADJUSTERS)
(6-6)
STEP 3 ATTACHING THE HEAVE ACTUATOR (6-7)
STEP 4 ATTACHING THE SAFETY LINK (6-8)
STEP 5 ASSEMBLING THE CASTER COVERS (6-9)
STEP 6 SETTING THE BEAM SENSOR (6-10)
STEP 7 POWER CABLE CONNECTION (6-11)
STEP 8 ASSEMBLING THE BOARDING STEP AND COIN TOWER (6-12)
STEP 9 ASSEMBLING THE BOARDING STEP AND FENCE (6-13)
STEP 10 INSTALLING THE COIN MECHANISM (6-14)
* INSTALLING THE ENTRANCE ON THE OPPOSITE SIDE (6-15)
STEP 11 GAME OPERATION VERIFICATION (6-16)
STEP 12 AFTER INSTALLATION IS COMPLETE (6-17)
38
6-5
INSTALLING THE REAR CASTERS AND MOVING THE PRODUCT
Note that each of the casters is different for each position (front, rear, left, right). The front
casters are installed when delivered. When installing the product, the front casters must be
adjusted using the adjustment nuts on each caster and the rear casters must be installed in
order to move the product.
6-5-1 INSTALLING THE REAR CASTERS
1)
2)
Remove the 6 screws of the maintenance cover.
Install the two rear casters using the three M12x35L bolts as shown in the figure. Use a
Ratchet Wrench and an extension bar to install the bolts securely.
3) Rotate the caster adjustment nut (M20) on all four casters clockwise until the product is
lifted off the floor.
39
6-5-2
REMOVING THE CASTERS
● When removing the casters, take care that the cabin or frame of the product
are not scratched or damaged.
● After installation, mark the casters to indicate the location (left/right, front/rear) of
each caster and store them for later use.
● Store the 12 M12x35L bolts removed during disassembly of the casters for later
use.
1) After the product is placed in position on the floor, loosen the caster height adjust nut (by
turning counter clockwise) for each caster until the caster wheel is completely lifted off the
floor.
2) Loosen the three M12x35L bolts that attach each of the caster assemblies to the product
base frame and remove each caster assembly.
40
6-6
SECURING THE BASE TO THE FLOOR (ADJUSTING LEVEL ADJUSTERS)
The product should be securely fixed on the floor. However, it’s not necessary that the product
is physically fixed with an anchor ring or by any other means. The body is fixed using the
rubber pads and level adjusters. If it is not fixed correctly, the product may be wobbly, players
cannot feel the motion as intended or the position the product is installed may be moved little
by little.
Check the positions of the 3 rubber pads and 4 level adjusters, referring to the figure in the
following page.
1) Raise the 4 level adjusters by turning the adjust nuts. Raise them until the level adjusters
do not touch the floor and the product is supported only by the 3 rubber pads. Immediately,
two adults should step on top of the two front rubber pads so that the product does not tilt
backward and is supported completely by the three pads.
2) A third person should lower the two rear level adjusters by turning the adjust nut. It is
recommended to first turn the adjust nut by hand (not using the crescent wrench) until the
level adjusters touches the floor and cannot be turned any more. Then, fix each level
adjuster more strongly by turning the adjust nut about 1/4 ~ 1/2 turn more using a crescent
wrench or a 24mm wrench.
After the two rear level adjusters are fixed, fix the two front level adjusters in the same
manner. In the case of a carpeted floor, turn the level adjusters more, taking into account
the cushion of the carpet material.
Fixation nut
Adjust nut
Level Adjuster
3) Verify that the product is secured correctly to the floor before continuing the installation
process. After the installation procedure is completed, the game should be played about 10
times. Verify that the pads are secure when the cabin is moving and also verify that the
product does not slowly move around. In case the product is not fixed appropriately, repeat
the procedure of securing the base to the floor.
Location of the 3 rubber pads and 4 level
CYCRAFT front
adjusters (as viewed from the top)
Rubber
Level
pads
Adjusters
41
6-7
ATTACHING THE HEAVE ACTUATOR
When installing or assembling the product, be sure that no parts of your
body are under the cabin at any instance. Be careful of the position of your
feet.
1) Go to the rear of the Product and verify the locations of the load binder, heave actuator, and
heave actuator holding bracket.
2) Loosen the bolts of the heave actuator holding bracket and release the heave actuator.
Take care that the heave actuator does not fall to one side and damage the product as the
bracket is loosened completely. Support the heave actuator and lower it slowly until it rests
on the cover plate.
3) Rotate the heave actuator piston counter clockwise until the piston is extended fully. Then,
align the bolt holes of the universal joint with the bolt holes on the bottom end of the rocker
arm.
4) Turn the load binder clockwise to lift the cabin. If you turn the load binder clockwise, the
cabin should lift up. If the cabin does not lift up, check to see whether the directional key of
the load binder is set properly. When the cabin is lifted, the front part of the cabin will drag
toward the backside as the cabin tilts forward. To prevent the cabin from dragging, have two
42
people lift the front side of the cabin as it is lifted by the load binder as in the following figure.
Note that the front section of the cabin should be lifted sufficiently to prevent possible
damage to the floor beam sensor and the cabin frame. Also note that the actuator motors
are in the “dynamic braking” condition. Therefore, the front side of the cabin cannot be lifted
suddenly. If this proves to be too difficult, the lifting of the front section can be made easier
by disconnecting the motor power cables of the two top actuator motors. Remember to
reconnect the cables after completing the lifting procedure.
5) When the cabin is being lifted using the load binder, the rear end of the rocker arm lowers
until it nearly touches the universal joint flange of the heave actuator. Position the heave
actuator and the rocker arm so that they are separated by about 1~2 mm and align the 4
bolt holes. Assemble the heave actuator to the rocker arm using four M12 bolts.
6) Tighten the bolts with approx. 120N·m torque. After tightening the bolts, mark them in white
line so that it can be visibly checked for looseness at a later date.
7) After the heave actuator is firmly attached, remove the load binder. Do not discard the load
binder after installation since it will be used for disassembly and assembly when the product
is moved to another location.
43
6-8
ATTACHING THE SAFETY LINK
1) Check the location where the safety link must be attached, referring to the figure below.
2) Connect the longer section of the safety link to the rocker arm and the shorter section to
the body.
3) Make sure that the safety link is attached such that the central joint is bent pointing forward
and upward as in the figure below on the left. Use the bolts (M14x80L) that are used to
disassemble the load binder to install the safety link. When installing the nylon nut, stop
tightening when the nut begins to touch the face of the flange.
Short
Long
Note the angle
Improper attachment
of the safety
link!
If the safety link is improperly attached as in the above right figure, it will cause
serious mechanical damage because the safety link will be in contact with the
heave actuator at certain instances during play.
44
Do not tighten the attachment bolts such that the surface of the flange and the
nut come into tight contact. Tighten until they just come into contact, otherwise,
undesirable noises may occur during operation.
「 POWER OFF 」Position
6-9
ASSEMBLING THE CASTER COVERS
After the front casters are removed (see 6-5), attach the caster covers in their places using
the M6X12L truss bolt as shown in the figure below.
45
6-10 SETTING THE BEAM SENSORS
When delivered, the rear beam sensor is assembled such that its arm is aligned with
the rear frame pole. This was done to reduce the packing dimensions of the product for
easier transport and access through entrances. In addition, the front beam sensor and
mirror assemblies are disassembled completely for delivery.
6-10-1 INSTALLING THE BEAM SENSOR
1) To correctly assemble the rear beam sensor, remove the two M6X15L bolts that
attach the beam sensor assembly onto the frame, rotate the beam sensor assembly
90 degrees so that the sensor extends out and reassemble using the same bolts.
The same procedure applies to both the left and right sensor assemblies.
● If you pull the arm bracket excessively after loosening the bolt, the
connector or electric wire inside the arm bracket assembly can be broken
or disconnected.
< Left/Right installation of a rear beam sensor bracket>
2) Join the front beam sensor bracket and mirror bracket with an M8X20L bolt. Be sure
that the beam sensor bracket is connected to the sensor’s connector and
appropriately inserted into a frame while being assembled.
3) Firmly attach it with the adjuster for the front beam sensor bracket & mirror bracket
to prevent any vibration, which may be generated during operation.
<Installation of the front beam sensor bracket & mirror bracket>
46
Sensor Lens
SEMS M6 x15L(3)
4) Remove the protection film covering the sensor’s lens. (If Any)
5) Make the beam sensor and reflector face each other by checking their positions
visually.
6-10-2 BEAM SENSOR ADJUSTMENT
Carry out this procedure after installing the power cable (see 6-11).
1) Turn on the system in the maintenance mode, referring to 9-5.
2) The LEDs on top of the beam sensor indicates the status. When correctly installed, the
yellow lamp lights up if no obstacle is detected between the sensor and the reflector mirror.
If an obstacle is detected, the lamp will turn off. If the lamp does not light up or lights up
green when there is no obstacle, it means the sensor is unstable and requires adjustment.
3) The beam sensor is adjusted by correctly pointing it in the direction of the reflector mirror.
First, remove the protection cover of the beam sensor. Slightly loosen the holding bolts on
the bracket, adjust the position of the sensor until the yellow LED lights up and tighten the
screws again.
Beam sensor adjust
screw
4) Make sure the reflector is fixed firmly when the adjustment is performed.
47
6-11 POWER CABLE CONNECTION
6-11-1 PREPARING THE POWER CABLE
Connecting the power cable to the indoor power source should be executed by
a qualified electrician. Unqualified people should not perform the operation.
Failure to comply may result in electrical shock.
The power cable is not included with the Product. The power cable which conforms
to the facility electrical specifications must be prepared by the owner.
To construct the power cable, prepare AWG16 3 power cable.
Green is used as the grounding wire. It is used with a round terminal of 1.25sq.mm–4ø and the
length should be 10cm longer than the other wires. The remaining power cables are used with
round and 2sq.mm–4ø terminals.
Power Cable
Insulated tube
UL 16 AWG
2 sq. - 4 O
UL 16 AWG
2 sq. - 4 O
UL 16 AWG (Green Color)
Insulated tube
1.25 sq. - 4 O
300 mm
The other specifications should be made to conform to the site facility specifications
(configuration of the facility electric panel board or wall outlet type). Make sure to use the power
cable that conforms to the local electric safety requirements (PSE in Japan, CE in Europe, UL
in U.S.A.).
48
6-11-2 POWER CABLE CONNECTION
Before turning the product on after the power cable is connected, check to see
whether the circuits in the MSCU are well connected and whether any other
potential causes for short-circuiting are completely eliminated. If a problem is
detected, fix it immediately because it will cause serious damage to the system.
The product is designed to be used with single phase and AC 200V、208V、220V、230V or
240V. The product can be used worldwide by selecting the correct power cable terminals. Since
frequency is compatible for 50/60Hz, no separate frequency setting is required.
Before opening the MSCU cover, set the breaker in the facility electric panel
board to the OFF position. This is very important in order to protect the workers
from receiving an unexpected electric shock.
Open the MSCU cover on the rear side of the body frame.
1) Check to see whether the main breaker is OFF. If the lever is down, it means that the
breaker is OFF. The breaker is circled in the figure below.
2) Check the location of the input power selection terminal block within the MSCU. The
terminal block is circled in the figure below.
Main breaker
Input power
terminal block.
3) Make sure to check the voltage output from power supply distribution panel of the building
with a voltage tester. Connect the AC32 line that is connected to the N.C when the unit is
released into the right input power terminal. Since the instructions about power line
connection is given in the sticker (below figure) near the terminal block, refer to it while
carrying out the connection procedure.
49
When connecting the input power cable into the terminal, fasten the holding
screws tightly. If the screws are loose, it may cause an unstable power supply,
which can cause unstable movement during operation.
4) Check the position of the terminal block to which the power cable is inserted. The label
should say MAIN AC POWER. First, connect the green and yellow grounding wires by
loosening the 1st grounding screw. The label for the 1st ground point is ‘ ’. Connect the
remaining power cable to 1 and 3.
3
1
1st ground point
When connecting the power cable to the terminal block, fasten the holding
screws tightly. If the screws are loose, it may cause an unstable power supply,
which can cause unstable movement during operation.
5) Check the cable connection again. Turn the breaker in the building and the main breaker to
the ON position.
6) Check whether green SOURCE lamp on the maintenance panel is lit. Before turning on the
system, fully understand the directions on how to handle the switches and functions.
50
6-12 ASSEMBLING THE BOARDING STEP, COIN TOWER AND FENCE POLES
● This installation should be executed by two or more workers.
● Before changing the entrance to the other side, make sure that the power is
turned off. Carrying out the procedures with the power on can cause serious
injury.
● Assemble the boarding step and the coin tower before assembling the fence. If
the boarding step is assembled to the fence first, it is not possible to assemble
the coin tower.
● By default, the product is delivered with the entrance to be located on the left
side (as seen from the rear of the product). If it is desired to place the entrance
to the right side, please refer to 6-15.
1) In order to make the assembly of the coin tower and the boarding step easier, stand
the boarding step on its side.
2) Position the coin tower as shown in the figure below and attach it to the boarding
step by tightening the four M8 nut from the inside of the boarding step.
51
6-13 ASSEMBLING THE BOARDING STEP AND THE FENCE
The figure below illustrates the positions of the various parts of the boarding step and
fence.
1) Attach the boarding step and coin tower assembly to the main frame of the product
using four M8x30L bolts as in the figure below. Note that in addition to the flat
washer and spring washer, a third washer (Φ35x8.5x6T) is used on each bolt.
Assemble the boarding step and the coin tower before assembling the fence. If the
boarding step is assembled to the fence first, it will not be possible to assemble the
coin tower.
52
2) Pre-assemble the gate doors to the boarding step using 8 M8x20L bolts. Do not
tighten the nuts yet. Make sure to align the gate in the direction of the product. (The
left and right sides can be distinguished by noting the face of the stickers).
3) Attach the fence pole on the gate doors. Insert the hinge of the gate door correctly
to the fence pole as in the figure and fix the pole to the boarding step using the 8
M8x20L bolts.
4) Tighten the bolts that attach the gate doors to the boarding step.
5) Make sure the fence poles and gate doors on both sides are attached firmly to the
boarding step.
6) The wire mesh and the fence pole are assembled to each other using the 4 M8x12L
bolts (two on each side) as in the figure below.
53
7) The fence pole – F (1ea.), and fence pole – R, S (3 ea.) are attached to the frame of
the product as in the figure below. Make sure that the bottom of the poles touch the
ground and tighten the M8x20L bolts. (Note the positions of the fence poles from the
figure in the beginning of this section).
8) Assemble the fence poles and wire meshes in the clockwise direction as shown
below, taking into account the procedures described in 6) and 7).
54
6-14 INSTALLING THE COIN MECHANISM
Only shop maintenance personnel or a qualified engineer should perform the
following procedure.
The coin tower of this product is compatible with various coin mechanisms.
However, in Japan, frame and peripheral parts by Asahi Seiko are recommended. In all other
countries, the coin frame manufactured by Happ Controls and Lorenzo are recommended.
Since the product does not ship with the coin mechanism, the end user may have to purchase
the relevant coin mechanism (i.e. SR3 Totalizer mode, NRI Totalizer Mode and Mechanical coin
acceptors. It is advisable to contact your distributor for more information on coin mech
application.
6-14-1 ASSEMBLING THE MECHANICAL PARTS OF THE COIN MECHANISM
To assemble the mechanical parts in the coin tower enclosure, follow the procedures outlined b
elow.
1)
Loosen the clips attached to the coin frame slightly and turn the clips to the direction of the
arrow shown in the picture below.
2)
Fit the coin vault box on to the coin frame and turn the clips to attach the coin vault box into
the door frame.
3)
Then, place the attached coin vault box in Coin Chute Tower shown in the picture below
and turn the clips around and tighten them using the Mini Rachet handle so that they will
hold the edge of the Coin Tower. Please ensure, not to damage the coin counter wire when
placing the coin vault box in the coin tower.
55
4)
Select the plate that coins are dropped through single hole or double holes cut outs, and
then tighten the four screws of the plate on top of the coin vault box. (It is recommended to
store the other plate, as it may be needed in the future)
5)
Fit the coin mech to the coin chute door and connect the wires that are pre-wired to suit
any model of the coin mechanism.
56
6-14-2 COIN WIRING CONNECTION
1) Insert the dedicated wiring harness into the access hole located at the left top of the coin
tower.
Be careful not to damage
wiring when inserting wires
through the hole.
2) Insert the wires one by one. Once all the wires are inserted, close the base bracket at the
hole by tightening M4 Trussbolt and nuts. The wiring harness consists of four wires. The
connectors (P3, P4) as shown in the below picture are connected to the coin counter 1,
counter 2. The connector (P1) consists of one signal line of coin selector and the other DC
12V power line. The connector P2 consists of one AC110V power line to be connected to
coin validator and DC 12V power line for coin lamp. Refer to the following table.
P1 (Coin Selector)
1 ---------GND
2 ---------+12V
7 ----------COIN SW1 in Game Board
8 ----------COIN SW2 in Game Board
P2 ( Coin validator AC110V, 12V)
1 ------------110V AC(R)
2------------110V AC(T)
3------------+12V
4------------GND
P3 (for Connector #1)
5_______
1-----------2------------P4 (for Connector #2)
1-----------2------------
COIN METER 1 in NAOMI
I/O BD
+5V
P3
P1
P4
P2
COIN METER 2 in NAOMI
I/O BD
+5V
3) When wiring, please refer to 22 SCU wiring diagram and refer to the specific
manufacturer’s installation instructions for the coin mechanism.
57
6-15 INSTALLING THE ENTRANCE ON THE OPPOSITE SIDE
●
Be sure to turn off the main power before working on the product. Failure to do
so may result in electrical shock.
●
Be sure not to damage any wiring. Damaged wires may cause fire, electrical
shock or short-circuit.
The default position of the fence entrance is on the left as seen from the rear of Cycraft.
However, you may change the entrance to the right side if desired due to your shop’s
circumstances or networking conditions.
To install the entrance on the right side of Cycraft, prepare the tools used when first installing
the coin tower, boarding step and fence (see 6-3), and in addition, prepare a flash light, nipper
and tie belts (10 ea.).
The following parts must be obtained from your dealer or the contact given in this manual.
-
Coin tower sticker (PDS-□□-017)
Door sticker(PDS-□□-015、 PDS-□□-016)
Emergency Stop Button sticker ( PDS-□□-007、PDS-□□-008)
For an explanation of each sticker, refer to section 1. The □□ mark in the sticker part number is
the indicator for the language of the sticker. The indication for each language is as follows:
Japanese: JP, English: EN, French: FR, German: GE, Spanish: SP, Italian: IT.
58
1) Attach the coin tower to the boarding step so that it will be on the left of the entrance (refer
to 6-13).
2) Install the boarding step on the right side of Cycraft. (refer to 6-13).
3) The figure below illustrates the position of the boarding step and fence poles when the
entrance is installed on the left side.
4) Refer to 6-13 for procedures to assemble the boarding step and fence.
5) Move the coin tower harness and the Emergency Stop Button to the other side.
In order to do this, first remove the covers that cover the right side coin harness hole and
the Emergency Stop switch hole.
59
6) Remove the maintenance cover to begin moving the coin harness.
7) Loosen the truss bolts of the bellows flange of the coin harness that is connected to the
product.
8) Separate the bellows from the coin harness and push the harness wires inside the MSCU
through the hole opening. Remove each of the wires of the harness one by one from the
bellow, otherwise the bellows or wires can be damaged.
9) Disassemble the Emergency Stop Button according to the figure below.
(1) Flip open the transparent cover and disassemble the red button by turning it counter
clockwise.
(2) Hold the silver nut securely and remove it by turning counter clockwise. Remove the
60
transparent cover. Also, be careful not to disassemble the gasket.
(3) Remove the main body of the Emergency Stop Button from inside the MSCU. Be
careful not to disassemble the gasket.
10) To move the coin tower harness to the other side, work must be carried out from inside the
MSCU. Therefore, it is advisable to prepare a flash light and 5 to 10 cable ties.
A total of four wires from the coin tower harness and the Emergency Stop Button
signal wire will be relocated to the right side. Remove each wire of the coin tower
harness from the harness hole on the left side and put them through the right side.
During the task, special attention is required because your hands will be stretched
far inside of the MSCU. After moving the wires, fasten intermediate parts of the
harness with cable ties.
11) After the coin harness is moved, install the harness bellows and the Emergency Stop
Button. The procedure to do this is the reverse of the procedure described in steps 8) and
9) above.
12) Plug the original coin harness hole and the Emergency Stop Button hole on the left side
with the respective covers removed from the right side.
13) For instructions on how to connect the coin harness wires to the coin mechanism in the
coin tower, refer to section 6-14.
14) Attach the correct stickers to the door and the coin tower.
61
6-16 GAME OPERATION VERIFICATION
Refer to the game Service Manual (420-6857-01) for information regarding the operation of the
game S/W.
6-17 AFTER INSTALLATION IS COMPLETE
Check to see that the installation and assembly of the Product is complete. The image of the
fully assembled Product is as show below.
62
7. TRANSPORT & RE-INSTALLATION
7-1
PRECAUTIONS WHEN TRANSPORTING AND RE-INSTALLING THE PRODUCT
The product consists of precision mechanical and electronic parts. Therefore, special attention
is required during moving and handling.
When moving the product within a building, you may move it in the assembled state with caster
wheels installed. However, the power cable and the fence should be disassembled.
If you are moving the product to a remote place, be sure to put it to the ‘Ready for Transport’
state To put the product to the ‘Ready for Transport’ state, perform the following:
-
separate the safety link
attach its load binder
disassemble the top end of the heave actuator from the rocker arm
fix the heave actuator to the frame with the shipping bracket
install the plywood on the main frame floor underneath the cabin
lower the cabin down until it rests completely on the main frame floor by turning the
load binder. Remember to place the plywood sheet that came with the original packing
under the cabin before lowering it.
If the product is moved a long distance without the cabin fixed and with the heave actuator
attached, the product can be seriously damaged due to impact or vibration during transport.
63
●
●
The following should be executed by shop maintenance personnel.
If attempted by someone who is not properly skilled or qualified, serious injury
such as electric shock can occur.
●
If you are moving the product from its original installation place to another
place, turn the power off first before working on the product. Otherwise, an
accident from electric shock can occur.
●
Follow the directions of this manual. Failure to do so may cause material
accidents. It may also disrupt the work flow and cause destruction and/or
deformation of components.
●
Follow the directions of this manual. It’s the safest way to complete the task.
Failure to follow directions may result in an accident.
●
Do not disassemble the product in unspecified ways, even if the product
cannot be made to pass through an entrance.
●
Disassemble the product only as specified in the manual. For
assembly/disassembly, specific tools or adjustments are required. Any
reckless assembly/disassembly may cause accidents from electric shock,
short-circuiting or physical injuries. If the product cannot be carried in through
an entrance, contact the manufacturer/supplier listed in this manual.
●
If the product cannot fit through an entrance even after executing the
directions specified in this manual, do not incline the product in any severe
way. Carrying in the product in the inclined state may cause an accident. It
may also cause destruction or deformation of the parts, possibly resulting in an
accident during the operation.
●
The specified number of workers should be made available. If an insufficient
number of workers handle the product, it can cause physical (back) injuries,
and also secondary accidents due to dropping of the item or parts.
●
Wiring should be protected from being damaged. Damaged wire can cause
accidents such as electric shock or short-circuiting.
●
Please secure an appropriate work area. Areas that are too narrow or have
low ceilings may cause an accident and make the work more difficult.
●
Do not work in a place inclined or with raised/dented spots. It may cause
material accidents such as toppling of the product. It may also make the work
harder.
●
Please make sure that persons other than designated workers do not
approach the working area.
●
Be careful of hands and feet when placing down disassembled heavy parts.
64
●
A stepladder is required for the safe and complete work. Working without a
stepladder may cause accidents from toppling or falling.
●
Special attention is required when handling any plastic parts. Mishandling the
parts may cause broken parts or cracks, possibly resulting in physical
injuries.
●
Do not tighten screws and nuts excessively when fixing any plastic parts.
Applying excessive force may cause broken parts, possibly resulting in
physical injuries.
●
Prepare a blanket or other soft material to protect disassembled parts from
being scratched.
●
Disassembly work may damage the floor. Check the floor condition before
disassembling the product.
CAUTIONS WHEN LOADING ONTO A TRUCK
●
●
●
It is normally not possible to lift the product regardless of the number of
workers. Therefore, a forklift or crane with over 1500kg lifting capacity should
be used to load the product. Attempting to lift the product manually can cause
accidents.
Prepare a cargo truck which can load objects with 1530 x 2920 mm
(60.236x114.960 in.). Work cannot be carried out safely with smaller trucks.
When using a crane, make sure the operator is qualified. The crane should
not be operated by unqualified operators.
When lowering the product on the ground or on the cargo bay, do so slowly and
with the product level horizontally. Lowering the product in the tilted state can
damage the casters or the level adjusters.
7-2 TOOLS FOR TRANSPORTING & RE-INSTALLING
Please refer to 5-5 and 6-3 in this manual.
7-3 TRANSPORTING AND RE-INSTALLING THE PRODUCT OUTSIDE THE SHOP
The following describes the procedures when transporting and re-installing the product outside
the shop it was in operating in. Follow the procedure specified and the safety cautions. If there
are any missing parts required for moving and installing the product, contact the
manufacturer/supplier listed in this manual.
65
1) Place plywood (which came packed with the product) on the floor of the frame so that the
cabin’s floor is not scratched when the cabin is lowered.
Do not cover the opening for the front casters when placing the wooden sheet.
The front caster installation will become difficult.
Plywood
2) Detach the safety link by loosening the bolts and nuts as in the following figure.
Pack the safety link, M14x55L bolt, washer and M14nut, which are separated from the
frame and transfer them with the frame. M14x80L bolt, washer and nuts, which are
disassembled from the rocker arm, are required for installing the load binder.
3) Install the load binder.
First, attach an Eye-nut, M16 onto the attachment position of the existing Eye-bolt. Then,
attach the 1/2” shackle to the Eye-nut as in the figure. Connect one side of the load binder
to the shackle. Then, adjust the length of the load binder and the other end to the rocker
arm using M14x80L bolt, washer and nut.
66
After making sure that the load binder is firmly attached, loosen the four M12x35L bolts that
connect the heave actuator piston flange to the universal joint.
Warning
Before separating the universal joints from the heave actuator, check whether the
load binder is firmly connected. If the load binder is not firmly connected, the cabin
may drop and cause damage to the product or physical injuries.
4) Extend the length of the load binder.
Since the cabin slowly lowers as the load binder is extended, two workers should lift up the front
side of the cabin before it reaches the floor so that impact and scratches to the floor plate is
prevented as shown in the figure below. After the cabin is lowered completely, attach the holding
bracket that fixes the heave actuator top end to the main frame. Connect the frame side with
M12x45L bolt and the actuator side with M12x35L bolt.
67
5) Disassemble the two front beam sensor brackets by loosening the attachment bolts
(M8X20L). Make sure to disconnect the electrical wires of the beam sensor inside the
bracket and frame before pulling out the bracket.
6) Loosen the bolts of the rear beam sensor bracket (M6X15L), turn the bracket to the vertical
position about 90˚ as in the figure and then reassemble the bracket with the same bolts.
7) Disassemble the caster cover by loosening the caster cover bolt (M6X12L) with a Phillips
head screwdriver.
8) Install the front casters.
Attach each one using 3 M12x35L bolts. Be aware that the left and right casters are
different. If the left and right casters are switched, scratches and damage to the cabin can
result when installing and lowering the caster wheels.
9) Remove the maintenance cover and install the two rear casters (refer to 6-5).
68
10) Rotate the each of the casters’ adjustment nuts to lift the Product off the floor and roll the
Product to the transport truck.
11) Lower the Product to the floor by turning each of the casters’ adjustment nuts.
12) Disassemble the rear casters and replace the maintenance cover to prevent dust and
foreign objects from entering the Product during transport.
13) Place the product on the transport truck using a crane or forklift.
14) The figure below shows how the product looks like when correctly prepared for loading on
a truck. Make sure the dimensions are accounted for when calling a truck.
69
7-4 MOVING THE PRODUCT WITHIN THE SAME SHOP
1) Disassemble the front and rear beam sensor brackets (refer to 7-3, steps 5) ~ 6) ).
2) Install the front and rear casters (refer to 7-3 steps 7) ~ 9) and 6-5).
3) Lift the Product off the ground by turning the caster adjustment nuts and roll the Product to
the new location.
The following figure shows the image of the product ready to be moved. Make sure that there is
no interference during movement. If there is a height limit, execute the steps described in 7-3
steps 1) ~ 4).
70
8. PLAYING THE GAME (NORMAL OPERATION)
8-1 INSPECTION BEFORE OPERATION
Shop staff should make sure that the safety-related sensors work normally. Do
not operate the product unless the sensors work properly. The manufacturer is
not responsible for any damage or physical injuries caused during operation of
the product with sensors that are not working normally.
After the player inserts a coin(s) to play the game and fastens the seat belt, the game is ready
to start. To start the game, press START button. The cabin will move up and motion cues will
start as the game is played.
If the player feels nausea or dizziness while playing the game, the player can press the Stop
button. If the button is pressed, the motion and the game will stop.
View Change button is used to change the player’s viewpoint in the game. It is recommended
to use the default viewpoint for most realistic driving experience.
The cabin will return to the standby position when the game is over. The screen will show a
message instructing the player to remain seated until the cabin is lowered completely and
motion stops. After the cabin is lowered, the message ‘You may exit the simulator’ will appear
and the player may exit.
8-2
GAME STORY
See chapter 3 of the Service Manual (420-6857-01).
71
9. TEST & DATA DISPLAY
9-1 FUNCTIONS OF THE OPERATION [OP] PANEL SWITCHES
OP Panel
6
5
SOURCE
POWER
MSCU
CONTROL SAFETY
NORMAL DRIVING ERROR SENSOR
L-VOL
R-VOL
4
CABIN
SEAT
BELT
MAINTENANCE
W-VOL
SPEAKER
12
POWER CUTOFF
SWITCH
DISPLAY
ESC MENU/SET UP
1
7
2
SYSTEM ON
RUN
SYSTEM
SHUTDOWN
BUZZER
DOWN
11
CABIN
SERVICE
TEST
ON
OFF
3
Simuline
10
9
8
72
The Op-Panel is located to the left side of the main frame as viewed from the rear of the
product facing the monitor screen. It is locked to prevent any unauthorized person from
touching it. The door may be opened with the service key that is fastened to the steering wheel
when the product is first delivered. The functions of the switches on the OP-Panel are as
follows.
1
2
3
4
5
6
Switch
Power Cutoff
Description
Cuts off the power supplied to motion actuators.
The button should be carefully used only in an emergency
Button
situation such as a fire. When the button is pushed, the cabin
will slowly lower to its power off position. Make sure that no
person or article is under the cabin before pressing this button.
Turns the system on.
System ON Button
To initiate, press the button for 2 seconds or longer.
System Shutdown Button Shuts down the system.
Should only be used by a serviceman or engineer.
Mode Switch
When booting the system, the system is turned on in the
[Maintenance/Run]
maintenance mode or run mode, depending on the position of
the switch. The system can be booted in Run mode for ordinary
operation or maintenance mode for maintenance or check-up by
an engineer or serviceman. For maintenance mode functions,
see 9-5.
Supply Power LEDs
LEDs light up according to the state of the power connection.
● SOURCE : external input power
● POWER : actuator motor operation power
● MSCU
: Power to MSCU which controls the system
● CABIN
: Power to the monitor, control panel, etc.
Condition LEDs
● NORMAL : lights up green if normal conditions are satisfied,
indicating the product is ready to start a game.
Normal Conditions:
1) The cabin is moved to the standby position
2) TCP-IP is connected between game board and motion
computer
3 3)Versions of Game S/W and SMCP Operational S/W are
compatible.
●DRIVING : green lamp is lit up, indicating the product is in
driving mode.
●CONTROL ERROR : indicates an error occurred in the right
section of the MSCU that controls motion when red. The product
automatically shuts down when a control error is encountered.
●SAFETY SENSOR : If any one of the Safety Sensors (Beam
●Sensor & Floor beam sensor) detects an obstacle, it lights up
red.
SEAT BELT : if the seat belt is loosened during the game, the
red lamp lights up.
73
7
Switch
Service LCD, Key
8
Service
9 TEST
10 CABIN ON/OFF
11 Buzzer
12 Sound Volume Knobs
13 Motion Stop button
Description
Service LCD displays the operation and error status of the
product. For test or settings modification, the following keys are
used.
●ESC
: Exit the current menu
●MENU/SET
: Select a menu/value
●UP
: Move up cursor
: Move down cursor
●DOWN
If pressed in standby mode, game credits increase. Coin counter
doesn’t change.
In test mode of Game BD, it is used to move among
items[menus].
Functions as test button of Game BD.
Controls the power to the monitor and speaker amp.
It is used during servicing and should not be operated during
normal situations.
Sounds an alarm if any of the safety sensors detect an obstacle.
Controls volumes of 2 front speakers, 2 rear speakers and
woofer speaker within the cabin. Operate the volume knobs
slowly. Sudden operation can be harmful to the ears.
The button is located above the OP-PANEL.
If pressed, the cabin motion stops in its current position. The
game does not stop. The cabin starts moving again 3 seconds
after the button is released by rotating it. The button can be used
by a shop’s staff or by customers. However, is should be used
only when required so that the game play is not interfered with
during normal situations.
9-2 POWER ON/OFF
Before turning the unit on, check the following.
1) Before booting the system, open the maintenance cover of the MSCU to check the
following.
- Power cable specifications conform to the recommended specs.
- Check to see if the cable has been damaged or scratched before & after installing the
power cable
- Check to see if the power cable is firmly clamped to the frame inside the MSCU (by the
CORD CLAMP)
- Check to see if the input power terminal is in accordance with the building’s power
supply
- Make sure that the product is firmly grounded
- Make sure that the main breaker is ON
2) Check whether power cutoff button and motion stop button are in the normal status
(released).
3) Check to see whether the Source LED on Op-panel is lit green.
74
When turning the unit on, make sure that there are no people or articles around
the product before switching the power switch to ON.
When turning the unit on, do not enter or place any heavy articles in the cabin.
Forcibly turning on the unit may result in an error.
9-3 BOOTING IN THE RUN MODE
In normal situations, the mode switch is in the Run mode position when the system is booted
up. Verify the mode switch position and press the System ON button for 3 seconds. It may take
1.5 to 3 minutes for the game to start after complete booting of the system (the time required
depends on game title).
1) The main power’s Magnetic Contact operates with a ‘tick’ sound and simultaneously, the
power lamp, MCU lamp and cabin lamp are lit green. Also, the service LCD lights up green.
2) On the game monitor, the game board’s booting status is displayed.
3) On the Service LCD, a message stating “Cycraft Kernel Loading…”is displayed and the
Motion BD is booted up simultaneously. In about 1.5 minutes, the progress reaches 100%,
a message stating “Wait a moment…” is displayed and CAN is indicated on the top of the
LCD. If the CAN mark appears, the cabin begins to move to the standby position (Power
On Position).
4) When communication between the Motion BD and the Game BD is established, ‘TCP’
appears on the Service LCD.
5) NOR (‘normal’) is displayed after SMCP operation s/w version within the Motion BD and the
game s/w in the GD-ROM are successfully checked for compatibility.
6) If the Game BD is successfully booted up, an idle screen appears, and the game is started.
If the System ON procedure is successfully completed, the Service LCD shows the following
indication, which means the system is working normally.
CAN
TCP
NOR
1) 8043
2) 8043
3) 8043
LCD display when successfully booted
9-4 SYSTEM OFF IN RUN MODE
Press the “SYSTEM SHUTDOWN” button of the Op-panel for 2 seconds to start the SYSTEM
OFF process. However, avoid turning the SYSTEM OFF during the game. In addition, the
system cannot be shutdown if any of the safety sensors sense an obstacle. Remove all
possible causes that are detected by the safety sensors before starting the SYSTEM OFF
process.
75
When the SYSTEM OFF process starts, the product slowly moves to the POWER OFF
POSITION. Even during this process, the motion of the cabin will stop in mid-movement if a
safety sensor detects that something is wrong. It resumes the movement if the problem is
solved. After reaching the POWER OFF POSITION, the Motion BD SMCP terminates and
finally, the main power’s magnetic contact is disconnected and the power is completely turned
off.
Check whether anyone or any article is under a cabin before SYSTEM OFF.
SYSTEM OFF can not begin if there is a person or article under the cabin.
However, if for some other reason the power is cut off, a person or article under
the cabin may be injured or damaged so special attention should be paid.
9-5 MAINTENANCE MODE
This procedure should be executed only by a qualified serviceman or engineer.
In order to carry out test procedures and adjust system settings, the product should be booted
with the Mode Switch in the OP-Panel put in the Maintenance Mode. Note that this is different
with the Test Mode of the Game Board2. All of the tests and settings in Maintenance Mode are
handled via the service LCD and keys.
9-5-1 SYSTEM ON IN MAINTENANCE MODE
Press the SYSTEM ON button for 2 seconds or more. If the product is booted in Maintenance
Mode, the following menu is displayed.
[MAINTENANCE
TENANCE MODE]
[MAIN
=>1. DIOTEST
2. MOTION TEST
3. SETUP TCP/IP
4. SENSOR USAGE
5. STATISTICS
6. MOTION LEVEL
7. EXIT
76
Main menu on LCD
9-5-2
CHANGING SETTINGS BY SERVICE LCD OPERATION
The functions of the 4 key buttons to control the service LCD are as follows.
Button
ESC
MENU/SET
UP
DOWN
Function
Use it to exit an item or to move to a higher menu
This button functions as an ENTER key. To set values, press it
for 1 second.
Move up cursor
Move down cursor
1) DIO Test
The function tests the product’s auxiliary systems. Test items are as follows.
Seatbelt Sensor
Game Stop SW
Safety Sensor
Motion Stop SW
Shutdown SW
Keypad 1
Keypad 2
Keypad 3
Keypad 4
Maintenance SW
LED Normal
LED Driving
LED Error
LED Safety
LED Seatbelt
Buzzer
To test, move to the desired menu item by using the UP/DOWN keys, press SET key to
start the test and use ESC to exit.
2) MOTION TEST
Using the menu, an operator can test the 3 actuators individually.
If this menu is selected and the Set button is pressed, each actuator will extend and retract
to its minimum length and maximum length starting from the No. 1 actuator (heave
actuator) to the No. 2 actuator and then the No. 3 actuator. The test cannot be stopped
once it is started. Wait until the test is completed to start the test again or press the
“System Shutdown” button to abort the test.
3) SET TCP/IP
This function changes the settings of Motion Board TCP/IP. TCP/IP is a communication
method between the Motion Board and the Game Board. When setting the game for
network play, the TCP/IP settings should be changed.
[SET TCP/IP]
=> 1. IP ADDRESS
2. SUBNET MASK
3. GATEWAY ADDR
4. EXIT
77
The followings show the default settings of the product when it is first released.
IP ADDRESS : 192.168.1.1
SUBNET MASK : 255.255.255.0
GATEWAY ADDR: 192.168.1.1
When changing IP Address, refer to the following sequence.
[SETUP TCP/IP]
=> IP ADDRESS
Move the arrow to [IP ADDRESS] by pressing
UP/DOWN button and then press [ENTER].
SUBNET MASK
GATEWAY ADDRESS
[IP ADDRESS]
192.168.1.1
Cursor moves to the right if you press the DOWN
button. It returns to the original position, after it
reaches the last position. Pressing the UP button
moves the cursor to the left.
[IP ADDRESS]
192.168.1.1
If you press the [SET] button at a position to change
a number, the number increases by 1, returning to 0
after 9. After adjustments are completed, press the
[ESC] button to return to the [SETUP TCP/IP] menu.
4) SENSOR USAGE : ACTIVATION/DEACTIVATION OF SAFETY SENSORS
The item is related to activation/deactivation of safety sensors as follows.
Safety Sensor : Beam Sensor + Floor Beam Sensor
Seat belt : Seat Belt Sensor
Motion Stop : Emergency Stop Button
To operate the product normally, all the above sensors should be ON. If one of them is not
switched on, there will be no motion when playing the game.
=> 1. Safety sensor
2. Seat belt
3. Motion stop
4. Exit
Sensor’’s Function Setting
Sensor
5) STATISTICS VIEW
Number displayed in STATISTICS show the total number of games played. In other words it
is the total number of games played by coin insertion and by operation of the service button
combined. The manufacturer may ask for this number during servicing, if required.
6) MOTION LEVEL
Sets the intensity of the motion. It is strongly recommended not to modify this level.
9-6
SPEAKER VOLUME CONTROL
The product contains 2 front speakers on the left and right side of the game monitor, 2 rear
78
speakers in the seat and 1 bass speaker above the accelerator/brake pedal. The OP-Panel
contains volume controls for the front, rear and bass speakers. Adjust the suitable volume
levels as desired.
9-7
GAME DATA DISPLAY
See chapter 5 of the Service Manual (420-6857-01).
79
10. SAFETY SYSTEM
For safe and normal operation in an arcade, the staff should fully understand the safety
specifications. The safety system protects the user from physical injury. The following is a brief
description of the safety system.
● Fence: A steel fence including an entrance door. It maintains an appropriate distance between
waiting customers and the cabin. It also discourages customers from unnecessarily stopping
the motion during a game by approaching the cabin too closely and tripping the beam sensor. A
“Warning board” and a “Rules board” are attached to the fence door, alerting customers to be
cautious.
● Beam sensor: 2 sensors are installed on the sides of the product and stops operation if any
obstacle(s) comes in between the sensor and reflective plate. Therefore, if anyone tries to jump
over the fence and approach the product, motion stops to ensure safety. Motion will resume 3
seconds after such obstacle(s) are removed.
● Floor beam sensor: The floor beam sensor senses any obstacles on top of the products floor
plate under the cabin. It operates in the same manner as with the beam sensor. The floor
beam sensor is an additional safety measure that will respond if a customer falls from the cabin,
or if it detects an object not previously detected by the beam sensor for some reason.
● Seat belt sensor: The seat belt contains a sensor which detects whether it is fastened or not.
The game will not start if the belt is not fastened and motion will stop if it is unfastened during a
game. In such a case, the game will resume 3 seconds after the belt is fastened again.
● Stop button: Located inside the cabin. Pressing this button will stop the motion at any time
during a game and the cabin will be moved into standby position.
● Emergency Stop button: Located in the rear of the coin tower, the button has a lock
mechanism that stops the motion of the cabin. Motion will restart in about 3 seconds after it is
unlocked. This button can be used by a shop’s staff or by customers when the beam sensor or
floor beam sensor does not work or the operation should be stopped for safety reasons.
● Power cut off switch: The button cuts off the main power going to the actuators and can be
pressed even when the OP-Panel door is closed by sliding its protection (slide) door. The
motion stops if the button is pressed, but unlike the other safety buttons and sensors, it does
not hold the position of the cabin. The cabin will slowly glide to the POWER OFF position. This
switch can be used if the stop button and/or the sensors do not operate properly. Like the
Emergency Stop Button, it must be unlocked to be return to the normal position.
Do not press POWER CUT OFF BUTTON if anyone or any article is below the
cabin. The cabin will slowly move down and can injure or damage any person or
article under the cabin.
80
11. MSCU
●
Be sure to turn off the main power before working on the product. Failure to do
so may result in electrical shock.
●
Be sure not to damage any wiring. Damaged wires may cause fire, electrical
shock or short-circuit.
11-1 REPLACING THE COMPACT FLASH MEMORY CARD
The Motion board in the MSCU of the product records errors occurred during the game in a log
file format. If any unidentifiable error occurs or a recurring error occurs that cannot be resolved,
you may be asked to send the compact flash memory card installed in the Motion board to the
dealer or manufacturer for analysis. In such cases, a replacement compact flash card may be
sent for you to install.
In addition, upgrade procedures to improve performance or change a game may require the
compact flash memory card to be replaced.
To remove the compact flash memory card, follow the steps below.
1) Before beginning, be sure to turn off the power. If the power is on, the power LED on the
motion board lights up.
2) Remove the 4 screws on the top of the maintenance cover and the 2 screws on the bottom
to remove the cover.
3) The Motion board is located within the MSCU as in the following figure.
Position of the Motion
Board in the MSCU
4) The Motion board consists of 3 boards. The compact flash is inserted into the port on the
bottom side of the lowest board.
5) Grasp the compact flash memory card with your fingers and pull it out by applying a little
force in the direction that is illustrated in the figure (towards the front).
81
Compact Flash
Memory Card
To install the card, follow the steps in the reverse order. If accessing the compact flash
memory card is too difficult, first remove the Motion BD according to the procedures
described in 12-3., and then replace the compact flash memory card.
Do not remove the compact flash memory card from the motion board unless an engineer
from the inquiry service instructs you to do so.
11-2 CHECKING THE BOARDS INSIDE THE MSCU
This procedure should be executed only by a qualified serviceman or engineer.
Be sure to turn off the main power before working on the product.
1) The following figure illustrates the locations of main electronic/electric parts inside the
MSCU. When repairing or replacing parts within the MSCU, make sure that the main power
supply is turned off. Replacing any electronic parts means replacing by board or by parts.
For details, see chapter 19. Part List. If you are unsure how to replace parts, contact the
inquiry service.
SCU Part
MCU Part
(SYSTEM CONTROL UNIT)
(MOTION CONTROL UN
82
Servo Motor
Control Board 2
Servo Motor
Control Board 1
Servo Motor
Control Board 3
SMCP-15V
Power Board
Switching Regulator
Noise Filter
SMCP-5V
Main Breaker
Input Voltage
Switching Regulator
MCU部の部品名
selection terminal
Main power input
terminal
Parts name of MCU Part
SCU-side
Switch Regulator
Game Board
Audio Amp
I/O Board
Motion Board
Main Terminal Block
Audio Amp
Power Supply
SRIP Board
Parts’ name of SCU Part
83
11-3 REPLACING THE MOTION BD
1) Separate all the connectors from the Motion BD.
2) Loosen 4 screws as in the figure below and then replace the board.
Bolt
3) The following figure illustrates the correct settings for the Motion BD DIP switches and
jumpers. Please check it before replacing the board and check it again after the work
SW1 DIP Setting : 1 2 3 4 5 6 = Off On On On On Off.
JP1
ON
JP2
6
5
4
3
2
1
SW1
JP3
JP4
JP5
JP6
4) Reconnect all of the connections (see Fig. Motion Board Wire Connection).
84
The Motion Board is connected by connectors in 6 positions as in the figure below.
Fig. Motion Board Wire Connection
4-1) Connect the Motion Board to the power supply (see No.1 in the above figure)
4-2) Connect the DI/O Signal 50p Flat Cable to the No 2 connector in the figure.
4-3) Attach the CAN connector to which two lines are connected (No.3 in the above figure)
- Caution : the side marked white should face upward.
4-4) Attach the CAN connector to which five lines are connected (No.4 in the above figure)
- Caution: the side marked white should face upward.
4-5) Attach the D-SUB 9P connected to the LCD (No.5 in the above figure).
4-6) Finally, connect the LAN Cable (No.6 in the above figure).
11-4 COUNTERMEASURES IN CASE THE MOTION BD FAILS TO BOOT
If only a cursor appears in the maintenance LCD or the message 「Cycraft Kernel
loading…98%」is displayed even after 3 minutes after the system is turned on and the
maintenance LCD lights up, it is most probable that the motion BD has failed to boot.
If this happens, verify that the product vicinity is safe and press the POWER CUT OFF
BUTTON to shut the system down. After power shutdown, repeat the power on procedure.
85
Check whether anyone or any article is under a cabin before SYSTEM OFF.
SYSTEM OFF can not begin if there is a person or article under the cabin.
However, if for some other reason the power is cut off, a person or article under the
cabin may be injured or damaged so special attention should be paid.
If booting repeatedly fails, execute the following steps.
First of all, position the Mode Switch to Maintenance Mode and press the SYSTEM ON switch
for 3 seconds to boot the system.
11-4-1 IN CASE THE MAINTENANCE LCD DISPLAYS ONLY A CURSOR EVEN AFTER 3
MINUTES
1) Turn the system OFF and set the Mode Switch to the Maintenance Mode position. Then,
turn the system back ON.
2) Open the maintenance cover and check to see whether the motion BD power LED in the M
SCU is ON (green).
3) If the motion board power LED is not ON, check the power connector. If there is no problem,
pull out the power connector and check the power supply.
The YELLOW-BLACK lines should show 12VDC and RED –BLACK should show 5DC.
4) Check whether the input power to the POWER SUPPLY of the Motion BD is AC220V.
5) Turn the system OFF, set the Mode Switch to the Run position, then turn the system back
ON.
6) If the problem persists, go to 11-4-2.
7) If no problem is found in steps 1-3, replace the compact flash memory card and reboot the
system. For instructions on how to replace the compact flash, see 11-1.
8) If the problem is not resolved after executing step 4), the Motion BD needs to be replaced.
Please contact the inquiry service.
11-4-2 IN CASE MAINTENANCE LCD SHOWS A MESSAGE STATING 「CYCRAFT KERNEL L
OADING….」 EVEN AFTER 3 MINUTES WITHOUT FURTHER PROGRESS
1) Reboot the system several times. If the problem persists, replace the Compact Flash
Memory Card with a new one (refer to 11-1) and reboot the system.
2) If the problem persists after changing the memory card, the motion board must be
exchanged. Please contact the Manufacturer/Supplier.
86
11-5 REPLACING THE FLOOR BEAM SENSOR LED
●
Be sure to turn off the main power before working on the product. Failure to do
so may result in electrical shock.
●
Be sure not to damage any wiring. Damaged wires may cause fire, electrical
shock or short-circuit.
When replacing the floor beam sensor LED, be aware of +/- polarities ( +/- as indicated below
the pin of the LED plate). After replacing the LED, check to see whether the LED lights up
normally by triggering the floor beam sensor. If there is no response, polarities should be
changed.
1) Replacing the floor beam sensor L LED
Connect Line Label J8-1b to LED (–) terminal
Connect Line Label +12V to LED (+) terminal
2) Replacing the floor beam sensor R LED
Connect Line Label L8-9 to LED (–) terminal
Connect Line Label +12V to LED (+) terminal
87
12. MONITOR
12-1 SAFETY CAUTIONS: MONITOR HANDLING
Before handling the monitor, read the following instructions carefully and follow the cautions
below.
Indicates important information
that, if ignored, may result in the
mishandling of the product and the
possibility of personal injury or
death.
Indicates a particular location of
the product that is not to be
touched.
●
●
●
●
Caution
Indicates important information that, if
ignored, may result in the mishandling
of the product and the possibility of
personal injury, and/or may result in
equipment damage.
Indicates that the power connector or
the power plug needs to be
disconnected.
Be sure to unplug the power cord first when installing/uninstalling the monitor or
disconnecting any external connector connected to the monitor or the internal
parts of the monitor. Working with the power on may result in electrical shock or
other accidents.
Do not modify the monitor without permission. The company is not responsible
for any trouble or accidents caused by unauthorized modifications.
Primary side and Secondary side
The monitor circuit is divided into the primary and secondary sides which are
electrically insulated. Do not touch the primary side or both the primary and
secondary sides simultaneously. Doing so may result in electric shock. When
adjusting the device, use a non-conductive screwdriver and do not touch any
other parts except for the handle. Do not short-circuit the primary and secondary
sides. It may cause an electric shock or malfunction.
High Voltage
Since the monitor contains parts that generate voltages higher than 20,000 volts,
do not touch the inside. If a piece of metal or paper is falls into the monitor,
immediately turn the power off. Failure to do so may result in a malfunction or a
fire.
88
●
Connecting the CRT and PCB
For the combination of CRT and PCB, use the specified part numbers so that
the factory’s adjustments are maintained. The CRT by itself can be very
dangerous because electric charges accumulate on the anode over time. Use
the Monitor with the Chassis, CRT and PCB in their assembled state. When
the monitor is returned for repair, send it in the assembled state.
Disassembling the parts can be very dangerous because high voltage may be
discharged. Never attempt to disassemble the parts.
● Static Electricity
Slight electricity may be felt if the CRT surface is touched. This is due to static
electricity in the surface and is not harmful to the human body.
● Ensure that the magnetizer coil, FBT, anode lead, and focus lead are not
positioned near corners and other sharp sections of the sheet metal. The
insulation can be damaged and cause electric shock or malfunction. (For
names of each part, see the above figure).
● Do not remove the aluminum tape on the corners of the top and bottom of the
CRT. The effect of reducing static electricity can be deteriorated.
89
12-2 CLEANING THE SURFACE OF THE CRT
The CRT monitor surface is specially coated to prevent static electricity from
being discharged. Clean it considering the following. If the coated film is removed
or damaged, it can cause an electric shock.
● Wipe the surface using a dry and smooth cloth (flannel). Do not use any
coarse materials such as gauze.
● For a cleaning solution, alcohol (ethanol) is recommended.
If a detergent is used you must adhere to the following.
▪ Dilute a neutral household detergent with some water, wet a cloth with the
diluted solution, and wipe the surface after squeezing out excess water.
▪ Do not use a detergent or powder that contains abrasives or bleach.
▪ Do not use alkali detergent such as window cleaner or paint thinner.
Do not rub the surface using a hard brush or a scrubber.
●
Clean the surface of the CRT at least once a week.
12-3 MONITOR ADJUSTMENT
● Since the monitor is fully adjusted when it is delivered, any other adjustments are
unnecessary. Handling the monitor, which contains high voltage components, is
very dangerous.
In addition, a wrong adjustment may cause breakdown due to a bad screen or
unfixed synchronization.
● Monitor (projector) should be appropriately adjusted. If a defect such as flashing is
detected on the screen, do not leave it without adjustment. An Inappropriately
adjusted screen may cause dizziness, headache, or other physical injury to
customers.
● Do not touch any unspecified parts. Failure to comply can result in electric shock
or short-circuit.
Support components securely when loosening the attachment screws.
Components can fall when the screws are loosened, and can result in injuries.
90
Check the position of the monitor controller. It is located at the left of the monitor.
(1)
(2)
(3)
(4)
(5)
Monitor Controller
(1) LED
(2) EXIT(DEGAUSSING)
(3) MENU(SELECT)
(4) DOWN
(5) UP
Switches (2) ~ (5) are the four operation switches.
Pressing the MENU switch, will display a menu as follows. To select the menu, use the UP or
DOWN buttons. Press the EXIT switch to close the menu.
1
11
2
3
4
5
6
7
12
13
14
15
16
17
8
9
10
18
19
20
1)
BRIGHTNESS : ADJUST SCREEN BRIGHTNESS.
「UP」 FOR BRIGHT /「DOWN」FOR DARK.
2)
CONTRAST
3)
H.POSITION : ADJUST HORIZONTAL POSITION.
「UP」FOR THE RIGHT /「DOWN」 FOR THE LEFT.
: ADJUST SCREEN CONTRAST.
「UP」FOR THICK /「DOWN」 FOR THIN.
91
4)
H.SIZE
: ADJUST HORIZONTAL SIZE.
「UP」FOR LARGE /「DOWN」 FOR SMALL SIZE.
5)
V.POSITION
: ADJUST VERTICAL POSITION.
「UP」FOR MOVING UPWARD,「DOWN」
FOR MOVING DOWNWARD.
6)
V.SIZE
: ADJUST VERTICAL SIZE.
「UP」FOR LARGE,「DOWN」 FOR SMALL.
7)
PINCUSHION : ADJUST SCREEN’S PIN CUSHION.
「UP」FOR LARGE,「DOWN」 FOR SMALL.
8)
PINBALANCE :ADJUST LEFT/RIGHT SCREEN PIN BALANCE.
「UP」FOR THE RIGHT /「DOWN」 FOR THE LEFT.
9) TRAPEZOID
10)
: ADJUST SCREEN’S TRAPEZOID SHAPE.
「UP」FOR LARGE /「DOWN」FOR SMALL.
PARALLELOGRAM : ADJSUST SCREEN’S PARALLELOGRAM.
「UP」FOR LARGE /「DOWN」 FOR SMALL.
11) ROTATION
:
12) TOP CORNER
:
13) BOTTOM CORNER :
14) H.MOIRE ADJUST :
15) V.MOIRE ADJUST :
16) LANGUAGE
:
17)
18)
COLOR-TEMP
DEGAUSS
ADJUST SCREEN ROTATION.
ADJUST SCREEN TO MONITOR TOP.
ADJUST SCREEN TO MONITOR BOTTOM.
ADJUST HORIZONTAL MOIRE.
ADJUST VERTICAL MOIRE.
SELECT A LANGUAGE.
(ENG –ENGLISH,DEUT-GERMAN, FRANC-FRENCH,
ESPAN-SPANISH, POR-PORTUGUESE)
: ADJUST COLOR(6500K, 9300K, USER)
: DEGAUSSING CONTROLS BY EXIST SWITCH, NOT ON THE
PANEL.
92
ONCE EXECUTING IT, DO NOT OPERATE THE SYSTEM
WITHIN 30 MINUTES, AT LEAST.
19) RECALL
20) ZOOM
93
13. DISASSEMBLING THE HANDLE MECHANICS ASSEMBLY
The product uses a steering wheel, which is manufactured by SEGA. If the steering wheel
malfunctions, see chapter 9 of the Service Manual (420-6857-01) or contact the
manufacturer/supplier.
1) Loosen the four wrench bolts (M4x20L) in the center cap of the steering wheel and
remove the cap.
2) After removing the center cap, loosen the wrench bolt (M8x25L) and remove the steering
wheel from the handle shaft.
3) Loosen the four truss bolts (M4x12L) and remove the handle shaft cover from the handle
case.
94
4) Loosen the four truss bolts (M5x20L) under each side of the handle case. Make sure to
support the case so that it does not drop when the screws are loosened.
5) Carefully lower the handle case. Note that electrical wires to the switches on the handle
cover is secured on the handle cover. Be careful not to damage the connectors of these
wires by pulling on them as the handle cover is being removed.
6) Disconnect the connectors connected to the handle case switches to completely remove
the handle cover.
7) Disassemble the handle supporter by loosening the two bolts and nuts (M8x70L) on either
side.
95
8) Before disassembling the handle mechanics assembly, make sure to disconnect the five
connectors of the wires connected to the unit. Also cut away the ties that secure the wires
to the cabin frame.
9) Loosen the four screws (M8x20L) on the front face of the handle mechanics assembly to
remove the unit. Be careful as the mechanical unit is heavy.
10) The assembly procedure is the reverse of the above disassembly procedure.
96
14. REMOVING THE PEDAL MECHANICS ASSEMBLY
The product contains a pedal mechanics assembly which are manufactured by SEGA. If the
accelerator or brake pedal malfunctions, see chapter 10 of the Service Manual (420-6857-01)
or contact the inquiry service.
1) By loosening the 6 (M5X20L) screws on the front cover of the cabin (be careful not to strip
the screws), remove the front cover and place it in a safe place.
2) Separate the connectors that are linked to the pedal mechanics assembly located below
the woofer speaker within the cabin (2 of 3 connectors are connected).
3) As pictured in the figure below, loosen the 4 (M8X20L) bolts with a socket wrench (13) and
separate the pedal mechanics assembly from the cabin.
4) When reattaching the pedals, follow the above procedure in the reverse order.
97
15. REMOVING THE GAME BOARD AND THE I/O BOARD
The product contains a Game Board and an I/O board, which are manufactured by SEGA. If
the game board or I/O board malfunctions, see chapter 7 of the Service Manual (420-6857-01)
or contact the inquiry service for troubleshooting.
Replacement of the game board or I/O board should be executed after the product
is powered down and the circuit breaker in the facility electric source is turned OFF.
Upon opening the maintenance cover, you will see the game board and I/O board as below.
I/O Board
Game Board
View from the rear
Game Board
I/O Board
View from the top
98
15-1 REMOVING THE GAME BOARD
The game board is not easily visible inside the MSCU. It is recommended to use a
lamp that can be hung in the MSCU.
The game board installed in the product is the game board which consists of the main NAOMI
board, DIMM board, and the GD-ROM drive. The DIMM board is installed on top of the NAOMI
board and the GD-ROM drive is installed on a bracket on top of the DIMM board. When
disassembling, the GD-ROM drive must be removed first. It is not necessary to remove the
DIMM board since it is attached directly on the NAOMI board.
15-1-1 REMOVING THE GD-ROM DRIVE
Refer to the figure below to identify the location of the bolts and connectors on the GD-ROM
drive.
Bolt
Connector
Front connections of the GD-ROM drive
1) Disconnect all the connectors on the GD-ROM drive.
Disconnect the connector on the front side of the GD-ROM drive and the power cable
shown in the figure above.
2) Remove the three bolts on the GD-ROM drive bracket with a Philips screwdriver.
99
3) Lift out the GD-ROM drive together with the bracket.
REMOVED GD-ROM drive
15-1-2 REMOVING THE NAOMI BOARD
1)
Disconnect all the connectors on the NAOMI board.
Front
2)
Remove the four bolts that hold the NAOMI board to the bottom plate with a driver. Of the
four bolts that must be removed, the two on the front side is difficult to see from the
maintenance cover opening. Please refer to the figure above for the position of these two
bolts.
3)
Remove the NAOMI board.
15-1-3 INSTALLING THE NAOMI BOARD
The installation procedure is the reverse of the disassembly procedure (15-1-2).
100
15-2 DISASSEMBLING THE I/O BOARD
1) Remove the screws that hold the four poles that support the cover on top of the I/O board
and the Motion board.
2) Remove the cover and poles.
3) Disconnect all the connectors on the I/O board.
4) Remove the screws that connect the I/O board to the bottom plate.
5) Remove the I/O board.
6) Installation of the I/O board is done in the reverse order.
101
16. MAINTENANCE
16-1 ROUTINE MAINTENANCE
Maintenance and repair should only be performed by an engineer who is
qualified. The procedures and safety instructions specified in this manual
should be followed at all times.
The maintenance specified in 16-2 and 16-8 should be executed after the
product is powered down and the circuit breaker in the facility electric
source is turned OFF. Working with the power may result in electric shock
or injuries due to movement of the product.
Regular maintenance is very important for the safe use and extended life of the product.
Perform maintenance according to the following schedule and for further inquiries, contact the
manufacturer/supplier.
Regular Maintenance Cycle
Cycle
Maintenance
Check to see whether safety sensors work normally.
Daily
Relevant sensor: 1) Floor beam sensor
2) Beam sensors
3) Seat belt sensor
4) Emergency Button
5) Stop Button
If any one of these components is malfunctioning, stop the
operation and repair the malfunction.
Check to see whether there is any abnormal noise or
Daily
vibration when playing the game
If any suspicious noise is detected, stop the operation, identify the
cause and eliminate the problem. Contact the manufacturer or
supplier to get replacement parts if required. In particular, check
the connection parts of the structure once again. In many cases
loosening of attachment bolts are the cause. Therefore, verify that
there are no loose bolts.
Check the major joints.
Weekly
Referring to white line marked on each bolt of these joints, check
it visually for loose bolts or use a torque wrench to see whether all
bolts are tightened properly.
Weekly
Check to see whether the snap ring in the universal joint is
firmly fixed.
Monthly
Check the major welded parts. Check to see if any of the
welded parts show cracks.
Monthly
Check to see whether the actuator’s drive belt is damaged. If
a problem is discovered, replace the damaged parts.
Monthly
Clean the MSCU air filter and fan.
Every 6 mts Lubricate the actuators.
Every 18
Lubricate the joints.
mts
102
Note.
16-2
16-3
16-4
16-5
16-6
16-7
16-8
16-2 CHECKING MAJOR JOINTS
The figure below illustrates important joints to be maintained regularly. They should be strictly
and thoroughly examined since they are directly related to safety. To see whether the bolts are
loose, examine the mark line indicated on each bolt. Otherwise, you may check it using a
torque wrench to see whether it is tightened to specifications.
103
Check
Point
A
Photo
How to check
Hexahead bolt M12 x 8 points
B
Since the lower joint of a heave actuator is in
the MSCU, you need to open the
maintenance cover for maintenance. Before
opening the cover, be sure to power down the
unit and be very careful not to damage the
electric devices.
Bolt M12 x 8 points
C
Bolt M12 x 4 points
D
Bolt M10 x 8 points
E
Bolt M10 x 4 points (down)
Nut M10 x 4 points (up)
F
Bolt M14 x 2 points
104
16-3 CHECKING THE SNAP RING
The universal joints attached to the actuators, each contain 2 snap rings.
Snap Ring
The snap ring fastens the joint bearing into the frame and directly affects safety. Therefore, it
should be periodically checked. Check to see whether the snap ring is firmly inserted into its
groove without any gaps. To examine it, try to push the ring using the sharp end of a flat head
screwdriver. If the snap ring is loose, push it until it is completely inserted into the groove. If
successfully inserted, it will click. After maintenance, check the status the next day to see
whether it is still properly positioned. If such a problem continues, contact the supplier to order
replacement parts.
16-4 CHECKING THE WELDED PARTS
Check the welded parts visually. Examine in particular the external frame and the cabin’s
stainless steel piping. Check to see whether there is a crack around the welding. If a problem is
found, stop operation and contact the supplier. For quick troubleshooting, take a detailed photo
from several angles using a digital camera.
16-5 TOP ACTUATOR DRIVE BELT
Any part requiring maintenance is normally located higher than 2m, so a
stepladder is required for your safety. There is a risk that you may loose your
balance when working and fall, so do not work from directly on top of the
machine.
Make sure that the main electrical power is shut off before carrying out the
maintenance procedures
Remove the actuator motor cover and check visually to see whether there are scratches or
tears on the belt. If you are unable to check it visually, insert your fingers into the assembly and
check it while slowly moving your fingers. If a dent or tear is
found, immediately replace the drive belt. After a visual
examination, check the belt’s tension. The normal
displacement is 0~5mm (0~0.196in.) when pressed with a
finger. If it is beyond the range, move the motor’s axis outward
a little bit. To move it, loosen the screws attached to the motor
but, do not completely loosen them. It is recommended to
loosen them only as much as necessary to adjust or move the
ACTUATOR
position of the motor. Tap the outside of the motor using a
DRIVER BELT
rubber hammer. Move it until the belt reaches the proper
105
tension.
16-6 CLEANING THE MSCU AIR FILTER & FAN
Do not use water or any other liquid chemicals to eliminate dust build-up on the
fan. Serious malfunctions may occur due to water leaking onto the electrical
circuits under the fan.
The MSCU contains two air filters and two cooling fans. These filters and fans circulate heat
generated from electronic parts and block the inflow of dust in the air to promote an appropriate
heat stream. This means that periodic maintenance is required because these parts are closely
related to the safety preventing excessive heating in the MSCU.
Remove air filters from the frame and clean them. If they are too contaminated for reuse,
replace them with new ones. If cleaning air filters with water, be sure to replace them after they
are completely dry. For the fans, wipe them off using a piece of clean cotton cloth.
MSCU FAN
MSCU AIR FILTER
16-7 GREASING THE ACTUATORS
The following maintenance items should be carried out every 6 months. Prepare the grease
and a grease gun provided in the spare box or a corresponding one as specified below. The
use of unspecified grease may damage the actuators.
Recommended grease type:
KLUBER HIMONAX WS433
Remove bellows and check the positions of grease nipples of the actuator.
106
Positions of
Actuator’s
Grease Nipple
107
1) Grease the following parts with the specified amount of grease.
No.
1
Point to be greased
Heave actuator cylinder
View
Vol.
60g
2,4
Top actuator cylinder
30g
3,5
Top actuator bearing
10g
2) Wipe up any grease overflow.
3) Execute a motion test 3 times in maintenance mode so that the newly applied grease is
equally distributed. Then, wipe up any grease overflow.
4) Return the actuator bellows to their original positions.
16-8 GREASING THE JOINTS
The following maintenance items should be carried out every 18 months. Prepare the grease
and a grease gun provided in the spare box or a corresponding one as specified below. The
use of unspecified grease may damage the joints.
Recommended grease type:
KLUBER HIMONAX WS433
1) Remove the bellows of the actuator and check the position of the grease nipples.
2) Add the amount of grease to the parts as specified in the following table.
108
Positions of Joint’s
Grease Nipple
No.
1
Part to be greased
Heave actuator universal joint
(up)
2
Heave actuator universal joint
(down)
5g
Rocker arm bearing
5g
3,4
View
109
Vol.
5g
5,6
Top Actuator
Gimbal joint
5g
7,8
Top Actuator
Universal joint
5g
Central universal joint
5g
9
3) Wipe up any grease overflow.
4) Execute a motion test 3 times in maintenance mode so that the applied grease is
distributed equally. Then, wipe up any grease overflow.
5) Return the actuator bellows to their original positions.
110
17. TROUBLESHOOTING
17-1 GAME BOARD ERROR MESSAGES
See 6-1 of the Service Manual (420-6857-01).
17-2 HANDLE MECHANICS AND PEDAL MECHANICS ERROR MESSAGES
See 6-2 of the Service Manual (420-6857-01).
17-3 MSCU ERROR MESSAGES (DISPLAYED ON MAINTENANCE LCD)
Error Code
Cause
FF00
A connector of the
controller-side
encoder is
disconnected
FFFF
FFC7
F800; or
the power
is entirely
turned off,
and the
LCD
doesn’t
show
anything.
Troubleshooting
[ Check the connection of the encoder connector ]
1. Check to see whether the encoder connector of the
controller in the MSCU is properly connected and to see if
the wires connected to (No.1:J9 No.2 & No.3: P1) are
damaged.
2. Check to see whether the encoder connector in the direction
of the actuator is correctly connected.
After the power is
[ Check the SMPS Output Power of 5V]
on, the controller
1. Check to see whether the voltage between DGND and +5V
does not receive
is between DC5.0V and 5.2V.
any information
2. If the above is normal but the same error recurs, contact the
from the encoder
supplier.
1. The Input power 1. Check to see whether after the error occurs, ‘Source’ LED’
is instantaneously
and ‘Power LED’ on the top of maintenance penal are lit on.
cut off;
1-1. If both are OFF: Check the circuit-breaker in the MSCU or
the input power source
2. The +15V Relay
- Check to see whether the MSCU’s circuit breaker is
contact of the input
disconnected. If so, turn on the circuit breaker and
power is
operate the system.
disconnected;
- If the circuit breaker is frequently
disconnected, contact the manufacturer/supplier.
3. A Brake Board is
- If the circuit breaker is connected but disconnects
broken; or
immediately after Power On, immediately stop
operation and contact the manufacturer/supplier.
4. A controller is
- If the circuit breaker is connected normally,
broken
check the input power source and see whether the
input power is cut off at the distribution panel in a
shop.
1-2. If the SOURCE indicator is ON but the POWER
indicator is OFF;
- Check the status of the 15V Relay
Check if the 15V Relay has bad physical contact or
there is defect such as a coil inside the relay.
1-3. If both are ON
Inquire to the supplier.
111
F200
The voltage of the
SMPS 5V drops.
FFFE
Limit sensor of the
actuator is not
found
90AE
9086
Check SMPS output voltage for 5V
1. Check whether the voltage between the GND and the 5V of
the SMPS is between 5.0 ~ 5.2VDC.
2. If the error recurs even though the SMPS output voltage of
5V is normal, contact the supplier.
1. Check the connection of the actuator’s Limit Sensor and
the status of the connector.
2. If nothing special is found and the error (FFFE) occurs
repeatedly in a specific controller, contact the supplier to
replace the controller.
If system is turned on when its posture is inclined, this error
may occur. If this happens, reboot the system.
An error occurred
when actuators
were powered on
and the system
just starts to move.
898e
An error occurred
1. Check for a defective Brake Board
when actuator
Check to see whether upon turning the System ON, if the
No.1 was powered
green LED on Brake Board No.1 lights up. If the LED light
on after the
up just after the System turns ON, replace the brake
System was turned
board.
ON.
2. Check for a bad controller
Contact the supplier to inquire about replacing controller
No.1.
3. Check for a bad motor
If no problem is found in controllers No.1 and No.2, loosen
the 4 bolts of actuator joint No.1 and try to turn the
System On. If the Product successfully initializes, it means
that a motor is defective and you need to contact the
supplier to replace the actuator.
88C3, 8C3 Fault error has
1. Check the output voltage of the SMPS of 15V.
occurred in a
Check to see whether it is between 14.5V~15.5V. If the
controller’s IPM
voltage is beyond the range, contact the manufacturer or
their service department to replace the 15V SMPS.
2. Visually and audibly check to see whether the two fans,
which are located in the heat sink where MSCU controller is
positioned, are working properly.
3. If nothing special is found and the error recurs in a specific
controller, contact the supplier to replace the controller.
10C3
Over-current
1. Check whether Main Trans output voltage (220R0, 220T0) is
90C3
protection error
between 215V - 225V. If it is beyond the range, contact the
manufacturer/supplier to adjust the terminal of the main
trans.
2. If an actuator is not properly assembled or its lubrication is
bad, the actuator may make strange sounds and produce
more friction. If this is the case greasing should be
executed when its routine maintenance terminates. If the
error still exists, contact the manufacturer/supplier.
3. If nothing special is found and the error continues in a
specific controller, contract the supplier to replace the
controller.
40C3,D0C3 Over-voltage
1. Check to see whether the Main Trans output voltage
112
protection error
84C3, 4C3
Under Voltage
(220R0, 220T0) is between 215V - 225V. If it is beyond the
range, contact the supplier to adjust the terminal of the
main trans.
2. Check the input power source to see if it suddenly receives
high voltage of over 240V.
3. If nothing special is found and the error continues in a
specific controller, contract the supplier to replace the
controller.
1. Check to see whether Main Trans output voltage (220R0,
220T0) is between 215V - 225V. If it is beyond the range,
contact the supplier to adjust the terminal of the main trans.
2. Check the input power source to see if the voltage drops
lower than 180V.
113
17-4 NO ERROR MESSAGES ARE DISPLAYED (ON MAINTENANCE LCD)
No Symptom
1
The System is On but
the monitor displays
an error message,
SMCP
or
connecting….
cycraft
searching..
for
3mins or longer; no
idle screen
2
System automatically
turns off between 1.5
~ 2 minutes after
System On
3
The system
occasionally turns off
during the game even
though there is no
power failure
「
「
4
5
6
Check
See Trouble
Shooting Chart 1 of
chapter 17-6.
Troubleshooting
See Trouble Shooting Chart 1 of chapter
17-6.
See Trouble
Shooting Chart 2 of
chapter 17-6.
See Trouble Shooting Chart 2 of chapter
17-6.
Check the following.
1. Open the
maintenance cover
and check whether
the harness holding
the screws for the
power cable terminal
block and input
power selection
terminal are loose.
2. Check whether
the Power Cutoff
Switch contact is
unstable.
3. Check whether
the building’s power
supply and the
system’s input power
terminal selection
coincide.
Defective steering
volume or bad
contact
Note that utility power may suddenly drop
lower than the current input power although
the system fully checks out; if this happens,
connect the power cord to Input Voltage
Selection TB, which is 1 stage lower than
the ordinary input power. If the current input
power is 231V, connect the system to
220V, instead of 230V. Do not operate the
system just after the connection but first
check to see whether the voltage between
No.1 and No.3 of the MCI is between 225 ~
235V. (See 6-11-2)
DRIVER BDMIDI or
MIDI
cable/connection is
defective
Leg Lever is
abnormally installed.
Refer to the software manual and insert the
cable connector again.
」
」)
During the game, the
steering doesn’t work
or steering wheel is
inclined to the left or
right.
Force-feedback
doesn’t work in
steering wheel.
The system frame
seriously shakes
during the game.
114
Refer to the software manual and readjust
or replace the steering wheel volume
resistor.
Readjust the Leg Leveler.
If the problem persists after adjustment,
contact the supplier.
7
The monitor image
and color deforms
8
Loud game sound
9
After inserting coins,
the player receives no
credits.
See chapter 12 and
remove static
electricity
Sound level is not
properly adjusted
1. Check to see
whether there is a
problem with the
coin selector
installation or
harness connection.
2. Check to see
whether the coin
meter is connected
and if the harness is
malfunctioning.
Readjust the monitor (chapter 12).
Adjust volumes for front, rear and woofer
speakers on the OP Panel.
17-5 NO GAME ERROR MESSAGE IS DISPLAYED
See 6 of the Service Manual (420-6857-01).
115
17-6 TROUBLESHOOTING CHART
Contact to Supplier
While a message stating
Turn the System off by
“SMCP connecting….” or
pressing System OFF
“cycraft searching..” is
continuously displayed
YES
on game monitor(longer
ModeSW
button and restart it as
Position Error
Mode SW is in Run
mode.
Are the code as
than 3min), the game
Service LCD
does not start
(1)43(2)43 (3)43
of service LCD
NO
Servo Control
NO
BD Fail
Contact to Supplier
Motion BD
Check the wiring status
Booting Fail
by referring to 22.
maintained?
Is Mode
Is the cabin
completely moved
to standby
NO
SW
positioned
YES
to Run?
Does “CAN”
YES
appear on
YES
Does “TCP” appear
NO
Service
General Wiring Diagram
LCD?
and restart it with Power
on Service LCD?
NO
YES
TCP-IP
Check the TCP-IP
communicatio
connection between
n fails
GAME BD and Motion
The version
Notify the supplier of the
compatibility
‘Compact Flash Version’
between
of the motion BD
Does “NOR”
appear on Service
LCD?
NO
YES
Game &
SMCP is
unavailable
Contact to supplier
Troubleshooting Chart 1
116
Although
pressing System
ON button for 3
seconds, System
After checking
ON does not
the voltage
work; or
/current cap,
The power turns
contact to
off after System
supplier.
ON for one and
half minute.
YES
Is the Source Pilot
Lamp (Green) of
Turn on the Main
NO
Is the Main Breaker
NO
Breaker and
within MSCU ON?
re-start
the Maintenance
Panel turned on?
Is the Power
Is the Power Pilot
YES
Lamp (Green) of the
Maintenance Panel
NO
Cutoff Button
pressed?
YES
Release the
Power Cutoff
Button and
turned on?
re-operate
NO
YES
Magnet Contact
(M) has Failed ->
Replacement
Shutdown Relay
has Failed >Replacement
Troubleshooting Chart 2
117
18. NETWORK SETTING
See chapter 8 of the Service Manual (420-6857-01).
To change IP address of the SMCP server, see 3) SET TCP/IP of 9-5-2 in this manual.
118
19.
PART LIST
ITEM NO
PART NO
Q’TY
DESCRIPTION
1
1
Frame Ass’y
2
1
Rocker Arm Ass’y
3
1
Cabin Frame Ass’y
4
1
Cabin FRP Cover Ass’y
5
1
Cabin Seat Ass’y
6
1
Heave Actuator Ass’y (ADS-180)
7
2
Top Actuator Ass’y (ABS-180C)
8
2
Gimbal Joint Ass’y
9
1
Sensor Part Ass’y
10
1
Fence Ass’y
11
-
Supporter Part
12
Cabin & Arm Clamp Ass’y
119
19-1 FRAME ASS’Y
ITEM NO
PART NO
Q’TY
DESCRIPTION
1
MET-03-001M
1
Main Frame Ass’y
2
MET-03-002M
1
Leg Frame Ass’y
3
MET-03-003M
1
Front Cover
4
MET-03-004M
1
Side Cover-L
5
MET-03-005M
1
Side Cover-R
6
MET-03-006M
1
Rear Cover
7
MET-03-007M
1
Maintenance Cover
9
MET-03-009M
1
Cross Cover-L
10
MET-03-010M
1
Cross Cover-R
11
MET-03-011M
1
OP-Panel Door
20
MET-03-020M
1
U-Plate
21
MET-03-021M
1
MCU-Plate
22
MET-03-022M
1
SCU-Plate
23
MET-03-023P
2
Bearing(UKFC208)
24
MET-03-024P
4
Level Foot
25
MET-03-025P
3
Rubber Pad
120
ITEM NO
PART NO
Q’TY
DESCRIPTION
27
MET-03-027P
2
Maintenance Cover Grip
28
MET-03-028P
1
Door Lock(OP-Panel)
29
MET-03-029M
1
Front Hole Cover
30
HB12-055HNN
8
HEX.Bolt - M12X55L (MMB-00-002P)
31
W-SP12HNN
30
Spring Washer- M12 (MAT-00-064P)
32
W-FL12HNN
30
Flat Washer –M12 (MAT-00-074P)
33
HB12-035HNN
16
HEX.Bolt – M12X35L (MMB-00-001P)
34
TR04-10NNP
53
Truss Bolt – M4X10L (MAT-00-031P)
44
MET-03-201M
1
Sliding Cover
45
TR05-010NNP
1
Truss Bolt – M5X10L (MET-03-083P)
46
MET-03-202P
1
Knob Nut- M5
48
MET-03-222M
1
R-B Sensor Cover-L
49
MET-03-223M
1
R-B Sensor Cover-R
50
MET-03-224M
1
F-B Sensor Cover-L
51
MET-03-225M
1
F-B Sensor Cover-R
52
MET-03-226M
1
F-Floor Plate
53
MET-03-227M
1
R-Floor Plte
54
MET-03-228M
2
Caster Cover
55
MET-03-229M
2
BRG Cap
56
MSM-00-039P
2
Beam Sensor BW40-18
57
MSM-00-039P
2
Beam Sensor (Reflector)BW40-18
58
SH08-020NNN
8
Sems Bolt (M8X20L)
59
SH06-015NNN
12
Sems Bolt (M6X15L)
60
TR06-012NNN
6
Truss Bolt (M6X12L)
61
MET-03-284P
2
SUS Band 2 1/2”
62
MSM-00-027M
2
Bellows Cover(Φ65X350L)
121
19-2
ROCKER ARM ASS’Y
ITEM NO
PART NO
Q’TY
DESCRIPTION
1
MET-03-036M
1
Arm Frame Ass’y
2
MET-03-037M
1
Pipe Cap
3
MET-03-038M
1
Connector Cover
6
TR-04-010NNP
22
Truss Bolt - M4X10L (MAT-00-031P)
7
MET-03-203M
2
Connector Bracket
8
MET-03-230M
1
Cable Duct-L
9
MET-03-231M
1
Cable Duct-R
10
MET-03-232M
1
Cable Fix Bracket
11
MET-03-233P
1
Rod End (JF8R)
12
MET-03-234P
1
Rod End (JM8R)
13
MAT-00-052M
1
Hex. Nut - M8
14
WR05-020NNN
5
Wrench Bolt - M5X20L
15
W-SP05NNN
5
Spring Washer - M5
16
W-FL05NNN
5
Flat Washer - M5
17
MET-03-284P
2
SUS Band 2 1/2”
122
19-3 CABIN FRAME ASS’Y
ITEM NO
PART NO
Q’TY
DESCRIPTION
1
MET-03-041M
1
Cabin Frame Ass’y
2
MET-03-042M
1
Handle Bracket Ass’y
3
MET-03-043M
1
Pedal Caver
4
MET-03-044M
1
Front Steel Cover
5
MET-03-045M
1
Monitor Bracket(Upper)
6
MET-03-046M
1
Monitor Bracket(Lower)
7
MET-03-047M
1
Head Cover Plate
8
MET-03-048M
1
Heaf Cover (PC-Green)
9
MET-03-049M
1
Handle Supporter –SPG2500
10
MET-03-050P
1
Bearing(GE25ES) –SPG2500
11
MET-03-051P
1
Snap Ring(RTW-42) –SPG2500
12
MET-03-052M
1
Foot Lest
13
MCB-05-016P
1
Monitor (Kotek : KT-2983DF 29”)
14
SPG-2500
1
Handle Mecha Ass’y (SEGA: SPG-2500)
(MET-03-054P)
15
SPG-2200
1
Pedal Mecha Ass’y (SEGA: SPG-2200) (MET-03-055P)
123
ITEM NO
PART NO
Q’TY
DESCRIPTION
16
MMB-00-002M
1
Middle Joint (YL150X140)
17
HB12-035HNN
4
HEX. Bolt – M12X35L (MMB-00-001P)
18
W-SP12HNN
12
Spring Washer – M12 (MAT-00-064P)
19
N-HN12HNN
4
HEX. Nut – M12 (MAT-00-054P)
20
HB10-1035HNN
8
HEX. Bolt – M10X35L (MAT-00-002P)
21
W-SP10HNN
8
Spring Washer – M10 (MAT-00-063P)
22
HB08-070HNN
2
HEX. Bolt – M8X70L (MET-03-056P)
23
W-SP08HNN
30
Spring Washer – M8 (MAT-00-062P)
24
W-FL08HNN
30
Flat Washer –M8 (MAT-00-072P)
25
N-HN08HNN
8
HEX. Nut – M8 (MAT-00-052P)
26
HB08-055HNN
2
HEX. Bolt – M8X55L (MET-03-057P)
27
HB08-030HNN
4
HEX. Bolt – M8X30L (MET-03-030P)
28
HB08-020HNN
8
HEX. Bolt – M8X20L (MET-03-058P)
29
N-NY08NNN
4
HEX. Nut – M8 (Nylon) (MET-03-059P)
30
TR06-010NNP
4
Truss Bolt – M6X10L (MET-03-060P)
31
TR04-010NNP
25
Truss Bolt – M4X10L (MAT-00-031P)
32
MCB-05-026P
1
Woofer (8”-4Ω)
33
TR04-016NNP
4
Truss Bolt – M4X16L (MET-03-061P)
34
W-SP04NNN
4
Spring Washer –M4 (MET-03-062P)
35
W-FL04NNN
4
Flat Washer – M4 (MET-03-063P)
36
N-HN04NNN
4
HEX. Nut – M4 (MET-03-064P)
37
MET-03-065P
4
Rubber Plate
38
MET-03-204M
2
Side Steel Cover
40
MET-03-282M
1
Cable Supporter
41
MET-03-283M
1
Seat Belt Fix Bracket
42
MET-03-284P
2
SUS Band 2 1/2”
43
MET-03-285P
2
SUS Band 2”
44
MET-03-286P
1
SUS Band 7”
45
MET-03-287P
2
SUS Band 3”
46
MSM-00-030M
1
Bellows Cover(Φ165X250L)
47
MET-03-310M1
1
Handle Shafe(SPG2500)
48
MET-03-310M2
1
Handle Collar(SPG2500)
124
19-4 CABIN FRP COVER ASS’Y
ITEM NO
PART NO
Q’TY
DESCRIPTION
1
MET-03-301M
1
Upper Case
2
MET-03-302M
1
Lower Case
3
MET-03-303M
1
Mainterance Cover
4
MET-03-304M
1
Handel Case
5
MET-03-305M
1
Monitor Cover
6
MET-03-306M
1
Side Cover-L
7
MET-03-307M
1
Side Cover-R
8
MET-03-308M
1
Joint Cover
9
MET-03-309M
1
Switch Panel
10
MET-03-310M
1
Handle Shaft Cover
11
MET-03-311M
1
Monitor Switch Panel
125
19-5 CABIN SEAT ASS’Y
Buckle
ITEM NO
PART NO
Q’TY
DESCRIPTION
1
MET-03-314M
1
Seat Ass'y
2
MET-03-315M
1
Seat Cover
3
MET-03-316M
1
Cushion Plate
4
MET-03-317M
1
Seat Rail Ass’y
5
ECB-05-033P
2
Rear Speaker
6
MET-03-318P
1
Seat Belt -Retrector
7
HB10-035HNN
6
HEX. Bolt – M10X35L (MAT-00-002P)
9
W-SP10HNN
16
Spring Washer – M10 (MAT-00-063P)
10
W-FL10HNN
10
Flat Washer –M10 (MAT-00-073P)
11
N-NH10HNN
6
HEX. Nut – M10 (MAT-00-053P)
12
N-FH10NNN
2
Flange HEX. Nut – M10 (MET-03-319P)
13
W-LF10NNN
6
Large Flat Washer – M10 (Φ38XΦ10X3.2t) (MET03-320P)
14
TR05-020NNP
6
Truss Bolt – M5X20L (MET-03-321P)
15
W-PW05NNN
6
Plastic Washer – M5 (MET-03-322P)
16
RW04-012NNN
8
Round Head Wrench Bolt - M4X12L (MET-03-323P)
126
ITEM NO
PART NO
Q’TY
DESCRIPTION
17
N-NY08NNN
6
HEX. Nut – M8 (Nylon) (MET-03-059P)
18
W-SP08HNN
6
Spring Washer – M8 (MAT-00-062P)
19
W-FL08HNN
6
Flat Washer –M8 (MAT-00-372P)
20
MET-03-319P
1
Buckle(Model SBB3 ;N-O type)
21
MET-03-320M
1
Buckle Bracket
22
HB10-030NNN
1
Hex. Bolt (M10X30L)
23
N-FH10NNN
1
Flange Hex. Nut (M10)
24
W-SP10NNN
2
Spring Washer (M10)
25
W-FL10NNN
2
Flat Washer (M10)
26
HB10-020NNN
1
Hex. Bolt (M10X20L)
27
MET-03-321M
1
Guide Plate
28
MET-03-322M
2
Clamper
29
SH04-016NNP
2
Sems Bolt (M4X16L)
30
MET-03-323M
1
Rubber Plate (3.2t)
31
MET-03-324M
1
Fix Plate
31
TR04-008NNP
6
Truss Bolt (M4X8L)
127
19-6 HEAVE ACTUATOR ASS’Y(ADS-180)
ITEM NO
PART NO
Q’TY
DESCRIPTION
0
MAT-06-000M
1
Heave Acuator Ass’y(ADS-180)
34
MAT-00-102P
1
Grease Nipple - M6
36
FL04-025NNN
4
Flush Bolt – M4X25L (MET-03-034P)
38
MAT-00-100P
2
Limit Switch (KH-9015-HR(S))
49
HB10-035HNN
8
HEX. Bolt – M10X35L (MAT-00-002P)
50
W-SP10HNN
1
Spring Washer – M10 (MAT-00-063P)
51
MAT-06-006M
2
Heave Acutator Joint
52
MAT-00-054M
2
Limit S/W Cover
53
MET-03-286P
1
SUS Band 5”
54
MSM099-029M
1
Bellows Cover(Φ135X450L)
128
19-7 TOP ACTUATOR ASS’Y(ABS-180C)
ITEM NO
PART NO
Q’TY
DESCRIPTION
0
MAT-07-000M
2
Top Acuator Ass’y(ABS-180C)
20
MAT-03-020P
1
Servo Motor (750W)
21
MAT-03-021P
1
Motor Pulley(P24-S5M-0200-A)
22
MAT-03-022P
1
Connector Pulley(P32-S5M-0200-A)
23
MAT-03-023P
1
Power Lock (φ16X24)
24
MAT-03-024P
1
Timing Belt (B200-S5M-325)
25
MAT-00-100P
2
Limit Switch (KH-9015-HR(S))
33
N-HN6NNN
4
HEX. Nut – M6 (MAT-00-051P)
35
WR06-030HNN
4
HEX. Wrench Bolt – M6X30L (MAT-00-015P)
38
FL04-025NNN
4
Flush Bolt – M4X25L (MET-03-034P)
39
MAT-00-102P
3
Grease Nipple - M6
42
W-SP06NNN
8
Spring Washer –M6 (MAT-00-060P)
45
W-FL06NNN
4
Flat Washer – M6 (MAT-00-071P)
54
MAT-00-054P
2
Limit S/W Cover
55
MMB-00-001M
1
AT-Joint
56
HB10-040HNN
4
HEX. Bolt – M10X40L (MAT-00-003P)
57
N-HN10HNN
4
HEX. Nut – M10 (MAT-00-053P)
58
W-SP10HNN
8
Spring Washer – M10 (MAT-00-063P)
59
W-FL10HNN
4
Flat Washer – M10 (MAT-00-073P)
60
MAT-07-003M
1
Motor Cover
61
TR04-006NNP
4
Truss Bolt – M4X6L (MAT-07-004P)
62
MET-03-286P
2
SUS Band 5”
63
MSM-00-028M
2
Bellows Cover(Φ125X350L)
129
19-8 GIMBAL JOINT ASS’Y
ITEM NO
PART NO
Q’TY
DESCRIPTION
0
MET-03-066M
2Set
Gimbal Joint Ass’y
1
MET-03-067M
2
Gimbal Joint Block
2
MET-03-068M
4
Joint Shaft Block
3
MET-03-069M
2
Joint Plate
4
MET-03-070M
8
Joint Kit
5
HB10-035HNN
16
HEX. Bolt – M10X35L (MAT-00-002P)
6
W-SP10HNN
16
Spring Washer – M10 (MAT-00-063P)
7
W-FL10HNN
16
Flat Washer – M10 (MAT-00-073P)
8
HB08-045HNN
16
HEX. Bolt – M8X45L (MET-03-071P)
9
W-SP08HNN
16
Spring Washer – M8 (MAT-00-062P)
10
MAT-00-102P
8
Grease Nipple – M6
130
19-9 SENSOR PART
DESCRIPTION
ITEM NO
PART NO
Q’TY
1
MET-03-072M
1
Sensor Supporter Ass’y-L
2
MET-03-073M
1
Sensor Supporter Ass’y-R
3
MET-03-074M
2
Flange Bracket
7
MET-03-078M
1
Adjust Bracket-L
8
MET-03-079M
1
Adjust Bracket-R
9
MET-03-080M
1
Sensor Cover-L
10
MET-03-081M
1
Sensor Cover-R
11
MAS-36-401P
2
Photo Sensor (BX5M-MFR)
12
-
4
Photo Sensor Mirror (MS-3)
13
TR04-010NNP
8
Truss Bolt – M4X10L (MAT-00-031P)
18
RH03-010NNN
8
Round Head Bolt – M3X10L (MET-03-082P)
22
MET-03-235M
1
F-Adjust Bracket
23
MET-03-236M
1
F-Sensor Supporter
24
MET-03-237M
1
F-Mirror Bracket Ass'y
25
MET-03-238P
2
Level Foot
26
N-NH12HNN
2
Hex. Nut - M12 (MAT-00-054P)
27
SH08-020NNP
8
Sems Bolt - M8X20L
28
SH06-015NNP
6
Sems Bolt - M6X15L
131
Ass'y
19-10 FENCE ASS’Y
47 54 56
47 54 56
19 22
20 22
46 5 54 56
21 22
23
49
18 51
22
1
17
2 16 47 53 56
44 48 53 55
14
3
8
4
9
10 41 51
실린더
24
배기
# 스피디 콘트롤 밸브 조립방향 #
12
11
2
58 59
6
5
57
52 54 56
132
13
DESCRIPTION
ITEM NO
PART NO
Q’TY
0
-
1set
1
MET-03-240M
2
Gate Door
2
MET-03-241M
2
Shaft
3
MET-03-242M
1
Stopper-L
4
MET-03-243M
1
Stopper-R
5
MET-03-244M
6
Washer
6
MET-03-245M
2
Spacer
7
MET-03-246M
1Set
8
MET-03-247M
1
Boarding Step
9
MET-03-248P
2
Air Cylinder(ACS3-CB25-S300-Y)
10
MET-03-249P
2
Speed Control Valve (NSF08)
11
MET-03-250P
2
Fitting(PL0801)
12
MET-03-251P
2
Air Silencer(ST01)
13
MET-03-252P
2
Tube(U-0850-BK)
14
MET-03-253M
2
Spring
15
MET-03-254P
2
Pipe Cap
16
MET-03-255M
1
Fence Pole B-L
17
MET-03-256M
1
Fence Pole B-R
18
MET-03-257M
2
Door Supporter
19
MET-03-258M
1
Fence Pole-F
Fence Ass'y
Boarding Step Ass'y
133
ITEM NO
PART NO
Q’TY
DESCRIPTION
20
MAT-03-259M
3
Fence Pole-R.S
21
MET-03-260M
4
Fence Pole-C
22
MET-03-261P
4
Pipe Cap( Φ50)
23
MET-03-262M
9
Wire Mesh(1170X900)
24
MET-03-263M
1
Coin Chute Tower Ass'y
25
MET-03-100M
2
Bellows Flange
26
MET-03-205M
1
Flange Cover
29
MET-03-206M
1Set
30
MET-03-207M
1
Credit Board Bracket
31
MET-03-208M
1
Coin Vault Box Ass’y
32
MET-03-209M
1
Vault Base Plate
33
MET-03-210M
1
Cash Box Stopper
34
MET-03-211M
1
Select Bracket(2Entry)
35
MET-03-212M
1
Select Bracket(1Entry)
36
MET-03-213P
1
Coin Meter(Happs: 42-0756-00 :DC5V)
37
MET-03-214P
4
Plastic Support (M3X10L)
38
MET-03-215P
1
Cash Box (SEGA)
39
TR04-008NNP
10
Truss Bolt(M4X8L)
40
TP03-008NNN
2
Tapping Screw(M3X8L)
41
N-HN04NNN
10
Hex. Nut (M4)
42
W-SP04NNN
10
Spring Washer(M4)
43
W-FL04NNN
10
Flat Washer(M4)
44
MET-03-264P
2
Bearing (UCFC205)
45
MET-03-265P
2
DU Bush (MB1210DU)
46
HB08-030HNN
4
Hex. Bolt(M8X30L)
47
HB08-020HNN
24
Hex. Bolt(M8X20L)
48
HB10-035HNN
8
Hex. Bolt(M10X35L)
49
WR08-012HNN
36
Wrench Bolt(M8X12L)
50
WR06-010HNN
4
Wrench Bolt(M6X10L)
51
TR04-025NNP
4
Truss Bolt(M4X25L)
52
N-HN08HNN
4
Hex. Nut(M8)
53
W-FL10HNN
8
Flat Washer(M10)
54
W-FL08HNN
12
Flat Washer(M8)
55
W-SP10HNN
8
Spring Washer(M10) (MET-03-085M)
56
W-SP08HNN
16
Spring Washer(M8) (MET-03-086M)
57
SH08-020NNN
2
Sems Bolt (M8X20L) (MET-03-087M)
58
TP04-016NNN
2
Tapping Screw(M4X16L)
Coin Vault Ass'y
134
59
MET-03-264P
2
Steel Band
135
19-11 SUPPORTER PART
ITEM NO
PART NO
Q’TY
DESCRIPTION
1
MET-03-111M
1
Safety Link
2
MET-03-112P
1
Hinge Boltt - M16X130L(SUS)
3
N-NY16NNN
2
Hex. Nut - M16(Nylon) (MET-03-113P)
4
W-SP16HNN
1
Spring Washer – M16 (MAT-00-065P)
5
HB14-055HNN
1
Hex. Bolt – M14X55L (MET-03-114P)
6
HB14-080HNN
1
Hex. Bolt – M14X80L (MET-03-115P)
7
N-NY14NNN
1
Hex. Nut – M14(Nylon) (MET-03-116P)
136
ITEM NO
PART NO
Q’TY
DESCRIPTION
8
W-FL14HNNN
4
Flat Washer – M14 (MAT-00-075P)
9
MET-03-118M
1
Fix Bracket
10
MET-03-119M
1
F-Caster Ass’y -L
26
MET-03-218M
1
F-Caster Ass’y -R
11
MET-03-120M
8
Pin
12
MET-03-121P
2
Caster
13
N-HN20HNP
4
Hex. Nut - M20XP2.5 (MET-03-122P)
14
W-FL20HNP
4
Flat Washer – M20 (MET-03-123P)
15
HB12-035HNN
14
Hex. Bolt – M12X35L (MMB-00-001P)
16
W-FL12HNN
14
Flat Washe – M12 (MAT-00-074P)
17
MET-03-124P
8
Snap Ring (STW-20)
18
MET-03-125M
1
R-Caster Ass’y-L
27
MET-03-219M
1
R-Caster Ass’y-R
19
MET-03-126P
2
Caster(4”)
20
MET-03-127P
1
Load Binder (3/8”X1/2”)
21
N-EY16NNN
1
Eye Nut – M16 (MET-03-128P)
22
MET-03-129P
1
Shakle (1/2”)
23
W-FL16HNNN
2
Flat Washer – M16 (MET-03-220P)
24
HB12-045HNN
1
Hex. Bolt – M12X45L (MET-03-221P)
25
N-HN12HNN
1
Hex. Nut – M12 (MAT-00-054P)
137
19-12 CABIN & ARM CLAMP ASS’Y
DESCRIPTION
ITEM NO
PART NO
Q’TY
1
MET-03-266M
1
Front lower Clamp –L (Cabin Frame Ass’y)
2
MET-03-267M
1
Front lower Clamp –R (Cabin Frame Ass’y)
3
MET-03-268M
1
Front Upper Clamp –L (Cabin Frame Ass’y)
4
MET-03-269M
1
Front Upper Clamp –R (Cabin Frame Ass’y)
5
MET-03-270M
1
Rear Clamp Ass’y –L (Cabin Frame Ass’y)
6
MET-03-271M
1
Rear Clamp Ass’y –R (Cabin Frame Ass’y)
7
MET-03-272M
4
Monitor Bracket (Cabin Frame Ass’y)
13
MET-03-277M
1set
Arm Clamp Ass’y (Rocker Arm Ass’y)
14
MET-03-278M
1
Arm Clamp-upper
15
MET-03-279M
1
Arm Clamp-Lower
16
MET-03-280M
1
Arm Plate-F
17
MET-03-281M
8
Arm Plate-R
18
HB08-035HNN
18
Hex. Bolt-M8X35
19
N-HN08HNN
8
Hex. Nut-M8
20
W-SP08HNN
18
Spring Washer-M8
21
W-FL08HNN
18
Flat Washer-M8
ITEM NO
PART NO
Q’TY
DESCRIPTION
138
22
WR10-100HNN
10
Wrench Bolt-M10X100L
23
N-HN10HNN
16
Hex.Nut-M10
24
W-SP10HNN
38
Spring Washer-M10
25
W-FL10HNN
28
Flat Washer-M10
26
W-LF10NNN
10
Large Flat Washer-M10(Φ38XΦ10X3.2t)
27
HB10-090HNN
6
Hex. Bolt-M10X90L
28
HB10-040HNN
10
Hex. Bolt-M10X40L
139
19-13 MSCU PART
140
9
27
26
29
28
26
28
11
10
24
24
2
26
28
7
6
7
1
3
4
141
5
ITEM
NO
1
PART NO.
Q’TY
EEC-32-107P
EMU-21-104P
1
3
4
5
6
EMU-27-101P
EMU-27-102P
EMU-29-309P
EMU-30-101P
1
1
1
1
7
EMU-30-103P
2
8
9
EMU-34-803P
EMU-40-307P
2
1
10
ESU-05-030P
1
11
ESU-05-029P
1
12
ESU-32-303P
1
13
14
ESU-00-622M
ESU-05-023P
1
1
15
ECB-05-024P
1
16
ESU-19-124P
1
17
ESU-19-121P
1
18
ESU-19-122P
1
19
ESU-19-123P
1
20
ESU-19-128P
21
22
23
24
25
ESU-19-125P
ESU-40-202P
EEX-02-504M
EMU-00-616M
EMU-00-625M
26
EMU-00-626M
27
EMU-00-410M
28
EMU-00-628M
29
EMU-00-411M
2
30
31
ESU-26-314P
ESU-05-032P
1
1
1
1
1
1
1
2
1
2
1
2
1
DESCRIPTION
SHUTDOWN RELAY
NOTE
KH-103-4C-3/AC230V
UFMCU FAN
80A23/80*38/FULLTECH
MAGNETIC CONTACT (S) GMC-12 / CH-3 / 220V
MAGNETIC CONTACT (M) GMC22/LG
CIRCUIT BREAKER
BKM-C / 2P 16A
NOISE FILTER(S)
WYF-S06 A2/AC220V 6A
FM-215T / 250V~, 15A
NOISE FILTER(M)
50/60HZ / DASTEK
MCU RESISTOR
35Ω 300W
MULTI-TRANSFORMER
4.5KVA/HST-10450
CS15-05
/
50~60HZ,
SMPS-5V
100~240VAC, 0.37A
CS30-15
/
50~60HZ,
SMPS-15V
100~240VAC, 0.79A
SOCKET / KH-RS-14N /
RELAY SOCKET
250V 7A / VDE
SW REGU FOR JVS
SEGA 400-5397-01
SW REGU FOR MBD
ST-300BLP
HAPPS
42-0756-00 /
COIN COUNTER
DC05V 1.5WATTS 6DIGIT
PCM-5820-E081
/
233
MOTION BD-MAIN
CPU,
VGA/LAN,
RAM
64MB
MOTION BD COMPACK
COMPACT FLASH ROM
FLASH ROM
PCM-3680
/
CAN
MOTION BD-CAN
MODULE(CARD)
PCM-3724 / PC104 48BIT
MOTION BD-DIO
I/O MODULE(CARD)
I/O CONTROL BD FOR SEGA 837-13551-92
JVS
GAME BD
SEGA NAOMI2 840-0091D
AMP TRANS
WYDC 224-100AP / 100VA
AMP STEREO BD ASS’Y
/ STK4392+MAIN3
MCU POWER BD
MCU POWER BOARD
SRIP BD
CYCRAFT SRIP
SERVO CONTROL BDPM30CSJ60
MITSUBISHI
SERVO CONTROL BD- TOSHIBA
/
MIG100
TOSHIBA
/CYCRAFT / BOARD
CYCRAFT 750W BRAKE
BRAKER BD-MITSUBISHI
VER.1 BOARD
CYCRAFT 2KW BRAKE
BRAKER BD-TOSHIBA
VER.1 BOARD
KH-516L-COO/DC12V/LED
FLOOR LED
TYPE/ GREEN
GD-ROM DRIVE KIT XKTGD-ROM
0833
142
19-14 MAINTENANCE PANEL
8
10
11
4
3
5
2
9
15
16
12
13
14
7
8
10
11
1
6
3
5
2
9
16
15
12
13
14
143
ITEM NO
PART NO.
Q’TY
DESCRIPTION
1
ECB-34-903P
3
AUDIO VR
2
ESU-05-006P
1
SERVICE LCD
3
ESU-05-019P
1
BUZZER
4
ESU-10-031P
3
KNOB
5
ESU-35-207P
1
POWER CUTOFF S/W
6
ESU-35-208P
1
MOTION STOP S/W
7
ESU-35-209P
1
S/W COVER
8
EAS-26-310P
4
LAMP
9
EMU-31-704M
1
KEYPAD PCB
10
EMU-31-804M
1
LED PCB
11
EAS-35-321P
1
MODE S/W
12
ESU-35-301P
1
S/W
13
ESU-35-303P
1
S/W
14
ESU-35-310P
1
S/W
15
ESU-35-311P
1
S/W
16
ESU-35-320P
1
CABIN S/W
144
NOTE
VR/DUAL
TYPE/100KΩ/SMALL SIZE
ELCD-204-BL
BUZZER / KH-4025D-24 /
24V 25Φ
KNOB 1-12 / VOLUME
KNOB
25Φ / KE 5BMRT10S / BCONTACT / KACON
KPB
25-ER/1A
/
ACONTACT / 12V
KPB 25-ER/1A
MOTION
S/W COVER
PILOT
LAMP/
AC220V/10Φ/TN102/GREEN
KEYPAD PCB
CYCRAFT LED PCB /
252*120 / V-CUT
SLIP SELECTOR SWITCH
2230
PUSH
SWITCH/W12M/12Φ/YELLOW
PUSH
SWITCH/W12M/12Φ/BLUE
PUSH
SWITCH/KH516C31/RED
PUSH
SWITCH/KH516C31/GREEN
VLA04/AC125V 6A, AC250V
6A / OTAX
19-15 CABIN PART
1
1
2
2
10
6
7
9
13
5
12
8
3
145
ITEM NO.
PART NO.
Q’TY
1
ECB-05-025P
2
2
ECB-05-027P
2
3
ECB-05-026P
1
4
ECB-05-033P
2
5
EMU-00-618M
1
6
ECB-14-517M
1
7
ECB-05-016P
1
8
ECB-05-017P
1
9
ECB-05-017Q
1
10
ECB-35-602P
1
12
EEC-10-042P
1
13
EEC-10-043P
1
DESCRIPTION
NOTE
52900-010 / 16Ω 15W /
FRONT SPEAKER
SAMSUNG
SPEAKER COVER / 4"
SPEAKER COVER
(114*114)
DM200-120F 8" 8Ω / MAX
BASE SPEAKER
200W
CSPK-1175E(C1151183E)
REAR SPEAKER
8Ω 8W
DRIVER BD MIDI
SEGA 838-14174
START/VIEW
SW CFT-2200 / ASS’Y VIRTUAL
PLATE
BUTTON
MONITOR TUBE
29" / KORTEK 2938DF
MONITOR MAIN BOARD /
MONITOR BD
29" / KORTEK 2938DF
MONITOR NECK BOARD /
MONITOR NECK BD
29" / KORTEK 2938DF
CROWIN 403(49.5MM) RED
STOP S/W
SWITCH
FLAT
USH-7SW-F/20P
TERMINALBLOCK20P
FLAT
TERMINALBLOCKUSH-7SW-F/40P
40P
146
19-16 ASSY HANDLE MECHA (SPG-2500)
See chapter 9 of service manual (420-6857).
19-17 ASSY ACCEL & BRAKE (SPG-2200)
See chapter 8 of service manual (420-6857).
19-18 ASSY STEERING (SPG-2001)
See chapter 9 of service manual (420-6857).
147
20. WIRE HARNESS LIST
20-1 OP PANEL PART CABLE LIST
PART
NO
PART NO.
1
ESU-14-001M
CABLE
1
CABIN LAMP POWER / OLFLEX150 2*0.5/1300L
2
ESU-14-002M
CABLE
1
MSCU LAMP POWER / OLFLEX150 2*0.5/1300L
3
ESU-14-003M
CABLE
1
POWER LAMP POWER /
NAME
Q’TY
DESCRIPTION
OLFLEX150 2*0.5/1300L
4
ESU-14-004M
CABLE
1
SOURCE LAMP POWER /
OLFLEX150 2*0.5/1300L
5
ESU-14-005M
CABLE
1
CABIN ON-OFF SWITCH / OLFLEX 2G*0.5
6
ESU-14-007M
CABLE
1
LED CABLE / LIYCY 7C*0.25
7
ESU-14-008M
CABLE
1
KEY PAD CABLE / LIYCY 7C*0.25
8
ESU-14-009M
CABLE
1
LCD POWER CABLE / OLFLEX 2G*0.5
9
ESU-14-010M
CABLE
1
LCD SIGNAL CABLE / LIYCY 2C*0.25
10
ESU-14-011M
CABLE
1
TEST SWITCH CABLE (A) / LIYCY 4C*0.25
11
ESU-14-012M
CABLE
1
TEST SWITCH CABLE (B) / LIYCY 4C*0.25
12
ESU-14-013M
CABLE
1
BUZZER CABLE / OLFLEX 2G*0.5
13
ESU-14-015M
CABLE
1
MAINTERANCE/RUN CABLE / LIYCY 2C*0.25
14
ESU-14-016M
CABLE
1
STOP/RESUME/SYSTEM SHUT/
24-20AWG OLFLEX 2*0.5
148
20-2 CABIN PART CABLE LIST 1
NO
PART NO.
1
ECB-14-101M
PART
NAME
CABLE
Q’TY
1
DESCRIPTION
MOTOR 2 POWER CABLE /
OLFLEX150 4G*2.5
2
ECB-14-102M
CABLE
1
MOTOR 3 POWER CABLE /
OLFLEX150 4G*2.5
3
ECB-14-103M
CABLE
1
MOTOR 2 ENCODER CABLE /
LIYCY 10C*0.25
4
ECB-14-104M
CABLE
1
MOTOR 3 ENCODER CABLE /
LIYCY 10C*0.25
5
ECB-14-105M
CABLE
1
LIMIT 2 CABLE(A) / LIYCY 4C*0.25
6
ECB-14-106M
CABLE
1
LIMIT 3 CABLE(A) / LIYCY 4C*0.25
7
ECB-14-107M
CABLE
1
MOTOR 1 POWER CABLE /
OLFLEX150 4G*2.5
8
ECB-14-108M
CABLE
1
MOTOR 1 ENCODER CABLE /
LIYCY 10C*0.25
9
ECB-14-109M
CABLE
1
LIMIT 1 CABLE / LIYCY 4C*0.25
10
ECB-14-110M
CABLE
1
CABIN POWER (AC220,100V) CABLE /
OLFLEX150 5G*1.0
11
ECB-14-111M
CABLE
1
SRIP J7 / DATA CABLE4C*20AWG
12
ECB-14-112M
CABLE
1
CABIN MG610070-2P /
OLFLEX 2G*0.5 ST730365-3
13
ECB-14-113M
CABLE
1
LIMIT 2 CABLE(B) / LIYCY 4C*0.25
14
ECB-14-114M
CABLE
1
LIMIT 3 CABLE(B) / LIYCY 4C*0.25
15
ECB-14-115M
CABLE
1
PHOTO SENSOR LEFT CABLE
16
ECB-14-116M
CABLE
1
PHOTO SENSOR RIGHT CABLE
17
ECB-14-117M
CABLE
1
CABIN SWITCH STOP / OLFLEX 2G*0.5
18
ECB-14-122M
CABLE
1
COIN POWER / OLFLEX150 4G*0.5
19
ECB-14-123M
CABLE
1
COIN METER MG620129-2P /
LIYCY 4C*0.25 ST740334-3
20
ECB-14-124M
CABLE
1
COIN Signal CABLE / LIYCY 4C*0.25
21
ECB-14-125M
CABLE
1
HANDLE MOTOR POWER CABLE /
OLFLEX150 CY 4G*1.5
22
ECB-14-131M
CABLE
1
PHOTO SENSOR LEFT CABLE (TYPE2)/
TERMINAL PART
23
ECB-14-132M
CABLE
1
PHOTO SENSOR LEFT CABLE (TYPE2)/
SENSOR PART
149
24
ECB-14-133M
CABLE
1
PHOTO SENSOR RIGHT CABLE (TYPE2)/
TERMINAL PART
25
ECB-14-134M
CABLE
1
PHOTO SENSOR RIGHT CABLE (TYPE2)/
SENSOR PART
26
ECB-14-135M
CABLE
1
LIMIT 1 CABLE (TYPE2)/
SERVO DRIVER 1 PART
27
ECB-14-136M
CABLE
1
LIMIT 1 CABLE (TYPE2)/ MOTOR 1 PART
28
ECB-14-137M
CABLE
1
MONITOR 29” VGA CABLE / Kortek
29
ECB-14-138M
CABLE
1
MONITOR 29” POWER CABLE / Kortek
150
20-3 CABIN PART CABLE LIST 2
NO
PART NO.
PART
Q’TY
DESCRIPTION
NAME
1
ESU-14-502M
CABLE
1
600-7141-100 / USB CABLE
2
ESU-14-503M
CABLE
1
HANDLE DRIVER BOARD JUMPER CABLE
3
ESU-14-504M
CABLE
1
NAOMI & GD-ROM POWER CABLE(A)
4
ESU-14-505M
CABLE
1
NAOMI POWER CABLE(B)
5
ESU-14-506M
CABLE
1
NAOMI I/O CABLE
6
ESU-14-507M
CABLE
1
HANDLE MOTOR POWER CABLE
7
ESU-14-508M
CABLE
1
HANDLE ENCODER CABLE
8
ESU-14-509M
CABLE
1
HANDLE VOLUME CABLE
9
ESU-14-510M
CABLE
1
ACCEL VOLUME CABLE
10
ESU-14-511M
CABLE
1
BRAKE VOLUME CABLE
11
ESU-14-512M
CABLE
1
HANDLE DRIVE BD MIDI CABLE
12
ESU-14-513M
CABLE
1
POWER SUPPLY 100VAC INPUT CABLE
13
ESU-14-525M
CABLE
1
HANDLE DRIVE BD AC100V INPUT
14
ESU-14-526M
CABLE
1
VIRTUAL S/W CABLE
151
21. GENERAL WIRING DIAGRAM
The wiring diagrams for the service of the product are illustrated in the following pages. Before
service, be sure to fully study the following three wiring diagrams.
D-ID3-1/3 MCU SINGLE-LINE DIAGRAM
D-ID3-2/3 SCU SINGLE-LINE DIAGRAM
D-ID3-3/3 CABIN INTERNAL SINGLE-LINE DIAGRAM
152