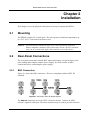
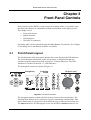
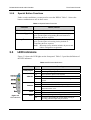
1
Model DP564 Multichannel Audio Decoder User’s Manual Issue 1 Part Number 91830 DP564 Multichannel Audio Decoder Dolby Laboratories, Inc. Corporate Headquarters Dolby Laboratories, Inc. 100 Potrero Avenue San Francisco, CA 94103-4813 Telephone 415-558-0200 Fax 415-863-1373 www.dolby.com European Headquarters Dolby Laboratories, Inc. Wootton Bassett Wiltshire, SN4 8QJ, England Telephone (44) 1793-842100 Fax (44) 1793-842101 Dolby, Pro Logic, and the double-D symbol are registered trademarks of Dolby Laboratories. Surround EX is a trademark of Dolby Laboratories. All other trademarks remain the property of their respective owners. 2002 Dolby Laboratories, Inc.; all rights reserved. S02/14327 Issue 1 ii Part Number 91830 DP564 Multichannel Audio Decoder Table of Contents List of Figures ............................................................................................................................ vi List of Tables.............................................................................................................................. vi Regulatory Notices and Fusing Information .................................................................... vii Fusing Information................................................................................................. ix Chapter 1 Introduction ...................................................................................................... 1-1 Chapter 2 Installation ............................................................................................ 2-1 2.1 Mounting.................................................................................................. 2-1 2.2 Rear-Panel Connections........................................................................... 2-1 2.2.1 BNC Connectors .......................................................................... 2-1 2.2.2 Optical In and Serial Ports ........................................................... 2-2 2.2.3 Analog Outputs ............................................................................ 2-3 2.2.4 Power ........................................................................................... 2-3 Chapter 3 Front-Panel Controls............................................................................ 3-1 3.1 Front-Panel Layout .................................................................................. 3-1 3.2 Button Functions...................................................................................... 3-2 3.2.1 Navigation.................................................................................... 3-2 3.2.2 Listening Modes .......................................................................... 3-3 3.2.3 Input ............................................................................................. 3-5 3.2.4 Preset............................................................................................ 3-5 3.2.5 Output Level ................................................................................ 3-5 3.2.6 Special Button Functions ............................................................. 3-6 3.3 LED Indicators......................................................................................... 3-6 3.4 RS-232 Connection.................................................................................. 3-7 Chapter 4 Menus .................................................................................................... 4-1 4.1 Menu Basics............................................................................................. 4-1 4.2 Hot-Key Functions................................................................................... 4-2 4.3 Status Menu ............................................................................................. 4-2 4.3.1 Main Status Menu ........................................................................ 4-2 4.3.2 Output Level Meters .................................................................... 4-4 4.3.3 Compression Meters .................................................................... 4-4 4.3.4 Monitor Status.............................................................................. 4-4 4.3.5 Metadata Status............................................................................ 4-4 4.3.6 Input Status .................................................................................. 4-5 4.3.7 AES Reference Input Status......................................................... 4-5 4.3.8 Timecode Status........................................................................... 4-6 4.3.9 Error Statistics.............................................................................. 4-6 4.3.10 System Status ............................................................................. 4-6 iii DP564 Multichannel Audio Decoder 4.4 Setup Menu .............................................................................................. 4-6 4.4.1 Operating Mode ........................................................................... 4-7 4.4.2 Monitor Control ........................................................................... 4-8 4.4.3 User Presets................................................................................ 4-12 4.4.4 I/O Control ................................................................................. 4-13 4.4.5 Monitor Configuration............................................................... 4-15 4.4.6 System Settings.......................................................................... 4-15 Chapter 5 Listening Room Calibration................................................................. 5-1 5.1 Speaker Configuration Settings ............................................................... 5-1 5.2 Speaker Delay Values .............................................................................. 5-2 5.2.1 Center Delay ................................................................................ 5-3 5.2.2 Surround Delay ............................................................................ 5-3 5.2.3 Back Surround Delay................................................................... 5-4 5.2.4 Pro Logic Delay ........................................................................... 5-4 5.3 Calibration ............................................................................................... 5-5 5.4 One-Touch Output Level Adjustment ..................................................... 5-9 Chapter 6 Operating Modes .................................................................................. 6-1 6.1 Monitoring Modes ................................................................................... 6-1 6.1.1 Downmix ..................................................................................... 6-1 6.1.2 Decoding ...................................................................................... 6-2 6.1.3 Listening ...................................................................................... 6-3 6.1.4 Compression ................................................................................ 6-3 6.2 Hardware Remote Control ....................................................................... 6-3 6.2.1 Cat. No. 549 Configuration.......................................................... 6-4 6.2.2 GPI/O Pin Configuration ............................................................. 6-5 Chapter 7 Using New Features ............................................................................. 7-1 7.1 Multiple Inputs......................................................................................... 7-1 7.2 Expanded Preset Storage ......................................................................... 7-1 7.3 Enhanced Monitoring Control ................................................................. 7-2 7.4 Dedicated GPI/O Remote Control Capability.......................................... 7-2 7.5 Dolby Digital Surround EX Decoding..................................................... 7-2 7.6 Dolby Pro Logic II Decoding .................................................................. 7-2 7.7 Dolby Headphone Processing .................................................................. 7-2 7.8 IFE Mode ................................................................................................. 7-2 7.9 Timecode Output ..................................................................................... 7-3 7.10 External AES Reference .......................................................................... 7-3 7.11 Ethernet Software Remote Control.......................................................... 7-3 7.12 Streaming ................................................................................................. 7-3 7.13 Karaoke .................................................................................................... 7-3 iv DP564 Multichannel Audio Decoder Chapter 8 Streaming Server and Remote Software ............................................ 8-1 8.1 DolbyRemote 564 .................................................................................... 8-1 8.2 Hardware Connection .............................................................................. 8-1 8.3 Installing DolbyRemote 564 .................................................................... 8-1 8.4 Launching the Application....................................................................... 8-2 8.5 DolbyRemote 564 Overview ................................................................... 8-2 8.6 Streaming ................................................................................................. 8-3 8.6.1 Server Location............................................................................ 8-3 8.6.2 File Selection ............................................................................... 8-3 8.6.3 Play, Pause, Stop Control ............................................................ 8-3 8.6.4 Slide Bar Control ......................................................................... 8-3 8.6.5 +10 Seconds / ñ10 Seconds Buttons ............................................ 8-3 8.7 Dolby Streaming Server........................................................................... 8-4 8.7.1 Installing the Dolby Streaming Server......................................... 8-4 8.7.2 Launching the Application........................................................... 8-4 Appendix A Metadata....................................................................................................1 A.1 Metadata Overview................................................................................. A-1 A.2 Dialogue Level........................................................................................ A-4 A.3 Dynamic Range Control ......................................................................... A-6 Dynamic Range Control Profiles ............................................................ A-8 A.4 Downmixing ........................................................................................... A-9 A.5 Parameter Definitions ........................................................................... A-11 A.5.1 Universal Parameters ............................................................... A-12 A.5.2 Extended Bitstream Information Parameters ........................... A-19 A.6 Metadata Combinations ........................................................................ A-23 Appendix B Latency Values ................................................................................................B-1 Appendix C Specifications ..................................................................................................C-1 v DP564 Multichannel Audio Decoder List of Figures Figure 1-1 DP564 System Block Diagram .................................................................................. 1-3 Figure 2-1 Connection Ports for Digital Signals ......................................................................... 2-1 Figure 2-2 Connection Ports for Optical, Ethernet, Remote, and GPI/O .................................... 2-2 Figure 3-1 Front-Panel Controls .................................................................................................. 3-1 Figure 3-2 LED Indicators ........................................................................................................... 3-6 Figure 4-1 Operating Mode Menu ............................................................................................... 4-1 Figure 4-2 Menu Showing Scrolling Options Available Both Above and Below Current Visible Choices........................................................................... 4-1 Figure 4-3 Main Status Menu with a Valid Dolby Digital Input................................................. 4-3 Figure 4-4 Main Status Menu with a Valid PCM Input .............................................................. 4-4 Figure 4-5 Main Setup Menu....................................................................................................... 4-7 Figure 4-6 Save Preset Text Entry Screen ................................................................................. 4-13 Figure 4-7 Unit Name Text Entry Screen .................................................................................. 4-15 Figure 5-1 Real Time Analyzer (RTA) Display .......................................................................... 5-8 Figure 6-1 Cat. No. 549 Configuration Screen Showing Active Settings for Button 4............... 6-4 Figure 6-2 GPI/O Pin Configuration Screen Showing Default Settings for Pin 23..................... 6-5 Figure A-1 Metadata Flow from Production to Consumer......................................................... A-3 Figure A-2 DRC Profile Pattern ................................................................................................. A-8 List of Tables Table 3-1 Special Button Functions............................................................................................. 3-6 Table 3-2 LED Status Definitions................................................................................................ 3-6 Table 4-1 Input Status Display for Streaming Input.................................................................... 4-5 Table 4-2 Factory-Reserved Presets .......................................................................................... 4-12 Table 6-1 Cat. No. 549 Default Button and LED Functions ....................................................... 6-5 Table 6-2 Default GPI/O Pin Assignments.................................................................................. 6-6 Table 6-3 Functions Available for Assignment to Input Pins ..................................................... 6-7 Table 6-4 Functions Available for Assignment to Output Pins................................................... 6-8 Table A-1 Metadata Parameters.................................................................................................. A-4 Table A-2 Outputs from Various Dolby Digital Signal Processing Equipment....................... A-10 Table A-3 Examples of Possible Metadata Settings ................................................................. A-23 Table B-1 SMPTE-Specified Latency .........................................................................................B-2 Table B-2 IEC 61937 Specified Latency, with Respect to Beginning of Dolby Digital (AC-3) burst payload......................................................B-3 Table B-3 Additional Latency in Silent Switch Mode ................................................................B-3 vi DP564 Multichannel Audio Decoder Regulatory Notices and Fusing Information FCC This equipment has been tested and found to comply with the limits for a Class A digital device, pursuant to Part 15 of the FCC Rules. These limits are designed to provide reasonable protection against harmful interference when the equipment is operated in a commercial environment. This equipment generates, uses, and can radiate radio frequency energy and, if not installed and used in accordance with this instruction manual, may cause harmful interference to radio communications. Operation of this equipment in a residential area is likely to cause harmful interference, in which case the user will be required to correct the interference at his or her own expense. Canada This Class A digital apparatus complies with Canadian ICES-003. UL WARNING: Troubleshooting must be performed by a trained technician. Do not attempt to service this equipment unless you are qualified to do so. Check that the correct fuses have been installed. To reduce the risk of fire, replace only with fuses of the same type and rating. Exposed portions of the power supply assembly are electrically ìhot.î To reduce the risk of electrical shock, the power cord must be disconnected before the power supply assembly is removed. The ground terminal of the power plug is connected directly to the chassis of the unit. For continued protection against electric shock, a correctly wired and grounded (earthed) threepin power outlet must be used. Do not use a ground-lifting adapter and never cut the ground pin on the three-prong plug. WARNING: Before applying power, check the main fuse, using the procedure on page ix. UK The power cord supplied for use in Europe (Dolby Part No. 92021) is not suitable for use in the UK. To use the cord in the UK cut off the CEE7/7 plug and replace with an approved BS 1363 13A plug: • The core that is coloured green and yellow must be connected to the terminal in the or coloured green or green plug identified by the letter E or by the earth symbol and yellow. • The core that is coloured blue must be connected to the terminal that is marked with the letter N or coloured black. • The core that is coloured brown must be connected to the terminal that is marked with the letter L or coloured red. • This apparatus must be earthed. vii DP564 Multichannel Audio Decoder EU This equipment complies with the EMC requirements of EN55103-1 and EN55103-2 when operated in an E2 environment in accordance with this manual. IMPORTANT SAFETY NOTICE This unit complies with the safety standard EN60065. The unit shall not be exposed to dripping or splashing and no objects filled with liquids, such as coffee cups, shall be placed on the equipment. To ensure safe operation and to guard against potential shock hazard or risk of fire, the following must be observed: o Ensure that your mains supply is in the correct range for the input power requirement of the unit. o Ensure fuses fitted are the correct rating and type as marked on the unit. o The unit must be earthed by connecting to a correctly wired and earthed power outlet. o The power cord supplied with this unit must be wired as follows: LiveóBrown NeutralóBlue EarthóGreen/Yellow IMPORTANT ñ NOTE DE SECURITE Ce materiel est conforme ‡ la norme EN60065. Ne pas exposer cet appareil aux Èclaboussures ou aux gouttes de liquide. Ne pas poser d'objets remplis de liquide, tels que des tasses de cafÈ, sur l'appareil. Pour vous assurer d'un fonctionnement sans danger et de prÈvenir tout choc Èlectrique ou tout risque d'incendie, veillez ‡ observer les recommandations suivantes. F o Le selecteur de tension doit Ítre placÈ sur la valeur correspondante ‡ votre alimentation rÈseau. o Les fusibles doivent correspondre ‡ la valeur indiquÈe sur le materiel. o Le materiel doit Ítre correctement reliÈ ‡ la terre. o Le cordon secteur livrÈ avec le materiel doit Ítre cablÈ de la maniËre suivante: PhaseóBrun NeutreóBleu TerreóVert/Jaune WICHTIGER SICHERHEITSHINWEIS Dieses Ger‰t entspricht der Sicherheitsnorm EN60065. Das Ger‰t darf nicht mit Fl¸ssigkeiten (Spritzwasser usw.) in Ber¸hrung kommen; stellen Sie keine Gef‰fle, z.B. Kaffeetassen, auf das Ger‰t. F¸r das sichere Funktionieren des Ger‰tes und zur Unfallverh¸tung (elektrischer Schlag, Feuer) sind die folgenden Regeln unbedingt einzuhalten: o Der Spannungsw‰hler mufl auf Ihre Netzspannung eingestellt sein. D o Die Sicherungen m¸ssen in Typ und Stromwert mit den Angaben auf dem Ger‰t ¸bereinstimmen. o Die Erdung des Ger‰tes mufl ¸ber eine geerdete Steckdose gew‰hrleistet sein. o Das mitgelieferte Netzkabel mufl wie folgt verdrahtet werden: Phaseóbraun Nulleiteróblau Erdeógr¸n/gelb NORME DI SICUREZZA ñ IMPORTANTE Questa apparecchiatura Ë stata costruita in accordo alle norme di sicurezza EN60065. Il prodotto non deve essere sottoposto a schizzi, spruzzi e gocciolamenti, e nessun tipo di oggetto riempito con liquidi, come ad esempio tazze di caffË, deve essere appoggiato sul dispositivo. Per una perfetta sicurezza ed al fine di evitare eventuali rischi di scossa Ílettrica o d'incendio vanno osservate le seguenti misure di sicurezza: o Assicurarsi che il selettore di cambio tensione sia posizionato sul valore corretto. o Assicurarsi che la portata ed il tipo di fusibili siano quelli prescritti dalla casa costruttrice. I o L'apparecchiatura deve avere un collegamento di messa a terra ben eseguito; anche la connessione rete deve avere un collegamento a terra. o Il cavo di alimentazione a corredo dell'apparecchiatura deve essere collegato come segue: Filo tensioneóMarrone NeutroóBlu MassaóVerde/Giallo AVISO IMPORTANTE DE SEGURIDAD Esta unidad cumple con la norma de seguridad EN60065. La unidad no debe ser expuesta a goteos o salpicaduras y no deben colocarse sobre el equipo recipientes con liquidos, como tazas de cafe. Para asegurarse un funcionamiento seguro y prevenir cualquier posible peligro de descarga o riesgo de incendio, se han de observar las siguientes precauciones: o Aseg˙rese que el selector de tensiÛn estÈ ajustado a la tensiÛn correcta para su alimentaciÛn. E o Aseg˙rese que los fusibles colocados son del tipo y valor correctos, tal como se marca en la unidad. o La unidad debe ser puesta a tierra, conect·ndola a un conector de red correctamente cableado y puesto a tierra. o El cable de red suministrado con esta unidad, debe ser cableado como sigue: VivoóMarrÛn NeutroóAzul TierraóVerde/Amarillo VIKTIGA SƒKERHETSTTGƒRDER! Denna enhet uppfyller s‰kerhetsstandard EN60065. Enheten fÂr ej uts‰ttas fˆr yttre Âverkan samt fˆremÂl innehÂllande v‰tska, sÂsom kaffemuggar, fÂr ej placeras p utrustningen." Fˆr att garantera s‰kerheten och gardera mot eventuell elchock eller brandrisk, mÂste fˆljande observeras: o Kontrollera att sp‰nningsv‰ljaren ‰r inst‰lld p korrekt n‰tsp‰nning. S o Konrollera att s‰kringarna ‰r av r‰tt typ och fˆr r‰tt strˆmstyrka s som anvisningarna p enheten fˆreskriver. o Enheten mÂste vara jordad genom anslutning till ett korrekt kopplat och jordat el-uttag. o El-sladden som medfˆljer denna enhet mÂste kopplas enligt foljande: FasóBrun NeutralóBl JordóGrˆn/Gul BELANGRIJK VEILIGHEIDS-VOORSCHRIFT: Deze unit voldoet aan de EN60065 veiligheids-standaards. Dit apparaat mag niet worden blootgesteld aan vocht. Vanwege het risico dat er druppels in het apparaat vallen, dient u er geen vloeistoffen in bekers op te plaatsen. Voor een veilig gebruik en om het gevaar van electrische schokken en het risico van brand te vermijden, dienen de volgende regels in acht te worden genomen: o Controleer of de spanningscaroussel op het juiste Voltage staat. NL o Gebruik alleen zekeringen van de aangegeven typen en waarden. o Aansluiting van de unit alleen aan een geaarde wandcontactdoos. o De netkabel die met de unit wordt geleverd, moet als volgt worden aangesloten: FaseóBruin NulóBlauw AardeóGroen/Geel viii DP564 Multichannel Audio Decoder Fusing Information WARNING: To reduce the risk of fire, replace fuses only with the same type and rating. The DP564 uses a universal switching power supply that handles the full range of nominal mains voltages between 90 and 264 VAC and any frequency between 50 and 60 Hz. Main Fuse The main fuse rating is: T 1A L (1 amp, 250 V, 20 mm, time-lag, low breaking capacity) for all operating voltages. The power cord must be removed from the rear-panel connection to inspect or replace the fuse. To inspect or replace the main fuse: 1. Slide open the fuse compartment in the AC power input housing by placing the tip of a small screwdriver in the notch. 2. Carefully pull out the fuse carrier. 3. Either replace the fuse with a new one, or check that the current fuse has the correct rating. 4. Slide the fuse compartment back into place, then snap the fuse compartment closed. Internal Fuse The switching power supply contains a separate fuse. Most fault conditions should be protected by the main fuse. If you find it necessary to replace the internal fuse, be certain to replace it with a fuse of the same type and rating as printed on the switching power supply board. ix Virtual Dolby Technologies Test DVD Track List iv DP564 Multichannel Audio Decoder Chapter 1 Introduction The DP564 Multichannel Audio Decoder gives studio professionals unparalleled ability to monitor different audio programs in a variety of listening modes. Critical monitoring is essential to ensure that the highest quality audio reaches your listeners at home. The DP564 Multichannel Audio Decoder, the next generation reference decoder from Dolby Laboratories, is the perfect tool for monitoring and quality control applications in DTV broadcast, postproduction, and DVD authoring. The DP564 enables decoding and monitoring of programs with DolbyÆ Digital, Dolby Surround Pro LogicÆ, or regular PCM soundtracks, as well as Dolby Digital Surround EXô and Pro Logic II decoding, making the DP564 the ideal digital reference decoder for both Dolby Digital and Dolby Surround audio. With the DP564, you can easily monitor all of Dolby Digitalís unique downmixing capabilities. This means content producers and providers can verify how material delivered in a 5.1-channel format will sound on systems that offer only Dolby Surround, two-channel stereo, or mono playback. By switching between listening modes using the front-panel controls, it is possible to monitor how any multichannel program will sound when played on fully configured multichannel surround systems, as well as surround systems with no Center channel (Phantom) or even systems with no Surrounds (3 Stereo). Compression modes can also be selected from the front panel to easily monitor Dolby Digitalís dynamic range control and dialogue normalization features. These features are tailored to professional users to allow you to hear how your audio will sound on any set-top box, DVD player, or home theater receiver. To set up and control the monitoring environment, the DP564 offers comprehensive monitoring functionsóincluding a master volume knob on the front panel, channel mutes, reference monitoring level, individual channel level trims, center and surround channel delays, bass management, and both full and band-limited pink noise for quick and accurate room calibration. The headphone output has its own volume control, as well as Dolby Headphone processing, which provides surround sound monitoring over standard headphones. This allows more accurate QC monitoring and reduced listener fatigue for headphone listeners. Figure 1-1 shows the DP564 system block diagram. 1-1 DP564 Multichannel Audio Decoder Introduction Note: The processing sequence is not identical to that of a consumer decoder. To efficiently deliver all the available features, downmixing is separated from the decoding block. Timecode Output AES1 (AES3 BNC) Dolby Digital Decoder Dolby Digital None, RF, Line, Custom Cut scaling Boost scaling LoRo / LtRt LFE Monitor Mode: Auto / On / Off Compression Selection Decoder Downmix LDEC RDEC AES2 (AES3 BNC) LsDEC RsDEC CDEC LFEDEC LPCM RPCM Input Select Bitstream Detect PCM On / Off Optical (TOSLINK) On / Off Manual / Auto Pro Logic/ Pro Logic II Mono Sum Pro Logic Decode Streaming (RTP 100BASE-T) C speaker On/Off S speakers On/Off Listening Modes LLM RLM DH1, DH2, DH3, or Off (stereo bypass) LsLM LsLM CLM Dolby Headphone Processor L/R Large/Small C Large/Small S Large/Small SW On/Off Bass Management LBM RBM LsBM RsBM CBM Bypass SW BM Dolby Surround EX Decoder LsEX,RsEX BsEX L/R Delay C Delay LsRs Delay Bs Delay LDH RDH Test Noise Manual / Auto On / Off SW Speaker Delays L/R, C, Ls/Rs, Bs LSD RSD CSD LsSD,RsSD BsSD None / 1 / 2 Bs Speaker Split LsSS,RsSS BslSS,BsrSS IFE Mode Output Select D/A D/A Level Control Analogue Output Master Volume Control, Channel Trims, and Dim Volume Control Optional Level Control Front-Panel Headphone Volume Control Headphone Amplifier Digital Output Headphone Output 1-2 DP564 Multichannel Audio Decoder Introduction Figure 1-1 DP564 System Block Diagram The 2-U rack-mount unit features multiple inputs including two AES3 inputs, a Toslink optical input, and an Ethernet port for RTP-streaming Dolby Digital audio. The inputs are easily selected with dedicated front-panel buttons. The front panel also incorporates a display screen, featuring high contrast and a wide viewing angle. In addition to providing an intuitive interface for menu access and setup, the display is easy to read and offers clear graphic status menus for all Dolby Digital metadata settings and metering of output levels and dynamic range control. The rear panel includes the main audio output connections for both digital AES3 and analog +4 dBu balanced outputs. A linear timecode (LTC) output generates timecode from a Dolby Digital bitstream, allowing DVD facilities to check A/V sync between encoded Dolby Digital audio files and uncompressed video. Front- and rear-panel serial interfaces and an Ethernet port enable remote control and software updates; a remote control software application is included to configure and control the DP564 from a PC via Ethernet or serial connection. Remote control is also possible from an optional dedicated hardware controlleróeither the Dolby Cat. No. 549 GPIO Controller or another system using the general-purpose I/O connector (GP I/O). 1-3 Virtual Dolby Technologies Test DVD Track List iv DP564 Multichannel Audio Decoder Chapter 2 Installation This chapter covers the physical connections necessary to operate the DP564. 2.1 Mounting The DP564 occupies 2U of rack space. The unit operates at ambient temperatures up to 122} F (50} C) and vents from front to rear. Caution: Do not mount the DP564 directly above heat-generating equipment. Ensure adequate ventilation. The temperature inside a poorly ventilated rack can be considerably higher than ambient room temperature. 2.2 Rear-Panel Connections The rear-panel connections include BNC inputs and outputs, an optical input, serial ports, analog audio outputs, and the power supply. It is best to make all other connections before connecting the power supply. 2.2.1 BNC Connectors Figure 2-1 shows the BNC connectors. These are compliant with the AES3-ID standard. AES 1 AES Ref L/R Digital In LTC Out AES 2 C/Sw Digital Out Ls/Rs Bsl/Bsr Figure 2-1 Connection Ports for Digital Signals The AES Ref connectors are for an AES3 external reference. Connect an AES3 reference signal to either port. The other connector may be used to pass the reference 2-1 DP564 Multichannel Audio Decoder Installation signal on to another unit; if pass-through is not necessary, this connector should be fitted with a 75-ohm terminator. The Digital In connectors, AES 1 and AES 2, can receive both DolbyÆ Digital and PCM signals. The decoder recognizes each signal type and processes the signal appropriately. Digital inputs can also be received using the Optical In and 100BASE-T inputs shown in Figure 2-2. The LTC Out connector provides a SMPTE 12M linear timecode output signal. Timecode is extracted from the timestamp embedded in a SMPTE 337M bitstream that may be present in a Dolby Digital signal. The Digital Out connectors provide a digital output signal for connection to a digital monitoring system. Each connector is labeled according to the channel pair it contains. 2.2.2 Optical In and Serial Ports Figure 2-2 shows the Optical In and the serial connections. 19 Optical In 100BASE-T 37 Remote RS-485 1 GP I/O 20 Figure 2-2 Connection Ports for Optical, Ethernet, Remote, and GPI/O The Optical In connection can receive both Dolby Digital and PCM signals. The decoder recognizes each signal type and processes the signal appropriately. The 100BASE-T port can connect to a 100Base-T or 10Base-T network. The connection can then be used for streaming audio, and to enable the DolbyRemote 564 remote control application. See Chapter 8, Streaming Server and Remote Software, for details. The Remote RS-485 port can connect to a computer running DolbyRemote 564. The DolbyRemote 564 application is far more efficient, however, when connected via the 100BASE-T port. For details, see Chapter 8, Streaming Server and Remote Software. The GP I/O port connects to the Dolby Cat. No. 549 GPIO Controller (sold separately) or to a separate remote control device, which must be configured according to the pinout information under GPI/O Configuration in Section 4.4.4, I/O Control. 2-2 DP564 Multichannel Audio Decoder 2.2.3 Installation Analog Outputs The +4 dBu balanced Analog Audio Outputs connect directly to your monitoring system. Each connector is labeled according to the channel signal it sends. If your system includes a single speaker for Back Surround, use only the Bsl output, and leave the Bsr output open. 2.2.4 Power The main fuse rating is: T 1A L (1 amp, 250 V, 20 mm, time-lag, low breaking capacity) for all operating voltages. WARNING: Before applying power, check the main fuse using the procedure on page ix. There is no power switch on the DP564. To apply power, connect the power cord to a live outlet. 2-3 Virtual Dolby Technologies Test DVD Track List iv DP564 Multichannel Audio Decoder Chapter 3 Front-Panel Controls Every function of the DP564, except control of streaming audio, is accessible using the front-panel buttons in combination with the information on the display screen. This chapter covers • • • • Front-panel layout Button functions LED indicators The RS-232 connection Streaming audio can be controlled using the DolbyRemote 564 software. See Chapter 8, Streaming Server and Remote Software, for details. 3.1 Front-Panel Layout The left-hand side of the front panel includes the screen display and LED indicators. The screen displays information on the current status, or setup menus that you navigate using the buttons described in Section 3.2, Button Functions. The LED indicators are defined in Section 3.3, LED Indicators. The front-panel controls are shown in Figure 3-1. Listening Mode Navigation Shift Bypass Status Esc Setup Output Level AES1 1 Pro Logic II Full Custom AES2 2 Pro Logic 3 Stereo Line Optical 3 EX Phantom RF Streaming 4 Decode Listening Input Preset Ref Dim Enter Brig htness Remote Stereo (Lo/Ro) Mono Lt/Rt Downmix Compression Master Volume Remote RS-232 Figure 3-1 Front-Panel Controls The navigation buttons control selection of menu items on the screen display. The listening mode buttons are for selection of specific monitoring configurations. This allows monitoring of a program in all the different ways a consumer may listen to it. The Input buttons are for choosing the source for the DP564. Preset buttons are for 3-1 DP564 Multichannel Audio Decoder Front-Panel Controls one-touch recall of a complete set of parameter settings previously stored as a preset. Output-level controls set the volume level for your listening environment. Detailed explanations of each button function follow. 3.2 Button Functions Each button on the front panel controls a function or functions in the DP564. These functions are defined in this section. Any time a feature is active, the front-panel button associated with that feature is lit. This is true whether the feature is activated or deactivated manually, or controlled by program metadata, GPI/O, or a preset configuration. 3.2.1 Shift Bypass Esc Enter Status Setup Navigation The primary function of each button in this group is printed on the button. To perform the alternate function (printed on the panel above or beside the button in yellow text), press Shift, then the button associated with the desired function. When you press Shift, that button stays lit until you press another button, or press Shift again to disable the alternate-function selection. In this group of buttons, there is one function that goes beyond navigation: Bypass. If the DP564 receives a PCM signal while in bypass mode, it passes the signal straight to the Left and Right channel outputs with no processing. If the DP564 receives a DolbyÆ Digital signal, it decodes the signal, but all further processing is disabled. This includes dialogue normalization, dynamic range control, and downmixing, as well as all surround formats, bass management, and channel delays. Channel level trims and master volume continue to function. When you select Bypass (Shift, then Esc), bypass mode remains in effect until you disable it by using the same button combination. When you disable bypass mode, the unit returns to the settings in effect when you entered bypass mode. The navigation buttons work in combination with the display screen menus. In setup menu screens and the Metadata Status, Error Status, and System Status screens, pressing Enter enters the submenu for the highlighted selection, and pressing Esc returns to the next higher menu level. If you are at the top of a menu structure, Esc has no effect. If you change a value for a parameter in the setup menu, Enter activates the new value and returns to the next higher menu level, and Esc discards the new value and returns to the next higher menu level. For details on menu structure, see Chapter 4, Menus. The default menu at startup is the status menu. The status and setup menus have separate functions and structures, detailed in Chapter 4, Menus. If you are in a status menu, Setup changes the display to a setup menu. If you used the setup menu within the previous five minutes, it returns you to the last setup menu you saw. If you have not used a setup menu within that time, pressing Setup displays the top-level setup 3-2 DP564 Multichannel Audio Decoder Front-Panel Controls menu. If you are in a setup menu, Status changes the display to a status menu. If you are in a setup menu, Setup brings up the top-level setup menu. If you are in a status menu, Status brings up the main status menu. ▲ moves the item selection in the display to the next item up. In the setup menu, if the current menu designates a numerical value, ▲ increases the value to the next higher increment. Brig htness ► navigates within and between menus. In the setup menu, ► enters that itemís submenu, unless there is no submenu. In the status menu, ► scrolls to the next available menu. Brightness takes you directly to the menu where you can adjust the intensity of the display. Remote ▼ moves the item selection in the display to the next item down. In the setup menu, if the current menu designates a numerical value, ▼ decreases the value to the next lower increment. ◄ navigates between menus. In a multi-layer menu, ◄ returns to the next-higher menu (same as Esc). In the top-level status menu, ◄ scrolls to the adjacent menu, (in the opposite scrolling direction as ►). Remote invokes remote control by the DolbyRemote 564 software. When the DP564 is under remote control, Remote ends remote control and re-activates all front-panel controls. Note: When the DP564 is under remote control, most front-panel controls are inactive. In this mode, the Master Volume knob is active, and you can scroll through the status menus, or press Remote, which ends remote control and reactivates all front-panel controls. 3.2.2 Listening Modes By reproducing the wide variety of consumer listening environments, listening mode selections enable you to make sure the audio program is optimized for every listening situation. The selections are divided into four categories: Downmix, Decode, Listening, and Compression. Downmix Stereo (Lo/Ro) Lt/Rt Use the Downmix buttons to select the downmix you monitor. Lo/Ro downmixes to a stereo output. Lt/Rt downmixes to a Dolby Surround Pro LogicÆ compatible stereo output. Lo/Ro and Lt/Rt are unavailable if the Dolby Digital input signal is in audio coding mode 2/0, 1/0, or if the input signal is PCM. Mono Mono summing is available only if the input is PCM, a Dolby Digital signal in audio coding mode 2/0, or any other Dolby Digital signal downmixed to Lt/Rt or Lo/Ro. 3-3 DP564 Multichannel Audio Decoder Front-Panel Controls Decode Use the Decode buttons to select a specific surround-decoding mode. Note: Dolby Digital decoding is applied whenever a Dolby Digital signal is received. The Decode buttons offer additional processing options. Pro Logic II Pro Logic EX EX activates Dolby Digital Surround EX ô decoding. It is available only when decoding Dolby Digital bitstreams with stereo surround channels. You must also have back surround (Bsl, Bsr) speakers selected in the Monitor Configuration menu. Pro Logic and Pro Logic II activate those decoding modes, respectively. The Pro Logic modes are available only if the input is PCM, a Dolby Digital signal in audio coding mode 2/0, or any other Dolby Digital signal downmixed to Lt/Rt. Note: To quickly access the display screen to adjust Pro Logic II settings, hold down the Pro Logic II button for two seconds. Listening Full 3 Stereo Phantom Use the Listening buttons to simulate different consumer multichannel speaker systems. Phantom mixes the Center channel signal to the Left and Right channel outputs to emulate a speaker system with no center channel. 3 Stereo mixes the Ls and Rs channel signals to the front-channel outputs to emulate speaker systems with no surround speakers. (Ls routes to L, and Rs routes to R.) Full maps all channel signals directly to the associated outputs. Only one of these modes is active at a time. Compression The Compression buttons can apply the dynamic range control profiles available to consumers when decoding Dolby Digital audio. Only one of these modes is active at a time; to disable compression, press the active button. Custom Line RF RF applies the strongest profile available, equivalent to an RF connection to a TV set or small PC speakers. Line applies what appears on some consumer decoders as ìlightî compression; this is usually the default setting in DVD players and set-top boxes. Custom allows scaling of the Line profile. The factory setting for Custom is 0 percent. At that setting, selecting Custom turns off dynamic range compression. To access the display screen to adjust the percentage setting for custom scaling, hold down Custom for two seconds. Note: When downmixing, the DP564 automatically applies compression at peak moments to prevent potential signal overload from combining multiple channels, regardless of whether a compression mode is selected. 3-4 DP564 Multichannel Audio Decoder 3.2.3 Front-Panel Controls Input Use the Input buttons to select the source for the input signal. Only one of these buttons is lit at a time, indicating the selected source: AES1, AES2, Optical, or Streaming. If the selected source receives an invalid signal, the Error LED turns red. 3.2.4 Preset Preset buttons 1, 2, 3, and 4 recall and store those preset configurations. To recall any one of those presets, press the associated button and release the button quickly. To store the current configuration as one of those four presets, pick a preset button and hold it down for two seconds or more before releasing. This saves the current configuration and keeps the existing preset name. To rename the preset, use the menus as described in Section 4.4.3, User Presets. Caution: When recalling presets 1–4 by pressing the Preset buttons, you must release the button in less than two seconds, or that preset will reconfigure to store the current settings. When you recall preset 1, 2, 3, or 4, the associated button is lit. When you alter any parameter setting, the button light turns off, because the configuration is no longer that of the preset. 3.2.5 Output Level You can control the DP564 output level with the Master Volume knob and the Ref and Dim buttons. The headphone output has its own dedicated volume-control knob. Rotate Master Volume to raise and lower the output level incrementally, within a range of ñ95 to +10 dB. Ref resets the output level to 0 dB at one touch. Any time the output level is 0 dB, Ref is lit, whether the level was set via button or by Master Volume adjustment. Dim adjusts the output by the amount set in the Dim Gain menu, as discussed in Section 5.4, One-Touch Output Level Adjustment. The headphone output volume knob controls the output level to the headphone jack only, and is not affected by Master Volume, Ref, or Dim. When any adjustment is made to the master volume, the middle of the screen momentarily shows the current master volume level. 3-5 DP564 Multichannel Audio Decoder 3.2.6 Front-Panel Controls Special Button Functions Under certain conditions, you may need to reset the DP564. Table 3-1 shows the button combinations to use in those cases. Table 3-1 Special Button Functions Function Action; Result Hardware Reset Press Shift + Esc + ► simultaneously; the DP564 reboots. Firmware Upgrade During reboot, press and hold Setup; the status display gives you the option of upgrading the unit firmware or completing the boot sequence. During reboot, press and hold Enter; the status display gives you the option of restoring factory defaults or completing the boot sequence. Factory Reset Note: 3.3 Restoring factory defaults includes all presets and GPI/O configuration assignments. LED Indicators Figure 3-2 shows the LED lights on the front panel. Table 3-2 provides definitions of the LED indicators. Table 3-2 LED Status Definitions LED Status Off Blue Off AES Ref Green Red Dolby Digital Dolby Digital AES Ref Remote Fault Error Figure 3-2 LED Indicators Off Remote Green Red Off Red Off Error Red Fault Meaning Not decoding Dolby Digital. Decoding Dolby Digital. AES reference input is not selected. AES reference input is selected and valid. AES reference input is selected but valid signal is not present. Remote control is disabled. Remote control is enabled and operating with no errors. Remote control is enabled, but there is a serial communications error. All clear. Hardware error. System is passing or decoding audio. An error is preventing the system from passing or decoding; DP564 output may be muted. 3-6 DP564 Multichannel Audio Decoder 3.4 Front-Panel Controls RS-232 Connection The Remote RS-232 connection port can be used to connect for software updates, or to a computer running DolbyRemote 564. The DolbyRemote 564 application is far more efficient, however, when connected via the 100BASE-T port. For details, see Chapter 8, Streaming Server and Remote Software. 3-7 Virtual Dolby Technologies Test DVD Track List iv DP564 Multichannel Audio Decoder Chapter 4 Menus Much of the versatility and power of the DP564 lies in its menu structure. This chapter covers: • • • • 4.1 Menu basics Hot-key function Status menu Setup menu Menu Basics The screen shows information on the current operating status via the status menu, and lets you adjust operational settings using the setup menu. In either menu structure, the title of a menu appears centered above a line at the top of the screen, and information or menu choices display below the line, as shown in the example in Figure 4-1. Operating Mode Decode Format Auto Detection Normal Stream Select Auto AES3 Ch Sel Auto Figure 4-1 Operating Mode Menu In a menu with more options than lines available on the screen, an arrow appears in the title bar to indicate that you can see more by scrolling up or down past the visible items. If menu items are available both above and below the current display, the title bar displays both up and down arrows, as shown in Figure 4-2. Metadata Status LFE Ch Enabled Data Rate 448 kbps BSMode Main Comp Center Dwnmx –3.0dB Srnd Dwnmx –3.0dB Dolby Srnd Not Ind Figure 4-2 Menu Showing Scrolling Options Available Both Above and Below Current Visible Choices 4-1 DP564 Multichannel Audio Decoder 4.2 Menus Hot-Key Functions Certain front-panel buttons activate a special function when you press and hold the button for two seconds. We refer to that function as the hot-key function. No matter what menu you are viewing, there are three front-panel buttons that display the setup menu for that function when you press and hold the button for two seconds: Pro Logic II, Custom, and Dim. Holding Custom down is the only way to define the parameters for custom compression scaling using the front-panel controls, but those parameters are also adjustable using the DolbyRemote 564 software. The Preset buttons have a different hot-key function. Holding down any Preset button for two seconds saves the current configuration but keeps the existing preset name. To rename the preset, use the menus as described in Section 4.4.3, User Presets. Caution: When recalling presets 1–4 by pressing the Preset buttons, you must release the button in less than two seconds, or that preset will reconfigure to store the current settings. 4.3 Status Menu The status menu includes these displays: • • • • • • • • • • 4.3.1 Main status menu Output level meters Compression meters Monitor status Metadata status Input status AES reference input status Timecode status Error Statistics System Status Main Status Menu At power-up, the DP564 displays the main status menu. If there is no valid input, the main status screen shows No Input. 4-2 DP564 Multichannel Audio Decoder Menus If the selected input is receiving a valid DolbyÆ Digital signal, the display conveys important information about the input stream and the decoding status, as shown in Figure 4-3. Dolby Digital Dialog 48kHz Level Data Rate 448 Chan Mode 3/2L 00:00:00:00 29ND PL EX Preset 1 EB DH -27 Figure 4-3 Main Status Menu with a Valid Dolby Digital Input The main box displays the type of input, sample rate, data rate (in kbps), channel mode, and timecode. Dialogue level displays in the upper right-hand corner. Timecode information displays according to the option selected in the Timecode Display menu. Timecode information continually updates with the input signal. In the display mode shown here, the timecode display is hours:minutes:seconds:frames. 29 indicates the frame rateóin this case, 29.97 fps. ND indicates non-drop frame status. In a drop-frame condition, those letters read DF, and semicolons separate the timecode units: hours;minutes;seconds;frames. Other options for the timecode information in the main status menu are the timestamp delay word, or blank. Complete timecode information is always available in the Timecode Status menu. If a preset is in use, the preset number and name display in the bottom left-hand corner. On the right-hand side, any of the four abbreviations shown in Figure 4-3 may appearóthese indicate metadata parameters in the Dolby Digital stream. All four will never appear together, as they do in Figure 4-3, because some of those bitstreams are mutually exclusive. The abbreviations are: • PL (indicating a 2/0 bitstream is flagged ìDolby Surround encodedî) • EX (indicating a 5.1, 5.0, or 2/2 bitstream is flagged ìDolby Surround EXô encodedî) • EB (indicating a bitstream includes extended bitstream information) • DH (indicating a 2/0 bitstream is flagged as a pre-encoded Dolby Headphone mix) If there is a valid PCM signal, the display appears as shown in Figure 4-4. 4-3 DP564 Multichannel Audio Decoder Menus PCM Audio 44.1 kHz 20 Bit Consumer Preset 1 Figure 4-4 Main Status Menu with a Valid PCM Input The space above the line displays the type of input, sample rate, bit depth, and mode (Professional or Consumer) of the stream. The DP564 accepts inputs up to 96 kHz, downsampling higher sample rates for processing at 48 or 44.1 kHz. Below the line, you can still see the preset name and number, but the two-letter abbreviations do not apply to a PCM stream. 4.3.2 Output Level Meters The output level meters screen displays the level of each audio output signal after all decoding, downmix, listening-mode, compression-mode, and bass-management signal processing, but before any channel-level trims or delays. 4.3.3 Compression Meters The compression meters give a clear visual representation of the way in which the dynamic range control is working on a Dolby Digital program. This display shows dynamic range activity for both Line and RF profiles regardless of your Compression selection. This screen also shows the current dialogue level value in the Dolby Digital bitstream. 4.3.4 Monitor Status The Monitor Status menu shows the settings for your current monitor setup, including speaker configuration, subwoofer presence, crossover frequency (for bass management), extended bitstream emulation status, and headphone output mode (stereo or Dolby Headphone profile). 4.3.5 Metadata Status The Metadata Status menu displays the settings for metadata parameters received in the Dolby Digital bitstream. Use ▲ or ▼ to select any parameter, and Enter to view the unabbreviated parameter name and status. You can view extended bitstream parameter status by scrolling to the bottom of the Metadata Status menu to select Extended Bitstream, then pressing Enter. For more information about Dolby metadata, see Appendix A, Dolby Metadata. 4-4 DP564 Multichannel Audio Decoder 4.3.6 Menus Input Status The input status menu identifies the selected input in the menu title line. When a valid signal is present, information displays for signal lock, sample rate, signal type, and Emphasis, Bit-0, and Bit-1 informational bits. Emphasis reflects the setting of the channel status emphasis field in the input stream. Bit-0 indicates a professional or a consumer stream, and Bit-1 indicates whether the stream is audio or non-audio. When the selected input is not locked, the display shows only Unlocked. If the Streaming input is active, the title line shows Streaming Status. The informational lines are defined in Table 4-1. Table 4-1 Input Status Display for Streaming Input Item State Type File Packet Loss Time Server 4.3.7 Display Information and What it Means A connection has not been established with the Dolby Streaming Server. No other items display in this state. Stopped Audio file and server is specified, but audio is not being played. Playback starts file from beginning. Paused Audio is paused. Playback starts from pause point. Buffering Buffering data before playing the audio. Playing Audio file is playing. Dolby Digital Audio File playing is Dolby Digital. Invalid Input In Stopped or Paused state, input type is not known. Shows the file name being played. Shows number of packets lost since playback of this file began. Shows the time remaining in the current file. Shows name of server from which the file is streaming. No Input AES Reference Input Status This menu displays the lock status of the AES Ref input signal. When a valid signal is present, the menu shows the sample rate. 4-5 DP564 Multichannel Audio Decoder 4.3.8 Menus Timecode Status The Timecode Status menu includes: • • • A large timecode readout Frame rate Timestamp delay word The main status display also shows timecode information, according to settings in the Timecode Display setup menu. 4.3.9 Error Statistics When an error occurs, the front-panel Error LED is lit. The Error Stats menu supplies more detailed information to help troubleshoot the problem. The top line displays a quick identification of the type of error; press Enter with that line selected to see a more detailed description. The other lines display dedicated error counts for Dolby Digital CRC errors and AES coding, confidence, parity, and CRC errors. Press Enter with any of those items selected for more detailed information on that error. Pressing Enter again resets the counter on that error type to zero. 4.3.10 System Status The top line of this menu displays the current DP564 software version number. To receive notification of software upgrades, register your product on the software upgrades page at www.dolby.com/download/softreg. The next lines show the current settings for IP address (IP), subnet mask (Mask), default gateway (Route), and DNS server (DNS). Setup for these items can be changed using the Network Settings menu. Highlight any of these menu items and press Enter to see the full title and setting. The final two lines in the System Status menu are informational displays showing decoder latency and processing latency. Latency is discussed in Appendix B. 4.4 Setup Menu Press Setup to view the main setup menu, shown in Figure 4-5. 4-6 DP564 Multichannel Audio Decoder Menus Unit Setup Operating Mode Monitor Control User Presets I/O Control Monitor Configuration System Settings Figure 4-5 Main Setup Menu Scroll to select a menu item and press Enter or ► to display that itemís submenu. To change a parameter value, enter the parameter adjustment menu, and press ▲ or ▼ to adjust the parameter value. Press Enter to accept the new value selection and return to the next higher menu level. To discard a new value selection and return to the next higher menu level, press Esc or ◄. Menus available within the setup menu are: • Operating Mode • Monitor Control • User Presets • I/O Control • Monitor Configuration • System Settings Note: If you leave the display idle in any setup menu for five minutes or more, the display changes to the main status menu. 4.4.1 Operating Mode The Operating Mode menu includes these parameter adjustment menus: • Decode Format • Detection • Stream Select • AES3 Ch Sel Decode Format Decode Format offers two options: Automatic and Dolby Digital. Automatic processes Dolby Digital signals and passes PCM signals through. Dolby Digital only processes Dolby Digital signals, and mutes any PCM input. 4-7 DP564 Multichannel Audio Decoder Menus Detection Detection offers two options: Normal and Silent Switch. In Normal mode, an input that switches from PCM to Dolby Digital (if, for example, the complete bitstream information carried in a Dolby Digital signal is interrupted for some reason) may produce a short burst of noise at the transition point. Silent Switch eliminates that noise in most (but not all) instances; however, it adds latency to the PCM processing time. Normal is appropriate for most circumstances, but if you are monitoring a signal you know to have this problem, Silent Switch can help. Stream Select Stream Select offers Automatic selection, which accepts the lowest number Dolby Digital bitstream; or you can specify a Dolby Digital bitstream, (0-7) to be decoded when the input stream contains multiple Dolby Digital streams multiplexed together. In professional modes, bitstream number 7 is reserved for timecode. AES3 Channel Select AES3 Ch Sel offers four options: Automatic, Channel 1, Channel 2, and Channel 1+2. Dolby Digital is carried in one of two ways on an AES or S/PDIF interface: • • In 16-bit mode, it is packed into either the left or right channel of the pair of channels. In 32-bit mode, it takes both channels of the pair. Selecting Channel 1 or Channel 2 specifies that channel to be the accepted input. Selecting Channel 1+2 requires a 32-bit input stream. When you select Auto, the DP564 locks onto the first signal it recognizes. If there are two 16-bit streams in a pair, Auto locks to the stream on Channel 1. Auto saves time, and is therefore recommended unless you know you have 16-bit signals on each channel of the pair, in which case you should specify which signal you want to process. 4.4.2 Monitor Control The Monitor Control menu includes these parameter adjustment menus: • Pro Logic • Surround EX • Extnd Bitstrm • Dolby H Mode • Pro Logic II • Karaoke 4-8 DP564 Multichannel Audio Decoder • Speaker Mutes • LFE Mon Mode Menus Pro Logic Pro Logic is set either to Manual or Automatic. In Automatic, the DP564 applies Pro LogicÆ decoding according to the setting of the Dolby Srnd metadata parameter in a Dolby Digital 2/0 signal. You can use the front-panel buttons to apply Pro Logic II as soon as the Dolby Digital 2/0 input is locked. If the metadata parameter setting for Dolby Srnd is Not Indicated, or if the menu selection is Manual, activation of Pro Logic decoding is entirely under your control using the front-panel buttons. Surround EX Surround EX is set either to Manual or Automatic. Automatic applies Dolby Digital Surround EX decoding according to the setting of the Surround EX mode metadata parameter in a Dolby Digital 3/2 signal containing extended bitstream information. If the metadata parameter setting for Surround EX is Not Indicated, or if the menu selection is Manual, activation is under your control using the EX button. To allow Surround EX decoding, your monitor configuration must include at least one Back Surround speaker. Surround EX decoding can be applied only to Dolby Digital signals with two surround channels. Other signal types automatically inhibit Surround EX decoding. Extended Bitstream Extnd Bitstrm is set either to Enabled or Disabled. Enabled allows the DP564 to use all metadata parameters including Extended Bitstream when decoding a Dolby Digital bitstream. Disabled restricts the metadata parameters to the parameters read by older consumer decoders. For more information about the two categories of metadata, see Section A.5, Parameter Definitions. Dolby Headphone Mode Dolby H Mode controls the setting for Dolby Headphone processing. The settings are Off, DH1 (Small Room), DH2 (Medium Room), and DH3 (Large Room). Off produces a traditional stereo headphone sound. The DH settings all process according to the downmix and listening mode selections. For example, although Dolby Headphone technology can reproduce a full 5.1-channel mix, if you have a stereo downmix selected, Dolby Headphone will process that stereo downmix, and therefore there will only be two channels in the image. 4-9 DP564 Multichannel Audio Decoder Menus Pro Logic II The DP564 supports four Pro Logic II modes: Movie, Music, Pro Logic, and Matrix. Additional menus under Pro Logic II give you control over settings for Panorama, Dimension, and Center Width, which offer a variety of settings activated when in Music mode. Movie mode is the standard setting for programs with video. This decoding is based on the original Pro Logic decoding scheme, but with the single Surround channel separated into Left and Right Surround channels. Music mode is the most versatile feature of Pro Logic II. It activates the settings on the Panorama, Dimension, and Center Width menus; those settings can help a consumer make a stereo (Lo/Ro) recording into one that takes advantage of a multichannel listening environment. Particularly attractive for automotive entertainment systems, this can be used in home theaters as well. Pro Logic is the Pro Logic II system reproduction of the original Pro Logic decoding system. Because consumer decoders now offer Pro Logic II as the default Dolby Surround decoding system, this emulation mode is available to reproduce the original Pro Logic decoding if the consumer wishes to hear it. (This option is not available on all consumer decoders made with Pro Logic II.) Matrix is primarily for radio reception in cars. It is essentially the same as the original passive Dolby Surround decoder without the directional steering provided by Pro Logic. Matrix can also enhance mono programs, and can be used to try to clean up weak radio signals in cars. You can apply Matrix to a mono input by selecting the Lo/Ro downmix, and then Pro Logic II. Neither Pro Logic II nor Pro Logic is available if the Mono downmix is selected. Panorama Panorama mode sends the stereo signal to the surround speakers as well as the front Left and Right. The Panorama setting is disregarded if the Pro Logic II mode is anything other than Music. Dimension Dimension adjusts the focus of the signal from the front speakers to the rear speakers. If the Pro Logic II mode is anything other than Music, the Dimension setting is read as 0 (Center). Center Width Center Width steers the Center output signal between the Center, Left, and Right outputs. At –3, the center output is sent 100 percent to the Center channel. L/R sends the center output equally to Left and Right, with nothing sent to Center. 4-10 DP564 Multichannel Audio Decoder Menus Karaoke The DP564 can process karaoke information in a Dolby Digital bitstream. In a karaoke bitstream, the standard Center, Left Surround, and Right Surround channels are replaced with a music channel and two vocal channels. Karaoke processing may only be applied to a karaoke bitstream. The Karaoke menu includes Karaoke Mode and Level/Pan. Karaoke Mode can be set to Unaware, Aware, or Capable, representing the different karaoke DVD systems available. Level/Pan settings are only active if the mode is Capable. In Unaware mode, the DP564 will not perform any karaoke-specific downmixing. All channels are decoded according to the input and downmix settings. Aware detects a karaoke bitstream and automatically chooses appropriate karaoke reproduction settings, depending on the number of vocal channels in the bitstream and the output channel configuration. Capable activates the settings in the Level/Pan menu. Both the levels and position of the music and vocals are controlled in this menu. No automatic assignments are generated. Level/Pan Separate controls for two vocal channels and music are available for both Left/Right panning and volume level. Speaker Mutes Enter the Speaker Mutes menu to turn off individual channel outputs. Select a channel and press Enter to switch between Active and Mute for that channel. Note: Speaker Mutes do not affect the Headphone output. LFE Monitor Mode LFE Mon Mode allows you to select the LFE listening selection that best suits your purposes. To emulate consumer products, use Auto, which automatically assigns the correct LFE processing to the consumer mode in use. On enables the LFE channel in all listening modes. Off mutes the LFE channel. Note: The LFE Mon Mode setting is active only in Dolby Digital decoding. 4-11 DP564 Multichannel Audio Decoder 4.4.3 Menus User Presets The DP564 stores up to 32 presets. Each preset includes all active settings. If you recall a preset, then change one parameter, the configuration with the one changed parameter is not stored unless you save it as a separate preset. Presets 29ñ32 are reserved by the factory configurations shown in Table 4-2. Note: The factory ships the DP564 with these same presets saved as presets 1ñ4, respectively, so initially you can apply these presets by pressing the frontpanel Preset buttons. Presets 1ñ4 can be reset, of course, to suit your requirements. Table 4-2 Factory-Reserved Presets Manual Detection Mode Auto Detection Mode 29 30 Manual Ctrl Auto Ctrl Preset Number Preset Name Parameter Monitor Control– Pro Logic Monitor Control– Surround EX Pro Logic Decode Surround EX Decode Lo/Ro Downmix Lt/Rt Downmix Line Mode RF Custom Lo/Ro Downmix Line Mode Lt/Rt Downmix Line Mode Pro Logic Decode 31 Stereo Dwnmx 32 Lt/Rt Decode Setting Manual Auto Manual Manual Manual Off Auto - Manual Off Manual On Off Off Off Off Off Off Off Off Off Off Off On On - On On - The User Preset menu includes Recall Preset and Save Preset. Recall Preset You can recall any preset by entering the Recall Preset menu, scrolling to select the preset you want to use, and pressing Enter. You can recall preset 1, 2, 3, or 4 by pressing the appropriate front-panel Preset button. When you recall a preset, an activation message appears briefly in the middle of the display, showing the preset name and number. When you use a front-panel Preset button to activate preset 1, 2, 3, or 4, the display remains on the menu you are 4-12 DP564 Multichannel Audio Decoder Menus viewing, but if you activate any preset using the User Presets menu, the display goes to the main status menu upon activation. Save Preset Saving a preset stores every active setting. Be sure you have all parameters set correctly, then enter the Save Preset menu and choose the preset number you want to assign. You can give each preset a name with up to 12 characters. Select the preset number you want to assign, press Enter, and you see a text entry display, as shown in Figure 4-6. Figure 4-6 shows the display for Preset 1, but the preset number you see corresponds to the preset number you choose to save. OK AB NO Ø1 Save Preset 1 Preset 1 Del Space Clear ! CDEFGHIJKLM/ PQRSTUVWXYZ_ 23456789.:–~ Figure 4-6 Save Preset Text Entry Screen To enter text: 1. Press ► to select Del, then Enter to delete the text to the left of the flashing cursor. When the letter characters appear uppercase, ↓ changes them to lowercase. From the lowercase display, ↑ changes the letters to uppercase. Space inserts a single character space, Clear erases the whole text entry field. 2. Press the arrow buttons to select a letter or symbol, then Enter. The letter displays in the text entry field above the selection box. 3. When you have completed the entry, select OK and press Enter. 4.4.4 I/O Control The I/O Control menu includes these parameter adjustment menus: • Clock • IFE Mode • Monitor Out • Bypass • GPI/O Configuration 4-13 DP564 Multichannel Audio Decoder Menus Clock Use the Clock menu to select the clock source for the DP564. Digital In locks the system to the currently selected digital input (AES1, AES2 or Optical). Ref In locks the system to the reference input (AES Ref)1. When locking to the reference input, sample rate converters are available if the digital input and reference input sample rates do not match. Ref In–SRC On applies sample-rate conversion (SRC) to the digital outputs. Ref In–SRC Off, locks to the AES Ref clock but bypasses SRC processing. IFE Mode Use the IFE Mode menu to enable and disable in-flight entertainment (IFE) mode. IFE mode sends the Dolby Headphone signal to the DP564 outputs. Note: IFE mode is not a normal monitoring mode. None of the Monitor Configuration settings are applied in this mode. Monitor Out Use the Monitor Out menu to designate whether the Master Volume knob controls the analog outputs only, or both the digital and analog outputs. Bypass The Bypass menu controls whether bypass is Enabled or Disabled. You have easiest access to the bypass function by using the front-panel Bypass control, Shift + Esc. When in bypass mode, Esc is lit. GPI/O Configuration Use the GPI/O Configuration menu to set up parameters for a dedicated hardware remote controller. For details on configuring your device, see Section 6.2, Hardware Remote Control. 1 If the Streaming input is selected with the clock source set to Digital In, the DP564 uses an internal clock at the sampling rate indicated by the streaming data. Ref In–SRC On uses the reference internal and output clocks. Ref In–SRC Off uses the AES Ref input for internal and output clocks but requires that the reference sampling rate matches that indicated in the streaming data. 4-14 DP564 Multichannel Audio Decoder 4.4.5 Menus Monitor Configuration The Monitor Configuration menu is used primarily to configure your listening environment for accurate monitoring of all content. For details on how to set up your listening room, see Chapter 5, Listening Room Calibration, which covers Digital Ref, Dim Gain, Channel Trims, Speaker Delays, and Speaker Config. 4.4.6 System Settings The System Settings menu includes these parameter adjustment menus: • Unit Name • Unit Address • Timecode Display • Screensaver Timeout • Screensaver Design • Network Settings Unit Name You can give your unit a name, using up to 12 characters. This is useful to identify the DP564 from the DolbyRemote 564 software. You can also use the unit name for the screensaver. Select Unit Name, press Enter, and you see the text entry display shown in Figure 4-7. OK AB NO Ø1 Unit Name Model DP564 Del Space Clear ! CDEFGHIJKLM/ PQRSTUVWXYZ_ 23456789.:-~ Figure 4-7 Unit Name Text Entry Screen 4-15 DP564 Multichannel Audio Decoder Menus To enter text: 1. Press ► to select Del, then Enter to delete the text to the left of the flashing cursor. When the letter characters appear uppercase, ↓ changes them to lowercase. From the lowercase display, ↑ changes the letters to uppercase. Space inserts a single character space, Clear erases the whole text entry field. 2. Press the arrow buttons to select a letter or symbol, then Enter. The letter displays in the text entry field above the selection box. 3. When you have completed the entry, select OK and press Enter. Unit Address The unit address allows each DP564 to be uniquely identified when using the software remote over a serial connection using either the RS-232 or the RS-485 connection. You can connect more than one to the same RS-485 link and control them using one DolbyRemote 564, provided that each unit is assigned a unique address. To change the unit address, enter the Unit Address menu, then use the ▲▼ buttons to change individual characters, and the ◄► buttons to move between characters in the address. When you have the setting you need, press Enter. Timecode Display Use the Timecode Display menu to designate the timecode information to display on the main status menu when processing a Dolby Digital signal. A separate status menu, Timecode Status, displays all the available timecode information. Screensaver Timeout After a period of inactivity, the DP564 applies a screensaver to the display to preserve display life. Use the Screensaver Timeout menu to set the period of inactivity before the screensaver activates. Screensaver Design Use the Screensaver Design menu to choose between the Dolby logo and the unit name when the DP564 activates the screensaver. Network Settings To activate the streaming audio input or to use the DolbyRemote 564 software by network connection, you need to configure the DP564 using the Network Settings menu. 4-16 DP564 Multichannel Audio Decoder Menus The first line on this menu is IP Config, which lets you choose Manual or Automatic configuration. If you choose Automatic, the DP564 uses DHCP protocol to request an IP address from the network server. Note: Dynamic DNS updates must be enabled at the DHCP server for the DP564 automatic mode to register the host name on the network. The DNS server in the network should support Dynamic DNS. The default setting for Host Name is DP564. If you have more than one DP564 on the network, name each unit to uniquely identify it. If the network does not support automatic DNS configuration, choose Manual, or use IP address instead of host name to connect to the DP564. Note: For any change in the Network Settings menu to take effect, you must reboot the DP564. To reboot, press Shift + Esc + ► simultaneously. To verify the automatic configuration, after rebooting the DP564, view the System Status menu. IP, Mask, and Route should each display a valid address. If the network supports DNS, DNS also shows a valid address. If no assignment is made, DNS shows N/A. If your network is not a DHCP server network, choose Manual on the IP Config menu. Contact your network administrator to get the appropriate settings for Domain Name, IP Address, Subnet Mask, Default Gateway, and DNS Server. The network administrator registers the host name on the network. There is no verification step for manual configuration. Connection to a single computer for remote and streaming operation requires manual assignments for IP Address and Subnet Mask only. In this simple setup, use IP address (instead of host name) to connect to the DP564, because the domain name server is not configured. This setup can also be used to connect the DP564 to other PCs in the same LAN or subnet without specifying the default gateway. 4-17 Virtual Dolby Technologies Test DVD Track List iv DP564 Multichannel Audio Decoder Chapter 5 Listening Room Calibration Setting up your listening environment is a crucial element in enabling you to properly evaluate content. Follow the procedures in this chapter carefully. You should only need to do this once for each monitor system or room; however, quick checks are advised before each session to confirm the correct calibration settings. All the adjustments necessary to set up your listening room properly are found in the Monitor Configuration menu, which is on the main setup menu. To set up your listening environment: 1. Assign the speaker configuration settings to match your system. 2. Set the delay values to adjust for speaker placement. 3. Calibrate the speaker playback levels. 4. Assign a level to the one-touch Dim setting. 5.1 Speaker Configuration Settings Use the Speaker Config menu to configure the DP564 to match your listening system. The settings for speaker size, subwoofer and crossover determine how the DP564 distributes low frequencies to your speakers. Settings that match your system allow the most accurate processing possible in your listening environment. Large indicates that the speaker is considered full-range, and does not require bass management. A system with full-range speakers (setting: Large) at every output and a subwoofer (setting: Yes) allows the system to process the signals for each channel without any redirection. Setting a speaker to Small indicates that the speaker is a near-field or satellite design and is not designed to reproduce extremely low frequencies (typically, below 80 Hz). The Small setting filters out low-frequency information from that channel and redirects it to a speaker more capable of reproducing low frequencies (often a subwoofer). Subwoofer Crossover The setting you choose for the subwoofer crossover frequency (SW Xover Freq) depends on the capability of your front and surround speakers. The DP564 diverts signals below the value of this setting from those channels, set as Small in the Speaker Configuration menu, to either the subwoofer output (in nearly all cases) or to the Left and Right outputs. Most smaller speakers require a setting of 5-1 DP564 Multichannel Audio Decoder Listening Room Calibration 80 Hz, but if any of those speakers is particularly small, choose the highest frequency, 120 Hz. This setting not only produces better response from your system, but also protects small speakers from damage. In a system that includes a subwoofer, with all speakers set to Large, the crossover value is not applied. Back Surround Speakers Two Surround speakers (Ls, Rs) are used in standard 5.1-channel monitoring systems (setting: None). To monitor a DolbyÆ Digital Surround EXô program, a Back Surround speaker is required. You can use either a single Back Surround speaker (setting: One), or two speakers for the Back Surround channel (setting: Two). Back Surround Speaker settings are reflected in the output level meter display and the Monitor Status menu. If you use a single Back Surround speaker, use the Bsl connector on the rear panel, and leave the Bsr connector unused. If you use two speakers for the Back Surround channel, use both the Bsl and Bsr connectors. When listening to a 5.1-channel program without Surround EX decoding, and the monitoring environment has two Back Surround speakers, the Bsl output will be the same as the Ls output, and the Bsr output will be the same as the Rs output. 5.2 Speaker Delay Values Adjusting speaker delay values is an essential step in configuring your system. Because Dolby Digital and Dolby Surround Pro LogicÆ process signals differently, different calculations must be used to determine accurate delay settings. Speaker delay values for Dolby Digital are calculated so that signals from all speakers arrive at the reference listening position at the same time (coincident arrival). To calculate the delay settings, measure and record the distance from the reference listening position to each of the seven speakers: • • • • • • • Left (L) Center (C) Right (R) Left Surround (Ls) Right Surround (Rs) Back Surround Left (Bsl) Right Surround Right (Bsr) Make all of these measurements in feet. (If measuring in meters, then multiply the metric measurements by three to get the approximate distance in feet.) 5-2 DP564 Multichannel Audio Decoder Listening Room Calibration Note: Left and Right speakers should be equidistant from the reference listening position. If they are not, adjust the speaker positions. In the calculations that follow: L = the distance from the Left speaker to the reference listening position C = the distance from the Center speaker to the reference listening position R = the distance from the Right speaker to the reference listening position S = the shorter of the distances from Ls or Rs to the reference listening position Bs = the shorter of the distances from Bsl or Bsr to the reference listening position 5.2.1 Center Delay To calculate the setting for Center delay: L ñ C = setting in ms for Center delay Example 1: L=15; C=13. Center delay = L ñ C, or 15 ñ 13 = 2 ms Example 2: L=15; C=18. Center delay = L ñ C, or 15 ñ 18 = ñ3 ms Example 3: L=15; C=15. Center delay = L ñ C, or 15 ñ 15 = 0 ms In example 1, C is two feet less than L or R, so Center delay is set to 2 ms. In example 2, C is three feet more than L or R, set Center delay to ñ3 ms. Example 3 shows that if C = L = R, Center delay should be set to 0 ms. If you set a negative time value for Center delay, the DP564 actually sets Center delay to 0 and adds corresponding delay time to the Left, Right, and Surround outputs. To enter the Center delay setting: 1. On the Monitor Configuration menu, select Speaker Delays, then press Enter. 2. Press Enter again to go to the Center Speaker Delay menu. 3. Use the ▲▼ buttons to change the setting to match the value you calculated, then press Enter. 5.2.2 Surround Delay To calculate the setting for Surround delay: C ñ S = setting in ms for Surround delay To enter the Surround delay setting: 1. On the Monitor Configuration menu, select Speaker Delays, then press Enter. 2. Select Ls/Rs and press Enter to go to the Main Surround Ls, Rs menu. 5-3 DP564 Multichannel Audio Decoder Listening Room Calibration 3. Use the ▲▼ buttons to change the setting to match the value you calculated, then press Enter. 5.2.3 Back Surround Delay To calculate the setting for Back Surround delay: C ñ Bs = setting in ms for Surround delay To enter the Surround delay setting: 1. On the Monitor Configuration menu, select Speaker Delays, then press Enter. 2. Select Bsl/Bsr and press Enter to go to the Back Surround Bsl,Bsr menu. 3. Use the ▲▼ buttons to change the setting to match the value you calculated, then press Enter. 5.2.4 Pro Logic Delay In the case of Dolby Surround Pro Logic, a sound common to both the front channels and the surround channel should arrive at the listening position from the front speakers a fraction of a second before the sound arrives from the surround speakers. This takes advantage of the Haas effect (also known as the precedence effect): When two similar sounds arrive at our ears at slightly different times, our brain tends to focus on the sound arriving first and ignore the second. Dolby Surround takes advantage of this effect to reduce the perceived crosstalk between the front and rear channels. A time arrival difference of 10ñ20 milliseconds is adequate to achieve this effect. When Pro Logic decoding is used, the Pro Logic delay value is automatically added to the Surround delay value. For example, if your Surround delay setting (Main Surround Ls, Rs) is 10 and your Pro Logic delay setting is 15 ms, when Pro Logic decoding is selected, a delay value of 25 ms is applied to your Surround speakers. When Pro Logic decoding is then deselected, the Surround delay value returns to 10 ms. Note: The factory default setting of 15 ms is appropriate for a normal mixing environment. It may, however, be necessary to apply a longer delay setting in a larger listening environment where people sit very close to a Surround speaker. 5-4 DP564 Multichannel Audio Decoder Listening Room Calibration To enter the Pro Logic delay setting: 1. On the Monitor Configuration menu, select Speaker Delays, then press Enter. 2. Select Pro Logic and press Enter to go to the Pro Logic Delay menu. 3. Use the ▲▼ buttons to change the setting to match the value you calculated, then press Enter. 5.3 Calibration Prior to mixing in a multichannel environment, the monitoring system must be calibrated to establish a balance between all channels and to ensure that all speakers play back at the correct level relative to the listening reference position. There are three options to adjust monitor system playback levels: • • • Amplifier gain trim controls Mixerís group outputs (one for each of the L, C, R, Ls, Rs, and SW channels) Decoder output level trim controls The best option is to use your amplifier gain controls to set proper playback levels. This allows you to maintain optimum signal-to-noise performance from the decoder and console. When adjusting playback levels via a consoleís group outputs, pink noise readings depend on the type of console meter used to set reference level (and, strictly speaking, on the bandwidth of the pink noise signal). In film practice, pink noise level is read with a true VU meter, or a meter display with a VU characteristic. If reference level is specified as ì0 VU,î where ì0 VUî corresponds to ñ20 dBFS for a digital recording medium, then pink noise should be set to 0 VU on the console meter, and the sound pressure level (SPL) set accordingly. Note: Many modern consoles have peak-reading meters or meter displays. Pink noise that reads at reference level using a true VU meter will read from 8ñ12 dB higher on a peak-reading meter or meter display. If your console has switchable meter characteristics, be sure to select VU mode before setting pink noise levels. To properly calibrate speaker levels, use an SPL meter. A suitable and relatively inexpensive meter is available from Radio Shack (Tandy Electronics outside of North America). Relative level between channels is more important than absolute level, so the accuracy of this meter is sufficient for channel balancing. What is most important is that all of the main channels are set to the same SPLóthe absolute level is secondary to this. However, as a guide, here are some examples of conventional level settings. 5-5 DP564 Multichannel Audio Decoder Listening Room Calibration For film work, test noise at reference level should produce an SPL of 85 dBC for each of the main front channels (Left, Center, Right) and 82 dBC for each Surround channel . The lower Surround level is specific to film-style mixing rooms. For television work, test noise at reference level is typically set to produce an SPL ranging from 79 to 82 dBC for each of the main five channels. The lower reference level for television reflects the lower average listening levels preferred by the consumer (typically 70 to 75 dBC). For music mixing, each speaker channel should be set to the same SPL (just as in television mixing). There is no standard practice for reference levels for music mixing. Some engineers prefer to mix louder than others do, but if the levels between channels are correct, the overall level is not as crucial. When mixing for television or music in very small mixing rooms (for example, remote recording trucks), the Surround channel is generally set 2 dB lower than the front channels. This takes into account the short distance to the Surround speakers. Experience has shown that this setting makes the sound heard by the mixer more accurately reflect the sound heard in the home environment. Digital Reference Level Set this value to match your studio digital reference level. We recommend you set this level before turning on a test noise when calibrating your speaker system, because the level of the test noise, as measured by an average-responding meter, changes to match the digital reference level setting. This setting also properly calibrates the B-type section in the Pro Logic decoder. To automatically set the digital reference level: 1. On the Monitor Configuration menu, select Digital Ref Auto Cal, then press Enter. 2. Send a 1 kHz PCM tone at studio reference level to the Left input. 3. On the Digital Ref Auto Cal menu, select Yes, then press Enter. The DP564 sets the reference level to match the input. To manually set the digital reference level: 1. On the Monitor Configuration menu, select Digital Ref, then press Enter. 2. On the Digital Reference menu, use the ▲▼ buttons to change the setting to match your studio digital reference level, then press Enter. 5-6 DP564 Multichannel Audio Decoder Listening Room Calibration Measuring SPL Before generating test noise, press Ref to check that the master volume level is set to 0 dB. Master volume should remain at 0 dB while you set channel trim levels. The Ref button remains lit as long as the master volume level is set to 0 dB. If the Ref light turns off, press Ref again to return the level to 0 dB. If the overall level needs adjustment when you begin measuring SPL, adjust the Master Trim level before adjusting the levels for individual channels. WARNING: Before you turn on a test noise, be sure that your playback system is set to a moderate listening level. Adjust your amplifiers, self-powered speakers, or mixer, not the DP564 master volume. An overall attenuation of up to ñ20 dB can be applied using the DP564 master trim control. Beware that if the playback level is very high, you may risk damaging your speakers or possibly your hearing. The default test noise level from the DP564 is ñ20 dBFS to the digital outputs (+4 dBu to the analog monitor outputs). To generate test noise to the analog outputs: 1. From the Monitor Config menu, select Channel Trims, press Enter, then press Enter again to see the Test Noise menu 2. Use the ▲▼ buttons to select either Wideband (if your listening system has full-range speakers at all channel outputs) or Filtered (if any of your speaker settings is Small), then press Enter. The test noise cycles around the speakers in this order: Left, Center, Right, Right Surround, Back Surround Right, Back Surround Left, Left Surround, and Subwoofer channelsóremaining two seconds at each output before moving on to the next. When you enter an individual channel trim adjustment menu, the test noise remains at that channel until you complete the adjustment and move to another channel, which allows you to adjust the SPL for each channel carefully, using the following procedure. To accurately measure SPL: 1. Sit in the reference listening position. Set the SPL meter to ìCî weighting and ìslowî response. 2. Facing the front speakers, hold the SPL meter at chest level, with the microphone facing up at an angle of approximately 45 degrees to the center speaker. Keep the meter at armís length to prevent measuring audio that may reflect from your body. 5-7 DP564 Multichannel Audio Decoder Listening Room Calibration 3. Keep the SPL meter in this position. Make sure that the meter is aimed at the center speaker as you take readings for the Left, Center, and Right speakers. 4. To take the SPL readings for the Left Surround or Right Surround speakers, keep the meter at the same angle and position as you did for the front speakers. Turn your body 90 degrees from the Center speaker toward the wall closest to the Surround speaker you are measuring. This minimizes ìshadowing,î or obscuring the meter with your body. To make adjustments to an individual channelís trim setting, use the ▲▼ buttons to change the level setting for the current speaker. Press Enter to save a change in setting, or press Esc to discard a change. Press Esc to return to the Channel Trims menu. Subwoofer Calibration The ideal test noise for subwoofer calibration should be band-limited pink noise, lowpass filtered at 120 Hz. The DP564 outputs band-limited pink noise (20 to 120 Hz) on the Subwoofer output. To properly calibrate the subwoofer, a real-time analyzer (RTA) is required. If an RTA is not available, you can approximate the settings with an SPL meter. When using an RTA, proper calibration requires setting the LFE channel signal to be sent to the subwoofer, within its typical bandwidth of 20ñ120 Hz, 10 dB higher (as measured by the RTA) than the main channels. See Figure 5-1 for an example of an RTA display of a properly calibrated subwoofer. The precision of this measurement varies with the quality of the meter used. +10 dB datum SW channel +10 dB 0 dB datum Center channel 25 Hz 120 Hz 2 kHz Figure 5-1 Real Time Analyzer (RTA) Display If an RTA is not available, setting the subwoofer channel 4ñ6 dB higher, as measured by an SPL meter, provides an approximate level. For example, set the subwoofer channel to 89 dBC when the Center channel measures 85 dBC. 5-8 DP564 Multichannel Audio Decoder Listening Room Calibration For future reference, if you calibrate the subwoofer with an RTA, measure the calibrated level with an SPL meter and note the meter reading for the proper calibration. Use this measured value for quick future checks of the system calibration. When you have set trim levels for all channels, return to the Channel Trim menu, select Test Noise, select Off, and press Enter. 5.4 One-Touch Output Level Adjustment Dim provides a one-touch level adjustment. It applies a level shift you specify to the current volume setting. The range of settings for Dim is +6 to ñ30 dB, or Mute. To set the level shift for Dim: 1. On the Monitor Configuration menu, select Dim Gain and press Enter. 2. Use the ▲▼ buttons to find the setting you want, and press Enter. At any time, you can apply that level shift by pressing Dim. You can return to the previous level by pressing Dim a second time. This enables you, for instance, to lower the listening level to allow a conversation to take place easily, and then return to the previous listening level at one touch. The Dim button is lit when the level shift is active. 5-9 Virtual Dolby Technologies Test DVD Track List iv DP564 Multichannel Audio Decoder Chapter 6 Operating Modes The DP564 offers unique control and monitoring options. This chapter covers: • • 6.1 Monitoring modes Hardware remote control Monitoring Modes The front panel provides easy access to different monitoring modes. Control options include: • • • • Downmix Decoding Listening Compression Any time a feature is active, the front-panel button associated with that feature is lit. This is true whether the feature is activated or deactivated manually, or controlled by program metadata, a preset configuration, or a remote control device. 6.1.1 Downmix You can apply Downmix options when a DolbyÆ Digital multichannel input signal is present. Lt/Rt produces an output compatible with Dolby Surround Pro LogicÆ decoding. It is a two-channel signal, created to be similar to a program encoded as Dolby Surround. A properly encoded Dolby Digital program includes metadata that controls downmix delivery, so if the consumer has a Pro Logic system, but not Dolby Digital, the program plays back taking full advantage of Pro Logic. See Appendix A, Metadata for more detail on metadata as used in content encoding. Program metadata also customizes downmix delivery to a stereo system. Stereo (Lo/Ro) produces a two-channel output designed for two-channel stereo listening, so you can hear the downmix result under those conditions. Note: For correct emulation of consumer products, the LFE channel is discarded in Lt/Rt and Lo/Ro downmixing modes, but not in the listening modes Phantom and 3 Stereo. The DP564 may route low-frequency signals from all or some of the main speakers to the subwoofer, according to your speaker configuration. 6-1 DP564 Multichannel Audio Decoder Operating Modes Mono can only be activated when one of the two-channel downmixes is in use, or when the input is PCM or a 2/0 Dolby Digital program. We recommend that program mixers designate Lo/Ro as the source for mono downmixes. A mono output of the Lt/Rt mix is possible, however. Both Lo/Ro and Lt/Rt output to the Left and Right channels. If you apply Pro Logic decoding, the decoded output is sent to Left, Right, Center, and a single Surround channel output, which is then sent to both the Ls and Rs outputs to feed both Surround speakers, as described in Section 6.1.2, Decoding. Mono outputs to the Center channel only. 6.1.2 Decoding Your Decoding selections depend on the settings selected in the Monitor Control setup menu. When the setting in the Pro Logic menu is Auto, application of Pro Logic is controlled by metadata in a Dolby Digital input stream, as described in Section 4.4.2, Monitor Control. The application of Dolby Digital Surround EXô decoding is also controlled by metadata if the Surround EX setting is Auto. When these decoding modes are set to automatic detection, the light on the associated front-panel button is lit when that decoding mode is active. When those menus are set to Manual, you can select these decoding modes using the front-panel buttons. Pro Logic and Pro Logic II are available only when processing a two-channel signal, or when a Dolby Digital multichannel signal is downmixed to two channels. Pro Logic is best used to decode a signal encoded in Dolby Surround (Lt/Rt) to Left, Center, Right, and a single Surround channel output, which is then sent to both the Ls and Rs outputs to feed both Surround speakers. It can be used on an Lo/Ro signal to hear the effect of feeding a stereo signal into a Pro Logic decoder. Pro Logic II applies the selected mode in the Pro Logic II setup menu. Pro Logic II generates discrete signals for the Left and Right Surround channels from any signal. It enhances the decoding of a signal encoded in Dolby Surround (Lt/Rt) beyond the capability of the original Pro Logic. In addition, Pro Logic II is particularly well-suited to decoding an Lo/Ro signal into a multichannel listening environment. For more information on the modes and controls available using Pro Logic II, see Pro Logic II in Section 4.4.2, Monitor Control. EX applies Surround EX decoding to any Dolby Digital input with two surroundchannel signals. EX cannot be activated unless two surround-channel signals are present in the input and your monitor setup includes at least one Back Surround speaker. 6-2 DP564 Multichannel Audio Decoder 6.1.3 Operating Modes Listening The Listening section provides the ability to emulate different listening environments at a single touch. • • • 6.1.4 Full uses all speaker outputs. The signals are routed to the speakers directly. 3 Stereo routes the Ls and Rs signals to Left and Right outputs, respectively. Phant (Phantom Center) mutes the Center output and splits the Center signal equally between Left and Right. Compression The options in the Compression section are available only when decoding a Dolby Digital signal. RF and Line apply dynamic range control profiles carried in the Dolby Digital bitstream, in the same way consumer decoders do. Custom is a scalable application of the Line profile. The factory setting for Custom is 0 percent. At that setting, selecting Custom turns dynamic range compression off. To access the display screen to adjust the percentage setting for custom scaling, hold down Custom for two seconds. Note: When downmixing, the DP564 automatically applies enough compression at peak moments to prevent signal overload, regardless of whether a compression mode is selected. For more detailed information on compression modes, see Section A.3, Dynamic Range Control. 6.2 Hardware Remote Control You can control the DP564 with a dedicated hardware remote control. When a GPI/O control device is connected to the rear-panel GP I/O port, it is active, but not exclusiveóthe front-panel controls also remain active. To set up remote-control parameters, on the Unit Setup menu, select I/O Control, then GPI/O Configuration. If you are using the Cat. No. 549 GPIO Controller from Dolby Laboratories, connect it and select Cat. No. 549 Config. If you have your own GPI/O control device, connect that and select GPI/O Pin Config. Note: Presets include all the DP564 settings, including the GPI/O configuration. GPI/O settings should be assigned before saving a preset. 6-3 DP564 Multichannel Audio Decoder 6.2.1 Operating Modes Cat. No. 549 Configuration The Cat. No. 549 Config menu allows you to customize functions controlled by the Cat. No. 549 GPIO Controller. The initial display identifies which button is selected for configuration, and the active settings for that button. An example is shown in Figure 6-1. Cat.No.549 Config Button 4 Function Pro Logic II LED Sense Normal Figure 6-1 Cat. No. 549 Configuration Screen Showing Active Settings for Button 4 To change a configuration setting: 1. Press the front-panel arrow buttons to select a button or LED to configure. The button selection moves according to the layout of the image on the left-hand side of the display. 2. When you have selected a button to configure, press Enter to change the property assignments. The screen gives you a choice between Function and LED Sense, with each showing the current assignment. 3. Select either option, choose the appropriate assignment, and press Enter. 4. When you have configured the button, press Esc to return to the Cat. No. 549 Config menu, and repeat steps 1ñ3 as needed to configure other buttons on the GPI/O Controller. Table 6-1 shows the default assignments and the associated GPI/O pins for the Dolby Cat. No. 549 GPI/O Controller. 6-4 DP564 Multichannel Audio Decoder Operating Modes Table 6-1 Cat. No. 549 Default Button and LED Functions DP564 GPIO Pin Assignments Switch LED 1 AES Input 1 GPI pin 23 GPO pin 4 2 AES Input 2 GPI pin 24 GPO pin 7 3 Optical Input 3 GPI pin 25 GPO pin 8 4 Pro Logic II GPI pin 26 GPO pin 9 5 Pro Logic GPI pin 27 GPO pin 10 6 Surround EX GPI pin 28 GPO pin 11 7 Lt/Rt Downmix GPI pin 29 GPO pin 12 8 Stereo Downmix GPI pin 30 GPO pin 13 9 Mono Downmix GPI pin 31 GPO pin 14 10 Custom Mode GPI pin 32 GPO pin 15 11 Line Mode GPI pin 33 GPO pin 16 12 RF Mode GPI pin 34 GPO pin 17 13 Ref GPI pin 35 GPO pin 18 14 Dim/Mute GPI pin 36 GPO pin 19 Left LED Error GPO pin 3 Right LED Bypass GPO pin 5 Button Number 1 2 3 4 5 6 7 8 9 10 11 12 13 14 Cat. No. 549 GPIO Controller 6.2.2 Default Function GPI/O Pin Configuration The GPI/O Pin Config menu allows you to assign the functions your GPI/O device controls. The initial display identifies which pin is selected for configuration, and the active settings for that pin. An example is shown in Figure 6-2. GPI/O Pin Config Pin 23 Function AES1 Input In Out Polarity Pos Trigger Level Figure 6-2 GPI/O Pin Configuration Screen Showing Default Settings for Pin 23 To change a pin configuration setting: 1. Use the front-panel arrow buttons to select a pin to configure. The button selection moves according to the layout of the pins on the display. The screen shows you the current settings, and whether the pin is designated for input or output. 2. When you have selected a pin to configure, press Enter to change the property assignments. 6-5 DP564 Multichannel Audio Decoder Operating Modes 3. Choose the appropriate assignments, and press Enter to activate each change. 4. When you have configured the pin, press Esc to return to the GPI/O Pin Config menu, and repeat steps 1ñ3 as needed to configure other pins on the GPI/O Controller. Each pin is designated as an input or output pin as shown in Table 6-2. The available functions vary depending on whether you are configuring an input pin or an output pin. The available functions for an input pin are shown in Table 6-3. The available functions for an input pin are shown in Table 6-4. Table 6-2 Default GPI/O Pin Assignments Functions in bold italics are reserved and cannot be altered. Pin Output Function 1 2 3 4 5 +5 V (150 mA) Fault output Error AES input 1 Bypass 7 8 9 10 11 12 13 14 15 16 17 18 19 AES input 2 Optical input 3 Pro Logic II Pro Logic Surround EX Lt/Rt downmix Stereo downmix Mono downmix Custom mode Line mode RF mode Ref Dim/Mute Pin 6 20 21 22 23 24 25 26 27 28 29 30 31 32 33 34 35 36 37 6-6 Input Function Preset 1 Shaft encoder A input Shaft encoder B input Shaft encoder preset input AES input 1 AES input 2 Optical input 3 Pro Logic II Pro Logic Surround EX Lt/Rt downmix Stereo downmix Mono downmix Custom mode Line mode RF mode Ref Dim/Mute Digital ground DP564 Multichannel Audio Decoder Operating Modes Table 6-3 Functions Available for Assignment to Input Pins Bypass Preset 1 Preset 2 Preset 3 Preset 4 Preset 5 Preset 6 Preset 7 Preset 8 Preset 9 Preset 10 Preset 11 Preset 12 Preset 13 Preset 14 Preset 15 Preset 16 Preset 17 Preset 18 Preset 19 Preset 20 Preset 21 Preset 22 Preset 23 Preset 24 Preset 25 Preset 26 Preset 27 Preset 28 Preset 29 Preset 30 Preset 31 Preset 32 AES Input 1 AES Input 2 Optical Input 3 Streaming Input 4 Stereo Downmix Lt/Rt Downmix Mono Downmix Pro Logic II Pro Logic Surround EX Full 3 Stereo Phantom Center Custom Line RF Extended BSI Enable PL II - Movie PL II - Music PL II - ProLogic PL II - Matrix Dolby Headphone Off Dolby Headphone 1 Dolby Headphone 2 Dolby Headphone 3 Bass Manage Bypass AES Chan Select Auto AES Chan Select 1 AES Chan Select 2 Test Noise Left Speaker Mute Right Speaker Mute Center Speaker Mute Subwoofer Mute Ls Speaker Mute Rs Speaker Mute Bs Speaker Mute Master Volume Ref Dim/Mute 6-7 DP564 Multichannel Audio Decoder Operating Modes Table 6-4 Functions Available for Assignment to Output Pins Error External AES Ref Remote Control Dolby Digital Input Bypass Preset 1 Preset 2 Preset 3 Preset 4 Preset 5 Preset 6 Preset 7 Preset 8 Preset 9 Preset 10 Preset 11 Preset 12 Preset 13 Preset 14 Preset 15 Preset 16 Preset 17 Preset 18 Preset 19 Preset 20 Preset 21 Preset 22 Preset 23 Preset 24 Preset 25 Preset 26 Preset 27 Preset 28 Preset 29 Preset 30 Preset 31 Preset 32 AES Input 1 AES Input 2 Optical Input 3 Streaming Input 4 Stereo Downmix Lt/Rt Downmix Mono Downmix Pro Logic II Pro Logic Surround EX Full 3 Stereo Phantom Center Custom Line RF Extended BSI Enable PL II - Movie PL II - Music PL II - ProLogic PL II - Matrix Dolby Headphone Off Dolby Headphone 1 Dolby Headphone 2 Dolby Headphone 3 Bass Manage Bypass AES Chan Select Auto AES Chan Select 1 AES Chan Select 2 Test Noise on/off Left Speaker Mute Right Speaker Mute Center Speaker Mute Subwoofer Mute Ls Speaker Mute Rs Speaker Mute Bs Speaker Mute Master Volume Ref Dim/Mute 6-8 DP564 Multichannel Audio Decoder Chapter 7 Using New Features This chapter is for users of the DP562, the predecessor to this model. It provides a quick look at the new features in the DP564, and a quick reference on how to access those features, including: • • • • • • • • • • • • • 7.1 Multiple inputs Expanded preset storage Enhanced monitoring control Dedicated GPI/O remote control capability DolbyÆ Digital Surround EXô decoding Dolby Pro LogicÆ II decoding Dolby Headphone processing IFE (in-flight entertainment) mode Timecode output External AES reference Ethernet software remote control Streaming Karaoke capable mode Multiple Inputs The DP564 includes four separate digital audio input sources. There are two AES input ports, an optical input, and, for streaming audio, a 100BASE-T connection. The rear-panel ports are discussed on page 2-2. You control selection of the input source using the front panel Input buttons, as discussed on page 3-5. 7.2 Expanded Preset Storage The DP564 stores up to 32 separate presets. Each preset includes the complete set of parameters you can adjust, and you can name each preset. Presets 1ñ4 can be recalled using the one-touch front-panel Preset buttons. Presets 1ñ28 can be defined and stored, as discussed starting on page 4-13. Presets 29ñ32 are factory-defined as shown in Table 4-2. All 32 presets can be recalled using the menu screen, as discussed starting on page 4-12. 7-1 DP564 Multichannel Audio Decoder 7.3 Using New Features Enhanced Monitoring Control You have enhanced control over monitoring level and output control when using the DP564. The Master Volume knob and the Ref button make this adjustment quick and easy, and if you need to mute one or more channel outputs, you can do so using the menu screen as described on page 4-11. 7.4 Dedicated GPI/O Remote Control Capability One of the ways the DP564 can be controlled is by hardware remote. Dolby Laboratories makes the Cat. No. 549 GPIO Controller, which can be used with the DP564, or you can connect your own GPI/O device. Specific instructions for setting up GPI/O control begin on page 4-14. 7.5 Dolby Digital Surround EX Decoding If your speaker system includes at least one Back Surround speaker, you can decode a Dolby Digital Surround EX program using the DP564 by pressing EX. Details on configuring the DP564 for Surround EX decoding are on page 4-9. 7.6 Dolby Pro Logic II Decoding You can apply Dolby Pro Logic II decoding to any two-channel program, or a twochannel downmix of a Dolby Digital program, by pressing the front-panel Pro Logic II button. Pro Logic II offers a wide range of listening options, controlled by the Pro Logic II menu discussed on page 4-10. 7.7 Dolby Headphone Processing Dolby Headphone offers headphone listeners the effect of a five-channel surround system. The DP564 headphone output allows you to monitor a version of audio content processed with Dolby Headphone in any of three different room modes, or to monitor a traditional stereo mix of the program. Control of the headphone monitor mode is detailed on page 4-9. 7.8 IFE Mode In-flight entertainment (IFE) mode sends the Dolby Headphone output to the main speaker outputs. To enable and disable IFE mode, use the I/O Control menu. 7-2 DP564 Multichannel Audio Decoder 7.9 Using New Features Timecode Output The DP564 extracts the timecode from a Dolby Digital stream if timecode is present. This is used to generate a matching linear timecode output signal from the rear-panel LTC connection. This can be used to synchronize external equipment, such as a videotape machine, to follow the Dolby Digital bitstream. Details of timecode output are discussed under Clock on page 4-14. 7.10 External AES Reference You can lock the DP564 output to the studio reference clock by plugging the studio reference to the AES Ref connector on the rear panel, and selecting either Ref In option on the Clock menu. Details on the Clock menu options are discussed on page 4-14. 7.11 Ethernet Software Remote Control You can control the DP564 using the DolbyRemote 564 software provided on the CD-ROM included in the packing kit. This remote control software runs best via the rear-panel 100BASE-T connection. For instructions on installing and using the DolbyRemote 564 software, see Chapter 8, Streaming Server and Remote Software. 7.12 Streaming The DP564 processes streaming audio from the 100BASE-T input. Control of the features of streaming audio is available only when you use the DolbyRemote 564 software. For details, see Chapter 8, Streaming Server and Remote Software. 7.13 Karaoke The DP564 provides a variety of options for decoding karaoke programs. These options are controlled on the Karaoke menu, detailed on page 4-11. 7-3 Virtual Dolby Technologies Test DVD Track List iv DP564 Multichannel Audio Decoder Chapter 8 Streaming Server and Remote Software To activate the streaming audio input or to use the DolbyRemote 564 software by network connection, you need to configure the DP564 using the Network Settings menu as described starting on page 4-16. 8.1 DolbyRemote 564 DolbyRemote 564 provides quick access to virtually all DP564 functions. In addition, the application provides access to some features not available from the DP564 frontpanel interface. Using DolbyRemote 564 allows the DP564 to be located in another room or at some distance from the operator. While DolbyRemote 564 is in operation, the Remote LED on the front panel of the DP564 is lit and access to the setup menu via the front-panel buttons is disabled. 8.2 Hardware Connection You can connect the DP564 remote control using either the Ethernet (100BASE-T), RS-232, or RS-485 serial ports. For RS-232 connection, use the 8-pin mini DIN to 9pin serial cable supplied with your DP564 to connect to the front panel RS-232 port. For RS-485 connection, use a standard 9-pin to 9-pin serial cable to the rear-panel RS-485 port. The Ethernet connection provides the most effective communication link. 8.3 Installing DolbyRemote 564 DolbyRemote 564 software is provided on a CD-ROM. 8-1 DP564 Multichannel Audio Decoder Streaming Server and Remote Software CD-ROM Installation To install DolbyRemote 564 on your computer: 1. Place the CD-ROM in the PC. 2. The installation program should run automatically. If nothing happens, open the Run prompt (click the Start menu, then Run) and type d:\setup.exe (where d is the letter of your CD- or DVD-Rom drive). 3. Follow the on-screen prompts to install. 4. Use the default destination or select an alternate location for the software installation. 8.4 Launching the Application Configure the DP564 network settings parameters from the front panel prior to launching the DolbyRemote 564 software. If you are using an Ethernet connection, these settings are found in the System Settings, Network Settings setup menus. If you are using a serial connection, you must configure the Remote Baud Rate and Unit Address found in the System Settings menu. Upon launching the application, the Open Connection to DP564 window is displayed. The PC network settings should reflect the DP564 network settings. DolbyRemote 564 can also be opened in Off Line mode to view the application without a hardware connection. Before you click OK to begin remote software operation of the DP564, on the DP564 front panel, press Shift once so that the button illuminates, then press ◄. (Do not hold down Shift while pressing ◄.) To disable remote operation and resume using the front-panel interface, press Shift, ◄ again. 8.5 DolbyRemote 564 Overview DolbyRemote 564 offers a complete combination of setup, control, and emulation features available on the DP564. Many of these features can display simultaneously. The main section of DolbyRemote 564 supplies access to the features available on the front panel of the DP564, while the tab section in the upper right-hand corner offers the status and setup functionality available on the DP564 front-panel display and menus. 8-2 DP564 Multichannel Audio Decoder 8.6 Streaming Server and Remote Software Streaming The Streaming tab enables you to select and control the streaming input. This functionality includes: • • • • • 8.6.1 Server location File selection Play, Pause, and Stop control Slide bar control for locating starting positions within a file +10 Seconds / ñ10 Seconds buttons Server Location Select the server location by selecting the server name on the local area network (LAN) that contains the DolbyÆ Digital (.ac3) files you wish to play. This gives you access to the files on that server in the file selection window. 8.6.2 File Selection When the Server location is set to a computer or network that contains the Dolby Streaming Server program, the file selection window allows you to select a file to be played back via the streaming input. The DP564 only recognizes files that are stored in the directory defined when you install the Streaming Server program. 8.6.3 Play, Pause, Stop Control Click Play to play the selected file. The Streaming Server takes approximately 3 seconds to buffer the file before beginning to play. Pause pauses play while maintaining the file in the buffer, to allow quicker resumption of play. Stop ends play mode, and returns the slider to the beginning of the file. 8.6.4 Slide Bar Control The slide bar control allows you to select a play point within the file by clicking and dragging the slider. 8.6.5 +10 Seconds / –10 Seconds Buttons These buttons allow you to advance or back up the play point of the file in ten-second intervals. 8-3 DP564 Multichannel Audio Decoder 8.7 Streaming Server and Remote Software Dolby Streaming Server The Dolby Streaming Server gives functionality to the computer where you store Dolby Digital files you want to decode via the streaming input on your DP564. Note: The DP564 only recognizes files that are stored in the directory defined when you install the Streaming Server program. 8.7.1 Installing the Dolby Streaming Server The Dolby Streaming Server software is provided on a CD-ROM. CD-ROM Installation To install the Dolby Streaming Server software: 1. Place the CD-ROM in the PC. 2. The installation program should run automatically. If nothing happens, open the Run prompt (click the Start menu, then Run) and type d:\setup.exe (where d is the letter of your CD or DVD-Rom drive). 3. Follow the on-screen prompts during installation. 4. Use the default destination or select an alternate location for the software installation. 8.7.2 Launching the Application The Streaming Server has no user controls but it must be running prior to launching the DolbyRemote 564. To launch the Streaming Server, double-click the Dolby Streaming Server icon. You can also choose to have the Dolby Streaming Server automatically launch when you start your computer by choosing that option when the program is installed. DolbyRemote 564 and Dolby Streaming Server can be run on a PC that meets these minimum requirements: • • • • • • Windows 98, 2000, XP, NT4.0 or later 450 MHz Pentium III processor 128 MB RAM 200 MB available hard-drive storage (for server) 10 MB available hard-drive storage (for remote) Super VGA video card with 1024 • 768 resolution 8-4 DP564 Multichannel Audio Decoder Appendix A Metadata Note: This appendix was originally written for users of DolbyÆ E products that assign metadata parameter values. The DP564, as a decoder, simply uses the metadata parameters included in a Dolby Digital bitstream. However, the detailed explanation of metadata concepts and parameters may prove useful to you. Metadata provides unprecedented capability for content producers to deliver the highest quality audio to consumers in a range of listening environments. It also provides choices that allow consumers to adjust their settings to best suit their listening environments. In this appendix, we first discuss the concept of metadata: • Metadata overview We then discuss the three factors controlled by metadata that most directly affect the consumerís experience: • • • Dialogue level Dynamic range control (DRC) Downmixing We then define each of the adjustable parameters, and provide sample combinations: • • A.1 Individual parameters Metadata combinations Metadata Overview Dolby Digital and Dolby E are both bit-rate reduction technologies that use metadata to describe the encoded multichannel audio. In normal operation the encoded audio and metadata are carried together as a data stream on two regular digital audio channels (AES/EBU or S/PDIF). Metadata is carried in the Dolby Digital or Dolby E bitstream, describing the encoded audio and conveying information that precisely controls downstream encoders and decoders. Metadata allows content providers unprecedented control over how original program material is reproduced in the home. Dolby Digital is a transmission bitstream (sometimes called an emission bitstream) intended for delivery to the consumer. It consists of a single encoded program of up to six channels described by one metadata stream. The consumerís Dolby Digital A-1 DP564 Multichannel Audio Decoder Appendix A: Metadata decoder processes the metadata stream according to parameters set by the program creator, as well as certain settings for bass management and dynamic range that are chosen by the consumer to reflect their specific home theater equipment and environmental conditions. Dolby E is a distribution bitstream capable of carrying up to eight channels of encoded audio and metadata. The number of programs ranges from one single program (Program Config: 5.1) to eight individual programs on a single Dolby E stream (Program Config: 8 × 1). Each program is discrete with its own metadata in the Dolby E stream. Some control metadata parameters in a Dolby E stream automatically configure a Dolby Digital encoder while others are passed through to the consumerís Dolby Digital decoder. Dolby E is a professional technology used for broadcast applications such as program origination and distribution; the Dolby E bitstream carries the entire metadata parameter set. Dolby Digital, used for consumer applications such as transmission to the home or for DVD authoring, employs a subset of the entire metadata parameter set called Dolby Digital metadata; the Dolby Digital bitstream carries only those parameters necessary for proper decoding by the consumer. Metadata is first inserted during program creation or mastering, and is carried through transmission in a broadcast application or directly onto a DVD. The metadata provides control over how the encoded bitstream is treated at each step on the way to the consumerís decoder. For example: In a broadcast truck parked outside a football stadium, the program mixer chooses the appropriate metadata for the audio program being created. The resulting audio program, together with metadata, is encoded as Dolby E and sent to the television station via fiber, microwave, or other transmission link. At the receiving end of this transmission, the Dolby E stream is decoded back to baseband audio and metadata. The audio program is monitored and the metadata is altered or re-created as other elements of the program are added in preparation for broadcast. This new audio program/metadata pair is re-encoded as Dolby E, leaves the postproduction studio and is passed through the television station to Master Control, where many incoming Dolby E streams are once again decoded back to their individual baseband digital audio/metadata programs. The audio program/metadata pair that is selected to air is sent to the transmission Dolby Digital encoder, which encodes the incoming audio program according to the metadata stream associated with it, thereby simplifying the transmission process. Finally, the Dolby Digital signal is decoded in the consumerís home, with metadata providing the information for that decoding process. Through the use of metadata, the mixer in the truck has been able to control the home decoder for the sporting event, while news breaks, commercials, station IDs, and the like are similarly appropriately decoded. This control, however, requires the producer to correctly set the metadata parameters because they affect important aspects of the audioóand can seriously compromise the final product if set improperly. Although most metadata parameters are A-2 DP564 Multichannel Audio Decoder Appendix A: Metadata transparent to consumers, certain parameters affect the output of a home decoder, like when downmixing for a specific speaker configuration, or when the consumer chooses Dynamic Range Control to avoid disturbing family and neighbors. Figure A-1 shows a 5.1 + 2 Program Config consisting of a 5.1-channel program and a two-channel Secondary Audio Program (SAP). Multichannel Monitor System The Dolby E bitstream contains both the 5.1- and two-channel programs’ encoded audio, and each program's metadata. Metadata Program Source L/R DP570 Multichannel Audio Tool 5.1-Channel Program C/LFE DP571 Dolby E Encoder Ls/Rs in 5.1+2 Program Config in 5.1+2 Program Config Two-Channel (Stereo) Program Lt/Rt Decoded Dolby E bitstream delivers both the 5.1- and two-channel programs’ encoded audio along with corresponding metadata. The Dolby Digital bitstream contains a single program’s encoded audio and corresponding metadata. Broadcast DP569 Dolby Digital Encoder DP572 Dolby E Decoder SAP or Visual Descriptive Dolby TwoChannel Encoder Cable, Satellite, or Terrestrial Consumer Metadata Figure A-1 Metadata Flow from Production to Consumer In the simplest terms, there are two functional classifications of metadata: Informational: These parameters convey information but do not affect either the encoded bitstream or the decoding process. For example, the Bitstream Mode parameter describes the audio service provided in the bitstream according to the ATSC specification. This information may be used by certain components in the audio system. Control: These parameters direct how the decoder, encoder, or both process the audio when certain modes are applied to the encoder or decoder. For example, the Lowpass Filter parameter determines whether a lowpass filter is applied to the main inputs of a Dolby Digital encoder, and the Surround Downmix Level parameter instructs the Dolby Digital decoder how to mix the surround channels during downmixing. A-3 DP564 Multichannel Audio Decoder Appendix A: Metadata Both types of metadata can be examined, modified, or passed through during encoding. Table A-1 lists the active metadata parameters and indicates if each parameter is informational or control. Table A-1 Metadata Parameters Extended Bitstream Information parameters are in italics. Metadata Parameter Informational Control Dialogue Level Channel Mode LFE Channel Bitstream Mode Line Mode Compression RF Mode Compression RF Overmodulation Protection Center Downmix Level Surround Downmix Level Dolby Surround Mode Audio Production Information Mix Level Room type Copyright Bit Original Bitstream Preferred Stereo Downmix Lt/Rt Center Downmix Level Lt/Rt Surround Downmix Level Lo/Ro Center Downmix Level Lo/Ro Surround Downmix Level Dolby Surround EX Mode A/D Converter Type DC Filter Lowpass Filter LFE Lowpass Filter Surround 3 dB Attenuation Surround Phase Shift A.2 r r r r r r r r r r r r r r r r r r r r r r r r r r r Dialogue Level Dialogue level (also known as dialogue normalization or dialnorm) is perhaps the single most important metadata parameter. The dialogue level setting represents the average loudness of dialogue in a presentation. A-4 DP564 Multichannel Audio Decoder Appendix A: Metadata When received at the consumerís Dolby Digital decoder, this parameter setting determines the level shift in the decoder that sets, or normalizes, the average audio output of the decoder to a preset level. This aids in matching audio volume between program sources. The proper setting of the dialogue level parameter enables the Dynamic Range Control profiles chosen by the content producer to work as intended in less-thanoptimal listening environments, and is essential in any content production, whether it is for transmission in a broadcast stream or for direct distribution to consumers, as in DVDs. In broadcast transmission, standard setting of dialogue level ensures that the consumer can switch channels or watch a television program without having to adjust the volume control during commercial breaks. Using that standard for all content, whether conveyed by broadcast television, DVD, or other media, enables the consumer to switch between sources and programs while maintaining a comfortable listening level. Note: Programs without dialogue, such as an all-music program, still require a careful setting of the dialogue level parameter. When setting the parameter for such content, it is useful to compare the program to the level of other programs. The goal is to allow the consumer to switch to your program without having to adjust the volume control. The Scale The scale used in the dialogue level setting is from ñ1 to ñ31 dB in 1 dB steps. Contrary to what you might assume at first, a setting of ñ31 represents no level shift in the consumerís decoder, and ñ1 represents the maximum level shift. Hereís why: Dolby Digital consumer decoders standardize the average loudness (averaged over time by the formula LeqA) to ñ31 dBFS (31 dB below 0 dB full-scale digital output) by applying a shift in level based on the dialogue level parameter setting. When a decoder receives an input signal with a dialogue level setting of ñ31, it applies no level shift to the signal because this indicates to the decoder that the signal already matches the target level and therefore requires no shift. In contrast, a louder program requires a shift to match the ñ31 dB standard. When the dialogue level parameter setting is ñ21, the decoder applies a 10 dB level shift to the signal. When the setting is ñ11, it applies a 20 dB level shift, and so on. A Simple Rule: 31 + (dialogue level value) = Shift applied Example: 31 + (ñ21) = 10 dB A-5 DP564 Multichannel Audio Decoder Appendix A: Metadata The most important point to remember is that in setting the dialogue level parameter, you are providing your listener with an essential service. For your listeners, setting this level properly means: • • The volume level is consistent with other programs. The DRC profiles you make available to them work as you intend. Once dialogue level is set, you can set up DRC profiles to further benefit the consumer. A.3 Dynamic Range Control Different home listening environments present a wide range of requirements regarding dynamic range. Rather than simply compressing the audio program to work well in the poorest listening environments, Dolby Digital encoders calculate and send Dynamic Range Control (DRC) metadata with the signal. This metadata can be applied to the signal by the decoder to reduce the signalís dynamic range. Through the proper setting of DRC profiles during the mastering process, the content producer can provide the best possible presentation of program content in virtually any listening environment, regardless of the quality of the equipment, number of channels, or ambient noise level in the consumerís home. Many Dolby Digital decoders offer the consumer the option of defeating the Dynamic Range Control metadata, but some do not. Decoders with six discrete channel outputs (full 5.1-channel capability) typically offer this option. Decoders with stereo, mono, or RF-remodulated outputs, such as those found on DVD players and set-top boxes, often do not. In these cases the decoder automatically applies the DRC metadata associated with the decoderís selected operating mode. The Dolby Digital stream carries metadata for the two possible operating modes of the decoder. The operating modes are known as Line Mode and RF Mode due to the type of output they are typically associated with. Line Mode is typically used on decoders with six- or two-channel line-level outputs and RF Mode is used on decoders that have an RF-remodulated output. Full-featured decoders allow the consumer to select whether to use DRC and if so, which operating mode to use. The consumer sees options such as Off, Light Compression, and Heavy Compression instead of None, Line Mode, and RF Mode. Advanced decoders may also allow custom scaling of the DRC metadata. All that needs to be done during encoding is selection of the dynamic range control profiles for Line Mode and RF Mode. The profiles are described in the following sections. A-6 DP564 Multichannel Audio Decoder Appendix A: Metadata Note: While the use of DRC modes during decoding is a consumer-selectable feature, the dialogue level parameter setting is not. Therefore, the proper setting of the dialogue level parameter is essential before previewing a DRC profile. Line Mode Line Mode offers these features: • • • Low-level boost compression scaling is allowed. High-level cut compression scaling is allowed when not downmixing. Dialogue, as set by the dialogue level parameter, is reproduced at a constant level of ñ31 dBFS LeqA. All line-level or power-amplified outputs from two-channel set-top decoders, twochannel digital televisions, 5.1-channel digital televisions, Dolby Digital A/V surround decoders, and outboard Dolby Digital adapters use Line mode. Consumer control of the dynamic range is limited when downmixing. Products with stereo or mono outputs do not usually allow consumer scaling of Line Mode. This is because these devices are usually downmixing, (for example, when receiving a 5.1-channel signal.) However, in these products the consumer may have a choice between Line Mode and RF Mode. RF Mode RF Mode offers these features: • • • High- and low-level compression scaling is not allowed (when active, always fully applied). +11 dB gain shift raises overall program level. Dialogue, as set by the dialogue level parameter and combined with the +11 dB gain shift, is reproduced at a constant level of ñ20 dBFS LeqA. RF Mode is designed for products (such as set-top boxes) that generate a downmixed signal for connection to the RF/Antenna input of a television set; however, it is also useful in situations where heavy DRC is requiredófor example, when small PC speakers are used for DVD playback. In RF Mode, the overall program level is raised 11 dB, while the peaks are limited to prevent signal overload in the D/A converter. By limiting headroom, severe overmodulation of television receivers is prevented. The 11 dB gain provides an RF modulation level that compares well with analog television broadcasts and premium movie channels. In some situations it may be necessary to further constrain signal peaks above the average dialogue level so that there is less than 20 dB headroom. The selection of a suitable RF Mode profile achieves this. A-7 DP564 Multichannel Audio Decoder Appendix A: Metadata Dynamic Range Control Profiles in Ga y t i Un Early Cut Range Dialogue Level Setting Cut Range Null Band Centered at the Dialogue Level Setting Boost Range Low Ouput Level High Six preset DRC profiles are available to content producers: Film Light, Film Standard, Music Light, Music Standard, Speech, and None. Each is applied in the pattern shown in Figure A-2. All DRC profiles are encoded using a modified B-weighted curve. Low Input Level High Figure A-2 DRC Profile Pattern In each case the center of the null band is assigned to the dialogue level parameter setting, and the DRC profile is applied in relation to that level. • Film Light Max Boost: 6 dB (below ñ53 dB) Boost Range: ñ53 dB to ñ41 dB (2:1 ratio) Null Band Width: 20 dB (ñ41 dB to ñ21 dB) Early Cut Range: ñ26 dB to ñ11 dB (2:1 ratio) Cut Range: ñ11 dB to +4 dB (20:1 ratio) • Film Standard Max Boost: 6 dB (below ñ43 dB) Boost Range: ñ43 dB to ñ31 dB (2:1 ratio) Null Band Width: 5 dB (ñ31 dB to ñ26 dB) Early Cut Range: ñ26 dB to ñ16 dB (2:1 ratio) Cut Range: ñ16 dB to +4 dB (20:1 ratio) Music Light (No early cut range) Max Boost: 12 dB (below ñ65 dB) Boost Range: ñ65 dB to ñ41 dB (2:1 ratio) Null Band Width: 20 dB (ñ41 dB to ñ21 dB) Cut Range: ñ21 dB to +9 dB (2:1 ratio) • A-8 DP564 Multichannel Audio Decoder Appendix A: Metadata • Music Standard Max Boost: 12 dB (below ñ55 dB) Boost Range: ñ55 dB to ñ31 dB (2:1 ratio) Null Band Width: 5 dB (ñ31 dB to ñ26 dB) Early Cut Range: ñ26 dB to ñ16 dB (2:1 ratio) Cut Range: ñ16 dB to +4 dB (20:1 ratio) • Speech Max Boost: 15 dB (below ñ50 dB) Boost Range: ñ50 dB to ñ31 dB (5:1 ratio) Null Band Width: 5 dB (ñ31 dB to ñ26 dB) Early Cut Range: ñ26 dB to ñ16 dB (2:1 ratio) Cut Range: ñ16 dB to +4 dB (20:1 ratio) • None No DRC profile selected. The dialogue level parameter (dialnorm) is still applied. These choices are available to the content producer for both Line Mode and RF Mode. The content producer chooses which of these profiles to assign to each mode; when the consumer or decoder selects a DRC mode, the profile chosen by the producer is applied. In addition to the DRC profile, metadata can limit signal peaks to prevent clipping during downmixing. This metadata, known as overload protection, is inserted by the encoder only if necessary. For example, consider a 5.1-channel program with signals at digital full scale on all channels being played through a stereo, downmixed linelevel output. Without some form of attenuation or limiting the output signal would obviously clip. Correct setting of the dialogue level and DRC profiles normally prevents clipping and unnecessary application of overload protection. Note: DRC profile settings are dependent on an accurate dialogue level setting. Improper setting of the dialogue level parameter may result in excessive and audible application of overload protection. A.4 Downmixing Downmixing is a function of Dolby Digital that allows a multichannel program to be reproduced over fewer speaker channels than for which the program is optimally intended. Simply put, downmixing allows consumers to enjoy a DVD or digital television broadcast without requiring a full-blown home theater setup. As with stereo mixing where the mix is monitored in mono on occasion to maintain compatibility, multichannel audio mixing requires the engineer to reference the mix to fewer speaker channels to ensure compatibility in downmixing situations. In this way, Dolby Digital, using the metadata parameters that control downmixing, is an ìequal opportunity technologyî in that every consumer who receives the Dolby Digital data stream can enjoy the best audio reproduction possible, regardless of the playback system. A-9 DP564 Multichannel Audio Decoder Appendix A: Metadata It is important to consider the output signals from each piece of equipment that can receive a Dolby Digital program in the home. Table A-2 shows the output types from different equipment. Table A-2 Outputs from Various Dolby Digital Signal Processing Equipment Output Equipment Digital 5.1-Channel Analog The standard home theater A/V amp r r 5.1-channel decoder r r Hi-end DVD player r r DVD player r 5.1-channel amplifier PC Includes games consoles High-end set-top box Often HDTV Set-top box Usually SDTV IDTV TV set with an integrated digital TV tuner High-end TV Large screen TV with a 5.1-channel speaker system Two-Channel Analog RF Remodulated r r r (some units) r r r r r r r r r r r r Set-top boxes, used for the reception of terrestrial, cable, or satellite Digital Television, typically offer an analog mono signal modulated on the RF/Antenna output, a line-level analog stereo signal, and an optical or coaxial digital output. DVD players offer an analog stereo and a digital output, and some offer a six-channel analog output (for a 5.1-channel presentation). Portable DVD players offer analog stereo, headphone, and digital outputs. DVD players in computers and game consoles offer a digital output as well as analog stereo, headphone, and possibly six-channel analog outputs. 5.1-channel amplifiers, decoders and receivers have six-channel analog outputs and possibly six speaker-level outputs. In all of these cases, a Dolby Digital decoder creates the analog audio output signal. In the case of the set-top box or DVD player, the analog stereo output is a downmixed version of the Dolby Digital data stream. The digital output delivers the Dolby Digital data stream to either a downstream decoder or a Dolby Digital capable integrated amplifier. A-10 DP564 Multichannel Audio Decoder Appendix A: Metadata In each of these devices, the analog stereo output is one of two different stereo downmixes. One type is a stereo-compatible Dolby Surround downmix (also called Pro LogicÆ, left-total/right-total, or Lt/Rt) of the multichannel source program that is suitable for Dolby Surround Pro Logic decoding. The other type is a simple stereo representation (called a left-only/right-only, or Lo/Ro) suitable for playback on a stereo hi-fi or on headphones, and from which a mono signal is derived for use on an RF/Antenna output. The difference between the downmixes is how the surround channels are handled. The Lt/Rt downmix sums the surround channels and adds them, in-phase to the left channel and out-of-phase to the right channel. This allows a Dolby Surround Pro Logic decoder to reconstruct the L/C/R/S channels for a Pro Logic home theater. The Lo/Ro downmix adds the right and left surround channels discretely to the left and right speaker channels. This preserves the stereo separation for stereo-only monitoring and produces a mono-compatible signal. In all downmixes, the LFE channel is not included. On most home equipment, the consumer can use the productís user interface to choose the appropriate stereo output for their playback system. The mono signal feeding the RF/Antenna output is always derived from the Lo/Ro downmix. There are separate metadata parameters for the adjustment of the Lo/Ro and Lt/Rt downmix conditions. Certain metadata parameters allow the engineer to select how the stereo downmix is constructed and which stereo analog signal is preferred, but Lt/Rt is the default selection in all consumer decoders. See Section A.5, Parameter Definitions, for more information on individual parameters. During downmixing, as we have seen, the adjustment of dynamic range control parameters is limited. Broadly speaking, the stereo outputs use the Line Mode compression profile and the mono signal uses RF Mode compression. As with dynamic range control, downmixing is ultimately dependent upon each consumerís unique listening environment. While the engineer must optimize the multichannel mix for reproduction in an ideal listening environment, it is also important to preview the mix in downmixing conditions to ensure compatibility with different playback systems when selecting the downmixing metadata parameters. These previews can be achieved in real time using the DP570 Multichannel Audio Tool. A.5 Parameter Definitions Metadata parameters include: • • Universal parameters Extended Bitstream Information (Extended BSI) parameters Extended BSI parameters are active only when the consumerís decoder is capable of reading them and when the producer chooses to use them. All decoders can successfully decode a metadata stream without Extended BSI parameters, and A-11 DP564 Multichannel Audio Decoder Appendix A: Metadata Extended BSI parameters translate seamlessly to decoders that read only universal parameters. A.5.1 Universal Parameters Universal parameters are present in all Dolby Digital encoders and decoders. Dialogue Level The dialogue level parameter is discussed in Section A.2, Dialogue Level. Channel Mode This parameter (also known as audio coding mode) indicates the active channels within the encoded bitstream and affects both the encoder and consumer decoder. This parameter instructs the encoder as to which inputs to use for this particular program; it tells the decoder what channels are present in this program so the decoder can deliver the audio to the correct speakers. The setting is described as X/Y, where X is the number of front channels (Left, Center, Right) and Y the number of rear (surround) channels. The availability of certain channel modes depends on the data rate and whether the LFE Channel is present. For example, you canít have a mono stream with an LFE channel (1.1!) or a 3/2 stream at 96 kbps. Appropriate data rates are shown in the definition of each setting. Note: The presence of the LFE channel is indicated through a different metadata parameter (see LFE Channel). Channel Mode Setting 1+1 1/0 Mono 2/0 Stereo 3/0 2/1 3/1 2/2 3/2 Definition and Data Rate Dual mono (not valid for DTV broadcast or DVD production) From 56 kbps, usually 96 kpbs From 96 kbps, usually 192 kbps From 256 kbps From 256 kbps From 320 kbps From 320 kbps From 384 kbps, often 448 kbps A-12 DP564 Multichannel Audio Decoder Appendix A: Metadata LFE Channel The status of the LFE Channel parameter indicates to a Dolby Digital encoder whether an LFE Channel is present within the bitstream. Channel Mode determines whether the LFE Channel parameter can be set. You must have at least three channels in order to be able to add an LFE channel. LFE Channel Setting Enable Disable Bitstream Mode This parameter describes the audio service contained within the Dolby Digital bitstream. A complete audio program may consist of a main audio service (a complete mix of all the program audio), an associated audio service comprising a complete mix, or one main service combined with an associated service. To form a complete audio program, it may be (but rarely is) necessary to decode both a main service and an associated service using a maximum total bit rate of 512 kbps. Refer to the Guide to the Use of the ATSC Digital Television Standard, Document A/54 (www.atsc.org) for further information. Although a detailed description of each option follows, in practice most programming uses the default setting, Complete Main. An example of an exception to this rule is a special karaoke DVD, or an emergency service within digital television. A-13 DP564 Multichannel Audio Decoder Appendix A: Metadata Bitstream Mode Setting Complete Main (CM) Main M&E (ME) Assc. Visual Imp. (VI) Assc. Hear Imp. (HI) Assc. Dialogue (D) Assc. Commentary (C) Assc. Emergency (E) Definition CM flags the bitstream as the Main Audio Service for the program and all elements are present to form a complete audio program. Currently, this is the most common setting. The CM Service may contain from one (mono) to six (5.1) channels. The bitstream is the Main Audio Service for the program, minus a dialogue channel. The dialogue channel, if any, is intended to be carried by an Associated Dialogue Service. Different Dialogue Services can be associated with a single ME Service to support multiple languages. This is typically a single-channel program intended to provide a narrative description of the picture content to be decoded along with the Main Audio Service. The VI Service may also be a complete mix of all program channels, comprising up to six channels. This is typically a single-channel program intended to convey audio that has been processed for increased intelligibility and decoded along with the Main Audio Service. The HI Service may also be a complete mix of all program channels, comprising up to six channels. This is typically a single-channel program intended to provide a dialogue channel for an ME Service. If the ME Service contains more than two channels, the D Service is limited to only one channel. If the ME Service is two channels, the D Service can be a stereo pair; the appropriate channels of each service are mixed together (requires special decoders). This is typically a single-channel program intended to convey additional commentary that can be optionally decoded along with the Main Audio Service. This service differs from a Dialogue Service because it contains an optional, rather than a required, dialogue channel. The C Service may also be a complete mix of all program channels, comprising up to six channels. This is a single channel service that is given priority in reproduction. When the E Service appears in the bitstream, it is given priority in the decoder and the Main Service is muted. Assc. Voice Over (VO) This is a single channel service intended to be decoded and mixed to the center channel (requires special decoders). Main Sv Karaoke (K) The bitstream is a special service for karaoke playback. Line Mode Compression Profile Line Mode is discussed in Section A.3, Dynamic Range Control. RF Mode Compression Profile RF Mode is discussed in Section A.3, Dynamic Range Control. A-14 DP564 Multichannel Audio Decoder Appendix A: Metadata RF Overmodulation Protection This parameter is designed to protect against overmodulation when a decoded Dolby Digital bitstream is RF modulated. When enabled the Dolby Digital encoder includes pre-emphasis in its calculations for RF Mode compression. The parameter has no effect when decoding using Line Mode compression. Except in rare cases, this parameter should be disabled. RF Overmodulation Protection Setting Enable Disable Center Downmix Level When the encoded audio has three front channels (L, C, R), but the consumer has only left and right front speakers, this parameter indicates the nominal downmix level for the center channel with respect to the left and right channels. Dolby Digital decoders use this parameter during downmixing in Lo/Ro mode when Extended BSI parameters are not active. Center Downmix Level Setting 0.707 (–3 dB) default 0.596 (–4.5 dB) 0.500 (–6 dB) Definition The center channel is attenuated 3 dB and sent to the left and right channels. The center channel is attenuated 4.5 dB and sent to the left and right channels. The center channel is attenuated 6 dB and sent to the left and right channels. Surround Downmix Level When the encoded audio has one or more surround channels but the consumer does not have surround speakers, this parameter indicates the nominal downmix level for the surround channel(s) with respect to the left and right front channels. Dolby Digital decoders use this parameter during downmixing in Lo/Ro mode when Extended BSI parameters are not active. A-15 DP564 Multichannel Audio Decoder Appendix A: Metadata Surround Downmix Level Setting Definition 0.707 (–3 dB) default The left and right surround channels are each attenuated 3 dB and sent to the left and right front channels, respectively. Same as above, but the signal is attenuated 6 dB. The surround channel(s) are discarded. 0.5 (–6 dB) 0 (–999 dB) Dolby Surround Mode This parameter indicates to a Dolby Digital decoding product that also contains a Dolby Pro Logic decoder (for example a 5.1-channel amplifier) whether the twochannel encoded bitstream contains a Dolby Surround (Lt/Rt) program that requires Pro Logic decoding. Decoders can use this flag to automatically switch on Pro Logic decoding as required. Dolby Surround Mode Setting Definition Not Dolby Surround The bitstream contains information that was not Dolby Surround encoded. The bitstream contains information that was Dolby Surround encoded. After Dolby Digital decoding, the bitstream is Pro Logic decoded. There is no indication either way Dolby Surround Not Indicated Audio Production Information This parameter indicates whether the mixing level and room type values are valid. If Yes, then a receiver or amplifier could use these values as described below. If No, then the values in these fields are invalid. In practice only high-end consumer equipment implements these features. Audio Production Information Setting Yes No Definition Mixing Level and Room Type parameters are valid. Mixing Level and Room Type parameters are invalid and should be ignored. Mixing Level The Mixing Level parameter describes the peak sound pressure level (SPL) as experienced during the final mixing session at the studio or on the dubbing stage. The parameter allows an amplifier to set its volume control such that the SPL in the replay A-16 DP564 Multichannel Audio Decoder Appendix A: Metadata environment matches that of the mixing room. This control operates in addition to the dialogue level control, and is best thought of as the final volume setting on the consumerís equipment. This value can be determined by measuring the SPL of pink noise at studio reference level and then adding the amount of digital headroom above that level. For example, 85 dB equates to a reference level of ñ20 dBFS; the mixing level is 85+20, or 105 dB. Mixing Level Setting 80 to 111 dB in 1 dB increments Room Type The Room Type parameter describes the equalization used during the final mixing session at the studio or on the dubbing stage. A Large room is a dubbing stage with the industry standard X-curve equalization; a Small room has flat equalization. This parameter allows an amplifier to set the same equalization as heard in the final mixing environment. Room Type Setting Not Indicated Large Small Copyright Bit This parameter indicates whether the encoded Dolby Digital bitstream is copyright protected. It has no affect on Dolby Digital decoders and is purely for information. Copyright Bit Setting Yes No Original Bitstream This parameter indicates whether the encoded Dolby Digital bitstream is the master version or a copy. It has no affect on Dolby Digital decoders and is purely for information. Original Bitstream Setting Yes No A-17 DP564 Multichannel Audio Decoder Appendix A: Metadata Note: The parameters DC Filter, Lowpass Filter, LFE Lowpass Filter, Surround 3 dB Attenuation, and Surround Phase Shift appear after the Extended BSI parameters on Dolby E and Dolby Digital equipment menus. DC Filter This parameter determines whether a DC blocking 3 Hz highpass filter is applied to the main input channels of a Dolby Digital encoder prior to encoding. This parameter is not carried to the consumer decoder. It is used to remove DC offsets in the program audio and would only be switched off in exceptional circumstances. DC Filter Setting Enable Disable Lowpass Filter This parameter determines whether a lowpass filter is applied to the main input channels of a Dolby Digital encoder prior to encoding. This filter removes highfrequency signals that are not encoded. At the suitable data rates this filter operates above 20 kHz. In all cases it prevents aliasing on decoding and is normally switched on. This parameter is not passed to the consumer decoder. Lowpass Filter Setting Enable Disable LFE Lowpass Filter This parameter determines whether a 120 Hz 8th order lowpass filter is applied to the LFE channel input of a Dolby Digital encoder prior to encoding. It is ignored if the LFE channel is disabled. This parameter is not sent to the consumer decoder. The filter removes frequencies above 120 Hz that would cause aliasing when decoded. This filter should only be switched off if the audio to be encoded is known to have no signal above 120 Hz. LFE Lowpass Filter Setting Enable Disable A-18 DP564 Multichannel Audio Decoder Appendix A: Metadata Surround 3 dB Attenuation The Surround 3 dB Attenuation parameter determines whether the surround channel(s) are attenuated 3 dB before encoding. The attenuation actually takes place inside the Dolby Digital encoder. It balances the signal levels between theatrical mixing rooms (dubbing stages) and consumer mixing rooms (DVD or TV studios). Consumer mixing rooms are calibrated so that all five main channels are at the same sound pressure level (SPL). For compatibility reasons with older film formats, theatrical mixing rooms calibrate the surround channels 3 dB lower in SPL than the front channels. The consequence is that signal levels on tape are 3 dB louder. Therefore, to convert to a consumer mix from a theatrical calibration it is necessary to reduce the surround levels by 3 dB by enabling this parameter. Surround 3 dB Attenuation Setting Enable Disable Surround Phase Shift This parameter causes the Dolby Digital encoder to apply a 90-degree phase shift to the surround channels. This allows a Dolby Digital decoder to create an Lt/Rt downmix simply. For most material the phase shift has a minimal impact when the Dolby Digital program is decoded to 5.1 channels, but provides an Lt/Rt output that can be Pro Logic decoded to L, C, R, S, if desired. However, for some phase-critical material (such as music) this phase shift is audible when listening in 5.1 channels. Likewise some material downmixes to a satisfactory Lt/Rt signal without needing this phase shift. It is therefore important to balance the needs of the 5.1 mix and the Lt/Rt downmix for each program. The default setting is Enable. Surround Phase Shift Setting Enable Disable A.5.2 Extended Bitstream Information Parameters In response to requests from content producers, Dolby Laboratories recently modified the definitions of several metadata parameters from their original definition as described in ATSC document A/52. The original parameters were rarely, if ever used. The revised definitions allow more information to be carried about the audio program and allow more choices for stereo downmixing. When the metadata parameters carried in Dolby Digital were first described, they were generically called Bitstream Information or BSI. We refer to the alternate parameter definitions as Extended BSI. A-19 DP564 Multichannel Audio Decoder Appendix A: Metadata Because the revised definitions affect metadata parameters that were not used by the consumer decoders, all decoders will be compatible with the revised bitstream. Newer decoders that are programmed to detect and decode the new parameters will be able to implement the new features the Extended BSI provides. Products that allow emulation of the effects of metadata, such as the DP570, normally have a feature that allows emulation of a new (or compliant) decoder or a legacy decoder. Preferred Stereo Downmix Mode This parameter allows the producer to select either the Lt/ Rt or the Lo/Ro downmix in a consumer decoder that has stereo outputs. Consumer receivers are able to override this selection, but this parameter provides the opportunity for a 5.1-channel soundtrack to play in Lo/Ro mode without user intervention. This is especially useful on music material. Preferred Stereo Downmix Mode Setting Not Indicated Lt/Rt Preferred Lo/Ro Preferred Lt/Rt Center Mix Level This parameter indicates the level shift applied to the center channel when adding to the left and right outputs when downmixing to an Lt/Rt output. Its operation is similar to the center downmix level in the universal metadata. Lt/Rt Center Mix Level Setting 1.414 (+3.0 dB) 1.189 (+1.5 dB) 1.000 (0.0 dB) 0.841 (ñ1.5 dB) 0.707 (ñ3.0 dB) 0.595 (ñ4.5 dB) 0.500 (ñ6.0 dB) 0.000 (ñ999 dB) A-20 DP564 Multichannel Audio Decoder Appendix A: Metadata Lt/Rt Surround Mix Level This parameter indicates the level shift applied to the surround channels when downmixing to an Lt/Rt output. Its operation is similar to the surround downmix level in the universal metadata. Lt/Rt Surround Mix Level Setting 1.414 (+3.0 dB) 1.189 (+1.5 dB) 1.000 (0.0 dB) 0.841 (ñ1.5 dB) 0.707 (ñ3.0 dB) 0.595 (ñ4.5 dB) 0.500 (ñ6.0 dB) 0.000 (ñ999 dB) Lo/Ro Center Mix Level This parameter indicates the level shift applied to the center channel when adding to the left and right outputs when downmixing to a Lo/Ro output. When Extended BSI parameters are active, this parameter is used and the Center Mix Level parameter in the universal parameters is not. Lo/Ro Center Mix Level Setting 1.414 (+3.0 dB) 1.189 (+1.5 dB) 1.000 (0.0 dB) 0.841 (ñ1.5 dB) 0.707 (ñ3.0 dB) 0.595 (ñ4.5 dB) 0.500 (ñ6.0 dB) 0.000 (ñ999 dB) A-21 DP564 Multichannel Audio Decoder Appendix A: Metadata Lo/Ro Surround Mix Level This parameter indicates the level shift applied to the surround channels when downmixing to a Lo/Ro output. When Extended BSI parameters are active, this parameter is used, and the Surround Mix Level parameter in the universal parameters is not. Lo/Ro Surround Mix Level Setting 1.414 (+3.0 dB) 1.189 (+1.5 dB) 1.000 (0.0 dB) 0.841 (ñ1.5 dB) 0.707 (ñ3.0 dB) 0.595 (ñ4.5 dB) 0.500 (ñ6.0 dB) 0.000 (ñ999 dB) Surround EX Mode This parameter is used to identify the encoded audio as Surround EXô encoded material. This parameter is only used if the encoded audio has two surround channels. An amplifier or receiver with Dolby Digital Surround EX decoding can use this parameter as a flag to switch the decoding on or off automatically. The behavior is similar to the Dolby Surround Mode parameter. Surround EX Setting Not Indicated Not Surround EX Dolby Surround EX A/D Converter Type This parameter allows audio that has passed through a particular A/D conversion stage to be marked as such so that a decoder may apply the complementary D/A process. A/D Converter Type Setting Standard HDCD A-22 DP564 Multichannel Audio Decoder A.6 Appendix A: Metadata Metadata Combinations Table A-3 provides examples of combinations of parameters that could be used as a preset. Note: These parameter settings are provided as examples to demonstrate that different settings can be saved, named, and brought up as needed for quick use in different situations. The settings are not recommendations, but could provide a baseline starting point from which to create your own metadata values. Table A-3 Examples of Possible Metadata Settings Extended Bitstream Information parameters are in italics. Parameter Dialogue Level Channel Mode LFE Channel Bitstream Mode Line Mode Pro RF Mode Pro RF Ovrmd Protect Center Dwnmix Lev Srnd Dwnmix Lev Action Film (5.1) Drama (Lt/Rt) Local News (Mono) Music (5.0) Live Sporting Events (5.0) ñ27 dB 3/2L Enable Main Complete Film Standard Film Standard Disable 0.707 dB (ñ3 dB) 0.707 dB (ñ3 dB) ñ27 dB 2/0 N/A Main Complete ñ20 dB 1/0 N/A Main Complete Film Light Speech Film Light Speech Disable Disable N/A N/A N/A N/A ñ15 dB 3/2 Disable Main Complete Music Standard Music Standard Disable 0.707 dB (ñ3 dB) 0.707 dB (ñ3 dB) ñ18 dB 3/2 Disable Main Complete Film Standard Film Standard Disable 0.707 dB (ñ3 dB) 0.707 dB (ñ3 dB) N/A N/A N/A Yes 101 dB Large Yes Yes Dolby Surround Yes 90 dB Small Yes Yes No N/A N/A Yes Yes Yes 95 dB Large Yes Yes No N/A N/A Yes Yes Lt/Rt Lt/Rt N/A Lo/Ro Lt/Rt 0.707 (ñ3 dB) 0.707 (ñ3 dB) 1.0 (0.0 dB) 0.595 (ñ4.5 dB) Dolby Srnd Mode N/A Audio Prod Info Mix Level Room type Copyright Original Bitstream Preferred Stereo Downmix Lt/Rt Center Downmix Level Lt/Rt Surround Downmix Level A-23 N/A N/A 0.707 (ñ3 dB) 0.707 (ñ3 dB) N/A N/A DP564 Multichannel Audio Decoder Appendix A: Metadata Extended Bitstream Information parameters are in italics. Parameter Lo/Ro Center Downmix Level Lo/Ro Surround Downmix Level Dolby Surround EX Mode A/D Converter Type DC Filter Lowpass Filter LFE Lowpass Filter Srnd 3 dB Atten Srnd Phase Shift Action Film (5.1) Drama (Lt/Rt) Local News (Mono) Music (5.0) N/A N/A N/A N/A N/A N/A N/A N/A Dolby Surround EX N/A N/A N/A N/A Standard Standard Standard Standard Standard Enable Enable Enable Enable Enable Enable Enable Enable Enable Enable Enable N/A N/A N/A N/A Enable Enable N/A N/A N/A N/A Disable Enable Disable Enable A-24 Live Sporting Events (5.0) 0.707 (ñ3 dB) 0.595 (ñ4.5 dB) DP564 Multichannel Audio Decoder Appendix B Latency Values The latency of the DP564 is defined as the difference in time between the beginning of a valid DolbyÆ Digital frame entering the DP564 and the output of the first PCM sample represented by that frame. Note: At any sample rate, a Dolby Digital frame represents 1,536 audio samples. The DP564 accepts data over both professional and consumer industry standardized interfaces. The professional interface is specified by SMPTE2. The consumer interface is specified by IEC 619373. Each interface specification includes a specification for the latency of the decoder with respect to a reference point in the data stream. The DP564 may add a small additional delay over that specified in the SMPTE or IEC standards, if extra processing is performed. B.1 SMPTE Specification (Professional AES3) The SMPTE specification describes placement of the Dolby Digital frame on the AES3 interface such that a decoder with the specified latency produces audio that is timed correctly. The specified decoder latency is exactly one Dolby Digital frame period, with respect to the reference point. The reference point is the first bit of the Dolby Digital frame occurring on the interface. The SMPTE specification allows equipment that outputs Dolby Digital streams on the AES3 interface to know when, with respect to timecode or associated video, to output each Dolby Digital frame of data in order to allow a standard decoder to reproduce audio at the proper presentation time. The specification also allows equipment that receives the Dolby Digital data to know when the audio in each frame should be reproduced. Another way to maintain synchronization is by using time stamps. The SMPTE specification provides for a time stamp to be associated with an audio frame of data. The time stamp can indicate the timecode value that applies to an identified sample within a Dolby Digital frame. The time stamp can also indicate an absolute time offset of the stream, so that a Dolby Digital encoder, for example, can identify its own latency to another piece of equipment, for example an MPEG multiplexer. 2 3 SMPTE 340M Format for Non-PCM Audio and Data in AES3 - ATSC A/52 (AC-3) Data Type IEC 61937 Interface for non-linear PCM encoded audio bistreams applying IEC 60958 B-1 DP564 Multichannel Audio Decoder Appendix B: Latency Values Table B-1 shows the SMPTE Standard specified decoder latency with respect to the first word of the Dolby Digital frame (which is the reference point). Table B-1 SMPTE-Specified Latency B.2 Sample Rate Decoder Latency with Respect to Reference Point 48 kHz 44.1 kHz 32 kHz 32 ms 34.83 ms 48 ms IEC 61937 Specification (Consumer S/PDIF) Like the SMPTE professional specification, the IEC consumer specification also describes placement of the Dolby Digital frame on the S/PDIF interface such that a decoder with the specified latency will produce correctly timed audio. The specified decoder latency is exactly one Dolby Digital block period, with respect to the reference point. Note that since there are six blocks in a frame, the latency specification is for one sixth of a frame time, or the time span of 256 audio samples. In the IEC specification, the reference point is defined as the point two thirds of the way through the frame of Dolby Digital data. Since the frame size depends on the data rate, the reference point follows the beginning of the frame by a variable amount based on the data rate. Table B-2 shows the latency specified by IEC 61937, with respect to the beginning of the Dolby Digital frame on the S/PDIF interface. B-2 DP564 Multichannel Audio Decoder Appendix B: Latency Values Table B-2 IEC 61937 Specified Latency, with Respect to Beginning of Dolby Digital (AC-3) burst payload Data Rate in kbps 56 64 80 96 112 128 160 192 224 256 320 384 448 512 576 640 Latency in Milliseconds Sample Rate: 48 kHz Sample Rate: 44.1 kHz Sample Rate: 32 kHz 6.11 6.22 6.44 6.67 6.89 7.11 7.56 8.00 8.44 8.89 9.78 10.67 11.56 12.44 13.33 14.22 6.73 6.86 7.12 7.38 7.65 7.91 8.44 8.96 9.49 10.02 11.07 12.12 13.18 14.23 15.28 16.34 9.75 10.00 10.50 11.00 11.50 12.00 13.00 14.00 15.00 16.00 18.00 20.00 22.00 24.00 26.00 28.00 PCM Latency The DP564 offers two Bitstream Detection modes, Normal and Silent Switch, for automatically identifying bitstream type. In the Silent Switch mode, an additional latency is applied to an incoming PCM signal in order to detect bitstream type prior to decoding. This allows the DP564 to minimize any audio artifacts that may occur when switching between different bitstream types. Table B-3 shows the additional latency applied to PCM bitstreams when decoded using Silent Switch mode. Table B-3 Additional Latency in Silent Switch Mode Sample Rate Additional Latency in Silent Switch Mode 48 kHz 44.1 kHz 32 kHz 32 ms 34.83 ms 48 ms B-3 Virtual Dolby Technologies Test DVD Track List iv DP564 Multichannel Audio Decoder Appendix C Specifications Audio Coding Algorithms DolbyÆ Digital, Dolby Surround Pro LogicÆ, Dolby Digital Surround EXô, Dolby Pro Logic II, Dolby Headphone Audio Input Sampling Rates 32, 44.1, 48, 88.2, or 96 kHz Audio Output Sampling Rates 32, 44.1, or 48 kHz Frequency Response Digital Outputs: 20 Hz to 20 kHz, ±0.01 dB Analog Outputs: 20 Hz to 20 kHz, ±0.5 dB Distortion <0.02%, 20 Hz to 10 kHz Dynamic Range >106 dB Trim Level Adjust +6 to ñ20 dB in 0.125 dB steps Crosstalk <100 dB at 1 kHz Digital Audio Inputs Two BNC female connectors, unbalanced, 75Ω per AES-3ID-1995 (SMPTE 276M) Fiber optic via Toslink connector Formats supported: Dolby Digital in IEC 61937 format as specified in ATSC A/52 Annex B; PCM in AES3 format AES Reference Input BNC female with loop-through, unbalanced, 75Ω, signal levels per AES3-ID C-1 DP564 Multichannel Audio Decoder Appendix C: Specifications Digital Audio Outputs Four BNC female connectors, unbalanced, 75Ω per AES-3ID-1995 (SMPTE 276M) Analog Audio Outputs 0 dBFS = +24 dBu; balanced floating; eight 3-pin male XLR connectors, 24-bit DAC Headphone Output +7 dBu maximum output into 50Ω nominal; 1/4-inch standard stereo headphone jack; level adjustable Linear Timecode Output One SMPTE 12M-1995, BNC female, unbalanced, nominal output signal 1 Vpñp, output impedance 50Ω Serial Remote Control Input/Output Front: RS-232, 8-pin female mini-DIN Rear: RS-485, 9-pin female D-connector (SMPTE 207M) General Purpose Input/Output (GPI/O) Port 37-pin female D-connector, TTL compatible, may be configured to be level or edgesensitive using either polarity Ethernet Port 10/100BASE-T with auto-detection; RJ-45 female connector Front-Panel Display 128 × 64 pixel vacuum fluorescent display (VFD) Volume Controls One large master volume control knob One small headphone volume control knob Downmix Modes Lt/Rt, Stereo, Mono Listening Modes Full, 3 Stereo, Phantom Compression Modes Custom, Line, RF; Custom mode has adjustable parameters C-2 DP564 Multichannel Audio Decoder Appendix C: Specifications Test Noise Auto: Sequences wideband or band-limited pink noise through enabled channels at two-second intervals Manual: Feeds continuous noise to selected channel when unit is in Trim Level mode Power Requirements 90 to 264 VAC, 50 to 60 Hz, auto-sensing, 40 W maximum; this unit is designed to operate from a centrally switched power source Dimensions and Weight 2-U rack-mount: 88 × 483 × 376 mm (3.5 × 19 × 14.8 inches) Net: 4 kg (8.5 lbs) Environmental Conditions Operating: 0° to 50°C (32° to 122°F), natural convection cooling, 0 to 98% relative humidity (non-condensing) Non-operating: ñ20° to +70° C (ñ4° to +158°F) C-3