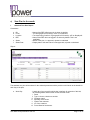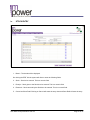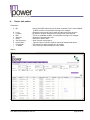
1
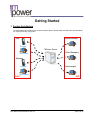
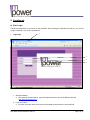
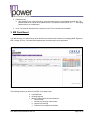
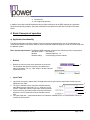
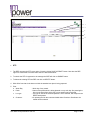
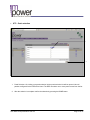
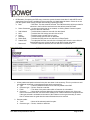
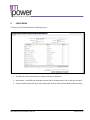
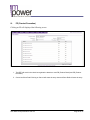
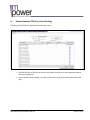
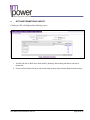
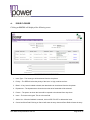
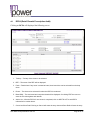
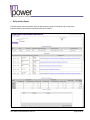
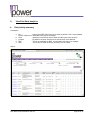
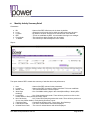
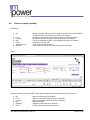
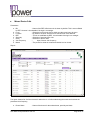
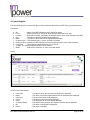
USER MANUAL
Role: Representative
Terminal: Web
Version: Retail 2.3
User Manual Representative Web 2.3
Page 1 of 81
Table of Contents
INTRODUCTION....................................................................................................................................................................3
1.
2.
3.
PURPOSE OF THE MANUAL ............................................................................................................................ 3
INTENDED READERSHIP................................................................................................................................. 3
HOW TO USE THIS DOCUMENT........................................................................................................................ 3
GETTING STARTED.............................................................................................................................................................4
1.
2.
3.
4.
5.
SYSTEM ARCHITECTURE ............................................................................................................................... 4
LOGGING ON................................................................................................................................................. 5
MR DASH BOARD ......................................................................................................................................... 6
BASIC CONCEPTS OF OPERATION .................................................................................................................. 7
EXIT SYSTEM................................................................................................................................................ 9
USING THE SYSTEM .......................................................................................................................................................100
1.
a)
b)
c)
2.
a)
b)
c)
d)
e)
f)
3.
a)
b)
PLANNING ................................................................................................ERROR! BOOKMARK NOT DEFINED.0
Defining and Managing Standard Tour Plan...................................................................................... 100
Defining and Managing Monthly Tour Plan........................................................................................ 144
View plan for the month ....................................................................................................................... 17
FIELD W ORK MANAGEMENT ........................................................................................................................ 20
Record Daily Activity Report ................................................................................................................ 20
Record a Non Call Activity (NCA) ........................................................................................................ 49
Recording a leave ................................................................................................................................ 51
Recording General Remarks ............................................................................................................... 52
View Daily Activity Report .................................................................................................................... 53
View Field Work Analytics.................................................................................................................... 56
MASTERS ................................................................................................................................................... 72
Request for addition or deletion of Customer ...................................................................................... 72
View Master Reports............................................................................................................................ 77
CONCLUSION......................................................................................................................................................................81
1.
ERROR MESSAGES & EXPLANATION ............................................................................................................ 81
User Manual Representative Web 2.3
Page 2 of 81
Introduction
1. Purpose of the Manual
This manual contains information for establishing your work using this software. Use this manual as a
self-learning textbook. It describes various reporting functions that are provided in the mobile
application. It will guide you through each of the facilities within MPower
2. Intended Readership
This manual has been written keeping in mind the end-user, who uses the application and which mainly
acts as a reference manual.
3. How to use this document
This manual is designed to get you up and using the MPower application. If you are new to the software
we strongly suggest you read through this publication along with the software. It gives step by step
description as to how the whole application works. The required functionality can be located in the
document from the index. Follow the page number to reach the required functionality. Refer to “Getting
there” section to understand how to navigate to the required destination. Follow each step as mentioned
in the manual and use the associated graphic images as a guide to check in case of any doubt.
User Manual Representative Web 2.3
Page 3 of 81
Getting Started
1. System Architecture
The web enabled part of MPower is an internet based system through which the field sales representatives
can capture their daily visit reports.
Brand Manager
Rep
Primary
MPower Server
Secondary
Other Managers
Manager
Primary
Administrator
Secondary
Field
User Manual Representative Web 2.3
HQ
Page 4 of 81
2. Logging on
a) User Login
The MPower application is secured by a user password. On accessing the main MPower web site, you will see
a page containing a user code and password.
Login Page
1
4
2
3
1. Web Site Address
a. After opening internet explorer, type in the address bar the name of the MPower web site
http://www.mympower.co.in/ ;
2. Login User Name
a. Input the user short name which has been allocated by administrator in the name field.
User Manual Representative Web 2.3
Page 5 of 81
3. Password entry
a. After typing the user code press tab or move the mouse cursor over password field and click. The
password has to be entered in the password field. The password will be shown as ‘****’. After typing
password click on LOGIN button.
4. Code: The fixed ID allocated to the customer by CWT. The code will not be readable.
3. MR Dash Board
The dash board is a console through which the MR can perform all his activities like managing DAR, Expenses,
MTP, Holiday, STP etc. The dash board appears after successful login to the application.
The following summary is shown to the REP on his dash board;
a. Last DAR Date
b. Pending Request
c. Month To Date figures (Current Month) for;
i. Chemist Calls
ii. Chemist call average Chemist calls
iv. Chemist call average
v. POB total for chemists and chemists
User Manual Representative Web 2.3
Page 6 of 81
vi. Stockist calls
vii. No of approvals pending
In addition to the above the MR dashboard also provides notifications to the REP regarding any approvals,
rejections and pending masters. Along with notifications, broadcasts if any will also be shown on the dash
board.
4. Basic Concepts of operation
a) Application functionality
The MPower application interface consists of various controls through which the user of the application can
communicate actions to the system. Each of these controls has a different purpose in order to communicate with
the MPower system.
Basic System Requirements: The MPower WEB application must have the following minimum requirements;
Operation System – Windows XP
Browser
– Internet Explorer V 7.0
Browser setting
– Java Scripting must be enabled
Buttons
1. Buttons are used to invoke some operation on the screen.
The operation that would be performed is indicated as a
label on the button. For e.g., “Add” button is to add or submit
a particular record.
1
Input Fields
1. Input fields are used to capture data. The data which can be typed into the input fields could be numeric,
alphanumeric or date.
2. The type of data that can be entered is indicated from the
label attached to the input field. For e.g. “Order qty” is only
numeric. Characters cannot be typed into numeric columns.
3. If there are many input fields on the screen then the field in
which the cursor is positioned is shown indicates current
field.
4. The input fields with ‘*’ symbol beside them is to indicate a mandatory field. I.e. the transaction cannot be
saved if the field is blank.
User Manual Representative Web 2.3
Page 7 of 81
2
3
1
4
Selection Lists
1
1. Selection lists are a list of options which usually depict a
business rule. The label attached to the list indicates the purpose
of the list.
2. It is a list with an arrow pointing downwards. On clicking of the
control, a list drops down for selection. Only one option can be
selected from the list at a time.
2
Calendar selections
1
1. The calendar window is invoked by pressing the
calendar button beside a date input field. No entry is
possible in the date field except through the
calendar selection.
2. The arrows at the top of the calendar window are for
changing the month and year. The single arrow is for
changing the month.
3. Any day in the month displayed in the calendar can
be selected by clicking with the mouse. The selected
date is highlighted.
2
3
Tabs
1
1. Tabs are like pages of a book. Where each page
has something written on it. Similarly each tab is a
window with some logically grouped fields in it.
The tabs can be selected by clicking on a tab
name. The highlighted tab is always the current
selected tab.
Multiple Selections (Check Boxes)
1. Check boxes are used in places where one or more selections
are required against a fixed set of options. It is a small box
beside the option to be selected. On clicking a Tick mark is
shown which indicates that the option is selected.
User Manual Representative Web 2.3
1
Page 8 of 81
Exit System
b) Logout from Application
In order to exit from the MPower application console the REP will have to use the logout control on the main
screen. The application exit can happen just by clicking on the LOGOUT button on the top of the console page.
To exit
User Manual Representative Web 2.3
Page 9 of 81
Using the system
a) Defining and Managing Standard Tour Plan
Getting there: Login -> Go to Planning menu -> Select Standard Tour Program Entry.
i) Create Standard Tour Plan
Open the Standard Tour Program screen which will initially be blank with list of week days. Press the Patch link
to insert a location and press OK button. This creates the line of entry for the first day. Similarly add all the line
of entries after selecting location types.
Next the parties can be selected for each day by clicking on the button against each line of entry consecutively.
Finally the Standard Tour Program can be saved using the SAVE button. After saving the Standard Tour
Program cannot be modified.
ii)
Plan for areas to be visited in the Standard Tour Plan
The patch column in the Standard Tour Program has a provision to select the area of work. Open the Standard
Tour Program and click on the patch link against the required line of entry. Then a list of all patches attached to
the REP will be shown for selection in a separate window.
One or more patches can be selected from the list and on pressing OK button in the list the names of the
selected patches is shown in Standard Tour Program separated by commas. If a patch is not present in the list
then it will have to be added through the patch configuration screen.
iii)
Configure parties to be visited in standard plan
The Customer column in the Standard Tour Program has a provision to select the area of work. Open the
Standard Tour Program using the EDIT operation and click on the Customer link against the required line of
entry. Then a list of all parties attached to the REP will be shown for selection in a separate window.
One or more parties can be selected from the list and on pressing OK a summary can be seen for chemists and
stockist showing the number of parties selected in tour plan under the selected patch.
User Manual Representative Web 2.3
Page 10 of 81
1
2
3
4
5
STP
1. The REP can save the STP at any point of time by clicking SAVE AS DRAFT button. Next time the REP
logs in he will be able to continue from where he had saved earlier.
2. To submit the STP for approval to the manager the REP will click on SUBMIT button.
3. To delete the existing STP the REP can click on DELETE button.
4. With effect from date is the date on which the standard tour plan is being prepared.
5. Plan:
a. Week Day
b. Patch
c.
Loc type
d. Customer
– Work day of any month.
– Name of the patch which is being planned on any work day. On pressing the
link a list is shown from which one or more parties can be selected.
– The type of area of the selected patches is to be selected, with respect to the
REP’s head quarter.
--On pressing the link the customer details either Chemist or Stockiest to be
visited can be selected.
User Manual Representative Web 2.3
Page 11 of 81
STP – Patch selection
1
2
1. Patch Selection: On clicking on a patch selection link the patch selection list will be opened. Here all
patches configured for the REP will be listed. The REP can select one or more patch names from the list.
2. After the selection is complete confirm the selection by pressing the DONE button.
User Manual Representative Web 2.3
Page 12 of 81
STP – Customer selection
1
2
1. Customer Selection: On clicking on a Customer button the Customer selection list will be opened. Here all
parties configured for the selected patches will be shown. The REP can select one or more Customer
names from the list.
2. After the selection is complete confirm the selection by pressing the ADD button.
3
4
3. On pressing ADD button go to Customer Selected TAB, the selected customers will be displayed.
4. Click on DONE button to confirm the selection.
User Manual Representative Web 2.3
Page 13 of 81
b)
Defining and Managing Monthly Tour Plan
Getting there: Login -> Go to Planning menu -> Select Monthly Tour Plan Entry
i)
Configure plan for a specific month
A monthly plan can be created using the Monthly Tour Plan (MTP). Open the monthly tour plan screen and
select the month in the header after which the days of the month are populated and plotted with the days from
Standard Tour Program.
After selecting the month and year all the dates of the month are listed in the detail of the monthly tour plan. Any
line of entry can be edited by using the edit link against the same. The patches and Customer can be modified
by clicking the patch and Customer link against any line of entry. Save the plan after entry. The MTP cannot be
modified after saving. On save the MTP is available to ABM for approval.
ii)
Check effect of holidays or non field day on monthly plan
The detail of the monthly tour plan has all the dates of the selected month. The dates on which leaves, general
holidays, weekly holidays or non field days are configured, are shown against the specific dates.
The Act type column shows the type of day, viz. if the day is for a holiday or weekly off then the Act Type will be
NWD. If the day is a non field day then ACT type will show NFW. The dates which are a holiday or NFD are not
editable.
iii)
Convert holiday or non field day into working days in monthly plan
The detail of the monthly tour plan has all the dates of the selected month. The dates on which leaves, general
holidays, weekly holidays or non field days are configured are shown in the monthly tour plan against the
specific dates.
The Act type column shows the type of day. Press the EDIT button against the line of entry which needs to be
modified and change the Act type as FW to convert a non field day or holiday into a working day.
iv)
Configure joint working for some days of the monthly plan
During add or modify operation on the monthly plan the day which involves joint working must be flagged
accordingly against the day using the JW flag. However the joint working can be assigned only by the ABM.
v)
Configure monthly plan based on the standard plan
If the Monthly plan has to be made as per the standard tour plan, the user may open the monthly tour plan in
ADD mode and select the “Populate STP” button. This will plot each day of the standard plan with each field day
on the monthly plan. After the STP is imposed over the MTP, any further changes can be made.
If the sequence in which the STP is plotted is to be changed then after super imposing the STP over MTP the
days may be reset by selecting the required work day (of STP) against the specific date in monthly tour plan.
User Manual Representative Web 2.3
Page 14 of 81
vi)
Submit plans for approval
Once the STP and MTP is prepared the SUBMIT button has to be pressed to submit the plan for approval.
MTP
12
2
1. MTP Header:- The MTP is opened from the dashboard for the selected REP:
a. Save As Draft
– The REP can save the MTP at any point of time by clicking SAVE AS DRAFT
button. Next time the REP logs in he will be able to continue from where he had
saved earlier.
b. Submit
- To submit the MTP for approval to the manager the REP will click on SUBMIT
button.
c. Delete
– To delete the existing MTP the REP can click on DELETE button.
d. Month
- The month for which MTP has to be created will be selected.
e. Criteria
- The criteria on which the MTP has to be populated i.e. New, Previous MTP or
From STP.
User Manual Representative Web 2.3
Page 15 of 81
2.
MTP:
a. Date
b.
c.
d.
e.
f.
g.
– Date of the month which is being planned. This is populated automatically from the
calendar.
Day type – The type of day is for indicating if the date is a holiday, weekly off or working day.
Act Type – Activity types viz. Field Work, Non field work, Non working day. This flag is to be used
if a day is to be reconfigured.
Patch
– Shows a patch list from which the patch names can be selected.
Path to be visited –Display of Patch Names which is selected.
Loc Type – The selected patches against each date have to be identified if they are head quarter
patches, ex-head quarter, out station, etc.
Customer – Shows the Customer list from which the Customer can be selected. Customer
attached to the selected patches will only be displayed.
User Manual Representative Web 2.3
Page 16 of 81
c)
View Plan for the month
i.
Standard Tour Plan Report
Parameters:a.
b.
c.
d.
BU
Level
Location
REP
e. Status
f. Status Date
– Name of the REP’s Business unit is shown by default.
- The Geographical hierarchy level is to selected.
– Corresponding location of geographical hierarchy will be displayed.
– Name of the REP who has logged in is shown by default. This is not
modifiable.
– Status of the plan, i.e. approved, rejected or submitted
– Display date of the status when it was approved, rejected or submitted.
Report:-
The standard tour plan will be shown for the selected parameters with a provision to drill down to the details for
each day of the plan;
a. Work Day
- A work day of any month for which plan is defined. On selection of this link,
the following details will be shown for the selected month.
i. Patch
ii. Type i.e. doctor, chemist or stockist.
iii. Customer name.
iv. Specialty of the doctor.
v. Class of the customer.
vi. VF of the customer.
vii. Focus Brand of the doctors.
User Manual Representative Web 2.3
Page 17 of 81
b. Town Planned
c. Town type
d. Patch
e. Chemist
f. Stockiest
ii.
– Town to be visited on a work day.
– The type of town with respect to the REPs headquarter. Viz. HQ, EX-HQ,
Outstation. For each workday, town planned and town type the report of
parties to be met can be drilled down by clicking on the work day.
– The patches planned for a specific work day in the selected town.
– Total number of Chemists to be met on the planned day.
- Total number of Stockiest to be met on the planned day.
Monthly Tour Plan Report
Parameters:1.
2.
3.
4.
BU
Level
Location
REP
5. Status
6. Status Date
– Name of the REP’s Business unit is shown by default.
- The Geographical hierarchy level is to selected.
– Corresponding location of geographical hierarchy will be displayed.
– Name of the REP who has logged in is shown by default. This is not
modifiable.
– Status of the plan, i.e. approved, rejected or submitted
– Display date of the status when it was approved, rejected or submitted.
Report:-
User Manual Representative Web 2.3
Page 18 of 81
The plan for any selected month can be displayed and printed if required. The monthly tour plan will be shown
for the selected parameters with a provision to drill down to the details for each day of the plan;
a.
b.
c.
d.
e.
Date
Day
Work day
Location
Location type
f. Patch
g. Chemists
h. Chemists
i.
Joint Working
– A date of the month for which plan has been defined.
– Day of the week for each date of the month.
– The work day as per the standard tour plan.
– Name of the town planned for visit for each date on the month.
– Type of the town as defined in the standard tour plan. Viz. HQ, Ex-HQ,
Outstation, etc.
– Name of the patch planned in the selected town and date.
– Total number of chemists to be met in the selected town, patch and on
specific date.
– Total number of chemists to be met in the selected town, patch and on
specific date.
– Name of the person with whom joint work would be done on the given date.
User Manual Representative Web 2.3
Page 19 of 81
2. Field Work Management
a)
Record daily activity report
i.
Preparing for field work entry based on plan
Getting there: Login -> Select Field Work menu option -> Select DCR Entry Option
The Daily Activity Report Screen initially shows only a header containing the DCR date and activity type. If a
tour plan for the month is created the customers selected in the tour plan for that date will be displayed
automatically. If no tour plan has been defined then the tabular will not be shown. The REP can select the
parties visited from the tour plan for the DAR date. After selection is complete the REP can press the
CONTINUE button to move forward.
In case tour plan is not available the Customer and patch selection can be done manually from the summary
screen. The REP can click on SELECT CUSTOMER screen to navigate.
DAR – Plan
User Manual Representative Web 2.3
Page 20 of 81
1. DCR header: On opening the DCR entry screen the system shows the last date for which DCR can be
entered and if a tour plan is available for that month then it is listed below the button. If there is no tour
plan the system allows moving forward and manually preparing the DAR.
a. Date
– DAR date. The date must be selected. The DAR date which will be provided for
selection in the list will be restricted to the date after the last DCR date.
b. Select Customers – In case the monthly plan is not created, on clicking Select Customer system
allows to add new customers.
c. Add Unlisted
- To add unlisted customers user will click Add Listed.
d. NCA
- To add a Non Call Activity user will click on NCA.
e. Leave
- To add a Leave user will click on Leave.
f. Remarks
- To add remarks user will click on Remarks.
g. Delete Draft
- To delete the DCR entries user will click on Delete Drafts.
h. Submit DAR
- To submit the DCR the user will click on Submit DAR. Once the user clicks on
Submit DAR the user will not be able to enter DCR for that date again.
i. Remove all
- To all the customers selected, the user will click on Remove All.
1. All the patches and parties selected in the plan are shown in the summary. This is a provision to add
any additional registered or unregistered parties into the selected list.
a. Type
– Listed or Unlisted Customer to be manually added to the DAR
b. Customer type – Doctor, Chemist or stockist
c. Patch
– The name of the patch under which a Customer is to be added.
d. Customer
– Name of the customer depending on the selected customer type. If the type
field is LISTED then the REP can select from existing list of customer which are configured to him.
If the type selected is unlisted then the name of the customer can be typed manually on name
field. If unlisted name is typed then the reason field also has to be entered.
2. Summary table:
a. Town
– Name of the selected patch from plan.
b. Customer type – Doctor, chemist or stockiest
User Manual Representative Web 2.3
Page 21 of 81
c.
Customer
d. Session
e. Action
ii.
– name of the customer. In case of Unlisted and Resident the field is enabled and
the customer name can be entered.
– time of the day.
– Remove a line of entry if not required.
Preparing for field work entry without a tour plan
Select places and people visited
The Daily Activity Report Summary Screen initially shows only a header containing the DAR date and the
activity type. The detail shows the patches and parties to be visited as selected from the tour plan.
If there was no tour plan then the detail grid will be blank. The REP can manually select the patches and parties
that he visited for the given DAR date. After selecting the Customer name and patch, press the GO button and
the same will be added to the summary.
Register unplanned activities
After selecting the places and people, refer to section “Select Places and People visited”, in the summary
section, the REP can add any additional unlisted parties also.
The REP can add unlisted or resident doctors, who have not been planned, from the summary itself. This is
done by selecting patch and Customer type from their respective fields. After this selection the SELECT button
must be pressed to include the Customer into the summary. The name of the Customer can then be entered
manually in the summary grid.
Define sequence of visits
Open the summary of people and places visited by referring to the section “Select Places and People visited”.
The list of parties listed in the summary is shown in sequence of selection. The sequence column will have to be
edited in the sequence of the visits.
If the sequence has to be changed then the sequence can be changed by clicking on edit link against individual
parties.
User Manual Representative Web 2.3
Page 22 of 81
iii.
Doctor Visit
Getting there: Login -> Select Field Work menu option -> Select DCR Entry option
Selecting a doctor
Open the daily activity screen and select the doctors TAB. The summary of doctors selected from the plan and
additional unplanned doctors are visible in a grid for selection. To know how this grid is prepared refer to the
section “Preparing for field work entry based on plan” and “Preparing for field work entry without a tour plan”.
The doctor whose activity report is to be made has to be first searched in the doctor’s grid. The name of the
doctor is shown in the Doctor Name field after selecting the entry from the doctor selection grid.
Set visit date and time for Activity report
In the header of the daily activity report Select the activity type as FIELD DAY and the DATE is automatically set
as the activity date for which the DAR is to be posted. The date cannot be manually entered.
Product Promotion
After following the procedure described in sections “Selecting a doctor” and “Set visit date and time”, the
products which have been promoted can be selected in the PP block. The values for the columns sample
quantity and order booked have to be set. The detailed or reminded have to also be flagged.
Register Joint Working
After following the procedure described in sections “Selecting a doctor” and “Set visit date and time”, details of
the person worked with can be selected in the Joint Working block. In case the name of the person is not in the
list, then select the unlisted option and type the name of the person in the field provided under the JW block.
Record Gift Distribution
After following the procedure described in sections “Selecting a doctor” and “Set visit date and time”, the gifts
and promotional items quantity distributed can be set for the gifts and promotional items in the gifts block.
Concluding a doctors visit
The outcome of a visit can be mentioned in the conclusion block of the daily report. After following the procedure
described in sections “Selecting a doctor” and “Set visit date and time”, the visit conclusion and next visit
objective has to be entered here. Any change in the doctor’s strategy can also be entered here.
User Manual Representative Web 2.3
Page 23 of 81
Field Day- Doctor Entry
i.
DETAILS:
Clicking on Details will displayed the following screen
1.
2.
3.
4.
5.
6.
Customer Name: The name of the customer will be displayed.
Sequence: The sequence no to be entered.
Session: Select the session from the drop down.
Activity: Select the activity i.e. call or campaign.
Time spent: Select the time spent from the drop down.
Cancel and Save Draft: Clicking on Cancel will erase the entry done and Save Draft will save the entry.
User Manual Representative Web 2.3
Page 24 of 81
ii.
JOINT WORK
Clicking on JW will displayed the following screen
1. The REP will mark in the check box to assign a manager as joint work.
2. Add unlisted – If the REP has visited the customer with an unlisted person, then he will type the name.
3. Cancel and Save Draft: Clicking on Cancel will erase the entry done and Save Draft will save the entry.
User Manual Representative Web 2.3
Page 25 of 81
iii.
PP (Product Promotion)
Clicking on PP will displayed the following screen
1. The REP will mark in the check box against the brands to mark PD (Product Detail) and PR (Product
Reminder).
2. Cancel and Save Draft: Clicking on Cancel will erase the entry done and Save Draft will save the entry.
User Manual Representative Web 2.3
Page 26 of 81
iv.
Sample Quantity/ POB (Pay Order Booking)
Clicking on SQ/ POB will displayed the following screen
1. The REP will click on EDIT link to enter the SQ, POB Q/V and Rx Q/V. After entering the data he
will click on Update link.
2. Cancel and Save Draft: Clicking on Cancel will erase the entry done and Save Draft will save the
entry.
User Manual Representative Web 2.3
Page 27 of 81
v.
GIFT AND PROMOTIONAL INPUTS
Clicking on GPI will displayed the following screen
1. The REP will click on EDIT link to enter the QTY (Quantity). After entering the data he will click on
Update link.
2. Cancel and Save Draft: Clicking on Cancel will erase the entry done and Save Draft will save the entry.
User Manual Representative Web 2.3
Page 28 of 81
vi.
DOCTOR FEEDBACK
Clicking on Dr. FB will displayed the following screen
1. Brand – The brand to be selected from the drop down.
2. Conclusion – The REP will type the visit conclusion. This is a free text field.
3. Conversion Status – The conversion status to be selected from the drop down.
4. Next Visit Objective – The REP will type the Next Visit Objective. This is a free text field.
5. Remarks – The will type Remarks. This is a free text.
6. Add to List – After the feedback is entered, click on ADD TO LIST to add another issue.
7. Cancel and Save Draft: Clicking on Cancel will erase the entry done and Save Draft will save the
entry.
User Manual Representative Web 2.3
Page 29 of 81
vii.
ISSUE ENTRY
Clicking on ISS will displayed the following screen
1. Issue Type – The Issue type will be selected from the drop down.
2. Priority – The REP will select the priority of the issue i.e. high, medium and low..
3. Brand – If any issue is related to brand, then brand also can be selected from the drop down.
4. Department – The department to whom the issue has to be forwarded will be selected.
5. Person – The person to whom the issue will be reported to be selected from drop down.
6. Issue – The issue to be typed. This is a free text field.
7. Add to List – After the feedback is entered, click on ADD TO LIST to add another issue.
8. Cancel and Save Draft: Clicking on Cancel will erase the entry done and Save Draft will save the entry.
User Manual Representative Web 2.3
Page 30 of 81
viii.
ISSUE CLOSURE
Clicking on ISSCLS will displayed the following screen
1. Issue Type – The Issue type will be selected from the drop down.
2. Priority – The REP will select the priority of the issue i.e. high, medium and low..
3. Brand – If any issue is related to brand, then brand also can be selected from the drop down.
4. Department – The department to whom the issue has to be forwarded will be selected.
5. Person – The person to whom the issue will be reported to be selected from drop down.
6. Issue – The issue to be typed. This is a free text field.
7. Add to List – After the feedback is entered, click on ADD TO LIST to add another issue.
8. Cancel and Save Draft: Clicking on Cancel will erase the entry done and Save Draft will save the entry.
User Manual Representative Web 2.3
Page 31 of 81
ix.
OBJECTIVES
Clicking on OBJ will displayed the following screen
1. Objective Type – The Objective type to be selected from the drop down.
2. Brand – If the objective is related to brand then brand can be selected from the drop down.
3. Objective – Describe the Objective. This is a free text field.
4. Ratings – Ratings to be selected from the drop down.
5. Comments – Comments to be added. This is a free text field.
6. Add to List – After the feedback is entered, click on ADD TO LIST to add another issue.
7. Cancel and Save Draft: Clicking on Cancel will erase the entry done and Save Draft will save the entry.
User Manual Representative Web 2.3
Page 32 of 81
iv.
Chemist Visit
Getting there: Login -> Select Field Work menu option -> Select DCR Entry option
Selecting a chemist
Open the daily activity screen and select the chemist TAB. The summary of chemists selected from the plan and
additional unplanned chemists are visible in a grid for selection. To know how this grid is prepared refer to the
section “Planning a days field report based on plan” and “Planning a days field report without tour plan”. The
chemist whose activity report is to be made has to be first searched in the chemist’s grid. The name of the
chemist is shown in the Chemist Name field after selecting the entry from the chemist selection grid.
Set visit date and time
In the header of the daily activity report Select the activity type as FIELD DAY and the DATE is automatically set
as the activity date for which the DAR is to be posted. The date cannot be manually entered.
Register joint work
After following the procedure described in sections “Selecting a chemist” and “Set visit date and time”, details of
the person worked with can be selected in the Joint Working block. In case the name of the person is not in the
list, then select the unlisted option and type the name of the person in the field provided.
Capture prescription habits
After following the procedure described in sections “Selecting a chemist” and “Set visit date and time”, the
prescription habits of doctors can be entered in the Rx habits block for the selected chemist. Select the patch
and doctors whose Rx habits have to be entered. Each of the selected doctors Rx habits can be entered into the
brand block, the block shows own brands and competitors brands immediately below own brands. Own brands
are shown in colored columns. The PV value can be entered against both own as well as competitor brands.
Book an order
After following the procedure described in sections “Selecting a chemist” and “Set visit date and time”, the order
booked for the selected chemist can be captured in the POB block. All the products are listed in the POB block
and the qty (or value as configured) can be entered against each product.
User Manual Representative Web 2.3
Page 33 of 81
i.
Field Day- Chemist Entry
DETAILS
Clicking on DETAILS will displayed the following screen
1. Customer Name: The name of the customer will be displayed.
2. Sequence: The sequence no to be entered.
3. Session: Select the session from the drop down.
4. Activity: Select the activity i.e. call or campaign.
5. Time spent: Select the time spent from the drop down.
6. Cancel and Save Draft: Clicking on Cancel will erase the entry done and Save Draft will save the
entry.
User Manual Representative Web 2.3
Page 34 of 81
ii.
JOINT WORK
Clicking on JW will displayed the following screen
1. The REP will mark in the check box to assign a manager as joint work.
2. Add unlisted – If the REP has visited the customer with an unlisted person, then he will type the name.
3. Cancel and Save Draft: Clicking on Cancel will erase the entry done and Save Draft will save the entry.
User Manual Representative Web 2.3
Page 35 of 81
iii.
Sample Quanitity/ POB (Sample Quantity/ Pay Order Booking)
Clicking on SQ/ POB will displayed the following screen
1. The REP will click on EDIT link to enter the SQ, POB Q/V and Rx Q/V. After entering the data he
will click on Update link.
2. Cancel and Save Draft: Clicking on Cancel will erase the entry done and Save Draft will save the
entry.
User Manual Representative Web 2.3
Page 36 of 81
iv.
GIFT AND PROMOTIONAL INPUTS
Clicking on GPI will displayed the following screen
1. The REP will click on EDIT link to enter the QTY (Quantity). After entering the data he will click on
Update link.
2. Cancel and Save Draft: Clicking on Cancel will erase the entry done and Save Draft will save the
entry.
User Manual Representative Web 2.3
Page 37 of 81
v.
ISSUE ENTRY
Clicking on ISS will displayed the following screen
1. Issue Type – The Issue type will be selected from the drop down.
2. Priority – The REP will select the priority of the issue i.e. high, medium and low..
3. Brand – If any issue is related to brand, then brand also can be selected from the drop down.
4. Department – The department to whom the issue has to be forwarded will be selected.
5. Person – The person to whom the issue will be reported to be selected from drop down.
6. Issue – The issue to be typed. This is a free text field.
7. Add to List – After the feedback is entered, click on ADD TO LIST to add another issue.
8. Cancel and Save Draft: Clicking on Cancel will erase the entry done and Save Draft will save the entry.
User Manual Representative Web 2.3
Page 38 of 81
vi.
ISSUE CLOSURE
Clicking on ISSCLS will displayed the following screen
1. Issue Type – The Issue type will be selected from the drop down.
2. Priority – The REP will select the priority of the issue i.e. high, medium and low..
3. Brand – If any issue is related to brand, then brand also can be selected from the drop down.
4. Department – The department to whom the issue has to be forwarded will be selected.
5. Person – The person to whom the issue will be reported to be selected from drop down.
6. Issue – The issue to be typed. This is a free text field.
7. Add to List – After the feedback is entered, click on ADD TO LIST to add another issue.
8. Cancel and Save Draft: Clicking on Cancel will erase the entry done and Save Draft will save the entry.
User Manual Representative Web 2.3
Page 39 of 81
vii.
RCPA (Retail Chemist Prescription Audit)
Clicking on RCPA will displayed the following screen
1. Territory – Territory of the doctor to be selected.
2. REP – The name of the REP will be displayed.
3. Patch – Patch where If any issue is related to brand, then brand also can be selected from the drop
down.
4. Doctor – The doctor to be selected for whom the RCPA is conducted.
5. Brand SKU – The own brand and competitor brand will be displayed. On clicking EDIT the user can
enter the PV value against each brands.
6. Add to List – After the RCPA for one doctor is completed, click on ADD TO LIST to add RCPA
information for another doctor.
7. Cancel and Save Draft: Clicking on Cancel will erase the entry done and Save Draft will save the entry.
User Manual Representative Web 2.3
Page 40 of 81
viii.
CHEMIST FEEDBACK
Clicking on CH. FB will displayed the following screen
1. Remarks – The will type Remarks. This is a free text.
2. Cancel and Save Draft: Clicking on Cancel will erase the entry done and Save Draft will save the entry.
User Manual Representative Web 2.3
Page 41 of 81
ix.
OBJECTIVES
Clicking on OBJ will displayed the following screen
1. Objective Type – The Objective type to be selected from the drop down.
2. Brand – If the objective is related to brand then brand can be selected from the drop down.
3. Objective – Describe the Objective. This is a free text field.
4. Ratings – Ratings to be selected from the drop down.
5. Comments – Comments to be added. This is a free text field.
6. Add to List – After the feedback is entered, click on ADD TO LIST to add another issue.
7. Cancel and Save Draft: Clicking on Cancel will erase the entry done and Save Draft will save the entry.
User Manual Representative Web 2.3
Page 42 of 81
v.
Stockist Visit
Getting there: Login -> Select Field Work menu option -> Select DCR Entry option
Select a stockist
Open the daily activity screen and select the stockist TAB. The summary of stockist selected from the plan is
visible in a grid for selection. To know how this grid is prepared refer to the section “Planning a days field report”
and “Planning a days field report without tour plan”. The stockist whose activity report is to be made has to be
first searched in the stockist grid. The name of the stockist is shown in the Stockist Name field after selecting the
entry from the stockist selection grid.
Set the visit date
In the header of the daily activity report Select the activity type as FIELD DAY and the DATE is automatically set
as the activity date for which the DAR is to be posted. The date cannot be manually entered.
Capture visit information
To capture information about the stockist visit, the name will have to be selected from the stockist block and
then details for the same will have to be entered in the remarks column.
User Manual Representative Web 2.3
Page 43 of 81
i.
Field Day- Stockist Entry
DETAILS
Clicking on DETAILS will displayed the following screen
1. Customer Name: The name of the customer will be displayed.
2. Sequence: The sequence no to be entered.
3. Session: Select the session from the drop down.
4. Activity: Select the activity i.e. call or campaign.
5. Time spent: Select the time spent from the drop down.
6. Cancel and Save Draft: Clicking on Cancel will erase the entry done and Save Draft will save the entry.
User Manual Representative Web 2.3
Page 44 of 81
ii.
JOINT WORK
Clicking on JW will displayed the following screen
1. The REP will mark in the check box to assign a manager as joint work.
2. Add unlisted – If the REP has visited the customer with an unlisted person, then he will type the name.
3. Cancel and Save Draft: Clicking on Cancel will erase the entry done and Save Draft will save the entry.
User Manual Representative Web 2.3
Page 45 of 81
iii.
OBJECTIVES
Clicking on OBJ will displayed the following screen
1. Objective Type – The Objective type to be selected from the drop down.
2. Brand – If the objective is related to brand then brand can be selected from the drop down.
3. Objective – Describe the Objective. This is a free text field.
4. Ratings – Ratings to be selected from the drop down.
5. Comments – Comments to be added. This is a free text field.
6. Add to List – After the feedback is entered, click on ADD TO LIST to add another issue.
7. Cancel and Save Draft: Clicking on Cancel will erase the entry done and Save Draft will save the entry.
User Manual Representative Web 2.3
Page 46 of 81
iv.
STOCK ENTRY
1. Brand – The brands will be displayed.
On clicking the EDIT link the system will allow to enter the following fields.
2. Stock – Stock to be entered. This is a numeric field.
3. Receipt – Stock given to the Stockist to be entered. This is a numeric field.
4. Returned – Stock returned by the Stockist to be entered. This is a numeric field.
5. Cancel and Save Draft: Clicking on Cancel will erase the entry done and Save Draft will save the entry.
User Manual Representative Web 2.3
Page 47 of 81
v.
STOCKIST FEEDBACK
Clicking on STK. FB will displayed the following screen
1. Remarks – The will type Remarks. This is a free text field.
2. Cancel and Save Draft: Clicking on Cancel will erase the entry done and Save Draft will save the entry.
User Manual Representative Web 2.3
Page 48 of 81
b)
Recording Non Call Activity
Getting there: Login -> Select Field Work menu option -> Select DCR Entry option -> Select NCA Tab
In case part of a field day is used for some non field activities (unplanned), then while recording DAR this non
field information can be captured.
1. Territory – Territory to be selected from the drop down where the user had done NCA from drop down.
2. Type – The NCA type to be selected from the drop down.
3. Half Day – If the user marks on Half day, the NCA will be counted as Half Day NCA and if not marked
then the NCA will be counted as Full Day NCA.
4. Town – Town to be selected from the drop down where the user had done NCA from drop down.
5. Unlisted – If the user had visited the town which is not in his geographical hierarchy, he can enter the
name of the town here. This is a free text field.
6. Time Spent – The time spent to be selected from the drop down.
7. Sequence – The Sequence of the NCA to be mentioned.
8. Remarks – The user can enter remarks. This is a free text field.
User Manual Representative Web 2.3
Page 49 of 81
9. Add to List – If the user has had more than one NCA, then he can enter another NCA by clicking this
button.
10. Cancel and Save Draft: Clicking on Cancel will erase the entry done and Save Draft will save the entry.
User Manual Representative Web 2.3
Page 50 of 81
c)
Recording a leave
Getting there: Login -> Select Field Work menu option -> Select DCR entry -> Select Leave Tab
i)
Capture leave details
After clicking on LEAVE, the purpose of taking the leave must be entered in the Remarks column provided.
Leave
1. Leave Type – The Leave type to be selected from the drop down.
2. Remarks – The user can enter remarks. This is a free text field.
3. Reference – The user can enter with whom has he referred to for prior to entering a leave. This is a free
text field.
4. Cancel and Save Draft: Clicking on Cancel will erase the entry done and Save Draft will save the entry.
User Manual Representative Web 2.3
Page 51 of 81
d)
Recording General Remarks
Getting there: Login -> Select Field Work menu option -> Select DCR entry -> Select Remarks Tab
ii)
Capture General Remarks
The user can enter general remarks for the day in case he has not made any calls due to some reasons other
than leave or NCA
Leave
1. Remarks – The user can enter remarks. This is a free text field.
2. Cancel and Save Draft: Clicking on Cancel will erase the entry done and Save Draft will save the entry.
User Manual Representative Web 2.3
Page 52 of 81
e)
View daily activity report (DAR)
The MR web home page contains a calendar which shows the dates configured based on the holidays (Refer to
section “MR Dash board”). The days on which the daily activity report has been posted will be distinctly visible
on the calendar with a GREEN background. On clicking on a date on the calendar the daily activity report is
activated.
Daily Activity Report
1.
Calendar: The calendar shows the current month and the dates of the month are can be selected by
moving the mouse cursor over it. If a DAR has been posted on a date and the REP clicks with the mouse on
that date, would run the daily report.
User Manual Representative Web 2.3
Page 53 of 81
Daily Activity Report
The Daily activity report for specific days can also be got by going to Field Work Tab of main menu.
Enter the Date for which Daily Activity Report has to be viewed.
User Manual Representative Web 2.3
Page 54 of 81
1. Visit details shown in DAR for Doctor, Chemist and Stockist
Location – The location where the user has made his call will be displayed.
Customer Details – The details of the customers will be displayed to whom the calls were made.
Planned – If the calls were planned in MTP then it will display “Yes” against that call, if not planned in
MTP then it will display “No”
Call Details – The call details will be displayed i.e. type of call, time of call, time spent.
Activities Done – The activities carried out by the user will be displayed. On clicking the link the details
of the call will be displayed:
CHEMIST ACTIVITIES
1.
2.
3.
4.
5.
6.
7.
8.
CHEMPOB
CHEMObjetcive
CHEMGPI
CHEMFeedback
ChemCloseIssue
CHEMJWW
CHEMIssue
RCPAEntry
– Chemist POB
– Chemist Objective
– Chemist GPI
– Chemist Feedback
– Chemist Issue Closed
– Chemist Joint Work
– Chemist Issue Added
– RCPA entry details of chemist.
DOCTOR ACTIVITIES
1.
2.
3.
4.
5.
6.
7.
DrCloseIssue
DRGPI
DRFeedback
DRJWW
DRIssue
DRObjetcive
DRPP
– Doctor Issue Closed
– Doctor GPI
– Doctor Feedback
– Doctor Joint Work
– Doctor Issue Added
– Doctor Objective
– Doctor Product Promotion information.
STOCKIST ACTIVITIES
1.
2.
3.
4.
STKObjective
STKJWW
STKFeedback
STKInventory
– Stockist Objective.
– Stoickist Joint Work
– Stockist Feedback
– Stockist Inventory details.
User Manual Representative Web 2.3
Page 55 of 81
f)
vi.
View Field Work Analytics
Daily Activity summary
Parameters:a. BU
– Name of the REP’s Business unit is shown by default. This is not modifiable
by REP. However it is selectable if the login is a manager.
b. Level
– Select the level from the list for which area the report has to be seen.
c. Location
– By default it is blank. Area has to be selected from a list attached.
d. REP
– This is not modifiable by REP. It is selectable if the login is a manager.
e. Date
– The period for which the activity summary is to be viewed.
Report:-
User Manual Representative Web 2.3
Page 56 of 81
The report shows summarized details of each days work done by the selected REP during a selected month;
a.
b.
c.
d.
e.
f.
g.
h.
i.
j.
k.
l.
m.
n.
o.
p.
q.
r.
s.
t.
Date
– Date of the selected month.
Day
– Day of the week and the type of day for each date of the month.
Location Planned
- The location planned in MTP will be displayed in this box.
Location Worked
- The Location worked will be displayed.
Submit Mode
– Mode of DAR submitted i.e. Mobile.
Submit Date
– Date of last activity synched for the day in case of Mobile or date of DAR
submission in case of Web.
Activity type
– FW, NFD, Leave, Holiday, Weekly Off
Campaign
- The name of the Campaign conducted on that date will be displayed.
PCP
- The count of PCP done before meeting the customer will be displayed.
Listed Doctor calls
– Total calls made to the listed doctors.
Unlisted Doctor calls
– Total calls made to the unlisted doctors.
Doctor Total
– Total Doctor met today i.e. unlisted and listed.
Listed Chemist calls
– Total calls made to the listed chemists.
Unlisted Chemist calls – No. of calls made to unlisted chemists.
Chemist Total
– Total Chemists met today i.e. unlisted and listed.
POB
– Total Rupee Value of orders booked for the day from the chemist visits.
Stockist
– Number of Stockist visited
Non Call Activity
– Type of NFD will be shown if the applicable for the date.
Joint Work
– Name of person worked with (No. of calls made with this person today); In
case of no. of persons is more than 1, they are separated by comma
Managers comments – Date, Manager Designation/ Short Name, comment; multiple comments are
separated by commas
User Manual Representative Web 2.3
Page 57 of 81
Monthly Activity Summary Retail
vii.
Parameters:a.
b.
c.
d.
e.
f.
BU
Level
Location
REP
From Month
To Month
– Name of the REP’s Business unit is shown by default.
– Select the level from the list for which area the report has to be seen.
– By default it is blank. Area has to be selected from a list attached.
– This is not modifiable by REP. It is selectable if the login is a manager.
– The month from which analytics is to be viewed.
– The month up to which analytics is to be viewed.
Report:-
The report shows a REP’s month wise summary of activities done and performance;
1.
2.
3.
4.
5.
6.
7.
8.
9.
User
– Name of the REP selected in the parameters.
Location
– Name of the REP’s location is shown by default. This is not modifiable.
Month/ Year
– The month selected to view the reports.
Work Days
– No. of available working days in this month (Month Days - Weekly Offs Holidays)
Leave days
– No. of leaves taken this month. There will be a provision to click to view
further details in “Daily Activity Summary” report.
Non Call Activity
– No. of Non Call Activity days taken this month. There will be a provision to
click to view further details in “Daily Activity Summary” report.
Field Work Days
– Computed as Working days - Leave days - Non field days
Listed Doctor Calls
- The count of listed doctor calls will be displayed.
Unlisted Doctor Calls – The count of unlisted doctor calls will be displayed.
User Manual Representative Web 2.3
Page 58 of 81
10.
11.
12.
13.
14.
15.
16.
17.
18.
19.
20.
21.
22.
23.
Listed Doctor Call average – Total listed doctor calls / Field working days.
Total Doctor Call Average – Total doctor listed calls + Total doctor unlisted calls / Field working days.
Doctor Coverage %
- No. of doctors covered atleast once / total no. of doctors x 100
Doctor VF Coverage % - No. of doctors covered as per the predefined VF / total no. of doctors x 100
Missed Doctors
- Count of doctors not even met once.
Missed Doctor Calls
- Count of doctors not covered as per the predefined Visit Frequency
Listed Chemist Calls
- The count of listed chemist calls will be displayed.
Unlisted Chemist Calls – The count of unlisted chemist calls will be displayed.
Listed Chemist Call average – Total listed chemist calls / Field working days.
Total Chemist Call Average – Total chemist listed calls + Total chemist unlisted calls / Field working
days.
POB
- Total value of POB taken from the doctors and chemists.
Stockist
– Total calls made to all stockist.
Joint Work
– No. of Joint working days. Only those days will be considered where there is
joint working. There will be a provision to click to view further details in “Daily Activity Summary” report.
Doctors added
– No. of chemists added this month. After clicking the following details will be
displayed
i. Date added –
ii. Doctor name –
iii. Doctor short name
iv. Location
v. Specialty
vi. Class
vii. Visit Frequency
viii. Last visit date
ix. Own PV
x. Potential PV
xi. Reasons
24. Doctors deleted
– No. of chemists deleted for the month, click to view the details below (7)
i. The same details will be shown as for
Chemist Added
User Manual Representative Web 2.3
Page 59 of 81
viii.
Doctor coverage summary
Parameters:-
a. BU
b.
c.
d.
e.
f.
g.
Level
Location
REP
Class
Visit Frequency
MONTH
– Name of the REP’s Business unit is shown by default. This is not modifiable
by REP. However it is selectable if the login is a manager.
– Select the level from the list for which area the report has to be seen.
– By default it is blank. Area has to be selected from a list attached.
– This is not modifiable by REP. It is selectable if the login is a manager.
– Selection of chemist class
– Input of chemist visit frequency.
– The period for which the coverage summary is to be viewed.
Report:-
The report shows a summary of REP’s coverage with respect to class and visit frequency of doctors;
a.
b.
c.
d.
e.
f.
BU
Level
Location
Rep
Specialty
Class
– Name of business unit as selected.
- Name if the Level to which the doctor is attached
– Name of the town to which the doctor is attached.
– Name of the REP
- Specialty of the Doctor to be selected.
– Doctor class as selected in parameters
User Manual Representative Web 2.3
Page 60 of 81
g. Visit frequency
h. Total Doctors
i.
j.
k.
l.
m.
n.
o.
p.
q.
r.
s.
– Visit frequency of doctors.
– Total number of doctors who belong to the selected town, class and visit
frequency.
Ideal calls
– Total no. of calls required to be made as per the visit frequency of doctors.
Doctors met once
– The number of doctors met only once.
Doctors met twice
– The number of doctors met only twice.
Doctors met thrice
- The number of doctors met only thrice.
Doctors met four times – The number of doctors met four times.
Doctors met five times - The number of doctors met five and more times.
Missed doctors
– No. of doctors not met even once.
Total calls made
– Total no. of calls made to all the listed doctors during the month.
Missed calls
– No. of calls missed as per the visit frequency of doctors.
% Coverage
– No. of doctors covered at least once/ total no. of doctors in the list
% Visit Freq. coverage – No. of doctors covered as per the predefined visit frequency/ total no. of
doctors in the list
User Manual Representative Web 2.3
Page 61 of 81
ix.
Doctor visit pattern
Parameters:a. BU
b.
c.
d.
e.
f.
g.
h.
i.
j.
Level
Location
REP
Specialty
Class
Visit Frequency
Doctor Name
From Month
To Month
– Name of the REP’s Business unit is shown by default. This is not modifiable
by REP. However it is selectable if the login is a manager.
– Select the level from the list for which area the report has to be seen.
– By default it is blank. Area has to be selected from a list attached.
– This is not modifiable by REP. It is selectable if the login is a manager.
– Selection of specialty from a list.
– Selection of doctor class
– Input of doctor visit frequency.
- Type the name of a doctor to get the reports of that particular doctor.
– The month from which analytics is to be viewed.
– The month up to which analytics is to be viewed.
Report:-
User Manual Representative Web 2.3
Page 62 of 81
The report shows a summary of REP’s coverage with respect to specialty and class of doctors;
a.
b.
c.
d.
e.
f.
g.
h.
i.
j.
k.
Doctor Name
– Name of the doctor for the selected area, specialty and class.
Doctor Short Name
– Short name
BU
– Name of business unit as selected.
Rep name
– Name of the REP
Reps Location
– Name of the REP’s head quarters.
Town
– Name of the town to which the doctor belongs
Specialty
– Doctor Specialty
Class
– Doctor class
Visit Frequency
– Doctors visit frequency
Month
– Actual visit dates in the respective month are shown separated by commas.
The number of months is shown as per the selected period in parameters.
Total visits
– Total no. of visits in the selected period
User Manual Representative Web 2.3
Page 63 of 81
x.
Missed Doctor Calls
Parameters:a. BU
– Name of the REP’s Business unit is shown by default. This is not modifiable
by REP. However it is selectable if the login is a manager.
b. Level
– Select the level from the list for which area the report has to be seen.
c. Location
– By default it is blank. Area has to be selected from a list attached.
d. REP
– This is not modifiable by REP. It is selectable if the login is a manager.
e. Specialty
– Selection of specialty from a list.
f. Class
– Selection of doctor class
g. Visit Frequency
–
Input of doctor visit frequency.
h. Month
– The period for which the missed call details is to be viewed.
Report:-
The report shows a list of all the doctors for whom the no. of calls made during the month are less than the
predefined visit frequency;
a. Doctor Name
– Name of the doctor for the selected area, specialty and class.
User Manual Representative Web 2.3
Page 64 of 81
b.
c.
d.
e.
f.
g.
h.
i.
j.
k.
l.
Doctor Short Name
– Short name
BU
– Name of business unit as selected.
Rep name
– Name of the REP
Reps location
– Name of the REP’s location.
Town
– Name of the town to which the doctor belongs
Specialty
– Doctor Specialty
Class
– Doctor class
Visit Frequency
– Doctors visit frequency
No of visits during month – Total number of visits to the doctor for selected month
Last visit date
- The last visit date is displayed.
No of days since last visit – No of days lapsed since the last visit date to the doctor.
User Manual Representative Web 2.3
Page 65 of 81
vi. Leave Balance Report
The intension of this report is to view the leaves taken and the leave balance of the REPs during a particular
period.
Parameters:a. BU
- Name of the REP’s Business unit is shown by default. This is not modifiable by REP. However
it is selectable if the login is a manager.
b. Level
- Select the level from the list for which area the report has to be seen.
c. Location
- By default it is blank. Location has to be selected from a list of areas attached to the REP.
d. User
- Name of the REP who has logged in is shown by default. This is not modifiable. This is not
Report-
On clicking the link in the Month column, the list of leaves will be displayed below including the reason for taking
the leave.
List of Column Specification:
a.
b.
c.
d.
e.
f.
g.
RepName
RepLcoation
Leave
OpenBalDate
Opening Balance
Availed
Balance Available
- The name of the REP selected.
- The name of the Rep Location.
- The type of the leaves.
- The date on which the new balance of leave is uploaded.
- The balance of the leaves.
- The count of leave taken.
- Total balance of leave available after the OpenBalDate.
User Manual Representative Web 2.3
Page 66 of 81
vii. Issue Register
The use of this report is to view all the issues of the customers reported by the REP during a particular period.
Parameters:a.
b.
c.
d.
e.
f.
g.
h.
i.
j.
BU
- Name of the REP’s Business unit is shown by default.
Level
- Select the level from the list for which area the report has to be seen.
Location
- By default it is blank. Area has to be selected from a list of areas attached to the REP.
Rep
- The name of the REP selected will be displayed.
Brand
- The name of the brands will be displayed for selection.
Customer type - The customer type i.e. doctor, chemist or stockiest
Customer name - The name of the customer can also be typed to find the issue of that customer.
From Date
- The month from which analytics is to be viewed
To Date - The month till which analytics is to be viewed
Status
- Status of the customer i.e. open, close and replied.
Report-
List of Column Specification:
a.
b.
c.
d.
e.
f.
g.
h.
Issue Date
Brand
Issue type
Priority
Issue
Customer Details
BU
Name
- The date on which the issue was reported will be displayed.
- The name of the brand against which issue is reported will be displayed.
- The type of the issue will be displayed.
- The priority of the issue will be displayed.
- The description of the issue will be displayed.
- The details of the customer who reported the issue will be displayed.
- The name of the BU will be displayed.
- The name of the REP.
User Manual Representative Web 2.3
Page 67 of 81
i.
j.
Rep Location
Escalated to
escalated.
k. Replied Date
l. Reply
m. Closure Date
n. Closing Remarks
o. Elapse Days
- The location of the REP.
- The name and the designation of the person to whom the issue has been
- The date on which the person to whom the issue has been escalated replies.
- The description of the reply will be displayed.
- The date on which the REP closes the issue.
- The closing remarks added by the REP will be displayed.
- The no. of days till which the issue is opened.
vii. Pending Issues
The use of this report is to view all the issues which are in pending state with the REP till date.
Report-
List of Column Specification:
a.
b.
c.
d.
e.
f.
g.
h.
Customer Name
Issue No.
Issue type
Priority
Brand Name
Department
Issue
Name
- The name of the customer will be displayed.
- The Issue no. which is pending will be displayed.
- The type of the issue will be displayed.
- The priority of the issue will be displayed.
- The brand name will be displayed.
- The department to which the issue is escalated will be displayed.
- The description of the issue will be displayed.
- The name of the REP.
User Manual Representative Web 2.3
Page 68 of 81
viii. Campaign Implementation Status
The use of this report is to view all the Campaign Implementation Status.
Report-
List of Column Specification:
a. BU
- The name of the BU.
b. Level-Location.
- The level and location of the user will be displayed.
c.
- The name of the user will be displayed.
User
d. Total REPs
- Total count of REPs who have been assigned the campaign will be displayed.
e. Coverage
- Count of REPs as per their % coverage of the campaign will be displayed in
the slabs of coverage i.e. 100%, 75-90%, 50-74%, 25-49%, 24% or less and Nil.
f.
Business Generated on Campaign Days – Business Generated on Campaign Days in value wil be
displayed.
g. Overall Business Generated - Overall Business Generated in values will be displayed.
User Manual Representative Web 2.3
Page 69 of 81
h. Incremental Business
- Incremental Business in values will be displayed.
i.
% Reps that have assigned
j.
% Reps that have started campaign
k.
% Reps that have not started campaign
User Manual Representative Web 2.3
Page 70 of 81
ix. SGPI Balance Report
This report provides the details of the Samples and Gifts and Promotional Inputs for a particular period of time.
List of Column Specification:
1. SGPI
- The names of all the Samples, Gifts and Promotional Inputs.
2. Op. Balance
- The Opening balance of the SGPI will be displayed.
3. Receipts
- Any SGPI received by the user will be displayed.
4. Adjustment
- The additions or returns of samples will be displayed.
5. Total
- The total no. of SGPI with the user will be displayed.
6. Distributed
- The no. of SGPI distributed to the customers will be displayed.
7. Balance available - The balance available with the user will be displayed.
User Manual Representative Web 2.3
Page 71 of 81
Masters
a)
Request for addition or deletion of Customer
Getting there: Login -> Select Masters menu option -> Select addition / deletion option
i.
Post a request for addition of doctor
The doctor addition request will have a provision to add the key fields of the doctor, viz. Name, Short Name,
town, patch, specialty and qualification. Open the doctor addition screen which will be in ADD mode. On save of
the request the entry will be available to the ABM and Admin for approval of the Customer. The details captured
for add requests are Name, Location and specialty details.
ii.
Post a request for addition of chemist / stockist
The chemist / stockiest addition request will have a provision to add the key fields of the chemist and stockiest
viz. name, short name, town and patch. Open the chemist or stockiest addition screen which will be in ADD
mode by default. On save of the request the entry will be available to the ABM and Admin for approval of the
Customer.
iii.
Post a request for modify or deletion of Customer
Open Delete or modify request screen, and select the Customer type and Customer name from a list. The list will be
restricted to parties attached to the REP. On SAVE the Customer delete or modify request will be visible to the ABM for
approval.
User Manual Representative Web 2.3
Page 72 of 81
Doctor add Request
1. Add request:
a) Territory
b) Rep
c) First Name
d) Last Name
e) Patch
f)
Town
g)
h)
i)
j)
k)
Specialty
Qualification
Class
Frequency
Reason
- Territory to which the REP is attached will be displayed.
- The name of the REP under the territory will be displayed
- Free Text entry.
- Free Text entry.
– Patch to which the Customer is to be configured. Patches belonging to the
REP will only be shown.
– town to which the Customer is attached. The list of town configured to the
REP will only be shown.
– Specialty of the doctor being requested for addition
– Qualification to be selected from the drop down.
– Class of the doctor being requested for addition
– Frequency of the doctor being requested for addition
– Remarks to indicate reason for adding the Customer.
User Manual Representative Web 2.3
Page 73 of 81
Chemist / Stockist add Request
1. Add request:
a) Territory
b) REP
c) First Name
d) Customer Type
e) Patch
f)
Town
g) Class
h) Frequency
i) Reason
– Territory to which the REP is attached will be displayed.
- The name of the REP under the territory will be displayed.
- Free Text entry.
– Chemist or stockiest
– Patch to which the Customer is to be configured. Patches belonging to the
REP will only be shown.
– town to which the Customer is attached. The list of town configured to the
REP will only be shown.
- Class of the doctor being requested for addition
- Frequency of the doctor being requested for addition
– Remarks to indicate reason for adding the Customer.
User Manual Representative Web 2.3
Page 74 of 81
Doctor Delete Request
1.
2.
3.
4.
5.
6.
7.
8.
9.
10.
11.
12.
Territory
- Territory to which the REP is attached will be displayed.
Rep
- The name of the REP under the territory will be displayed
Customer type
- Filter to restrict Customer list to the selected type.
Town
- Town to which the Customer is attached. The list of town configured to the
Patch
- Patch to which the Customer is to be configured. Patches belonging to the
REP will only be shown.
Name
- The Name of the customer.
Short Name
- The Short Name of the customer.
Specialty
- Specialty of the doctor being requested for addition
Class
- Class of the doctor being requested for addition
Qualification
- Qualification to be selected from the drop down.
Frequency
- Frequency of the doctor being requested for addition
Reason
- Remarks to indicate reason for adding the Customer.
User Manual Representative Web 2.3
Page 75 of 81
Doctor Modification Request
1. Modify Request:
a. Area
– Towns attached to the REP.
b. Doctor
– List of doctors configured for the REP will be shown for selection
c. Name – First, Last names – This is a display only field.
d. Qualification
– Doctor Qualification is a display only field.
e. Specialty
– Doctors specialty to be selected from list
f. Class
– Doctors class to be selected from list
g. Frequency
– Visit frequency to be selected from list
User Manual Representative Web 2.3
Page 76 of 81
b)
View Master Reports
i.
Area Customer Summary
Parameters:a. BU
b. Organizational tree
– Name of the REP’s Business unit is shown by default. This is not modifiable
by REP. However it is selectable if the login is a manager.
– Complete organizational hierarchy is displayed for selection
Report:The report shows the total count of customers under any level in the organizational hierarchy;
a. Level
b. Doctors
c.
Chemists
d. Stockist
– Name of the REP’s Business unit is shown by default. This is not modifiable
by REP. However it is selectable if the login is a manager.
– Total count of doctors under each successive level under the selected level of
the organizational tree.
i. Specialty wise class wise breakup of total count of doctors.
– Total count of chemists under each successive level under the selected level
of the organizational tree
i. Selecting any level will show the list of all chemists.
– Total count of stockist under each successive level under the selected level of
the organizational tree
i. Selecting any level will show the list of all chemists.
User Manual Representative Web 2.3
Page 77 of 81
ii.
Doctor List
Parameters:a. BU
b.
c.
d.
e.
f.
g.
h.
Level
Location
REP
Specialty
Class
Visit Frequency
Doctor Name
– Name of the REP’s Business unit is shown by default. This is not modifiable
by REP. However it is selectable if the login is a manager.
– Select the level from the list for which area the report has to be seen.
– By default it is blank. Area has to be selected from a list attached.
– Name of the REP to be selected for whom the reports are to be viewed.
– Selection of specialty from a list.
– Selection of doctor class
– Input of doctor visit frequency.
– Input name of doctor to search
Report:The report shows all doctors for the selected parameters;
a. Doctor data
– Following data is shown for doctors matching the selected parameters;
Name
Doctor Short Name
Qualification
Registration No.
DOB
DOA
Town
Specialty
Class
Visit Frequency
No of patients per day
Best time to meet
Address
City
State
Pin
Phone
Email
b. REP Details
– details of REP attached to the doctor.
Business unit
Rep Name
Reps HQ
Last Visit Date by the REP
– PV (Own Brands) recorded for Last 30 days from the last visit date
– PV (Own Brands + Comp Brands) recorded for Last 30 days from the last visit
date
c. Own PV
d. Total PV
e. Date of addition
f. Last updated date
– Last date when any update was made on the doctor
User Manual Representative Web 2.3
Page 78 of 81
iii.
Chemist List
Parameters:a. BU
– Name of the REP’s Business unit is shown by default. This is not modifiable
by REP. However it is selectable if the login is a manager.
b. Level
– Select the level from the list for which area the report has to be seen.
c. Location
– By default it is blank. Area has to be selected from a list attached.
d. REP
– Name of the REP to be selected for whom the reports are to be viewed.
Report:The report shows all chemists for the selected parameters;
a. Chemist data
b. REP Details
c.
BV
d. Last POB Value
e. Date of addition
f. Last updated date
– Following data is shown for chemists matching the selected parameters;
Name
Chemist Short Name
Contact Person
Address
City
State
Pin
Phone
Email
Town
– details of REP attached to the chemist.
Business unit
Rep Name
Reps HQ
Last Visit Date by the REP
– BV (Business value) is Based on the prescription audit recorded for all
doctors on the last visit date; total value of business done in a month
– Last POB value taken from the chemist
– Last date when any update was made on the Chemist
User Manual Representative Web 2.3
Page 79 of 81
iv.
Stockist List
Parameters:a. BU
– Name of the REP’s Business unit is shown by default. This is not modifiable
by REP. However it is selectable if the login is a manager.
b. Level
– Select the level from the list for which area the report has to be seen.
c. Location
– By default it is blank. Area has to be selected from a list attached.
d. REP
– Name of the REP to be selected for whom the reports are to be viewed.
Report:The report shows all chemists for the selected parameters;
a. Stockiest data
– Following data is shown for stockiest matching the selected parameters;
a. Name
b. Stockist Short Name
c. Contact Person
d. Address
e. City
f. State
g. Pin
h. Phone
i. Email
j. Town
b. REP Details
– details of REP attached to the chemist.
a. Business unit
b. Rep Name
c. Reps HQ
d. Last Visit Date by the REP
c. Date of addition
d. Last updated date
– Last date when any update was made on the Stockiest
User Manual Representative Web 2.3
Page 80 of 81
Conclusion
1. Error Messages & Explanation
1. There are No more Record to view.
Reason: Whenever you are viewing already entered data for daily entry and there is no more record, you
will get this message.
2. Network is not available try after some time.
Reason: If internet is not available then such a message can rise.
User Manual Representative Web 2.3
Page 81 of 81