1
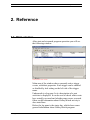
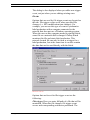
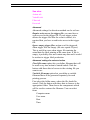
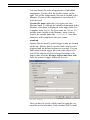
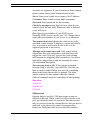
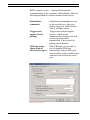
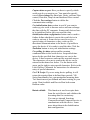
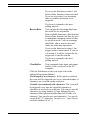
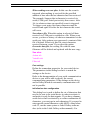
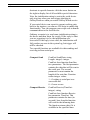
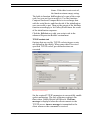
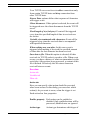
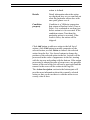
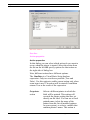
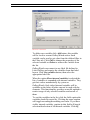
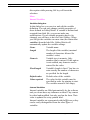
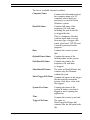
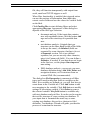
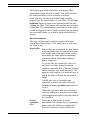
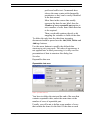
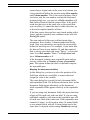
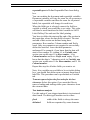
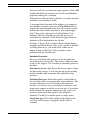
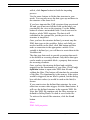
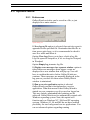
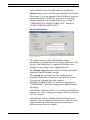
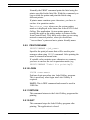
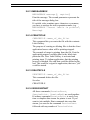
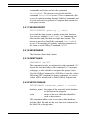
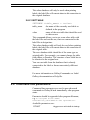
SATO Label Gallery TruePro
GalleryWatch
SATO International Pte Ltd
English Edition
Version SI-040603-06
Copyright © 2004-2005 SATO International Pte Ltd
All rights reserved.
Contents
Contents
1. Introduction
1-1
1.1 About GalleryWatch .....................................................1-1
1.2 About this manual.........................................................1-2
1.2.1 Conventions used in this manual............................1-2
2. Reference
2-1
2.1 Main window................................................................2-1
2.2 File Menu .....................................................................2-2
2.2.1 New .....................................................................2-2
2.2.2 Open ....................................................................2-2
2.2.3 Save .....................................................................2-2
2.2.4 Save As ................................................................2-2
2.2.5 Close....................................................................2-3
2.2.6 Exit ......................................................................2-3
2.3 Action Menu.................................................................2-3
2.3.1 Start/Stop .............................................................2-3
2.3.2 Add trigger File ....................................................2-3
2.3.3 Add trigger Email .................................................2-4
2.3.4 Add trigger COM port...........................................2-4
2.3.5 Add trigger TCPIP ................................................2-4
2.3.6 Edit trigger ...........................................................2-4
2.3.7 Delete trigger........................................................2-6
2.4 View Menu...................................................................2-6
2.4.1 Toolbox................................................................2-6
2.5 Options Menu ...............................................................2-6
2.5.1 Preferences ...........................................................2-6
2.6 Tools Menu ..................................................................2-6
2.7 Help Menu....................................................................2-6
2.7.1 Contents ...............................................................2-6
2.7.2 Label Gallery on the web ......................................2-6
2.7.3 About...................................................................2-6
2.7.4 Missing Help Topic...............................................2-6
2.8 GalleryCommands ........................................................2-6
2.8.1 LABEL ................................................................2-6
2.8.2 LABELCLOSE.....................................................2-6
GalleryWatch User's Manual
i
Contents
2.8.3 SET......................................................................2-6
2.8.4 SETPRINTPARAM .............................................2-6
2.8.5 COMMENT .........................................................2-6
2.8.6 PRINT .................................................................2-6
2.8.7 PORT...................................................................2-6
2.8.8 PRINTER.............................................................2-6
2.8.9 PRINTJOBNAME................................................2-6
2.8.10 LOGIN.................................................................2-6
2.8.11 RETURN .............................................................2-6
2.8.12 QUIT ...................................................................2-6
2.8.13 MESSAGEBOX...................................................2-6
2.8.14 CREATEFILE......................................................2-6
2.8.15 DELETEFILE ......................................................2-6
2.8.16 SESSIONSTART.................................................2-6
2.8.17 SESSIONPRINT ..................................................2-6
2.8.18 SESSIONEND .....................................................2-6
2.8.19 OEMTOANSI ......................................................2-6
2.8.20 SETDATABASE..................................................2-6
2.8.21 SETTABLE..........................................................2-6
2.9 Command line parameters .............................................2-6
3. Glossary of Terms
ii
3-F
GalleryWatch User's Manual
Chapter 1: Introduction
1. Introduction
1.1 About GalleryWatch
GalleryWatch is part of SATO Label Gallery TruePro
software package, which lets you create and print labels
with ease and in fully WYSIWYG style. GalleryWatch
enables communication and synchronization of the label
production process with certain events. If one or more of
these events take place, the pre-defined action is
triggered.
GalleryWatch can:
• Run Label Gallery and manipulate label at the
appearance of a trigger file, receipt of an e-mail
message, TCP/IP socket connection or COM
port activity. These activities are called trigger
events and they are a signal for GalleryWatch to
start with action execution.
• Send label data via current Internet technologies
using TCP/IP socket connection or a text-based
email. Thus mobile users can print labels from
any location to any printer.
• Send GalleryCommands to Label Gallery at the
occurrence of trigger event (open label, print
label, send commands through JOB file, set
variables, etc). With GalleryCommands a better
control over the label data and printing can be
accomplished.
• Easily parse and map data from non-typical data
streams to label variables. Data can be easily
GalleryWatch User's Manual
1-1
Chapter 1: Introduction
extracted from non-structural data sources and
transferred to the variable fields on the label.
• Use the most productive means available to
initiate label printing from mobile wireless
devices. Mobile devices can print the labels by
themselves or initiate label printing on a remote
printing server.
• Watch up for up to 50 different events with
special action for every trigger event.
GalleryWatch can concurrently monitor mixed
triggers events.
• Manipulate data files when an event occurs.
1.2 About this manual
This user manual contains one chapter: Reference, which
describes various options and dialogs of this program.
1.2.1 Conventions used in this manual
• Text that appears in bold letters refers to the
names of the menus, buttons and other
'clickable' things like OK button.
• Text that appears in italic refers to the options
and confirming actions - like Read only.
• Text enclosed in brackets refers to keys from
PC keyboard - like <Enter>.
1-2
GalleryWatch User's Manual
Chapter 2: Reference
2. Reference
2.1 Main window
After start and at normal program operation you will see
the following window:
GalleryWatch main window
Main area of the window shows currently active trigger
events, with their properties. Each trigger can be enabled
or disabled by tick setting on the left side of the trigger
name.
Underneath is a log pane. In it a description of a past
activities is displayed. It can be used to check what events
have actually occurred and whether some errors occurred.
Other useful information about GalleryWatch activity is
also stated here.
Below the log pane is the status bar, which shows some
general information about GalleryWatch program.
GalleryWatch User's Manual
2-1
Chapter 2: Reference
On top of main window is the menu bar that contains all
possible commands logically organized in menus and
shortcut toolbar, which contains icons that access most
often used commands. It is movable and can be placed
anywhere on the screen. It can be docked within
GalleryWatch main window or floating outside the main
window.
The title bar of the window is showing currently active
configuration file.
2.2 File Menu
All GalleryWatch settings are stored in configuration files
with extension of .NWC. You can keep your various
setting organized in several configuration files. To make
a new setting file active, simply open it with File-Open
command. Last open .NWC file is memorized and is
opened again automatically when GalleryWatch starts.
Name of the configuration file can also be used as a
command-line parameter to GalleryWatch executable
file.
All trigger events and instructions what actions that need
to be executed when they occur are stored in these
configuration files.
2.2.1 New
Create a new (blank) configuration file.
2.2.2 Open
Open an existing configuration file and makes settings in
this file active - GalleryWatch will respond and process
trigger events that exist in this configuration file.
2.2.3 Save
Save currently opened configuration file. Use it to save
the changes you have made to the configuration file.
2.2.4 Save As
Save currently opened configuration file in another file.
2-2
GalleryWatch User's Manual
Chapter 2: Reference
2.2.5 Close
Hide the administration window of GalleryWatch. Note,
GalleryWatch still runs in the background and waits for
the opportunity to trigger actions.
2.2.6 Exit
Quit GalleryWatch.
2.3 Action Menu
2.3.1 Start/Stop
This command starts or stops processing of events. If you
stop it, GalleryWatch will not check for events (such as
file changes, e-mail, serial port activity, TCP/IP socket
monitoring) and therefore no action is processed even if
events do occur. Think of this command as a master
switch that you can use to turn GalleryWatch on/off
without closing the application itself.
When event processing is active, icon in status line is
green, and word Active is present.
When GalleryWatch application is closed, this setting is
not remembered. GalleryWatch will always start in run
mode so that event processing is active.
To quickly start event processing you can click the
shortcut icon , or the shortcut icon to stop the
processing. Both shortcuts are available in the toolbar.
2.3.2 Add trigger File
Add a new file trigger event. Edit action dialog box is
shown in which you can set various options regarding
this trigger.
Please see File tab of the Edit action dialog for further
information about setting file trigger options.
You can also click the shortcut icon
quickly access this command.
GalleryWatch User's Manual
on the toolbar to
2-3
Chapter 2: Reference
2.3.3 Add trigger Email
Add a new e-mail trigger event. Edit action dialog box is
shown in which you can set various options regarding
this trigger.
Please see e-mail tab of the Edit action dialog for further
information about setting file trigger options.
You can also click
icon on the toolbar to quickly
access this command.
2.3.4 Add trigger COM port
Add a new COM port trigger event. Edit action dialog
box is shown in which you can set various options
regarding this trigger.
Please see COM port tab of the Edit action dialog for
further information about setting file trigger options.
You can also click the shortcut
quickly access this command.
on the toolbar to
2.3.5 Add trigger TCPIP
Add a new TCP/IP trigger event. Edit action dialog box
is shown in which you can set various options regarding
this trigger.
Please see TCP/IP tab of the Edit action dialog for
further information about setting file trigger options.
You can also click the shortcut icon
quickly access this command.
on the toolbar to
2.3.6 Edit trigger
Edit currently selected trigger. To quickly display
properties for an event you can also double-click on event
name in the main window.
Dialog box for editing trigger settings that is shown has
several tabs of which some are common to all triggers,
but some are relevant to currently selected trigger type
only. In general, only the first tab is specific for selected
trigger and the other three are the same for all.
2-4
GalleryWatch User's Manual
Chapter 2: Reference
This dialog is also displayed when you add a new trigger
event, not just when you are editing existing ones.
File tab
Options that are used by file trigger events are located on
this tab. File trigger events occur when specified file
changes (i.e. file's modification time changes). For
example, you can use this type of event to synchronize
label production with a computer connected to the
network that does not use a Windows operating system.
When the user on this computer needs to print the labels,
some file on a network disk is changed. GalleryWatch
monitors this file and starts label production. This
network-located file can only be used as a trigger for a
label production, but at the same time it can also contain
the data that can be used directly with the labels.
Edit action: File tab
Options that can be set for file trigger event are the
following:
File trigger: Here you enter full path of a file that will be
monitored. When this file changes, file trigger event
occurs and corresponding actions are performed. The
GalleryWatch User's Manual
2-5
Chapter 2: Reference
other option is to monitor a whole trigger directory for
files with a certain mask in their extensions. Some often
used file extensions are already defined in GalleryWatch,
but you can use any other file mask, just type it in.
Detection method
There are two ways GalleryWatch can detect that trigger
file has changed. If first method - Monitor folder and
detect changes is selected, then the Windows operating
system itself monitors file changes and notifies
GalleryWatch at that time. This is the preferred method
as it uses less processor time and is quicker. It however
only works when trigger file is located on disk that is
controlled by Windows operating system. If trigger file is
on a UNIX- or NetWare-powered machine, this method
will not detect changes in the file. In this case you have to
use the second method - Check for a new/modified file
every... s. In this case trigger file is checked every n
seconds and if change is detected, actions are executed.
If you are not sure which method to use, try the first
method and only if it doesn't work switch to second
method.
Advanced: Advanced settings for detection method can
be set here.
Before selected action
Here you can specify what do you want to do with trigger
file before actions are processed. This can be used to
signal other application or other triggers within
GalleryWatch that label production has started.
You can Delete, Truncate (empty the trigger file so it is 0
bytes long) or Rename the trigger file.
After selected action
Here you can specify what do you want to do with trigger
file after actions are processed. This can be used to signal
other application or other triggers within GalleryWatch
that label production has finished.
You can Delete, Truncate (empty the trigger file so it is 0
bytes long) or Rename the trigger file.
Advanced: Advanced settings for renaming of the file can
be set here.
2-6
GalleryWatch User's Manual
Chapter 2: Reference
See also:
Action tab
Variable tab
Filter tab
Error tab
Advanced
Advanced settings for detection method can be set here.
Require write access for trigger file: you must have a
write access for the trigger file. If your trigger action
deletes the trigger file after the event is started, it is
required that you have a read/write access to the trigger
file.
Ignore empty trigger files: action won't be triggered,
when trigger files are empty (file size equals 0 bytes).
This is useful in cases when trigger file contains the
actual data for label printing at the same time. If file is
empty, it probably does not contain any data and it would
be useless to trigger label production.
Advanced settings for selected action
Fixed file name option lets you define filename that will
be used every time action is started/ended. Click the
button with three dots to browse to the existing file you
want to use.
Variable file name option lets you define a variable
filename that will be generated separately for each
printing process.
First select the folder name, where the file should be
stored. Click the button with three dots to browse to the
appropriate folder. Then choose the components which
will be used to contruct the filename. You can select
from:
Computer name
User name
Date
Time
GalleryWatch User's Manual
2-7
Chapter 2: Reference
You can change the order of appearance of individual
components. For this click the up/down arrow on the
right. Tick all the components you want to include in the
filename. If some of the components is not selected, it
won't be used.
Custom file name option lets you create your own
filename mask. To include the variable components in the
filename, enter them as displayed in the upper table. For
Computer name use %1, for User name use %2 etc. To
include some variable in the filename, insert colon in
front of the variable name like :variable. Any other
characters will be applied as they are written.
e-mail tab
Options that are used by e-mail trigger events are located
on this tab. When e-mail is received and e-mail event is
triggered and pre-defined actions are executed. You can
limit which e-mails trigger the event with subject of email. If the subjects of received e-mail message is the
same to that set in the Message subject must start with
field, the action is trigger, otherwise it is not.
Edit Action: E-mail tab
First you have to specify which e-mail account do you
want the action to monitor. Only standard POP3 e-mail
2-8
GalleryWatch User's Manual
Chapter 2: Reference
accounts are supported. If you do not know these settings,
please contact your system administrator for help.
Server: Enter your e-mail server name or its IP address.
Username: Enter e-mail account name (username).
Password: Enter password for this account.
Check for messages every: Specify, how often do you
want to check for new mail. When new mail is detected,
event will occur.
Port: Specify port number of your POP3 server.
Normally POP3 servers use the port 110. Change this to
some other port number, if your server is set otherwise.
Test connection button checks the connectivity to the
specified e-mail account. It displays a report and notifies
you, if account or mail server do not exist, or if the
supplied password is not correct.
Message subject must start with: Only e-mail whose
subject line start with string that is specified here will
trigger the event. This way you can use your existing
mail account for triggering label production. Just choose
appropriate subject that would not normally be sent to
you and enable this option.
Save message body to file: If this option is checked,
message body is saved to a specified file. This file can
later be used in Label Gallery as a text file, containing
data for the labels that need to be printed. The other
usable scenario for this option is that file contains
GalleryCommands used for controlling of label printing.
See also:
Action tab
Variable tab
Filter tab
COM port tab
Options that are used by COM port trigger events are
defined on this tab. When a data is received on the serial
port, pre-defined actions are executed. The data can not
only be received from the external devices but can also be
sent back to the deviced to control or program their
behaviour. Different serial devices (barcode scanners,
GalleryWatch User's Manual
2-9
Chapter 2: Reference
RFID scanners, scales…) demand bi-directional
communication to the computer. GalleryWatch offers the
following methods to control external serial devices.
Initialization
commands
Initialization commands are sent
to the serial device, when you
enable triggers in GalleryWatch.
This is one-time action.
Trigger start
options (device
polling)
Trigger start options support
devices, which do not
automatically send data, but first
need a request for data
transmission. Time period for
polling can be defined.
VBScript action
(along with all
other action types)
With VBScript, you are able to
use all standard VBScript
functionality and are able to get
and set values of the variables and
read and write to/from the serial
port.
Edit action: COM Port tab
2-10
GalleryWatch User's Manual
Chapter 2: Reference
Capture data on port: Here you have to specify which
serial port do you want to use. You must also specify
correct Port settings like Baud rate, Parity, software flow
control, Data bits, Stop bits and hardware flow control.
Click the Port settings button to define the
communication settings.
Use initialization data section is used if you want to
wake-up your serial to become active and can exchange
the data with the PC computer. Some serial devices have
to be initialized before they can send the data.
Initialization data configuration button can be used to
further define what data is sent to the serial device in
order to activate it. Some devices need to receive a
special string of characters so they wake up. Bidirectional communication to the device is possible to
query the device if it is ready to send the data. Click the
Send data button to test your initialization settings.
Use polling for data option enables constant
communication to the serial device. In specified time
intervals the specified data characters are sent to the
device. It then responses and send the required answer.
The characters you want to send to the device can be
entered in the memo box below. Use the button with
arrow on the right to enter special characters. Refer to the
Label Gallery's Manuals for instructions for alternative
entry of special characters.
Use VB Script: If you are using device polling, it will
return the required data in defined time periods. VB
Script functionality lets you manipulate incoming data.
Two functions are pre-defined and must existing in your
script. DataAvailable and ReceiveData both return
Boolean value.
DataAvailable
This function is used to acquire data
from the serial device and validates the
incoming data for consistency.
You can use internal functions
Comport.Send and Comport.Receive to
communicate with the device. Learn
more about them in the Initialization
data configuration.
GalleryWatch User's Manual
2-11
Chapter 2: Reference
If you set the function to return 1, the
ReceiveData function is then executed.
If you set it to return 0, no incoming
data is available and action is not
triggered.
The focus is returned to the next
polling interval.
ReceiveData
You can pass the incoming data from
the serial device acquired in
DataAvailable function to this function.
ReceiveData function can then be used
to manipulate incoming stream of data
to suit your needs. You can re-arange
data fields, add or remove text and
make any other data operations.
If you set the function to return 1, the
trigger action is then started. If you set
it to return 0, it will be a signal for the
trigger not to start the actions.
The focus is returned to the next
polling interval.
ClearBuffer
This command clears input and output
buffers of the serial port on the PC
computer.
Click the Edit button to edit you script code in the
enhanced Expression Builder.
Fixed length of size (in bytes): If this option is selected,
the event will be triggered once every selected number of
characters are received on the serial port.
Variable size terminated with characters: The event will
be triggered every time the specified sequence of
characters is received via serial port. You can use special
characters by using number (#) sign followed by two
characters that represent hexadecimal ASCII code of a
character. You can also use caret character (^) to specify
escape (ESC, 27) character. To enter # or ^, type it twice
one after another (## or ^^).
2-12
GalleryWatch User's Manual
Chapter 2: Reference
When nothing new sent after: In this case the event is
triggered when nothing is received for the specified
amount of time after the last character has been received.
The example: Suppose that a character is received via
serial (COM) port. Serial port activity then ceases. After
10s (or whatever time was specified) event is triggered.
To trigger event again, first some characters must be
received and again 10s after the last character this event
will occur.
Save data to file: When this option is selected, all data
received via COM port is recorded to a file. When event
occurs, you have a history of what was transmitted via the
serial port. After actions were processed, a content of this
file is deleted. Effectively this file stores characters
received between events. If you select the option
Overwrite data file, the existing file with the same
filename will be deleted and replaced with the new copy.
See also:
Action tab
Variable tab
Filter tab
Port settings
Define the connection properties for your serial device.
The parameters in this dialog box have to match the
settings or the device.
Refer to the documentation of your serial communication
device so you will be able to specify the correct
communication parameters. If the settings on the device
and in GalleryWatch do not match, communication will
not be possible.
Initialization data configuration
This dialog box is used to define the set of characters that
need to be sent to the serial device in order to activate it
and make it ready for data acquire. If you have a dummy
serial device that is activated by a certain combination of
characters, you can type in such characters. If you need to
enter special control characters with ASCII values below
code 32, use the same syntax as Label Gallery software
does (refer to the Label Gallery online manuals). For
GalleryWatch User's Manual
2-13
Chapter 2: Reference
shortcuts to special character click the arrow button on
the right to display list of all available special characters.
Note, the initialization string is sent to the serial device
only at a time when you start trigger checking in
GalleryWatch or when you restart GalleryWatch service.
If your serial device can report its current working state
back to the inquirer, you can use VB Script to enable this
functionality. You can program your script code to handle
communication to the serial device.
Ordinary scenario is to send some initialization string to
the device and then listen for a reply. If the reply is what
you are expecting it to be, the initialization was
successful. If the reply is not valid, the initialization will
fail, produce an error in the system log, but trigger will
still be checked.
Two special functions are available for data sending and
receiving to/from serial port.
Comport.Send
ComPort.Send(Data: string,
Length: integer): integer
ComPort class function Send has
two parameters. The first parameter
contains the data that will be sent to
the serial port. The second
parameter is must contain the
length of the sent data. Function
return integer values:
1 - if writing to serial port was
successful and
0 - if error occurs.
Comport.Receive
ComPort.Receive(TimeOut:
integer): string
ComPort class function Receive
has parameter TimeOut. This
parameter contains the time (in
seconds), how long the function
will wait for the incoming data.
The function returns data if it is
available in the specified time
2-14
GalleryWatch User's Manual
Chapter 2: Reference
frame. If the data is not received,
the function returns empty string.
The built-in function InitData has to be part of the script
code, but you are free to modify it. Use the functions
Comport.Send and Comport.Receive to exchange data
with the serial device and then decide if the initialization
was successful or not. Then set the output of the InitData
function accordingly to let GalleryWatch know the result
of the initialization sequence.
Click the Edit button to edit your script code in the
enhanced Expression Builder environment.
TCP/IP sockets tab
Options that are used by TCP/IP sockets trigger events
are defined in this dialog. When some data is received
specified TCP/IP socket, pre-defined actions are
executed.
Edit Action: TCP/IP sockets
Set the required TCP/IP parameters to successfully enable
socket monitoring. The only obligatory setting is the
Port, where GalleryWatch will listen to. Welcome
message is displayed when the client connects to the
TCP/IP server. Answer message is transmitted to the
client whenever the command is received.
GalleryWatch User's Manual
2-15
Chapter 2: Reference
Your TCP/IP server can be set to allow connections only
from certain TCP/IP hosts and deny connection from
other TCP/IP hosts.
Extract Data options define what sequence of characters
will trigger event.
Client disconnect: If this option is selected, the event will
be triggered once the client disconnects from the TCP/IP
server.
Fixed length of size (in bytes): Event will be triggered
every time the specified length of data is received over
the socket.
Variable size terminated with characters: Event will be
triggered every time the received data is accompanied
with specified characters.
When nothing new sent after: In this case event is
triggered when nothing is received for specified amount
of time after the last character has been received.
Save data to file: When this option is selected, all data
received via TCP/IP socket is saved to a file. When event
occurs, you have a history of what was transmitted via the
serial port. After actions were processed, a content of this
file is deleted. Effectively this file stores characters
received between events.
See also:
Action tab
Variable tab
Filter tab
Action tab
Here you can specify what action should be executed
when event occurs. In this dialog you can select which
action(s) do you want to occur, when the trigger is set.
Each action has four properties:
Enable property Each action can be enabled or
disabled. Only enabled actions will be
processed, disabled ones are ignored.
Action type
2-16
Action type determines which type of
GalleryWatch User's Manual
Chapter 2: Reference
action is defined.
Details
Detail information about the action
are displayed here so you can find out
what this particular action does with
one quick glance over it.
Condition
property
Condition is a VBScript expression
that returns a Boolean value (True or
False). It is evaluated at run time just
before action is to be executed. If the
condition returns True then this
particular action is executed. If the
result is False, the action will be
skipped.
Click Add button to add new action to the left list of
actions, click Edit button to modify properties of the
selected action; or click Delete to remove the selected
action from the list. Use Arrow buttons to change the
position of the selected action in the list. Actions will be
processed in the order of appearance in the list, starting
with the top one and ending with the bottom. If the action
processing is aborted because of some error, any possible
actions to the end of the list will not be processed and the
reason for the error will be written in the log file.
The Action description section in the bottom part will
provide more information about the currently selected
action so that you do not have to edit the action to see
exactly what it does.
GalleryWatch User's Manual
2-17
Chapter 2: Reference
Edit action: Action tab
See also:
Action properties
Action properties
In this dialog you can select which action do you want to
occur, when the trigger is started. Select the action from
the list on the left and specify options for that action on
the right side of dialog box.
Note, different actions have different options.
The Condition is a Visual Basic Script boolean
expression. Only two results are possible (True and
False). Use this option to enable current action only when
some term is met. The action will be started if condition
returns True as the result of the expression.
Set printer
action
2-18
Selects a different printer to which the
label will be printed. This setting will
override the printer setting that was set
directly on the label. You can use a fixed
printed name (select the name of the
printer from the list of installed printers
on your system), or select a variable that
contains printer's name. This action is
GalleryWatch User's Manual
Chapter 2: Reference
useful, if you want to print one label file
to several different printers without need
for changing of the label file.
Send custom You can enter some additional
commands
GalleryCommands in the Custom
commands memo field. These commands
action
will be sent to the Label Gallery when the
button is clicked. The selected labels are
already loaded in Label Gallery before
any of custom commands are sent.
You can also include variables in the
commands. Just type in the variable name
and precede it with colon character (for
example, :[variable]). When the button is
clicked and actions will start, the
variable's value will be used.
You can enter the custom commands in
the provided memo field. It will be
sufficient for simple scripts. But if you
need to construct more complex script,
click the Edit button to start Expression
Builder.
For more information on usage of
GalleryCommands please refer to Label
Gallery online help or printed
documentation.
Print label
action
This action prints label attached to the
form. You have several possibilities to
select the quantity of labels to be printed.
There are Basic and Advanced tabs for
this command that can be set for the same
action.
Basic tab contains most commonly used
printing parameters.
If the Fixed radio button is selected then
the number entered in edit field defines
how many labels will be printed.
If Unlimited is selected, the maximum
quantity of labels supported by the current
printer will be printed. Be careful and do
GalleryWatch User's Manual
2-19
Chapter 2: Reference
not create an infinite loop, when label
production would not end. This options is
generally used with database files, where
unlimited would be translated to: print the
whole database.
If Variable Quantity is selected, then
some variable field on the label (either
prompted variable or database-connected
variable) will set the quantity of labels to
be printed. In most cases this will be
some field from the database and this way
semi-automated printing can be achieved.
If the From variable radio button is
selected, then the value of the selected
variable defines the quantity of labels that
are going to be printed.
If desired, you can also enter number of
labels that are skipped on page. This
number can also be Fixed or obtained
From variable. This is applicable when
printing sheets of labels (mostly for laser
and inkjet printers) and some of the labels
in the beginning of the sheet are already
used.
Advanced tab contains controls for
Identical label copies and the Number of
labels sets. Both can be either fixed or
acquire values from some variable. The
first one sets the number of label copies
you want to use with every printed label.
The latter one instructs how many times
the printing process should be repeated.
Label set is an expression for one print
action.
For example, if you set Number of Labels
to 5 in the Basic tab and Number of labels
sets to 3 in the Advanced tab, the printing
of 5 labels will be repeated three times.
Run job
action
2-20
Runs a specified JOB file with Label
Gallery. You can set a fixed JOB name or
let some variable define it. The JOB file
GalleryWatch User's Manual
Chapter 2: Reference
is a plain text file containing
GalleryCommands for controlling Label
Gallery. This option is very similar to
Send custom commands above, with
only difference that is uses already
prepared text file with GalleryCommands.
Take a look at the sample JOB file
provided with Label Gallery in the
Samples\Labels folder.
GalleryWatch User's Manual
Set variable
action
Sets a value to the selected variable.
Open
document/
program
action
Executes specified program when the
button is clicked. This should be a path
and name of the executable program (with
.EXE extension). You can also select a
variable that contains the full path and
name to the selected program name. The
action will produce no result if you would
enter the document name that it
associated with requested application, you
have to use executable filename. For
example, to open MS Word document
SAMPLE.DOC, it is not sufficient to
enter it as the program name. You should
use the full name to the application and
provide document name as a parameter.
Enclose the whole text to parenthesis.
This is how the resulting command
should look like: "C:\Program
Files\Microsoft
Office\Office\Winword.exe C:\My
Documents\SAMPLE.DOC".
Open label
action
Close label
action
Open some label file created with SATO
Label Gallery Plus software.
Close the label you have opened with
Open label command. GalleryWatch can
have opened multiple labels at the same
time. It is recommended to keep the label
opened at all times. For faster printout
and optimized printing (using only one
print session) will be achieved this way.
2-21
Chapter 2: Reference
When you quite GalleryWatch, it will
automatically open all opened labels.
VBScript
action
The script will have the possibility to use
all standard VBScript functionality. In
addition the script will also be able to get
and set values of the variables and to read
and write to/from the serial port. You can
use Expression Builder to write your
scripts.
If you want to verify the syntax of you
script, click the button Check script. You
will be notified if there is any syntax error
in the script.
Variable tab
Use this tab to define a variables used in the actions.
There are four type of variables:
Prompt variables that are defined in a label
file.
GalleryWatch will reads these variables from
the label file and show them in the list.
Database variables that are defined in a label
file.
GalleryWatch will read these variables from the
label file and show them in the list.
Variables that are defined in GalleryWatch.
These variables are local to GalleryWatch and
are not included in the label file. You can use
these variables with filter functionality.
Internal GalleryForm variables.
These variables are local to GalleryForm and
are not included in the label file. You can use
these variables on the form and in the actions.
2-22
GalleryWatch User's Manual
Chapter 2: Reference
Edit action: Variable tab
To define new variable click Add button, this variable
will be local to current GalleryWatch action. Such
variable can be used to get value from the defined filter in
the Filter tab. Click Edit to change the properties of the
selected variable or Delete to remove the variable from
the list.
GalleryWatch can connect to any label file defined in
Label Gallery and acquire the variables from that label
layout. Click Get variables button, then select the
appropriate label file.
When the option Show internal variables is selected the
list of variables is expanded with internal variables. They
get their values automatically by system or
GalleryWatch. Only ticked internal variables will be
available on the form, all other can not be used with the
elements. This functionality provides an useful method to
restrict usage of only selected variables and not all of
them.
To sort the variables in the list, click the field caption the
variables should be sorted by. Clicking the same caption
will toggle ascending/descending sort order. If you have
visible internal variables, caption in this field will toggle
selection/deselection of all internal variables. Clicking
GalleryWatch User's Manual
2-23
Chapter 2: Reference
this caption while pressing Ctrl key will invert the
selection.
More:
Internal Variables
Variable dialog box
In this dialog box you can view and edit the variable
definition. You can only change variable properties of
those defined in GalleryWatch. If variable is defined and
acquired from label file, you can not make any
modifications. If such variable properties have to be
changed, you will have to do it in Label Gallery. When
you will get the variables one more time (the button Get
variables) from the label file, GalleryWatch will
automatically update the variable settings.
Name
Variable name
Length
The length of the variable (maximal
number of characters allowed for
variable's value)
Numeric
Variable type is numeric. Only
numbers can be entered. If this option
is not enabled, any character can be
entered for the value.
Fixed length
Variable's length is fixed. You have to
enter exactly the number of characters
as specified for the length.
Default value
Default value of the variable.
Value required
The value for this variable must be
specified in order for printing to start.
The variable cannot be left empty.
Internal Variables
Internal variables are filled automatically by the software
and you do not have any influence on them. They cannot
be edited and modified, but only used on the form. Their
value is updated for every printed label.
Internal variables are represented with the icon so they
can be easily distinguished from the other types of
variables.
2-24
GalleryWatch User's Manual
Chapter 2: Reference
The list of available internal variables:
ComputerName
Contains the information about
the computer name of a PC
computer where labels are
processed, as specified from
Windows system.
DataFileName
Contains full name of the
temporary file with data,
including the path to the file
(c:\trigger\file.dat).
This is a temporary file that
contains input data received
from any type of trigger (file,
email, serial port, TCP/IP) and
is actually processed in the
program.
Date
Contains the current system
date.
DefaultPrinterName
Contains the name of the
default printer on the system.
PathDataFileName
Contains the path to the
temporary file with data
(c:\trigger\).
ShortDataFileName
The same as DataFileName but
contains only the filename
without the path.
ShortTriggerFileName Contains the name of the trigger
file that acutally started the
actions. Only has a value with
file triggers.
GalleryWatch User's Manual
SystemUserName
Contains the name of the
system Windows user that is
logged in and is running the
application.
Time
Contains the current syste time.
TriggerFileName
The same as
ShortTriggerFileName but
contains also the full path to the
file.
2-25
Chapter 2: Reference
UserName
Contains the name of the user
as defined in Label Gallery
software. Only has a value if
you have enable user
management.
Filter tab
Filter functionality is an extremely useful option, if the
data you have received from your trigger (either file,
serial, e-mail or TCP/IP) is not quite suitable to be used
directly on the label. Filters can be used to extract only
the part of the data that your really need. The received
data is usually formatted as in one of the following cases:
unstructured files
Document analysis filter
This filter can be used with data
that has no structure whatsoever.
The perfect example for this filter
is a report file or printer data
stream file (text file with printer
commands). Use this filter to
define data-parts within received
data, that you want to assign to
certain variables.
structured files
Text database analysis
This filter can be used with a
classic text database files that hold
the data for variable fields on the
label. Data can be encoded with
fields of fixed width or fields,
delimited with some character.
Different separators can be used
for field delimiters (comma,
semicolon, tabs, user-defined
character).
structured files
XML database analysis
This filter can be used with data
formatted in XML files.
Note that the data for filters is provided with your trigger.
Output of the trigger will be used as input for the filter.
Filters do not necessarily have to be connected to the text
2-26
GalleryWatch User's Manual
Chapter 2: Reference
file, they will function transparently with output from
serial, email and TCP/IP triggers as well.
When filter functionality is enabled, the triggered action
can use the portions of information from input data,
extract correct fields and use the values for variable fields
on the label.
Click Enable filter to start defining filters and select
appropriate filter type. Appearance of this dialog box
depends of the filter type selection.
• document analysis : If the input data contains
area with repeatable items, click the button Add
rep. and set the start/stop of repeatable data
area.
• text database analysis: Original data type
structure can be either fixed (width of the fields
is always the same), or delimited (fields are
separated by some character, that has to be set
in Separator section. Tab is pre-defined
separator, but you can use any other character,
enter it in Custom edit field.). You can define a
Delimiter, if needed. If your data does not begin
in the first row, set the proper Start import at
row setting.
• XML database analysis: you can set your own
database definition using Add, Edit, Delete and
navigation buttons, or Get structure from an
external XML file (recommended).
The dialog box Field properties is common to all filter
types and is used to map data fields to variables on the
label. If no variable are defined yet, you will first have to
create them in the Variable tab. Click Add button to add
new mapping to the variable. Click Edit button to modify
settings of an existing variable. Click Delete to remove
the selected variable. Get fields button is available only
with text database analysis filter. It can be used to acquire
the text file structure of some existing text database. If
your input data is formatted the same way as some
existing text database, this can be a shortcut to field
definition. Text database Wizard will guide you thru the
process of extraction the structure.
GalleryWatch User's Manual
2-27
Chapter 2: Reference
The bottom part of the dialog box will display filter
information about selected variable. You will learn how
the extraction filter for this variable is defined.
Once you have the structure defined and variables
mapped, test the functionality of your filter. Click Verify
definition button to open some document data file and
validate the filter. This button will simulate the execution
of the filter. The functionality is the same as if the action
would be triggered, but no label is printed, but the dialog
box with data values (as would be used on the label) is
shown.
Document analysis
This type of filter can be used to acquire fields from
unstructured data sources. Two main types of such data
are often in use.
Report files Report files are an example for data format
with repeatable data in semi-defined form.
The header and footer parts of the report
are usually the same and are containing
company related information (address,
phone, email etc.).
To set up filter for report files, first you
will have to enable option Document
contains repeatable data. Click the Settings
button to define repeatable data area. The
purpose of this option is to limit the area in
which the filter will look for the desired
fields.
Usually one row of repeatable part
represents a data for one label, thus the
Number of rows repeatable part option is
set to 1.
When the repeatable data area is defined,
close the dialog box and you can continue
with mapping the fields in the input data to
the variables.
Printer
command
files
2-28
This type of data source is totally
unstructured file format, but you generally
know where the fields are positioned or
they are enclosed in some well-known
GalleryWatch User's Manual
Chapter 2: Reference
prefix and suffix text. Commands have
always the same syntax with changeable
parameters so they can be easily identified
in the data stream.
More lines in the source data usually
represent the data for one label, thus the
Number of rows repeatable part option is
set to number of rows from which data has
to be acquired.
Then you should continue directly with
mapping the variables to fields in the data.
To define the rules how the data from incoming
document should be parsed use the Add, Edit, Delete and
Add rep. buttons.
Use the arrow buttons to modify the defined data
structure to suit your needs. The order of appearance is
not applied later in label processing, it is only used for
presentation of data in structure this dialog box.
See also:
Repeatable data area
Repeatable data area
Define repeatable data area
You have to define the start and the end of the area that
contains repeatable data, and at the same time set the
number of rows of repeatable part.
Usually you will want to define some number of rows
that contain the items for the label. If the data on such
GalleryWatch User's Manual
2-29
Chapter 2: Reference
report always begins/ends on the some row/column you
can go ahead and define the position using Row number
and Column number. This is the easiest instance. But if
you know only the row number, and not the horizontal
position in this row, you can use a Prefix word that will
find GalleryWatch to find the proper value. If the prefix
word does not exist in the same row as the actual data,
you can offset (+/- rows) the data in either direction, up
or down for required number of lines.
If the data source does not have any formal ending with a
footer, and the repeatable area continues to the end, tick
End of file option.
The start and end of the area is defined using three
parameters. Row number, Column number and Prefix
word. Only two parameters are required to successfully
define the start/stop area. For example, if you know that
the data will start in row number 10, and that required
data is always preceded with string "Data #", you would
enter 10 to Row number "Data #" to Prefix word and
leave Column number to 0.
If the document contains more repeatable parts and not
just one, define this in Number of rows of repeatable
part. This option defines the lines of data that compose
the repeatable part.
Mapping the document variables
In this dialog box you have to select the position of the
field from which you would like to extract data and
assign the value to the variable.
The same dialog box is used for both, document fields
and repeatable fields. The difference between those is that
document fields appear absolutely on the document,
while repeatable fields appear relatively in the repeatable
area.
If you are using only document fields, the input data from
trigger will be used only with one label. If you are using
repeatable variables, each item in the repeatable area will
be used on a label at the same time. If the repeatable area
contains 10 items, it will result in either 10 printed labels
or one printed labels with all 10 items being used at the
same time. It depends on the setting Number of rows of
2-30
GalleryWatch User's Manual
Chapter 2: Reference
repeatable part in Define Repeatable Data Area dialog
box.
You can combine the document and repeatable variables.
Document variables will stay the same for all occurrences
of repeatable variables and thus the same for all printed
labels, but repeatable will change for each item.
When the field type is selected, connect the field to a
variable to which you would like to set value. This value
will then be used transferred to label variable in SATO
Label Gallery Plus and used for label printing.
You have to define the start and the end of the section in
the input data, where the data field is located. The start
and end of this section are defined using three
parameters. Row number, Column number and Prefix
word. Only two parameters are required to successfully
define the start/end. Leave the third parameter
unchanged. For example, if you know that the data will
start in row number 10, column 14, in Variable start
section you would enter 10 to Row number, 14 to
Column number and leave Prefix word empty. If you
know that the data is 7 characters wide, in Variable stop
section you would enter 10 for Row number, and 21 for
Column number.
Repeat this step for all other fields you want to set.
Note, if no variables are available to be set in this dialog
box, you should first define some or import them from a
label file. This procedure can be performed on Variable
tab.
Truncate spaces before the first and after the last
character: Select this option if you want the filter to
remove leading and trailing white space characters from
the extracted data.
Text database analysis
Use this option if your trigger input data is in structured
data format. The data type structure can be either:
GalleryWatch User's Manual
fixed
width of the fields is always the same
delimited
fields are separated by some character
2-31
Chapter 2: Reference
First you will have to define the type structure. Click Add
button and define the structure of text file and Database
properties dialog box will open.
When the text data structure is defined, you must map the
variables to text database fields.
If you input data from one of the triggers is in common
text database structure, you can use Get fields button to
acquire the structure from some text file on your system,
that has the same field's structure as your input trigger
data. This can be a shortcut to field definition. Text
database Wizard will guide you thru the process of
extraction the structure. Fields from this equivalent text
database will be displayed in the list box.
All there is left to do it to connect them with the proper
variables in GalleryWatch. Note, if no variable is defined
in GalleryWatch yet, you should first define one or
import it from a label file. This procedure can be
performed on the Variable tab.
Database Properties
Here you can define the structure of the text data you
want the process in the filter. The source of this text data
is one of the triggers. The text data is internally passes to
the filter.
Start import at row: Specify the line in text source where
the data really begins. A few lines on the top are usually
used for headers and comments that explain the data
structure.
Delimited data type: Select this option, if data fields in
the text data source are separated by some character. The
separator character can be selected in the Separator
section. You can use any of pre-defined separators (tab,
semicolon, comma) or define your own one. If your data
fields include the separator character as the value, you
need to enclose such data values in the delimiter
character. Usually it is double quote or single quote.
Fixed data type: Select this option if data fields in the
text data source always occupy the fixed width of
columns.
2-32
GalleryWatch User's Manual
Chapter 2: Reference
Mapping the text database variables
If the structure of the input trigger data is not the same as
one of the text database files on your system, you cannot
use the Get fields button to acquire the file structure. In
this case, you will have to manually define the field
structure.
Choose the appropriate Variable from the combo box.
Field name option is used if you are importing database
structure from existing text file. If you are manually
defining the data structure, you can use it for field's
description.
Note, if no variables are available to be set in this dialog
box, you should first define some or import them from a
label file. This procedure can be performed on Variable
tab.
The appearance of this dialog box depends on the data
type selection.
If you have defined the Fixed data type when defining the
connection to the text database then only the Fixed data
type section is accessible. You are able to set the start
position of the field and its length. The position is
counted in characters from the beginning of the line.
If you have defined the Delimited data type when
defining the connection to the text database then only the
Delimited data type is accessible. Select the desired field
number, you would like to use with the variable.
Truncate spaces before the first and after the last
character: Select this option if you want the filter to
remove leading and trailing white space characters from
the extracted data.
XML database analysis
Use this option if you have the data organized in the
external structured XML file.
The XML definition can be created manually using Add,
Edit, Delete and navigation buttons. However, the easiest
method is to read and simply import the structure from
the XML file. Click the button Get structure, browse to
the XML file and open it. The data structure will be
displayed in the preview window. If you are satisfied
GalleryWatch User's Manual
2-33
Chapter 2: Reference
with it, click Import button to finish the importing
process.
Use the arrow buttons to fit the data structure to your
needs. You can only move the data types up and down in
the structure of the same level.
If you have imported the XML structure from an external
file and you do not need all the fields on the label, you
can simplify the view on the structure. Use the Delete
button to remove not needed fields. You do not need to
display a whole XML structure. The data is still
contained in the external file, just the preview on the
structure is simplified.
Once you have the structure defined, you must map the
XML data types to the variables. Select each field you
need to include on the label, click Edit button and then
make a connection to the appropriate variable. If no
variable is defined yet, you will have to create them in the
Variables tab.
The data type that needs to provide recurring data needs
to be defined as recurring element. Only these data types
can be marks as repeatable block, a property that ensures
the recurring elements.
Once you have the structure defined and variables
mapped, test the functionality of your filter. Click Verify
definition button to open some XML data file and
validate the filter. This button will simulate the execution
of the filter. The functionality is the same as if the action
would be triggered, but no label is printed, but the dialog
box with data values (as would be used on the label) is
shown.
If you want to store the defined data structure for some
other time or some other trigger, click the Save button. It
will save the defined structure in the separate XML file.
Note, this XML file contains only the filter structure as
defined in GalleryWatch. No data is saved in the file.
To retrieve the stored filter structure, click the Load
button.
More:
XML field properties
2-34
GalleryWatch User's Manual
Chapter 2: Reference
XML field properties
To define a new field for the XML structure the
following properties must be defined.
Field name. Specify the field name to easier identify its
contents and to separate it from other fields.
Field type. Can be one item from the following list.
element
This data type is the basic construct in the
XML definition. Each element can contain
a data (an thus acts as the attribute) or can
contain additional structure of sub-fields
(constructed from element, recurring
elements or attributes).
recurring
element
This data type can have the same syntax as
normal element and can be used in the
same manner. But it must be used with
recurring data. Only the data structure
defined as recurring element can be
marked as repeatable block and used as
such.
This type defines the fields that will be
repeated for the element one level above.
attribute
This data type contains the value of the
field. It is the smallest data type and cannot
be divided into parts.
Variable. This is the variable defined on the label or in
GalleryWatch application. It will get the value stored in
the selected field from XML file.
Use the element as repeatable block. Tick this option to
define the current field as a repeatable block. The
repeatable block is a data structure that can provide two
or more records for the element which defines the block.
Such field should in fact be a node containing further
sub-fields. Imagine yourself having a XML file with
address data of your colleagues. Each colleague can have
more than one address specified (home, work...). The
element Address contains sub-fields Street, Region, ZIP
code and Country. If you want to use your friend's name
with all the associated addresses, this element has to be
GalleryWatch User's Manual
2-35
Chapter 2: Reference
specified as repeatable block. If the Address element is
not defined as repeatable block, only the first data value
is used.
Error tab
When some error occurs while printing labels from
GalleryWatch printing server, this error event can be
intercepted and the data that triggered the action can be
saved for later. The data is saved in the format as it was
received by the application. The origin of the data is not
important, it can be any of the available triggers.
The error can occur out of many reasons: the printer can
be out of paper, communication problems with the
printer, wrong data assigned to the variables or bar codes
etc.
The saved data can be used to reprint the label later or for
debugging purposes to find out if wrong data was tried to
be used with label variables.
Tick Enable error event option to switch on the error
event monitoring. You can use a fixed filename, which
will be overwritten with every error. Or you can click the
Advanced button and specify the variable file name that
is different for each error occasion.
2.3.7 Delete trigger
Deletes currently selected trigger. All data regarding this
trigger and action connected to it will be lost.
2.4 View Menu
2.4.1 Toolbox
Specify if you want a toolbox to be displayed or not. It
contains shortcuts to frequently used commands in the
GalleryWatch application.
2-36
GalleryWatch User's Manual
Chapter 2: Reference
2.5 Options Menu
2.5.1 Preferences
GalleryWatch activities can be saved in a file, or just
displayed in a main window.
Options dialog box
If Save log to file option is selected, then activity report is
appended to the specified file. Remember that this file in
time grows quite large, so it is recommended to check it
once in a while and delete it.
Option View log allows you to have a look at log file.
Log file opens in Notepad or, if it's too long for Notepad,
in Wordpad.
Option Empty log truncates log file.
If Display error messages in a separate window option is
ticked then error messages about trigger events are
displayed in a new window that will pop up. You will
have to confirm the notice before GalleryWatch can
continue. These messages are normally displayed in the
log pane so you don't see them when GalleryWatch
window is minimized.
If Run as service application option is selected
GalleryWatch can run in background as a service
application. What this means is that GalleryWatch is
started on your computer even if no user has logged on.
This way entirely unattended label printing can be
achieved. GalleryWatch can be automatically started with
Windows operating system. Note, this option will
function only on Windows NT, 2000 and XP operating
systems. Windows 95, 98 and ME do not have enabled
possibility for true background service applications. You
can set advanced options regarding running
GalleryWatch User's Manual
2-37
Chapter 2: Reference
GalleryWatch as service application by clicking the
Startup button. Service Preferences dialog box will open.
Please note, if you are running GalleryWatch as a service
application and use .JOB files, make sure to use UNC
quotation instead of the mapped drives (e.g. LABEL
"\\SERVER\MY LABELS\LABEL.LBL" instead of
"G:\MY LABELS\LABEL.LBL").
Service Preferences
Service preferences
This dialog box is used for defining the startup
parameters of GalleryWatch as a service application. The
layout of this dialog box is similar to Windows own
dialog box for setting service application start.
The Startup Type determines how will GalleryWatch be
launched at next Windows startup.
The Log On As section is used for setting the user
account GalleryWatch will use to log on to the system.
You can use a domain user (the syntax is
DOMAIN\USERNAME) or a local user (the syntax is
.\USERNAME) - note the leading period and backslash
characters.
Click button with three dots (...) to browse for the local or
domain user, who's computer account will be used to log
on to the system.
GalleryWatch can be controlled from system Services
console. You can start/stop it from there or directly from
GalleryWatch (note that start and stop buttons have
different icons in service mode).
2-38
GalleryWatch User's Manual
Chapter 2: Reference
2.6 Tools Menu
In this menu you can quickly start other programs from
SATO Label Gallery TruePro.
Label Gallery Plus
Starts Label Gallery Plus- program for designing and
printing labels.
GalleryForm
Starts GalleryForm - custom user entry form designer.
GalleryData
Starts GalleryData - database manager and editor.
GalleryMemMaster
Starts GalleryMemMaster - printer memory card
manager.
2.7 Help Menu
2.7.1 Contents
Opens a dialog box, where you can find instructions for
using help. If you are using help for the first time, we
recommend you read these instructions.
2.7.2 Label Gallery on the web
Opens Label Gallery web site
(www.satoworldwide.com) in your current web browser.
2.7.3 About
Opens a dialog box with the title picture of the program,
information about the program and its serial number.
2.7.4 Missing Help Topic
The Help topic associated with the currently selected
request is unfortunately not available in on-line help at
this time. Label Gallery help is in constant process of
upgrade and the new version of Label Gallery software
with updated help files might already be available for
download on the internet.
GalleryWatch User's Manual
2-39
Chapter 2: Reference
Please visit Label Gallery website at
http://www.satoworldwide.com and verify if the upgrade
of Label Gallery software is available.
2.8 GalleryCommands
GalleryCommands can be used to control Label Gallery
from another program that supports DDE. In this case
GalleryWatch.
Example:
LABEL "C:\LABELS\LABEL1.LBL"
SET Title = "Some string"
SET BarCode = "123456789012"
PRINT 10
FILECLOSE
Loads label stored in file C:\LABELS\LABEL1.LBL,
sets variable field value to "Some string", sets barcode
value to "123456789012", prints ten labels and closes
label file.
Label Gallery supports the following list of
GalleryCommands:
2.8.1 LABEL
LABEL <name_of_the_file>
The command opens the working label. If the label is
already opened, the program will use this one. It is
recommended to write full path name along with the file
name.
Note, if variable value contains space characters or
commas, you will have to enclose the whole path in
quotation marks (e.g. LABEL "C:\Program
Files\SATO\Gallery\Labels\SAMPLE3.LBL")
.
If you use LABEL command with GalleryWatch running
in service mode, use UNC quotation instead of the
mapped drives (e.g. LABEL "\\SERVER\MY
2-40
GalleryWatch User's Manual
Chapter 2: Reference
LABELS\LABEL.LBL" instead of "G:\MY
LABELS\LABEL.LBL").
2.8.2 LABELCLOSE
LABELCLOSE
The command closes the currently active label. Label
Gallery will stay opened. FILECLOSE command does
the same thing, but is depreciated. To speed up label
printing do not use this command frequently. Label
Gallery can have opened more label files simultaneously.
If the label is already opened, it does not have to be
loaded and thus the label processing can be performed
quickly.
2.8.3 SET
SET name=value_of_the_variable,
[,step[, quantity_of_repetition]]
Name is the name of the variable defined on the label. If
the variable isn't on the label, an error will occur. Step
and Quantity_of_repetition are option
parameter. These parameters tell the increment of the
variable and the number of the labels before change.
If variable value contains space characters or commas,
you have to enclose the text in quotation marks.
2.8.4 SETPRINTPARAM
SETPRINTPARAM paramname=value
This command allows you to set advanced print
parameters before printing.
Currently supported PARAMNAMES are:
PAPERBIN
Use it to specify from which tray
the paper should be used. If the
printer is equipped with more than
just one paper / label tray, you can
control which is used for printing.
The name of the tray should be
acquired from the printer driver.
PRINTSPEED
GalleryWatch User's Manual
Use this parameter so specify
2-41
Chapter 2: Reference
printing speed. The value for
parameter varies from one printer
to the other. Consult printer's
manuals for numbers.
PRINTDARKNESS
Use this parameter so specify
printing darkness / contrast. The
value for parameter varies from
one printer to the other. Consult
printer's manuals for numbers.
2.8.5 COMMENT
;
When developing program code or scripts it is very wise
to well document your commands. This will help you
decode what the script really performs, when you will
look at the code after some time.
Use semicolon (;) on the beginning of the line.
Everything following it will be treated as script comment
and will not be processed by Label Gallery.
2.8.6 PRINT
PRINT quantity [, skip [, identical
label copies [, number of label
sets]]]
Command PRINT starts printing. The first parameter is
the quantity of the labels that should be printed.
2-42
<number>
This many labels will be printed.
VARIABLE
Some variable contains the
information how many labels should
be printed. It can be label-defined
prompted variable or a field from the
database.
UNLIMITED
If you use a database to acquire values
for variable fields, unlimited printing
will print as many labels as there are
record in the database. If you do not
use a database, there is not much
sense to use this option. In this case
GalleryWatch User's Manual
Chapter 2: Reference
the maximum number of labels that
thermal printer internally supports
will be printed.
The parameter skip in the command represents the
number of the labels you want to omit before first printed
label on the page. The parameter is used for label printing
on sheets of paper. When the part of the page is already
printed, you can re-use the same sheet by shifting the start
location of the first label. The rest of the unused labels on
the page can be printed with the help of this parameter.
The parameter identical label copies specifies
how many copies of the same label should be printed. If
you have a prompted or database variable on the label,
then each record on the label will be printed in this many
copies. If you have a label without variable elements, the
actual label copies will be the product of the parameter
quantity and parameter identical label
copies.
The parameter number of label sets specifies
how many times the whole printing process should be
repeated.
If you do not need to set some of the supplementary
parameters, use their default values.
Skip
0
Identical label copies
1
Number of label sets
1
2.8.7 PORT
PORT <port_name>
This command overrides the printer's port name. Next
PRINT command will print to the port specified.
Usually this command is used to print label to a file. In
this case you must specify name of file in parameter
port_name before using the PRINT command.
2.8.8 PRINTER
PRINTER <printer_name>
GalleryWatch User's Manual
2-43
Chapter 2: Reference
Normally the PRINT command prints the label using the
printer specified in the label file. With this command you
can override the printer and print the labels using
different printer.
If printer name contains space characters, you have to
enclose it in quotation marks.
For printer_name always use the system printer
name as is displayed in the status line in the SATO Label
Gallery Plus application. System printer names are
usually the same as the printer names in Printers folder
from Control Panel. They differ only when you are using
network-connected printers, when you should use
"\\server\share" syntax and not a printer friendly name.
2.8.9 PRINTJOBNAME
PRINTJOBNAME <job_name>
Specifies the print job name that will be used in print
manager when using PRINT command. After printing the
name is returned in normal state.
If variable value contains space characters or commas,
you have to enclose the text in quotation marks (e.g.
PRINTJOBNAME "Label for printing").
2.8.10 LOGIN
LOGIN <username>
Performs login procedure into Label Gallery program.
This is necessary when login into Label Gallery is
required.
NOTE. This is DDE command and cannot be used in
.JOB files.
2.8.11 RETURN
This command returns to the Label Gallery program after
printing.
2.8.12 QUIT
This command stops the Label Gallery program after
printing. The application is closed.
2-44
GalleryWatch User's Manual
Chapter 2: Reference
2.8.13 MESSAGEBOX
MESSAGEBOX message [, caption]
Print the message. The second parameter represents the
title of the message dialog box.
If variable value contains space characters or commas,
you have to enclose the text in quotation marks (e.g.
MESSAGEBOX "Insert labels in printer",
Warning).
2.8.14 CREATEFILE
CREATEFILE <name_of_the_file>
This command lets you create the file with the contents
Label Gallery.
The purpose of creating or deleting files is that the client
application knows when will be printing stopped.
The example of usage is printing from the file. First the
application prepares variable data for the labels into
particular file. Now Label Gallery is activated and
printing starts. To inform application, that the printing
process is finished, file with data could be deleted at the
end. This could be a signal to application, that new "job"
could be started.
2.8.15 DELETEFILE
DELETEFILE <name_of_the_file>
This command deletes the file.
See also:
CREATEFILE
2.8.16 SESSIONSTART
All three commands(SessionStart,
SessionPrint, SessionEnd) are used together.
If ordinary command SessionPrint is used, every
time a complete data stream for printer is sent. If you
want to join multiple Print commands into one data
stream, you can use the command SessionStart
followed with any number of SessionPrint
GalleryWatch User's Manual
2-45
Chapter 2: Reference
commands and in the end use the command
SessionEnd. The stream is not closed until the
command SessionEnd occurs. These commands offer
a way of optimal printing through GalleryCommands and
it is not necessary to generate a complete data stream for
each print session.
2.8.17 SESSIONPRINT
SESSIONPRINT quantity [, skip]
You send the data stream to printer using this function.
You can use multiple SessionPrint commands one
after another and join them in single data stream. The
stream is not closed until the command SessionEnd
occurs. The meaning of quantity and skip parameters is
the same as with Gallery Command PRINT.
2.8.18 SESSIONEND
The function closes data stream.
2.8.19 OEMTOANSI
OEMTOANSI ON|OFF
This command works in conjunction with command SET.
It puts the text that follows the command SET in proper
codepage, so that variable is assigned the proper value.
Use this GalleryCommand in .JOB files, to put the values
following SET command to proper codepage, so correct
values will be transferred to Label Gallery at print time.
2.8.20 SETDATABASE
SETDATABASE <database_name> = <value>
database_name the name of the currently used database
as defined in the program
value
name of the new table that should be
used as data source
This command allows you to use some other database
with the label file and not the one, that was connected to
the label file at design time.
2-46
GalleryWatch User's Manual
Chapter 2: Reference
This other database will only be used when printing
labels, the label file will remain intact with connection to
the original database.
2.8.21 SETTABLE
SETTABLE <table_name> = <value>
table_name
the name of the currently used table as
defined in the program
value
name of the new table that should be used
as data source
This command allows you to use some other table with
the label file and not the one, that was connected to the
label file at design time.
This other database table will only be used when printing
labels, the label file will remain intact with connection to
the original table.
The new database table should be of the same type as
original table. For example, you cannot change the table
from dBase to Paradox. The structure of new table has to
be identical to the original one.
You can use table from the database that is already
connected to the label or from some entirely different
database.
For more information on GalleryCommands see Label
Gallery documentation or Help file.
2.9 Command line parameters
Command line parameters are used to pass advanced
commands to GalleryWatch immediately after program
starts.
Parameter should be appended after program filename;
e.g. C:\Program Files\SATO\
LabelGallery\Bin\GWatch.exe <parameter>.
Available parameters are:
/START
GalleryWatch User's Manual
triggers are activated at startup
2-47
Chapter 2: Reference
/STOP
triggers are deactivated at startup
/M
program starts in tray bar and not
in normal window
[configuration file]
set the configuration file which
will be used instead of the
default one; i.e. C:\My
Documents\GWatch.nwc
[labels directory]
set the directory, where label
files are located; i.e. C:\My
Documents\Labels
2-48
GalleryWatch User's Manual
Chapter 3: Glossary of Terms
3. Glossary of Terms
trigger event
Event that must occur before GalleryWatch begins
executing some actions - for example printing labels.
There are three types of events: file, e-mail and COM
port events.
File trigger event occurs when a specified trigger file is
modified or created, e-mail trigger event occurs when
new e-mail is received and COM port trigger event
occurs when some data is received via communication
(COM) port on computer.
JOB file
This is a plain ASCII text file containing Label Gallery
commands, which are to be executed. JOB files are
usually used to print a batch of labels.
trigger file
GalleryWatch monitors the modification time and date of
the trigger file and if the time of the trigger file is newer
than the time the action was last executed, it executes the
action. Changing the time and date of the file is called
'touching the file'. One of the ways to do that is using the
MS-DOS command: REM>trigger_file.
DDE
Dynamic Data Exchange - A protocol that enables
communication between Windows applications. An
application must support DDE in order to use it. With
DDE Commands you can control one application (for
example Label Gallery) with another (for example
Microsoft Access).
GalleryWatch User's Manual
3-A