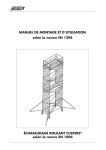
1
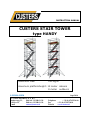
INSTRUCTION MANUAL CUSTERS STAIR TOWER type HANDY maximum load: 200 kg/m2 maximum platformheight: 12 meter indoors 8 meter outdoors 9.505.600.012EN CUSTERS HYDRAULICA B.V. Smakterweg 33, 5804 AE VENRAY NL P.O.Box 22, 5800 AA VENRAY NL e-mail [email protected] Sept. 2014 Telephone : +31 (0) 478 55 30 00 Fax : +31 (0) 478 55 30 10 Website : www.custers.nl INHOUD 1 2 3 4 INTRODUCTION................................................................................................................... 3 WARRANTY AND LIABILITY ........................................................................................... 4 CHECKING THE DELIVERY ............................................................................................. 4 SAFETY INSTRUCTIONS ................................................................................................... 5 4.1 Checking before assembly ................................................................................................. 5 4.2 Assembly ........................................................................................................................... 5 4.3 Raising components ........................................................................................................... 5 4.4 Outriggers/elbow outriggers .............................................................................................. 6 5 ASSEMBLY OF THE STAIR TOWER ZIG-ZAG ............................................................. 8 6 ASSEMBLY OF THE STAIR TOWER PARALLEL ..................................................... 12 7 USING THE STAIR TOWER ............................................................................................. 16 8 MOVING THE STAIR TOWER ........................................................................................ 17 9 ANCHORING ....................................................................................................................... 17 10 DISASSEMBLY OF THE STAIR TOWER ....................................................................... 17 11 MAINTENANCE OF THE STAIR TOWER ..................................................................... 17 12 COMPONENTS .................................................................................................................... 18 12.1 Component list ............................................................................................................. 18 12.2 Assembly tables ........................................................................................................... 21 Custers Hydraulica BV, Venray, the Netherlands. No part of this publication may be copied, duplicated and/or published by means of photocopying, printing, microfilm, CD-ROM, DVD, the Internet or any other means whatsoever, without the express written permission of Custers Hydraulica B.V. 2 1 INTRODUCTION The Custers stair tower is part of a wide range of aluminium scaffolding products. If assembled according to the instructions given in this manual, the Custers stair tower meets the requirements of the EN1004. The Custers stair tower is available in the following lengths: - Scaffolding length: 1.8 m and 2.5 m - Scaffolding width: 1.3 m This instruction manual gives step-by-step instructions for the easy and safe assembly of the stair tower. Incorrect assembly can lead to dangerous situations for the user. Read the instructions carefully before assembling the tower. The tower must be assembled and disassembled by experienced and skilled personnel. The user is responsible for making sure the instruction manual is present at the location where the stair tower is to be assembled and used and that the person who supervises the work also has a copy. It there is any uncertainty concerning this instruction manual, please contact your supplier and/or the manufacturer. Manufacturer: Custers Hydraulica B.V. Smakterweg 33 5804 AE Venray Nederland Telephone: +31 (0) 478 553 000 Telefax: +31 (0) 478 553 010 E-mail: [email protected] Website: www.custers.nl Supplier: 3 2 WARRANTY AND LIABILITY Custers provides a guarantee for material and manufacture faults. This guarantee is valid for 12 months after delivery. This means that we will repair faults or, at our discretion, we will take back part of the delivery or the whole delivery and replace it with a new delivery free of charge. If, by fulfilling our guarantee obligations, we replace delivered goods, the goods returned will become our property. All costs which exceed the obligations described above will have to be met by the customer. If products are returned to be treated, repaired, etc., the guarantee only applies to the quality of the treatment requested. Custers is not responsible: a. If the fault is the result of improper use or if the fault is due to a cause other than faulty materials or poor manufacture. b. If the cause of the fault cannot be clearly proved. c. If not all of the instructions for the use of the product, including the guidelines given in this instruction manual, have been accurately carried out in full. The manufacturer is not liable if the customer carries out, or has carried out by third parties, any alterations and/or repairs to the product without the express permission of Custers. 3 CHECKING THE DELIVERY After delivery, check whether the stair tower is complete and undamaged. Contact your supplier immediately if components are damaged or if the delivery is incomplete. 4 4 SAFETY INSTRUCTIONS 4.1 Checking before assembly Check whether the people assembling the stair tower are suitably qualified and check if the location where the stair tower is to be erected is safe and suitable. Note: - The surface must be flat and sufficiently strong. - The area must be free from obstructions, both at ground level and above the ground. - Check whether the wind conditions are such that the stair tower may be used. - Check whether all the components are present at the location. - Damaged, incorrect or non-original components must not be used. 4.2 Assembly The assembly of the stair tower is described in the assembly instructions. The stair tower must be assembled by at least two people. Also use safety rails during the assembly. If necessary, fit the rails temporarily. The stair tower must be assembled on a flat surface. Check this using a spirit level. It is possible to correct the stair tower by rotating the wheel spindles’ spindle nut. The wheels must remain braked at all times, expect when the tower is being moved. Make sure the wheels are locked, either by tightening the wing nut or by clipping the locking nock over the edge of the strengthening ring. The platforms must be secured by sliding the wind securing pin under the rung. The frames must be locked together using the locking pin. The horizontals or railings must be fitted to the stands in such a way that the claws’ openings face outwards. The work platform must have: railings, intermediate railings and toeboards fitted all around. 4.3 Raising components Components must be raised to higher levels by carrying them up the stairs. Hoists must not be secured to the stair tower. 5 4.4 Outriggers/elbow outriggers The outriggers/elbow outriggers stated in the assembly tables must always be fitted as soon as the bottom section of the stair tower reaches a height of 2 metres. The basic shape to be used, i.e. the outrigger/elbow outrigger to be used (small or large), can be found in the assembly tables. The basic shapes given below must be strictly followed! If the required shape is deviated from, it may be necessary to use ballast. Contact the manufacturer or supplier for further information. Small elbow outriggers may be replaced by small outriggers and large elbow outriggers may be replaced by large outriggers if, when using the outriggers, the same basic shape is maintained as for the elbow outriggers. This means that the outriggers must be fitted in the same position as the elbow outriggers when viewed from above. Basic shapes A: Small elbow outrigger, length 1300 mm B: Large elbow outrigger, length 2000 mm 1: Horizontal, length 2500 mm, art. nr. 9501.200.030 6 outrigger elbow outrigger optional:horizontal When the tower is positioned against a wall, do not remove the outriggers/elbow outriggers, but turn them parallel to the wall. When the tower is positioned in a corner, remove the inside outrigger/elbow outrigger, and turn the outside two parallel to the wall. 7 5 ASSEMBLY OF THE STAIR TOWER ZIG-ZAG 1: insert both wheels in the frame; make sure that the wheels are locked correctly 2: place the horizontals on the stands of the frame 2 1 here walk through frame (or 8-rung frame) 3: insert both wheels in the frame; make sure that the wheels are locked correctly 4: place the horizontals on the stands of the frame 4 3 8 between 5th and 6th step from bottom; firmly screw wingnut 8 7 5: 6: 7: 8: 9: position the horizontal/diagonal position the stairs; make sure the stairs are properly secured (under the rung) position the stairs guardrail on the inside of the stairs place both horizontals on the stands of the frames apply the brakes and make the tower level by rotating the wheels' spindle nut 6 5 9 now assemble the four (large or small) outriggers: 10/15 13 12/14/15 10: place the upper coupling below the 6th or 7th rung (small outrigger), 9th or 10th rung (large outrigger) 11: put base on the ground in compliance with the prescribed base pattern (see 4.4) 12: make sure the bottom coupling comes between two rungs 13: turn the outrigger so that the prescribed base pattern (see 4.4) is achieved 14: loosely attach the bottom coupling to the stand and push the coupling up over the stand until the outrigger is a little bit under pressure 15: firmly tighten both couplings 11 9 22 20 21 16 19 17 16: position both frames 17: position locking pins between the mutual frames 18: position the diagonal (from 1st to 11th rung) 19: position a horizontal on the stands of the frames 20: position the stairs; make sure the stairs are properly secured (under the rung) 21: position the stairs guardrail on the inside of the stairs 22: place both horizontals on the stands of the frames 18 29 28 26 next level: 25 23 24 27 23: position both frames 24: position locking pins between the mutual frames 25: position the guardrail/diagonal along the stairs of the previous level 26: position a horizontal on the stands of the frames 27: position the stairs; make sure the stairs are properly secured (under the rung) 28: position the stairs guardrail on the inside of the stairs 29: place both horizontals on the stands of the frames 10 35 34 the penultimate level: 33 30 31 32 30: position both frames 31: position locking pins between the mutual frames 32: position the guardrail/diagonal along the stairs of the previous level 33: place both horizontals on the stands of the frames 34: position the stairs; make sure the stairs are properly secured (under the rung) 35: position the stairs guardrail on the inside of the stairs and on the outside of the stairs 36 top level: 40 38/39 37 41 43 42 36: position both railing frames 37: position locking pins between the mutual frames 38: position the platform with hatch (above the stairs); slide both wind securing pins under the rung 39: position the platform; slide both wind securing pins under the rung 40: place four horizontals on the stands of the frames 41: place the four toeboardholders 42: place both toeboards 1,22m 43: place both toeboards 1,73 or 2,45m 11 6 ASSEMBLY OF THE STAIR TOWER PARALLEL 1: insert both wheels in the frame; make sure that the wheels are locked correctly 2: place the horizontals on the stands of the frame 2 1 here walk through frame (or 8-rung frame) 3: insert both wheels in the frame; make sure that the wheels are locked correctly 4: place the horizontals on the stands of the frame 4 3 10 between 5th and 6th step from bottom; firmly screw wingnut 5: 6: 9 7: 8: 8 9: 6 7 10: 11: position the horizontal/diagonal position the stairs; make sure the stairs are properly secured (under the rung) position the diagonal (from 1st to 7th rung) position the stairs guardrail on the inside of the stairs position the platform; slide both wind securing pins under the rung place the horizontal on the stands of the frames apply the brakes and make the tower level by rotating the wheels' spindle nut 11 5 now assemble the four (large or small) outriggers: 12/17 15 12: place the upper coupling below the 6th or 7th rung (small outrigger), 9th or 10th rung (large outrigger) 13: put base on the ground in compliance with the prescribed base pattern (see 4.4) 14: make sure the bottom coupling comes between two rungs 15: turn the outrigger so that the prescribed base pattern (see 4.4) is achieved 16: loosely attach the bottom coupling to the stand and push the coupling up over the stand until the outrigger is a little bit under pressure 17: firmly tighten both couplings 13 14/16/17 13 23 21 24 18 22 20 19 18: position both frames 19: position locking pins between the mutual frames 20: position a horizontal on the stands of the frames 21: place both horizontals on the stands of the frames 22: position the stairs; make sure the stairs are properly secured (under the rung) 23: position the platform; slide both wind securing pins under the rung 24: position a horizontal on the stands of the frames 31 29 32 next level: 25 30 28 26 27 25: position both frames 26: position locking pins between the mutual frames 27: position the guardrail/diagonal along the stairs of the previous level 28: position a horizontal on the stands of the frames 29: place both horizontals on the stands of the frames 30: position the stairs; make sure the stairs are properly secured (under the rung) 31: position the platform; slide both wind securing pins under the rung 32: position a horizontal on the stands of the frames 14 37 39 38 the penultimate level: 33 35 34 36 33: position both frames 34: position locking pins between the mutual frames 35: place a horizontal on the stands of the frames 36: position the guardrail/diagonal along the stairs of the previous level 37: place both horizontals on the stands of the frames 38: position the stairs; make sure the stairs are properly secured (under the rung) 39: position the stairs guardrail on the outside of the stairs 44 40 top level: 42/43 41 45 46 47 40: position both railing frames 41: position locking pins between the mutual frames 42: position the platform with hatch (above the stairs); slide both wind securing pins under the rung 43: position the platform; slide both wind securing pins under the rung 44: place four horizontals on the stands of the frames 45: place the four toeboardholders 46: place both toeboards 1,22m 47: place both toeboards 1,73 or 2,45m 15 7 USING THE STAIR TOWER The following must be carried out each time before the stair tower is used: - Check whether the base (including the outriggers/elbow outriggers, wheel brakes) of the stair tower is correct. - Check whether the entire construction is correct and complete. - Check whether there are any changes in the circumstances which may affect the safe use of the stair tower. The stair tower is intended for providing access to a work location. It is not permitted to use the stair tower as suspended scaffolding, as an overhanging work floor or for stepping onto other constructions. No bridges may be built between the stair tower and a building. No bridges may be built between two stair towers, unless use is made of objects which have been specifically designed for this use. The maximum work load is 200 kg/m2 (scaffold class 3). The maximum load may only be placed on one level of a tower. It is not permitted to jump on the platform. The hatch in the platform must remain closed at all times, except for when climbing or descending the stair tower. The maximum platform height is: - Indoors: 12 metres - Outdoors: 8 metres The stair tower may only be climbed from the inside using the stairs. No boxes, stepladders or other aids may be placed on the platform to gain extra height. It is not permitted to work on the stair tower if the wind force is greater than force 6 Beaufort (large branches on trees move, umbrellas blow inside out, wind speed 11 – 14 m/s or approx. 45 km/h). For an expected wind force greater than force 6 Beaufort, a free-standing stair tower must be disassembled, moved to an area out of the wind or anchored. This should also be done if the stair tower is not used. Pay attention to openings in a building, uncovered buildings and the corners of buildings which may increase the force of the wind. Be careful when exerting a horizontal force (e.g. when drilling) which will cause the stair tower to be pushed away from the construction. The maximum horizontal force is 30 kg. Horizontals, railings, intermediate railings and diagonals may not be used as steps. It is not permitted to secure objects which may catch the wind, such as bill boards or sailcloths, to free-standing stair towers. The stair tower must not be exposed to aggressive liquids or gasses. 8 MOVING THE STAIR TOWER The stair tower may only be moved manually along the ground. When moving the stair tower, the normal walking speed must not be exceeded and no people or materials may left on the tower. Pay attention to obstructions, both on the ground and above ground level, when moving the stair tower. The tower may not be moved in winds greater than force 4 Beaufort (dust, earth and paper blow around, small branches break off, the wind speed is 4 – 6 m/s = approx. 18 km/h). Be careful when the stair tower is moved over an unsuitable surface (incline, insufficiently strong surface, holes, etc). Make sure the wheels are braked or released at the correct times. When moving the stair tower, the support points for the outriggers may only be a couple of centimetres above the ground. After moving the stair tower, the support points must be placed back on the ground so that they just support the weight. 9 ANCHORING The tower must be anchored when the tower becomes unstable, for example, due to a high wind. The anchoring must be firmly connected to both of the frame’s stands with couplers. Anchor the tower at reliable and suitable places on the construction or the building. A minimum of two anchors must be fitted every 4 metres (therefore, one on every frame). 10 DISASSEMBLY OF THE STAIR TOWER The stair tower is disassembled in the opposite order to assembly. Start at the top and remove the toeboards and the toeboardholders. Components must be lowered to lower levels by carrying them down the stairs. Disassemble the stair tower from the top to the bottom. Never throw components from the stair tower. 11 MAINTENANCE OF THE STAIR TOWER All parts, particularly the pivoting parts and the welds, must be inspected regularly, but at least once per year, on wear and damages. Lost or damaged parts must be replaced. Aluminium scaffolding parts are not allowed to be used in the following cases: when round tubes have one or more dull dents with a depth of more than 3,0 m; when round tubes have one or more dents directly next to a welding junction, in spite of the depth or shape of the dent; when square of rectangular tubes have one or more dull dents with a depth of more than 2,0 mm; when round or square tubes have one or more sharp dents or cracks, regardless length, depth or location of these dent(s)/crack. Pivoting parts, among others castor wheels, must be clean and run smoothly. Repair of scaffold-material may only be done in consultation with the producer. 17 12 COMPONENTS 12.1 Component list standard components 1 2 3 4 5 6 7 8 9 10 11 12 13 14 15 16 17 18 eight rung frame walk through frame tower railing frame wheel outrigger 1300 outrigger 2000 stairs stairs guardrail platform platform with hatch horizontal (red coloured) horizontal/diagonal (yellow coloured) guardrail/diagonal 1-11 toeboardholder toeboard 1,73m/2,45m toeboard 1,22m locking pin diagonal 1-7 (blue coloured) alternative components A B C D E elbow outrigger 1300 elbow outrigger 2000 spindle with footplate horizontal eight rung frame scaffold length 1.8m 9501.200.010 9501.200.109 9501.200.125 9501.510.010 9501.410.100 9501.420.100 9501.600.??? 9501.600.??? 9501.310.010 9501.330.015 9501.200.058 9501.200.049 9501.600.145 9501.800.087 9501.200.086 9501.200.090 9501.410.162 9501.200.043 scaffold length 2.5m 9501.200.010 9501.200.109 9501.200.125 9501.510.010 9501.410.100 9501.420.100 9501.600.370 9501.600.400 9501.310.020 9501.330.025 9501.200.030 9501.200.050 9501.600.020 9501.800.087 9501.200.080 9501.200.090 9501.410.162 9501.200.056 scaffold length 1.8m 9501.460.010 9501.470.010 9501.520.010 9501.200.030 9501.200.010 scaffold length 2.5m 9501.460.010 9501.470.010 9501.520.010 9501.200.030 9501.200.010 A: alternative for outrigger 1300 B: alternative for outrigger 2000 C: alternative for wheel when using the elbow outrigger D: option when using the elbow outrigger E: alternative for walk through frame 18 3 9/10 14 16 15 13 17 11 8 7 1 2 5/6 12 zig-zag 4 19 9/10 3 14 15 16 8 11 7 17 13 1 2 5/6 12 18 4 parallel 20 12.2 Assembly tables The tables below shows which components are necessary for the assembly of a tower of a certain height. Make sure these components are present. Assembly table stair tower zigzag, available in the lengths: 1,8 m. and 2,5 m. Working height (m): Platform height (m): Description 8-rung frame walk through frame tower railing frame wheel toeboard holder toeboard 1,22m locking pin Article number 9501.200.010 9501.200.109 9501.200.125 9501.510.010 9501.800.087 9501.200.090 9501.410.162 scaffold length 1,8m. Article number 9501.600.??? 9501.600.??? 9501.310.010 9501.330.015 9501.200.058 9501.200.049 9501.600.145 9501.200.086 Description stairs stairs guardrail platform platform with hatch horizontal horizontal/diagonal guardrail/diagonal 1-11 toeboard 1,73m/2,45m ONLY FOR USE INDOORS outrigger 1300 9501.410.100 outrigger 2000 9501.420.100 INDOOR/OUTDOOR USE outrigger 1300 9501.410.100 outrigger 2000 9501.420.100 x : outdoor use prohibited unless anchored kg 12,5 12,0 5,0 7,2 0,2 2,4 0,1 kg 15,0 15,0 2,3 2,5 3,1 3,3 kg 6,6 9,8 kg 6,6 9,8 6 4 3 1 2 4 4 2 8 scaffold length 2,5m. Article number 9501.600.370 9501.600.400 9501.310.020 9501.330.025 9501.200.030 9501.200.050 9501.600.020 9501.200.080 8 6 10 12 14 8 10 12 5 7 9 11 1 1 1 1 2 2 2 2 4 4 4 4 4 4 4 4 2 2 2 2 12 16 20 24 kg 21,3 2 3 4 5 6 2,6 3 4 5 6 7 19,5 1 1 1 1 1 19,5 1 1 1 1 1 3,0 10 13 16 19 22 3,1 1 1 1 1 1 3,7 1 2 3 4 5 4,4 2 2 2 2 2 4 4 4 4 4 4 4 4 x x x x 21 Assembly table stair tower parallel, available in the lengths: 1,8 m. and 2,5 m. Working height (m): Platform height (m): Description 8-rung frame walk through frame tower railing frame wheel toeboard holder toeboard 1,22m locking pin Article number 9501.200.010 9501.200.109 9501.200.125 9501.510.010 9501.800.087 9501.200.090 9501.410.162 scaffold length 1,8m. Article number 9501.600.??? 9501.600.??? 9501.310.010 9501.330.015 9501.200.058 9501.200.049 9501.200.043 9501.600.145 9501.200.086 Description stairs stairs guardrail platform platform with hatch horizontal horizontal/diagonal diagonal 1-7 guardrail/diagonal 1-11 toeboard 1,73m/2,45m ONLY FOR USE INDOORS outrigger 1300 9501.410.100 outrigger 2000 9501.420.100 INDOOR/OUTDOOR USE outrigger 1300 9501.410.100 outrigger 2000 9501.420.100 x : outdoor use prohibited unless anchored kg 12,5 12,0 5,0 7,2 0,2 2,4 0,1 kg 15,0 15,0 2,3 2,5 2,3 3,1 3,3 kg 6,6 9,8 kg 6,6 9,8 6 4 3 1 2 4 4 2 8 scaffold length 2,5m. Article number 9501.600.370 9501.600.400 9501.310.020 9501.330.025 9501.200.030 9501.200.050 9501.200.056 9501.600.020 9501.200.080 8 6 10 12 14 8 10 12 5 7 9 11 1 1 1 1 2 2 2 2 4 4 4 4 4 4 4 4 2 2 2 2 12 16 20 24 kg 21,3 2 3 4 5 6 2,6 2 2 2 2 2 19,5 2 3 4 5 6 19,5 1 1 1 1 1 3,0 10 14 18 22 26 3,1 1 1 1 1 1 2,9 1 1 1 1 1 3,7 1 2 3 4 4,4 2 2 2 2 2 4 4 4 4 4 4 4 4 x x x x 22