1
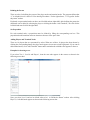
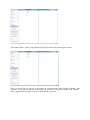
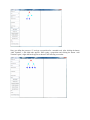
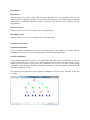
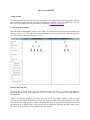
How to Use NEGEXT
Getting Started
The documentation focuses on the concepts and features of the program. The following samples illustrate
the use of the graphical interface in analyzing extensive form games. These are suitable for users who
have any level of experience with game theory, in particular, extensive form games.
Layout of the main window
The main frame of the program consists of two panels. The left panel is the menu panel for drawing each
input tree step by step. The right is the center panel that has two canvas areas for displaying the game
trees. The following screenshot shows two trees.
Drawing the Game tree
To draw a tree, select the Tree 1 or Tree 2 in the panel on the left. If Tree 1 is selected, the game tree
appears in the left canvas on the right panel. If Tree 2 is selected, the tree appears in the right canvas on
the right panel.
Then, to start drawing the game, you need to select the Level. The program supports to draw the game
tree from root node to the terminal nodes one by one. First, you choose level 0 for drawing the root node.
Next, for each new node, you have to define the parent first. There is no need to define the parent node for
the root and 0 is its default. Then, a player node has to be selected for placing a new node. After placing
the root node, the next levels can be continued one after another.
Defining the Parent
There are rules for defining the parent of the player nodes and terminal nodes. The program defines that
“1” is default for level 1 and level 2 for drawing left subtree. For the right subtree, “2” is typed in “define
the parent” textbox.
Each node except terminal nodes can have one left child and one right child. After defining the parent, the
child node can be added by selecting the player or clicking the button “Add Terminal”; one click for the
left child and next click for the right child.
Set Proposition
For each terminal node, a proposition must be defined by filling the corresponding text box. This
proposition should contain at most two characters because of the space limit.
Adding Players and Terminal Nodes
There are 10 players that are represented by colors. When one of these 10 players has been chosen by
clicking the corresponding button, the player node appears in one canvas in the right panel. If you want to
add terminal nodes, click “Add Terminal” button and a terminal node with blue color appears in the tree.
Examples for drawing a tree
If you select Tree 1, Level 0 and Player 1, then the root node appears in the canvas as shown in the
following screen shot.
Next, you select Level 1 and set its default value to be 1 in “Define the Parent” textbox. After clicking
Player 3, a left child node appears as shown in the following screen shot.
After clicking Player 3 again, a right child node appears as shown in the following screen shot.
Then, you choose Level 2 and type a proposition for a terminal node. After clicking the button “Add
Terminal”, a left child node appears. After typing a proposition and clicking the button “Add Terminal”
again, a right child node appears as shown in the following screen shot.
Next, you define the parent as “2” and type a proposition for a terminal node. After clicking the button
“Add Terminal”, a left child node appears. After typing a proposition and clicking the button “Add
Terminal” again, a right child node appears as shown in the following screen shot.
Reset Buttons
Keep the Tree
After drawing one tree in the canvas, click the button “Keep the Tree” for placing the current tree in
memory and for resetting the parameters. Then, the user can draw the next tree. After clicking “Sequential
Combination”, or “Parallel Combination” button, you need to click “Keep the Tree” button for resetting
the parameters.
Reset Left Canvas
If the user wants to reset Tree 1 in the left canvas, click this button.
Reset Right Canvas
If the user wants to reset Tree 2 in the right canvas, click this button.
Combination of two trees
Sequential Combination
For the sequential combination of two trees, click this button. A new window will appear with the
combined tree, Tree 1;Tree 2. Group strategies can be checked for the combined tree.
Parallel Combination
For the parallel combination of two trees, click this button. Note that a parallel combination of two trees
will give rise to a set of trees, since we are considering all possible interleaving of these two trees. A new
window will appear with one of the trees in the combination: Tree 1||Tree 2. For other possible parallel
combinations, click the button “Parallel Combination” repeatedly to see all the parallel combinations until
no parallel combination is left.
The following screen shot shows the sequential combination of the two trees presented in the first
screenshot.
Checking the Strategy
For checking a strategy for a player or a group of players who played in the game, the following steps
have to be taken.
- First, draw Tree 1 in left canvas;
- Enter the player name;
- Note that the player name must be the following format:
- player i for one player
- player i,player j,and so on, for a group of players;
- Enter the formula (proposition in the terminal node);
- Click the button “Check Winning Strategy”;
After combining the two trees sequentially or in parallel, the individual or group strategy can also be
checked by clicking the button “Check Strategy”, filling out the associated players and formula textboxes.
Each player is represented as a different colored node. To find the strategy for the player, the player name
has to match with the player node in the tree.
The following screenshot shows a group strategy of a set of four players.