1
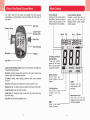
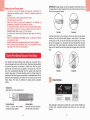
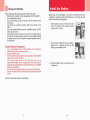
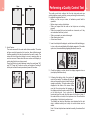
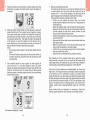
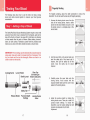
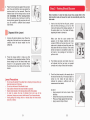
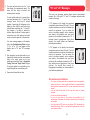
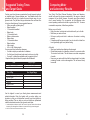
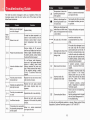
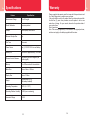
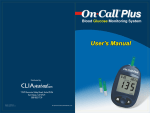
Table of Contents
En
Getting Started .................................................................................... 1
Component Descriptions .............................................................. 2
Clarity Plus Blood Glucose Meter ............................................
3
Meter Display ................................................................................4
Clarity Plus Blood Glucose Test Strips ....................................
5
Clarity Plus Glucose Control Solution ......................................
8
Install the Battery .............................................................................. 10
Meter Setup Before Testing .............................................................. 11
Step 1 - Coding the Meter ...........................................................11
Step 2 - Adjusting the Meter Settings ......................................... 12
Performing a Quality Control Test ................................................... 14
Testing Your Blood ............................................................................ 17
Step 1 - Getting a Drop of Blood ................................................ 17
Step 2 - Testing Blood Glucose .................................................. 22
"HI" and "LO" Messages ............................................................ 24
Using the Meter Memory ................................................................... 26
Viewing Stored Records ............................................................. 26
Clearing the Memory .................................................................. 27
Maintenance ....................................................................................... 28
Replacing the Battery ................................................................. 28
Caring for Your Clarity Plus
Blood Glucose Monitoring System ............................................. 28
Suggested Testing Times and Target Goals ................................... 29
Comparing Meter and Laboratory Results ...................................... 30
Troubleshooting Guide ..................................................................... 31
Specifications .................................................................................... 33
Warranty ............................................................................................. 34
Index ................................................................................................... 35
ii
En
Meter Setup Before Testing
Before testing, the following steps should be followed:
Step 1 - Coding the Meter
Simply insert the code chip to code the meter. Every time you change to
a new box of test strips, you need to insert the code chip packed with
the new box of test strips. You can see the code number appears on the
meter. Make sure this number matches the code number printed on the
test strip vial label and the number printed on the code chip.
You can easily find a code chip in your starter kit box. This code chip is
used with the test strip packed in your carrying case when you first
open the carrying case. If there is already one code chip inserted,
remove it and insert the new code chip.
1. Take the code chip from the test strip box. Compare the code
number on the code chip with the code number printed on the test
strip vial label. If the two numbers are not identical, you may get
inaccurate results. If the code number on the code chip does not
match the number on the vial of strips with which it was packaged,
please contact Clarity Diagnostics immediately.
2. With your meter turned off, insert the new code chip into the code
chip slot of the meter. It should easily snap into place. The code
chip should remain in the meter, do not take it out until you change
to another new box of test strips.
Step 2 - Adjusting the Meter Settings
Adjust the meter settings to set the clock, ensuring that results stored in
the memory are shown with the correct date and time. You can also turn
the meter audio feature on or off. You need to adjust the meter settings
before you first use your meter.
You will need to set the clock settings after replacing the battery.
1. Press the S button to enter the meter setup mode. The meter will
automatically enter the setup mode when turned on for the first time
by any method.
2. First, set the clock for either 12 or 24 hour mode. Press the M
button to switch between the two settings, then press the S button
to save your choice and start setting the year, month and date.
OR
3. The year will appear at the top of the display. Press the M button
until the correct year is displayed. Once you have selected the
correct year, press the S button to save your choice and start
setting the month. Press the M button until the correct month is
displayed, then press the S button to save your choice and start
setting the date. Press the M button until the correct date is
displayed, then press the S button to save your choice and start
setting the time.
Year
Month
Date
CODE
135
CODE
135
135
CTRL High
Note: If a test strip is inserted and no strip code is stored in memory, the
display will flash "- - - CODE".
4. The hour will appear at the top of the display. Adjust the hour with
the M button until the correct hour is displayed. Press the S button
to save your choice and set the minutes. Press the M button to
change to the correct minute. Press the S button to save your
choice and move to set the audio feature.
11
12
En
En
Hour
Hour
OR
Minutes
Minutes
OR
5. Audio Feature
The meter comes with the meter audio feature enabled. The meter
will give one short beep when it is turned on, after sufficient sample
has been applied to the test strip and when the result is ready. The
meter will sound three short beeps to sound a warning when an
error has occurred. Please check the error number on the display to
confirm what kind of error has occurred.
Press the M button to switch between turning the meter beep "On"
and "Off". Press the S button to confirm your selection. Pressing S
at this point will end the setup mode and power off the meter.
Performing a Quality Control Test
The quality control test confirms that the test strips and meter are
working together properly, and that you are performing the test correctly.
It is important to perform this test:
· Before you first use your meter, to familiarize yourself with its
operation.
· Before using a new box of test strips.
· When you suspect that the meter or test strips are not working
properly.
· When you suspect that your test results are inaccurate, or if they
are inconsistent with how you feel.
· When you suspect your meter is damaged.
· After cleaning your meter.
· At least once a week.
1. Insert a test strip into the strip port, contact bars end first and facing up,
to turn on the meter and display all the display segments. If the audio
option is on, the meter will beep, signaling the meter is turned on.
mmoll L
MEM
mgl dL
CODE
2. Check the display to confirm that all the display segments turn on
(see display illustration above).
OR
13
3. Following this display check, the system will
enter the test mode. The display will show the
date and time and the strip icon with the blood
sample icon blinking. The code number will be
displayed in the center of the screen. Make
sure that the code number that appears on
the display matches the code number (CODE)
CODE
on the test strip vial. If not, make sure to
locate and insert the code chip that came with the box of strips. If
the codes still do not match, do not perform a test. You will need a
new package of test strips to perform a test.
The blinking test strip and blood drop icon indicates that the test
strip is inserted correctly and a drop of control solution can be
added.
Note: If the test strip has been inserted incorrectly, the meter will not
turn on.
14
En
1 and 2
for delicate skin
3
for normal skin
4 and 5
for calloused or thick skin
Note: Greater pressure of the lancing device
against the finger will also increase the
puncture depth.
3 4 5
The forearm and palm areas have fewer nerve endings than the
fingertip so you may find that obtaining blood from these sites is less
painful than from the fingertip. The technique for forearm and palm
sampling is different. You need the clear cap to draw blood from these
sites. The clear cap is not adjustable for puncture depth.
5
IMPORTANT: There are important differences between forearm, palm
and fingertip samples that you should know. Important information
about forearm and palm glucose testing:
· When blood levels are changing rapidly such as after a meal,
insulin dose or exercise, blood from the fingertips may show these
changes more rapidly than blood from other areas.
· Fingertips should be used if testing is within 2 hours of a meal,
insulin dose or exercise and any time you feel glucose levels are
changing rapidly.
· You should test with the fingertips anytime there is a concern for
hypoglycemia or you suffer from hypoglycemia unawareness.
3 4
5. Pull the cocking barrel back to set the lancing
device. You may hear a click. The device is
now loaded and ready for obtaining a drop of
blood.
Forearm or Palm (at the base of the thumb) Testing
6. Prior to testing, wipe your hand with an
alcohol swab or wash your hands with soap.
Use warm water to increase blood flow in
your fingers if necessary. Then dry your
hands thoroughly. Massage the hand from
the wrist up to the fingertip a few times to
encourage blood flow.
Please refer to Fingertip Testing to insert the lancet and load the
lancing device.
7. Hold the lancing device against the side of
the finger to be lanced with the cover resting
on the finger. Push the release button to prick
your fingertip. You should hear a click as the
lancing device activates. Gently massage
from the base of the finger to the tip of the
finger to obtain the required blood volume.
Avoid smearing the drop of blood.
For the greatest reduction in pain, lance on
the sides of the fingertips. Rotation of sites is
recommended. Repeated punctures in the
same spot can make your fingers sore and
calloused.
19
5
1. Screw the clear cap onto the lancing device.
3 4
En
2. Choose a puncture site on the forearm or
palm. Select a soft, fleshy area of the
forearm that is clean and dry, away from
bone, and free of visible veins and hair.
To bring fresh blood to the surface of the
puncture site, massage the puncture site
vigorously for a few seconds until you feel it
getting warm.
20
En
En
4. The meter will count down from 9 to 1 and
then display the measurement results. The
meter will also beep to indicate that
measurement is complete.
To mark invalid results and to prevent them
from being included in the 7, 14 and 30 day
averages, press the M and S buttons
together. A pound sign (#) will appear on the
display to show that the result will not be
included when calculating the 7, 14 and 30day averages. If a result is marked by
accident, press the M and S buttons again to
unmark the result. After marking the invalid
result, run the test again with a new test strip.
If an error message appears on the display,
refer to the Troubleshooting Guide on page
31. If a "HI" or "LO" error appears on the
display, refer to "HI" and "LO" messages
below.
5. After inspection, record valid results in your
logbook with the date and time, and compare
them to the target goals set by your
healthcare professional. Refer to Suggested
Testing Times and Target Goals on page
29 and your logbook for more details on your
target blood glucose concentration goals.
"HI" and "LO" Messages
mgl dL
The meter can accurately measure blood glucose concentrations
between 20 to 600 mg/dL. "HI" and "LO" messages indicate results
outside of this range.
If "HI" appears on the display, the measured
concentration value is above 600 mg/dL. The test
should be retaken to ensure that no mistake was
made in the procedure. If you are certain the
meter is functioning properly and no mistakes
were made in the procedure, and your blood
glucose is still consistently measured as "HI", it
indicates severe hyperglycemia (high blood
glucose). You should contact your healthcare
professional immediately.
If "LO" appears on the display, the measured
concentration value is below 20 mg/dL. The test
should be retaken to ensure that no mistake was
made in the procedure. If you are certain the
meter is functioning properly and no mistakes
were made in the procedure, and your blood
glucose is still consistently measured as "LO", it
may indicate severe hypoglycemia (low blood
glucose). You should treat yourself for
hypoglycemia immediately as recommended by
your healthcare professional.
6. Remove and discard the test strip.
Precautions and Limitations
· The meter, test strips and other components have been designed,
tested and proven to work together effectively to provide accurate
blood glucose measurements. Do not use components from other
brands.
· Use only with whole blood. Do not use with serum or plasma
samples.
· Do not use for testing newborns.
· Do not use the meter in any manner not specified by the
manufacturer. Otherwise, the protection provided by the meter may
be impaired.
· Very high (above 55%) and very low (below 30%) hematocrit can
cause false results. Talk to your healthcare professional to find out
your hematocrit level.
23
24
En
En
· Abnormally high levels of Vitamin C (ascorbic acid),
Acetaminophen, Uric Acid, L-Dopa, Tolazamide or other reducing
substances will produce falsely high blood glucose measurements.
· Fatty substances (Triglycerides up to 3,000 mg/dL or Cholesterol up
to 500 mg/dL) have no major effect on blood glucose test results.
· The Clarity Plus Blood Glucose Monitoring System has been tested
and shown to work properly up to 8,516 ft (2,595 meters).
· Severely ill persons should not run the glucose test with the Clarity
Plus Blood Glucose Monitoring System.
· Blood samples from patients in shock, or with severe dehydration or
from patients in a hyperosmolar state (with or without ketosis) have
not been tested and are not recommended for testing with Clarity
Plus Blood Glucose Monitoring System.
· Dispose of blood samples and materials carefully. Treat all blood
samples as if they are infectious materials. Follow proper
precautions when disposing of materials.
Using the Meter Memory
The meter automatically stores up to 300 test records. Each record
includes the test result, time and date. If there are already 300 records in
memory, the oldest record will be erased to make room for a new one.
The meter will also calculate the average values of records from the last
7, 14 and 30 days.
Viewing Stored Records
To view stored records:
1. Press the M button to turn the meter on and enter memory mode.
The most recent value and the word "MEM" will appear on the
display.
mgl dL
MEM
If you are using the meter for the very first time, the meter display
will show three dashed lines (---), the word "MEM" and the unit of
measure. This shows that no data have been stored in memory.
mgl dL
MEM
2. The date and time will be displayed together with the results stored
in memory. A pound sign (#) indicates records that will be omitted
from the 7, 14 and 30 day averages.
3. Press the M button to go through the stored records.
4. Press the S button to view the data averages. The words "DAY
AVE" will appear on the screen.
Note: If you do not wish to view your average glucose
measurements, you can press the S button again to turn off the
display.
25
26
En
En
Suggested Testing Times
and Target Goals
Tracking your blood glucose concentration through frequent testing is
an important part of proper diabetes care. Your diabetes health care
professional will help you to decide the normal target range for your
glucose levels. They will also help you determine when and how often
to test your blood glucose. Some suggested times are:
· When you wake up (fasting level)
· Before breakfast
· 1-2 hours after breakfast
· Before lunch
· 1-2 hours after lunch
· Before or after exercise
· Before dinner
· 1-2 hours after dinner
· Before bedtime
· After a snack
· At 2 or 3 AM, if taking insulin
You may need to test more often whenever1:
· You add or adjust your medication for diabetes.
· You think your blood glucose levels may be too low or too high.
· You are ill, or feeling uncomfortable over long periods of time.
Expected blood glucose levels for people without diabetes:2
Range, mg/dL
70 - 100
Less than 140
Time
Fasting and Before Meals
2 Hours after Meals
Comparing Meter
and Laboratory Results
Your Clarity Plus Blood Glucose Monitoring System and laboratory
results both report the glucose concentration in the serum or plasma
component of your blood. However, the results may differ somewhat
due to normal variation. This is expected, but the difference under
normal operating conditions should be no greater than 20%. To ensure
a reasonable comparison, follow these guidelines.
Before you go to the lab:
· Bring your meter, test strip and control solution with you to the lab.
· Make sure your meter is clean.
· Perform a quality control test to make sure the meter is working
properly.
· Comparisons will be more accurate if you do not eat for at least four
hours (preferably eight hours) before testing.
At the lab:
· Wash your hands before obtaining a blood sample.
· Obtain blood samples for a laboratory test and for your meter within
10 minutes of each other. This will ensure an accurate comparison
of results.
· Never use your meter with blood that has been placed in test tubes
containing fluoride or other anticoagulants. This will cause falsely
low results.
Your Target Range
Time of Day
Waking up (Fasting level)
Before meals
2 hours after meals
Bedtime
2 AM to 3 AM
Other
Use the logbook to record your blood glucose measurements and
related information. Bring the logbook with you when visiting your
physician so that you can determine how well your blood glucose is
being controlled. This can help you and your health care professional
make the best decisions about your glucose control plan.
1. Jennifer Mayfield and Stephen Havas, "Self-Control: A Physician's Guide to Blood Glucose
Monitoring in the Management of Diabetes An American Family Physician Monograph"
2. ADA Clinical Practice Recommendations, 2003.
29
30
En
En
Specifications
Warranty
Feature
Specification
Measurement Range
20 to 600 mg/dL
Result Calibration
Plasma-equivalent
Sample
Fresh capillary whole blood
Minimum Sample Size
1 µL
Test Time
10 seconds
Power Source
One (1) CR 2032 3.0V coin cell battery
Battery Life
12 months or approximately 1,000 tests
Glucose Units of Measure
The meter is pre-set to milligrams per
deciliter (mg/dL)
Memory
Up to 300 records with time and date
Meter Size
85mm x 54mm x 20.5mm
Display Size
35mm x 32.5mm
Weight
Approximately 49.5 g
(with battery installed)
Operating Temperature
5-45 oC (41 - 113oF)
En
Please complete the warranty card that came with this product and mail
it to Clarity Diagnostics to register your purchase.
If the meter fails to work for any reason other than obvious abuse within
the first five (5) years from purchase, we will replace it with a new
meter free of charge. For your records, also write the purchase date of
your product here.
Date of purchase:
Note: This warranty applies only to the meter in the original purchase,
and does not apply to the battery supplied with the meter.
Operating Relative Humidity 20-90% (non-condensing)
Hematocrit Range
30-55%
33
34
En
Index
Averaging Results...................26
Procedure
Precautions and Limitations.....24
Battery, Replacing the.............28
Carrying Case.............................1
Testing Your Blood....................17
Clearing the Memory...............27
Quality Control Test.................14
Data Port......................................3
Control Solution..........................8
How to Run...............................14
Date Format............................7, 9
Results
Guidelines....................................i
Blood Glucose..........................23
Hematocrit..........................24, 33
Control Solution........................15
Install the Battery.....................10
Meter vs. Lab Results...............30
Lancing Device...............1, 17, 28
Target Goals..............................29
Lancets..................................1, 17
Unit of Measure...................15, 29
Logbook................................2, 29
Suggested Testing Times........29
Maintenance and Disposal..5, 28
Test Strip.....................................5
Measure, Unit of ..................4, 15
Code............................................6
Meter............................................3
Expiration.....................................7
Audio feature............................13
Precautions.................................8
Cleaning....................................28
Testing Your Blood..................17
Code chip....................................2
Get a Drop of Blood..................17
Display.........................................4
Test Blood Glucose...................22
Error Messages.........................31
Troubleshooting.......................31
"HI" and "LO" Messages...........24
Viewing Stored Records.........26
M Button......................................3
Warranty..............................2, 34
Memory......................................26
Meter code................................11
Meter Setup...............................11
Meter Use and Precautions........5
S Button.......................................3
Set the Clock.............................12
Specifications............................33
35