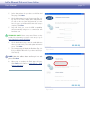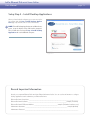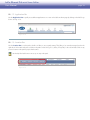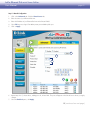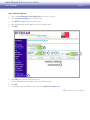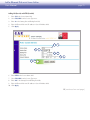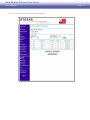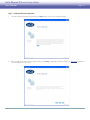
1
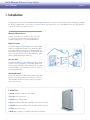
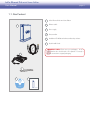
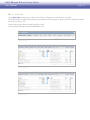
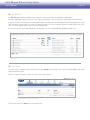
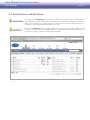
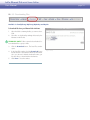
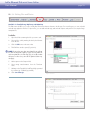
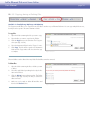
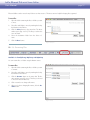
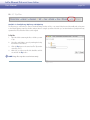
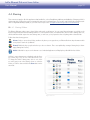
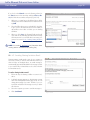
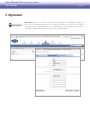
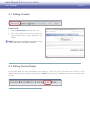
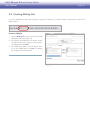
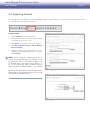
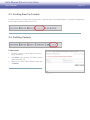
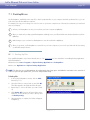
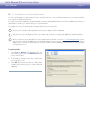
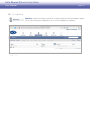
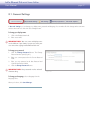
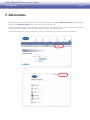
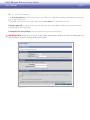
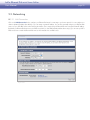
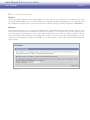
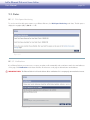
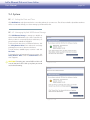
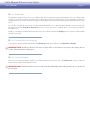
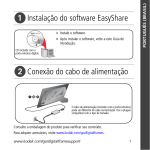
Ethernet Disk mini
home
user manual
manuel utilisateur
manual de instrucciones
gebruikershandleiding
guída utente
handbuch
ed i t i o n
LaCie Ethernet Disk mini Home Edition
User Manual
page Table of Contents
Health and Safety Precautions
General Use Precautions
4
4
1. Introduction
I want to:
1.1. Box Content
1.2. System Requirements
1.3. Specifications and Services
5
5
6
7
8
9
2. Installation and Setup
Setup Step 1 – Verify10
Setup Step 2 – Connect10
Setup Step 3 – Install and Configure Device11
Setup Step 4 – Install Desktop Applications13
Record Important Information13
3. Connecting to Your Ethernet Disk mini Home
14
3.1. HipServ Agent with QuickConnect15
3.2. LaCie Media Portal16
4. Sharing Your Content and Managing Files
17
4.1. About the Browser Interface17
4.1.1. Welcome Home Page17
4.1.2. Application Bar18
4.1.3. Location Bar18
4.1.4. Action Bar19
4.1.5. File List
20
4.1.6. Search
20
4.2. Family Library and My Library
21
4.3. Managing Files
22
4.3.1. Creating Folders
22
4.3.2. Uploading Content
23
4.3.3. Downloading Files
24
4.3.4. Editing Files and Photos
25
4.3.5. Copying, Moving or Deleting Files
26
4.3.6. Renaming Files
27
4.3.7. Zip Files
28
4.4. Sharing
29
4.4.1. Sharing Folders
29
4.4.2. Sending Sharing Invitation Email
30
5. MyContacts
5.1. Adding Contacts
5.2. Editing Contact Details
5.3. Creating Mailing Lists
5.4. Importing Contacts
5.5. Sending Email to Contacts
5.6. Deleting Contacts
31
32
32
33
34
35
35
6. Digital Media Sharing and Home Entertainment
Digital Media Server (DMS)
Digital Media Players (DMP)
36
36
36
LaCie Ethernet Disk mini Home Edition
User Manual
Digital Media Standards
page 37
7. Sync and Back Up Files
7.1. DesktopMirror
7.1.1. Backing Up Files
7.1.2. Scheduling Backups
7.1.3. Restoring Files
7.1.4. DesktopMirror Synchronization Mode
7.1.5. MyBackup
7.2. MySafe
7.2.1. Connecting an External USB Hard Drive
7.2.2. Backing Up Files to the USB Hard Drive
7.2.3. Restoring Files to the Ethernet Disk mini
7.2.4. Disconnecting your MySafe External Hard Drive
38
39
39
40
40
41
42
43
43
44
44
45
8. Settings
8.1. General Settings
8.2. MyContacts Settings
8.3. File Settings
46
47
48
48
9. Administration
9.1. Adding and Managing Users
9.1.1. Adding Users
9.1.2. User Management
9.2. Networking
9.2.1. LAN Connection
9.2.2. Network Services
9.2.3. Router Configuration
9.2.4. Windows Networking
9.3. Status
9.3.1. Disk Space Monitoring
9.3.2. Notifications
9.4. System
9.4.1 Setting the Date and Time
9.4.2. Managing MySafe USB External Storage
9.4.3. Registration
9.4.4. Shutting Down or Restarting
9.4.5. Software Update
49
50
50
51
52
52
53
53
54
55
55
55
56
56
56
57
57
57
Appendix A: Router Configuration
D-Link® Router Configuration
Linksys® Router Configuration
Netgear® Router Configuration
58
58
63
68
LaCie Ethernet Disk mini Home Edition
User Manual
Copyrights
Copyright © 2007 LaCie. All rights reserved. No part of this publication may
be reproduced, stored in a retrieval system, or transmitted in any form or by any
means, electronic, mechanical, photocopying, recording or otherwise, without
the prior written consent of LaCie.
Trademarks
Apple, Mac, and Macintosh are registered trademarks of Apple Computer, Inc.
Microsoft, Windows 2000, Windows XP
and Windows Vista are registered trademarks of Microsoft Corporation. Other
trademarks mentioned in this manual are
the property of their respective owners.
Changes
The material in this document is for information only and subject to change
without notice. While reasonable efforts
have been made in the preparation of this
document to assure its accuracy, LaCie
assumes no liability resulting from errors
or omissions in this document, or from the
use of the information contained herein.
LaCie reserves the right to make changes
or revisions in the product design or the
product manual without reservation and
without obligation to notify any person of
such revisions and changes.
2.
The devices must accept any interference received, including interference that may cause undesired operation.
NOTE: This equipment has been tested
and found to comply with the limits for
a Class B digital device, pursuant to Part
15 of the FCC Rules. These limits are designed to provide reasonable protection
against harmful interference in a residential installation. This equipment generates,
uses and can radiate radio frequency energy and, if not installed and used in accordance with the instructions, may cause
harmful interference to radio communications. However, there is no guarantee that
interference will not occur in a particular
installation. If this equipment does cause
harmful interference to radio or television reception, which can be determined
by turning the equipment off and on, the
user is encouraged to try and correct the
interference by one or more of the following measures:
❖ Reorient or relocate the receiving antenna.
❖ Increase the separation between the
equipment and receiver.
❖ Connect the equipment into an outlet
on a circuit different from that to which
the receiver is connected.
Modifications to this product not authorized by LaCie could void the FCC & Industry Canada regulations and negate
your authority to operate the product.
FCC Statement
Manufacturer’s Declaration
for CE Certification
We, LaCie, solemnly declare
that this product conforms to the following
European standards: Class B EN60950,
EN55022, EN55024
LaCie Hard Drive
This device complies with Part 15 of the
FCC Rules. Operation is subject to the
following conditions:
.
The devices may not cause harmful
interference
This symbol on the product
or on its packaging indicates
that this product must not be
disposed of with your other
household waste. Instead, it
is your responsibility to dispose of your
waste equipment by handing it over to a
designed collection point for the recycling
of waste electrical and electronic equipment. The separate collection and recycling of your waste equipment at the time
of disposal will help to conserve natural
resources and ensure that it is recycled in
a manner that protects human health and
the environment. For more information
about where you can drop off your waste
equipment for recycling, please contact
your local city office, your household
waste disposal service, or the shop where
you purchased the product.
CAUTION: Modifications not
authorized by the manufacturer may
void the user’s authority to operate
this device.
CAUTION: This LaCie hard
drive's warranty may be void as a
result of the failure to respect the
precautions listed above.
❖ Consult the dealer or an experienced
radio/TV technician for help.
Canada Compliance Statement
This Class A digital apparatus meets all
requirements of the Canadian Interference-Causing Equipment Regulations.
Tested to comply with
FCC standards for home
or office use
page With reference to the following conditions: 73/23/EEC Low Voltage Directive;
89/336/EEC EMC Directive
CAUTION: A shielded-type
power cord is required in order to
meet FCC emission limits and also
to prevent interference to the nearby
radio and television reception. It is
essential that only the supplied power cord be used.
LaCie Ethernet Disk mini Home Edition
User Manual
page Health and Safety Precautions
❖ Only qualified persons are authorized
to carry out maintenance on this device.
❖ Read this user manual carefully and
follow the correct procedure when setting up the device.
❖ Do not open your LaCie Mobile Hard
Drive or attempt to disassemble or
modify it. Never insert any metallic
object into the drive to avoid any risk
of electrical shock, fire, short-circuiting
or dangerous emissions. Your LaCie
Mobile Hard Drive contains no userserviceable parts. If it appears to be
malfunctioning, have it inspected by a
qualified LaCie Technical Support representative.
❖ Never expose your device to rain, or
use it near water, or in damp or wet
conditions. Never place objects containing liquids on the LaCie Mobile
Hard Drive, as they may spill into its
openings. Doing so increases the risk
of electrical shock, short-circuiting, fire
or personal injury.
❖ Make sure that the computer and
LaCie Mobile Hard Drive are electrically grounded. If the devices are not
grounded, there is an increased risk of
electrical shock. Power requirements
100-240 V~, 1.5 A, 60-50 Hz, (Supply voltage fluctuations not exceeding
± 10% of the nominal, transient overvoltages according to over-voltage
category II).
General Use Precautions
❖ Do not expose the LaCie Mobile Hard
Drive to temperatures outside the
range of 5° C to 35° C (41° F to 95°
F); or to operational humidity beyond
5-80%, non-condensing, or non-operating humidity beyond 10-90%, noncondensing. Doing so may damage
the LaCie Mobile Hard Drive or disfigure its casing. Avoid placing your LaCie Mobile Hard Drive near a source
of heat or exposing it to sunlight (even
through a window). Inversely, placing
your LaCie Mobile Hard Drive in an
environment that is too cold or humid
may damage the unit.
❖ Always unplug the LaCie Mobile Hard
Drive from the electrical outlet if there
is a risk of lightning or if it will be unused for an extended period of time.
Otherwise, there is an increased risk
of electrical shock, short-circuiting or
fire.
❖ Do not place the LaCie Mobile Hard
Drive near sources of magnetic interference, such as computer displays,
televisions or speakers. Magnetic interference can affect the operation and stability of your LaCie Mobile Hard Drive.
❖ Use only the power supply shipped
with the device.
❖ Do not place heavy objects on top of
the LaCie Mobile Hard Drive or use
excessive force on it.
❖ Do not use the LaCie Mobile Hard
Drive near other electrical appliances
such as televisions or radios. Doing
so may cause interference which will
adversely affect the operation of the
other products.
❖ Never use excessive force on your LaCie Mobile Hard Drive. If you detect a
problem, see the Troubleshooting section in this manual.
Important Info: Any loss, corruption or destruction of data while using a LaCie drive is the sole responsibility of the user, and
under no circumstances will LaCie be held liable for the recovery or restoration of this data. To help prevent the loss of your data, LaCie
highly recommends that you keep two copies of your data; one copy on your external hard drive, for instance, and a second copy either
on your internal hard drive, another external hard drive or some other form of removable storage media. LaCie offers a complete line
of CD and DVD drives. If you would like more information on backup, please refer to our website.
Important Info: 1GB = 1,000,000,000 bytes. 1TB = 1,000,000,000,000 bytes. Once formatted, the actual available storage capacity varies depending on operating environment (typically 5-10% less).
LaCie Ethernet Disk mini Home Edition
User Manual
page 1. Introduction
Congratulations! As the owner of an Ethernet Disk mini Home Edition home server you’ve taken the latest step in expanding your digital
life. All of your digital media – photos, videos, recorded TV, music and computer files – are now available wherever you have an Internet
connection, whenever you want to access it.
Whenever, Wherever Access
At home, a friend’s house, an Internet café or the office,
you can access your personal content at home from a
computer, mobile phone, or any web enabled device.
Digitize Your Home
Your Ethernet Disk mini Home Edition is a powerful digital
media server (DMS) that can deliver your media throughout
your home, playing content from your Ethernet Disk mini
Home Edition on computers (Windows® or Macintosh®) and
many consumer electronic devices (IP-enabled TVs, game
stations, digital media players and more).
Store Your Stuff
Your Ethernet Disk mini Home Edition provides a central
location to store and organize your valuable digital assets.
Connect easily with HipServ Agent and back up your data
with DesktopMirror to ensure that your precious content is
saved and synchronized.
Share Digital Content
Go beyond simple photo album sharing. Allow friends and
family to secure access to the specific content you choose to
make available, whether it’s photos, word processing documents, video or music.
I want to:
❖ Install my Ethernet Disk mini Home Edition
❖ Create a new user account
❖ Share photos with my friends
❖ Access my Ethernet Disk mini Home Edition when I’m not at home
❖ Stream videos from my Ethernet Disk mini Home Edition to my TV
❖ Learn about iTunes Server
❖ Back up my computer to my Ethernet Disk mini Home Edition
LaCie Ethernet Disk mini Home Edition
User Manual
page 1.1. Box Content
1
2
LaCie Ethernet Disk mini Home Edition
2
Ethernet cable
3
Power supply
4
Drive stand kit
5
Installation CD-ROM with utilities and backup software
6
Quick Install Guide
Important Info: Please save your packaging. In the
event that the drive should need to be repaired or serviced, it
must be returned in its original packaging.
3
4
5
1
6 ethernet disk mini
HOME EDITION
Quick Install Guide
LaCie Ethernet Disk mini Home Edition
User Manual
page 1.2. System Requirements
■ Network Requirements
To make use of all the Ethernet Disk mini Home features, you will need the following:
❖ Consumer Broadband Internet connection: HipServ utilizes ports 80 (http _, 443 (https) and 22 (ssh) unblocked (without this,
you can still set up HipServ and use it locally, but remote access will not be possible). Consult your ISP for more details.
Technical note: If your ISP or firewall blocks port 80, remote access will not be possible.
❖ Internet gateway/router providing DHCP service with UPnP enabled: If the router does not have UPnP or if UPnP is not
enabled, see the troubleshooting section for enabling UPnP and the automated setup or manual configuration of the router to enable remote access.
❖ USB hard drive (for backing up your Ethernet Disk mini to MySafe only)
■ Computer Requirements
Windows Users
❖ Windows 2000 SP4, Windows XP SP2 or Windows Vista
❖ 500MHz Pentium III or greater
❖ 512MB RAM
❖ CD- or DVD-ROM drive
❖ Web browser (Internet Explorer 6.0 or later, Firefox 1.5 or later)
Mac Users
❖ Mac OS 10.3 or later
❖ G3 or later or Intel Core processor
❖ 512MB RAM or greater
❖ CD- or DVD-ROM drive
❖ Web browser (Firefox 1.5, or Safari 1.3 or later)
LaCie Ethernet Disk mini Home Edition
User Manual
page 1.3. Specifications and Services
■ Software
Included Software
System Software: Axentra HipServ 1.5
Desktop Software: HipServ Desktop Agent, QuickConnect, Desktop Mirror (Backup & Sync) for Windows and Mac
■ Services
Services
Remote Access Service: Includes free personal remote access. Operates on any broadband connection. Optional Premier Service
enables remote access for friends and family plus additional features and enhanced functionality.
■ Supported Media, Mobile Devices and UPnP Player Compatibility
Supported Media Formats
Media Class
Supported Formats
Image
JPEG, PNG, BMP, TIFF
Audio
MP3, WMA, WAV, 3GP, M4A, MP4, LPCM, Ogg Vorbis, FLAC, MP2, AC3, MPA, MP1, AIF
note: iTunes unprotected DRM files are “M4A” audio files. Video files are M4V and protected music is in
M4P (protected music can be played on computers authorized to play it)
AV
MPEG1, MPEG2, MPEG2-TS, MPEG4, AVI, WMV, VOB, DivX, 3GP, VDR, ASF, MPE, DVR-MS, Xvid, M1V, M4V
Internet Raido
vTuner, Shoutcast
Playlists
WPL, PLS, M3U
UPnP Media Player Compatibility
Media players supporting uPnP-AV, Windows Connect, and DLNA certified devices, Netgear EVA8000, PS3 / Xbox360, Kodak
EX1011 and EX811 for digital picture frames have wireless connectivity, Loewe TV Connect, networked sound system like a Roku,
Sonos or Squeezebox
Supported Mobile Devices (Premium version only)
Playstation Portable, Pocket PCs, iPhone, Blackberry, Windows Mobile Phones, Mobile Phone (Nokia N95 ...)
LaCie Ethernet Disk mini Home Edition
User Manual
2. Installation and Setup
Carefully follow these steps to set up your LaCie Ethernet Disk mini Home Edition:
Step 1
Verify – Make sure your computer and network meet the minimum requirements
Step 2
Connect – Connect your Ethernet Disk mini Home Edition to your network
Step 3
Install and Configure Device – Configure LaCie Home and install desktop applications
Step 4
Install Desktop Applications – Install DesktopMirror and HipServ Agent
Step 5
Record Important Information
page LaCie Ethernet Disk mini Home Edition
User Manual
page 10
Setup Step 1 – Verify
Verify System and Connection Requirements
Before connecting your Ethernet Disk mini, make sure that your broadband home network is running properly. Make sure you are able
to access the Internet from your computer.
HipServ automatically configures the majority of today’s consumer routers utilizing UPnP features. Make sure your router UPnP-enabled.
If the router is not UPnP enabled, refer to http://www.homelacie.com/help/router/ for manual configuration help.
HipServ Connection Requirements
❖ Broadband Internet connection utilizes Ports 80 (http), 443 (https) and 22 (ssh) unblocked – refer to your ISP for details
❖ UPnP router (with UPnP enabled; see router user guide) or refer to http://www.homelacie.com/help/router for more details
❖ Personal Computer running Microsoft Windows 2000/XP/Vista or Mac OS X 10.3 or later (for more information, see section 1.2,
System Requirements)
❖ Internet Explorer 6 or higher, Firefox 1.5 or higher, Safari 1.3 or later
HipServ Desktop Applications Minimum Requirements
For HipServ Agent, QuickConnect and DesktopMirror:
❖ Windows XP SP2, Vista, 2000 SP4 or Mac OS 10.3 or later
Setup Step 2 – Connect
Unpack your Ethernet Disk mini. See section 1.1, Box
Contents to make sure you have everything you need.
2.
Connect the power cord (B, Fig. 2.1) to the Ethernet
Disk mini and to a grounded electrical outlet.
3.
Connect the included Ethernet cable to your Ethernet
Disk mini and to your router (A, Fig. 2.1).
4.
Press the blue power button on front of the device.
5.
Wait for the solid blue light. Continue to step 3.
USB
.
B
Figure 2.2
Power button
A
LaCie Ethernet Disk mini Home Edition
User Manual
page 11
Setup Step 3 – Install and Configure Device
■ Registration and Setup
.
Insert the LaCie Utilities CD into your computer’s CDor DVD drive to begin the Ethernet Disk mini - Home
Edition Setup program.
2.
On the Ethernet Disk mini Setup page, click Step 1 Setup (Fig. 2.3-A) and follow the on-screen instructions.
3.
On the End User License Agreement page, click
Agree.
Figure 2.3-A
4.
On the Registration page (Fig. 2.3-B) enter the 16-letter product key on the back of your drive (Fig. 2.3-C)
and give your Ethernet Disk mini a name. The name
you enter here will be the “Portal Name” you use to log
in to your Ethernet Disk mini. Click Next.
note: Try to choose a name that is easy to remember.
This is the name you will give to friends or family with
whom you want to share content.
■ (continued on next page)
Figure 2.3-B
AAAA-AAAA-AAAA-AAAA
Figure 2.3-C
LaCie Ethernet Disk mini Home Edition
User Manual
5.
Set the date and time for your device on the Date and
Time page. Click Next.
4.
On the Administrator Account Creation page (Fig. 2.3D), enter a user name, display name and password.
You will use the user name and password you enter
here to log in to your Ethernet Disk mini when setup is
complete. Click Next.
5.
Setup will check your router for UPnP compatibility
and automatically configure it to communicate with
homelacie.com.
page 12
technical note: Router setup varies. Please see Appendix A for information on proper router setup or go to
www.homelacie.com/help/router.
6.
On the Notifications page, enter the email addresses
where you want notices, errors and update information
sent to. Click Next.
7.
The Summary page will display the IP address (Fig. 2.3E) of your Ethernet Disk mini on your home network (ex.
192.168.1.5).
Figure 2.3-D
note: Write this address down and keep it in a safe
place. Click Next.
8.
When setup is complete, the Finish page will open.
Click Finish and continue to Setup Step 4 – Install
Desktop Applications.
Figure 2.3-E
LaCie Ethernet Disk mini Home Edition
User Manual
page 13
Setup Step 4 – Install Desktop Applications
When you have finished configuring your router return to the
Setup page and click Step 2 Install Desktop Applications (Fig. 2.4) and follow the on-screen instructions.
NOTE: To install Desktop Applications on additional computers, insert the HipServ Setup CD into the computer’s
CD- or DVD drive and repeat Step 2 Install Desktop
Applications for each additional computer.
Figure 2.4
Record Important Information
Record your important Ethernet Disk mini Home Edition Information below. You can use this information to configure
desktop applications and to administer your Ethernet Disk mini.
Ethernet Disk mini Setup Notes:________________________________________________________________________
Ethernet Disk mini Hostname: ________________________________________________________example (TheSmiths)
Ethernet Disk mini Full Domain Address: __________________________________ example (TheSmiths.homelacie.com)
Administrator Username: _____________________________________________________________ example (MrSmith)
Administrator Password: ______________________________________________________________________________
LaCie Ethernet Disk mini Home Edition
User Manual
page 14
3. Connecting to Your Ethernet Disk mini Home
There are several ways to connect to HipServ to save or retrieve your media. Choose the method that works best for you and the way
you like to use your computer.
3.1 HipServ Agent with QuickConnect works like your Windows Explorer or Macintosh Finder and is a fast way
to access or upload files.
Page 15
3.2. LaCie Media Portal is a universal interface that works from any web browser that has an Internet connection and
can be used either on your local network or across the Internet. A Drag and Drop mode makes uploading files easy.
Page 16
LaCie Ethernet Disk mini Home Edition
User Manual
page 15
3.1. HipServ Agent with QuickConnect
The fastest and easiest method of connecting to your Ethernet Disk mini is to use the HipServ Desktop Agent (see Setup Step 4, Install
Desktop Applications). The Desktop Agent will automatically connect you to your Ethernet Disk mini folders using Windows Explorer or
Mac Finder or automatically navigate to your device using your default Web browser.
HipServ Desktop Agent uses QuickConnect to find your Ethernet Disk mini, but QuickConnect is also installed as a separate application:
❖ Windows users: Start > Programs > HipServ Desktop Applications > QuickConnect
❖ Mac users: Applications > HipServ Desktop Applications > SmartFolderShortcut
■ Accessing folders using Windows Explorer or Mac Finder:
The first time you use your Ethernet Disk mini Home Edition, you’ll probably want to transfer your digital library from your computer
to the Ethernet Disk mini. The fastest and easiest way to do this is to open an Windows Explorer window or a Mac Finder window and
simply drag and drop files from your computer to your Ethernet Disk mini. This method works much better for transferring large folders
containing many large files (like your music library) than does the browser interface. You might find that this method is more comfortable
for everyday use because it’s exactly the same as managing any other folder on your computer.
Windows Users
.
Click on the HipServ Agent icon in the system tray.
2.
Select Explore my HipServ folders. QuickConnect
will determine the status of your connection to your
Ethernet Disk mini.
3.
Select the first option, showing your Ethernet Disk mini’s
web address and “(home)”. Click OK.
4.
Enter your user name and password. Click OK.
5.
A Windows Explorer window will open displaying the
three default folders – FamilyLibrary, MyBackup and
MyLibrary (Fig. 3.1-B).
Figure 3.1-A
Now just open the folders on your Ethernet Disk mini and
drag files from your desktop or from another Explorer window.
Figure 3.1-B
LaCie Ethernet Disk mini Home Edition
User Manual
page 16
Mac Users
.
Right-click (control-click) on the HipServ Agent icon in
the dock.
2.
Select Explore my HipServ folders (Fig. 3.1-C).
QuickConnect will determine the status of your connection to your Ethernet Disk mini.
3.
Select the first option, showing your Ethernet Disk mini’s
web address and “(home)”. Click OK.
4.
Enter your user name and password. Click OK.
5.
A Finder window will open displaying the three default
folders – FamilyLibrary, MyBackup and MyLibrary.
Figure 3.1-C
3.2. LaCie Media Portal
The LaCie Media Portal web interface is the most common and most universal method of connectivity for web-enabled devices.
Combined with HipServ’s whenever, wherever capability, the experience at home is the similar to the experience on the road,
whether you’re using a laptop computer or a web-enabled cellular phone (cell phone service available with premium service
only).
To connect to your Ethernet Disk mini Home using a Web
browser:
.
Open your web browser (Internet Explorer, Safari or
Firefox) and go to www.homelacie.com. Or use
QuickConnect and select the Navigate to www option.
2.
Enter the portal name you created in Setup.
3.
Enter the user name and password you created in
Setup.
4.
Select Remember Me to automatically fill the portal
name and user name fields when you return to this
page.
5.
Click Sign In.
Figure 3.2
LaCie Ethernet Disk mini Home Edition
User Manual
page 17
4. Sharing Your Content and Managing Files
First, a few common terms:
Applications: refers to the different screens available when you sign in to your Ethernet Disk mini Home Edition with a web browser
(Internet Explorer, Firefox, Safari, etc.), such as FamilyLibrary, MyLibrary or MyBackup.
Upload: the act of transferring files from your computer to your Ethernet Disk mini.
Download: the opposite of Upload – the act of transferring files from your Ethernet Disk mini to your computer.
Sharing: Controlling who can access your files (such as a photo album, or home video). They can be made available to only you, to
the whole world, or to only a specified group of people. Invitations to remotely access content on your Ethernet Disk mini can be sent
to friends and family through an email that includes a secure link.
File management and sharing are the primary functions of the LaCie Ethernet Disk mini. In this section, you’ll learn how to use the
browser interface to access, download, upload and share your files.
4.1. About the Browser Interface
Take a few moments to familiarize yourself with the parts of the Ethernet Disk mini interface.
The interface has five main parts: Application Bar, Location Bar, Action Bar, File List and Search. The Welcome Home page is where
you’ll start after logging in.
■ 4.1.1. Welcome Home Page
When you log in to your Ethernet Disk mini the personalized Welcome Home page opens. From this page you can
access all of the applications you’ll need to manage your
Ethernet Disk mini.
note: Although you can switch between applications at
any time, just click the blue LaCie logo in the upper left
corner of the page if you want to return to this page at
any time.
Figure 4.1.1
LaCie Ethernet Disk mini Home Edition
User Manual
page 18
■ 4.1.2. Application Bar
Use the Application Bar to quickly access different applications or to return to the Welcome Home page by clicking on the LaCie logo
button. See Fig. 4.1.2.
Figure 4.1.2
■ 4.1.3. Location Bar
Use the Location Bar to see the path to the file or folder you are currently viewing. The folder you’re currently viewing is listed on the
right side of the list with each previous folder in the path to its left. In Fig. 4.1.3, below, “Frosty Day” is the current folder. Click on any
previous location in the path to jump to that location.
Use the Up One Level button to move up one step in the path.
Figure 4.1.3
LaCie Ethernet Disk mini Home Edition
User Manual
page 19
■ 4.1.4. Action Bar
Use the Action Bar to perform various tasks to files or folders, to change the view of the file list or to get help.
The Download, Edit, Copy, Delete, Move, Rename, Zip, and Share buttons are grayed out (inactive) if no files or folders are selected in
the File List. See Fig. 4.1.4-A.
Selecting a file activates all actions except Share (Fig. 4.1.4-B).
Selecting a folder deactivates Download and Edit (Fig.4.1.4-C).
Figure 4.1.4-A
Figure 4.1.4-B
Figure 4.1.4-C
LaCie Ethernet Disk mini Home Edition
User Manual
page 20
■ 4.1.5. File List
The File List displays all files and folders in the location you are viewing. Folders are listed before individual files.
Select files and folders using the check boxes to the right of each filename or select the check box beside Name to select them all.
In Figure 4.1.5 below, the filenames are sorted alphabetically in ascending order, as indicated by the downward-pointing arrow to the
right of the Name column header. To sort files according to their type or size, click on the blue square to the right of Type or Size. Click
once to sort in ascending order or twice to click in descending order.
The columns in the File List change depending on the application you are using (FamilyLibrary, MyLibrary, MySafe, etc.).
Figure 4.1.5
■ 4.1.6. Search
To search for files or folders by name and by tag, click in the Search field, enter keywords to search for and click Go. Search results
appear in the File List area.
Figure 4.1.6, below, shows the results for a search on the keyword “photos.”
Figure 4.1.6 – Action Bar Inactive
To start a new search, click Clear and enter new keywords.
LaCie Ethernet Disk mini Home Edition
User Manual
page 21
4.2. Family Library and My Library
Files placed in the FamilyLibrary can be made accessible to all users with accounts on the Ethernet Disk
mini. FamilyLibrary contains default folders for FamilyDocuments, FamilyMusic, FamilyPhotos and FamilyVideos. Any user with access can add new folders or subfolders. Files can also be shared with anyone on
the Internet or with a Digial Media Player (DMP) in your home.
Files placed in MyLibrary folders are only accessible to the user who placed them there. Each user who
logs in only sees the files in their own MyLibrary. The same default folders exist as in the FamilyLibrary, and
the same rules apply to creating new folders and to sharing files.
Figure 4.2
LaCie Ethernet Disk mini Home Edition
User Manual
page 22
4.3. Managing Files
Use the Actions Bar to perform file management tasks such as uploading and downloading, moving, renaming, deleting and editing
files. The actions available in the Action Bar of each application vary depending on the action and the combination of files and folders
you have selected. All actions are listed in this section. Actions unique to a particular application are labeled accordingly.
For information on sharing, see section 4, Sharing Your Content and Managing Files.
■ 4.3.1. Creating Folders
Available in: FamilyLibrary, MyLibrary and My Computers
To create a new folder in any location:
.
Click the Create Folder button. The New Folder window opens.
2.
Enter a name for your new folder in the “Name” field.
3.
Choose a location for your new folder from the “Create in” menu. Double-click on a folder in the Create in
menu to see its sub-folders.
4.
Click Create Folder. The new folder appears in the
location you selected.
Figure 4.3.1
LaCie Ethernet Disk mini Home Edition
User Manual
page 23
■ 4.3.2. Uploading Content
Available in: FamilyLibrary, MyLibrary and MyBackup
To upload files or folders:
.
Navigate to the folder you want to upload files to.
2.
Click the Upload button. The Upload window opens.
3.
Select Manual Upload (selected by default) or Drag
and Drop. See below.
Manual Upload
For each file you want to add, click the Choose File button
and select the file to upload. When you have made your
selections, click the Upload button.
technical note: Folders cannot be uploaded with
the Manual Upload tool. To upload folders, use Drag and
Drop.
Drag and Drop
Drag and Drop is simple. Just open a Windows Explorer
window (Windows) or a Finder window (Mac), find the file or
folder you want to upload and drag it into the area indicated
in the Upload widow (Fig. 4.3.2-B). You can drag and drop
files from multiple locations on your computer, but they will
all be uploaded to the same folder on your Ethernet Disk
mini.
Figure 4.3.2-A
important info: You must have Java installed on
your computer to use Drag and Drop. If Java is not installed on your computer, use the prompts in the Drag
and Drop window to download and install Java. Please
note that you may need to close and restart your browser
for changes to take effect.
Figure 4.3.2-B
LaCie Ethernet Disk mini Home Edition
User Manual
page 24
■ 4.3.3. Downloading Files
Available in: FamilyLibrary, MyLibrary, MyBackup and MySafe
To download files from your Ethernet Disk mini Home:
.
Open the folder containing the files you want to download.
2.
Select files to download by marking the boxes by the
filenames in the File List.
technical NOTE: Folders cannot be downloaded. Select individual files or groups of files.
3.
Click the Download button. The Save Files window
opens.
4.
In the Save Files window, click the Download button
beside each file to download it. All files are downloaded to your browser’s default download location, just
like other files you download from the Internet.
5.
Click Done to close the window.
Figure 4.3.3
LaCie Ethernet Disk mini Home Edition
User Manual
page 25
■ 4.3.4. Editing Files and Photos
Available in: FamilyLibrary, MyLibrary and MyBackup
The Edit action will allow you to edit / modify files with actions that are relevant to the file type. For most file types, you can only add
and edit tags applied to the files. For photo files, you can add and edit tags, add and edit captions and perform some simple image
manipulations.
To edit files:
.
Open the folder containing the files you want to edit.
2.
Select a file to edit by marking the box by the filename
in the File List.
3.
Click the Edit button in the action bar.
4.
The Edit Photo window opens (Fig.4.3.4-A).
note: If you select more than one photo file you will not
be able to edit photo captions. If you select a photo file
and non-photo file, the Edit Tags (Fig. 4.3.4-B) window
will open. In either case, some of the options below may
not apply.
5.
Add a caption in the Caption field.
6.
Select image transformations from the Transform
menu.
7.
Add tags in the Tags field (or Add Tags field), separated
by commas (eg. cat,black,eyes,animal).
8.
Click Save Changes.
Figure 4.3.4-A
Figure 4.3.4-B
LaCie Ethernet Disk mini Home Edition
User Manual
page 26
■ 4.3.5. Copying, Moving or Deleting Files
Available in: FamilyLibrary, MyLibrary and MyBackup
The Copy action will allow you to copy files from one folder to another on your Ethernet Disk mini. You can copy multiple files at once,
but they must be copied to the same destination folder.
To copy files:
.
Open the folder containing the files you want to copy.
2.
Select the files you want to copy from the File List.
3.
Click the Copy button in the action bar. The Copy window opens (Fig. 4.3.5-A).
4.
Select the destination folder from the “Copy to” menu.
5.
Click Copy. The files will be copied to the destination
folder and the Copy window will close when the copy
is complete.
Figure 4.3.5-A
Files and folders can be deleted from any folder. Deleted files cannot be retrieved.
To delete files:
.
Open the folder containing the files or folders you want
to delete.
2.
Select files and folders by marking the box by the filename in the File List.
3.
Click the Delete button in the action bar. The Delete
window opens (Fig. 4.3.5-B). The files you selected to
delete are listed.
4.
Make sure you’re ready to delete all listed files and
then click the Delete button.
Figure 4.3.5-B
LaCie Ethernet Disk mini Home Edition
User Manual
page 27
Files and folders can be moved to any folder a user has access to. The Move action is helpful in keeping files organized.
To move files:
.
Open the folder containing the files or folders you want
to move.
2.
Select files and folders to move by marking the box by
the filename in the File List.
3.
Click the Move button in the action bar. The Move
window opens (Fig. 4.3.5-C). The files you selected to
move are listed.
4.
Select the destination folder from the “Move to”
menu.
5.
Click the Move button.
Figure 4.3.5-C
■ 4.3.6. Renaming Files
Available in: FamilyLibrary, MyLibrary and MyBackup
You can rename files or folders using the Rename action.
To rename files:
.
Open the folder containing the files or folders you want
to rename.
2.
Select files and folders to move by marking the box by
the filename in the File List.
3.
Click the Rename button in the action bar. The Rename window opens (Fig. 4.3.6). The files you selected
to move are listed in text boxes.
4.
Click in a text box to change a file name.
5.
When you’re done changing file names, click the Rename button.
Figure 4.3.6
LaCie Ethernet Disk mini Home Edition
User Manual
page 28
■ 4.3.7. Zip Files
Available in: FamilyLibrary, MyLibrary and MyBackup
The Zip action is useful when you want to download a large number of files, or an entire folder, that would normally take a long time
to download. Zipping compresses the files and puts them in a single .zip archive file which you can download more quickly than many
separate files. Files and entire folders can be zipped.
To Zip files:
.
Open the folder containing the files or folders you want
to zip.
2.
Select files and folders to move by marking the box by
the filename in the File List.
3.
Click the Zip button in the action bar. The Zip window
opens (Fig. 4.3.7).
4.
Make sure you want to zip all of the listed files an folders and click the Zip button.
note: Large files may take several minutes to zip.
Figure 4.3.7
LaCie Ethernet Disk mini Home Edition
User Manual
page 29
4.4. Sharing
These instructions apply to all of the applications that handle files, such as FamilyLibrary, MyLibrary and MyBackup. Changing a folder’s
sharing state (who is allowed to view it) is managed the same way in each application. You can also make folders with media files available to a Digital Media Player (DMP) on your home network (see section 6, Digital Media Sharing and Home Entertainment).
■ 4.4.1. Sharing Folders
The Ethernet Disk mini makes it easy to share folders with people on the Internet. You can control what information you publish on the
Internet using the Ethernet Disk mini sharing facilities. You can only share folders, not individual files; when a folder’s sharing state is set,
all files within that folder acquire the same sharing state, so make sure you’re prepared to share everything within a shared folder.
Folders have three sharing options:
Private: Only you can see these folders, and then only when you are signed in to your Ethernet Disk mini. Any information which
is not private is said to be “published”.
Shared: Published only to people with whom you choose to share it. This is accomplished by creating a Sharing List (see “Managing Sharing Lists” below).
Public: Published for anyone on the Internet to see. Individual applications will display the public URL for these folders.
A folder’s current sharing state is displayed under the Sharing column (Fig. 4.4.1), as one of the above three icons.
To change the folder’s sharing state, click on one of the
two other (gray) icons in the Sharing column or select the
folders you want to share and click the Share button in the
action bar.
Figure 4.4.1-A
LaCie Ethernet Disk mini Home Edition
User Manual
page 30
If you click on the Shared icon in the Sharing column (or
the Share button in the action bar and then, Choose Users) the Share Access window will open (Fig. 4.4.1-B).
.
Add users or contact lists to the Allowed Access list by
selecting them in the Address Book list and then clicking Add.
2.
Select the “Allow these users to upload files” check box
to give users in the Allowed Access list the ability to
upload files to the folder or folders you are sharing
with them.
3.
When you click Save, the Sharing Email window will
open with an automatically-generated email message
with instructions for your friends about accessing your
content. See section 4.4.2, Sending Sharing Invitation
Email.
note: See section 5, MyContacts for information about
creating contacts and contact lists (mailing lists).
Figure 4.4.1-B
■ 4.4.2. Sending Sharing Invitation Email
Sharing invitation emails make it easy for your contacts to
access the content you want to share with them. When you
share a folder, as described above, an email message is
automatically generated. Embedded in the message is a link
to your content. All your friends have to do is click on the link
for immediate access.
To send a sharing invitation email:
.
Follow the steps for sharing a folder in section 4.4.1,
above.
2.
A default message appears in the Message content
area of the Sharing Email window (Fig. 4.4.2). You can
change this message if you want. The link to you content will be included in the message even if you delete
all of the text.
3.
Select the recipients you want to send the message to.
4.
Click Send Email.
Figure 4.4.2
LaCie Ethernet Disk mini Home Edition
User Manual
page 31
5. MyContacts
MyContacts allows you to create an email contact lists for sharing files. A mailing list is simply a collection of your contacts that can be given access to groups of your files as you choose. You can also use
MyContacts as your everyday address book – you can add up to 6 phone numbers, a home address, a
work address and two email addresses for every contact in your MyContacts.
LaCie Ethernet Disk mini Home Edition
User Manual
page 32
5.1. Adding Contacts
To add a contact:
.
Click the New Contact button in the action bar.
2.
Enter contact details on each of the three tabs in the
Contact Details window – Basics, Email/Phone and
Address.
note: Display name and Email on the Basics tab are
required, but all other information is optional.
Figure 5.1
5.2. Editing Contact Details
To edit contact details, like name, email address, phone number, etc., either click on the contact name in the contacts list or select
multiple contacts from the list using the check boxes and click Edit in the action bar. A Contact Details window for each selected contact
will open.
LaCie Ethernet Disk mini Home Edition
User Manual
page 33
5.3. Creating Mailing Lists
You can use mailing lists to share folders with groups of people. For example, you can share a folder of vacation pictures with several
family members.
To create a mailing list:
.
Click the New List button in the action bar. The Add
Mailing List window opens (Fig. 5.3).
2.
All contacts in your address book are listed in the Address Book list. Select the contacts you want to add to
the mailing list and click Add.
3.
The added names appear in the This List list. When
you’re done adding names, click Save. The mailing
list will appear in your address book.
Figure 5.3
LaCie Ethernet Disk mini Home Edition
User Manual
page 34
5.4. Importing Contacts
If you already have a large address book in either Mozilla/Netscape 7 or Outlook Express, you can export the address book as an .ldif
or .csv file and import it directly into MyContacts.
To import contacts:
.
Click the Import button in the action bar.
2.
Follow the instructions in the Import Contacts window
for exporting the proper type of file.
3.
Click Browse… to locate the file on your computer.
4.
Click Import Mozilla Contacts or Import Outlook
Express Contacts.
5.
Match the columns of your exported file to the corresponding contact details fields (Fig. 5.4-B, .csv shown).
Click Continue.
note: You can simplify the matching process by removing unnecessary fields from your exported .csv file
by opening the file in a spreadsheet program such
as Microsoft Excel and deleting empty columns. In
the .csv file used for Fig. 5.4-B, all columns but First
Name, Last Name and Email address 1 were deleted.
MyContacts will import contacts from Windows .csv files
exported from any email program. Mac users, be sure to
save your file as a Windows .csv file.
Figure 5.4-A
Figure 5.4-B
LaCie Ethernet Disk mini Home Edition
User Manual
page 35
5.5. Sending Email to Contacts
To send an email to your contacts, select contact from the contacts list and click the Send Email button. Your default email application
will open with the selected contacts in the To: line.
5.6. Deleting Contacts
To delete contacts:
.
Select the contacts you want to delete from the list using the check boxes.
2.
Click Delete in the action bar. The Delete Contacts
window opens (Fig. 5.6).
3.
Make sure you want to delete all listed contacts and
click Delete.
Figure 5.6
LaCie Ethernet Disk mini Home Edition
User Manual
page 36
6. Digital Media Sharing and Home Entertainment
The Ethernet Disk mini’s Digital Media Server (DMS) component allows you to access and play your digital media – photos, videos and music – on a broad range of digital media players (DMPs) at home and on the road. At home, you could listen to digital music stored on the Ethernet Disk mini over your high end audio system in the den while simultaneously streaming video to
your IP-enabled TV in the living room. Access home camcorder video, recorded TV or internet downloaded video podcasts stored
on your Ethernet Disk mini on your Digital Video Recorder (DVR) or PC or DMP anywhere in the house. Your LaCie Ethernet Disk
mini Home Edition is Digital Meida Player- (UPnP Audio Video) compatible. For the latest compatibility information please visit
http://www.homelacie.com/digitalmedia/.
■ Digital Media Server (DMS)
Ethernet Disk mini includes DMS support for several protocols, making digital media available to the broadest range of DMPs supporting a variety of industry standards.
To enable a folder for sharing with DMPs:
.
Locate the folder you want to share in FamilyLibrary or
MyLibrary and select its check box.
2.
In the Media column, click on the TV icon to enable
sharing. The icon appears in full color when sharing is
activated. See Fig. 6.
3.
Any digital media players connected to network will detect playable media on the Ethernet Disk mini.
note: Please refer to you DMPs documentation for information on playback of shared content.
DMS support varies by device, and the specific protocols
supported are determined by the device manufacturer. Visit
http://www.hipserv.com/support/digitalmedia/ for
the latest on the protocols available and any optional upgrades that could be added to support your specific devices.
■ Digital Media Players (DMP)
Figure 6
Digital Media Players provide the ability to play back your
media. Sometimes called a client/server model, all your
media can be stored on your Ethernet Disk mini and that content can be enjoyed on any digital media player in the home. There are
several examples of digital media players, and each type of player may provide different functions. Some DMPs are dedicated to music,
others full audio/video. Several of the leading gamestations now offer DMP functionality. Some of the newest IP enabled TVs also
provide integrated DMP capability.
For interoperation, DMPs need to be compatible with the DMS in several areas: Networking Protocol, Device and Service Discovery and
Controls, Media Format and Transport, Media Management, and any applicable Digital Rights Management (DRM) / content protection
that the content creator may have applied.
LaCie Ethernet Disk mini Home Edition
User Manual
page 37
■ Digital Media Standards
The Ethernet Disk mini supports a variety of digital media standards. The most common standard is UPnP / UPnPAV. Other standards
include DLNA (Digital Living Network Association), iTunes, Windows Media Connect and many more. HipServ supports the broadest
range of digital media players through standard and optional modules that can support specific DMPs.
UPnP and UPnP-AV (Universal Plug and Play and UPnP – Audio Video) are the most commonly supported and most basic standard
that is incorporated into the majority of devices.
iTunes
Apple has its own protocol known as iTunes. All HipServ’s include iTunes Server support. Computers and DMPs with iTunes support
can enjoy their media that is stored on the HipServ. Selected protected content using Apple’s FairPlay DRM will need to adhere to the
rules that the content creator has specified. HipServ complies to these requirements and will allow playback if those requirements are
met. When UPnP sharing for a folder on your Ethernet Disk mini Home Edition is turned on, the device will appear in iTunes under
Shared.
Windows Media
Microsoft’s protocol is known as Windows Media or Windows Media Connect. This protocol is supported on all windows PCs and
the Microsoft Xbox360. Networked Xbox360 game stations can support full DMP functionality for music, photo and video playback
with a direct connection to the HipServ, without the need for a PC nor MediaCenter PC. http://www.microsoft.com/windows/windowsmedia/devices/wmconnect/default.aspx
DLNA is a common standards organization for digital media. To learn more about how DLNA works, visit:
http://www.dlna.org/en/consumer/experience/how/
To learn more about other standards and proprietary protocols, please visit:
http://www.homelacie.com/howto/digitalmedia/
note: See section 1.3, Specifications and Services for a list of supported media, mobile devices and UPnP devices.
LaCie Ethernet Disk mini Home Edition
User Manual
page 38
7. Sync and Back Up Files
7.1. Back Up Your Computers – DesktopMIrror and MyBackup
HipServ DesktopMirror allows you to easily backup or synchronize files from your desktop computers to your Ethernet Disk mini. When
the file in one location changes (for example, you change some text in a document on your Personal Computer) the file is synchronized
with its copy on the Ethernet Disk mini so that the changes are reflected in both locations. Synchronization is sometimes known as replication, because that is essentially what is happening: the changed file in one location is being replicated in the other location, replacing
the out of date version.
Files you back up with DesktopMirror appear in MyBackup on your Ethernet Disk mini and are accessible in the same way that files in
your FamilyLibrary and MyLibrary are.
7.2 Back Up Your Ethernet Disk mini – MySafe
As an added layer of data safety, you can also use the MySafe application to back up the most important files on your Ethernet Disk mini
to an external USB hard drive you attach to it.
LaCie Ethernet Disk mini Home Edition
User Manual
page 39
7.1. DesktopMirror
Use DesktopMirror, installed from the setup CD, to back up important files on your computers and then synchronize files so you can
work on the same file from different computers.
For example, let’s say you’re working on a novel. You write on your home computer most of the time, but sometimes you travel and
write on your laptop:
1
At home, use DesktopMirror to save your novel from your home computer to MyBackup.
2
When you travel with your laptop (with DesktopMirror installed), access your Ethernet Disk mini and download the novel from
MyBackup.
3
Make changes to your novel and use DesktopMirror to save the novel back to MyBackup.
4
When you get home, use DesktopMirror to restore files to your home computer so your novel is up to date with the new writing
you did while away from home.
■ 7.1.1. Backing Up Files
First, install DesktopMirror if you haven’t already done so. See Setup Step 4 for more information on installing desktop applications.
Open DesktopMirror:
❖ Windows users: Start > Programs > HipServ Desktop Applications > DesktopMirror
❖ Mac users: Applications > HipServ Desktop Applications
note: The first time you use DesktopMirror, the configuration wizard may open. Just follow the instructions in the wizard and
make sure you have your portal name, user name and password handy.
To back up files:
.
In the main DesktopMirror window, click the Add…
button (Fig. 7.1.1).
2.
Select the folder you want to back up and click OK.
The folder appears in the Folder list with its file path.
3.
Repeat Steps 1 & 2 for all folders you want to back
up.
4.
Click Backup All to back up all of the folders in the
Folder list, or select the files you want to back up and
click Backup Item(s).
5.
When the backup is complete, the folders will appear
in MyBackup.
Figure 7.1.1
LaCie Ethernet Disk mini Home Edition
User Manual
page 40
■ 7.1.2. Scheduling Backups
You can create a backup schedule using DesktopMirror’s Schedule Feature. Creating a schedule means you never have to remember
to back up your important data. DesktopMirror remembers for you.
To create a backup schedule:
.
Select Tools > Options in DesktopMirror. The Options window opens. Click on the Schedule button at
the top of the window.
2.
Select Timed Backup.
3.
To select a timed interval for your backup, select backup every. To select a specific time and day to perform
the backup, select Backup at.
4.
Click OK. The backup schedule is activate immediately.
Figure 7.1.2
■ 7.1.3. Restoring Files
After you’ve backed up files to MyBackup using DesktopMirror, you can restore them to their original location on your computer using
the Restore feature. Remember, restoring files overwrites all of the files in MyBackup.
important info: Do not move files you have backed up or change the name of the files on MyBackup. When you restore
files from your original backup, two folders will be created and the files will not synchronize.
To restore files:
.
In the main DesktopMirror window, select the folders
you want to restore and click the Restore button (Fig.
7.1.3 A).
2.
A dialog box will open asking if you are sure you want
to overwrite the files in MyBackup. Click OK if you are
sure.
3.
DesktopMirror will restore the files to MyBackup from
your computer. Check the status of the restore in the
status bar at the bottom of the window (Fig. 7.1.3 B).
A
B
Figure 7.1.3
LaCie Ethernet Disk mini Home Edition
User Manual
page 41
■ 7.1.4. DesktopMirror Synchronization Mode
You can use DesktopMirror’s Synchronization mode to copy files both ways – from your Ethernet Disk mini to your computer and from
your computer to the Ethernet Disk mini.
If you back up a folder in MyBackup using DesktopMirror, and then upload additional files to the folder in MyBackup, the folder you
added will be copied to your computer when you use synchronization.
For example, let’s say you’re traveling with your laptop and you buy a new music CD:
1
At home, you’ve already used DesktopMirror to back up your MyMusic folder to MyBackup.
2
Copy the new music to the MyMusic folder on your laptop and synchronize your laptop with MyBackup using DesktopMirror.
3
When you get home (or automatically if you have created a backup schedule, see section 7.1.2, Scheduling Backups), synchronize your home computer with MyBackup to automatically update your home computer with the new music. If someone at home
added music to your home computer while you were gone, it will be copied to MyBackup, so the next time you sync your laptop,
you’ll get that music too.
To synchronize files:
.
Select Tools > Options in DesktopMirror. The Options window opens. Click on the Advanced button at
the top of the window.
2.
In the Mode of Operation area, select “Synchronization mode” (Fig. 7.1.4).
3.
Click OK. The next time you back up a folder, DesktopMIrror will copy files from your computer and from
MyBackup.
Figure 7.1.4
LaCie Ethernet Disk mini Home Edition
User Manual
page 42
■ 7.1.5. MyBackup
MyBackup contains the files that are uploaded to your Ethernet Disk mini via the DesktopMirror application. You can manage files in MyBackup just as you would in FamilyLibrary or MyLibrary.
Figure 7.1.5
LaCie Ethernet Disk mini Home Edition
User Manual
page 43
7.2. MySafe
Use MySafe to back up the files stored on the Ethernet Disk mini Home to an attached USB storage device.
This way, if files on the Ethernet Disk mini are damaged or accidentally deleted, you can restore them to
their original locations.
There are three main steps to using MySafe:
❖ Connecting an external USB hard drive
❖ Backing up files to the external USB hard drive
❖ Restoring files to the Ethernet Disk mini (if necessary)
See section 9.4.2. Managing MySafe USB External Storage for information on disconnecting and formatting your MySafe drive.
■ 7.2.1. Connecting an External USB Hard Drive
Before you can back up files, you need to connect a hard drive to your Ethernet Disk mini via the USB port on the back. We recommend
that you use a hard drive that is USB 2.0 compatible.
technical note: The Ethernet Disk mini is not compatible with external hard drives using HFS+ (Macintosh) format. Connect a
drive formatted in NTFS. Refer to your external hard drive’s user documentation for information about the file system format.
To connect an external hard drive:
.
Make sure your Ethernet Disk mini is turned on and
connected to your network.
2.
Turn on the external USB hard drive.
3.
Connect the external hard drive’s USB cable to the USB
port on the back of the Ethernet Disk mini, just like you
would connect the external hard drive to your computer (Fig. 7.2.1-A).
4.
AAAA-AAAA-AAAA-AAAA
Confirm that the drive is properly connected. Log in
and click on the Administer HipServ link. Click on
USB External Storage under System. If the USB External Storage page displays the message in Figure
7.2.1-B, click the refresh button.
Figure 7.2.1-A
Figure 7.2.1-B
LaCie Ethernet Disk mini Home Edition
User Manual
page 44
■ 7.2.2. Backing Up Files to the USB Hard Drive
To back up files, navigate to the file or folder you want to
back up to the external hard drive and click on the disk
icon in the “Backup” column of the file list (Fig. 7.2.2).
When you back up files to MySafe, the Ethernet Disk mini
duplicates the file path in MySafe so that everything you
back up is organized in MySafe just as in its original location. So, if you copy a file from MyLibrary, a MyLibrary folder
will appear in MySafe, with all folders leading to the backed
up file.
note: Hover the mouse pointer over the disk icon to
display a screen tip that tells you whether the file or folder
already exists in MySafe. The color of the disk icon also
tells you if the file or folder is already in MySafe; a gray
icon means it is not backed up and a green icon means
that it is.
Figure 7.2.2
■ 7.2.3. Restoring Files to the Ethernet Disk mini
If you accidentally delete files from your Ethernet Disk mini
or if you make modifications to files that you want to undo,
you can restore backed up files on your external hard drive
to their original locations on the Ethernet Disk mini with just
a couple of clicks.
To restore files from MySafe to your Ethernet Disk mini:
.
Go to MySafe and locate the files you want to restore.
2.
Select the files in the file list and click Restore in the
action bar. The Restore window opens (Fig. 7.2.3).
3.
By default, the original location of the files is displayed
in the Restore to: menu. If you want to restore the files
to a different location, click in the menu and select the
new location.
4.
Choose how you want to handle restored files.
5.
Click the Restore button.
Figure 7.2.3
LaCie Ethernet Disk mini Home Edition
User Manual
page 45
■ 7.2.4. Disconnecting your MySafe External Hard Drive
Always click the Safely Remove Drive button (Fig. 7.2.4-A)
on the USB External Storage before unplugging your MySafe
external hard drive. Wait for the interface to change and for
the Use Drive button (Fig. 7.2.4-B) to appear before disconnecting the USB cable from the Ethernet Disk mini.
caution: Failure to safely remove your external hard
drive before disconnecting the USB cable can cause data
loss and/or damage the drive. Always use the Safely Remove Drive feature when disconnecting an external hard
drive.
Reconnecting your external hard drive:
The Ethernet Disk mini knows when your external hard drive
is connected, even if you’ve clicked the Safely Remove Drive
button. To make the drive available for use again, just click
the Use Drive button.
Figure 7.2.4-A
Figure 7.2.4-B
LaCie Ethernet Disk mini Home Edition
User Manual
page 46
8. Settings
The following sections describe the settings that can be adjusted by administrators and regular users in
their MySettings pages. For information on administrative settings, please see section 9, Administration. For
network settings, please see section 9.2, Network Services.
There are three categories of users on the Ethernet Disk mini – Administrator, Regular user, and Guest user.
❖ Administrators have the most access privileges, the ability to create other administrator accounts and access to the administrative
settings.
❖ Regular users have access to all features and applications, can invite guest users to use the Ethernet Disk mini Home and can make
changes on their own accounts through MySettings.
❖ Guest users typically only have viewing or downloading privileges.
LaCie Ethernet Disk mini Home Edition
User Manual
page 47
8.1. General Settings
In General Settings you can change your display name, password and language. You can make all of the changes at the same time
and save them with one click of the Save Changes button.
To change your display name:
.
Click in the Display Name field.
2.
Enter a new name.
IMportant info: Your user name and display name
can be different if you choose, but you must enter your
user name when signing into the Ethernet Disk mini.
To change your password:
.
Click the Change Password button. The Change
Password window opens (Fig. 8.1).
2.
Enter your current password in the Current Password
Field.
3.
Enter your new password in the New Password and
Confirm New Password fields.
4.
Click the Change Password button.
IMportant info: New passwords must be at least 5
characters long.
To change your language, select a language from the
Language menu.
When you’re done, click Save Changes.
Figure 8.1
LaCie Ethernet Disk mini Home Edition
User Manual
page 48
8.2. MyContacts Settings
In My Contacts Settings you can change the number of
contacts displayed in your contacts list. Just select a number
from the menu and click Save Settings (Fig. 8.2).
Figure 8.2
8.3. File Settings
In File Settings you can change the maximum number of files and folders displayed on each page, the return email address appearing
on sharing email you send and the default action that occurs when two files of the same name are placed in a folder on your Ethernet
Disk mini Home.
To change File List settings, select the number of files to
display from the drop-down menu. Marking the “Show the
number of folders and files in each folder” box displays
folder contents information in the Type column of the File
List (Fig. 8.3).
To change sharing settings, enter an email address in the
“Return email address” field. When you share files or folders with your contacts, this email address will appear in the
“From:” field.
To change file name settings, select an action from the
“When two files have the same name” drop-down menu.
When you’re done, click Save Settings.
Figure 8.3
LaCie Ethernet Disk mini Home Edition
User Manual
page 49
9. Administration
Administrators can access the Ethernet Disk mini Home administration pages by clicking the Administer HipServ button in MySettings
(Fig. 9-A) or the Administer HipServ link on the Welcome Home page (Fig. 9-B).
From the administration pages you can add, delete and modify user accounts, change network settings, view the status of the device
and make system-wide changes like time and date, update the software or shut down the device.
To leave administration and continue working with your files, just click the LaCie logo in the upper left corner at any time.
Figure 9-A
Figure 9-B
LaCie Ethernet Disk mini Home Edition
User Manual
page 50
9.1. Adding and Managing Users
In the Account Access section of administration you can add new users, delete users or modify the accounts of existing users.
■ 9.1.1. Adding Users
To add a user account:
.
Click the Add New User link on the administration page.
2.
Enter a user name, display name and password in the appropriate fields.
3.
Mark the box beside “Create as administrator account” to give the user administrative privileges.
4.
Mark the box beside “Let this user access the FamilyLibrary folder” to give the user access to the FamilyLibrary from the browser
interface.
important info: Marking this box does not prevent the user from accessing the FamilyLibrary folder from a computer on
your local area network. The user’s access to the folder is only blocked in the browser interface.
5.
Click Add Account to create the account.
Figure 9.1.1
LaCie Ethernet Disk mini Home Edition
User Manual
page 51
■ 9.1.2. User Management
In the User Management page of Account Access you can change users’ display names and passwords, change users’ access privileges or delete user accounts.
To get started, choose an account to modify or delete from the User Name menu under Choose Account.
To change a password, just enter a new password in the “Password” and “Confirm Password” fields. The new password must be
entered exactly the same in both fields.
To change the user’s access privileges, select or deselect the boxes under Account Properties.
important info: At least one user must be an administrator. Administrators cannot remove their own administrative privileges, but they can remove the privileges of other administrators.
Figure 9.1.2
LaCie Ethernet Disk mini Home Edition
User Manual
page 52
9.2. Networking
■ 9.2.1. LAN Connection
Click on the LAN Connection link to configure your Ethernet Disk mini for connecting to your home network. You can configure it to
obtain a dynamic IP address (the default), or you can assign it a static IP address. You can also optionally configure your Ethernet Disk
mini to use your ISP’s DNS servers when resolving host names. This is required if your Ethernet Disk mini is assigned a static IP address.
By default your Ethernet Disk mini runs its own DNS server, but if you have DNS-related problems when using it, you can enter your ISP’s
DNS servers here to make the Ethernet Disk mini use them instead of its own DNS server.
Figure 9.2.1
LaCie Ethernet Disk mini Home Edition
User Manual
page 53
■ 9.2.2. Network Services
On this screen you can control access to services, both internally from your own network, and externally from the Internet. If you do not
plan to use a service, its safest to turn access to that service OFF.
File Transfer Protocol (FTP): Allows file transfers via FTP.
Figure 9.2.2
■ 9.2.3. Router Configuration
This page helps you to configure your router to make the best use of your Ethernet Disk mini Home Edition.
Router Configuration
To aid you in accessing your router’s configuration screens, the HipServ Router Configuration screen provides a link to it. This is particularly helpful if you do not know the IP address of your router. See Appendix A, Router Configuration for more information.
Router UPnP Negotiation
To allow you to use your HipServ remotely from the Internet, and to allow you to share content with friends and family, your HipServ uses
UPnP to forward certain ports to itself. This negotiation is done automatically during the Router Configuration step in Setup. You can use
the provided link to re-negotiate the connection (for example, if your HipServ’s IP address has changed).
Figure 9.2.3
LaCie Ethernet Disk mini Home Edition
User Manual
page 54
■ 9.2.4. Windows Networking
File Server
The files on your Ethernet Disk mini can be made available to all of the computers on your local network. To enable this feature, select
the checkbox labeled “Enable access to your HipServ Private files through Microsoft Windows Networking”. You can set the name of the
Microsoft Windows Workgroup used to connect to these files in the “Windows Workgroup” text field. The default is “WORKGROUP”.
Print Server
Once the Workgroup name is set, you can also plug a USB printer into your Ethernet Disk mini and share it with the computers on your
local network. Connect the printer to the USB port on the back of your HipServ. To use the printer from your client computer, consult
your client computer’s documentation for how to connect a Network Printer. The “server” in this case will be your HipServ. Follow the
steps to add a Network Printer, and find your printer listed under your HipServ. The driver for your printer will be installed on your client
computer (not on the HipServ). If the driver is not available on your client computer, you will need to install it from the CD that came
with your printer.
Figure 9.2.4
LaCie Ethernet Disk mini Home Edition
User Manual
page 55
9.3. Status
■ 9.3.1. Disk Space Monitoring
Too see how much free disk space remains on your Ethernet Disk mini, click Disk Space Monitoring under Status. The disk space is
displayed in megabytes (MB). 1,000 MB = 1 GB.
Figure 9.3.1
■ 9.3.2. Notifications
If your Ethernet Disk mini encounters errors or requires an update, it will automatically send a notification email to the email addresses
on this page. Click Notifications under Stauts and follow the instructions on the page to add notification email addresses.
important info: The Ethernet Disk mini will not be able to deliver notifications if it is not properly connected to the internet.
Figure 9.3.2
LaCie Ethernet Disk mini Home Edition
User Manual
page 56
9.4. System
■ 9.4.1 Setting the Date and Time
Click Notifications under System and set the correct date and time for your time zone. This will ensure that file upload dates and times
will be accurate and will help you to better manage your Ethernet Disk mini.
■ 9.4.2. Managing MySafe USB External Storage
Click USB External Storage to manage your MySafe attached external USB hard drive (if you have connected one).
When your drive is connected properly, its model name, capacity and space available are displayed.
To disconnect the drive from your Ethernet Disk mini, click
the Safely Remove Drive button and wait for a message
indicating that it is save to disconnect the device.
To make the drive available again, reconnect it and click
Use Drive.
To format the drive and permanently erase its contents, click
Safely Remove Drive. Click the Format Drive button
when it appears.
caution: Formatting your external USB hard drive will
erase all data on the drive. Back up any data you want to
save before formatting.
Figure 9.4.2-A
Figure 9.2.4.-B
LaCie Ethernet Disk mini Home Edition
User Manual
page 57
■ 9.4.3. Registration
The Registration page will let you know if your Ethernet Disk mini is registered properly with HomeLaCie.com. If your Ethernet Disk
mini was not properly connected to the Internet when it was set up the first time, you might need to come to this page to complete the
registration process so that you can begin accessing your Ethernet Disk mini from the Internet and begin enjoying the benefits of remote
access.
You can also verify that all user accounts are registered with HomeLaCie.com so that they will be allowed to sign in remotely. Visit
this page and click the Verify User Accounts button if you receive any errors or warnings about a user not being created on
HomeLaCie.com.
Finally, you can change your Ethernet Disk mini name if you choose. Enter it and click the Change button to register your Ethernet Disk
mini with a new name.
■ 9.4.4. Shutting Down or Restarting
To shut down or restart your Ethernet Disk mini, click Shut Down under System and then click Shut Down or Restart.
important info: Your Ethernet Disk mini will not be accessible while it is shut down or in the process of restarting. All user
sessions will be interrupted, including yours.
■ 9.4.5. Software Update
LaCie may issue important software updates for your Ethernet Disk mini from time to time. Click Check now to start, or follow the
instructions if an update has already been found.
important info: Your Ethernet Disk mini may need to restart after downloading and installing updates. All user sessions will
be interrupted.
LaCie Ethernet Disk mini Home Edition
User Manual
page 58
Appendix A: Router Configuration
Router configuration for the Ethernet Disk mini Home varies depending on the brand and model of router connecting your Ethernet Disk
mini Home Edition to your network and the Internet. Below are instructions for configuring three common brands of routers. If your router
is not listed below or for more help go to http://www.homelacie.com/help/router/.
Before beginning router configuration you will need the IP address of your Ethernet Disk mini Home.
important info: To allow you to use your HipServ remotely from the Internet, and to allow you to share content with friends
and family, your Ethernet Disk mini uses UPnP to forward certain ports to itself. This negotiation is done automatically during the
Router Configuration step in Setup. You only need to complete the steps below if your router does not support UPnP.
❖ D-Link Router Configuration – page 58
❖ Linksys Router Configuration – page 63
❖ Netgear Router Configuration – page 68
D-Link® Router Configuration
Step 1 – Access your router configuration page
.
Open a Web Browser and navigate to the IP address for your D-Link router. If you don’t know your router’s IP address, try
http://192.168.0.1 or http://192.168.1.1 (these are common IP addreses for home networking routers).
2.
Enter your username and password. Please refer to your D-Link user manual for the default username and password.
LaCie Ethernet Disk mini Home Edition
User Manual
page 59
Step 2 - Configure your router for UPNP
.
Click on the Tools tab in header bar.
2.
Click on the Misc. button on the left.
3.
In UPNP Settings, click Enabled and then click Apply.
1
2
3
LaCie Ethernet Disk mini Home Edition
User Manual
page 60
Step 3 - Finish your HipServ installation
.
Go back to Ethernet Disk mini setup and click the Retry button on the router configuration page.
2.
If the message shown below does not appear after you click Retry, continue to Step 4 – Manual Configuration. The message below
appears, click Next to continue with Setup.
LaCie Ethernet Disk mini Home Edition
User Manual
page 61
Step 4 – Manual Configuration
.
Click on the Advanced tab. Click the Virtual Server tab.
2.
Enter the name of your Ethernet Disk mini.
3.
Enter the IP Address of your Ethernet Disk mini in the Private IP field.
4.
Select TCP as protocol type. Enter 80 in private port and 80 in public port.
5.
Click on Apply.
1
2
3
4
5
6.
Repeat steps 2 to 5, shown above, adding ports 21, 22 and 443. The ports will appear in the Virtual Servers List as you apply
changes.
7.
Select the Enabled option, click Apply.
■ (continued on next page)
LaCie Ethernet Disk mini Home Edition
User Manual
page 62
Step 5 – Verify Manual Router Configuration
.
Go back to Ethernet Disk mini setup and click the Retry button on the router configuration page.
2.
If the message shown below does not appear after you click Retry, contact LaCie Customer Support, or click here to perform a
port forwarding test on your router.
LaCie Ethernet Disk mini Home Edition
User Manual
page 63
Linksys® Router Configuration
Step 1 – Access your router configuration page
.
Open a Web Browser and navigate to the IP address for your Linksys router. If you don’t know your router’s IP address, try
http://192.168.1.1 or http://192.168.0.1 (these are common IP addreses for home networking routers).
2.
Enter your username and password. Please refer to your Linksys user manual for the default username and password.
LaCie Ethernet Disk mini Home Edition
User Manual
page 64
Step 2 - Configure your router for UPNP
.
Click on the Administration tab in header bar.
2.
Click on the Management button on the left.
3.
In UPNP, click Enabled.
4.
Click Save Settings.
1
2
3
4
LaCie Ethernet Disk mini Home Edition
User Manual
page 65
Step 3 - Finish your HipServ installation
.
Go back to Ethernet Disk mini setup and click the Retry button on the router configuration page.
2.
If the message shown below does not appear after you click Retry, continue to Step 4 – Manual Configuration. The message below
appears, click Next to continue with Setup.
LaCie Ethernet Disk mini Home Edition
User Manual
page 66
Step 4 – Manual Configuration
.
Click on the Applications & Gaming tab.
2.
Click the Single Port Forwarding link.
3.
Enter the name of your Ethernet Disk mini in the Application field.
4.
Enter 80 in External Port and 80 in Internal Port.
5.
Select TCP as protocol type.
6.
Enter the IP address of your Ethernet Disk mini in the IP Address field.
7.
Check the Enabled checkbox.
1
2
3
4
8.
Repeat steps 3 to 7, shown above, for ports 21, 22 and 443.
9.
Click Save Settings.
5
6
7
LaCie Ethernet Disk mini Home Edition
User Manual
page 67
Step 5 – Verify Manual Router Configuration
.
Go back to Ethernet Disk mini setup and click the Retry button on the router configuration page.
2.
If the message shown below does not appear after you click Retry, contact LaCie Customer Support, or click here to perform a
port forwarding test on your router.
LaCie Ethernet Disk mini Home Edition
User Manual
page 68
Netgear® Router Configuration
Step 1 – Access your router configuration page
.
Open a Web Browser and navigate to the IP address for your Netgear router. If you don’t know your router’s IP address, try
http://192.168.1.1 or http://192.168.0.1 (these are common IP addreses for home networking routers).
2.
Enter your username and password. Please refer to your Netgear user manual for the default username and password.
NOTE: The router name listed in the Authentication Required dialog may be different depending on your specific Netgear router
model.
LaCie Ethernet Disk mini Home Edition
User Manual
page 69
Step 2 - Configure your router for UPNP
.
Click on the UPnP link in menu on the left.
2.
Check the “Turn UPnP on” checkbox.
3.
Click Apply.
2
3
1
LaCie Ethernet Disk mini Home Edition
User Manual
page 70
Step 3 - Finish your Ethernet Disk mini installation
.
Go back to Ethernet Disk mini setup and click the Retry button on the router configuration page.
2.
If the message shown below does not appear after you click Retry, continue to Step 4 – Manual Configuration. The message below
appears, click Next to continue with Setup.
LaCie Ethernet Disk mini Home Edition
User Manual
page 71
Step 4 – Manual Configuration
.
Click on the Port Fowarding / Port Triggering link in the menu on the left.
2.
Select the Port Forwarding option under service type.
3.
Select HTTP (Port 80) from the Service Name menu.
4.
Enter the Ethernet Disk mini’s IP adderss in the Server IP Address fields.
5.
Click Add.
2
3
6
4/7
5/8
9
1
6.
Select FTP (Port 21) from the Service Name menu.
7.
Enter the Ethernet Disk mini’s IP adderss in the Server IP Address fields.
8.
Click Add.
9.
To add SSH (Port 22) and HTTPS (Port 443), click on the Add Custom Service button.
■ (continued on next page)
LaCie Ethernet Disk mini Home Edition
User Manual
page 72
Adding SSH (Port 22) and HTTPS (Port 443)
.
Enter SSH in the Service Name field.
2.
Select TCP/UDP from the Service Type menu.
3.
Enter 22 in the Starting Port and Ending Port fields.
4.
Enter the Ethernet Disk mini’s IP address in Server IP Address fields.
5.
Click Apply.
2
1
6
3
8
7
4
5
9
10
6.
Enter HTTPS in the Service Name field.
7.
Select TCP/UDP from the Service Type menu.
8.
Enter 443 in the Starting Port and Ending Port fields.
9.
Enter the Ethernet Disk mini’s IP address in Server IP Address fields.
0. Click Apply.
■ (continued on next page)
LaCie Ethernet Disk mini Home Edition
User Manual
When you’re done, the Port Forwarding page should look like this:
page 73
LaCie Ethernet Disk mini Home Edition
User Manual
page 74
Step 5 – Verify Manual Router Configuration
.
Go back to Ethernet Disk mini setup and click the Retry button on the router configuration page.
2.
If the message shown below does not appear after you click Retry, contact LaCie Customer Support, or click here to perform a
port forwarding test on your router.