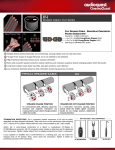
1
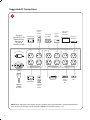
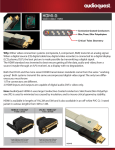
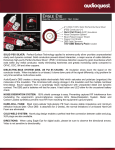
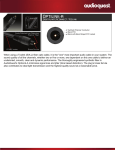
Niagara
7000
|
Low-Z Power Noise-Dissipation System
Owner’s Manual
EN Instructions in English are available at the link below.
L as instrucciones de instalación en el español se encuentran disponibles en el enlace que
se indica a continuación.
FR Les instructions d’installation en français sont disponibles au lien suivant.
ZH 安
裝說明請詳見下列網址連結.
JA 日
本語 のインストールガイドは下記リンク先でご覧いただけます。
ES
www.audioquest.com/Niagara7000/manual
2
Niagara 7000 Features
4
Introduction4
Installation
6
Unpacking
6
Safety Information/Warnings
Servicing/Return to AudioQuest
Power Source
Placement
6
6
6
7
Connection to Audio/Video Components
7
AC Cable Routing
7
High Current/Low-Z Power Banks
Ultra-Linear Noise-Dissipation System/Dielectric-Biased Symmetrical Power Banks
Suggested AC Connections
8
8
10
Operation and Continuous Use 12
Power Switch/Circuit Breaker and LED Power Indicator
Rear-Panel Power Correction Switch/Niagara 7000 Current Draw
Ground Fault Circuit Interrupter (GFCI) “Test” Button/Momentary Switch
Extreme Voltage Indicator
XFMR-1 and XFMR-2: Front-Panel Circuit Breaker Reset Buttons
Break-in Time/Continuous Use
Specifications
12
13
13
13
14
15
Trouble-Shooting Guide
Warranty
12
16
21
3
Niagara 7000 Features
¡¡ Dielectric-Biased AC Isolation Transformers: AQ’s patented technology greatly reduces nonlinear distortions that have previously plagued even the finest magnetic-based systems, all the
while increasing the bandwidth and efficiency of the transformers’ noise dissipation.
¡¡ Transient Power Correction: Provides over 90 amps peak instantaneous current reservoir with reduced
line impedance for current-starved power amplifiers, whether they incorporate linear or switching power
supplies.
¡¡ Ground Noise-Dissipation System: AQ’s patented technology vastly reduces ground-borne noise
without compromising safety or creating low-level ground loops.
¡¡ Ultra-Linear Noise-Dissipation Technology: Ensures the most consistent and widest bandwidth
noise dissipation possible, without the inconsistent results that typify minimalist, multi-node
resonant peaking found in many AC power conditioners.
¡¡ Ultra Low-Z NRG Series AC Power Inlets and Outlets: These inlets and outlets not only feature
a grip with far lower resistance (utilizing far more mass than conventional or audiophile-grade
designs), but they also include a heavy Hanging-Silver plating to ensure the lowest impedance at
radio frequencies, enabling superior noise dissipation.
Introduction
The science of AC power delivery is not a simple one; it demands focus, and the devil is in the details. In fact, the
great increase in airborne and AC-line-transmitted radio signals, combined with overtaxed utility lines and the
ever-increasing demands from high-definition audio/video components, has rendered our utilities’ AC power a
somewhat antiquated technology.
Where Alternating Current (AC) is concerned, we’re relying on a century-old technology created for incandescent
lights and electric motors—technology that was certainly never meant to power the sophisticated analog and
digital circuits used in premium audio/video systems. To properly accommodate the promise of today’s everincreasing bandwidth and dynamic range, we must achieve extraordinarily low noise across a very wide range
of frequencies.
Further, today’s power amplifiers are being taxed for instantaneous peak-current demand, even when they’re
driven at modest volumes. Although we have seen a substantial increase in dynamics from much of our audio
software, the loudspeakers we employ to reproduce them are often no more efficient than they were two to
four decades ago. This places great demands on an amplifier’s power supply, as well as the source AC power
supplying it.
Our systems’ sensitive components need better alternating current—a fact that has resulted in a host of AC power
conditioning, isolation transformers, regeneration amplifiers, and battery back-up system topologies. Through
differential sample tests and spectrum analysis, it can be proven that up to a third of a high-resolution (low-level)
audio signal can be lost, masked, or highly distorted by the vast levels of noise riding along the AC power lines
that feed our components. This noise couples into the signal circuitry as current noise and through AC ground,
permanently distorting and/or masking the source signal.
All sincere attempts to solve this problem must be applauded since once the audio/video signal is gone, it’s
gone forever…
For AudioQuest, honoring the source is never a matter of simply using premium “audiophile-grade parts” or relying
on a proprietary technology—common approaches used within the audiophile market. For years, we have all been
witness to the same, seemingly endless audiophile debates: Valves versus transistors. Analog versus digital. Can cables
really make a difference? The debates go on and on. While we, too, can brag about our many unique technologies,
4
we realize that true audio/video optimization is never a matter of any one secret or exotic circuit. When it comes to
noise dissipation for AC power, many approaches can yield meaningful results. However, these approaches may
also impart ringing, current compression, and non-linear distortions that can render the cure worse than the disease.
The Niagara 7000 uses our patented AC Ground Noise-Dissipation System, the world’s first Dielectric-Biased AC
Isolation Transformers, and the widest bandwidth-linearized noise-dissipation circuit in the industry. Our unique
passive/active Transient Power Correction Circuit features an instantaneous current reservoir of over 90 amps peak,
specifically designed for modern current-starved power amplifiers. Most AC power products featuring “high-current
outlets” merely minimize current compression; the Niagara 7000 corrects it.
Though it’s easy to boast, it’s quite another thing to create a solution that is consistent, holistic, functional, and
that honors verifiable science. It’s not enough to reduce AC line noise and its associated distortions at just one
octave, thus leaving vulnerable the adjacent octaves and octave partials to noise, resonant peaking, or insufficient
noise reduction. Consistency is key. We should never accept superior resolution in one octave, only to suffer from
masking effects a half-octave away and ringing artifacts two octaves from there. This is the principal criterion for
AudioQuest’s Low-Z Power Noise-Dissipation System.
The Niagara 7000 represents over 20 years of exhaustive research and proven AC power products designed
for audiophiles, broadcast engineers, and professional-audio applications. Every conceivable detail has been
addressed: In the Niagara 7000, you’ll find optimized radio-frequency lead directionality, run-in capacitor forming
technologies developed by Jet Propulsion Laboratories and NASA, and AC inlet and outlet contacts with heavy
silver plating over extreme-purity copper, assuring the tightest grip possible.
A great system is built from a solid foundation, and that foundation starts with power. With an AudioQuest Niagara
7000, you’ll experience for the first time the clarity, dimensionality, frequency extension, dynamic contrast, and
grip your system has always been capable of delivering—if only the power had been right!
We welcome you to experience the Niagara 7000 and hear firsthand the remarkable results of highly optimized
power management: startlingly deep silences, stunning dynamic freedom, outstanding retrieval of ambience
cues, and gorgeous delineation of instruments and musicians in space. Once you’ve experienced it, it may seem
so elegant, so logical, and so easy that you find yourself wondering why it hadn’t been done before.
—Garth Powell, Director of Power Products, Engineering, AudioQuest
5
Installation
Unpacking
Before unpacking your Niagara 7000, inspect the carton for any obvious damage to the boxes and internal
protective materials. If internal damage is likely, contact the carrier who delivered the unit. If shipping damage
is evident on the product, then please contact your shipping carrier. Please save all shipping and packing
materials. Should you move or otherwise need to transport your Niagara 7000, these packing materials will
ensure the safest transportation.
The double box set should contain the Niagara 7000 (120V North American Edison Duplex AC Outlets), two foam
inserts, owner’s manual, quick-start sheet, front-panel polishing cloth, and warranty registration card. Registration
is recommended. In the event that your original ownership documents are lost, your registration can be used to
establish whether the unit is within the warranty period.
Safety Information/Warnings
Before operating the Niagara 7000, please read and observe all safety and operating instructions (or, at the very
least, the quick-start sheet). Retain these instructions for future reference.
¡¡ Do not disassemble or in any way modify the Niagara 7000. There are no user-serviceable parts inside.
¡¡ Keep away from moisture and avoid excessive humidity.
¡¡ Do not allow liquids or foreign objects to enter the unit.
Servicing/Return to AudioQuest
Servicing of the Niagara 7000 must be performed by AudioQuest, and is only required when:
¡¡ The Niagara 7000 has been exposed to rain, flooding, or extreme moisture.
¡¡ The Niagara 7000 does not appear to operate normally. (See “Trouble-Shooting Guide.”)
¡¡ The Niagara 7000 has been dropped and sustained considerable physical damage.
If sending the Niagara 7000 to AudioQuest for servicing (or shipping it for any reason), please use the factoryapproved packaging materials. If you have lost any of these (double carton, two foam inserts, one poly bag),
please contact AudioQuest for replacements. We will provide replacement packaging materials for a nominal
charge; shipping costs will be paid by the individual or company requesting the packaging material. Please do not
rely on other methods of packaging, including those provided or suggested by packaging/mailing stores. These
methods and materials could seriously damage the product, as well as its finish. Even the loss of the thick polybag
is enough to permanently damage the finish during transport. If you have lost the original packaging material,
please request replacement materials from AudioQuest.
Power Source
Ideally, the power source to which the Niagara 7000 is connected should be adequate for use at 120V single-phase
nominal voltage, 20 amps (current capacity RMS). However, the Niagara 7000 will operate very well with a 15-amp
service outlet. If the maximum current capacity available is 15 amps, and the system exceeds 15 amps RMS current
capacity, it is possible that there may be nuisance tripping at your electrical service panel. This is not a safety issue;
the electrical panel’s circuit breaker will trip if the maximum current capacity is exceeded.
For proper operation, the Niagara 7000 requires a safety ground (supplied via the power utility AC wall outlet).
6
Placement
The Niagara 7000 is manufactured with four rubber textured polymer feet for safe, secure placement on any
table, cabinet, shelf, or floor. When rack-mounting is required, these feet may be removed with a standard Phillips
screwdriver. The Niagara 7000’s design obviates the need for compliant or high-Q isolation feet. Although many
audio/video products benefit greatly from these devices, the Niagara 7000 does not.
Placement or proximity to other components is not critical, and, under standard use, the Niagara 7000 does not
produce any appreciable heat. The Niagara 7000 may be rack-mounted in a standard 19” rack by attaching the
optional Niagara Series 3-RU rack ears. To attach the optional rack ears to the Niagara 7000 chassis, first remove
the three Phillips flathead screws from the front portion of both the left and right sides of the cover assembly.
Next, mount the rack ears flush against the back of the Niagara 7000’s front panel. Finally, secure the rack ears into
place by installing the rack-mount kit’s Phillips pan head SEMS screws.
When tight installations do not provide adequate room on a shelf or cabinet, the Niagara 7000 can actually be placed
on its side. Such placement will pose no safety or performance compromises, but we recommend placing a soft
towel or carpet under the unit to prevent the chassis and front panel from being scratched or marred in any way.
Connection to Audio/Video Components
AC Cable Routing
Once the Niagara 7000 is placed, an appropriate 20-amp-rated AC cord must be connected to the rear panel AC
inlet (IEC-C20) connector. The AC cord must have an IEC-C19 female end connector and a grounded male 120VAC
Edison/NEMA plug for use in North America or Taiwan. We highly endorse the use of any AudioQuest NRG Series
20-amp-rated AC cord, but the Niagara 7000 will function properly with any appropriate AC cord that meets the
aforementioned requirements.
When facing the Niagara 7000’s rear panel, the IEC-C20 inlet is located on the unit’s lower-left side. The AC input
cord must be connected to an appropriate AC outlet (see “Power Source,” page 6). Though a conventional AC
outlet will function safely and yield high performance, for the very best sonic performance, we highly endorse the
installation of the AudioQuest NRG Edison 20 (or NRG Edison 15, if the electrical panel will only accommodate a
15-amp RMS service).
Whenever possible, it is best to keep at least three inches (approximately 7cm) between AC cables and any signal
cable. When this is not possible in a practical layout of system cabling, crossing the AC cables to signal cables at 90
degrees is best to minimize induced noise.
Connecting AC cables to the Niagara 7000’s NRG Edison AC outlets – WARNING!
The AudioQuest NRG Edison AC outlets feature the strongest grip of any commercially available AC outlet in
history. There are many reasons this was done—lower impedance, superior transient current delivery, and vastly
reduced noise, to name a few. However, there is a price to be paid for superior performance: It will take some time
and patience to both insert an AC cord into and remove an AC cord from these receptacles.
We have made every effort to exercise these receptacles during testing and final inspection, but they will still
require slow and careful “wiggling”: When either inserting a plug into these receptacles or removing an AC cord’s
male plug from the receptacles, gently move the male AC cord’s plug from side to side while providing an even
forward or backwards pressure. If you find it is simply too difficult to insert an AC cord’s male plug into one of
the outlets, it may be that its male prongs are slightly oversized due to either its design or generous quantities of
plating material.
7
This is not a reason to return the Niagara 7000 or abandon the use of such an AC plug! Typically, the outlet
in question can be slightly opened up by gradually exercising it with an AC plug. For this, we actually do not
recommend an AudioQuest or any other premium brand of AC cord or male plug. For exercising the outlet, obtain
from an electrical supply house or hardware store a generic three-prong 15-amp-rated AC cord or plug that
affords a generous and secure area to handle. Any will work, but the best will be those with three brass (un-plated)
prongs so that if multiple insertions are required, no nickel plating from the generic AC plug will find its way into
the AudioQuest NRG Edison outlet.
High Current/Low-Z Power Banks
There are two High Current/Low-Z Power banks (labeled “1” and “2”) with two AC outlets each. The outlets feature
our Transient Power Correction Technology, and are designed to enhance the performance of power amplifiers
via our circuit’s low-impedance transient current reservoir. Power amplifiers, monoblock amplifiers, integrated
amplifiers, powered receivers, or powered subwoofers should be connected to these four outlets. The primary
mono, stereo, or multi-channel power amplifier(s) should be connected to Bank 1. This enables the standby sense
circuit, which requires the current draw of a power amplifier connected to (and only to) outlet Bank 1. In terms of
sonic performance, there is no difference between outlet banks 1 and 2. If the standby sense circuit is not utilized,
and the sense circuit bypass switch is set to “Enabled,” any outlet on the two banks may be utilized.
For systems with only one or two power amplifiers, the two uppermost outlets of banks 1 and 2 will provide
slightly superior performance due to their closer proximity to the AC outlets’ radio frequency noise-dissipation
circuit. However, the outlets located directly below will certainly afford exemplary performance!
Regardless of class of operation or circuit topology (valve, solid-state, digital, or otherwise), the Transient Power
Correction Circuit will not compress the current of any power amplifier. Quite to the contrary, it will improve the
amplifier’s performance by supplying the low-impedance current source that the amplifier’s power supply so
desperately needs.
However, the other four AC outlet banks (Ultra-Linear Noise-Dissipation/Dielectric-Biased Symmetrical Power), are
not appropriate for power amplifiers. They have been optimized for line-level audio preamplifiers, DACs, universal
players, turntables, and video products that utilize constant current voltage amplifier circuits. These circuits never
suffer from current compression, but their lower input level and higher gain require a more robust means of noise
dissipation. This is key to the Niagara 7000’s discrete AC power banks, in that not every circuit is treated the same,
but rather isolated bank by bank and optimized for best performance.
Ultra-Linear Noise-Dissipation System/Dielectric-Biased Symmetrical Power Banks
There are four banks that utilize this technology within the Niagara 7000. Further, the first two banks (3 and 4) are
100% isolated from banks 5 and 6. All four of these are in turn 100% isolated from the High-Current/Low-Z banks
1 and 2. This offers a great advantage in controlling the complex interactions of RF (radio frequency) and other
induced noises present in the AC power supplied from your utility, the noise that will be present on and in every
AC cord, and the noise that is produced within your system’s components and that “backwashes” into the Niagara
7000’s output circuits.
Though it would be simple to recommend putting the digital or video components into banks 3 and 4, and the linelevel audio components and turntables into banks 5 and 6, the quest for optimal performance is more complex.
This scenario will work, and likely work well, but a certain amount of experimentation is best given the fact that
no filter or screen can eliminate 100% of all noise, the size of many of these RF-induced waveforms is as small as
the edge of this paper you’re reading, and the interactions are complex. So long as the power amplifiers are in
their appropriate banks, and the other components are in banks 4 through 6, you should experience exemplary
performance. Still, for the audiophile with patience, the reward will be system performance with the highest
possible resolution and lowest possible noise.
8
To achieve that optimal performance, we recommend the following guidelines. For systems that utilize very few
components, bear in mind that it is advantageous to use the uppermost outlets in each bank as they have a closer
proximity to the final stage noise-dissipation circuits. (The same holds true for the High-Current banks.) Again, because
banks 3 and 4 are 100% isolated from banks 5 and 6, placing a DAC and/or universal player in one isolated group, and a
preamplifier and turntable in another, would be an excellent way to start. For systems that are much larger and require
more outlets, try starting with the most basic setup, then adding one component at a time. Try either of the two isolated
bank groups to see which works best for you. The bank that sounds best (yielding the greatest resolution) is the best one
for your system!
9
Suggested AC Connections
1
Powered
LoudSpeaker
“Engaged”
position must be
default setting.
See page 10
for use of
“Standby” mode.
Phono
Preamplifier
Line-Level
Preamp
Monoblock
Flat Screen
Monitor /
Projector
Mono Block
Mono Block
Mono Block
Universal /
CD Player
Line-Level Pre Amp
Mono Block
Phono Amp
Phono Amp
Phono Amp
Line-Level Line-Level
Pre Amp Pre Amp
Mono BlockMono Block
Cable / Sat Box
Phono Amp
POWER CORRECTION
Cable / Sat Box
3
2
1
Phono Amp
Phono Amp
DAC
/ Sat |
Box
DAC
ULTRA-LINEAR NOISE-DISSIPATION Cable
SYSTEM
DIELECTRIC-BIASED SYMMETRICAL
POWER
HIGH CURRENT | LOW-Z POWER CORRECTION
STANDBY
Line-Level Pre Amp
Line-Level Pre Amp
Line-Level Pre Amp
DAC
6
5
4
ENGAGED
Cable / Sat Box
Cable / SatCable
Box / Sat Box
DAC
DAC
DAC
120 VAC 60Hz
Mono Block
20 AMPS MAXIMUM
5 AMPS RMS MAXIMUM OUTPUT
5 AMPS RMS MAXIMUM OUTPUT
20 AMPS RMS MAXIMUM OUTPUT
NIAGARA-7000 DESIGNED, ASSEMBLED AND TESTED IN U.S.A.
SYMMETRICAL POWER BANKS ARE GFCI PROTECTED - 60/120V 1O AC
Phono Amp
Phono
Phono
Amp Amp
Line-Level Pre Amp
Mono Block
Turntable
Monoblock
Line-Level
Pre Amp
Line-Level
Pre Amp
Mono Block
Mono Block
20 Amp
Rated
AC Cord
Line-Level
Pre Amp
Line-Level
Pre Amp
Line-Level Pre Amp
MonoMono
BlockBlock
Cable / Sat Box
/ Sat Box
CableCable
/ Sat Box
Cable /
Satellite
Box
DAC
DAC DAC
DAC
Powered
LoudSpeaker
Phono Amp
Phono Phono
Amp Amp
Cable / Sat Box
Cable /Cable
Sat Box
/ Sat Box
DAC
DAC
DAC
Note: Banks 3 through 6 are subject to many variables and circuit conditions, so experimentation for
best results is encouraged. Power amplifiers must be connected to banks 1 or 2.
10
2
Line-Level Pre Amp
Mono Block
“Engaged”
position must be
default setting.
See page 10
for use of
“Standby” mode.
Monoblock
STANDBY
Phono
Preamplifier
Line-Level
Preamp
Line-Level Pre Amp
Mono Block
Mono Block
Line-Level Pre Amp
Universal /
CD Player
Phono Amp
DAC
Line-Level Pre Amp
Mono Block
DAC
/ Sat |
Box
DAC
ULTRA-LINEAR NOISE-DISSIPATION Cable
SYSTEM
DIELECTRIC-BIASED SYMMETRICAL
POWER
HIGH CURRENT | LOW-Z POWER CORRECTION
Cable / Sat Box
DAC
3
2
1
Phono Amp
Phono Amp
Cable / Sat Box
Phono Amp
Line-Level Line-Level
Pre Amp Pre Amp
Phono Amp
Mono BlockMono Block
Phono Amp
POWER CORRECTION
Subwoofer
6
5
4
ENGAGED
Cable / Sat Box
DAC
Cable / SatCable
Box / Sat Box
Line-Level Pre Amp
Mono Block
DAC
DAC
120 VAC 60Hz
Line-Level Pre Amp
Line-Level Pre Amp
Mono Block
Mono Block
20 AMPS MAXIMUM
5 AMPS RMS MAXIMUM OUTPUT
5 AMPS RMS MAXIMUM OUTPUT
20 AMPS RMS MAXIMUM OUTPUT
Phono Amp
NIAGARA-7000 DESIGNED, ASSEMBLED AND TESTED IN U.S.A.
SYMMETRICAL POWER BANKS ARE GFCI PROTECTED - 60/120V 1O AC
Phono Amp
Phono Amp
Cable / Sat Box
Line-Level Pre Amp
Mono Block
Line-Level Pre Amp
Mono Block
Monoblock
Mono Block
20 Amp
Rated
AC Cord
DAC
Turntable
Line-Level Pre Amp
Subwoofer
Cable / Sat Box
Cable / Sat Box
Streamer
DAC
DAC
Computer
Phono Amp
Phono Amp
Phono Amp
Cable / Sat Box
DAC
Cable / Sat Box
Cable / Sat Box
DAC
DAC
Note: Banks 3 through 6 are subject to many variables and circuit conditions, so experimentation for
best results is encouraged. Power amplifiers must be connected to banks 1 or 2.
11
Operation and Continuous Use
Power Switch/Circuit Breaker and LED Power Indicator
Once the AC cords are properly connected to the AC source tap, and the components are connected to the
appropriate outlet banks, it is safe to energize the Niagara 7000. On the right-hand side of the Niagara 7000’s front
panel, there is a black rocker switch. Firmly press the rocker switch so that its upper portion is flush with the front
panel. Typically within a couple of seconds, you should hear an audible “clack” sound(s) from one or more relays
within the Niagara 7000. At the same time, the front-panel LED power indictor will glow blue, signifying that the
unit is operational. (If this does not occur, see the “Trouble-Shooting Guide” in this manual.)
Rear-Panel Power Correction Switch/Niagara 7000 Current Draw
The default position for this switch should always be “Engaged”—even for applications in which there are no
power amplifiers of any kind powered by the Niagara 7000. Defaulting to “Engaged” serves two functions: It
activates the Transient Power Correction Circuit for power amplifiers that would be energized by outlet banks 1 or
2, and also provides a portion of the Ultra-Linear Noise-Dissipation Circuit for outlet banks 3 through 6. Although
no damage to the Niagara or the connected components will occur, performance will be noticeably compromised
when this switch is not set to the “Engaged” position.
However, there is one exception to this. Niagara 7000 has an internal current sense circuit that will automatically
engage the Transient Power Correction Circuit, as well as turn it off when your audio/video system is placed in
standby mode. To utilize this feature, two things must be present:
1.The primary power amplifier(s) or powered receiver must be connected to High Current/Low-Z
Power Correction Bank 1 only (as it is the only power bank with the current sense monitoring for
this circuit function).
2.The primary power amplifier(s) or powered receiver must have a power standby mode, and its
current consumption at 120VAC in standby mode must not exceed 25 watts. (Although 1 watt is
an industry standard for standby power, many great amplifiers routinely dismiss it for reasons of
performance over power savings. Therefore, you should consult the specification sheet in your
amplifier’s user manual.)
If these two requirements cannot be met, simply place the power correction circuit switch in the “Engaged”
position and leave it there! Rest easy, knowing that you will receive every last bit of performance the circuit
can deliver.
However, if your system allows for the scenario listed above and your amplifier(s) or powered receiver meets
the criteria listed above, you may wish to take advantage of the standby circuit. (It is likely that many systems
will meet these criteria. However, if the standby function is not important to you, simply leave the switch in the
“Engaged” position).
The standby function was not created to place the connected system into a standby or switched mode, but rather
to place the Transient Power Correction Circuit into standby mode (disengaged), for instances when the system is
powered but not functioning (i.e., when there is no signal present). This was implemented because the Transient
Power Correction Circuit creates a reactive current draw of as much as 9 to 10 amps RMS at idle (real world draw
is a small fraction of an amp), and electrical technicians who connect a current probe to a product such as this
are frequently alarmed: They suspect that the product is either broken or that it is drawing a distressingly high
amount of current from the wall outlet (akin to a pair of monoblock power amplifiers left in full operational mode).
This is actually far from the truth. If the Niagara 7000 was consuming that much current (or even 20% of that level),
it would need to dissipate the energy loss in heat. It would be quite warm (even hot) to the touch, just like most
power amplifiers while in operation. In fact, the Niagara 7000 runs cool, precisely because this current reading is
false. The circuit utilizes massive capacitive reactance across the AC line, which, akin to a battery, will both absorb
12
and immediately release the current several times per second. Further, when incorporated with power supplies
such as those found in power amplifiers, the current readings actually come down! This is due to what’s known as
a vector load, and it’s quite dynamic in an audio system. In this scenario, there is one thing that can run somewhat
warmer than it might otherwise: the AC cord that supplies power to the Niagara 7000. This is because the wiring
and the circuit breaker that supply power to Niagara 7000 simply look at RMS current and do not distinguish
between reactive loads, resistive loads, or inductive loads, but your utility does.
This circuit and many like it have been utilized for many years, and, when tested into buildings with absolutely
no loads present aside from the transient power correction circuit, there was virtually zero power draw from the
utilities power meter. Still, in an age where so-called “smart meters” are omnipresent, and some utilities may or
may not change their standards for “what type of power or current is suitable for billing,” we have gone to great
lengths to offer an alternative to those who may be concerned, but who nevertheless wish to achieve the best
possible audio or video performance.
Again, if you wish to utilize this feature, and your amplifier(s) and/or powered receiver meet the criteria,
simply place the Power Correction Switch in the “Standby” position. Otherwise, please leave the switch in the
“Engaged” position.
Ground Fault Circuit Interrupter (GFCI) “Test” Button/Momentary Switch
To offer unparalleled safety and security for both you and your valuable equipment, the Niagara 7000 features
a ground fault interruption circuit for the Ultra-Linear Noise-Dissipation Dielectric-Biased Symmetrical Power
outlets. This will trip the front-panel power switch (which also acts as an ultra-low resistance 20-amp RMS magnetic
circuit breaker) if there is ever more than 5.5mA of current leakage from Line to Ground or Neutral to Ground.
This is extremely rare, and only exists as these four outlet banks utilize two isolation transformers as part of their
circuitry. Since the output is Symmetrical (Balanced), there is voltage potential on Neutral relative to Ground. In
and of itself, this is not at all a problem or danger; in fact, it is precisely the feature used by the transformer in most
components with a linear power supply (in that application, called “center tapped”).
However, if a connected component’s power supply were to suffer a catastrophic failure, there would be a remote
possibility of some AC voltage being present on the component chassis. With the incorporation of the GFCI, this is
not possible, as the current fault would shut off the main power switch within a tiny fraction of a second. Because
we insisted on creating it for optimal performance and safety, this method of redundancy protection is complex
and costly. As a result, the symmetrical outlet banks in the Niagara 7000 are safer to use than those found in any
home, office, or hospital.
To ensure the circuit is functioning properly, simply lightly press the button. (It is a momentary switch, so it will not
latch.) This should instantly disengage the front panel’s power switch/circuit breaker, and the blue power indicator
will no longer light. Once this “test” has been performed, you will not need to do so again unless the unit is moved
or has been serviced.
Extreme Voltage Indicator
One portion of the Niagara 7000’s non-sacrificial surge protection is dedicated to a fast-acting extreme voltage
shutdown circuit. If more than 140VAC is present on the incoming AC line for more than a quarter of a second, the
circuit will instantly open a high-current relay that will disengage the AC power from all of the Niagara 7000’s AC
outlets, activating the red front-panel LED “Extreme Voltage” warning indicator. Once the event has passed, or the
building wiring fault has been corrected, the circuit will automatically re-engage.
XFMR-1 and XFMR-2: Front-Panel Circuit Breaker Reset Buttons
If either AC outlet banks 5 and 6 (XFMR-1) or banks 3 and 4 (XFMR-2) exceed 5 amps RMS capacity, the circuit
breaker will trip, the output to those AC outlet banks will no longer be present, and the breaker will need to be
reset. (The tip of a pencil or pen will work well for resetting the breaker.) If you are uncertain about the current
that your connected products will draw at 120VAC input, consult your user manuals. Note: We are referring to 5
13
amps per isolated dielectric-biased symmetrical power group; this will have no effect on power amplifiers that can
draw far in excess of 5 amps! Most line-level audio products will draw far less than one amp—typically, a fraction
of an amp. Most projectors and flat-screen televisions are also well under 5 amps, though there are exceptions.
Most plasma televisions are also under 5 amps, and, contrary to myth, are not current-starved devices; they utilize
voltage amplifiers with constant current draw. The Dielectric-Biased Symmetrical Power outlets are the appropriate
AC outlets for these devices. It is quite unlikely that you would ever need to reset these, and far less likely that you
would need to reset both.
Break-in Time/Continuous Use
The Niagara 7000 is made of a variety of passive and active components. Though every attempt has been made
to reduce the necessity of so-called “break-in,” “burn-in,” or “run-in” time—including high-power run-in of every
critical capacitor in the Ultra-Linear Noise-Dissipation Circuits—the Niagara 7000 will benefit from continuous
use, just like any other audio/video component. This is not to say that you will be made to “suffer” through weeks
or months of intolerable performance until that “magic day” when the parts are fully formed and ready. On the
contrary, the Niagara 7000 will perform very well from the first moment you use it. It will improve gradually, in
small increments, over a period of approximately two weeks. While leaving the Niagara 7000 turned on during
this period will aid the process, it is also perfectly acceptable to turn the unit off; doing so will simply increase the
time it takes to reach final “break-in.”
The Niagara 7000 has a five-year warranty, but it was designed to last for over two decades. Provided that the
Niagara 7000 is used inside a home, store, studio, or office with a reasonable climate (45 degrees to 100 degrees
Fahrenheit, with less than 20% humidity), it can be left on continuously; there are no parts that will wear out.
14
Specifications
Surge Suppression:
Non-sacrificial (nothing to damage with repeated 6000V/3000A
input surge tests, which is the maximum that can survive through a
building’s AC electrical panel).
Extreme Voltage Shutdown
Voltage:
140VAC (will activate the main high-current relay to open within less
than 0.25 second; automatically resets once the incoming power is
within a safe range).
Common-Mode Noise Dissipation:
In excess of 30dB from 60Hz to 100MHz, linearized for dynamic
(rising) line impedance with frequency (source) and 10 to 50 ohm
load, system current dependent.
Transverse-Mode Noise
Dissipation:
In excess of 24dB from 3kHz to 1GHz, linearized for dynamic
(rising) line impedance with frequency (source) and 10 to 50 ohm
load, system current dependent.
Input Current Maximum Capacity:
20 amps RMS (total).
Ultra-Linear Dielectric-Biased
Symmetrical Power AC Outlet
Banks:
4 (two 100% isolated groups total). Group one is AC Bank 5/6
and group two is Bank 3/4 (5 amps RMS total per group, maximum
output current capacity).
Number of AC Outlets:
12 (4 High Current/Transient Power Correction; 8 Ultra-Linear/
Dielectric-Biased Symmetrical Power).
Power Consumption:
Typically, less than 0.25 amps at 120VAC input, or with the power
correction switched to Standby setting.
(This is dependent on a reactive vector load. For more info, see “Operation
and Continuous Use: Rear-Panel Power Correction Switch – Niagara 7000
current draw.”)
Dimensions:
17.5” W x 5.24” H x 17.2” D (3-RU rack-mounting ears, optional)
Weight:
81 lbs.
15
Trouble-Shooting Guide
At AudioQuest, we always appreciate hearing from you. However, if you have questions, problems, or
suspect that your Niagara 7000 requires service, please start here.
There is no power to any of the AC outlets.
When the Niagara 7000’s front-panel LED power indicator glows blue, the unit is operational. If the Power On
indicator is not lit, consider the following: Is the upper portion of the front-panel rocker switch fully flush with
the chassis? Is the input AC cord fully inserted into the Niagara 7000’s AC inlet? Is the input AC cord properly
plugged into the wall AC service outlet? Is the wall’s AC outlet functioning properly? Plug into the outlet another
component, product, or lamp to verify that power is present and that the electrical panel’s circuit breaker has
not tripped.
If there are only one or two AC outlets that have no output power, a component may be malfunctioning. Verify the
AC output with a known simple device such as a lamp.
There is no power to any of the AC outlets and the red front-panel
Extreme Voltage indicator is lit.
This indicates that either there is more than 140VAC (+/-3V) present on the wall’s AC service outlet, or the Niagara
7000’s protection circuit is miscalibrated. The latter is quite rare. (This circuit is adjustable, but it’s tested and
retested before it leaves the factory, and it’s glued into place, so shipping will not affect it.) Use an AC voltage
meter to determine if your outlet has too much voltage to be safe for operation, or if there is a wiring fault that is
causing this to occur.
Once the power is brought into a safe range for operation (90VAC to 137 VAC), the Niagara 7000’s protection
circuit will automatically switch to operational mode and the blue power indicator will light.
There is no power to any of the “Ultra-Linear Dielectric-Biased
Symmetrical Power” outlets.
The front panel has two 5-amp circuit breaker reset buttons that are slightly inset from the edge of the panel. The
button to the left controls AC outlet banks 5 and 6, and the button to the right controls AC outlet banks 3 and 4.
It would be VERY unlikely that both circuit breakers would trip from too much RMS current draw per outlet group.
However, if one outlet group (banks 3 and 4) or the other group (banks 5 and 6) has no output, check to see if
the breaker for that AC outlet group has tripped. To reset the breaker: Using the back of a pencil or pen, press the
appropriate circuit breaker reset button into the chassis until it reaches its normal state—slightly loose, with little
spring tension.
When resetting or testing the reset of one or both of the front-panel 5-amp XFMR-1 and XFMR-2 circuit breakers, it
is important that the AC outlet group is not connected to a component or product that is defective and has shorted.
To verify that the circuits are working, we recommend disconnecting all but one known properly functioning
product from the AC outlet group.
If after verifying that the circuits are operating (or, if after resetting the circuit breaker for one of the power groups),
you discover that one or multiple products activate the circuit breaker, check the current consumption rating
of that/those products. (Typically, this information can be found on the last page of the component’s owner’s
manual; it should be listed as the power consumption at 120VAC.)
The current specification will typically be in watts. Know that 5 amps at 120VAC equals 600 watts. (You will want to
be at least slightly under that number.) You may simply add wattage ratings to calculate your total consumption:
If you have four components into group one (banks 5 and 6), the maximum capacity of all four outlets combined
is just under 600 watts or 5 amps. The same is true for group two (banks 3 and 4).
16
The main power rocker switch/circuit breaker tripped to the lower (off) position
while the system was playing.
You may have exceeded the maximum current capacity of the Niagara 7000. This should be rare, but it may be
possible. Typical power amplifiers draw about one-third of their maximum current consumption at 120VAC, as listed
in the product’s specifications (typically found in their owner’s manual). This is further complicated by the fact that
the power consumption to AC outlet group one (banks 5 and 6) and two (banks 3 and 4) is an additional draw on the
maximum current capacity of 20 amps that will trip this switch/magnetic circuit breaker.
The Transient Power Correction Circuit may also contribute to the overall draw seen by the circuit breaker. Still,
it should be rare that the total capacity is exceeded, but, given that some televisions, projectors, and power
amplifiers can draw substantial current, it is certainly not impossible. If this is the case, an additional Niagara 7000
or Niagara 5000, and a discrete 15- to 20-amp AC service on the same phase of the electrical panel, will be required
for some or all of the power amplifiers.
When a component was plugged into one of the Ultra-Linear Dielectric-Biased
Symmetrical Power outlets and switched on, the main power rocker switch/circuit
breaker tripped to the lower (off) position.
You have likely tripped the GFCI circuit (ground fault protection). This circuit ensures that even in the event of a
catastrophic failure to the connected components’ power supply and/or circuits (demonstrated by full shorting and
possible smoke), there will be no AC voltage on the components’ chassis that could possibly shock a person. This
circuit instantly recognizes if there is more than 5mA of current leakage from Line to AC Ground, or Neutral to AC
Ground. This is the maximum current allowed for ALL 8 of the Symmetrical AC outlets. If this current leakage is
detected, the main power switch/magnetic circuit breaker will immediately switch off, thus protecting the system
operator and all others that might come in contact with the system.
It is very rare for this circuit to trip. If it does, the connected component that causes this is either defective (most
likely), or it (and possibly another component on the same Symmetrical Power bank) may have a combined
current leakage to ground that exceeds 5mA. Technically, this is not allowed in modern electronic circuit design,
but that does not necessarily mean an otherwise well-performing product with an “unconventional” power supply
is unsafe to use. Such a component may need to be used with either the Niagara 7000’s high-current AC outlets,
which do not utilize the GFCI protection circuit, or they may be powered by another discrete AudioQuest Niagara
Series power product, thus preventing the GFCI nuisance tripping.
As a final check, inspect the GFCI test button on the left side of the Niagara 7000’s front panel. It is a momentary
switch and it will not latch; by pressing it lightly into the chassis, it will activate the GFCI protection circuit and
trip the main power switch/magnetic circuit breaker. Though extremely rare, it is possible that the switch could
be stuck in an “on” position from taking a blow during shipping. (The rest of the unit may be perfectly fine, but
the tolerance of this test button switch to the chassis and front panel is tight.) When pressed, the switch should
exhibit some “travel” or “give” and should not feel binding in any way. If the switch feels tight or stuck, there may
be a problem. (This will require servicing, so please be certain.)
My power amplifiers sound muddy, compressed, or weak.
The Transient Power Correction Circuit may not be operating. Be sure that all power amplifiers, powered receivers,
powered loudspeakers, and or powered subwoofers are plugged into the High Current/Power Correction
AC outlets. If any of these are plugged into the Ultra-Linear Dielectric-Biased Symmetrical Power outlets, the
connected power amplifier(s) will be current compressed, as the impedance is too high for any power amplifier.
If the power amplifier(s) are plugged into the High Current/Power Correction AC outlets, make certain that the
rear-panel Power Correction switch is in the “Engaged” position. Although it is possible for the Power Correction
Circuit to work properly while the switch is in the “Bypass” position (see “Power Correction Switch,” p.12), you
might find that the unit sounds substantially better in the “Engaged” position. If this is the case, it is possible that
17
Trouble-Shooting Guide, continued
the main or primary power amplifier(s) are not plugged into High-Current AC bank 1, the power amplifier has
insufficient current draw to activate the circuit, or the circuit is miscalibrated.
When the Power Correction switch is set to the “Engaged” position, the current sense circuit will be defeated. Yet,
even with the current sense circuit functioning properly, audiophiles may prefer the “Engaged” position, as it will
slightly decrease the impedance of the Transient Power Correction Circuit.
My Niagara 7000 has no power amplifiers connected to it, but it sounds odd or not
quite as good as it once did.
The Transient Power Correction Circuit also aids the Ultra-Linear Noise-Dissipation Circuits. Make certain that the
rear-panel Power Correction switch is in the “Engaged” position.
A technician or electrician found that my Niagara 7000 consumes over 8 amps
of current. Is it broken?
No, it’s not broken, and it’s not drawing 8+ amps in any conventional sense. The Niagara 7000’s Transient Power
Correction Circuit creates a reactive current draw of as much as 9 to 10 amps RMS at idle, and, when incorporated with
power supplies such as those found in power amplifiers, the current readings decrease. This is a vector load, which will
vary with the connected equipment. When plugged into an AC service that has no other electrical draw, it is typical to
see a real-world RMS power draw well below 30 watts at idle. (For an in-depth explanation of the circuit, see “Power
Correction Switch,” p.12.)
I did not notice hum with any prior power device, but there is a hum in my system
with the Niagara 7000.
Typically, this will not occur. In fact, the Niagara 7000’s two Ultra-Linear Dielectric-Biased Symmetrical Power outlet
groups are 100% isolated from one another, 100% isolated from the High Current/Power Correction outlet group,
and floating. This allows opportunities to break up ground loops in an audio system. However, the hum created by
ground loops (typically, a voltage differential from Neutral to Ground among two or more signal-connected devices
in an audio/video system) can at times be quite complex and difficult to easily diagnose.
To diagnose the hum/ground loop: With everything else unplugged, start with the simplest system that can still
play music through your loudspeakers. Use a source such as a universal player, computer, or a turntable so there is
no external cable or satellite cable connected to ANY of the associated components. Is there any hum? If yes, and
there is more than one line-level (non-power amplifier) component connected in this “minimalist” test, try placing
one in Symmetrical Power group one and the other in group two.
If the hum no longer persists under these conditions (which is likely), try reconnecting each additional component
into the Niagara 7000 one at a time. Once you find the component that creates the hum, you can possibly achieve
increased isolation by connecting it to a different Ultra-Linear/Symmetrical Power outlet group. This can typically
help, as well as increase overall system performance by decreasing system noise. If adding a cable or satellite signal
to the system reintroduces the ground-loop hum, that incoming signal line may require an isolation transformer
or humbucker.
If it seems that hum didn’t occur before, but does now, it’s most likely that the hum was in fact always there. The
difference is simply a matter of degree. Sometimes the ground loop difference is right on the edge of breaking
into an area where it’s audible, instead of only measureable with electronic measurement instruments. The very
act of creating better connections, thus minimizing the impedance to the power amplifiers, can tip the scales. If
the hum/ground-loop exists on the incoming satellite or cable line, then it will be necessary to fix the real problem.
This is common with large custom install systems. As these signal lines are always grounded in a different place
and at a different potential than the rest of the system’s ground return, the system will benefit greatly by utilizing
isolation under these conditions.
18
In rare circumstances, there are some computer peripherals or DACs that feature three-prong grounded AC cords
and whose circuits rely on a hard AC ground (i.e., they cannot be floated). Under these rare circumstances, you may
obtain better results with that one component plugged into one of the High Current/Power Correction outlets or
into an accompanying Niagara 5000, 500, 200, or 100 Low-Z Power Noise-Dissipation System.
My home or grounds were hit by lightning. The Niagara 7000 seems to be
functioning properly. Should it be sent in for inspection or service?
If you see or smell smoke coming from the unit, it needs service. Otherwise, if it functions after such an event
(which is very likely), there is nothing that would be compromised or damaged. If it fails after such an event, it
will fail totally. However, it’s unlikely that this would occur. The circuit is designed to easily handle any voltage
or current surge that could possibly make it past an electrical panel. The force required to damage the Niagara
7000 via a power surge would melt the panel and burn the building (in which case, the Niagara 7000 is the least
of your worries).
I broke off an AC plug tab while connecting or removing one of my AC cords.
The tab is stuck in the outlet. What should I do?
First, turn off or place on standby/mute all of your components, then turn off the Niagara 7000. Next, only after
you are absolutely certain that the power switch is off—you could also remove the input AC cord for even greater
safety assurance—use a strong set of pliers or a small handheld vice grip tool to grasp the portion of the tab that is
protruding from the NRG Edison outlet. While producing moderate outward pressure, gently wiggle the tab until it
pulls free from the outlet. This should be all that is necessary, and the outlets should be fine.
This will be a rare occurrence, but, because the gripping strength of the NRG Edison outlets is far greater than
that of generic or audiophile-grade AC Edison outlets, it is possible, if: An AC cord plug has tabs that are slightly
oversized or An AC cord plug has plating that is overly thick; or an AC cord plug is installed or removed in haste.
How do I clean the chassis and/or the electrical contacts?
The Niagara 7000’s black-painted chassis and dark chrome front panel can be cleaned with AudioQuest CleanScreen
or a modest misting of household window cleaners. Please use soft cotton or wool toweling to remove the liquid
from the metal and painted surface. Whenever possible, use the supplied polishing rag for the front panel, only
using liquid cleaner when oil or grime is beyond the polishing cloth’s capacity to thoroughly clean. Never use
alcohol or solvent-based cleaners. They can damage the surfaces, paint, and silk-screening material.
The AC inlet, outlet posts, and grips are all generously plated with silver. There is no need to clean these if they
are not exposed to foreign substances such as grease and dirt. Silver oxide is a superior conductor to silver itself.
If cleaning is required, Isopropyl alcohol (preferably 99% purity) on a cotton swab is best for the inlet tabs. Some
manufacturers provide specialized cleaners for the AC output surfaces. Again, however, cleaning these surfaces
will most likely be unnecessary.
Note: A pipe cleaner or cleaning swab with a wood stick and compact wool tip (available from an electronics
supply house) will be superior to household swabs. When working in a small area such as an AC outlet, this is
critical. Loose strands of cotton may damage the AC outlet. Damage to an AC inlet or outlet due to cleaning is not
covered under your warranty. If you damage an inlet or outlet in an attempt to clean it, you will be charged for the
repair and you will be responsible for all shipping costs.
I hear a slight buzzing sound coming from the Niagara 7000. Is it damaged?
No, it’s not damaged (or, at least, damage is very unlikely). If you’re in an extraordinarily quiet room and you hear
this buzzing sound only when in relatively close proximity to the Niagara 7000, or only when you place your ear
next to the unit, the buzzing is normal and, unfortunately, cannot be eliminated.
19
Trouble-Shooting Guide, continued
What you are experiencing is called magnetostriction. When an extraordinarily high quantity of harmonic
distortion is present on an AC line, or when the AC line contains some DC offset voltage that should not be
present, even the finest power transformers in the world will react to this problem. In order to reduce or
eliminate this distortion, the power transformers try to turn it into heat, causing the transformers’ steel alloy
core to hum at 60 cycles per second and all harmonics above that. This has no effect on the performance of the
Niagara 7000 or its connected components.
Ninety-eight percent of installations never exhibit this problem, but that’s no help to the 2% that do. The Niagara
7000 features a very robust DC-blocking circuit that feeds the input or primary to each of the AC isolation
transformers, but there are times when otherwise fabulous audio/video component or computer products can
nevertheless backwash DC (or a severely chopped waveform) into the output secondary of the transformers.
When this occurs, it is necessary to perform some experimentation: Remove each component and its AC cord, one
at a time, from the Ultra-Linear Dielectric-Biased Symmetrical Power outlet groups one or two. (The High Current/
Power Correction Outlets are in no way connected to these transformers, so these may stay as they are.)
Once magnetostriction is present on a transformer core, the audible noise (saturation) becomes greater as the
transformer is asked to pass more current. Moving some products, or a moderately high-current product, to the
opposite transformer group may alleviate the problem. Additionally, many computer drives come with external
(wall-wart type), switching power supplies that feature chopped AC waveforms. If mechanical noise is present,
such power supplies may be better served by the Niagara 7000’s High Current outlets or by using an additional,
smaller Niagara Series product, such as the Niagara 5000 or Niagara 500, which does not employ transformers.
If you notice that the slight buzzing sound has increased over time (i.e., was once negligible, but is now quite
noticeable), please understand that the Niagara 7000’s AC isolation transformers are like the proverbial “canary in
a coal mine.” In all likelihood, the Niagara 7000 has not developed a problem. (If you remove all of the AC output
cords and listen for the slight buzzing sounds, you will likely find that they are gone.) However, it is possible that
otherwise state-of-the-art components are causing the problem.
Investigate valve or vacuum tube power supplies. If the tube(s) are wearing, some circuits will offset some DC
onto the AC line and back to the Niagara 7000, or affect the AC waveform that the Niagara 7000 feeds. If the
components were going into a power filter or conditioner without transformers, you would never be aware of the
problem, but transformers never lie: It’s time to replace one (or more) of the power supply tubes!
20
Warranty
The Quest Group, DBA: AudioQuest, warrants to the original purchaser of this AudioQuest Niagara 7000, will be
free from defects in material and workmanship for a period of one year. The purchaser of the product is allowed
30 days from the date of purchase to complete the warranty registration by mail or on-line at the AudioQuest
website. If the purchaser completes the aforementioned registration, the warranty period will be increased to five
years from the date of purchase. If the product does not conform to this Limited Warranty during the warranty period (as herein above specified),
purchaser shall notify AudioQuest in writing (or e-mail), of the claimed defects. If the defects are of such type and
nature as to be covered by this warranty, AudioQuest shall authorize the purchaser to return the product to the
AudioQuest factory (2621 White Road, Irvine, California, 92614 USA). Warranty claims should be accompanied by a
copy of the original purchase invoice showing the purchase date; this is not necessary if the Warranty Registration
was completed either by mailing in the completed warranty card or by registering on-line at the AudioQuest
website. Shipping charges to the AudioQuest factory (Irvine, California, USA) must be prepaid by the purchaser
of the product. AudioQuest shall, at its own expense, furnish a replacement product or, at AudioQuest’s option,
repair the defective product. Return shipping charges back to the purchaser will be paid by AudioQuest.
All warranties contained herein are null and void if: the AudioQuest AC power product (Noise-Dissipation System)
has been opened, improperly installed, altered in any way, or tampered with. AudioQuest is not responsible for
any connected equipment or any claims of damage to connected equipment due to the occurrence of an AC
power surge, spike, or over-voltage event, unless AudioQuest determines after thorough inspection and testing
by AudioQuest (with product shipped to AudioQuest USA at the owner’s expense), that the protection circuitry
was in whole or in part improperly functioning. AudioQuest is not responsible for any connected equipment that
is damaged due to external signal lines (non-AC power lines), that carry an electrical storm or signal wiring fault
surge or spike (such as Ethernet, cable, and satellite connections). All AudioQuest AC power products (Noise-Dissipation Systems), must be plugged directly into a properly wired
AC power line with a protective ground. All AudioQuest AC power products (Noise-Dissipation Systems) cannot
be “daisy-chained” together in serial fashion with other AC power strips, UPS’s, other AC surge protectors, AC
power conditioners, three-to-two prong adapters, or AC extension cords. Any such installation voids the
warranty. The AudioQuest warranty only protects against damage to properly connected equipment or AC cables
where AudioQuest has determined, at its sole discretion, that the damage resulted from an AudioQuest power
product (Noise-Dissipation System) circuit or protection circuit malfunction and does not protect against acts of
God (other than lightning), such as flood, earthquake, war, terrorism, vandalism, theft, normal-use wear and tear,
erosion, depletion, obsolescence, abuse, damage due to low-voltage disturbances (i.e., brownouts or sags), or
system equipment modification or alteration. Do not use this product in any way with a generator, heater, sump
pump, water-related devices, life-support devices, medical devices, automobile, motorcycle, or golf-cart battery
charger. To be used indoors only and in dry areas. All warranties contained herein are null and void if used in any
way with any of the aforementioned devices. THE FOREGOING IS IN LIEU OF ALL OTHER WARRANTIES, EXPRESS OR IMPLIED, INCLUDING BUT NOT LIMITED TO
THE IMPLIED WARRANTIES OF MERCHANTABILITY AND FITNESS FOR A PARTICULAR PURPOSE. AudioQuest does
not warrant against damages or defects arising out of improper or abnormal use or handling of the product,
against defects or damages arising from improper installation, against defects in products or components not
manufactured by AudioQuest, or against damages resulting from such non-AudioQuest made products or
components. This warranty shall be cancelled by AudioQuest at its sole discretion if the product is modified in
any way without written authorization from AudioQuest. This warranty also does not apply to products upon
which repairs have been affected or attempted by persons other than then pursuant to written authorized by
AudioQuest.
THIS WARRANTY IS EXCLUSIVE. The sole and exclusive obligation of AudioQuest shall be to repair or replace the
defective product in the manner and for the period provided above. AudioQuest shall not have any other obligation
21
with respect to this product or any part thereof, whether based on contract, tort, strict liability, or otherwise. Under
no circumstances, whether based on this Limited Warranty or otherwise, shall AudioQuest be liable for incidental,
special, or consequential damages. AudioQuest employees or representatives’ ORAL OR WRITTEN STATEMENTS
DO NOT CONSTITUTE WARRANTIES, shall not be relied upon by purchaser, and are not a part of the contract for
sale or this limited warranty. This Limited Warranty states the entire obligations of AudioQuest with respect to the
product. If any part of this Limited Warranty is determined to be void or illegal, the remainder shall remain in full
force and effect.
Warranty claims should be accompanied by a copy of the original purchase invoice showing the date of purchase.
(If a Warranty Registration Card was mailed in at the time of purchase or if the product was registered on-line, this
is not necessary.) Before returning any equipment for repair, please be sure it is adequately packed and cushioned
in either the original or a new AudioQuest factory-supplied polybag, foam insert pair, and dual carton set to
protect against damage in shipment, and that it is insured.
22
23
©2015 AudioQuest • California, USA • The Netherlands • Hong Kong • www.audioquest.com • Email: [email protected] • Made in USA
October/2015