1
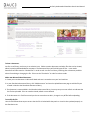
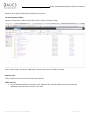
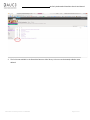
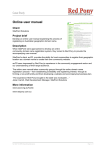
Act Early Ambassadors
SharePoint Portal User Manual
https://ambassadors.aucd.org
____________________________________________________________
WRITTEN BY:
Oksana Klimova
Director of Web Services, AUCD
June 11, 2014
____________Act Early Ambassador SharePoint Portal User Manual
Table of Content
For Help Contact ..................................................................................................................................................................... 3
Setting your browser to work with SharePoint ...................................................................................................................... 3
Accessing the Act Early Ambassador SharePoint Portal ......................................................................................................... 9
ALERTS................................................................................................................................................................................... 11
Creating Alerts:...................................................................................................................................................................... 11
Editing or Deleting an Alert: .................................................................................................................................................. 14
How to Request account for Act Early Ambassadors SharePoint Portal .............................................................................. 14
Act Early Ambassador SharePoint Portal Areas .................................................................................................................... 14
Homepage ............................................................................................................................................................................. 14
To Post a Document: ............................................................................................................................................................ 15
Add a new Microsoft Word Document: ................................................................................................................................. 15
To modify this file: ................................................................................................................................................................. 15
To view a file: ........................................................................................................................................................................ 16
To delete a file: ...................................................................................................................................................................... 16
To create document folder: ................................................................................................................................................... 17
Resource Links....................................................................................................................................................................... 17
Add a new Link: ..................................................................................................................................................................... 17
Calendar ................................................................................................................................................................................ 19
Add a new Event: .................................................................................................................................................................. 19
To export one calendar event to Outlook: ............................................................................................................................. 20
To export the entire site calendar (all months) to Outlook: ................................................................................................... 21
Association of University Centers on Disabilities
Page 2 of 21
____________Act Early Ambassador SharePoint Portal User Manual
The Act Early Ambassador SharePoint site is a web-based system for accessing, editing, managing, and sharing
collections of documents. This password-protected shared web space creates a place for the Ambassadors to access
materials (drafts), events and share information and ideas. SharePoint is designed to function most fully with Microsoft
Office tools including Word, Excel, and PowerPoint. The SharePoint portal works best with the latest combination of
tools: Internet Explorer, Office 2010/2013, and Windows operational systems.
This manual includes the following topics:
•
•
•
•
Setting your browser to work with SharePoint
Accessing Act Early Ambassador Portal of the AUCD SharePoint server (https://ambassadors.aucd.org/)
Alerts
Accessing the portal features
For Help Contact
If you need assistance or have questions about the Portal, please contact any of the following:
•
Tory Christensen, CDC/MCHB Senior Project Specialist
[email protected]
301-588-8252, ext. 216
•
Adriane K. Griffen, Project Director, CDC Cooperative Agreement
[email protected]
301-588-8252, ext. 204
•
Oksana Klimova, Director of Web Services
[email protected]
301-588-8252, ext 210
Setting your browser to work with SharePoint
In order to login in a non-anonymous SharePoint Web Site, we have to provide our domain/username credentials. But
any time we try to open an Office document (such as Word or Excel file) from it, it prompts for the credentials again.
This happens even if the user was the creator of the file.
This is a common issue and occurs because Word (or other non-web apps) is seen as a new session by Internet Security
and Acceleration Server and for that reason the authentication cookie provided to the web browser is only valid for that
particular web session and not Word; and that’s why Word (or Excel) gives an additional authentication prompt.
Solution: Make the SharePoint portal a Trusted Site:
Attention:
•
Only perform the solution on your own computer.
Association of University Centers on Disabilities
Page 3 of 21
____________Act Early Ambassador SharePoint Portal User Manual
•
•
Only perform this action on a password-protected computer.
Never perform this action on a publicly accessible computer, i.e. at a library or internet cafe.
1. Open Internet Explorer (highly recommended to use IE)
2. Log on to the portal home page (https://ambassadors.aucd.org)
3. On the Internet Explorer tool bar, select the "Tools" menu, then select "Internet Options".
Association of University Centers on Disabilities
Page 4 of 21
____________Act Early Ambassador SharePoint Portal User Manual
4. Select the "Security" and then "Trusted Sites" tab
5. Select the "Sites" button
6. Add the portal address in the "Add this website to the zone" box. Click "Add" and "Close".
•
•
If the portal web address is not in the input field, then copy and paste it from the browser address at the top of
your browser window.
Check "Require server verification (https) for all sites in this zone"
Association of University Centers on Disabilities
Page 5 of 21
____________Act Early Ambassador SharePoint Portal User Manual
Association of University Centers on Disabilities
Page 6 of 21
____________Act Early Ambassador SharePoint Portal User Manual
7. Click on the "Custom Level" button.
Association of University Centers on Disabilities
Page 7 of 21
____________Act Early Ambassador SharePoint Portal User Manual
8. Scroll down to the middle and enable "Display mixed content"
9. Scroll down to the bottom
Under "User Authentication/Logon", select "Automatic logon with Current Username and Password" and click "OK"
Association of University Centers on Disabilities
Page 8 of 21
____________Act Early Ambassador SharePoint Portal User Manual
10. Click "OK" twice to close all dialog boxes
11. The next time you log on, be sure to select "Remember my password"
Accessing the Act Early Ambassador SharePoint Portal
1. To access the Act Early Ambassador SharePoint Portal, enter https://ambassadors.aucd.org/ in the address bar of
your web browser.
2. The server requires authentication. Enter your AUCD username and your password in the log-in box. You may find it
convenient to click the "Remember my credentials."
Association of University Centers on Disabilities
Page 9 of 21
____________Act Early Ambassador SharePoint Portal User Manual
3. After you have logged in, you will see the SharePoint main portal. Depending on your computer's configuration,
you may see the Internet Explorer Information Bar and a notice that you will need to install and 'Active X' control to
allow you to fully access SharePoint.
4. Close the alert message and then click on the yellow info bar to install the ActiveX control (ActiveX controls are miniprograms that expand or enhance your browser). Select "Run ActiveX Control" from the contextual drop-down menu.
5. Click "Run" on the alert message to install the ActiveX control.
Association of University Centers on Disabilities
Page 10 of 21
____________Act Early Ambassador SharePoint Portal User Manual
6. After you’ve logged in, you should be directed to the homepage of Act Early Ambassador SharePoint Portal.
ALERTS
Creating Alerts:
In order to participate fully in the collaborative features of SharePoint, members will have to create individual alerts for
their preferences. To receive email alerts on posted documents and ongoing discussion, a member will create an alert
for these features.
Association of University Centers on Disabilities
Page 11 of 21
____________Act Early Ambassador SharePoint Portal User Manual
Alerts can be created at any time; however, it is recommended that they be created upon first access to the site.
1. Login (see above)
2. On the Act Early Ambassador Homepage, find your name located at the top right corner of the browser window. Click
on the arrow next to your name, and from the drop down menu, choose My Settings
Association of University Centers on Disabilities
Page 12 of 21
____________Act Early Ambassador SharePoint Portal User Manual
3. On the User Information Page choose My Alerts
4. Choose
Add Alert
5. From this page you can choose any of the lists or libraries for which you wish to receive emailed alerts. You can only
choose one alert at a time. Recommended are:
•
•
•
•
Shared Documents
Resource Links
Calendar
Contacts
Choose NEXT
6. You will now create specific criteria under which you want the alert to be sent. For example, you may wish to receive
daily alerts regarding document postings; however you may want announcements and calendar listings immediately.
You can even set the time of day to have the emails sent. Choose OK.
7. You now see the Add Alert’s screen with your new alert created in a list. Repeat the creation of alerts for all desired
lists and libraries in SharePoint following these steps.
Association of University Centers on Disabilities
Page 13 of 21
____________Act Early Ambassador SharePoint Portal User Manual
Editing or Deleting an Alert:
You can edit the criteria on your alerts by going under My Settings, choose My Alerts, and select the alert you wish to
edit or delete from the list displayed.
How to Request account for Act Early Ambassadors SharePoint Portal
SharePoint is a collaborative workspace on the intranet however, it is password protected and only members to the site
will have access. You will be supplied with a username and password to log in to the site.
To set up a member for Act Early Ambassadors Portal, a request must be sent to IT department with the person’s name,
email address, and phone number. The email should be addressed to Oksana Klimova ([email protected]) and Tory
Christensen ([email protected]).
There are categories for membership on a Share Point site; Member and Administrator. All members of the site will be
assigned Member type access. Members will have rights to add, edit and delete content on the Act Early Ambassadors
SharePoint portal.
Act Early Ambassador SharePoint Portal Areas
Homepage
The Act Early Ambassador Portal homepage displays:
1. Announcements.
2. Help Contact List.
3. Recently Shared Documents.
Association of University Centers on Disabilities
Page 14 of 21
____________Act Early Ambassador SharePoint Portal User Manual
To Post a Document:
Just like a real library, each entry is an exclusive item. Folders contain documents and other files that can be viewed,
edited, copied, and downloaded to computers. The Document library will hold all types of files -- even media.
Documents and files must be “checked out” in order to edit. Just like in a library, Checking Out a document prohibits
others from editing or changing the file. Files must be “Checked In” in order for others to edit.
Add a new Microsoft Word Document:
1. Create your new document in Microsoft Word and save it somewhere on your local machine.
2. In your SharePoint document library, click “Add document” and use the Upload Document page to add the file you
created in Word to the SharePoint document library.
3. The document is now available in the SharePoint document library. You may see your screen refresh to indicate that
the file has uploaded. Files can now be viewed, edited or even deleted.
4. If the document is in final format and you do not want others to edit it, change it to a pdf file before uploading.
To modify this file:
Users should follow these steps to ensure that the file is locked while they work on it and is then updated properly on
the SharePoint site.
Association of University Centers on Disabilities
Page 15 of 21
____________Act Early Ambassador SharePoint Portal User Manual
PC Users:
1. Check out the file by mousing over the file name in SharePoint and click Check Out in the dropdown menu.
2. Click on the file name to open the file.
3. Work on the file in Word and save your work.
4. Close the file.
7. At this point your document is uploaded, and you should see a page prompt to check in the document that you've
uploaded so that others can work on it.
Mac Users:
1. Check out the file by mousing over the file name in SharePoint and click Check Out in the dropdown menu.
2. Click on the file name to download the file to the Mac.
3. Work on the file in Word and save your work.
4. Click Upload in the SharePoint document library to open the Upload Document page.
5. Use the browse button to add the document to the Name text box and make sure that the Add as a new version to
exiting files checkbox is checked.
6. Click OK.
7. At this point your document is uploaded, and you should see a page prompt to check in the document that you've
uploaded so that others can work on it
In the case of uploading a document to an existing folder, select the folder from the Shared Documents list then follow
directions above.
If you do not see your name and date next to the file name refresh browser window.
To view a file:
Select file and it will open. You may be prompted to enter your username and password again. This is normal and does
not indicate a problem with the system. To avoid entering your credentials multiple times you should follow instructions
in chapter “Setting your browser to work with SharePoint.”
You may choose to download or copy a document to your computer for editing or filing. This is accomplished by
selecting the arrow to the right of the file name. Choose “Send To” and another menu will appear. Choose Download
copy and this will allow you to download a copy to your computer or an external drive.
To delete a file:
Association of University Centers on Disabilities
Page 16 of 21
____________Act Early Ambassador SharePoint Portal User Manual
Select arrow to right of file and choose delete from the menu.
To create document folder:
Select tab “Documents” under the tab “Library Tools” from the horizontal menu.
Click on “New Folder” icon and in “New Folder” form provide name for a folder, click Save.
Resource Links
Click on “Resource Links” to post link to external resources.
Add a new Link:
1. In your SharePoint Resource Link library, click “Add new link”, add URL address of your resources and
explanatory text into Notes text area. Click “save”.
Association of University Centers on Disabilities
Page 17 of 21
____________Act Early Ambassador SharePoint Portal User Manual
2. The link is now available in the SharePoint Resource Links library. Links can now be viewed, edited or even
deleted.
Association of University Centers on Disabilities
Page 18 of 21
____________Act Early Ambassador SharePoint Portal User Manual
Calendar
All events related to Act Early Ambassador activities will be posted in the portal calendar.
Add a new Event:
1. In the left hand menu, choose “Calendar”. This opens the Calendar section.
2. In your SharePoint Calendar section, click “Add new event”.
Association of University Centers on Disabilities
Page 19 of 21
____________Act Early Ambassador SharePoint Portal User Manual
3. Complete the form and click the “OK” button.
3. The Event is now available in the Calendar section. Events can now be viewed, edited or even deleted.
To export one calendar event to Outlook:
1. Choose Calendar in the left side navigation pane.
2. Select tab “List” under the tab “Library Tools” from the horizontal menu.
3. Select event from the calendar that you would like to export to Outlook
4. Choose Connect to Outlook from the tool bar.
Association of University Centers on Disabilities
Page 20 of 21
____________Act Early Ambassador SharePoint Portal User Manual
To export the entire site calendar (all months) to Outlook:
1. Choose Calendar in the left side navigation pane.
2. Select tab “List” under the tab “Library Tools” from the horizontal menu.
3. You will have to allow the folder to be shared with Outlook. Click OK
Association of University Centers on Disabilities
Page 21 of 21