1
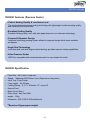
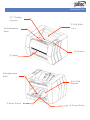
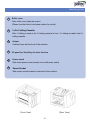
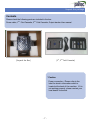
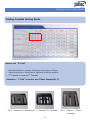
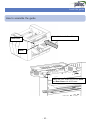
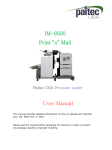
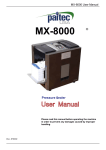
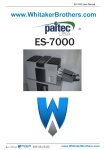
USER MANUAL
IM3100
Pressure sealer
This manual provides detailed information on how to operate and maintain
your IM3100
Please read this manual before operating the machine in order to prevent
any damage caused by improper handling.
Rev. 11-01-31
Introduction
Thank you for purchasing Paitec USA products.
Copyright
Any of the contents should not be copied, re-printed or translated by other
languages without Paitec USA approval.
IM3100 is the registered trademark of Paitec USA
-2-
Contents
1.
IM3100 Specification
--------------- ------------------------
4
2.
Identifying the parts
-----------------------------------------
5~6
3.
Unpack the --------------------------------------------------------
7
4.
How to install the fold plate
8
5.
How to adjust the fold plate
---------------------------
9
6.
How to install the guide
----------------------------
10
7.
OP Guide
8.
Manual Feeding
9.
Paper jam removal
----------------------------------------------------------------------------------------------------------------------------------
10. Handling the error messages
11. Maintenance
---------------------------
11~14
15
16
-------------------------------- 17
----------------------------------------- 18
-3-
IM3100 Features
IM3100 Features (Pressure Sealer)
• Perfect Sealing Quality & Low Noise Level
The most advanced pressure sealing technology with lightweight, excellent sealing quality
and extremely low noise levels.
• Excellent Folding Quality
Excellent folding quality, even with plain paper based on our advanced technology.
• Compact & Dynamic Design
Advanced technology sealing system allows for compact design which saves valuable
workspace.
• Angle Seal Technology
Innovative and exclusive angled seal technology provides superior sealing capabilities.
• Inline Pressure Sealer
IM3100 is compatible with several printers and it is very simple but useful.
IM3100 Specification
•
•
•
•
•
•
•
•
•
•
Form Size : A4 / Letter / Legal size
Speed : Maximum 3,000 forms / hour (Depends on the printer)
Input Tray : From Printer
Form weight : 60-120gsm
Folding Setting : Z, C, V & Double, 14” uneven Z
Manual Feed
Batch Count Alarm
Noise Level : less than 45db
weight : 22kg
Dimension : 320 X 390 X 280mm(WxLxH)
*Based on 80gsm paper weight.
-4-
Identifying Parts
② 1st Folding
Cassette
① Fold Roller
Fold adjustment
cover
Knob
④ OP panel
③ Output
Fold adjustment
Knob
② 2nd Fold
Cassette
⑤ Power Switch
⑥ Power Socket
Identifying Parts
1
Roller cover
Open roller cover when jam occurs.
(Please turn the Knob in clockwise rotation for unlock).
2
1st/2nd Folding Cassette
After 1st folding is made in the 1st folding cassette in front , 2nd folding is made in the 2nd
folding cassette.
3
Output
Finished forms exit the front of the machine
4
5
OP panel for Start/Stop & other function
Power switch
After check power socket, please turn on/off power switch
6
Power Socket
Main power socket located on the back of the machine
[Rear View]
[Front View]
-6-
안전 테이프 및 보호 스티로폼 제거하기
기기를 작동하기 전에 모든 안전 테이프와 보호 스티로폼을 제거 하십시요.
Unpack the package
Contents
Please check the following parts are included in the box.
Power cable, 1ST Fold Cassette, 2nd Fold Cassette, Output stacker User manual
[Unpack the Box]
[1st, 2nd Fold Cassette[
*Caution
Power connection : Please refer to the
label for electric information which is
located at the back of the machine. If it is
not working properly, please contact your
local dealer for service.
-7-
안전 테이프 및 보호 스티로폼 제거하기
기기를 작동하기 전에 모든 안전 테이프와 보호 스티로폼을 제거 하십시요.
How to install the Folding Cassette
Adjusting the Fold Cassette
Insert the 1st Cassette (Pic. 1) on the front and 2nd Cassette on the back (Pic. 2)
Turn the Knob to adjust the fold cassette to the desired paper size (Refer to fold
.
assist label on top of the in-feed tray.)
[Pic.1 : Set the 1st Cassette]
[Pic 2 : Set the 2nd Cassette]
[Pic 3 : Adjust 1st Cassette]
[Pic 4 : Adjust 2nd Cassette]
-8-
안전 테이프 및 보호 스티로폼 제거하기
기기를 작동하기 전에 모든 안전 테이프와 보호 스티로폼을 제거 하십시요.
Folding Cassette Setting Guide
Folding Cassette Setting Guide
How to set “Z-Fold”
• Swivel the Knob to counter clockwise and move on 99mm.
• Swivel the Knob to clockwise to tight and hold the position.
• 2nd Cassette is same as 1st Cassette.
! Attention : “C-Fold” is need to use 270mm Cassette(Pic. 3)
[Pic.1 : Standard 1st Cassette] [Pic. 2 : Standard 2nd Cassette]
-9-
[Pic. 3 : Option – 270mm
Cassette]
안전 테이프 및 보호 스티로폼 제거하기
기기를 작동하기 전에 모든 안전 테이프와 보호 스티로폼을 제거 하십시요.
Install the guide
How to assemble the guide
Fit the Guide to the Rear Cover.
Rear Cover
Guide
Match the four holes and fix the Guide
and Rear Cover with M3-Screws.
- 10 -
안전 테이프 및 보호 스티로폼 제거하기
기기를 작동하기 전에 모든 안전 테이프와 보호 스티로폼을 제거 하십시요.
OP panel Guide-1
Operation Panel
Count Reset
Please push a [Count Reset] button for initializing the working count on the Ready State.
Reset
[Ready] : Initialize the paper thickness .
• General Mode
[Count Reset] : working count is 0.
• Batch Alarm mode
[Count Reset] : batch counter is initialized, but working count is not initialized.
- 11 -
안전 테이프 및 보호 스티로폼 제거하기
기기를 작동하기 전에 모든 안전 테이프와 보호 스티로폼을 제거 하십시요.
OP Panel Guide-2
DFD (Double Feed Detection) on/off
If you do not want to use double detection function, you can make “DF mode” Off.
Press [DFD] and see disappearing “paper thick” on LCD.
Tip : You can use this function when the DFD is out of order because of the printed
contents on the paper.
DFD Sensibility
DFD sensibility sometimes has to be changed for better detection.
Please hold the [DFD] button and change the “paper thick‟ value by using the [Direction]
button. And for confirming and storing hold the [DFD] button again.
Batch Alarm Mode ON/OFF
Press [Batch Alarm] button for activating the batch count function. And press [Batch Alarm]
button once again for deactivating the function.
Adjust Batch Count
The batch count adjusting menu is appeared through holding the [Batch Alarm] button.
You can change the value by using the [Direction] buttons and confirm the count by
holding the [Batch Alarm] button again.
- 12 -
안전 테이프 및 보호 스티로폼 제거하기
기기를 작동하기 전에 모든 안전 테이프와 보호 스티로폼을 제거 하십시요.
OP Panel Guide-3
INFORMATION Menu
An information menu is appeared when the [INFO] button is pressed on the ready state.
1) What is the “Information‟ menu.
In this menu, a couple of information about the machine is showed.
And user can check the several settings and information about the OM3D easily.
2) Menu
a) Total Count : The total count of the machine
b) Paper Thick : The sensitivity of the DFD function.
c) Firmware Version
d) Installation Date : The date when the machine was installed.
e) Total Usage Time : Measure the using time.
f) Batch Count Alarm : The number of the batch mode.
For moving back to the ready state, press the [INFO] button again.
- 13 -
안전 테이프 및 보호 스티로폼 제거하기
기기를 작동하기 전에 모든 안전 테이프와 보호 스티로폼을 제거 하십시요.
OP panel Guide -4
1. If the [Count Reset] is clicked a Working Count becomes „0‟ .
2. If the [Ready] is clicked the Paper Thickness is initialized.
Ready
7
Work
13
[Paper thickness]
6
[Working count]
6
[Ready state]
[Work state]
Batch Count Mode
1. Check the „Ready State‟ of the OP Panel.
2. Adjust the fold-position of the 1st and 2nd CST by using the setting guide of the foldposition[Page 11].
3. Press the [Batch Alarm] button and check the LED is turned on.
3. To hold the [Batch Alarm] button shows „Batch count setting „ when the „Batch mode‟ is
activated. The number of batch count can be changed [from 1 to 200] every time the
[Direction] buttons are pressed. And the count is changed fast for holding [Direction]
4. Hold the [Batch Alarm] button for saving the count.
Batch
Set
100
[Count setting]
Ready
7
B100
0
[Batch set]
- 14 -
안전 테이프 및 보호 스티로폼 제거하기
기기를 작동하기 전에 모든 안전 테이프와 보호 스티로폼을 제거 하십시요.
Manual Feed
MANUAL FEED
1. Press [Manual Feed] button and confirm „Manual Feeding‟ is displayed on LCD.
2. Insert the paper into the manual feed guide.
3. AC motor starts to running firstly if the paper is detected by the infeed sensor and
the paper is fed after two sec later.
4. The manual feed is turned off automatically after a paper was folded.
! CAUTION : Please pay attention that the clothes do not stuck into the press roller.
- 15 -
안전 테이프 및 보호 스티로폼 제거하기
기기를 작동하기 전에 모든 안전 테이프와 보호 스티로폼을 제거 하십시요.
Paper Jam removal
Paper Jam Removal
The paper jam that is occurred in the IM3100 can be removed very easily.
The machine is stopped automatically when the paper jam is occurred. And the paper jam
can be removed by using the jam removal tool.
Open it.
Pull
the 1st CST
Locking Knobs.
[Remove the 1st CST]
[Open the top cover by un-locking the
locking knob.]
[Remove the jam by using the jam removal tool]
[Insert the tool into the hole on the press
roller and rotate the press roller by hand]
! CAUTION : Please keep the jam removal tool to right position after removing the jam.
- 16 -
안전 테이프 및 보호 스티로폼 제거하기
기기를 작동하기 전에 모든 안전 테이프와 보호 스티로폼을 제거 하십시요.
Handling the error messages
Handling the error messages.
Open it.
Double
Feed
Feed
Jam
Locking Knobs.
[Detect double feed &
feed jam]
[Open the cover and
remove the jam]
1st CST
1st
CST
Open
[1st Cassette Error]
[Check 1st Cassette]
2nd CST
2nd
CST
Open
[2nd Cassette Error]
[Check 2nd Cassette]
- 17 -
안전 테이프 및 보호 스티로폼 제거하기
기기를 작동하기 전에 모든 안전 테이프와 보호 스티로폼을 제거 하십시요.
5. Maintenance
Operator Maintenance
Due to the pressure seal forms leaving paper dust, ink and toner residues, it is very
important to occasionally clean the surface of the each roller to ensure optimum performance.
In case of fold roller, remove 1st folding cassette and separate roller cover.
Clean ink and toner residues on the folding roller with this soft cloth wet through alcohol.
*Caution : Do not use oil as this will damage the surface of the folding roller.
Infeed Sensor
Outfeed Sensor
[remove the forms]
[clean the sensor]
- 18 -
This page is intentional left blank
Division of Pai Trading, Inc.
Headquarter & Factory
15951 SW 41st Street #400
Davie, FL 33331
www.paitec.com