1
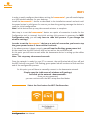
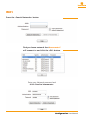
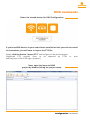
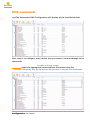
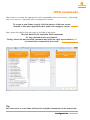
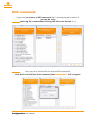
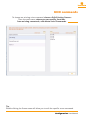
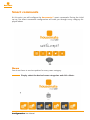
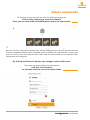
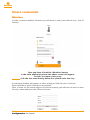
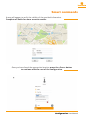
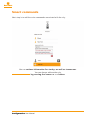
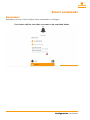
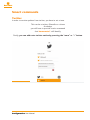
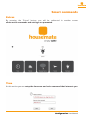
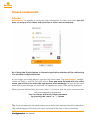
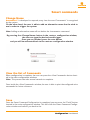
Configuration
User Manual
Configuration User Manual
WiFi
In order to easily configure the wireless setting for housemate®, you will need a laptop
or a USB wireless adapter for your desktop.
Install the housemate® device as described in the installation manual and wait until
the power button is solid green. As soon as you hear the greeting message the device is
ready for initial configuration.
Note: Initial device boot up may take several minutes to complete.
Next step is to set the housemate® device as a point of connection in order for the
Configuration tool to transmit the initial settings (this process is necessary for WiFi
Configuration only, you will only have to redo this process if you change the
wireless settings).
In order to set the housemate® device as a point of connection you have to tap
the green power button 5 times within 8 seconds.
If the above process is done correctly, you will see the flashing green power led.
At the same time, the WiFi led will turn red, as well as the notification led.
At this point you will have to wait while the housemate device is setting up the adHoc
network.
Note: This step may take several seconds.
Once the network is ready for your PC to connect, the notification led will turn off and
the WiFi led will turn green. The flashing green power led will continue to flash until the
end of the configuration process.
At this point, you will have to manually connect to the housemate network.
Simply open the (add name of windows wifi settings)
and click on the network «housemateAP».
Once you are connected,
you can continue with the WiFi setup described below.
Select the first button for WiFi Configuration
Configuration User Manual
WiFi
Press the «Search Networks» button
Find you home network that housemate®
will connect to and click the «OK» button.
Enter your Network password and
click «Send to housemate».
Configuration User Manual
WiFi
If the process was successful you will receive the appropriate message.
The housemate® green power led will stop flashing and the device will reset in
order to connect to the newly setup WiFi network.
The above setup is required only the first time, or if you change any of the WiFi setting
(i.e. SSID, encryption type or password)
If you fail to configure the WiFi settings, housemate will not be able to access the internet.
Configuration User Manual
KNX commands
Select the second button for KNX Configuration
If you have KNX devices in your smart home installation that you wish to control
via housemate, you will have to import the ETS file.
Simply click the button “Import ETS” and navigate to the desired project.
(Supported ETS projects have to be exported by ETS4 or
and they have to be of file type «.knxproj»)
later
Next, open the imported KNX
project by double clicking the project name.
Configuration User Manual
KNX commands
The Housemate KNX Configuration will display all the installed devices
Next step is to configure every device that you want to control through voice
commands.
In order to do that, simply
select the appropriate commandfrom the related drop list.
This step is necessary only for the devices that you wish to interact with housemate.
Configuration User Manual
KNX commands
Next step is to create the appropriate voice commands that housemate® will recognize. housemate® interprets voice commands as scenes.
To create a new Scene, simply click the button «Add new scene»
located in the main application bar under the category Scenes.
Next, select the device that you want to include in the scene.
This will auto fill the available KNX commands
for the selected device at column 2.
Finally, select the desired KNX command and click the right arrow button (>>)
to include this command in the scene.
Tip:
You can create a scene that will execute multiple commands at the same time.
Configuration User Manual
KNX commands
If you need to remove a KNX command that is already placed in column 3,
you can do so by
selecting the commandand clicking the left arrow button (<<).
Once you have selected all the desired KNX commands,
click finish and add the Voice command that housemate® will recognize.
Configuration User Manual
KNX commands
To change an existing voice command, choose «Edit Existing Scenes»
from the main menu, where you can modify functions
from existing commands, and delete Voice Commands.
Tip:
Double clicking the Scene name will allow you to edit the specific scene command.
Configuration User Manual
Smart commands
At this point, you will configure the housemate® smart commands. During the initial
set up, the smart commands configuration will walk you through every category displayed above.
News
You do not have to receive updates for every news category.
Simply select the desired news categories and click «Next».
Configuration User Manual
Smart commands
At the next screen you will see only the selected categories.
Click on any category to view more details.
Once you are done with the modifications press the next button.
The details of each category are depicted in the popup below. When you select a category for the first time some default sites will be displayed. You can edit the information
or even completely delete them. Available options include the total number of news you
wish to receive from the specific news feed, and the associated voice command that
housemate will recognize.
By clicking the Reset all button, any changes made will be reset.
Once you are done editing the information
click the «Save» button
to continue with the rest of the news feeds.
Configuration User Manual
Smart commands
Weather
In order to receive weather forecasts you will have to specify the desired city / area of
interest.
Once you have clicked the «Weather» button
in the main application panel, the above screen will appear.
In order to create a new entry,
click the text area directly below the «please enter the city».
A new popup window will appear in order to help you find the area of interest.
Please provide as much information as possible.
Note: in order for the search engine to function properly you will have to enter at least
the city’s name and press the «Search» button.
Configuration User Manual
Smart commands
A map will appear to verify the validity of the provided information.
Complete all fields for more accurate results.
Once you have found the appropriate location, press the «Save» button
to continue with the rest of the configuration.
Configuration User Manual
Smart commands
Next step is to add the voice commands associated with the city.
You can retrieve information for «today» as well as «tomorrow».
You can always add another city
by pressing the «more» or «+» button.
Configuration User Manual
Smart commands
Reminders
Reminders are one of the simplest smart commands to configure.
You simply add the text that you want to be reminded about,
as well as the voice command that will be identified by housemate®
Example:
Voice command:
«Tell me Maria’s phone number»
Reminder:
«555 555 555»
Configuration User Manual
Smart commands
Twitter
In order to receive updates from twitter, you have to set a term.
This can be a twitter @handle or a #term
As always,
you will have to provide a voice command
that housemate® will identify.
Finally, you can add extra twitter entriesby pressing the “more” or “+” button.
Configuration User Manual
Smart commands
Extras
By pressing the “Extras” button, you will be redirected in another screen
where extra commands and settings are presented.
Time
At this section you can setup the time zone and voice command that interests you.
Configuration User Manual
Smart commands
Stocks
housemate® is capable of retrieving stock information. In order to do that, you will
have to setup a stock ticker and associate it with a voice command.
By clicking the Stocks button in the main application window will be redirecting
in a window as depicted below.
At this stage, you simply have to type the full stock name. The housemate® configuration will start to auto fill the stock name. Once you have finished with the stock
name, you will have to select the appropriate stock exchange. As soon as the stock
name and stock exchange are selected, the appropriate stock ticker will be displayed.
When you have finished with the stock ticker, it is time to type the voice command that
will be recognized by housemate.
You can always add more stock commands
by pressing the “more” or “+” button.
Tip: If you are aware of the stock ticker you can write that instead of the full stock name.
The search engine will match your ticker and auto fill the rest of the information.
Configuration User Manual
Smart commands
Change Name
housemate® is developed to respond, every time the word “housemate” is recognized
by the system.
On the other hand, the user is able to add an alternative name that he wish to
use in order to trigger the system.
Note: Adding an alternative name will not delete the «housemate» command.
By pressing the «Change Name» button in the «extras» configuration window,
the user can type the desired word/trigger.
Once you are finished, press the save button
and you will be redirected back to the «extras» configuration window.
View the list of Commands
When configuration is complete, the user can press the «View Commands» button located in the main configuration windows.
Note: This process can take several seconds to complete.
Once inside the «View Commands» window, the user is able to print the configured voice
commands for future reference.
Save
Once the Smart Command Configuration is completed, you can press the “Finish” button
located in the main configuration window. This will close the Smart Command Configuration window and redirect you back to the
Configuration User Manual
Smart commands
Send configuration to Housemate
After completing the 3 steps (WiFi, KNX commands, Smart commands), you can press
the button «Send configuration to Housemate». This process might take a few minutes, so please don’t close the program until you get the message that the process is complete.
Using the voice command «housemate» or the one that you defined in the Smart
Command Configuration, the housemate® logo led will light up, indicating that
the device is waiting for a follow up command.
Configuration User Manual