1
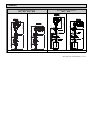
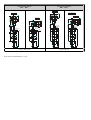
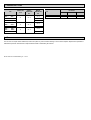
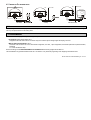
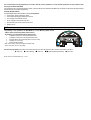
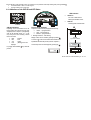
N I VO T R A C K
M-300, M-300 Ex series
2-wire compact
magnetostrictive level transmitter
INSTALLATION
and
PROGRAMMING MANUAL
1th Edition
0408
Manufacturer:
NIVELCO Ipari Elektronika Rt.
H-1043 Budapest, Dugonics u. 11.
Phone.: -369-7575 ♦ Fax: -369-8585
e-mail:[email protected] ♦ www.nivelco.com
BKI 02 ATEX 278X ♦ mba3052a0600p_01 ♦ 1 / 40
BASIC CONCEPT OF MEASUREMENT WITH NIVOTRACK
LB = P05 – DIST,
LEVEL = L B + P04 = P05 – DIST + P04
BKI 02 ATEX 278X ♦ mba3052a0600p_01 ♦ 2 / 40
DIST
Measured basic value
H
P04
(LEVEL offset)
LB
0% , 4mA (P10 )
LEVEL
(LB + offset)
Programmed
measurement
range
P05
Zero point distance
L – Nominal length
LR – Measurement range
(calibration value)
100 % , 20 mA (P11 )
CONTENTS
1. INTRODUCTION............................................................................................................................................................................................................................5
2. ORDER CODE ...............................................................................................................................................................................................................................6
2.1 DIMENSIONS ..............................................................................................................................................................................................................................7
3. TECHNICAL DATA........................................................................................................................................................................................................................9
3.1 ACCESSORIES ..........................................................................................................................................................................................................................11
3.2 ACONDITIONS CONDITIONS OFEX APPLICATION ........................................................................................................................................................................11
3.3 TEMPERATURE CLASSES ...........................................................................................................................................................................................................12
3.4 MAINTENANCE AND REPAIR E .....................................................................................................................................................................................................12
4. INSTALLATION ...........................................................................................................................................................................................................................13
4.1 MOUNTING ...............................................................................................................................................................................................................................13
4.2 WIRING ...................................................................................................................................................................................................................................14
4.2.1 wiring of Ex certified units..............................................................................................................................................................................................15
4.3 LOOP CURRENT CHECKING ........................................................................................................................................................................................................15
5. PROGRAMMING .........................................................................................................................................................................................................................15
5.1 PROGRAMMING WITHOUT DISPLAY MODULE .................................................................................................................................................................................16
5.2 PROGRAMMING WITH THE SAP-201 DISPLAY MODULE ................................................................................................................................................................19
5.2.1 SAP-201 Display Module...............................................................................................................................................................................................19
5.2.2 Steps of programming by the SAP-20 Display Module .................................................................................................................................................20
5.2.3 Indications of the SAP-201 and LED Status..................................................................................................................................................................21
5.2.4 QUICKSET ....................................................................................................................................................................................................................22
5.2.5 Full parameter access ...................................................................................................................................................................................................24
6. PARAMETERS – DESCRIPTIONS AND PROGRAMMING .......................................................................................................................................................26
6.1 MEASUREMENT CONFIGURATION ...............................................................................................................................................................................................26
6.2 CURRENT OUTPUT ...................................................................................................................................................................................................................30
6.3 MEASUREMENT OPTIMISATION...................................................................................................................................................................................................31
6.4 VOLUME MEASUREMENT ...........................................................................................................................................................................................................32
6.5 32-POINT LINEARISATION ..........................................................................................................................................................................................................33
6.6 INFORMATIONAL PARAMETERS (READ OUT PARAMETERS) ...........................................................................................................................................................34
6.7 SERVICE PARAMETERS..............................................................................................................................................................................................................35
6.8 SIMULATION .............................................................................................................................................................................................................................35
6.9 ACCESS LOCK ..........................................................................................................................................................................................................................36
7. ERROR CODES...........................................................................................................................................................................................................................37
8. PARAMETER TABLE..................................................................................................................................................................................................................38
BKI 02 ATEX 278X ♦ mba3052a0600p_01 ♦ 3 / 40
BKI 02 ATEX 278X ♦ mba3052a0600p_01 ♦ 4 / 40
Thank you for choosing NIVELCO.
We are sure that you will be satisfied throughout its use!
1. INTRODUCTION
Application
NIVOTRACK M-30 series working on the magnetostrictive principle are
suitable for high accuracy level measurement of storage tanks. Due to their
high temperature and pressure rating these units can also be used for level
gauging of technological tanks. The most suitable applications are with
liquids free of solid particles and with low viscosity both in ordinary and
hazardous locations.
Its high precision renders NIVOTRACK suitable for custody transfer
measurement of valuable liquids such as fuels, solvents, alcohol distillates,
etc. Plastic version of the series substantially expands the field of
application by a wide range of aggressive materials.
Operating principle
The magnetostrictive transmitter is using the special feature of the
magnetostrictive wire spanned in the rigid or flexible probe. An electric
excitation signal given to the magnetostictive wire develops a twist in the wire
at the interference point with the magnetic disc placed in the float. The twist
travels back to the electronics in the form of an acoustic wave with defined
velocity. Measurement is based on measuring the flying time since it is
proportional with the distance of the float from the electronics.
The above distance constitutes the basis for all output signals of the
NIVOTRACK!
With the help of further mechanical data level and volume (tank content)
can be calculated.
BKI 02 ATEX 278X ♦ mba3052a0600p_01 ♦ 5 / 40
2. ORDER CODE
PROBE /
PROCESS CONNECTION
Transmitter
Transmitter+display
T
B
Transmitter PFA
coated probe
E
Transmitter+display
PFA coated probe
G
Tube 1” BSP
Tube 2” BSP
Tube 1” NPT
Tube 2” NPT
W/O process conn.*
Flexible 2” BSP
Flexible 2” NPT
–
CODE
HOUSING
CODE
CODE
A
C
D
G
U*
K
N
Aluminium
Plastic
3
4
0
1
2
3
4
5
6
7
8
9
A
* Process connection to be ordered separately
NOMINAL LENGTH
0m
1m
2m
3m
4m
5m
6m
7m
8m
9m
10 m
0m
0,1 m
0,2 m
0,3 m
0,1 m
0,5 m
0,6 m
0,7 m
0,8 m
0,9 m
ACCESSORIE TO BE ORDERE:
FLANGES M F T –
1
2
3
4
5
6
7
8
DN 65
DN 80
DN 100
DN 125
DN 150
DN 200
2½”
3”
4”
5”
6”
8”
0
1
2
3
4
5
6
7
8
9
CODE
4 … 20 mA / 1x float
4 ... 20 mA, HART / 1x float
4 ... 20 mA / 1x float / EEx ia
4 ... 20 mA, HART / 1x float / EEx ia
4 ... 20 mA / 1x float / EEx d
4 ... 20 mA, HART / 1x float / EEx d
4 … 20 mA / 1x float / EEx d + EEx ia
4 … 20 mA , HART / 1x float / EEx d + EEx ia
4 … 20 mA , HART / 1x float / 5 mm resolution
CODE
1
2
3
4
5
6
PRESSURE
PN 16 / 150 psi
PN 25 / 300 psi
CODE
1
2
INNER DESIGN
Gland
1” BSP
2” BSP
1” NPT
2” NPT
CODE
1
2
3
5
6
TYPE
CONNECTION
2
4
6
8
A
B
C
D
N
MBH-105-2M-300-00
MBK-105-2M-300-00
MBL-105-2M-300-00
MBN-105-2M-300-00
1” BSP
2” BSP
1” NPT
2” NPT
S
H
L
B
(mm) (mm) (mm) (mm)
41
36
20
70
43
24
41
38
∼10
70
43
∼11
S
S
B
DIN / carbon steel
DIN / 1.4571
DIN / PP
DIN / carbon steel + PTFE
ANSI / carbon steel
ANSI / 1.4571
ANSI / PP
ANSI / A38 + PTFE
DIMENSION
DIN ANSI
OUTPUT / NUMBER OF FLOATS / EX
SLIDING SLEEVES:
–
STANDARDS/MATERIAL CODE
CODE
H
CODE
–
H
TYPE
M
L
NIVOTRACK
BSP
BKI 02 ATEX 278X ♦ mba3052a0600p_01 ♦ 6 / 40
NPT
2.1 DIMENSIONS
RIGID TUBE TRANSMITER
WITH THREADED PROCESS CONNECTION
FLEXIBLE TUBE TRANSMITTER
WITH SLIDING SLEEVE PROCESS CONNECTION
MA … MC MD … MG
MK… MN…
Position "A"
Max. ~100
Position "B"
Position "A"
adjustable: ±130mm
167
222
297 (Ex:313)
238(Ex:254)
2” BSP or NPT
245
146
445
adjustable: ± 130mm
Position "B"
146
521 (Ex:537)
321 (Ex:337)
Max. ~100
2” BSP or NPT
20 mA
20 mA
2" BSP or NPT
20 mA
Ø95
M
UP
B = 194
100
150
4 mA
100
4 mA
4 mA
L
4 mA
Ø96
Ø96
Mmax = L – 100 – A – C/2
L = Nominal length
Ø95
Ø52
B = 194
Ø52
L
M
UP
C
L
M
20 mA
M
C
1" BSP or NPT
M = Measurement range
B = Bottom dead band
Mmax = L – 342 – A – C/2
C = Ball height
A + C/2 = Top dead band *See ball dimensions in the Technical Data
BKI 02 ATEX 278X ♦ mba3052a0600p_01 ♦ 7 / 40
RIGID TUBE TRANSMITER
WITHOUT PROCESS CONNECTION
FLEXIBLE TUBE TRANSMITTER
WITHOUT PROCESS CONNECTION
MTU… MBU…
MEU… MGU…
Position “A”
Max.~100
Position “A”
L P=L M+C/2+100
Max.~100
82
130 (Ex:146)
Min.140
Flange with
sliding sleeve
C/2
C/2
C
UP
Ø 76
LMax = Nominal length
BKI 02 ATEX 278X ♦ mba3052a0600p_01 ♦ 8 / 40
100
100
100
LMax = Lp - 100 – A – C/2
100
LP
LP
LP
LM
Ø52
UP
Ø 76
LM
C/2 A
2” BSP
or NPT
C
LM
C
UP
LP
LM
Ø52
UP
Flange with
sliding sleeve
C
Sliding sleeve
Min. 140
Min. 140
Sliding sleeve
C/2 A
Min. 140
1” BSP or NPT
82
130 (Ex: 146)
Position “B”
157 (Ex: 173)
157 (Ex: 173)
Position “B”
LMax = Lp - 100 – C/2
3. TECHNICAL DATA
RIGID TUBE VERSION
MA..., MC…, MD...,
MG…, MTU…, MBU…
TYPE
Measured process values
Nominal length (L)
Material of the tube
Max. medium pressure
Medium temperature
Linearity with dry calibration
Resolution
Temperature coefficient
Range (M)
Zero span
Float diameter / material
Medium density
Material of wetted parts
Ambient temperature *
Outputs
(for any process
value)
Damping
Error indication
Output load
Power supply
Intrinsical safety data
Electric protection
Ingress protection
Process connection
Electric connection
Housing
Mass
FLEXIBLE TUBE VERSION
MK…
MN…
RIGID PLASTIC VERSION
MEU…
MGU…
Level; two float version: interface level, level difference
2 m … 10 m
0.5 m … 3 m
Stainless steel: 1.4571 (DIN)
PFA coated st.st.
2.5 MPa (25 bar)
1.6 MPa (16 bar)
0.3 MPa (3 bar)
-40 °C ... +130 °C see temperature chart
±1 mm
1mm or 5 mm (depending on order)
0.04 mm/°C
Maximum: see calculating formula under DIMENSIONS
Minimum: 200 mm
Anywhere within the range
∅ 52 x 59 mm / st.st or ∅ 95 mm / st.st *
∅ 76 x 87 mm / PVDF
min. 0.8 g/cm³; with ball float ∅ 95 mm: min. 0.5 g/cm³
Stainless steel: 1.4571 (DIN)
PFA and PVDF
-40 ºC … +70 ºC (see temperature chart
0.5 m …4.5 m
Analogue
4…20 mA (can also be assigned in inverted mode)
Serial comm.
HART interface (close end resistor 250 Ohm)
Display
with SAP-201 6 digits (7 mm character) icon, bargraph
0 … 60 s programmable
By the current output: 3.8 mA or 22 mA
Rs= (Us-12V) / 0.02 A, Us = voltage of the power supply
12 … 36 V DC
Umax = 30 V
Imax = 140 mA
Pmax = 1 W
Ci < 15 nF
Li < 200 µH
Class III.
IP 67
According to the order codes
Outer diameter of the cable for M 20 x1.5 conduit: ∅ 6 …∅12 mm Wire cross section: max.1.5 mm2
Aluminium (powder paint coated) or plastic (PBT fibre-glass reinforced, flame retardant)
1.7 kg + tube: 0.6 kg/m
1.7 kg + tube: 0.6 kg/m + 12 kg
1.7 kg + tube: 0.6 kg/m
* Maximum medium pressure for units with float ∅ 95 mm: 1,6 MPa (16 bar)
BKI 02 ATEX 278X ♦ mba3052a0600p_01 ♦ 9 / 40
Type
Ex marking
M -3 -6Ex
M -3 -8Ex
M -3 -GEx
M -3 -HEx
II 1 G EEx ia IIB T6…T4
0,5…5m
M -3 -AEx
M -3 -BEx
M -3 -JEx
M -3 -KEx
M -3 -CEx
M -3 -DEx
M -3 -LEx
M -3 -MEx
II 1/2 G EEx d ia IIB T6…T4
0,5…5m
II 2 G EEx d IIB T6…T4
II 1 G EEx ia IIA T6…T4
5…10m
Iimax = 140 mA
Pimax = 1 W
Uimax = 30 V
Ci < 15 nF Li < 200 µH
Class III
IP 67
According to the order code
M 20 x1,5 conduit
Ex electrical data
Electrical protection
Ingress protection
Process connection
Cable conduit
Cable diameter
II 1/2 G EEx d ia IIA T6…T4
5…10m
Ø 7 …13 mm
Ø 9 …11 mm
Wire cross section: 0,5…1,5 mm2
Electric connection
Housing
Paint coated aluminium (öAlSi10Mg)
* Max. medium pressure 1,6 MPa (16 bar)
Ambient temperature
Maximum allowed ambient temperature over medium temperature of +70 °C
Medium temperature
BKI 02 ATEX 278X ♦ mba3052a0600p_01 ♦ 10 / 40
3.1 ACCESSORIES
•
User’s manual,
Csak az MK és MN típushoz
•
Warranty certificate,
•
1 pc weight
•
Certificate, of confornmity
•
1 pc M 10 nut
•
Installation and programming manual
•
1 pc M 10 spring washer
•
2 pcs conduit
•
1 pc M 10 washer
•
1 pc gasket (klingerit oilit) fior BSP threads only
•
1 pc spacer (for float ∅ 52 mm only)
3.2 CONDITIONS OF E X APPLICATION
The unit can only be powered by a duly approved and certified EEx ia IIA vagy EEx ia IIB intrinsically safe loop according to the technical data.
Device can be mounted to tanks with max working pressure of 3 bar. It is not eligible for flame barrier between the in- and outside space of the tank.
After its installation and during its service required pressure tests should be performed in accordance with the relevant regulation.
Aluminium hosing of the unit should be connected to the equipotentil (grounding) system.
MEU and MGU plastic covered equipment may be electrostatically charged, therefore:
• Medium to measure must be electrically conductive and with specific resistance not exceeding the value of 104 Ωm even on the most unfavourable places and
under the most unfavourable conditions.
• Sped as well as way of filling and emptying should be chosen according to the medium.
BKI 02 ATEX 278X ♦ mba3052a0600p_01 ♦ 11 / 40
3.3 TEMPERATURE CLASSES
UPPER TEMPERATURE LIMITS
TYPE
MA -...,
MC –
MD -...,
MG -...
MK -…,
MN -…
MEU -…,
MGU -…
MA -…,
MC -...
MD -…,
MG -...
MEU -…,
MGU -…
MA -…,
MC -...
MD -…,
MG -...
MEU -…,
MGU -…
LOWER TEMPERATURE LIMITS
TEMPERATURE
CLASS
AMBIIENT
TEMPERATURE
MEDIUMTEMPERATURE
MAX
MAX
+80 °C
T6
+70 °C
EX MARKING
TYPE
ia
d
d+ia
MT -...,
ME -...
- 40 °C
- 40 °C
- 40 °C
MB -…,
MG -…
- 25 °C
- 20 °C
- 20 °C
+70 °C
+80 °C
T5
+59 °C
+95 °C
+95 °C
T4
+45 °C
+130 °C
+130 °C
3.4 MAINTENANCE A ND REPAIR E
The unit does not require routine maintenance, however the probe may need occasional cleaning to remove surface deposits. Repairs will be performed at
Manufacturer’s premises. Units returned for repair should be cleaned or disinfected by the customer.
BKI 02 ATEX 278X ♦ mba3052a0600p_01 ♦ 12 / 40
4. INSTALLATION
4.1 MOUNTING
• The unit should be located in an area, which allows easy access for service, calibration and monitoring.
•
Waving, turbulence and heavy vibration affects accuracy of the measurement. Thus the unit has to be installed far away from devices or places causing
such disturbance for instance from openings for filling or emptying. These affects can be attenuated in applications with rigid tube probes by the use of
stilling pipe along the whole probe. Kindly consult Nivelco distributor!
•
To ensure consistent and durable operation the process fluid should be free of suspended solids or materials, which could stick between the float and the
guide tube.
•
The unit should be protected against direct heat radiation.
•
Design dimensions of the unit and the tank as well as calculations should be checked before mounting.
•
Before installation a preliminary operational check is suggested.
•
Should manufacturer setting be changed it is to perform as per chapter 5.
•
The unit is offered with a wide variety of process connections according to the order codes Tank opening exceeding the float diameter is recommended for
insertion. Should this not be possible the float has to be removed from the (rigid or flexible) guide inserted through the opening and the float must be
reattached from inside of the vessel. The word “UP” etched on the float is to ensure mounting the float in correct position.
•
Insertion position of the MEU and MGU types can be adjusted. Free length over the tank however must
not be longer than 200 mm.
Flexible tube
Flexible tube
UP
UP
∅ 95
∅ 52
B
195
150
B
195
Displacer
150
• Units with flexible tube of type MK … MN are provided with weight for spanning of
the tube and keeping it in position. Weight and fastening nut are part of the unit.When
lowering down the flexible tube (with the weight at his end) to the bottom of the tank,
special care has to be taken to avoid interlocking or twisting and the coil diameter must
not be smaller than 60 cm. Dropping or twitching may damage the unit. Float or floats
should be placed next to the weight to avoid its hitting against the weight. Proper
spanning can be checked by the analogue signal or on the display. If the float is at the
lowest point Iout < 4 mA or display should read < 0 mm
Weight
Weight
∅ 96
∅ 96
BKI 02 ATEX 278X ♦ mba3052a0600p_01 ♦ 13 / 40
Attention!
In order to avoid damaging the probe do not put it to torsion when installing or removing the unit. Therefore, special care has to be taken when the process
connection is being screwed into or out of the flange. The best is to hold the rigid part of the probe with a suitable tool as long as the process connection is
tightened to its place Sliding sleeve must not be loosened during operation.
4.2 WIRING
This transmitter is designed to operate on 12 … 36 V DC power only.
The maximum loop resistance (including barrier resistance) is depending on the voltage
of the power supply and can be between 0 and 1200 Ohm. Calculation formula can be
seen in the Technical Table under Output Load. Using transmitter with HART a terminal
resistance with a minimum value of 250 Ohm should be applied.
The power supply should be interconnected with the unit with twisted, shielded cable that
can be pulled through the cable conduit. The cable can be connected to the terminal strip
after removing the cover and the display unit.
CAUTION: the enclosure of the transmitter should be grounded.Grounding resistance
should be < 1 Ohm. Shielding of the interconnecting cable should be grounded at the
end of the control room. To avoid disturbing noises the interconnecting cable must not be
led near to high voltage cables. Especially critial are inductive couplings of AC harmonics
against which the protection of shielding is not effective.
Display unit
connector
Terminal points
for loop current
U- U+
1/2” NPT
Pg16 or M20 x 1.5
!
4...20 mA loop current and
supply (HART)
I- I+
1/2” NPT
GND
Pg16 or M20 x 1.5
The unit may be damaged by electrostatic discharge (EDS), via its terminal thus used commonly precautions should be applied to avoid
electrostatic discharge e.g. touching a properly grounded point before removing the cover of the enclosure.
Possible electrostatic discharge may damage the unjit. Does the internal electric connection points mut not be touched by hand.
BKI 02 ATEX 278X ♦ mba3052a0600p_01 ♦ 14 / 40
4.2.1 WIRING OF EX C ERTIFIED UNITS
200mV
Ex
Ex
Nem Ex
Nem Ex
MultiCONT
24V
With HART
4.3 LOOP CURRENT
Ordinary
With MULTICONT
CHECKING
After removing the cover and the display module the actual loop current can be measured with an accuracy of 0,5 % by connecting a voltmeter (in the range of
200 mV) to the points indicated on the drawing above
5. PROGRAMMING
The NIVOTRACK can be programmed by the following two ways:
• Programming without Display Module see 5.1.
Assignment of the levels to the 4 and 20 mA current output, error indication by the analogue signal and damping can be set.
• With the SAP-201 Display Module, see 5.2.
All features of the unit can be set, such as measurement configuration, zero offset, , output assignments, measurement optimisation 32-point linearisation,
dimensions
for 11 tanks with different shape.
Devices with the type number NIVOTRACK MB-3 and MG-3 are already equipped with the SAP-201.
The NIVOTRACK is fully operational without the SAP-201. The SAP-201 is only needed for programming and/or displaying measurement values.
BKI 02 ATEX 278X ♦ mba3052a0600p_01 ♦ 15 / 40
The unit will measure during programming in accordance with the previous parameters. The new, modified parameters will only be effective after
returning to the Measurement Mode
If the transmitter is left in Programming Mode by mistake, it will automatically return to Measurement Mode after 30 minutes and will operate with the parameters
entered during the last completed programming.
FACTORY SETTING (Default)
The NIVOTRACK will be delivered with the following Factory Default:
⇒
Current output, display and bargraph: LEVEL
⇒
Current output and bargraph proportional to the level
⇒
4 mA: assigned to the minimum level 0%
⇒
20 mA: assigned to the maximum level 100%
⇒
Error indication by the current output: hold last value
⇒
Damping: 60 sec
5.1 PROGRAMMING
WITHOUT DISPLAY MODULE
Programming is only possible if the NIVOTRACK is in Level Measuring Mode and the
“VALID” LED is lit (representing stable medium surface)
The following can be programmed without display module
•
Assignment of the 4 mA to the required minimum level
•
Assignment of the 20 mA to the required maximum level
•
Error indication by the current output (Hold, 3.8 mA or 22 mA)
•
Damping (10, 30 or 60 sec)
•
Reset to the factory default
Note: Current output can also be assigned in inverted mode:
4 mA = 100% (Full), 20 mA = 0% (Empty)
Procedure of programming: press button in the relevant sequence and check the state of the LED-s. Symbols for the states of the LED-s:
= LED is off,
= LED is blinking,
= LED is on,
= LEDs are blinking alternatively
= Don’t care
BKI 02 ATEX 278X ♦ mba3052a0600p_01 ♦ 16 / 40
Assignment of low (0%, minimum) level to 4 mA
Action
LED state following the action
1) Check for a stable surface
=
Stable surface, transmitter programmable
2) Press NEXT
=
NIVOTRACK in programming mode
=
Level assigned to 4 mA (see picture)
=
Programming completed
keys steadily
3) Press UP
key steadily
4) Release keys
Tank should be filled up to the level
which is to be assigned to the
current output of 4 mA.
A felső szint (tele tartály, 100%) hozzárendelése a 20 mA-hez
Action
LED state following the action
1) Check for a stable surface
=
Stable surface, transmitter programmable
2) Press NEXT
=
NIVOTRACK in programming mode
=
Level assigned to 20 mA (see picture)
=
Programming completed
3) Press UP
key steadily
keys steadily
4) Release keys
Tank should be filled up to the level
which is to be assigned to the
current output of 4 mA.
“Error state” indication by the analogue signal (Check for a stable surface as above)
As a result of this setting the value of the analogue output will be 3.8 mA; 22 mA or according last value (hold) until the error is ceased.
BKI 02 ATEX 278X ♦ mba3052a0600p_01 ♦ 17 / 40
Action
1) Press
LED state following the action
key steadily
2) Press and keep
so any of the keys
DOWN
ENTER
NEXT
,
E,
3) Release keys
=
NIVOTRACK in programming mode
=
– hold last value
– 3.8 mA
– 22 mA
=
Programming completed
Damping time setting (Check for a stable surface as above)
Action
1) Press ENTER
E
key steadily
LED state following the action
=
NIVOTRACK in programming mode
2) Press and keep NEXT ,
so any of the keys UP ,
DOWN
=
– 10 sec
– 30 sec
– 60 sec
3) Release keys
=
Programming completed
RESET: Returning to the default (Check for a stable surface as above)
Action
1) Press NEXT
2) Press ENTER
key steadily
E
key steadily
LED state following the action
=
NIVOTRACK in programming mode
=
Default loaded
Indication of mistakes (by LEDs) made during programming
Action
LED state following the action
Possible correction
Attempted programming
=
blinking twice = probe failure
Call service
Attempted programming
=
blinking three times = no access possible
With SAP-201 only See 5.2 (P99)
=
blinking four times = NIVOTRACK not in
Level Measurement Mode
With SAP-201 only See 5.2 (P01)
Attempted programming
BKI 02 ATEX 278X ♦ mba3052a0600p_01 ♦ 18 / 40
5.2 PROGRAMMING
WITH THE SAP-201 DISPLAY MODULE
The NIVOTRACK should be adjusted to the process by programming the parameters.
The SAP-201 Display Module can be used to display the parameters during
programming and measurement values during measurement..
Gyorsprogramozás (QUICKSET) (5.2.4)
Recommended for fast programing of the following 6 basic parameters
•
Selection of the engineering units for the display (Metric or US)
•
Zero offset
•
Assignment of the analogue output
•
Error indication by the current output
•
Damping time
Dugaszolható kijelző egység
Teljes
programozás
Gyorsprogramozás
Full Parameter Access (5.2.5)
Highest level of programming for access of all features of the NIVOTRACK such as:
•
Settings as with the QUICKSET
•
Measurement configuration
•
Measurement optimisation
•
11 pre-programmed tank shapes for volume calculation
• 32-point linearisation
5.2.1 SAP-201 Displ ay Module
Symbols used on the LCD:
•
DIST – Distance (measuring) mode
•
LEV – Level (measuring) mode
•
VOL – Volume (measuring) mode
•
PROG - Programming mode
(device under programming)
•
FAIL - Measurement / device error
- Level changing direction
•
Bargraph
proportional to the current output
•
•
•
•
•
•
•
•
Symbols used on the frame
M – metric (European) system
US – imperial unit system
1 – Upper float
2 – Lower float
∆ - Difference
Status indication LEDS
COM – indicating HART communication
VALID – indicating stable surface.
BKI 02 ATEX 278X ♦ mba3052a0600p_01 ♦ 19 / 40
5.2.2 Steps of prog ramming by the SAP-20 Display Module
Programming will be performed by pressing and releasing the relevant one or two keys (simultaneously). Programming steps below are for the overview only,
detailed description is under 5.2.4 and 5.2.5.
Single key pressing
NEXT
UP
DOWN
to select parameter address and go to parameter value
to save parameter value and return to parameter address
to move the blinking (sign of change) of the digit to the left
to increase value of the blinking digit
to decrease value of the blinking digit
yy :xxxx
Double key pressing
Press two keys simultaneously for desired programming step. Simultaneous pressing will be indicated by “ + “.
Qui
ckse
t
o
all m
cel
n
a
C
*
ns *
atio
c
i
if
d
Default
E
E
Full Parameter
Access
Basic steps while parameter address is blinking
Return to default*
* LOAD readout ** CANCEL readout
GET LEVEL function
Special function used only in level and distance measurement modes
UP
Parameter value
Enter into or quit programming modes
yy
parameter address (P01, P02…P99)
xxxx parameter value (dcba)
bargraph
Basic steps while parameter value is blinking
E
s
t ion *
if ica ddress
d
o
all m eter a
m
cel
Can to pa ra
rn
u
t
e
r
Display default value
* cancellation immediately active
+ DOWN
Notes:
If after pressing ENTER E blinking does not spring over from the parameter address to the parameter value this means that
•
the parameter is either a read-out type, or
•
the secret code prevents the modification (see P99)
BKI 02 ATEX 278X ♦ mba3052a0600p_01 ♦ 20 / 40
Actual
E
Parameter value
ENTER
If the modification of the parameter value is not accepted i.e. the parameter value keeps blinking after pressing ENTER
•
the modified value is either out of the range, or
•
the code entered is not a valid code
E
,
5.2.3 Indications of the SAP-201 and LED Status
LED indication
SAP-201 indications
Process values displayed
Depending on the measurement one of the
below symbols will lit and the process value
displayed (see P01 chapter 6.1). Engineering
units will be indicated directly (°C, °F and
mA) and by the lit arrow showing towards
them on the frame
A kijelzőn a következő mennyiségek jeleníthetők meg:
•
Volume – if programmed so
•
Level – if programmed so
•
Distance – if programmed so
•
•
•
•
DIST
LEV
VOL
FAIL
displayed
distance
level
volume
(blinking) Error code
For paging readouts NEXT
pressed.
.
key should be
Display screens can be scrolled by pressing key NEXT .
To return to the screen of the selected measurement mode
key ENTER E should be pressed (see P01 chapter 6.1)
(mA)
VALID-LED
lit in case of stable surface
blinking with unstable surface
•
COM-LED
Indicating HART communication
(Vol/Flow)
• Warning indications – FAIL blinking
Current output value can be displayed by pressing key
.
•
.
See P01
for possible readouts
(Distance)
(Error)
BKI 02 ATEX 278X ♦ mba3052a0600p_01 ♦ 21 / 40
5.2.4 QUICKSET
Recommended as a simple and fast way to start up NIVOTRACK.
QUICKSET programming (aided by 6 screens) is used in uncomplicated level metering
applications to set the 6 basic parameters. The other parameters can only be modified in the Full
Parameter Access Mode see 5.2.2 (P01).
The instructions of this programming mode are also to be found on the front panel above the
SAP-201 Display Module socket.
Keys
ENTER
E
+ DOWN
UP
, DOWN
UP
+ DOWN
ENTER
(press for min 3 s!)
, NEXT
E
Function
Enter or exit QUICKSET programming mode
Increase/decrease and move left the blinking digit
“GET LEVEL" - display actual level measured by the NIVOTRACK
Save readout and step to the next screen
NEXT
+ UP
Quit Current Output Scaling without saving the modifications (CANCEL))
NEXT
+ DOWN
Display of the DEFAULT value.
BKI 02 ATEX 278X ♦ mba3052a0600p_01 ♦ 22 / 40
Screens
AP :xxyy
Actions
APplication
xx= select “EU” (European) for metric or “US” for US engineering units (Use UP
yy= indicating “Li” for liquids
DEFAULT: EU
/ DOWN
keys)
Warning: Changing of this parameter will result in loading the full parameter set with the values of the
factory default with the corresponding engineering units. Thus reprogramming may be necessary!
H :xxxx
H = xxxx Zeropoint offset – Distance between lower end position of the float and the tank bottom.
Manual: set value (Use UP / DOWN / NEXT keys) and save it (by ENTER E )
DEFAULT: 0
4:xxxx
4 mA xxxx – level value assigned to 4 mA current output
Manual: set level value (by UP / DOWN / NEXT keys) and save it (by ENTER E )
+ DOWN ) to display the actual measured value with level in tank or a
Automatic: use the “GET LEVEL” function (UP
fixed target, i.e. wall. (“GET LEVEL” functions only if VALID LED is lit) and save it as above.
DEFAULT: 0 m (0%, minimum level)
BKI 02 ATEX 278X ♦ mba3052a0600p_01 ♦ 23 / 40
Screens
Actions
20 :xxxx
20 mA xxxx – level value assigned to 20 mA current output
Manual: set level value (Use UP / DOWN / NEXT keys) and save it (by ENTER E )
+ DOWN ) to obtain actual measured value with level in tank or a fixed
Automatic: use the “GET LEVEL” function (UP
target, i.e. wall. (“GET LEVEL” functions only if ECHO LED is lit) and save it as above.
DEFAULT: maximum measuring range [m]
Er :xxxx
Error indication by the current output – select “Hold”, 3.6 mA or 22 mA (by UP
DEFAULT: hold last value
damping time: select required damping time (by UP
dt: xxxx
/ DOWN
/ DOWN
key) and save it as above.
DEFAULT: 60 sec for liquids, 300 sec for solids
Note: – Current output can also be programmed for inverted operation: 4 mA= 100% (Full), 20 mA= 0% (Empty)
– Description of failures can be found under the chapter 7 Error codes.
5.2.5 Full parameter access
Full Parameter Access is the highest programming level to access all features provided by the EchoTREK
Description of all parameters can be found under the chapter “Parameter” (Chapter 6.).
Keys
Function
Enter or exit Full Parameter Access programming mode.
ENTER E + NEXT
(press for 3 seconds)
In this programming mode, the display will indicate:
yy :xxxx
BKI 02 ATEX 278X ♦ mba3052a0600p_01 ♦ 24 / 40
yy
xxxx
Parameter Address (P01, P02 … P99)
Parameter Value (dcba)
bargraph
key) and save it as above.
Measuring is going on during programming in accordance with the old parameter set. New parameter set will be valid after returning to the
Measurement to the Programming Mode.
Steps and indications of the Full Parameter Access programming mode
pressing Keys
ENTER
E
while Parameter Address is blinking
while Parameter Value is blinking
Go to the Parameter Value
Save the modification of the Parameter Value and return
to the Parameter Address
NEXT
+ UP
Cancel all modifications of the actual programming phase.
Pressing for 3 sec is required while CANCEL will be displayed
for warning
Neglect the modification of the Parameter Value.
and return to the Parameter Address without saving the
modifications
NEXT
+ DOWN
Reset entire device to Factory Default.
Since this action will reset all parameters, “LOAD” will appear on
the display:
- to confirm, press
- to escape, press any other key
Display default of the Parameter Values
E
)
Move blinking (changeability) of the digit to the left
NEXT
UP
(it can be saved by pressing ENTER
/ DOWN
Modify the blinking digit (increase, decrease) or scroll up/down
BKI 02 ATEX 278X ♦ mba3052a0600p_01 ♦ 25 / 40
6. PARAMETERS – DESCRIPTIONS AND PROGRAMMING
6.1 MEASUREMENT CONFIGURATION
P00: - cba
Application/Engineering Units
Changing of this parameter will result in loading the full parameter set with the values of the factory default with the corresponding
engineering units. Thus reprogramming may be necessary!
a
0
Operating (measurement) mode
Liquid level measurement
b
Engineering units
(according to “c”)
0
1
US
ft
inch
Metric
m
cm
c
0
1
Calculation system
Metric
US
FACTORY DEFAULT: 000
BKI 02 ATEX 278X ♦ mba3052a0600p_01 ♦ 26 / 40
Attention: mind the sequence!
When programming this parameter the
right value “a” will be blinking first.
P01: - - ba
Measurement Mode – Bargraph
Parameter value „a” will determine the basic measurement value that will be displayed and proportional with the current output. Depending on the
value of “a” process values as listed in the 3d column can also be displayed by pressing NEXT . For return to the display of the basic value the
ENTER E key should be pressed.
Ba
00
01
02
03
04
P02: - - ba
Measurement Mode
Distance
Level
Level in percentage
Volume
Volume in percentage
Display symbol
DIST
LEV
LEV%
VOL
VOL%
Displayed values
Distance
Level, Distance
Level %, Level, Distance
Volume, Level, Distance
Volume %, Volume, Level, Distance
Attention: mind the sequence!
When programming this
parameter the
right value “a” will be blinking
first.
Calculation units
Attention: mind the sequence!
a
Temperature
When programming this parameter the right
0
°C
value “a” will be blinking first.
1
°F
This table is interpreted according to P00(c), P01(a) and P02(c) and is irrelevant in case of percentage measurement ( P01(a)= 2 or 4 )
b
0
1
Volume
Metric
m3
litre
US
ft3
gallons
Weight (set also P32)
Metric
US
tons
lb (pound)
tons
tons
BKI 02 ATEX 278X ♦ mba3052a0600p_01 ♦ 27 / 40
P03: - - - a
Values displayed - Rounding
It is important to keep in mind that the instrument is measuring distance and all other variables will be calculated from this basic measurement.
Displayed VOL
Display Format
x,xxx
xx,xx
xxx,x
xxxx,x
xxxxx,x
xxxxxx,x
x,xxxx : e
(exponential format)
(overflow) Err4
Decimal point will be shifted with increasing value displayed. (See table at the
left). Values over one million will be displayed in exponential format whereas
the value (e) represents the exponent. Over the value of 1x10¹⁰ Err4 (overflow)
will be displayed.
Steps In The Displayed
Value
1 (no rounding)
2
5
10
20
50
A couple of millimetres of fluctuation of the basic DIST value (e.g. due to
waves) will be enlarged by the mathematical operations. This enlarged
fluctuation in displaying VOL can (if disturbing) be avoided by rounding to be
set in P03. Rounding value 2, 5, 10 etc represents the steps by which the
calculated value will be changed in its (one or two) last digit(s).
Examples:
P03=1 steps by 2: 1,000; 1,002; 1,004
P03=5 steps by 50: 1,000; 1,050; 1,100 or 10,00; 10,05(0); 10,10(0);
10,15(0)
(the 0 from the steps 50, 100, 150 etc will not be displayed)
Displayed Value
0,000 – 9,999
10,000 – 99,999
100,000 – 999,999
1000,000 – 9999,999
10000,000 – 99999,999
100000,000 – 999999,999
1 million – 9,99999*109
1*1010 over
Rounding
Parameter Value “a”
0
1
2
3
4
5
FACTORY DEFAULT: 0
BKI 02 ATEX 278X ♦ mba3052a0600p_01 ♦ 28 / 40
P04
Zero point distance from the tank bottom (H) (Zero offset of the unit)
This parameter is for arranging zero offset which represents virtual expansion of the measurement range. Obviously measurement will only
be performed in the range, therefore in case of zero offset, displayed value will always be over zero and analogue output over 4 mA.
Should zero offset not be required this parameter will be unchanged. Zero offset will be performed by setting in this parameter the value of
distance between the tank bottom and the low-end position of the float. (See BASIC CONCEPT OF MEASUREMENT WITH NIVOTRACK on
page 3)
Programming of the analogue output in P10 will not be influenced by the zero offset.
FACTORY DEFAULT: 0
P05:
Zero point distance from the high-end position of the float (Zero offset within the range)
This parameter is for arranging zero offset within the measurement range. Obviously this represents the reduction of the measurement range.
The value of this parameter will be the distance between the required low (zero point) position and the high-end position of the float.
Analogue output in P10 should be programmed accordingly i.e. if P05≠0 then P05 = P10.
FACTORY DEFAULT: maximum measurement range i.e. distance between the low- and high-end position of the float
P08:
Fixed value of the analogue output
This parameter is for setting analogue output for fixed value.
Setting value between 3.8 and 20.5 mA in this parameter this fixed value will appear on the analogue output. This also will overwrite all error
indications and in case of P19 ≠ 0 the value of the output current will be (instead of 4 mA) the value set here.
If the parameter is 0, the current output will be according to the settings in the other parameters.
FACTORY DEFAULT: 0
BKI 02 ATEX 278X ♦ mba3052a0600p_01 ♦ 29 / 40
6.2 CURRENT OUTP UT
P10:
Value (of distance, level, volume or flow) assigned to 4 mA current output
P11:
Value (of distance, level, volume or flow) assigned to 20 mA current output
Values are interpreted according to P01(a). Please note that in case of programming for (LEV or VOL) % measurement the min and max value
has to be entered in the relevant engineering units of LEV (m, ft) or VOL (m3, ft3).
Assignment can be made so that the proportion between the change of the (measured or calculated) process value and the change of the current
output be either direct or inverse. E.g. level 1 m assigned to 4mA and level 10 m assigned to 20 mA represents direct proportion and level 1 m
assigned to 20 mA and level 10 m assigned to 4 mA represents the inverse proportion.
Remember. if P05≠0 then P05 = P10!
FACTORY DEFAULT: P10 = 0
P12: - - - a
and
P11 = measurement range (m)
Error indication by the current output
In case of error the NIVOTRACK will provide one of the current outputs below. (For errors and their interpretation see Chapter 7).
a
0
1
2
ERROR INDICATION (ACCORDING TO NAMUR)
Hold last value
3.8 mA
22 mA
FACTORY DEFAULT: 0
P19:
HART address (applies for models with HART)
The short address of the unit can be selected for 0 to 15. If one unit is involved the address should be 0 (thus P19=0) and the 4-20mA is
operational. In Multidrop applications (with more than one unit) the address should be other than 0-tól P19≠0, and the output will be fixed to 4mA
provided P08=0.
FACTORY DEFAULT: 0
BKI 02 ATEX 278X ♦ mba3052a0600p_01 ♦ 30 / 40
6.3 MEASUREMENT O PTIMISATION
P20: - - - a
Damping
This parameter can be used to reduce unwanted fluctuation of the display and output.
Damping
LIQUIDS
time
a
None/moderate
Heavy/dense fume or
(seconds)
fume or waves
turbulent waves
0
no filter
1
3
applicable
not recommended
2
6
recommended
applicable
3
10
recommended
recommended
4
30
recommended
recommended
5
60
recommended
recommended
FACTORY DEFAULT: 60 sec
P32:
Specific gravity [kg/dm3] or [lb/ft3] depending on setting in P00 (c)
Entering a value (other than “0”) of specific gravity in this parameter, the weight will be displayed (instead of VOL) in tons or lb depending on
setting in P00(c) and P02(b).
Factory default: 0
BKI 02 ATEX 278X ♦ mba3052a0600p_01 ♦ 31 / 40
6.4 VOLUME MEASU REMENT
P40: - - ba
P41-45:
Tank shape
ba
Tank shape
Also to be set
b0
Standing cylindrical tank shape (value of “b” as below)
P40 (b), P41
Attention!
01
Standing cylindrical tank with conical bottom
P41, P43, P44
The value „a” determining the
shape of the tank should be
02
Standing rectangular tank (with chute)
P41, P42, (P43, P44, P45)
set first.
b3
Lying cylindrical tank shape (value of “b” as bellow)
P40 (b), P41, P42
04
Spherical tank
P41
FACTORY DEFAULT: 00
Tank dimensions
Standing cylindrical tank with
Standing cylindrical tank with conical
Standing rectangular tank with or without
hemispherical bottom a = 0
bottom a = 1 ; b = 0
chute a = 2 ; b = 1
If no chute
P43, P44 and P45=0
b=0
b=1
P40 b=3 b=2
Lying cylindrical tank a = 3
P40 b=3
b=2
b=1
b=0
BKI 02 ATEX 278X ♦ mba3052a0600p_01 ♦ 32 / 40
Spherical tank a = 4 ; b = 0
6.5 32-POINT LINEA RISATION
P47: - - - a
Linearisation
Linearisation is the method of assigning requested (calibrated or calculated) values to level values measured by the transmitter, where the
assignment will be defined by data pairs. This can be used (as LEVEL ⇒ VOLUME conversion) for instance in case of a horizontal, cylindrical
tank
a
0
1
P48:
Linearisation
OFF (FACTORY DEFAULT)
ON
Linearisation table
Data-pairs of the linearisation table are handled in a 2x32 matrix, consisting of two columns.
Left column “L”
LEVEL measured
Right column “r”
LEVEL or VOLUME or FLOW to be transmitted and displayed
The left column values (indicated on the display as “L”) contain the measured LEVEL values. The right column values (indicated on the display as
“r”) contain the calibrated values and are interpreted according to the selected measurement value in P01(a).
Number of data pairs
in the table
+
Enter
the table
Exit the
table
Address of data pair
Level
Left hand measured
value
column
Right Level
hand
volume
column flow
}
to be transmitted
and displayed
Entering values
+
Copying measured value
+
Neglect modification (CANCEL)
+
Entering "0" (closing up the tble)
+
Canceling last modification
BKI 02 ATEX 278X ♦ mba3052a0600p_01 ♦ 33 / 40
Conditions of correct programming of the data pairs
Left column “L”
Right column “r”
L(1)= 0
r(1)
L(i)
r(i)
:
:
L(j)
r(j)
The table must always start with: L(1)= 0 and r(1)= value (assigned to 0 level)
The table must be ended either with the 32nd data pair i.e. j=32 or if the linearisation table contains less than 32 data-pairs j<32, the table must be
closed by a level value “0” e.g. L(j<32)= 0.
The NIVOTRACK will ignore data after recognising level value “0” with serial number other than “1”.
If the above conditions are not met, error codes will be displayed (see chapter: Error Codes).
6.6 INFORMATIONAL PARAMETERS (READ OUT PARAMETERS)
P60:
Overall operating hours of the unit (h)
Indication varies according to the elapsed time:
Operating hours
0 to 999.9h
1000 to 9999h
Over 9999h
P61:
Time elapsed after last switch-on (h)
Indication same as in P60.
BKI 02 ATEX 278X ♦ mba3052a0600p_01 ♦ 34 / 40
Indication form
xxx,x
xxxx
X,xx: e meaning x,xx 10e
6.7 SERVICE PARAM ETERS
P80:
Current output test (mA)
Going to this parameter, the actual current output (corresponding to the measured process value) will be displayed. By pressing ENTER E the
(now blinking) current value can be set for any value between 3,9 and 20.5 mA. The current output has to show the same value which can be
checked by an ampere meter, according to the description under 4.4. Press ENTER E to quit test mode and return the parameter address
P97: b:a.aa Software code
a.aa: Number of the software version
b:
Code of the special version
6.8 SIMULATION
This function enables the user to test the settings of the outputs. The EchoTREK can simulate the static or continuous change of level according
to the simulation cycle time, high level and low level set in P85, P86 and P87. (The simulation levels must be within the programmed measuring
range set in P04 and P05.)
After selecting simulation type in P85 and setting simulation values Measurement Mode has to be re-entered. While the EchoTREK is in
simulation mode the DIST, LEV or VOL symbol will be blinking. To quit Simulation Mode P84= 0 should be set.
P84: - - - x
Selection of the simulation
X
0
1
Simulation type
No simulation
The level changes continuously up and down between the level values set
in P86 and P87 with a cycle time set in P85
FACTORY DEFAULT: 0
LEV [m]
P87
P86
P85
P85:
P86:
P87:
t [sec]
Cycle time for simulation (s)
Simulated low level value (m/ft)
Simulated high level value (m/ft)
BKI 02 ATEX 278X ♦ mba3052a0600p_01 ♦ 35 / 40
6.9 ACCESS LOCK
P99: dcba
Access Lock by Secret Code
The purpose of this feature is to provide protection against accidental (or intentional) re-programming of parameters. The Secret Code can be
any value other than 0000. Setting a Secret Code will automatically be activated when the EchoTREK is returned to the Measurement Mode.
If the Secret Code is activated, the parameters can only be viewed, this is indicated by the a flashing colon “:” between the parameter address
and the parameter value. In order to program the device locked by a secret code, first enter the Secret Code in P99. The Secret Code is reactivated each time the EchoTREK is returned to Measurement Mode.
To delete the Secret Code, enter the Secret Code in P99. After confirming it with [E] re-enter the parameter P99 and enter 0000.
[dcba (Secret Code) ] → [E] → [E] → [0000] → [E] ⇒ Secret Code deleted
BKI 02 ATEX 278X ♦ mba3052a0600p_01 ♦ 36 / 40
7. ERROR CODES
Error Code
1
2
3
4
5
6
12
13
14
15
16
17
18
Error description
Memory error
Probe failure
Hardware (EEPROM communication) error
Display overflow
Probe or calibration error (level in the dead band)
The measurement is at the reliability threshold. No clear
signal for evaluation (noise, electromagnetic disturbance)
Linearisation error: both L(1) and L(2) are zero (no valid data-pairs)
Linearisation error: there are two identical L(i) data in the table
Linearisation table error: the r(i) values are not monotone increasing
Linearisation error: no value assigned to the measured value
The check sum of the program in the EEPROM is wrong
Parameter consistency failure (error corrected automatically)
Hardware failure (failure of the master PCB)
Causes and solutions
Contact local agent
Contact local agent
Contact local agent
Check settings
Check installation and calibration
Eliminate source of disturbance, try better location for the probe.
See the Section ”Linearisation”
See the Section “Linearisation”
See the Section “Linearisation”
See the Section “Linearisation”
Change any one of the parameters and return to the Measurement
Mode. Is this trial unsuccessful contact local agent.
Check programming
Contact local agent
BKI 02 ATEX 278X ♦ mba3052a0600p_01 ♦ 37 / 40
8. PARAMETER TABLE
Par.
Page
Description
Value
Par.
Page
Description
d c b a
P00
P01
P02
P03
P04
P05
P06
P07
P08
P09
P10
P11
P12
P13
P14
P15
P16
P17
P18
P19
P20
P21
P22
P23
P24
P25
P26
P27
27
27
29
29
32
30
26
30
31
Applied. engineering units
Measurement Mode
Calculation units
Rounding
Maximum Measuring Distance
Zero point distance from the high-end
position of the float Distance
N.A.
N.A.
Fixed value of the analogue output
N.A.
Value assigned to „4 mA”
Value assigned to „20 mA”
“Error” indication by the current output
N.A.
N.A.
N.A.
N.A.
N.A.
N.A.
HART address
Damping
N.A.
N.A.
N.A.
N.A.
N.A.
N.A.
N.A.
BKI 02 ATEX 278X ♦ mba3052a0600p_01 ♦ 38 / 40
Value
d c b a
P28
P29
P30
P31
P32
P33
P34
P35
P36
P37
P38
P39
P40
P41
P42
P43
P44
P45
P46
P47
P48
P49
P50
P51
P52
P53
P54
P55
31
32
32
32
32
32
32
33
33
N.A.
N.A.
N.A.
N.A.
Specific gravity
N.A.
N.A.
N.A.
N.A.
N.A.
N.A.
N.A.
Selection of tank shape
Dimensions of tank
Dimensions of tank
Dimensions of tank
Dimensions of tank
Dimensions of tank
Linearisation
Linearisation table
N.A.
N.A.
N.A.
N.A.
N.A.
N.A.
N.A.
Par.
P56
P57
P58
P59
P60
P61
P62
P63
P64
P65
P66
P67
P68
P69
P70
P71
P72
P73
P74
P75
P76
P77
Page
34
34
Description
N.A.
N.A.
N.A.
N.A.
Overall operating hours of the unit
Time elapsed after last switch-on
N.A.
N.A.
N.A.
N.A.
N.A.
N.A.
N.A.
N.A.
N.A.
N.A.
N.A.
N.A.
N.A.
N.A.
N.A.
N.A.
Value
d c b a
Par.
P78
P79
P80
P81
P82
P83
P84
P85
P86
P87
P88
P89
P90
P91
P92
P93
P94
P95
P96
P97
P98
P99
Page
35
35
35
35
35
35
36
Description
Value
d c b a
N.A.
N.A.
Current generator test
N.A.
N.A.
N.A.
Simulation mode
Simulation cycle time
Simulation low level
Simulation high level
N.A.
N.A.
N.A.
N.A.
N.A.
N.A.
N.A.
N.A.
N.A.
Software code
N.A.
Access lock
BKI 02 ATEX 278X ♦ mba3052a0600p_01 ♦ 39 / 40
mba3052a0600p_01
November 2004.
NIVELCO reserves the right to change technical data without notice.
BKI 02 ATEX 278X ♦ mba3052a0600p_01 ♦ 40 / 40