1
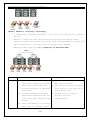
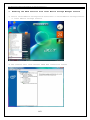
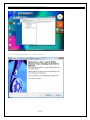
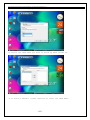
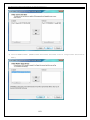
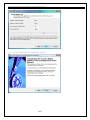
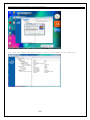
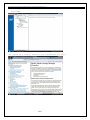
Intel Matrix Storage Manager Quick Guide for Acer Selected Veriton PC V1.1
Acer RAID Ready Systems
With Intel Matrix storage Manager
User's Guide
Acer Incorporated
Version: v1.1
Date: August, 2007
This document contains proprietary technical information, which is the property
of the Acer Incorporated and shall not be disclosed to others in whole or in
part, reproduced, copied, or used as the basis for design, manufacturing, or
sale of apparatus without written permission of Acer Incorporated.
1/21
Intel Matrix Storage Manager Quick Guide for Acer Selected Veriton PC V1.1
Revision History
Rev. # Date
1.0
2007/08/15
1.1
2007/8/22
Explanation of Change
First release
Format and spelling enhancement
2/21
Approved by
Intel Matrix Storage Manager Quick Guide for Acer Selected Veriton PC V1.1
TABLE OF CONTENTS
1. INTRODUCTION ........................................................................................................................... 4 2. RAID TECHNOLOGY AND SELECTION .................................................................................. 5 RAID0 (STRIPING) .............................................................................................................................. 5 RAID1 (MIRRORING) ............................................................................................................................ 6 RAID5 (STRIPING WITH PARITY) ....................................................................................................... 6 RAID10 (RAID1+0: STRIPING + MIRRORING) ............................................................................... 7 3. WARNINGS AND REMINDERS ................................................................................................... 9 4. ENABLING THE RAID FUNCTION WITH INTEL MATRIX STORAGE MANAGER CONSOLE
10 5. CONFIGURING RAID0 OR RAID1 ON YOUR RAID READY ACER PC ...................... 17 6. CONFIGURING AN EXISTING HDD AS A RAID0 OR RAID1 VOLUME .................... 18 7. MIGRATING FROM RAID0/1/10 TO RAID5 SYSTEM ................................................... 19 8. PRE-INSTALLATION OF THE INTEL® MATRIX STORAGE MANAGER DRIVER ...... 20 8.1 BUILD THE RAID DRIVER ON A FLOPPY DISK .......................................................................... 20 8.2 PRE-INSTALLATION USING THE "F6" PROCESS ...................................................................... 20 3/21
Intel Matrix Storage Manager Quick Guide for Acer Selected Veriton PC V1.1
1. Introduction
This document will assist customers in evaluating, configuring and enabling
RAID functionality on Acer RAID Ready platforms using the Intel® Matrix Storage
Manager software.
This document also describes RAID volume management such as creating, deleting,
and modifying volumes, common usage models, and any special notes necessary to
enable customers to develop their RAID-compatible products.
Selected high-end Acer desktop systems are configured as Intel RAID Ready
systems. A "RAID Ready" system can be upgraded to RAID0, RAID1, RAID5 or RAID10
using the RAID migration feature built into Intel Matrix Storage Manager 7.5.
This technology enables you to install additional SATA hard drives, and then
migrate a RAID Ready configuration to a RAID0, RAID1, RAID5 or RAID10
configuration.
Before you start to build your RAID system, please do check Section 3 "Warnings
and Reminders" for more detailed information. You can also check the on-line
user's manual for the Intel Matrix Storage manager in Windows for detailed RAID
function execution.
4/21
Intel Matrix Storage Manager Quick Guide for Acer Selected Veriton PC V1.1
2. RAID Technology and Selection
RAID (a redundant array of inexpensive disks, also later known as a redundant
array of independent disks) is a system that uses multiple hard drives to share
or replicate data among the drives. Depending on the version chosen, the benefits
of RAID are one or more of the following: greater capacity, reliability,
protection of data, and/or speed compared to a single drive.
RAID0 (striping)
• RAID0 splits data evenly across two or more disks with no parity information
for redundancy.
• Multiple files can be read (and written) simultaneously and transfer time
is improved dramatically, thus increasing throughput.
• RAID0 volume capacity = number of (HDDs) x (capacity of smallest HDD)
• RAID0 can be created with disks of differing sizes, but the storage space
added to the array by each disk is limited to the size of the smallest disk.
For example, if a 120 GB disk is striped together with a 100 GB disk, the
size of the array will be 200 GB.
D is k 1
B lo c k 1
B lo c k 1
B lo c k 3
B lo c k 2
B lo c k 5
B lo c k 3
B lo c k 7
D is k 2
B lo c k 2
B lo c k 4
R A ID 0
B lo c k 4
B lo c k 6
B lo c k 8
P h y s ic a l d is k s
P h y s ic a l d is k P h y s ic a l d is k
120 GB
120 GB
B lo c k 5
B lo c k 6
B lo c k 7
B lo c k 8
L o g ic a l d is k s
L o g ic a l d is k
240 GB
5/21
Intel Matrix Storage Manager Quick Guide for Acer Selected Veriton PC V1.1
RAID1 (mirroring)
• RAID1 creates an exact copy (or mirror) of a set of data on two or more
disks when reliability is more important than data capacity.
• A classic RAID1 mirrored pair contains two disks, which increases
reliability exponentially over a single disk.
o
Mirroring allows continued operation of the system in the event of
one drive or array failing.
o
Restoration can be performed using the mirrored copy.
o
I/O performance may suffer during reconstruction due to the increased
activity between locations.
• RAID1 volume capacity = capacity of smallest HDD
• Such an array can only be as large as the smallest member disk.
D is k 1
B lo c k 1
B lo c k 2
B lo c k 3
B lo c k 1
B lo c k 4
D is k 2
B lo c k 1
R A ID 1
B lo c k 2
B lo c k 3
B lo c k 4
B lo c k 2
B lo c k 3
B lo c k 4
L o g ic a l d is k
P h y s ic a l d is k s
P h y s ic a l
d is k s
120 GB
P h y s ic a l
d is k s
120 GB
L o g ic a l d is k s
120 GB
RAID5 (striping with parity)
• RAID5 uses block-level striping with parity data distributed across all
member disks.
• A RAID5 array can withstand a single disk failure without losing data or
access to data.
• RAID5 is a good all-round system that combines efficient storage with
excellent security and decent performance. It is ideal for file and
application servers.
• RAID5 volume capacity = [(number of HDDs) - 1] x (capacity of smallest HDD)
6/21
Intel Matrix Storage Manager Quick Guide for Acer Selected Veriton PC V1.1
Disk 1
Disk 2
Disk 3
Block A1
Block A2
Block Ap
Block B1
Block Bp
Block B2
Block Cp
Block C1
Block C2
Physical
disk
120 GB
Physical
disks
120 GB
Physical
disk
120 GB
Logical disks
240 GB
RAID10 (RAID1+0: striping + mirroring)
• A combination of RAID1 and RAID0 — mirroring and striping, but without
parity.
• RAID10 is used for both replicating and sharing data among disks.
• RAID10 is often the primary choice for high-load databases, because the
lack of parity to calculate gives it faster write speeds.
• RAID10 volume capacity = 2 x (capacity of smallest HDD)
RAID 0
RAID 1
Physical
disks
120 GB
RAID0
RAID 1
Disk 1
Disk 2
Disk 3
Disk 4
Block A1
Block A1
Block A2
Block A2
Block A3
Block A3
Block A4
Block A4
Block A5
Block A5
Block A6
Block A6
Physical
disks
120 GB
Physical
disks
120 GB
Physical
disks
120 GB
Logical disks
240 GB
Characteristics/Advantages
Disadvantages
¾
¾
RAID0 implements a striped
NOT fault-tolerant
disk array, the data is broken
down into blocks and each
¾
¾
The failure of just one drive
block is written to a separate
will result in all data in an
disk drive
array being lost
I/O performance is greatly
¾
Should never be used in
improved by spreading the I/O
mission-critical
load across many channels and
environments
drives
¾
Not a "True" RAID because it is
Best performance is achieved
when data is striped across
7/21
Intel Matrix Storage Manager Quick Guide for Acer Selected Veriton PC V1.1
multiple controllers with
only one drive per controller
RAID1
¾
Very simple design
¾
Easy to implement
¾
Twice the Read transaction
Highest disk overhead of all
rate of single disks, same
RAID types (100%) —
Write transaction rate as
inefficient
¾
single disks
¾
¾
May not support hot-swap of
100 percent redundancy of data
failed disk when implemented
means no rebuild is necessary
using software RAID
in case of a disk failure, just
a copy to the replacement disk
¾
Transfer rate per block is
equal to that of a single disk
¾
Under certain circumstances,
RAID1 can sustain multiple
simultaneous drive failures
¾
Simplest RAID storage
subsystem design
RAID5
¾
Highest Read data transaction ¾
Most complex controller
rate
design
Medium Write data transaction ¾
Difficult to rebuild in the
rate
event of a disk failure (as
Low ratio of ECC (parity)
compared to RAID 1)
disks to data disks means high ¾
Individual block data
efficiency
transfer rate same as single
¾
Good aggregate transfer rate
disk
¾
Very high I/O rates are
¾
¾
RAID10
¾
achieved by striping RAID1
¾
very high inherent cost
¾
segments
Excellent solution for sites
that would normally use RAID1
8/21
Very limited scalability at a
Expensive to maintain
Intel Matrix Storage Manager Quick Guide for Acer Selected Veriton PC V1.1
3. Warnings and reminders
A. Using the Intel® Matrix Storage Console in Windows® is highly recommended.
You may use Intel Matrix Storage manager console in Windows for most RAID
functions. However, using the Intel® Matrix Storage Manager option ROM
(accessed by pressing Ctrl-I when starting your computer) is NOT recommended,
because it will reformat the hard disk and Acer eRecovery Management's
Restore to Factory Defaults function will NOT be usable anymore.
B. Enabling RAID on your system is a time-intensive process and it is important
that your computer stay on during the whole process, or you will risk data
loss. Disable your screen saver and power-management options such as
auto-shutdown, auto-hibernate and auto-standby. Plug your system into an
AC adapter before attempting to enable RAID on your system.
C. Enabling RAID may change how your hard disk drives are ordered, and Acer
eRecovery Management may not function properly if your system does not have
the needed drive ordering.
D. You cannot use Acer eRecovery Management to revert your system to a non-RAID
configuration after enabling the RAID function.
E. The HDD password feature will not function once the RAID function has been
enabled.
F. Before enabling RAID on your system, back up important data and applications
using Acer eRecovery Management or another appropriate backup tool.
G. If you plan to enable RAID0 or Matrix RAID on your system, you cannot return
your system to a non-RAID state without reformatting your system.
H. Please refer to section 8 if you wish to install the RAID function by yourself.
Install Intel® Matrix Storage Drivers are needed prior enabling the RAID
function.
9/21
Intel Matrix Storage Manager Quick Guide for Acer Selected Veriton PC V1.1
4. Enabling the RAID function with Intel Matrix Storage Manager Console
1) Select "Intel Matrix Storage" from Start menu -> Intel® Matrix Storage Console
-> Intel Matrix Storage Console
2) The Console will show current SATA HDD connection status
10/21
Intel Matrix Storage Manager Quick Guide for Acer Selected Veriton PC V1.1
3) Select "Actions" to create a RAID Volume.
4) Follow the wizard to click "Next"
11/21
Intel Matrix Storage Manager Quick Guide for Acer Selected Veriton PC V1.1
5) Select the RAID type you want to build up.
6) Select the SATA HDDs you want to build up RAID volume on.
7) To build a RAID0/1 volume requires at least two SATA HDDs.
12/21
Intel Matrix Storage Manager Quick Guide for Acer Selected Veriton PC V1.1
8) Select the source HDD first.
9) Select Member HDD. (Member HDD should be the same size or larger than the Source
HDD.)
13/21
Intel Matrix Storage Manager Quick Guide for Acer Selected Veriton PC V1.1
10) Specify RAID Volume size.
11) Click "Finish" to complete setup.
14/21
Intel Matrix Storage Manager Quick Guide for Acer Selected Veriton PC V1.1
12) System will start to build the RAID volume.
13) You can check the RAID volume status after RAID build completes.
15/21
Intel Matrix Storage Manager Quick Guide for Acer Selected Veriton PC V1.1
14) For more information, refer to the online user manual: Select Help-> Contents
and Index.
15) Click on a link to refer to the information you want.
16/21
Intel Matrix Storage Manager Quick Guide for Acer Selected Veriton PC V1.1
5. Configuring RAID0 or RAID1 on your RAID Ready Acer PC
Selected high-end Acer desktop computer systems are configured as Intel RAID
Ready systems. You can use the following steps to migrate from a single-drive
non-RAID configuration to a two-drive RAID0 or RAID1 configuration. The resulting
configuration will be identical to that created by the procedure in section 6.1.
To prepare for this, you will need to install another SATA hard drive with a
capacity equal to or greater than the capacity of the hard drive being used as
the source hard drive.
1. Note the serial number of the hard drive already in the system; you will need
this to select it as the source hard drive for the migration.
2. Install the second SATA hard drive to an available SATA port.
3. Boot Windows, then install the Intel Matrix Storage Manager software, if not
already installed (it is pre-installed in Acer RAID Ready systems), using the
setup package obtained from a CD-ROM or from the Internet. This will install
the necessary Intel Matrix Storage Console and start menu links.
4. Open the Intel Matrix Storage Manager from the Start Menu and select Create
RAID Volume from Existing Hard Drive from the Actions menu.
5. The Create RAID Volume from Existing Hard Drive Wizard will be activated.
Follow the instructions as prompted. It is important to understand what will
occur during the migration process because all data on the destination hard drive
will be lost.
6. After the migration is complete, reboot the system. If you migrate to a RAID0
volume, use Disk Management from Windows in order to partition and format the
empty space created when the two hard drive capacities are combined. You may
also use third-party software to extend any existing partitions within the RAID
volume.
17/21
Intel Matrix Storage Manager Quick Guide for Acer Selected Veriton PC V1.1
6. Configuring an existing HDD as a RAID0 or RAID1 volume
If you are booting from a single SATA hard drive that contains program or
personal data, you may use the migration feature to use this hard drive as the
source hard drive for a migration. After the migration is completed, you will
have a two-HDD RAID0 volume where data is striped or a two-HDD RAID1 volume where
the data is mirrored across the two SATA hard drives. To do this, the ICH9 I/O
Controller must be enabled in the BIOS and you must have the Intel Matrix Storage
Manager software installed. (Acer systems enable the RAID controller and have
the Matrix storage manager software pre-installed by default.)
Launch Intel Matrix Storage Manager Console and do the following:
1. Note the serial number of the SATA hard drive that is already installed. You
will need this to select it as the source hard drive when initiating the migration.
2. Physically attach the second SATA hard drive to an available SATA port.
3. Boot to Windows, install the Intel Matrix Storage Manager software, if not
already installed (it is pre-installed in Acer RAID Ready systems), using the
setup package obtained from a CD-ROM or from the Internet. This will install
the necessary Intel Matrix Storage Console and start menu links.
4. Open the Intel Matrix Storage Console from the Start Menu.
5. Select Create RAID Volume from Existing Hard Drive from the Actions menu.
This will activate the Create RAID Volume from the Existing Hard Drive Wizard.
Follow the instructions as prompted. It is important to understand what will
occur during the migration process because all data on the destination hard drive
will be lost.
6. After the migration is complete, reboot the system.
18/21
Intel Matrix Storage Manager Quick Guide for Acer Selected Veriton PC V1.1
7. Migrating from RAID0/1/10 to RAID5 system
RAID level migration allows an existing RAID configuration which supports
levels 0, 1 or 10 to be migrated to RAID5. The following migrations are possible:
¾
2-drive RAID1 to 3- or 4-drive RAID5
¾
2-drive RAID0 to 3- or 4-drive RAID5
¾
3-drive RAID0 to 4-drive RAID5
¾
4-drive RAID10 to 4-drive RAID5
Note: In order for the migration to complete successfully, the minimum SATA hard
drive requirements for the new RAID5 configuration have to be met.
Please follow the procedure illustrated below:
1. Boot the system to Windows.
2. Start the Intel Matrix Storage Console application:
Start Menu ->All Programs -> Intel Matrix Storage Manager -> Intel Matrix Storage
Console
3. Click the View menu and select the Advanced Mode option.
4. Choose the RAID volume you want to migrate. Right-click and select Modify
Volume.
5. The Modify RAID Volume Wizard will be displayed. The wizard will walk you
through the procedure to migrate to RAID5.
6. After the migration starts, the Information tab shows the migration progress
in the Status field.
7. When the Status field indicates Normal, the migration is complete.
19/21
Intel Matrix Storage Manager Quick Guide for Acer Selected Veriton PC V1.1
8. Pre-Installation of the Intel® Matrix Storage Manager Driver
This section is for user who may want to install the operating system
themselves. Because Acer systems are defaulted as RAID Ready systems, you may
need to follow the following steps to pre-install the RAID driver.
The Intel Matrix Storage Manager driver must be installed before installing
Windows XP on a RAID volume or when in AHCI mode. The Intel Matrix Storage Manager
AHCI driver can be installed over Vista's native AHCI driver.
8.1 Build the RAID driver on a floppy disk
You can download the RAID driver from the Acer website or Acer Resource CD.
The driver file is named "f6flpy32." Once the build up complete, remove the floppy
disk and prepare for Windows installation.
1. On a system running Windows, download the application f6flpy32.exe (for 32-bit
operating system) or f6flpy64.exe (for 64-bit operating system) to your local
drive.
2. Double click on the application. A dialog box prompting you to Insert floppy
to write will appear.
3. Insert a blank floppy into floppy drive and click OK to proceed.
4. The application will perform the following tasks:
a. Format the disk.
b. Write data to the disk
c. Verify data on the disk.
5. After the task is done, About Self-Extractor for WinImage will be displayed.
Click OK to exit.
6. Now your floppy disk will have the valid Intel Matrix Storage Manager Driver
which can be used for installation using the F6 process.
8.2 Pre-Installation Using the "F6" process
1. When installing Windows XP and older operating systems, the user may encounter
a message stating Setup could not determine the type of one or more mass storage
devices installed in your system. If this is the case, then the user is ready
to supply the driver. If this is not the case, press F6 when prompted at the
beginning of Windows setup.
2. Press the 'S' key to select Specify Additional Device.
3. The user will be prompted to insert a floppy disk containing the
manufacturer-supplied driver into the A: drive. (See Section 7.3 for instructions
20/21
Intel Matrix Storage Manager Quick Guide for Acer Selected Veriton PC V1.1
on making a driver installation disk.)
4. For Windows Vista:
During the operating system installation, after selecting the location to install
Vista click the Load Driver button to install a third party SCSI or RAID driver.
5. When prompted, insert the floppy disk or media (Floppy, CD/DVD or USB) created
in step 8.1.3 and press Enter.
6. Review the list of available SCSI Adapters. This list should include Intel®
82801HEM SATA RAID Controller(ICH9M-E) when the system is in RAID mode and Intel®
82801HEM SATA AHCI Controller(ICH9M-E) or Intel® 82801HBM SATA AHCI
Controller(ICH9M) when the system is in AHCI mode.
7. Select the appropriate Intel RAID controller and press ENTER.
8. The next screen should confirm that the user has selected the Intel® RAID
controller. Press ENTER again to continue.
9. After successfully installing the Intel® Matrix Storage Manager driver,
Windows setup should continue.
10. Leave the disk in the floppy drive until the system reboots itself. Windows
setup will need to copy the files from the floppy again after the RAID volume
is formatted and Windows setup starts copying files.
21/21