1
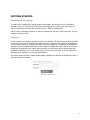
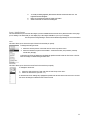
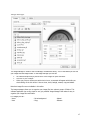
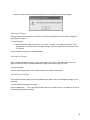
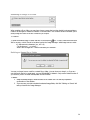
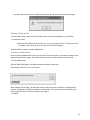
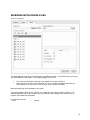
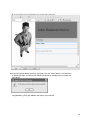
Site Center User Manual 1 Table of Contents INTRODUCTION .........................................................................................................................................3 GETTING STARTED ..............................................................................................................................4 FEATURES WITHIN THE EDITOR ...............................................................................................................6 WORKING WITH IMAGES ...............................................................................................................................16 WORKING WITH FLASH MOVIES ............................................................................................................. 21 WORKING WITH MEDIA FILES................................................................................................................. 25 ADDING A PAGE TO YOUR WEB SITE ...................................................................................................... 29 CREATING A NEW FOLDER.............................................................................................................................31 RENAMING A FILE OR FOLDER ................................................................................................................ 32 COPYING A FILE .................................................................................................................................34 DELETING A FILE..................................................................................................................................... 36 UPDATING SITE OPTIONS ..............................................................................................................................37 UPLOADING A FILE.................................................................................................................................. 39 GLOSSARY..........................................................................................................................................41 2 INTRODUCTION This guide doesn’t require any technical knowledge, and is designed for users who are beginners to the Internet and the area of Content Management. This guide outlines the online website editor – It begins with explanations for how to use this guide, to a complete list of the programs features. This online editor is all you need to create a website, modify it as frequently as you require and to manage all the files (pictures and information) that will be displayed on your website. With this software, you no longer need someone else to create or manage your website – you specify and personalize the style, content and updates of your own site. You may want to create a website for displaying or sharing information or for your business needs. Either way, you will need your website to look interesting and professional, without the hard work of having to learn technical skills and programming. Using the editor and this guide, you can create a professional looking website in a short period of time. You can then update information, and modify your site directly from just about any computer that has Internet access – so you can make changes from a PC or laptop anytime and anywhere! 3 GETTING STARTED Requirements and settings To create, edit or maintain your website using the online editor, you must be on a PC or Macintosh compuer. If you’re on a PC you will need to use Internet Explorer or FireFox as your web browser. If you’re on a Macintosh you will need to be using FireFox. Safari is not supported. (NB. You don’t need Internet Explorer or FireFox to visit and see your site - anyone can see it. You just need this browser to edit it). Logging in To start creating your website, you need to log into your account. The main reason you need to login is so that only you can access your files. Generally, each user is given their own username, and password. Your username may be (or contain) your name or any other sequence of characters. A username is required so that the program knows who you are if there are multiple users, and is able to let each user access their corresponding files. Other users may know your username, but you should keep your password confidential so as to not enable anyone else to access your files. (Your username and password will be assigned to you by your administrator). You need to type in the URL of where the site builder is installed. You will then be prompted to enter in your username and password. 4 To Login simply: 1. Enter your username and password and 2. Click the ‘Login Now’ button. If you are having problems logging in: - Check that your CAPS-LOCK key is NOT on (as the login and password are case sensitive – e.g. entering ‘John’ is different to entering ‘john’) and - Ensure you are entering the correct username and password. If you are still getting the following error message you can reset your password by clicking on the “Forgot your password?” link at the bottom of the screen. When you login successfully you will be able to build and/or maintain your web site. Logging out Logging out means that you will exit the web site editor and have to log back in to access your files. The files will be updated to the last point where you chose the ‘save’ option. To Logout: 1. Click the 'Logout' button from the left frame in the web site editor. ! QUICK TIP It is always good practice to log out after you have completed and saved your work. 5 FEATURES WITHIN THE EDITOR The Editor Toolbar The tool for editing your web pages is the editor. The editor has a toolbar – this is a row of icons on along the top of the editor page and each activates different commands or functions when clicked. Some have drop-down lists which allows you to view all the functions associated with the icon. When moving your mouse over each icon, you will notice that text will appear which indicates the function and title of the icon. To get information on the functionality of this icon, look up the name (that appears on the icon) in the following section on editor commands. 6 Editor Commands This section will list all the icons listed in the editor toolbar. You will find the command title in bold, a description of the command in italic below the title, followed by the icon that appears in the toolbar for that command (left) and a step-by-step outline on how to perform the particular command. Some commands have shortcut keys. Shortcut keys are usually a combination of holding the ‘ctrl’ (control) key on your keyboard down with another key. These are handy shortcuts for when you become more familiar with the commands and want to perform the more common ones quickly without going through the editor. A full list of shortcut keys are provided in the section titled ‘Shortcut Keys Index’ and you will notice the shortcut keys noted in bold in the following list of commands (where applicable). Cut If you need to remove a section of text (either to paste somewhere else or delete), you would use this feature. To cut a portion of the document (image or text): 1. 2. Highlight the desired portion and click the Edit menu then click the 'Cut' option (keyboard shortcut – Ctrl + x), or Click the right mouse button on the desired portion and choose ‘cut’ Copy If you want to copy of a certain section of text, and you don’t want to re-write it, or if you want a copy of an image that is already on the page and don’t want to go through the process of inserting it, then you can use the copy command. To copy a portion of the document: 1. Highlight the desired portion and click the Edit menu then click the ‘Copy’ option (keyboard shortcut - ctrl+c), or 2. Click the right mouse button on the desired portion and choose ‘copy’ If you want to copy multiple items that can’t be highlighted together with the cursor, then hold down the control key and highlight the areas you need copying with the mouse cursor. Paste This command allows you to paste the last copied item or items to the position of your cursor. To paste a portion that has already been cut (or copied): 1. Click where you want to place the desired portion on the page and 2. Click the “Paste” menu and choose one of three options. “Paste” will perform a normal paste. “Paste as Plain Text” will strip formatting from HTML and “Paste from MS Word” will preserve all formatting made to the content by Microsoft Word (keyboard shortcut – ctrl+v), or 3. Click the right mouse button on the desired portion and choose ‘paste’ 7 Undo This command allows you to undo the last operation you performed (unless it’s a ‘save’). This is useful if you have performed an incorrect operation or one that you don’t want to save. To undo the last change: 1. Click the 'Undo' button on the toolbar (keyboard shortcut – ctrl+z). Each consecutive click will undo the previous change to the document. Redo This command allows you to undo your last undo, hence redo it. It is essentially the opposite of an undo. To redo the last change: 1. Click the 'Redo' button on the toolbar (keyboard shortcut - ctrl+y). Each consecutive click will repeat the last change to the document. Bold Bolding text makes it stand out from normal body text. It increases the thickness of the lettering. For example ‘edit’ is not bold, and ‘edit’ is bold. You can bold text that you want to stand out such as headings and keywords. To bold text: 1. Select the desired portion of text & click the 'Bold' icon (keyboard shortcut – ctrl + b). - Each consecutive click will toggle this function on and off. To find out whether existing text is bold, highlight the text with the cursor. If the ‘bold’ button is indented, then the text has been formatted to ‘bold’ Italic Making text italic makes the letters of the selected text slant to the right. E.g. ‘ed’it is italic, ‘edit’ is not. To convert text to italic: 1. Select the desired portion of text and click the 'Italic' icon (keyboard shortcut – ctrl+ i). Each consecutive click will toggle this function on and off. To find out whether existing text is italic, highlight the text with the cursor. If the ‘italic’ button is indented, then the text has been formatted to ‘italic’ 8 Insert Number List This command is useful when you have rows of print in sections and you need to number and list them. Text being typed is inserted into a bulleted list. In the following example: “the document comes in two formats: filename.doc filename. pdf” ‘.doc’ and .’pdf’ can be highlighted and a numbered list inserted to create, where a number prefixes each listed item: “the document comes in two formats: 1. filename..doc 2. filename.pdf” To start a numbered text list: 1. Click the 'Insert Numbered List' icon. If text has already been selected, the selection will be converted to a numbered list. Each consecutive click will toggle this function on and off. Insert Bullet List As in the previous command, the highlighted consecutive items are sorted into a list. Text being typed is inserted into a bulleted list. In the previous example they were sorted with numbers, in this command they are numbered with bullets which are defining dots that prefix each listed item. From the previous example, inserting a bulleted list would produce: “the document comes in two formats: filename. .doc filename.pdf” To start a bullet text list: 1. Click the 'Insert Bullet List' icon. If text has already been selected, the selection will be converted to a bullet list. Each consecutive click will toggle this function on and off. Outdent This command enables you to remove an indent (or tab) of text. To decrease indent of a paragraph: 1. Highlight the portion of text needing indenting. 2. Click the Format menu and then click the 'outdent' option. Each consecutive click will move text further to the left. 9 Align Left This command enables you to align existing sections of text or text being written to a defined left border of the page or cell. This formatting can be used for headings and body text. To align to the left: 1. Make a selection in the document and click the 'Align Left' icon. Align Center This command enables you to align existing sections of text or text being written, to the center of the page or cell. This formatting can be used for and body text but is mainly used for headings. To align to the center: 1. Make a selection in the document and click the 'Align Center' icon. Align Right This command enables you to align existing sections of text or text being written to a defined right border of the page or cell. This formatting can be used for headings and body text. To align to the right: 1. Make a selection in the document and click the 'Align Right' icon. Create / Modify HyperLink A hyperlink is a reference or link from one particular point in a web page file to particular point in another file OR another place in the same file. When a user clicks on the link in your web page with the mouse, the browser will display the target of the link This feature is useful for when you want to sort your website into different sections or pages and reference them easily or if you want your website to contain links to other pages in other sites. A URL is used to reference a section of another web page, a section of another website, or an anchor. To create a hyperlink: 1. Select text/image to create the link on 2. Click the Insert Link' icon. The file manager will appear. - You can also type the full URL of the page you want to link to in the URL text box. - You can also enter the target window information (optional) and an anchor name (if linking to an anchor - optional). This is if you want to reference a different section of the same file. - You can specify the file extension you need. The left section contains a cut-down version of the 'File Manager'. You can use this to navigate through your site's files and folders. When you have found the file you want to link to, click the 'Get Link Location' link next to that page. The information will be automatically updated in the 'Link Information' portion of the page. 3. 4. When finished, click the 'Insert Link' button to insert the HyperLink you just created, or click 'Remove Link' to remove an existing link. Clicking 'Cancel' will close the window and take you back to the editor. 10 5. 6. 7. To modify an existing hyperlink, select the link and click on the Insert Link' icon. The HyperLink window will appear. Make your changes and select the 'Insert Link' button. Select ‘remove link’ to remove an existing link. Insert / Modify Image This command allows you to browse the images you have available and insert them into a particular section of the page you are editing. This means that you can display any of the images available to you on your web page. This will open the Image Manager. See the section titled Image Manager for more information. Font This menu allows you to choose the style of font for the text that you specify. To change the font type of text: 1. 2. Select the desired portion of text and click the 'Font' drop-down menu. Select the desired font (choose from Default - Times New Roman, Arial, Verdana, Tahoma, Courier New, Georgia). To find the type of font of existing text, highlight the specific text and look at the ‘font’ menu. The font menu will change to indicate the type of font used Font Size This menu allows you to choose the size of font for the text that you specify. To change the size of text: 1. 2. Select the desired portion of text and click the 'Size' drop-down menu. Select the desired size (text size 1-7). To find the font size of existing text, highlight the specific text and look at the ‘font size’ menu. The font size menu will change to indicate the size of the font used 11 Font Color This menu allows you to choose the color of font for the text that you specify. It allows you to format the text in your page to match the style of your web page and distinguish heading from body text etc To change the color of text: 1. 2. 3. Select the desired portion of text and Click the 'Color' drop-down menu. Select the desired color from the large selection in the drop-down menu. Highlight Font This menu allows you to choose the highlight text that you specify. It allows you to format the text in your page to distinguish sections that you want to stand out. To highlight font: 1. 2. 3. Select the desired portion of text and Click the 'Highlight' drop-down menu. Select the desired color from the large selection in the drop-down menu. Remove Text Formatting This command allows you to select a specific portion of text and remove any of the formatting which it contains – leaving it with font style ‘Times New Roman’, format ‘Normal’ and font size ‘3’. To any text formatting to the default Times New Roman, Normal, size 3 font: 1. 2. Select the desired portion of text and Click the Tools menu and then click the 'Remove Text Formatting' option. Style The values in this box are predefined styles that are called from a stylesheet. This allows you to keep styles for your site on hand to be reused throughout your website for consistency. To change the style of text, images, form objects, tables, table cells etc: 1. Select the desired element and click the 'Style' drop-down menu, which will display all styles defined in the style-sheet. Select the desired style from the menu. Note: this function will not work if there is no style-sheet applied to the page. 12 Insert Table A table can be a collection of text or images arranged in rows and columns. You can add images or text to a table, shade it, use headings etc. Each row & column interval is called a cell. You can choose to use to use a table with the cells visible on the website, or invisible and only evident to you whilst editing for the sake of aiding the organization of its contents. For example, a company may insert a table with 3 columns and x rows to display their products. The first column may contain images of the products, the next column on the same row may contain the product description, and the last column on the same row may contain the product price. In the editor the following attributes have the following properties: Row: allows you to specify how many rows are required in your table Column: allows you to specify how many columns are required in your table Width: allows you to specify what percentage of the page section the width of the table will span Bgcolor: allows you to specify the background color of the table Cell spacing: allows you to specify the size of the spacing between each cells Cell padding: allows you to specify the size of the space that will be left clear between the wall of the cell and the contents of the cell. Border: allows you to specify the width of the border. To insert a table: 1. Select the desired location, and click the 'Insert Table' drop down icon (ctrl + t). A new window will pop-up with the following fields: Rows - number of rows in table; Columns - number of columns in table; Width - width of table; BgColor - background color of table; Cell Padding - padding around cells; Cell Spacing - spacing between cells and Border - border around cells. 2. Fill in table details then click the 'Insert Table' button to insert table, or click 'Cancel' to go back to the editor. To access any of the following table features, either click on the ‘table’ drop down menu, or click the right mouse button ensuring that the mouse cursor is within the table. Modify Table Properties This command allows you to change the properties that were specified when the table was first created. To modify table properties: 1. Select a table or click anywhere inside the table to modify, then click the 'Modify Table Properties' option from the tables menu. A pop-up window will appear with the table's properties. Note: this function will not work if a table has not been selected. 13 Modify Cell Properties This command allows you to modify the properties the cell of the table selected. To modify cell properties: 1. Click inside the cell to modify, then click the 'Modify Cell Properties' icon. A popup window will appear with the cells' properties. 2. Click the 'Modify Cell Properties' button to save your changes, or click 'Cancel' to go back to the editor. Note: this function will not work if a cell has not been selected and does not work across multiple cells. Insert Row Above You may find that after creating a table, you need to add an additional row. Instead of creating another table from scratch, you can add a row where you need. To insert row above: 1. 2. Click inside cell above which to insert a row, Click the Table menu and ten click the 'Insert Row Above' option. Each consecutive click will insert another row above the selected cell. Note: this function will not work if a cell has not been selected. Insert Row Below You may find that after creating a table, you need to add an additional row. Instead of creating another table from scratch, you can add a row where you need. To insert row below: 1. Click inside cell below which to insert a row 2. Click the Table menu and ten click the 'Insert Row Below' option. Each consecutive click will insert another row below the selected cell. Note: this function will not work if a cell has not been selected. Delete Row You may find that after creating a table, you need to delete row from a table that is no longer needed. To delete a row: 1. Click inside cell which is in the row to be deleted 2. Click the Table menu and ten click the 'Delete Row' option. Note: this function will not work if a cell has not been selected. 14 Insert Column to the right You may find that after creating a table, you need to add an additional column. Instead of creating another table from scratch, you can add a column where you need. To insert column after: 1. Click inside cell after which to insert a column 2. Click the Table menu and ten click the 'Insert Column After' option. Each consecutive click will insert another column after the selected cell. Note: this function will not work if a cell has not been selected. Insert Column to the left You may find that after creating a table, you need to add an additional column. Instead of creating another table from scratch, you can add a column where you need. To insert column before: 1. Click inside cell before which to insert a column c 2. Click the Table menu and ten click the 'Insert Column After' option. Each consecutive click will insert another column before the selected cell. Note: this function will not work if a cell has not been selected. Delete Column You may find that after creating a table, you need to delete column from a table that is no longer needed. To delete a column: 1. Click inside cell which is in the column to be deleted 2. Click the Table menu and ten click the 'Delete Column' option. Note: this function will not work if a cell has not been selected. Increase Column Span After the table is created, you can increase the span of a specific column/s with this command To insert column span: 1. Click inside cell who's span is to be increased 2. Click the Table menu and ten click the 'Increase Column Span' option. Each consecutive click will further increase the column span of selected cell. Note: this function will not work if a cell has not been selected. Decrease Column Span After the table is created, you can decrease the span of a specific column/s with this command To decrease column span: 1. Click inside cell who's span is to be decreased 2. Click the Table menu and ten click the 'Decrease Column Span' option. Each consecutive click will further decrease the column span of the selected cell. Note: this function will not work if a cell has not been selected. 15 WORKING WITH IMAGES Images on the web Images are used to add photos and animations (such as your company’s logo and product pictures) to your web pages. There are two main types of image files you will use, ‘.gif’ and ‘.jpeg/.jpg’. GIF is an acronym is for Graphics Interchange Format, created so that images could be exchanged regardless of which operating system you were on. The file format is known for its compression and the fact that it can store and display multiple images for animation. The major drawback to GIF is that images that images are displayed with less colors than JPEG files, which doesn’t make GIF’s the best choice for photographic images. You would choose the .GIF format for: Images with a transparent background. Animated graphics Less complex images containing 256 colors or less JPEG/JPG is an acronym for (developed by) theJoint Photographic Experts Group. This file format is the Internet standard for presenting photo realistic images. It has the capability to compress large images down to very small file sizes while retaining the overall photographic quality of the image. You would choose the .JPG format for: Photographs More complex images When you can get better quality AND a smaller file size (using a method called compression) Like HTML files, image files also have a filename.extension. For example: - smile.jpg is a JPEG (a compressed digital image file format) named “smile” - laugh.gif is a GIF (a graphics file format) named “laugh”. 16 Image Manager The Image Manager is similar to the File Manager, the difference being - it is an area where you can see your image files and image folders. In the image manager you will see: The name and optionally a preview shot of the image for quick reference. The size of your images. When you put your mouse over certain text or icons, a comment will appear which tells you what clicking on the link will do. Links are view, insert, backgd, rename, copy and delete. Note that image files are not editable in this editor. The image manager allows you to organize your image files into relevant groups of folders. This software application has a very simple to use, yet powerful Image Manager that makes it easy to organize your image files and folders. For Images you can: - Insert - View - Set as background - Copy - Upload - Rename 17 - Delete All folders are represented with the folder icon and files all image files have a small preview. The Current Working Directory, located directly above the Images, will at all times reflect your current location in the file system, relative to your document root. Uploading an Image You may want to upload an image to keep it handy in the image manager for inserting into your web pages. You can upload an image for later use or to insert into your pages as many times as needed. Your uploaded images can be viewed as thumbnails (smaller versions of the actual image – for easy browsing). To upload an image: 1. Click the 'Browse' button to open a 'Choose File' box that allows you to select a local image to upload. 2. Once the file has been selected, click 'Go' to begin uploading the file. Upon successful upload of the image, you will be taken back to the Image Manager. 18 Once your image has been successfully uploaded, you will receive the following message: Viewing an Image You may need to view an image to see what it will look like when displayed on your website. Viewing an image doesn’t change it. To view an image: 1. Select the desired image and click on it in the list of images. The image will be shown in the preview area on the right side of the image manager. Click the image in the preview area to see it in full size. Close the window to return to the site builder/editor. Inserting an Image Once you have uploaded an image, you can insert it where you need to. Just select the area on your page you want the image, and select browse the images to select the image you need. To insert an image: Click the 'Insert Image' button in the image browser at the bottom of the screen. Set background Image There may be a certain image you have uploaded that you want to set as the background image of your web page. To set an image as a background image: Click the Background icon in the image browser next to the image to be set. The image will be set as the current page background image. 19 Renaming an Image or a Folder When creating a file or folder, you may have chosen a name that you then decide is not appropriate or needs to be changed to reflect its contents or context better. The ‘rename’ function will allow you to easily change the name of the file or folder as you require. To rename: 1. Select the desired image or folder and click on the Rename icon. 2. Enter a valid name and click 'OK' to rename, or click 'Cancel' to be taken back to the Image Manager. Valid image names c onsist of - Alphanumeric characters (a-z, A-Z 0-9) - The underscore '_' or a dash '-'. - MUST have a single dot '.' and be followed by an extension. Deleting an Image file or Folder You may no longer have a need for a certain file or folder. You can choo se to keep it, or if you are sure it doesn’t need to be used again, you can PERMANENTLY delete it. Only use the delete function if you are sure you do not need the file/folder and its contents. To delete: 1. Select the desired image or folder and click on the 'Delete' icon. You will be prompted for confirmation of the deletion. 2. If you are sure you wish to delete the selected image/folder, click 'OK'. Clicking on 'Cancel' will take you back to the Image Manager. 20 WORKING WITH FLASH MOVIES Flash Manager The Flash Manager is similar to the File Manager, the difference being - it is an area where you can see your flash movies and flash folders. In the flash manager you will see: The name and optionally a preview of the flash movie for quick reference. When you put your mouse over certain text or icons, a comment will appear which tells you what clicking on the link will do. Links are view, insert, rename and delete. Note that flash movies are not editable in this editor. The flash manager allows you to organize your flash movies into relevant groups of folders. This software application has a very simple to use, yet powerful flash manager that makes it easy to organize your flash movies and folders. For Flash movies you can: - Insert - Upload 21 - View - Delete - Rename All folders are represented with the folder icon and all flash files have a small preview. The Current Working Directory, located directly above the Flash Files, will at all times reflect your current location in the file system, relative to your document root. Uploading a Flash Movie You may want to upload a flash file to keep it handy in the flash manager for inserting into your web pages. You can upload a flash movie for later use or to insert into your pages as many times as needed. To upload a flash movie: 1. 2. Click the 'Browse' button to open a 'Choose File' box that allows you to select a local flash movie to upload. Once the file has been selected, click 'Go' to begin uploading the file. Upon successful upload of the flash movie you will be taken back to the Flash Manager. 22 Once your flash movie has been successfully uploaded, you will receive the following message: Viewing a Flash Movie You may need to view a flash movie to see what it will look like when displayed on your website. To view a flash movie: 1. Select the desired flash movie and click on it in the list of flash movies. The flash movie will be shown in the preview area on the right side of the flash manager. Close the window to return to the site builder/editor. Inserting a Flash Movie Once you have uploaded a flash movie, you can insert it where you need to. Just select the area on your page you want the flash movie, and browse the flash movies to select the flash movie you need. To insert a flash movie: Click the 'Insert Flash' button in the flash browser at the bottom of the screen. Renaming Flash Movies and Folders When creating a file or folder, you may have chosen a name that you then decide is not appropriate or needs to be changed to reflect its contents or context better. The ‘rename’ function will allow you to easily change the name of the file or folder as you require. To rename: 23 Select the desired flash movie or folder and click on the Rename icon. 2. Enter a valid name and click 'OK' to rename, or click 'Cancel' to be taken back to the Flash Manager. Valid file names consist of - Alphanumeric characters (a-z, A-Z 0-9) - The underscore '_' or a dash '-'. - MUST have a single dot '.' and be followed by an extension. Deleting Flash File and Folders You may no longer have a need for a certain file or folder. You can choose to keep it, or if you are sure it doesn’t need to be used again, you can PERMANENTLY delete it. Only use the delete function if you are sure you do not need the file/folder and its contents. To delete: 1. Select the desired flash file or folder and click on the 'Delete' icon. You will be prompted for confirmation of the deletion. 2. If you are sure you wish to delete the selected file/folder, click 'OK'. Clicking on 'Cancel' will take you back to the Flash Manager. 24 WORKING WITH MEDIA FILES Media Manager The Media Manager is similar to the File Manager, the difference being - it is an area where you can see your multimedia files and folders. In the media manager you will see: The name and optionally a preview of the media file for quick reference. When you put your mouse over certain text or icons, a comment will appear which tells you what clicking on the link will do. Links are view, insert, rename and delete. Note that media files are not editable in this editor. The media manager allows you to organize your media files into relevant groups of folders. This software application has a very simple to use, yet powerful media manager that makes it easy to organize your media files and folders. For media files you can: - Insert - Upload 25 - View - Delete - Rename All folders are represented with the folder icon and all media files have a small preview. The Current Working Directory, located directly above the Media Files, will at all times reflect your current location in the file system, relative to your document root. Uploading a Media File You may want to upload a media file to keep it handy in the media manager for inserting into your web pages. You can upload a media file for later use or to insert into your pages as many times as needed. To upload a media file: 1. Click the 'Browse' button to open a 'Choose File' box that allows you to select a local media file to upload. 2. Once the file has been selected, click 'Go' to begin uploading the file. Upon successful upload of the media file you will be taken back to the Media Manager. 26 Once your media file has been successfully uploaded, you will receive the following message: Viewing a Media File You may need to view a media file to see what it will look like when displayed on your website. To view a media file: 1. Select the desired movie and click on it in the list of media files. The movie will be shown in the preview area on the right side of the media manager. Close the window to return to the site builder/editor. Inserting a Media File Once you have uploaded a media file, you can insert it where you need to. Just select the area on your page you want the movie, and browse the movies to select the movie you need. To insert a movie: Click the 'Insert Media' button in the flash browser at the bottom of the screen. Renaming Media Files and Folders When creating a file or folder, you may have chosen a name that you then decide is not appropriate or needs to be changed to reflect its contents or context better. The ‘rename’ function will allow you to easily change the name of the file or folder as you require. To rename: Select the desired media file or folder and click on the Rename icon. Enter a valid name and click 'OK' to rename, or click 'Cancel' to be taken back to the Media Manager. Valid file names consist of 27 - Alphanumeric characters (a-z, A-Z 0-9) - The underscore '_' or a dash '-'. - MUST have a single dot '.' and be followed by an extension. Deleting A Media File or Folder You may no longer have a need for a certain file or folder. You can choose to keep it, or if you are sure it doesn’t need to be used again, you can PERMANENTLY delete it. Only use the delete function if you are sure you do not need the file/folder and its contents. To delete: Select the desired media file or folder and click on the 'Delete' icon. You will be prompted for confirmation of the deletion. If you are sure you wish to delete the selected file/folder, click 'OK'. Clicking on 'Cancel' will take you back to the Media Manager. 28 ADDING A PAGE TO YOUR WEB SITE Depending on the options your administrator has placed setup for your account, you can create anywhere from a few to an unlimited number of pages for your web site. To add a new page to your site, follow the steps below: Clic k the button on the toolbar in the left frame. This will take you to the New Page wizard. There are 2 required and 3 optional fields to complete. They are explained below: 1. Page Name – Enter a name for the page, such as “Home Page” or “About Us”. This will be displayed in the web browser’s title bar and menu navigation when viewing the page. 2. File Name – Enter a file name for this page. Generally, all files names should end in “.html”. Your home page should be called index.html. It’s a good idea to make your fil e name similar to your page name, such as “about. html” for your About page. 3. Parent Page - Optionally choose a page under which this page will appear on your web site’s navigation menu. If you choose a parent page, your menu will automatically be converted into a drop down menu. 4. Page Keywords – Also known as META keywords, these are used to help search engines index your page. Enter the keywords separated with commas, such as “our products, our music, our books”. When you have filled out the form, click the “Next >>” button and the page will be built and uploaded to your web site for you. A link to the page will also be added to the navigation menu of your web site automatically. You will now be able to edit the file in the right frame. Areas that are surrou nded by a blue border can be edited: 29 • Once you’ve finished adding content to your page, click the “Save” button in the left frame to update the page. You will see the following confirmation message when your page has been saved: Congratulations, you’ve just added a new page to your web site! 30 CREATING A NEW FOLDER When you create or upload a file, folders are a great way to keep them organized. Creating a new folder in the site builder is easy. Here’s how: Using your mouse, click on the “New Folder” icon on the toolbar in the left frame: The “New Folder” tab will appear. To create the folder simply type the new folder name into the text box and then click the OK button. You will be notified when the folder has been created: 31 RENAMING A FILE OR FOLDER Sometimes you might want to change the name of a file that you’ve uploaded or created using the site builder. To do this, you can rename the file. Here’s how: Using your mouse, click on the name of the file in the left frame: Click the “Rename Selected File/Folder” button on the toolbar: The rename tab will appear. Type in the new name for the file you have selected and click OK: 32 • When the file has been renamed you will be notified, like so: • If the filename you enter is already taken, you will be shown an error message, like so: 33 COPYING A FILE If you have uploaded a file or created a page in the site builder, you can quickly and easily make a copy of that file or web page. Here’s how: Using your mouse, click on the name of the file in the l eft frame: Click the “Copy File” button on the toolbar: The copy tab will appear. By default the name for the new file will be the name of the file you selected, prefixed with “copy_of_”. You can change this to anything you like. Enter the new filename and click the OK button: 34 • • You will be notified when the file has been copied: If the filename you entered already exists you won’t be able to copy the file. Instead, you will see an error message like this: 35 DELETING A FILE It’s easy to delete a file or folder in the site builder, but be careful: once you delete a file or folder it can never be retrieved, so use the delete button with caution. Here’s how to delete a file or folder: Using your mouse, click on the name of the file or folder that you want to delete in the left frame: Click the “Delete” icon on the toolbar. You will be asked if you are sure you wish to proceed. Click OK to continue or cancel to stop: When you click OK you will be notified that the file/folder you chose has been deleted. If you chose to delete a folder containing other folders, only the files in that folder will be deleted. The site builder will NOT recursively delete folders for security reasons. 36 UPDATING SITE OPTIONS PLEASE NOTE: This section only applies to web sites that were built using the site builder. If you have an existing web site and are only using the site builder for editing then this information will not apply to you. After you’ve built your web site using the site builder it’s quick and easy to go back and change your site options, including web site name, page order and layout template. To do this you use the “Site Options” tab. Here’s how: Using your mouse, click the “Site Options” button on the toolbar in the left frame: You will see the site options tab. From here you can change the name of your web site, which is displayed on all pages. You can also re-order the way pages appear on the navigation menu of your web site. Finally, you can change the template layout for your web site too. Changing your web site name: To change the name of your web site simply type a new name in the “Web Site Name” text box and click the OK button. Changing page order: To change the order in which pages will appear on your navigation menu simply choose a page and click the Up/Down arrow next to the “Page Order” box. Click Up to move the page to the left and Down to move the page to the right. Click OK when you’re done. Changing the layout template: To change the layout that your web site is using start by choosing a category from the “Layout Category” drop down list. When you choose a category, the list of template images shown below the list will change. Click on an image to use that layout for your web site. You can also preview a layout by clicking the Preview butt on. Click OK to confirm all changes. The site builder will update your web site layout and menu automatically and will notify you when it’s done: 37 38 UPLOADING A FILE It’s easy to upload your own files using the site builder’s file upload tab. Here’s how: Click the “Upload File” button on the toolbar in the left frame: The upload tab appears. Click the “Browse...” button to choose a file from your hard drive to upload. Make sure you pay attention to the size of the file you are uploading. The site builder will tell you the maximum size of the file you can upload: 39 • Click the OK button to upload the file. You will be notified when the file has uploaded. Depending on the file size, this could take anywhere from a few seconds to a few minutes: 40 GLOSSARY Term Application Program Backup Browser Bug CD-ROM CPU (Central Processing Unit) Crash Cursor Data Database Default Desktop Desktop PC Desktop Publisher Disk Disk Drive Download Driver E-mail Explorer Field File Filename Filename extension Floppy disk Floppy disk drive Folder Format FTP Graphical User Interface (GUI) Hardware Header Home page HTML Icons Description A software program that is designed to enable the user to perform a specific task. An example of an application program is a work processor. A copy of the original contents. It is good practice to make backup copies of files. A program that allows you to traverse and view internet web pages A computer error A storage device that accesses compact disc-based information and also plays audio CD’s. CDRW drives allow you to record onto these disks An integrated circuit chip that processes the data flowing in and out of a PC (also called a microprocessor) Disk drive failure An item on your screen that shows where the next text character will appear or where the mouse is currently pointing Raw figures of information A program enabling users to manage, view and report large amounts of data. A command or location that the computer will assume if the user does not enter overriding information. The screen on the background on which program and data windows appear in the graphical user environment. A PC that fits on a desktop. An application program used to create magazine and newspaper like publications. A flexible plastic disk coated with magnetic material and covered by a protective jacket, used primarily by computers to store data magnetically. Also called a diskette A device that reads data stored on a magnetic or optical disk and writes data onto the disk for storage To retrieve data (such as files) from a remote location. Is a software routine that is able to tell windows how to communicate with specific hardware. Short for electronic mail – is mail transferred between recipients over modems, network connections and the internet. The name given to the Windows utility program that enables the user to view and manage disk drives and folders Is an area on the screen where a user can enter information, this is also called a text box. A collection of related information stored on a drive The name that is given to a file The suffix after the filename that indicates the type of the file See disk A device that reads data stored on a magnetic disk and writes data onto the disk for storage A collection of related files (and folders) The layout, design, arrangement of a document, page or a file. An acronym for File Transfer Protocol (FTP) An interface for issuing commands to a computer utilizing a pointing device, such as a mouse, that manipulates and sets in motion graphical images on a monitor The physical components that make up your PC The part of an email message or news article that precedes the body of a message. It can contain, among other things, the sender's name and e-mail address and the date and time the message was sent. The first web page to appear when you connect to an internet website. An acronym for Hypertext Markup Language. The language behind internet web pages Pictures (usually small) that represent data, program, windows, file types and commands 41 Installation Internet Internet explorer Keyboard License Linux Media Memory Multimedia Netscape Navigator Network Online Operating environment Path, pathname Peripheral device Program Programmer Programming language Root Software Subfolder System System program Taskbar Thumbnail sketches Toggle Undo Uniform Resource Locator (URL) Unix Wallpaper Web Windows Word processor WYSIWYG Zip The procedure that needed to put software onto a PC/server A world-wide system (network) of interconnected computers A Web browser (made by Microsoft) provided free of charge from the internet and with the most major Microsoft packages. A frequently used input device with alpha numeric and special characters that you type to get data into your PC. A right to run a software application An operating system – a trademark for an open-source version of the UNIX operating system Paper, disks, tapes and other items on which data can appear. Storage Relating to an application that can combine text, graphics, full-motion video, and sound into an integrated package. A internet web browser 2 or more computers that are joined together for file or peripheral sharing. The status of being connected to an online service or to the internet The environment where the operating system works with its users A specific location of a file. A device such as a floppy disk drive, printer or monitor that gets data to and from a PC’s CPU Is a set of instructions, stored in a file with a filename that tells a computer what to do A person who write computer programs A computer language used by a programmer to write a program The top level folder Consists of programs, data and applications A folder that resides in another folder A set of related parts working together to accomplish a specific goal. The personal computer is a set of components that make up a system A program that is able to manage other programs (eg, able to manage operating systems) A row of buttons or graphical controls on a screen that represent open programs, among which the user can switch back and forth by clicking on the appropriate one. A small preview of (eg. Of a picture or a printed page) any instruction that works first one way and then the other; it turns something on the first time it is used and then turns it off the next time A feature enabling the user to reverse a recent activity within a program. Location of a specific Web page A trademark name used for a computer disk operating system. The graphical background on the desktop An internet system made up of graphical screen pages that display graphics, text and other controls (also called WWW – the World Wide Web) A trademark name used for a computer disk operating system. A software application that allows the user to run and create documents Is the acronym for What You See (on the screen) Is What You Get (on paper). A type of high-capacity (removable) disk drive. 42