1
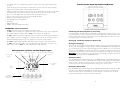
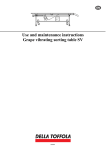
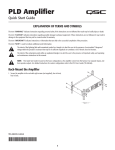
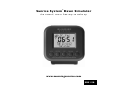
®
Sunrise System Dawn Simulator
t h e n a t u r a l , s t re s s f re e w ay t o w a ke u p
www.morningsunrise.com
SRS 150
WARNING
To reduce the risk of fire or electric shock, do not expose this appliance to rain or moisture
CAUTION*
Use of controls or adjustments or performance of procedures other than those specified may
result in hazardous radiation exposure.
M
M
CAUTION
!
RISK OF ELECTRIC SHOCK
DO NOT OPEN
CAUTION - TO REDUCE THE RISK OF ELECTRIC SHOCK,
DO NOT REMOVE COVER (OR BACK). NO USER-SERVICING
TAKE PRODUCT TO QUALIFIED SERVICE PERSONNEL
* A Caution Marking is located on the
bottom of this appliance.
M
M
The lightning flash with arrowhead symbol, within an equilateral triangle, is intended to alert the
user to the presence of uninsulated ‘dangerous voltage’ within the product’s enclosure that may
be of sufficient magnitude to constitute a risk of electric shock.
!
The exclamation mark within an equilateral triangle is intended to alert the user to the presence
of important operating and maintenance (servicing) instructions in the literature accompanying
the product.
IMPORTANT SAFETY INSTRUCTIONS
1. Read these instructions.
2 Keep these instructions.
3. Heed all Warnings.
4. Follow all instructions.
5. Do not use this apparatus near water.
6. Clean only with a damp cloth.
7. Do not block any of the ventilation openings. Use in accordance with the manufacturers instructions.
8. Do not place near any heat sources such as radiators, heaters, stoves or other apparatus (including
amplifiers) that produce heat.
9. Do not disregard the safety purpose of the polarized or grounding - type plug. A polarized plug has two
blades with one wider than the other. A grounding type plug has two blades and a third grounding prong.
The wide blade or the third prong is provided for your safety. If the provided plug does not fit into your
outlet, consult an electrician for replacement of the obsolete outlet.
10. Protect the power cord from being walked upon or pinched, particularly at plugs and the point where
they exit from the apparatus.
11. Only use attachments / accessories specified by the manufacturer.
12. Unplug the apparatus during lightning storms or when unused for long periods of time.
13. Refer all servicing to qualified service personnel or the manufacturer. Your warranty may be affected if you
dismantle the product. Servicing is required when the apparatus has been damaged in any way, such as
power-supply cord or plug damage, liquid has been spilled or objects have fallen into the apparatus, the
apparatus has been exposed to rain or moisture, the apparatus does not operate normally or has been
dropped.
2
In This Guide
Introduction
Product features
Important safety information
Sunrise System front and LCD display layout
Sunrise System top and set up buttons
Setting up instructions
Programming table
Troubleshooting tips
Support and warranty
Technical specifications
3
3-4
4
4
5
5-8
9
10
10
11
Sunrise System Dawn Simulator
Introduction
Thank you for purchasing the Sunrise System Dawn Simulator 150. You will now be able to enjoy
the health and relaxation benefits of the Sunrise System which is one of the most natural and
stress free ways of awakening. Once connected to your bedside lamp the Sunrise System can be
set to imperceptibly simulate a sunrise and sunset.The sunrise brightens the room gradually, gently
waking the sleeper and the sunset slowly dims the room, helping the user to relax and ease into a
restful and natural sleep. With the benefit of an integral digital stereo FM/AM radio, weather band
radio (US model only) and MP3 player you can also wake or relax to the sounds of nature or to
your favourite music.The SRS 150 has a colour change display and includes a sleep sound SD card.
To enjoy the full benefits of your Sunrise System Dawn Simulator please read this manual carefully,
particularly the safety information on page 4. If you do have initial queries, try the troubleshooting
information at the end of the guide.The Sunrise System can be set to meet your own individual
lifestyle requirements so take the time to look at the full list of features which begin below.
Product Features
• Sunrise: simulates a sunrise over a period of 15, 30, 45, 60, 75 or 90 minutes. minutes.
Set to suit your preference.
• Sunset (sleep button): simulates a sunset over a period of 5 - 90 minutes.
Set to suit your preference.
• The Sunrise System connects directly to your own bedside lamp. Your bedside lamp then
generates the sunrise/sunset feature.The Sunrise System integrates with your own bedroom
or home décor.
• Your bedside lamp brightness can also be manually controlled through the Sunrise System,
and set to any level, for example - to brighten the lamp for reading.
• All functions of the Sunrise System 150 are indicated on the large backlit multicolour LCD
display to clearly show the function being altered.
• A night light feature has also been included and the night light is user adjustable.
• A security feature that randomly turns the lamp full on and off between the times of 7:00pm
and 9:00am can be set to operate when you are away from home.
• 12 or 24 hour clock display - you choose.
3
• The audible alarm can be disabled if you prefer to wake to the sunrise feature without MP3
or radio.
• Power fail battery backup is provided on all functions for power cuts to the home electricity
supply or if the Sunrise System is inadvertently disconnected
• Full seven day alarm is provided to allow the user to set different times (if desired) on the alarm
for different days of the week.The factory programmed time for all seven days is 07:00am
• Easy to read text display shows time and date, MP3 track, radio frequency
• The day of the week and Leap years are automatically calculated.
• Option to select a language of your choice
• LCD backlight and colour adjustment
• MP3 Player
• Digital FM/AM radio
• Weather band radio (USA model only)
IMPORTANT Safety Instructions
• NEVER immerse the clock or the wiring of the clock in water.
• Do NOT connect anything but a regular home lamp to the Sunrise System 150 (use light bulb
up to 200W USA, up to 300W Europe) NOT for use with any other appliance!
• Do NOT attempt to replace the bulb in the lamp connected to the Sunrise System whilst the
power supply is connected or plugged in to either the lamp or the clock. The Sunrise System
will retain all settings if there is no power supply to the clock and a battery is fitted.
• Use ONLY regular tungsten light/lamp bulbs in the lamp connected to the Sunrise System.
Do NOT use power saving bulbs or non standard bulbs in the lamp when connected to the
Sunrise System 150. Do NOT use with a lamp that has a built in dimmer.
Sunrise System 150 Front and LCD Display Layout
alarm on icon
alarm sound night light
snooze mode/sleep sunset when flashing
security mode
sunrise / sunset
indicator
low / no battery
indicator
12 hour
mode
Sunrise System Clock Top and Set Up Buttons
Connecting the Sunrise System to your lamp
The Sunrise System 150 (SRS 150) is supplied with a specially designed cable in order to connect it
to your lamp. One end of the cable has a socket, insert the plug of your bedside lamp into this
socket. If your bedside lamp has a switch, ensure it is in the ON position.The other end of the cable
is the mains plug for use with the wall socket.
Setting Up and Using the Sunrise System 150
Setting the Language
When the SRS 150 is plugged in for the first time or after a factory reset, the SRS 150 will prompt
the user to set the language.The display will show ENGLISH LANGUAGE. Momentarily press the
up or down buttons to select the required language then press MENU to go on and set the time
and date or press SNOOZE to exit the setup menu.To change the language again after it has been
set, a factory reset must be performed. See factory reset instructions on page 9 of this user guide.
Please Note: The SRS 150 will come out of Setup Mode automatically if no button is pressed for
12 seconds or if you press the zzZ (SNOOZE) button.
Setting the Time
Press the MENU button until the display shows 12 HOUR CLOCK or 24 HOUR CLOCK the
current time will also be shown on the display. Momentarily press the light up or down buttons to
set the clock in 1 minute increments or press and hold the up or down buttons to set the clock in
10 minute increments. Press the Display button to change 12 or 24 hour mode.
Setting the Alarm Time
Press the MENU button until the display shows MONDAY ALARM TIME, the alarm time will also
be shown on the display. Momentarily press the light up or down buttons to set the time in 1
minute increments or press and hold the up or down buttons to set the clock in 10 minute
increments. Repeat this procedure for each day of the week.
AM/FM radio
Weather band radio*
(*US model only)
4
5
Setting the Date
Press the MENU button until the display shows YEAR, the current date will also be shown with
the year segment flashing. Momentarily press the up or down buttons to set the year or press and
hold the up or down buttons to quickly skip through the year. Repeat this procedure for the
month and date, the display will show MONTH and DATE in place of YEAR.
To change the date format from European (DD/MM/YYYY) to American (MM/DD/YYYY) press
the DISPLAY button once whilst setting up the Year, Month or Date.
Please Note: The weekday and Leap year are automatically calculated by the SRS 150 therefore
there is no need to adjust them manually.
Media Card
The SRS 150 can accept MMC, MMC+, SD and SDHC as well as RS SD cards using a suitable
adaptor. Insert the card into the back of the SRS 150 with contacts facing down, pressing inward
with a light pressure until the card clicks into place, the display will show READING CARD this
typically takes about 2 seconds but could be as long as 1 minute with some cards. If the display
shows CARD ERROR then ensure the card is correctly inserted and the card contacts are clean
also ensure the card is formatted correctly and that there are MP3 tracks stored on the card.
Please Note: The card must be formatted as FAT(FAT16) or FAT32 and contain .mp3 files in the
root folder “/” directory of the card. MP3 tracks in separate folders / directories will be ignored.
Setting the Sunrise Time
Press the MENU button until the display shows 15 MINUTES SUNRISE for example.The Sunrise
duration can be set to 15, 30, 45, 60, 75 or 90 minutes. See Setting a Wake Up Sound instruction
later in the user guide if you like to wake up with Sunrise and Sound.
MP3 Player
Press the MP3 button to begin playing MP3 tracks. If the radio was on it will be switched off automatically. If the display shows INSERT CARD refer to the Media Card section of this guide, above.
The display will show MP3 PLAYER together with information about the MP3 track if available, for
example song title, artist and composer. If no information is available the display will show NO
TITLE. Providing the media card has not been removed and the SRS 150 has not been
disconnected the MP3 will begin playing from the start of the last played track.To change the
current MP3 track being listened to, momentarily press the forward < or > backward buttons to
select a previous or next MP3 track or press and hold the < or > buttons to quickly skip by 10
MP3 tracks.The display will show the current track number and the maximum file number for
example: 00003 / 00040 would indicate that track (or file) 3 of a possible 40 tracks is selected.
Using the Night Light
Momentarily press the NIGHTLIGHT button to enable the Night Light, the display will show
NIGHTLIGHT ON and the Night Light icon will be displayed.To disable the Night Light press the
NIGHTLIGHT button momentarily. Press the NIGHTLIGHT button again the display will show
NIGHTLIGHT OFF and the Night Light icon will no longer be displayed.
Please Note: When the Night Light is enabled it will not be possible to dim the light below the
preset Night Light level.
To stop the MP3 playback press the STOP button.The display will show STOPPED for 2 seconds.
Setting the Night Light Level
First ensure the Night Light is off (see above). Press the light up or down buttons to brighten or
dim the attached lamp at the required light level then press and hold the NIGHTLIGHT button for
approximately 2 seconds until the display will show NIGHTLIGHT LEVEL for 2 seconds and the
new setting will be stored.
Please Note: If the Night Light is on or the attached lamp is switched off it will not be possible to
set the Night Light level.
Using the Reading Light
Press the light up or down buttons to set the attached lamp to the required light level. If the
Sunrise has not already begun or the alarm is not activated pressing the SNOOZE button will
quickly switch the attached lamp on at full brightness or off if the lamp is already on. When the
SNOOZE button is pressed the display will show LAMP ON or LAMP OFF.
Display Backlight Colour and Light Level
Press the DISPLAY button, the display will show BACKLIGHT together with the current backlight
intensity setting.To adjust the display backlight intensity press the light up or down buttons within 5
seconds while the display is showing BACKLIGHT.
Press the DISPLAY button again to cycle through the available backlight colours.To enter a colour
change mode, (where colour of backlight changes randomly) press and hold the DISPLAY button
until the display shows RANDOM BACKLIGHT. To cancel the random backlight mode, press the
DISPLAY button again. The display colour and intensity level will return to the setting chosen
prior to entering random backlight mode.
AM/FM/WB* Radio
Press the AM/FM button to switch on the radio.The radio will switch on to the last radio band
and tuned frequency that was selected. If the MP3 player was playing it will stop automatically.
The display will show the selection, 87.50 MHz FM RADIO for example.
Press the rewind/tune < or > forward/tune buttons to change the tuned frequency or press and
hold the < or > buttons to begin an autonomous search for a radio station.The search will stop if
a station is found or the search frequency loops back to the beginning or the starting point. During
the search the display will show SEARCHING.
To change the radio band from FM, AM or WB* (weather band) press the AM/FM button again.
* Note: Weather band is only available on US models.
To switch off the radio press the STOP button, the display will show RADIO OFF for 2 seconds.
Listening Volume
To adjust the volume press the VOLUME - or + buttons, the display will show VOLUME with the
current setting.There are 16 sound levels from zero. If zero sound is selected (no bars) the
speakers will be muted.
Setting a Wake Up Sound
The wake up sound will begin when the Sunrise starts and gradually increase in volume reaching
the maximum user set volume at the alarm time.You can set the Radio or the MP3 PLayer as your
wake up sound or choose not to have a wake up sound.
Please Note:
The backlight intensity cannot be adjusted whilst the random backlight mode is active.
6
7
Setting the radio as a Wake Up Sound
Switch the radio on and tune it to the desired band AM, FM or WB* and frequency. Next set the
desired maximum volume. Press and hold the ALARM button until the display shows FM RADIO
ALARM SOUND ON, for example.The Wake Up sound selection is now stored.The radio can
now be switched off if preferred.
*Note: Weather band is only available on US models.
Setting the MP3 player as a Wake Up Sound
There are three MP3 wake up modes:
1.Continuous play. Plays from last track listed.
2. Repeat track. Plays from a specific track.
3. Repeat daily. Plays from a specific track each day.
To play from a specific track, start the MP3 player and select the required track using the forward
< or > rewind buttons. Next set the desired maximum wake up volume. Press and hold the
ALARM button, the display will show MP3 PLAYER ALARM SOUND.The MP3 Wake Up sound
has 3 different options available from the setup menu, see above. Press MENU until the display
shows MP3 ALARM SOUND then press the up or down light buttons to select the way you want
the Wake Up sound to play.
No Wake Up Sound
Press Stop then press and hold the Alarm button until the display shows ALARM SOUND OFF.
Alarm Clock
To enable the alarm clock, momentarily press the ALARM button.The display will show ALARM
ON together with the alarm day and alarm time.The alarm clock icon will also be displayed to
indicate the alarm clock is enabled.The alarm day and time will be displayed while the SRS 150 is
in an idle condition, i.e. Not in a set up menu, no radio or MP3 playing.
Please Note: If there is insufficient time to complete a full sunrise the alarm will automatically
be set for the following day.
Backup Battery
The backup battery ensures the time and date remain correct in the event of a power failure or if
the SRS 150 is unplugged from the mains supply. If the backup battery is low, the low battery icon
will flash on the display and the battery should be replaced.
Please Note: If the battery is not fitted or runs too low the time and date may be lost if the
power fails. Other user settings are stored in a non-volatile memory and are retained even if no
battery is fitted.
Factory Reset Procedure
To reset the SRS 150 back to factory default settings follow the instructions below:
1. Unplug the SRS 150 from the mains supply.
2. Press and hold the MENU button and plug the SRS 150 back into the mains supply while still
holding the MENU button.
3. The display will show VERSION 1.00 for example. Now release the MENU button.
4. After a short delay the SRS 150 will start up with defaults loaded.
Please Note: If a backup battery is fitted the time and date will remain set even after following this
reset procedure.The time and date can be reset by following Time and Date Reset Procedure
below.
Time and Date Procedure
The time and date can be adjusted from the setup menu at any time. It can also be reset by
following the procedure below:
1. Unplug the SRS 150 from the mains supply.
2. Remove the backup battery and wait 10 minutes.
3. Plug the SRS 150 back into the mains supply and refit the backup battery.
4. Set the time and date through the setup menu.
Programming Table
If the alarm has begun to activate or is sounding, momentarily press the ALARM button to cancel
the alarm for the day. The alarm clock will automatically be reset for the following day.
To switch the alarm clock off (providing the alarm has not begun to activate) momentarily press
the ALARM button (press ALARM twice if the alarm has begun to activate) the display will show
ALARM OFF for 2 seconds and the alarm clock icon will no longer be displayed.
If the alarm is on, the alarm day and time will be shown on the display while the radio and MP3
are off, for example MON 07:00am and if a wakeup sound is programmed the sound type will be
appended to the alarm time for example MON 07:00am ))MP3.
Sleep Timer (Sunset)
The sleep timer period can be set in increments of 5 minutes up to a maximum of 90 minutes.To
set the sleep timer, momentarily press the SLEEP button the display will show 05 MINUTES SLEEP
TIMER for example. Press and hold the SLEEP button to cancel the sleep timer.
While the sleep timer is active the SNOOZE icon will flash on the display.
If the attached lamp is on at full brightness it will begin fading down over the selected sleep timer
period at the end of this period the radio or MP3 player (if on) will switch off.
8
No of Presses
of MENU button
Result
(First setting is the Default)
1
2
3
4
5
6
7
8
9
10
11
12
13
14
CLOCK SET
MONDAY ALARM TIME
TUESDAY ALARM TIME
WEDNESDAY ALARM TIME
THURSDAY ALARM TIME
FRIDAY ALARM TIME
SATURDAY ALARM TIME
SUNDAY ALARM TIME
MP3 ALARM SOUND
YEAR
MONTH
DATE
SUNRISE 15, 30, 45, 60, 75, 90
SECURITY (ON/OFF)
9
Troubleshooting Tips
How do I generate a Sunrise?
The Sunrise works in conjunction with the alarm time, first set the alarm time (see page 5 ), then
choose the desired Sunrise duration from the menu (e.g set to 15 min). Activate the alarm by
pressing the alarm button (top left).The Sunrise will start 15 minutes before the alarm time and
the lamp will be at full brightness after 15 minutes.
How do I generate a Sunset?
Press the light UP button until the lamp is set to the desired brightness level or press the zzZ
SNOOZE button to turn lamp full on.To activate the Sunset just press the sleep button.The lamp
will slowly dim and switch off. The sunset time can be set between 5 - 90 minutes. If the radio or
MP3 is playing either will switch off after the sunset period.
How do I switch my lamp off after a sunrise?
Press the ALARM button to switch the alarm off, then press the zzZ SNOOZE button to turn the
lamp off.
Can the unit be reset to the factory default settings?
Yes. See page 9.
Can I use any light bulb in the lamp attached to my SRS 150?
No, you must use a regular tungsten or tungsten halogen light bulb to the recommended wattage
for your lamp.The Sunrise System will not work properly if an energy saver or fluorescent bulb is
used. Do not use with a ‘dimming’ lamp.
Sunrise System Support
You can contact the Sunrise System team and find out more about the benefits of using the
Sunrise System dawn simulator by visiting our website: www.morningsunrise.com
You will also find a Q&A section on our website.
Warranty
Gullwing Ltd. warrants to the end user that this product will be free from defects in materials and
workmanship in the course of normal use for a period of one year from the date of purchase.
Gullwing Ltd. does not accept liability for improper or unintended use of the product. Should you
have a problem with your unit, please get in touch with your supplier or contact Gullwing Ltd. via
our website or by writing to us.
Default Settings and Ranges
Time and date: EU/UK Models
US Model
Display colour: White
Display level:
50%
Volume:
50%
FM:
WB:
US model only
AM:
EU/UK Models
US Model
Night Level:
20% approximately
Night Light:
Off
Security:
Off
Alarm Clock:
Off
Alarm Time:
EU/UK Models
US Model
12:00
01/01/12 (1st January 2012
12:00 pm 01/01/12 (January 1st 2012)
87.5 ~ 108.0 MHz
162.400 ~ 162.550 MHz
522 ~ 1710 kHz (9 kHz step)
520 ~ 1710 kHz (10 kHz step)
07:00 (Monday - Sunday)
07:00am (Monday - Sunday)
Sunrise System Compliance (USA models)
RoHS and WEEE compliant.
Technical Specifications
General: For use in USA (European model also available)
Dimensions: 5” (width) x 5” (height) x 5” (depth)
Power supply: 110V-120V AC, 60Hz
Connecting bedside lamp: Tungsten bulb only - up to 200W 110V-120V
Sunrise System Compliance (European models)
RoHS and WEEE compliant.
This equipment complies with the requirements of the EMC Directive 2004/108/EC.
In demonstration of conformance with the Essential Requirements for Safety and Electro-magnetic
Compatibility covered by the above directive, the product meets the following standards:
Safety
Electro Magnetic
Compatibility
EN 60335-2 - 26: 2002/A1:2008
EN 61000-6-1:2007
EN 61000-6-3 :2007
Technical Specifications
General: For use in Europe. (USA model also available).
Dimensions: 130mm (width) x 110mm (height) x 70mm (depth)
Power supply: 230V AC, 50Hz
Connecting bedside lamp: Tungsten bulb only - up to 300W 230V
CE marked. Complied with EMC (2007/C 225/01) and Low Voltage Directives (2008/C 28/01)
Although every effort is made to ensure the content of this User Guide is correct and accurate, Gullwing Ltd cannot accept liability for errors or
omissions. Updates to this user guide may be found on www.morningsunrise.com
Bien que tous les efforts possibles soient entrepris pour assurer que le contenu de cette notice d'utilisation soit correct et précis, Gullwing Ltd ne
sera pas tenu responsable en cas d'erreurs ou d'omissions. Les mises à jour de cette notice d'utilisation sont librement consultables sur
www.morningsunrise.com
Aunque se ha hecho todo lo posible para garantizar que los contenidos de esta Guía del usuario son correctos, Gullwing Ltd. no acepta responsabilidad por los errores u omisiones en este manual. Es posible encontrar actualizaciones de esta guía del usuario en www.morningsunrise.com
Obwohl alles versucht wurde, um die Richtigkeit des Inhalts dieses Benutzerhandbuchs zu gewährleisten, akzeptiert Gullwing Ltd. keine Haftung für
eventuelle Fehler oder Auslassungen. Überarbeitete Versionen dieses Benutzerhandbuchs finden Sie gegebenenfalls unter: www.morningsunrise.com
©
10
Copyright Gullwing Ltd
eu/usa rev 2
10/09
www.morningsunrise.com