1
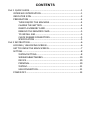
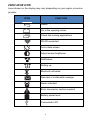
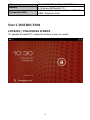
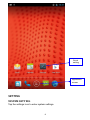
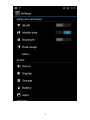
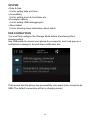
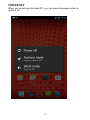
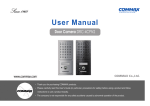
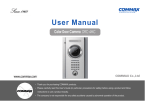
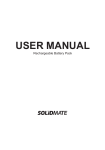
User Manual
Using this manual
Thank you for purchasing this tablet PC device. This device will provide
you with high quality tablet PC communication and entertainment based
on exceptional technology and high standards.
This user manual has been specially designed to guide you through the
functions and features of your device.
Read me first
This user manual includes important safety precautions and operation
guide. For avoiding accident, please read this manual carefully before
operating your tablet.
•
This tablet is suitable for the non-tropics.
•
Do not connect your tablet with other equipment without permission.
•
Prohibit strictly to use other specification of battery.
•
Prohibit strictly to charge battery under the Mine.
•
Do not leave your tablet in car with windows closed in hot summer.
•
Do not turn the volume too high. If you feel tinnitus, please turn down
the volume.
•
Please charge when it is at below condition.
1. Battery icon indicates no power.
2. Tablet power off automatically and power off again soon after
reboot.
•
Do not disconnect your tablet while uploading, downloading or
formatting to avoid a program error.
•
Do not disassemble your tablet by yourself. Do not use alcohol,
diluents or Benzene to clean its surface.
•
Do not use your tablet at the area where electronic devices are
forbidden, such as on flight.
•
Do not operate your tablet when driving or walking at street.
•
USB port is for data transmission and charging. (Please use the
original USB cable).
•
Do not turn off your tablet when it is connecting to PC or other device.
CONTENTS
Part 1 QUICK GUIDE ................................................................................1
INTERFACE INTRODUTION ..............................................................1
INDICATOR ICON .............................................................................3
PREPARATION .................................................................................4
TURN ON/OFF THE MACHINE .................................................4
CHARGE THE BATTERY ............................................................4
INSERT A MEMORY CARD .......................................................4
REMOVE THE MEMORY CARD.................................................5
TO INSTALL SIM .......................................................................5
CHECK RUBBER CONNECTORS ................................................5
SPECIFICATION ........................................................................5
Part 2 INSTRUCTION ................................................................................6
LOCKING / UNLOCKING SCREEN .....................................................6
GET TO KNOW THE MAIN SCREEN ..................................................7
SETTING ...........................................................................................8
SYSTEM SETTING .....................................................................8
WIRELESS&NETWORKS .........................................................10
DEVICE ...................................................................................10
PERSONAL .............................................................................10
SYSTEM ..................................................................................11
USB CONNECTION .................................................................11
POWER OFF ...................................................................................13
Part 1 QUICK GUIDE
INTERFACE INTRODUTION
1
1.Power Button:Press power button to select power off or press for 10
seconds to reset your tablet.
2.HDMI&RS232 Interface:use for Connecting RS232 or HDMI device.
3.Camera Button:use for active Camera and taking picture.
4.MIC: Used for record.
5.Shortcut key for Menu.
6.Shortcut key for Home page.
7.Shortcut key for Back.
8.Receiver:to listen to the coming call
9.Front Camera:2.0 MP
10.Charging Lamp:Indicate the charging status of battery.
11.Customization Button.
12.Volume Button:to control the volume for -.
13.Volume Button:to control the volume for +.
14.Flash for Rear Camera.
15.Rear Camera:8.0 MP.
16.DC Charging Port: DC1.0 Standard.
17.Earphone Jack: The built-in speaker will shut down automatically
when plug in the earphone.
18.Mini USB:Connect to external USB device or other mobile device.
19.Card Slot:Use for TF card.
20.Card Slot:Use for SIM card.
21.Screw Holes: Use for fixing on the Vehicle Mounts.
22.Reading Area:For reading NFC card.
23.Speaker:Left speaker and right speaker.
2
INDICATOR ICON
Icons shown on the display may vary depending on your region or service
provider.
ICON
FUNCTION
Return
Go to the opening screen
Check the running applications
WLAN connected
Auto-rotate screen
Adjust screen brightness
Notification
Setting up
Bluetooth activated
New text or multimedia message
Alarm activated
Error occurred or caution required
Battery power level
Connected to PC
3
PREPARATION
TURN ON/OFF THE MACHINE
Pressing “power button” for 3 seconds, you will see the loading screen
and then the opening screen.
Pressing “power button” for 3 seconds, you will see a power-off option
notice.
Tap “Power off” to turn off your tablet.
Notes:
• Follow all posed warnings and directions from official personal when in
areas where the use of wireless devices is restricted, such as airplanes
and hospitals.
CHARGE THE BATTERY
Before using the device for the first time, you must charge the battery. You
can charge the device with a adapter.
Notes:
1.Whenyour battery is low, the device will display a low battery
message, the battery icon will also be empty. If the battery level
becomes too low the device will automatically power off. Recharge
your battery to continue using your device.
2. If the battery is completely discharged, you cannot turn on the device,
even with the travel adapter connected. Allow a depleted battery to
charge for a few minutes before you try to turn on the device.
INSERT A MEMORY CARD
To store additional multimedia files, you can insert a memory card. Your
device accept micro SD memory card with maximum capacities of 32GB
(depending on memory card manufacturer and type).
• Insert a memory card with memory card slot.
4
REMOVE THE MEMORY CARD
Before removing a memory card, first uninstall it for safe removal.
1. In idle mode, select Applications → Settings→ Storage →Uninstall SD
card →OK.
2. Remove the memory card.
Notes: Do not remove a memory card while the device is transferring or
accessing information, as this could result in loss of data or damage to the
memory card or device.
TO INSTALL SIM
When you subscribe to cellular service, you will receive a subscriber
identity (SIM) card, with subscription details, such as your personal
identification optional services, to use network data services.
• Insert a SIM card with SIM card slot.
Notes:
Do not remove a SIM card while the device’s modem power is not turn off.
CHECK RUBBER CONNECTORS
Please make sure that all kinds of rubber connectors have been locked
tightly before using the tablet PC.
SPECIFICATION
Product Module
Brief Introduction
Chipset
Built-In OS
RAM Density
FLASH MEMORY
LCM
Touch Panel
Support
7〞Tablet PC
tri-proof
MTK6582 Quad Core 1.3GHz
Android 4.4.2
1GB DDR2
16GB
720*1280 IPS HD Panel
Multi Capacitive Touch
3G/Wi-Fi/GPS/Bluetooth
5
Camera
Battery
Connection Slot
Front: 2.0 M Pixel ; Rear: 8.0 M Pixel
Li-Polymer 9000mAh/3.7V
SIM Card / MicroSD Card / Micro USB / Mini
USB / Earphone Jack
Part 2 INSTRUCTION
LOCKING / UNLOCKING SCREEN
To operate the tablet PC, swipe the locking screen to unlock.
6
When the screen is unlocked, the camera will be accessible.
GET TO KNOW THE MAIN SCREEN
When the device is in idle mode, you will see the idle screen. The idle
screen has multiple panels, scroll left or right to a panel of the idle screen.
You can also select a dot at the bottom of the screen to move the
corresponding panel of the idle screen directly.
7
Quick
setting
Application
screen
SETTING
SYSTEM SETTING
Tap the settings icon to enter system settings.
8
9
WIRELESS&NETWORKS
• Wi-Fi
It is for setting wireless device and turning it on/off.
• Bluetooth
It is for setting Bluetooth device and turn it on /off.
• Data usage
Measured by your tablet, your carrier’s data usage accounting may
different.
• More
It includes two parts about VPN settings and Mobile networks settings.
DEVICE
• Sound
It is for setting volume, notice ring, default notification etc.
• Display
It is for setting brightness, wallpaper, auto-rotate screen, sleep and front
size.
• Storage
It is for checking the memory capacity and memory usage status.
• Battery
It is for checking battery use .
• Apps
It is for management application.
PERSONAL
• Location services
It is for setting Google’s location service、GPS satellites and Location &
Google search.
• Security
It is setting Screen lock, owner info, encrypt tablet etc
• Language & input
It is setting language, default language, personal dictionary , etc.
• Backup & reset
It is for restoring factory setting etc.
10
SYSTEM
• Date & time
It is for setting date and time.
• Accessibility
It is for setting touch & hold delay etc.
• Developer options
It is for setting USB debugging,etc.
• About tablet
It is for showing some information about tablet.
USB CONNECTION
You must first configure the Storage Mode before transferring file in
storage setting.
Use USB cable to connect your phone to a computer, and it will pop up a
notification message in the pull down notification bar.
That means that the phone has successfully connected to the computer by
USB.(The default connection will be in charging mode)
11
You can manually select the USB storage device, then it can connect to
the PC successfully.
12
POWER OFF
When you do not use the tablet PC, you can press the power button to
switch it off.
13
TROUBLE SHOOT
Your device displays network or service error messages.
When you are in areas with weak signals or poor reception, you may lose
reception, move to another area and try again.
If “?” icon displaying with 3G signal, take notice the plugging
direction for SIM card.
You cannot access some optional without a subscription, contact your
service provider for more details.
The touch screen responds slowly or improperly.
If your device has a touch screen and the touch screen is not responding
properly, try the following:
1. Remove any protective covers from the touch screen, protective
covers may prevent the device from recognizing your inputs and are
not recommended for touch screen devices.
2. Ensure that your hands are clean and dry when tapping the touch
screen.
3. Restart your device to clear any temporary software bugs.
4. Ensure that your device software is upgraded to the latest version.
5. If the touch screen is scratched or damaged, take it to your service
center.
Your device is hot to the touch.
When you use applications that require more power or use applications on
your device for an extended period of time, your device may feel hot to the
touch, this is normal and should not affect your device’s lifespan or
performance.
A connection is not established when you connect the device to a PC.
1. Ensure that the USB cable you are using is compatible with your
device.
2. Once connected properly, the charging indicator LED will be red or
green.
3. Ensure that you have the proper drivers installed and updated on
your PC.
14