1
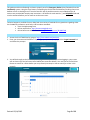
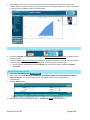
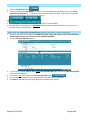
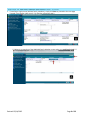
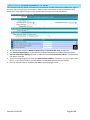
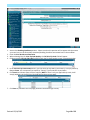
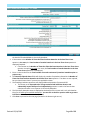
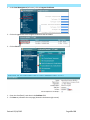
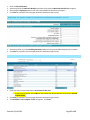
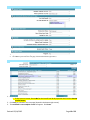
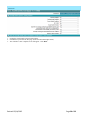
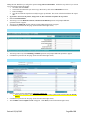
CT HMIS TLP/SHP/S+C User Manual for CaseWorthy Created by: Nutmeg Consulting Phone: Fax: Email: Web: Revised: 05/14/2015 (860) 256-4822 (866) 622-9487 [email protected] www.NutmegIT.com Page 1 of 22 Contents Overview ............................................................................................................................................................... 3 Getting CT HMIS Help and Training ....................................................................................................................... 3 Logging in to CASEWORTHY ................................................................................................................................... 3 Changing your role and/or provider in CaseWorthy .............................................................................................. 4 How to search for a client ..................................................................................................................................... 4 How to Enroll a client into a program .................................................................................................................... 5 Completing the Add client demographics form in the enroll client workflow ........................................................ 5 Completing the add family member spreadsheet Form – at entry......................................................................... 6 Completing the release of information Form – at entry......................................................................................... 7 CCEH client security exceptions FORM – at entry .................................................................................................. 8 Completing the program enrollment Add Form – At Entry .................................................................................... 8 HMIS enrollment members (Family Member program enrollment) form – At Entry.............................................. 8 Completing the veteran assessment – at entry...................................................................................................... 9 Completing the HUD universal data assessment Form – at entry .........................................................................10 Completing the Program assessment (Input) Form – at entry...............................................................................11 Completing the chronically homeless & disabling conditions assessment – at entry ............................................12 Completing the HUD Financial assessment – at entry ...........................................................................................13 Completing the HUD health insurance assessment – at entry ..............................................................................14 Completing the tlp and shp assessment - at Entry ................................................................................................14 How to exit a client or family from a program ......................................................................................................15 Completing the exit enrollment for all family members Form – at exit ................................................................15 Completing the HUD program assessment Form – at exit (copy feature) .............................................................16 Completing the hud Program assessment Form – at exit ......................................................................................16 COMPLETING THE CHRON. HOMELESS & DISABLLING CONDTIONS ASSESSMENT – AT EXIT .................................17 Completing the financial assessment – at exit ......................................................................................................17 Completing the new during program workflow ....................................................................................................18 Completing the HUD universal data assessment – during program ..................................................................18 Completing the Program assessment – during program ....................................................................................19 Completing the Income spreadsheet – during program ........................................................................................19 Completing the chronically homeless & disabling conditions assessment – during program ................................20 How to exit a client or family from a program ......................................................................................................21 Completing the exit enrollment for all family members – at exit..........................................................................21 Completing the Program assessment – at exit ......................................................................................................21 Completing the Chron. Homeless and Dis. Cond Assessment – At Exit .................................................................22 Completing the financial assessment – at exit ......................................................................................................22 Revised: 05/14/2015 Page 2 of 22 OVERVIEW This guide provides a walkthrough on how to properly enroll an Emergency Shelter client/household into the CaseWorthy system. Using the Copy Feature, Completing the Exit Enrollment Workflow, Enrolling clients into bedlists as well as checking them in are also covered. Not all possible scenarios are included and not all sections are provided with step-by-step instructions. All fields with a red asterisk (*) are REQUIRED fields and must be answered before you can move on to the next screen. GETTING CT HMIS HELP AND TRAINING Technical support is available from our Help Desk via a variety of methods for any questions regarding either the CaseWorthy software or with Policy and Procedure standards. Email: [email protected] Online request form: http://www.nutmeghelp.com/ Online Resources and Information: http://www.cthmis.com/ & HMIS FAQ LOGGING IN TO CASEWORTHY 1. Access the Live CT HMIS site by going to https://ecm.cthmis.com/cceh.ecm 2. Enter your Username and Password. If you forget your password, simply click the Forgot Password link and follow the prompts. 3. You will be brought to the CaseWorthy homepage. If this is your very first time logging in, your screen will not have any of the left menu items loaded (see screenshot below). You must use to the find client feature to search for a Client before you can proceed (view steps in How to search for a client in this manual). Revised: 05/14/2015 Page 3 of 22 4. After loading a client, your screen will populate with the selected clients record and the left menu options. (Please note that the last client you were working on/viewing will always be visible in the top left corner and their CaseWorthy ID will be visible as well). CHANGING YOUR ROLE AND/OR PROVIDER IN CASEWORTHY 1. Click on the Provider (In the example above it is the: Test Provider-Emergency Shelter) for which you will be entering data. 2. Click on the Role (Emergency Shelter (ES) example role in above screenshot). This option is only available if you are assigned more than one Role. (NOTE: Click on the words, not the arrow icon). a. You will need to complete these steps each time you need to enter data as a different Provider and/or Role. HOW TO SEARCH FOR A C LIENT 1. Click on the Find Client Button 2. Type in the client’s CaseWorthy ID number (this is the same number used in the Coordinated Access Network referral). You can also search by the other fields listed, but the CaseWorthy ID is recommended. 3. Click the Search button. 4. Review the list of possible matches carefully. Click on their name to load the record. Revised: 05/14/2015 Page 4 of 22 HOW TO ENROLL A CLIEN T INTO A PROGRAM 1. Click the Enroll Client button. 2. Choose the appropriate PROGRAM from the list. In the example below, you would click on the “Enroll Supportive Housing Client.” ***What you see here should match your Role. If your Role is Transitional Living you will see Enroll Transitional Living Client.*** 3. This will begin the Enroll Client workflow (which opens in a new window). 4. All fields with a red asterisk (*) are REQUIRED fields and must be answered before you can move on to the next screen in this workflow. COMPLETING THE ADD CLIENT DEMOGRAPHICS FORM IN THE ENROLL CLIENT WORKFLOW 1. Search for the client by entering their CaseWorthy ID (this is the same number used in the Coordinated Access Network referral). You can also search by Name/SSN/DOB. 2. Click the Check for Duplicates button. 3. If your client is listed, click on their name and document their ID. The client’s Basic Demographic information will populate. 4. If the client is not listed, client on the This is a new client button . 5. For new client’s, complete all of the required fields (indicated by the red asterisk). 6. Click Save to proceed to the next page (located in the bottom right corner). Revised: 05/14/2015 Page 5 of 22 COMPLETING THE ADD FAMILY MEMBER SPREADSHEET FORM – AT ENTRY 1. If enrolling a single person (without family members), simply click Save to proceed to the next page (located in the bottom right corner). For families, proceed to step 2. ***Below is a screenshot of the HMIS Add Family Member screen when you scroll to the right.*** Revised: 05/14/2015 Page 6 of 22 ***Below is a screenshot of the HMIS Add Family Member Spreadsheet AFTER clicking on Check for Duplicates. *** 2. If enrolling a family, complete the following steps: a. Click Add Row to enter additional family members (do this for each family member you need to add). Add all family members BEFORE clicking the Save button!! b. Check for Duplicates is required (*) for each additional family member. If no matches are found, you must click the “This is a new client” button to proceed. 3. Click Save to proceed to the next page (located in the bottom right corner). COMPLETING THE RELEASE OF INFORMATI ON FORM – AT ENTRY 1. Enter the Section I: Release Share Status designated by the client. 2. Enter the Release Start Date and the Release End Date o NOTE: The standard release period for CT is 2 years. 3. Choose “Yes” or “No” for: o Witness (case manager/staff) has signed Release. o Client has signed Release. 4. Click Save to proceed to the next page (located in the bottom right corner). Revised: 05/14/2015 Page 7 of 22 CCEH CLIENT SECURITY EXCE PTIONS FORM – AT ENTRY This screen will only appear if the Section I Release Share status is an option that includes exceptions. If the client Refused or agreed to a Full data share, this screen will not appear. 1. Enter the Start and End dates for the ROI. 2. Click on the bubble next to an agency to select it (it will turn blue). 3. Click Save to proceed to the next page (located in the bottom right corner). COMPLETING THE PROGRAM ENROLLMENT ADD FORM – AT ENTRY 1. Enter the client/family’s Program Entry Date. This is the Admission/Start date for your program. 2. Select the program that client/family is being enrolled into. 3. You can also click on the Assign Case Manager box to view the list of Case Managers assigned to your agency in CaseWorthy. 4. Click Save to proceed to the next page (located in the bottom right corner). HMIS ENROLLMENT MEMBERS (FAMILY MEMBER PROGR AM ENROLLMENT) FORM – AT ENTRY If enrolling a Single person (not in a family) simply click Save to proceed to the next page. 1. Click the bubble next to family member’s names to include them in the program enrollment and the rest of this workflow. Their bubbles will turn blue. 2. Make sure to change the Begin Date to the correct date! 3. Click Save to proceed to the next page (located in the bottom right corner). Revised: 05/14/2015 Page 8 of 22 COMPLETING THE VETERAN ASSESSMENT – AT ENTRY This assessment will only appear if Vet Status is Yes (located on the Basic Demographics/Add Client page). If the client you are enrolling has assessments in HMIS, you will see an option to copy all assessment data. Please refer to the table of contents in this manual to get the steps to use the copy feature. 1. All data elements except for Months of Active Duty and Served in War Zone are required. 2. The Theatre of Operations list is populated by the Date Entered Service and Date Separated Service. 3. Veteran Address Data Quality will show an additional field of Last Permanent Address if answered with Full address reported. 4. Click on the magnifying glass to enter the Last Permanent Address. If Unknown, you can choose it from the list. If the client provides it, you will need to click Add New and enter the new address. 5. Once all required fields are complete click Save in the bottom right corner. Revised: 05/14/2015 Page 9 of 22 COMPLETING THE HUD UNIVERSAL DATA ASSES SMENT FORM – AT ENTRY 1. Answer the Disabling Condition question. Please note that this question will re-appear with the answer you enter here, on the Chronically Homeless/Disabling Condition assessment later in the workflow. 2. Enter the Prior Residence Information 3. When selecting FULL for Prior Zip Code Quality, the Full Prior Zip Code field will appear. 4. Clicking into the Full Prior Zip Code field will launch the Zip Code Lookup screen in a pop-up window. 5. In the Full Prior Zip Code Lookup screen, you can enter the zip code (if you know it), or simply search by City and State. It is not necessary to search by “County” if you know the city and state. 6. Click Search and choose from the list of options (NOTE: If there’s only one applicable zip code, it will simply populate it in the Full Prior Zip Code field on the previous page). 7. Click Save to proceed to the next page (located in the bottom right corner). Revised: 05/14/2015 Page 10 of 22 COMPLETING THE PROGRAM ASSESSMENT (INPUT) FORM – AT ENTRY 1. The questions that you see on this page will vary based on the answers a client provides, which may trigger follow up questions. Example: When you answer YES to the Domestic Violence question, the When experience occurred question will appear. If you answer No to the DV question, there is not an additional question to answer. 2. If you answer YES to the Non-Cash Benefits question, the Non Cash Benefits List field will appear. You must click on choose options to view the list. Click the boxes of the applicable Non Cash Benefit the person has. This list will allow multiple selections if a person has more than one. If you select one accidentally, you can simply click on it to remove it from the list. You must click Add Selected after checking the box of the applicable benefit. 3. Answering YES to the Health Insurance question will allow the Health Insurance Assessment to show later in the workflow. This assessment will not appear if the answer to this question is NO. 4. Answering YES to the Employed question will display the Employment Type/Number of hours worked in the past week/Name of Employment questions. o If you answer NO to the Employed question, an additional question of Why Not Employed will appear. 5. Answer the General Health Status question. 6. The Pregnancy Status field will only appear for Female clients. If answered YES, the Due Date field is required. 7. The Education questions for an adult are School Status/Last Grade Completed/Received Vocational training or apprenticeship certificates. o If you are enrolling any children with the family, you will see an additional section: Child Education (see screenshot below) when you start entering data for that child in the workflow. 8. Click Save to proceed to the next page (located in the bottom right corner). Revised: 05/14/2015 Page 11 of 22 COMPLETING THE CHRON ICALLY HOMELESS & DI SABLING CONDITIONS ASSESSMENT – AT ENTRY 1. Most of the questions in this section are included in the formula used to calculated whether or not the Head of Household/Adult is chronically homeless. 2. If the answer to the Number of Times the Client has been Homeless in the Past Three Years question is 4 or more, the Total number of months homeless in the Past Three Years question is displayed/required. a. If the answer to the Number of Times the Client has been Homeless in the Past Three Years question is anything less than 4 or more, the Total number of months homeless in the Past Three Years question is not displayed. 3. Enter a numeric value for the Total number of months continuously homeless immediate prior to project entry. 4. The Homeless Episode Dates fields will display the number of episodes indicated in the Number of Times the Client has been Homeless in the Past Three Years question. The dates are not required, but you should enter them if a person has supplied the dates. 5. The Disabling Conditions questions will display additional questions if answered YES. a. The answer to the Expected to be of long-continued and indefinite duration and substantially impairs ability to live independently question is used in the formula that calculates whether or not a person is Chronically Homeless. 6. The Chronically Homeless status is displayed at the bottom of the screen and is only calculated at Entry for all Heads of Households and Adults. You can click on the blue question mark to get more information about how CH status is calculated. 7. Click Save to proceed to the next page (located in the bottom right corner). Revised: 05/14/2015 Page 12 of 22 COMPLETING THE HUD FINANCIAL ASSESSMENT – AT ENTRY 1. Choose an option for Area Median Income. If entering a new client, choose CT 2014 SMI & Fed Poverty Tables. For clients that entered prior to 2014, you can choose the United States 2012 option. 2. Answer the Income from Any Source question. a. If Yes than choose an Income Type from the list and follow the steps (3-5) below. b. If they have no income, answer No and click on the Save No Income button (bottom right corner). 3. Choose an Income Type from the list by clicking on the bubble next to the correct type. Multiple Income Types can be chosen from the list. 4. Choose the Interval (Daily/Weekly/Monthly etc.) 5. Enter the Amount. 6. Click Save to proceed to the next assessment. Revised: 05/14/2015 Page 13 of 22 COMPLETING THE HUD HEALTH INSURANCE ASSESSMENT – AT ENTRY 1. A Yes or No answer is required for all of the Health Insurance Types listed. a. The If “No” Reason question is not required, but you should enter it if the person supplied the information. COMPLETING THE TLP AND SHP ASSESSMENT - AT ENTRY NOTE: If you are enrolling a family, at this point you will repeat the above workflow for each family member. If you refer to the left side of the screen, you will see where you are in the workflow process. The star icon indicates which form you are on and the person that has the star under their name is the person you are entering data for. 1. Click Done to proceed to the next page (located in the bottom right corner). 2. The workflow is now complete screen will appear. Click Done. Revised: 05/14/2015 Page 14 of 22 HOW TO EXIT A CLIENT OR FAMILY F ROM A PROGRAM 1. Under Case Management (left menu), click on Program Enrollment. 2. Click on the gear next to the Program Enrollment that has ended. 3. Click on Exit Enrollment for ALL Family Members. This will launch the Exit workflow. COMPLETING THE EXIT ENROLLMENT FOR ALL FAMILY MEMBERS FORM – AT EXIT 1. Enter the client/family’s exit date in the End Date field. 2. Click Save to proceed to the next page (located in the bottom right corner). Revised: 05/14/2015 Page 15 of 22 COMPLETING THE HUD PROGRAM ASSESSMENT FORM – AT EXIT (COPY FEATURE) During the Exit Workflow you will get the option to Copy All Assessment Data. Follow the steps below if you want to copy an assessment using this feature. 1. Click Yes, then click Done. 2. Choose the assessment that you want to copy data from by click on the radio button next to it. 3. Then click Copy. 4. Once the Assessments copied successfully box pops up click Ok. The screen will refresh and show the copied data. If you don’t want to use the feature, simply click No, then click Done. COMPLETING THE HUD PROGRAM ASSESSMENT FORM – AT EXIT Revised: 05/14/2015 Page 16 of 22 1. 2. 3. 4. Enter the Exit Destination. Answering YES to the Non-Cash Benefits questions will prompt the Non Cash Benefits List to appear. Answering the Employed question will also prompt additional question(s) to appear. Click Save to proceed to the next page (located in the bottom right corner). COMPLETING THE CHRON. HOMELESS & DISABLLING CONDTIONS ASSESSMENT – AT EXIT 1. Answering YES to any of the Disabling Conditions questions will prompt additional questions to appear. 2. Click Save to proceed to the next page (located in the bottom right corner). COMPLETING THE FINANCIAL ASSESSMENT – AT EXIT 1. Enter the client’s Income Information at the time of their exit. o If they have no income, Choose No for the Income Last 30 days question and click the Save No Income button. 2. Click Save to proceed to the next page (located in the bottom right corner). 3. The workflow is now complete screen will appear. Click Done. Revised: 05/14/2015 Page 17 of 22 COMPLETING THE NEW D URING PROGRAM WORKFLOW 1. 2. 3. Click on the gear next to the Program Enrollment that needs to be updated. Click on New “During Program” Assessment. Click on the assessment date that is displayed, then click on Edit Date/Restriction 4. 5. Change the date to the date of the assessment you are entering and click Save. Answer all required questions in the “New during Program Workflow”. Some assessments will not be displayed because they are only required at Entry or at Exit. COMPLETING THE HUD UNIVERSAL DATA ASSESSMENT – DURING PROGRAM 1. 2. Enter the client/family’s current Housing Status. Click Save to proceed to the next page (located in the bottom right corner). Revised: 05/14/2015 Page 18 of 22 COMPLETING THE PROGR AM ASSESSMENT – DURING PROGRAM 1. 2. Update the client/family’s Program Assessment. Click Save to proceed to the next page (located in the bottom right corner). COMPLETING THE INCOM E SPREADSHEET – DURING PROGRAM 1. Enter the client’s Income Information at the time of the update. o If they have no income, Choose No for the Income Last 30 days question and click the Save No Income button. 2. Click Save to proceed to the next page (located in the bottom right corner). 3. The workflow is now complete screen will appear. Click Done. Revised: 05/14/2015 Page 19 of 22 COMPLETING THE CHRON ICALLY HOMELESS & DI SABLING CONDITIONS ASSESSMENT – DURING PROGRAM 1. 2. 3. Update the client/family’s Program Assessment. Click Save to proceed to the next page (located in the bottom right corner). The workflow is now complete screen will appear. Click Done. Revised: 05/14/2015 Page 20 of 22 HOW TO EXIT A CLIENT OR FAMILY FROM A PRO GRAM 1. 2. 3. 4. 5. 6. Under Case Management (left menu), Click on Program Enrollment. Click on the gear next to the Program Enrollment that has ended. Click on Exit Enrollment for ALL Family Members (if applicable). If only one or some members of the family are leaving, refer to the 11.2. Exiting a family member (when the HoH and other members stay) page in the HMIS FAQ Knowledge Book. Update the client/family’s Assessment. Click Save to proceed to the next page (located in the bottom right corner). COMPLETING THE EXIT ENROLLMENT FOR ALL F AMILY MEMBERS – AT EXIT 1. 2. 3. Enter the client or family’s Exit date in the End Date field. Click Save to proceed to the next page (located in the bottom right corner). Click the box for Exit Case Assignment for Case Manager if you assigned a Case Manager to the client/family. COMPLETING THE PROGR AM ASSESSMENT – AT EXIT Revised: 05/14/2015 Page 21 of 22 During the Exit Workflow you will get the option to Copy All Assessment Data. Follow the steps below if you want to copy an assessment using this feature. 1. Click Yes, then click Done. 2. Choose the assessment that you want to copy data from by click on the radio button next to it. 3. Then click Copy. 4. Once the Assessments copied successfully box pops up click Ok. The screen will refresh and show the copied data. If you don’t want to use the feature, simply click No, then click Done and follow the steps below. Enter the Exit Destination Answering Yes to the Domestic Violence, and Non-Cash Benefits questions will prompt additional questions/choices to appear. Answering the Employed question will also prompt additional questions to appear. Click Save to proceed to the next page (located in the bottom right corner). COMPLETING THE CHRON. HOMELESS AND DIS. COND ASSESS MENT – AT EXIT 1. 2. Answering YES to any of the Disabling Conditions questions will prompt additional questions to appear. Click Save to proceed to the next page (located in the bottom right corner). COMPLETING THE FINANCIAL ASSESSMENT – AT EXIT 1. 2. 3. Enter the client’s Income Information at the time of their exit. o If they have no income, Choose No for the Income Last 30 days question and click the Save No Income button. Click Save to proceed to the next page (located in the bottom right corner). The workflow is now complete screen will appear. Click Done (located in the bottom right corner). Revised: 05/14/2015 Page 22 of 22