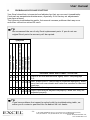
1
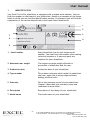
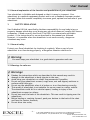
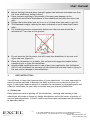
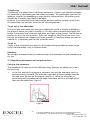
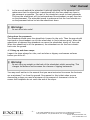
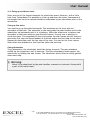
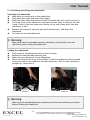
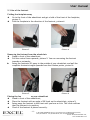
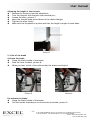
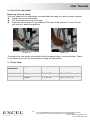
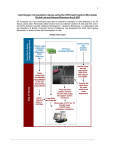
User manual YOU AND/OR YOUR ATTENDANT MUST READ AND FULLY UNDERSTAND THIS MANUAL BEFORE USE. General Information You have just purchased a wheelchair from Van Os Medical UK Ltd. We want to thank you for your confidence in our Excel products. The wheelchair is a quality product. The policy of Van Os Medical UK Ltd. is to continuously improve the quality and reliability of our products. We reserve the right, therefore, without proper notification, to alter this guide. It is important that you read this manual carefully. The manual contains important information on the safe use and maintenance of your manual wheelchair. We recommend that you keep this manual, it is also your proof of warranty and it can come in useful later. The safety instructions in this guide are general guidelines that should be seen as broad guidelines. Your new wheelchair requires frequent maintenance much of which you can do yourself. We want you to take your wheelchair once a year to be inspected by an expert. Caution! In this guide you will find informative notes and warnings. These are clearly identified by the symbols and the appearance of the text. Tip Information. Warning To avoid personal injury, follow the instructions. ~1~ © 2013 VAN OS MEDICAL UK Ltd., Excel House, Escrick Business Park, Escrick, York,YO19 6FD Tel. +44-(0)1904-720170, Fax +44-(0)1904-720398, E-mail: [email protected], www.vanosmedical.com User manual Enter the information from your authorized dealer: Company : ………………………………………………………………… Address: ………………………………………………………………… ………………………………………………………………… Telephone number: ………………………………………………………………… Fax number: ………………………………………………………………… Emailadress: ………………………………………………………………… Website: ………………………………………………………………… ~2~ © 2013 VAN OS MEDICAL UK Ltd., Excel House, Escrick Business Park, Escrick, York,YO19 6FD Tel. +44-(0)1904-720170, Fax +44-(0)1904-720398, E-mail: [email protected], www.vanosmedical.com User manual 1 INDENTIFICATION ........................................................................................................................ 4 2 GENERAL EXPLANATION OF YOUR WHEELCHAIR........................................................................... 5 2.1 COMPONENTS OF THE WHEELCHAIR ............................................................................................................. 5 2.2 GENERAL EXPLANATION OF THE FUNCTION AND POSSIBILITIES OF YOUR WHEELCHAIR ............................................. 6 3 SAFFETY REGULATIONS ................................................................................................................ 6 3.1 GENERAL SAFETY...................................................................................................................................... 6 3.2 WARNINGS FOR SAFE USE .......................................................................................................................... 6 4 USER INSTRUCTIONS .................................................................................................................... 7 4.1 SAFETY TIPS ............................................................................................................................................ 7 4.2 NEGOTIATING PAVEMENTS AND UNEQUAL SURFACES ...................................................................................... 8 4.3 GOING UP AND DOWN RAMPS .................................................................................................................... 9 4.4 GOING UP AND DOWN STAIRS .................................................................................................................. 10 5 INSTRUCTIONS FOR USE AND MOUNTING OPTIONS ................................................................... 11 5.1 TECHNICAL INFORMATION ....................................................................................................................... 11 5.2 UNFOLDING AND FOLDING THE WHEELCHAIR ............................................................................................... 12 5.3 USE OF THE FOOTREST ............................................................................................................................ 13 5.4 USE OF THE BRAKE ................................................................................................................................. 14 5.5 USING THE ARMRESTS ............................................................................................................................. 15 5.6 USE OF THE REAR WHEEL ......................................................................................................................... 16 5.7 TYRES TABLE ......................................................................................................................................... 16 5.8 USE OF THE FOLDING BACKREST ................................................................................................................ 17 5.9 USE OF ACCESSORIES AND OTHER OPTIONS OF YOUR WHEELCHAIR ................................................................... 18 6 TRANSPORT AND TRANSIT IN CAR .............................................................................................. 20 6.1 DE-ASSEMBLY ....................................................................................................................................... 20 6.2 ASSEMBLY ............................................................................................................................................ 20 7 MAITENANCE ............................................................................................................................. 21 7.1 TYRES .................................................................................................................................................. 21 7.2 BRAKES ................................................................................................................................................ 21 7.3 CROSS FRAME ....................................................................................................................................... 22 7.4 REAR WHEELS ........................................................................................................................................ 22 7.5 FRONT WHEEL AND FRONT CASTOR FORK .................................................................................................... 22 7.6 UPHOLSTERY ......................................................................................................................................... 22 7.7 CLEANING............................................................................................................................................. 23 8 PROBLEM ANYLYSIS AND SOLUTIONS ......................................................................................... 24 9 WARRANTY ................................................................................................................................ 25 9.1 WARRANTY APPLICATION ........................................................................................................................ 25 9.2 WARRANTY DEFINITION ........................................................................................................................... 25 10 SERVICE AND MAINTENANCE ..................................................................................................... 27 10.1 GENERAL MAINTENANCE INSTRUCTIONS ................................................................................................... 27 10.2 SERVICE CHECKLIST ............................................................................................................................... 29 ~3~ © 2013 VAN OS MEDICAL UK Ltd., Excel House, Escrick Business Park, Escrick, York,YO19 6FD Tel. +44-(0)1904-720170, Fax +44-(0)1904-720398, E-mail: [email protected], www.vanosmedical.com User manual 1 INDENTIFICATION Your Excel G-Lite Pro wheelchair is equipped with a unique serial number. You can find this number on the frame of your wheelchair. Below is an example of the frame label on which you can find the identification number. Furthermore you will find the explanation of the various data stored on the frame label listed below. 1 2 3 7 6 4 5 1. Serial number Every wheelchair has its own unique serial number. You must have this number when making technical requests or if warranty parts are required for your wheelchair. 2. Maximum user weight The largest occupant weight allowed for protection of wheelchair and the user. 3. Production date Production date of your wheelchair. 4. Type number This number indicates which model of wheelchair you have, again this is always required when making technical calls. 5. Warranty This is the warranty period of your wheelchair. Chapter 9 describes your warranty terms and conditions in more detail. 6. Description Description of the design of your wheelchair. 7. Model name The model name of your wheelchair. ~4~ © 2013 VAN OS MEDICAL UK Ltd., Excel House, Escrick Business Park, Escrick, York,YO19 6FD Tel. +44-(0)1904-720170, Fax +44-(0)1904-720398, E-mail: [email protected], www.vanosmedical.com User manual 2 GENERAL EXPLANATION OF YOUR WHEELCHAIR 2.1 Components of the wheelchair 16 1 15 2 14 3 13 4 12 5 11 6 10 7 9 8 1 2 3 4 5 6 7 8 Backrest pad flip over Height adjustable armrest Seat pad flip on Footrest Cross frame Heel strap Footplate Front wheel 9 10 11 12 13 14 15 16 Front castor Bearing house Stepper Brake Hand rim Rear wheel Fixation lever for fordable backrest Push handle Your wheelchair is equipped with a number of elements and parts. You should know these before continue reading this manual. Designs and specifications may change without prior notice. ~5~ © 2013 VAN OS MEDICAL UK Ltd., Excel House, Escrick Business Park, Escrick, York,YO19 6FD Tel. +44-(0)1904-720170, Fax +44-(0)1904-720398, E-mail: [email protected], www.vanosmedical.com User manual 2.2 General explanation of the function and possibilities of your wheelchair Your wheelchair is foldable and designed so that it is easy to transport. Your wheelchair is a medical equipment product and is not a standard consumer product. You must follow this manual completely to ensure good, optimal and safe use of your wheelchair. 3 SAFFETY REGULATIONS Van Os Medical UK Ltd. specifically disclaims responsibility for any body injury or property damage which may occur during any use which does not comply with laws or ordinances. If used correctly the Excel G-lite PRO is an utmost safe and stable product, if the instructions for use as described in this manual are followed. However, it is possible when the wheelchair is not used correctly, dangerous situations may occur. 3.1 General safety Protect your Excel wheelchair by checking it regularly. When a part of your wheelchair is not functioning properly, a dangerous situation could occur. Warning: You must keep your wheelchair in a good state to guarantee safe use. 3.2 Warnings for safe use Warnings: Disobey the instructions which are described in this manual may result in damage to the wheelchair or body injuries to the user; Avoid using your wheelchair on roads. Use pavements if possible; Do not use your wheelchair on sand, rough area, wet and slippery surfaces or surfaces with little grip; Do not use the wheelchair when it is broken or is not functioning correctly; This model of wheelchair is not suitable for use as a seat in a motor vehicle. The wheelchair could fail in a vehicle impact, leading to injury of the wheelchair occupant or others; Do not lean over the back of the wheelchair. This can result in tipping over the wheelchair; Before leaning or reaching forward, push your bottom to the back of the chair and face the castors forwards; Do not drive into curbs; ~6~ © 2013 VAN OS MEDICAL UK Ltd., Excel House, Escrick Business Park, Escrick, York,YO19 6FD Tel. +44-(0)1904-720170, Fax +44-(0)1904-720398, E-mail: [email protected], www.vanosmedical.com User manual Before leaning forwards place yourself against the backrest and make sure that the front wheels are facing forward; Never connect anything to the wheels, this may cause damage to the wheelchair and effects the balance of the wheelchair and may also injure the user; Engage the brakes when you are in or on a lift and when you want to get off; The maximum weight capacity has been indicated on your wheelchair frame label; For suitable protection of potential obstruction the footrests should be a minimum of 7 cm clear of the ground; Figure 1 4 Do not stand on the footrests, this will cause the wheelchair to tip over and injure the user (figure 1); Place the wheelchair on a stable, flat surface and engage the brakes before transferring to or from the wheelchair; Unauthorized modification and or use of parts not supplied by Van Os Medical UK Ltd. will invalidate the warranty of this wheelchair and may lead to injury to the user and or damage to the wheelchair. USER INSTRUCTIONS You will have to learn the characteristics of your wheelchair. It is most important to learn the safest methods to develop the daily activities in accordance to your life style. Consult your medical advisor or therapist for assistance by developing safe and effective techniques for your daily activities and your physical possibilities. 4.1 Safety tips Daily operations such as getting off the wheelchair, reaching and bending in the wheelchair will cause a change of weight distribution and in the center of gravity of you and your wheelchair. You will need to perform these movements and techniques as described below. ~7~ © 2013 VAN OS MEDICAL UK Ltd., Excel House, Escrick Business Park, Escrick, York,YO19 6FD Tel. +44-(0)1904-720170, Fax +44-(0)1904-720398, E-mail: [email protected], www.vanosmedical.com User manual Transferring Transferring in a wheelchair is a difficult manoeuvre. Consult your physical therapist for assistance in developing your individual technique. The possibilities you have for making a transfer are depending on your physical characteristics. We advise you to discuss this first with your physical therapist. However if you have sufficient body strength and you want to transfer to and from the wheelchair can you best do this in the following manner: To get out of the wheelchair: First of all you must make sure that your wheelchair stands as closely as possible to the place of where you wish to transfer to. Put the castors forward and engage the brakes. Swing away the footplates and place your feet on the ground. You are now in position to carry out the operation. Shift your weight to the front of the chair, you can use the armrests as a support and move yourself to the place where you wish to transfer to. If necessary you can use a transfer board. To get in: To get in your wheelchair you need to do the same things as when you want to get out of the wheelchair, only in reversed order. Reaching: We strongly recommend that you seek the help of an attendant to pick something up for you. 4.2 Negotiating pavements and unequal surfaces Going up the pavement: The attendant can help you in two different ways, however we advise you to do it the first way. 1. In the first method for going up a pavement you and the attendant reach to pavement facing forward. The attendant must pull the push handles towards him and place his foot on the stepper (see §2.1). When the attendant is performing both procedures at the same time there will be a leverage effect that tips the wheelchair, figure 2. Figure 2 ~8~ © 2013 VAN OS MEDICAL UK Ltd., Excel House, Escrick Business Park, Escrick, York,YO19 6FD Tel. +44-(0)1904-720170, Fax +44-(0)1904-720398, E-mail: [email protected], www.vanosmedical.com User manual 2. In the second method the attendant is already standing on the pavement and makes sure that the wheelchair is positioned with the rear wheels as close to the pavement as possible. The user of the wheelchair needs to lean backwards. This way the wheelchair will tip backwards and the attendant can pull the chair on the pavement. The attendant needs to make sure that the front wheels are on the pavement before he lets the wheelchair down. Warnings: Do not drive into curbs! Going down the pavement: The attendant should move the wheelchair forward to the curb. Then the user should lean back so the attendant can tilt the wheelchair to find a balance point. When the wheelchair is balanced the attendant can move the wheelchair slowly off the curb. When the wheelchair is off the pavement, the attendant can let the front wheels back onto the ground. 4.3 Going up and down ramps Inspect the slope always for risks, such as holes or slippery and uneven surfaces before you drive off. Warning: Do not carry any weight on the back of the wheelchair whilst ascending. This changes the balance and increases the chances of tipping backwards. You may recall earlier in the manual that you were instructed to ensure the footrests are a minimum 7 cm from the ground. One reason for this is that when you are descending a slope you need a minimum of this amount of clearance in order to ensure the footplates do not catch the end of the slope. ~9~ © 2013 VAN OS MEDICAL UK Ltd., Excel House, Escrick Business Park, Escrick, York,YO19 6FD Tel. +44-(0)1904-720170, Fax +44-(0)1904-720398, E-mail: [email protected], www.vanosmedical.com User manual 4.4 Going up and down stairs Stairs are one of the largest obstacles for wheelchair users. However, with a little help from 2 attendants it is possible to climb up and down the stairs. Assessment of the weight that has to be moved should be undertaken by the attendants prior to this manoeuvre. Going up the stairs You need to go up the stairs backwards. One attendant at the front and one attendant at the back. The attendant at the back grabs the push handles and let the wheelchair tip backwards until it is in balance. When the wheels are in balance the attendant at the front needs to grab the side frames. You are now in position to climb the stairs. The attendant on the front pushes the side frames up until they are above the first step and the attendant at the back makes the first step on the stairs. Repeat this technique until the last step of the stair. You can let the front castors down when the attendant at the front has taken the last step. Going downstairs To go downstairs, the wheelchair should be facing forwards. The rear attendant should tip the wheelchair until it balances. The front attendant should support the wheelchair by holding the side frames. The wheelchair should then be slowly guided down each step. Warning: Never lift a wheelchair by the push handles, armrests or footrests. Always hold a part of the main frame. ~ 10 ~ © 2013 VAN OS MEDICAL UK Ltd., Excel House, Escrick Business Park, Escrick, York,YO19 6FD Tel. +44-(0)1904-720170, Fax +44-(0)1904-720398, E-mail: [email protected], www.vanosmedical.com User manual MAKING ADJUSTMENTS TO YOUR WHEELCHAIR CAN CAUSE BIG RISKS FOR YOUR SAFETY AND THE FUNCTION OF YOUR WHEELCHAIR. ADJUSTMENTS MADE BY YOURSELF ARE STRONGLY ADVISED AGAINST AND CARRIED OUT AT YOUR OWN RISK. 5 INSTRUCTIONS FOR USE AND MOUNTING OPTIONS In this chapter we will explore all the possibilities that you have with your wheelchair. All setting and user instructions, such as the removal of the footrest, will be discussed. Your wheelchair is a Excel G-Lite Pro 5.1 Technical information Excel G-Lite Pro Seat width Seat depth Seat height Backrest height Total width Total length Total height Width (folded) Armrest height (Adjustable) Weight (complete) Maximum user weight ~ 11 ~ 40, 45 en 50 cm 42 cm 54 cm 42 cm Seat width + 15 cm 108 cm (incl footrest) 95 cm 30 cm 16 cm 12 kg 113 kg © 2013 VAN OS MEDICAL UK Ltd., Excel House, Escrick Business Park, Escrick, York,YO19 6FD Tel. +44-(0)1904-720170, Fax +44-(0)1904-720398, E-mail: [email protected], www.vanosmedical.com User manual 5.2 Unfolding and folding the wheelchair Unfolding the wheelchair Make sure you stand next to the wheelchair; Grab both seat tubes and move them apart; Push both seat tubes downwards so that the wheelchair will unfold, picture 1; Go to the front of the wheelchair and push the seat tubes in place of the side frame. Check if the seat tubes are directly on the side frame and if the seat upholstery is flat; Replace the seat pad, backrest pad and footrests back, fold down the footplates; You can now use the wheelchair. Warning: Make sure that the extended backrest upholstery is attached to the seat upholstery before using the wheelchair. Folding the wheelchair Fold away the footplates and remove the footrests; Remove the seat pad and backrest pad; Make sure you stand next to the wheelchair; Place one hand at the front in the middle of the seat upholstery and one hand at the rear side in the middle of the seat upholstery. Pull the seat upholstery straight up, see picture 2. Picture 1 Picture 2 Warning: Make sure the extended backrest upholstery and the seat upholstery is loosen before folding the wheelchair. ~ 12 ~ © 2013 VAN OS MEDICAL UK Ltd., Excel House, Escrick Business Park, Escrick, York,YO19 6FD Tel. +44-(0)1904-720170, Fax +44-(0)1904-720398, E-mail: [email protected], www.vanosmedical.com User manual 5.3 Use of the footrest Folding the footplate away Go to the front of the wheelchair and get a hold of the front of the footplate, picture 3; Fold the footplate in the direction of the footrest, picture 4. Picture 3 Picture 4 Removing the footrest from the wheelchair Stand in front of the wheelchair; Pull the control lever upwards, picture 5. You can now swing the footrest inwards or outwards; Swing the footrests 90ᵒ away to the outside of your wheelchair and pull the complete footrest straight upwards from the fixation points, picture 6. Picture 5 Picture 6 Placing the footrest back on your wheelchair Stand in front of the wheelchair; Place the footrest with an angle of 90ᵒ back on the wheelchair, picture 5; Swing away the footrest to the front until you hear a click. This click confirms that the footrest is in position; Check if the footrest is placed correctly. ~ 13 ~ © 2013 VAN OS MEDICAL UK Ltd., Excel House, Escrick Business Park, Escrick, York,YO19 6FD Tel. +44-(0)1904-720170, Fax +44-(0)1904-720398, E-mail: [email protected], www.vanosmedical.com User manual Adjusting the height of the footrest Remove the footrest from the wheelchair; Turn the footrest with the back side towards you; Loosen the allen, picture 7; Move the footrest tube up and down to the desired height; Tighten the allen firmly; Make sure the footplate is in place and that the length is equal on both sides. Picture 7 5.4 Use of the brake Activate the brake Grasp the black handle of the brake; Push the lever forward, picture 8; When you hear a click, this confirms that the brake is activated. Picture 8 Picture 9 De-activate the brake Grasp the black handle of the brake; Pull the handle towards you to de-activate the brake, picture 9. ~ 14 ~ © 2013 VAN OS MEDICAL UK Ltd., Excel House, Escrick Business Park, Escrick, York,YO19 6FD Tel. +44-(0)1904-720170, Fax +44-(0)1904-720398, E-mail: [email protected], www.vanosmedical.com User manual 5.5 Using the armrests Adjusting the height of the armrest Push the knob to unlock the armrest, picture 10 and 11; Move the armrest up or downwards to the desired height; Release the knob to lock the armrest; Check if the arm pad is correctly locked by moving it up or downwards, when the arm pad can not be moved it is locked correctly. Picture 10 Picture 11 Warning: When you are not driving in the wheelchair you can fold down the arm pads. While driving the wheelchair we strongly advice you to the place the armrest in the highest position. ~ 15 ~ © 2013 VAN OS MEDICAL UK Ltd., Excel House, Escrick Business Park, Escrick, York,YO19 6FD Tel. +44-(0)1904-720170, Fax +44-(0)1904-720398, E-mail: [email protected], www.vanosmedical.com User manual 5.6 Use of the rear wheel Removing the rear wheel The rear wheels of the wheelchair are removable by using the 'quick-release’ system: Stand next to the wheelchair; Tilt the wheelchair away from you; Press the black button in the middle of the rear wheel (picture 12 and 13) and pull the rear wheel towards you. Picture 12 Picture 13 To replace the rear wheel you should follow the above steps in reversed order. Check if the wheels are correctly locked before using the wheelchair. 5.7 Tyres table Model wheelchair Type wheelchair Size tyres (Front) Size tyres (Rear) Excel G-Lite Pro Self propel 7" x 1¼" PU 24" x 1⅜” PU Excel G-Lite Pro Transit 7" x 1¼ PU 12½" x 2¼” PU ~ 16 ~ © 2013 VAN OS MEDICAL UK Ltd., Excel House, Escrick Business Park, Escrick, York,YO19 6FD Tel. +44-(0)1904-720170, Fax +44-(0)1904-720398, E-mail: [email protected], www.vanosmedical.com User manual 5.8 Use of the folding backrest The folding backrest To lower the height of the wheelchair for transporting you can fold down the backrest in the following way: Stand behind the wheelchair; Squeeze both black levers at the back of the wheelchair, picture 14 at the same time to fold down the backrest; The folding mechanism is now unlocked, you can fold down the backrest, see picture 15. Picture 14 Picture 15 Make sure the backrest is straight up before taking place in the wheelchair; To put the backrest straight up you should follow the above steps in reversed order. ~ 17 ~ © 2013 VAN OS MEDICAL UK Ltd., Excel House, Escrick Business Park, Escrick, York,YO19 6FD Tel. +44-(0)1904-720170, Fax +44-(0)1904-720398, E-mail: [email protected], www.vanosmedical.com User manual 5.9 Use of accessories and other options of your wheelchair The safety belt (option) Your wheelchair is equipped with a seat belt which you can use the following way: When you are in the wheelchair you can fasten the belt by clicking the two loose ends together, picture 16; If the belt is too loose or too tight you can make it more secure by pulling the short loose strap. If you wish to loosen the safety belt you should pull the long loose strap, picture 17; To release the seat belt, you press on the black sides to unlock system. Picture 16 Picture 17 Use of the backrest pad flip over To remove the backrest pad flip over follow the next step: Stand behind the wheelchair; Loosen the top of the backrest pad flip over, picture 18; Pull the backrest pad flip over from the backrest upholstery, picture 19. Picture 19 Picture 18 To replace the backrest pad flip over back on the wheelchair you should follow the above steps in reversed order. Make sure that the backrest pad flip over is placed tightly onto the backrest upholstery. ~ 18 ~ © 2013 VAN OS MEDICAL UK Ltd., Excel House, Escrick Business Park, Escrick, York,YO19 6FD Tel. +44-(0)1904-720170, Fax +44-(0)1904-720398, E-mail: [email protected], www.vanosmedical.com User manual Use of the storage bag On the rear side of the backrest upholstery you willfind a storage bag. To open the storage bag place your hand under the closure and move it upwards, picture 20. Picture 21 Picture 20 To close the storage bag press down the closure against the Velcro, picture 21. Use of the seat pad flip on To remove the seat pad flip on follow the below steps: Stand in front of the wheelchair; Loosen the front side of the seat pad flip on, picture 22; Pull the seat pad flip on from the seat upholstery, picture 23. Picture 22 Picture 23 To replace the seat pad flip on back on the wheelchair you should follow the above steps in reversed order. Make sure that the seat pad flip on is placed tightly onto the seat upholstery. ~ 19 ~ © 2013 VAN OS MEDICAL UK Ltd., Excel House, Escrick Business Park, Escrick, York,YO19 6FD Tel. +44-(0)1904-720170, Fax +44-(0)1904-720398, E-mail: [email protected], www.vanosmedical.com User manual 6 TRANSPORT AND TRANSIT IN CAR Your Excel wheelchair is designed to be easily transported by car. Your wheelchair is foldable so the total width is limited to an average measure of 20 cm. Further your wheelchair is equipped with swing away and detachable footrests. At the same time the wheelchair is standard equipped with swing away and removable foot – or leg rests. At the same time some wheelchairs can be equipped with a couple of size decreasing accessories, like detachable rear wheels. 6.1 De-assembly Remove the foot- or leg rests on the front side of your wheelchair (see chapter 5 ‘Instructions for use and mounting options’); 1. Fold the wheelchair: Stand next to the wheelchair. Grab the seating at the front and rear side in the middle and pull at the same time straight up. Tilt the wheelchair to the side and puss both side together to complete the folding. 2. When needed, in lack of space and the rear wheel must be removed please see chapter 5 Instructions for use and mounting options. 6.2 Assembly If the rear wheels are removed, you will have to place them back first. Please see chapter 5, Instructions for use and mounting options; 1. When needed to replace the rear wheels Please see chapter 5, Instructions for use and mounting options; 2. Go stand next to the wheelchair, tilt the wheelchair a bit towards you and push the seat tube down. The wheelchair will un-fold. Go stand before the wheelchair and push again on the two seat tubes to ensure that they are directly on the frame. This is confirmed by flat seat upholstery. Warning: Never sit in you wheelchair while being transported. Tip The backrest can be folded to lower the height of the wheelchair for transport. ~ 20 ~ © 2013 VAN OS MEDICAL UK Ltd., Excel House, Escrick Business Park, Escrick, York,YO19 6FD Tel. +44-(0)1904-720170, Fax +44-(0)1904-720398, E-mail: [email protected], www.vanosmedical.com User manual 7 MAITENANCE Protect your Excel wheelchair by having it checked regularly. We strongly advise you to have your wheelchair check at least once a year by a qualified Excel dealer, who will only use Excel spare parts. This periodic inspection will ensure you that the wheelchair will function perfectly for years. There are a lot of things you can do yourself to keep your wheelchair in optimum condition. If you regularly check the wheelchair and perform (small) maintenance, this will extend the lifetime and increase the ease of use. 7.1 Tyres Examine tyres periodically for wear and replace them as needed. PU tyres: PU tyres (polyurethane either leak proof tyres) are more used on wheelchairs. They can be reconnised by missing the valve. The advantage that they do not need to be pumped up and can not be punctured. The same as AIR tyres the PU tyres can wear out. Check periodically to see if the tread is still deep enough. Warning: When tyres are not fully inflated this may cause bad functioning of the brakes and make the chair move when not intended. Tip For the maximum tyre pressure we direct you to chapter 5, Instructions for use and mounting options. 7.2 Brakes Before you can check the brakes, you need to make sure the tyre pressure is correct, (see chapter 5.11). Inspect both brakes for sharp rims. If there are sharp rims on the brakes we advise you to replace them. Ensure that all the parts of the brake are in the right position and fastened secure; Make sure that the mechanism is functioning smoothly. If it is not functioning smoothly put some oil at turning points with one or two drips of WD40 oil or Teflon. Remove surplus oil and dirt; Make sure the brakes do not come into contact with the wheels as you are moving. ~ 21 ~ © 2013 VAN OS MEDICAL UK Ltd., Excel House, Escrick Business Park, Escrick, York,YO19 6FD Tel. +44-(0)1904-720170, Fax +44-(0)1904-720398, E-mail: [email protected], www.vanosmedical.com User manual 7.3 Cross frame The cross frame of the wheelchair has to be in a good condition. The cross frame is the basic of your wheelchair. Make sure the wheelchair can easily be fold and unfold; Make sure the wheelchair travels in a straight line while moving; Make sure the cross frame is not bent and shows no wear signs. When one of the exceptions, noted above, occurs, please contact a qualified Van Os Medical UK Ltd. dealer. 7.4 Rear wheels A good adjustment of the rear wheels improves the stability of the wheelchair. Make sure that the wheels can move freely without touching anything; Make sure there is no margin on the rear wheels. A good adjustment of the rear wheels improves the stability of the wheelchair. Also it will allow you to use less energy to move the wheelchair. Make sure that the wheels can move freely without touching anything; Make sure there is no margin on the rear wheels. When one of the exceptions, noted above, occurs or if an adjustment is necessary it is recommended to do this through a qualified Van Os Medical UK Ltd. dealer. 7.5 Front wheel and front castor fork The front wheel and front fork must move and turn freely to ensure a smooth ride. Make sure the nut of the front fork is not too loose or too tight. When the nut is too loose, the wheels will rotate but the ride will be uncomfortable. If the nut is too tight, the chair will be difficult to steer because of the bearings getting pushed so the balls can not move freely. When the nut is correct in place the front wheel will stop slowly; Make sure the front castor shows no wear signs. When one of the exceptions, noted above, occurs or if an adjustment is necessary it is recommended to do this through a qualified Van Os Medical UK Ltd. dealer. 7.6 Upholstery It is important to check the lining of your wheelchair regularly. Torn or worn upholstery can no longer support human weight and this can create dangerous situations. Check the textile coating for holes, cracks and worn spots; Check the upholstery-mounting grommets to make sure that they are all correctly aligned and secure. ~ 22 ~ © 2013 VAN OS MEDICAL UK Ltd., Excel House, Escrick Business Park, Escrick, York,YO19 6FD Tel. +44-(0)1904-720170, Fax +44-(0)1904-720398, E-mail: [email protected], www.vanosmedical.com User manual 7.7 Cleaning It is important to clean your wheelchair regularly. Clean the upholstery, chassis and plastic components on the wheelchair regularly with a mild soap and water. Never use abrasive cleaners, they can damage the varnish. Also never use steam or high pressure cleaners; Wax the varnish of the chassis regularly. Never use solvents, abrasive waxes, caustic chemicals or spray silicone; Dry your wheelchair after cleaning. Also dry your wheelchair after you have been using it during a rainstorm. Tip You can also use a car shampoo; this cleans, protects and gives a beautiful gloss to your wheelchair. ~ 23 ~ © 2013 VAN OS MEDICAL UK Ltd., Excel House, Escrick Business Park, Escrick, York,YO19 6FD Tel. +44-(0)1904-720170, Fax +44-(0)1904-720398, E-mail: [email protected], www.vanosmedical.com User manual 8 PROBLEM ANYLYSIS AND SOLUTIONS Your Excel wheelchair is inspected and adjusted so that you can use it immediately. Continual use necessitates maintenance, especially if the factory set adjustments have been altered. The following troubleshooting guide, lists several common problems that may occur and offers corrective actions for each. Tip We recommend the use of only Excel replacement parts. If you do not use original Excel parts the warranty will be expired. Chair veers right Chair veers left The wheelchair moves to heavy Sluggish turning Castor flutter Squeaks / rattles Looseness in chair Symptom POSSIBLE CAUSE AND CORRECT SOLUTION Check if all nuts and bolts are tightly stuck. See paragraph 5.9. Rear wheels and/or castors may be adjusted improperly. Make sure that both rear wheels and castor are mounted in identical positions. Check if the bearings are not worn. Castor forks may be adjusted improperly. Make sure they are adjusted properly. Tip If you have problems that cannot be solved with the troubleshooting table, we advise you to contact a qualified Van Os Medical UK Ltd. dealer. ~ 24 ~ © 2013 VAN OS MEDICAL UK Ltd., Excel House, Escrick Business Park, Escrick, York,YO19 6FD Tel. +44-(0)1904-720170, Fax +44-(0)1904-720398, E-mail: [email protected], www.vanosmedical.com User manual 9 WARRANTY 9.1 Warranty application Together with your wheelchair you get the factory warranty. However, it is possible that your dealer offers a supplementary warranty. This manual only handles the factory warranty as given by Van Os Medical UK Ltd. A) Side frames, cross bar 10 years COMPONENT 2 years None This warranty is only granted to you as the consumer. It is not intended to be used commercially (like hiring or institutional use) The warranty is limited to defects to materials and possible hidden shortages. Van Os Medical UK Ltd. offers the following warranty terms. B) Wheels, hand brakes, front forks, arm rests, foot rests and all components not stated here under: C) Upholstered components like seat and back upholstery and rigid arms, plastic parts as foot plates, coating and rubber parts. Tyres and inner tubes. Also you can find the warranty periods label on the frame of your wheelchair. See also chapter 1. 9.2 Warranty definition Your manual is also the warranty form, fill in the relevant details in and store it carefully. Warranty conditions The warranty period commences upon the date of purchase of your wheelchair. If within the warranty period, your wheelchair will be defect, it will be repaired or replaced. However you do need to provide to Van Os Medical UK Ltd. a complete filled in warranty registration form, a copy of the bill with the date of purchase and with the original packaging. Without a warranty registration form or a proof of the purchase date the warranty will start at the date when Van Os Medical UK Ltd. sent the invoice to the dealer. ~ 25 ~ © 2013 VAN OS MEDICAL UK Ltd., Excel House, Escrick Business Park, Escrick, York,YO19 6FD Tel. +44-(0)1904-720170, Fax +44-(0)1904-720398, E-mail: [email protected], www.vanosmedical.com User manual Repairs and replacement must be performed by an authorized Van Os Medical UK Ltd. service agent. To qualify for the warranty, your wheelchair must require the care standards. Furthermore, if a problem occurs, you need to fully inform the Van Os Medical UK Ltd. service agent immediately. If you use the wheelchair outside the designated area of the Van Os Medical UK Ltd. service agent, you can repair your wheelchair by any other, by the factory approved, service agent. When parts of the wheelchair, within 24 months after the commence date, needs reparation or replacement, as a result of a manufactory or material error and the wheelchair is with its first owner, the part or parts will be repaired or replaced free of charge. This warranty does not include any labour charges incurred by replacements. Tip This warranty is not transferrable. Replaced or repaired parts fall under the same warranty conditions as the original wheelchair. Worn parts are normally not guaranteed, unless these parts are worn as a direct result of an original manufacturer defect. These parts are for example upholstery, tyres, inner tubes and similar kinds of parts. The warranty conditions above describe all wheelchair parts, and are applied for the models bought at the normal end-user price. Under normal circumstances Van Os Medical UK Ltd. accepted no responsibility when the wheelchair needs replacement or repairs as a direct result from: 1. 2. 3. 4. Not maintaining the wheelchair and parts according to the recommendations of the manufacturer or not using the specific original parts; Damaging the wheelchair or parts by inattentive use, accident or wrong use; Adjusting the wheelchair or parts, different from the specifications of the manufacturer or reparations done before the service agent is warned. If the product is not equipped with an original factory frame number and identification label as described in the manual, see chapter 1. ~ 26 ~ © 2013 VAN OS MEDICAL UK Ltd., Excel House, Escrick Business Park, Escrick, York,YO19 6FD Tel. +44-(0)1904-720170, Fax +44-(0)1904-720398, E-mail: [email protected], www.vanosmedical.com User manual The wheelchair that is described and showed in this manual can differ from your own model in details. However, all instructions are relevant, independent of slightly different details. We reserve the right to change the product in this manual without further notice. All drawings, measures and capacities showed in this manual, are approximations and may be slightly different to your wheelchairs specifications. Warning: Van Os Medical UK Ltd. cannot be liable for any consequent or individual damage whatsoever. While this manual is created with care it is not exclusive. If you are going to use the wheelchair not in accordance with the guidelines in this manual you need to consult with an authorized Van Os Medical UK Ltd. dealer. The warranty is only valid during the indicated period and only valid in the United Kingdom. If adjustments are made to the wheelchair, who have structural impact on the product, the warranty will expire completely. U can contact Van Os Medical UK Ltd. for an enlarged warranty and supply conditions and a address list of authorized dealers. For warranty service, contact your authorised dealer from where you have bought your wheelchair. If it occurs that you are not helped to your satisfaction concerning the warranty service, please contact Van Os Medical UK Ltd. in writing. You can find the address on front page of this manual. 10 SERVICE AND MAINTENANCE 10.1 General maintenance instructions Your wheelchair needs periodical maintenance. This is necessary for a long lifetime and an optimal users comfort of your wheelchair. A badly maintained wheelchair will give more technical problems, turn less flexible and falls out the warranty terms. Tip In chapter 7, you will also find extensive information on the maintenance of your wheelchair. ~ 27 ~ © 2013 VAN OS MEDICAL UK Ltd., Excel House, Escrick Business Park, Escrick, York,YO19 6FD Tel. +44-(0)1904-720170, Fax +44-(0)1904-720398, E-mail: [email protected], www.vanosmedical.com User manual Preventive maintenance is most important and many of these things you can easily do yourself or a friend or family member can help you. We highlight below the maintenance you can do yourself. Every week Check tyre pressure. Every month Check the fold ability of the wheelchair and if the rear wheels are easy to removable; Check upholstery for wear; Check wheel movement front and rear and check turn ability of the wheels; Check if the brakes are working correct. Every three months Check all bolts, screws and nuts and tighten if necessary; Check all spokes for tension; Check tyre tread for wear. Furthermore we advise you to let your wheelchair check by an authorised dealer every year. Make sure you dealer checks the point mentioned by paragraph 10.2. ~ 28 ~ © 2013 VAN OS MEDICAL UK Ltd., Excel House, Escrick Business Park, Escrick, York,YO19 6FD Tel. +44-(0)1904-720170, Fax +44-(0)1904-720398, E-mail: [email protected], www.vanosmedical.com User manual 10.2 Service checklist For optimal life your wheelchair should be periodically maintained by an authorized dealer. Service Schedule Service interval: ................................ Service number 1 2 3 4 5 6 7 8 9 Wheels: for example margin, wear bearings, adjust quick-release Tyres Hand rims: for example wear and burrs Front forks: for example control margin, adjustment ball head axle Brakes: for example adjustment, re-adjust, control for margins Foot rests: for example adjustment, line out Frame: for example fracture, welding seams, plastic components Arm rests: for example fixation, rigid arms Sealing-wax / coating / chrome Seat cushion Upholstery: for example adjust straps, control Connection material on all components Teflon treatment of all moving parts Checked by (initials) Inspection date Service stamp dealer ~ 29 ~ © 2013 VAN OS MEDICAL UK Ltd., Excel House, Escrick Business Park, Escrick, York,YO19 6FD Tel. +44-(0)1904-720170, Fax +44-(0)1904-720398, E-mail: [email protected], www.vanosmedical.com User manual 1 2 3 4 5 6 7 8 9 10 In practice the usage intensity varies greatly from person to person. It may therefore be that in your case, the wheelchair requires servicing more or less often than once a year. Tip Maintenance is not warranty. Your dealer may deviate from the maintenance interval. ~ 30 ~ © 2013 VAN OS MEDICAL UK Ltd., Excel House, Escrick Business Park, Escrick, York,YO19 6FD Tel. +44-(0)1904-720170, Fax +44-(0)1904-720398, E-mail: [email protected], www.vanosmedical.com User manual Product identification Product: Manually propelled wheelchairs Brand: Excel Model/type: G-Lite Pro Version: Manufacturer: Name Address Country EU Representative: Name Address Country Function Technical constructed file Prepared by: Function: Issue date: TCF date: Recertification date: Name Van Os Medical B.V. Koperslagerij 3 4651 SK Steenbergen The Netherlands W. van Os Koperslagerij 3 4651 SK Steenbergen The Netherlands Director J.M.J. Brouwer BBA Research & Development 01-04-2013 01-04-2013 Means of conformity The product is in conformity with Directive 93/42/EEC based on the use of a Technical construction file in accordance with Article 9 (Class I products) of the Directive Signature of EU representative: Place : Steenbergen Date : 01-04-2013 Number : VOS.TCF.EX.0337 ~ 31 ~ © 2013 VAN OS MEDICAL UK Ltd., Excel House, Escrick Business Park, Escrick, York,YO19 6FD Tel. +44-(0)1904-720170, Fax +44-(0)1904-720398, E-mail: [email protected], www.vanosmedical.com EX E E E Van Os Medical UK Ltd. Excel House Escrick Business Park Escrick, York YO19 6FD Tel.+44 (0) 1904 720170 Fax. +44 (0) 1904 720398 E-mail: [email protected] www.vanosmedical.com