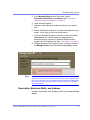
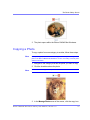
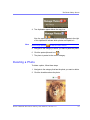
1
Ektron CMS400.NET Photo Gallery User
Manual
Version 1.0, Revision 3
Ektron® Inc.
542 Amherst St.
Nashua, NH 03063
Tel: +1 603-594-0249
Fax: +1 603-594-0258
Email: [email protected]
http://www.ektron.com
Copyright July 2007 Ektron®, Inc. All rights reserved.
EKTRON is a registered trademark of Ektron, Inc.
Version 1.0, Revision 3
For updated versions of this manual, please visit:
http://www.ektron.com/web-content-management-solutions.aspx?id=4020
EKTRON, INC. SOFTWARE LICENSE AGREEMENT
** READ THIS BEFORE LOADING SOFTWARE**
YOUR RIGHT TO USE THE PRODUCT DELIVERED IS SUBJECT TO THE TERMS AND CONDITIONS SET OUT IN THIS LICENSE
AGREEMENT. USING THIS PRODUCT SIGNIFIES YOUR AGREEMENT TO THESE TERMS. IF YOU DO NOT AGREE TO THIS SOFTWARE
LICENSE AGREEMENT, DO NOT DOWNLOAD.
CUSTOMER should carefully read the following terms and conditions before using the software program(s) contained herein (the “Software”).
Downloading and/or using the Software or copying the Software onto CUSTOMER’S computer hard drive indicates CUSTOMER’S acceptance of
these terms and conditions. If CUSTOMER does not agree with the terms of this agreement, CUSTOMER should not download.
Ektron, Inc. (“Ektron”) grants, and the CUSTOMER accepts, a nontransferable and nonexclusive License to use the Software on the following
terms and conditions:
1. Right to use: The Software is licensed for use only in delivered code form. Each copy of the Software is licensed for use only on a single
URL. Each license is valid for the number of seats listed below (the “Basic Package”). Any use of the Software beyond the number of authorized
seats contained in the Basic Package without paying additional license fees as provided herein shall cause this license to terminate. Should
CUSTOMER wish to add seats beyond the seats licensed in the Basic Package, the CUSTOMER may add seats on a block basis at the then
current price for additional seats (see product pages for current price). The Basic Packages are as follows:
Ektron CMS300 - Licensed for ten seats (10 named users) per URL.
Ektron CMS400.NET - Licensed for ten seats (10 named users) per URL.
Ektron eWebEditPro - Licensed for ten seats (10 named users) per URL.
Ektron eWebEditPro+XML - Licensed for ten seats (10 named users) per URL.
For purposes of this section, the term “seat” shall mean an individual user provided access to the capabilities of the Software.
The CUSTOMER may not modify, alter, reverse engineer, disassemble, or decompile the Software. This software product is licensed, not sold.
2. Duration: This License shall continue so long as CUSTOMER uses the Software in compliance with this License. Should CUSTOMER
breach any of its obligations hereunder, CUSTOMER agrees to return all copies of the Software and this License upon notification and demand by
Ektron.
3. Copyright: The Software (including any images, “pallets,” photographs, animations, video, audio, music and text incorporated into the
Software) as well as any accompanying written materials (the “Documentation”) is owned by Ektron or its suppliers, is protected by United States
copyright laws and international treaties, and contains confidential information and trade secrets. CUSTOMER agrees to protect the confidentiality
of the Software and Documentation. CUSTOMER agrees that it will not provide a copy of this Software or Documentation nor divulge any
proprietary information of Ektron to any person, other than its employees, without the prior consent of Ektron; CUSTOMER shall use its best efforts
to see that any user of the Software licensed hereunder complies with this license.
4. Limited Warranty: Ektron warrants solely that the medium upon which the Software is delivered will be free from defects in material and
workmanship under normal, proper and intended usage for a period of three (3) months from the date of receipt. Ektron does not warrant the use
of the Software will be uninterrupted or error free, nor that program errors will be corrected. This limited warranty shall not apply to any error or
failure resulting from (i) machine error, (ii) Customer's failure to follow operating instructions, (iii) negligence or accident, or (I) modifications to the
Software by any person or entity other than Company. In the event of a breach of warranty, Customer’s sole and exclusive remedy, is repair of all
or any portion of the Software. If such remedy fails of its essential purpose, Customer’s sole remedy and Ektron’s maximum liability shall be a
refund of the paid purchase price for the defective Products only. This limited warranty is only valid if Ektron receives written notice of breach of
warranty within thirty days after the warranty period expires.
5. Limitation of Warranties and Liability: THE SOFTWARE AND DOCUMENTATION ARE SOLD “AS IS” AND WITHOUT ANY
WARRANTIES AS TO THE PERFORMANCE, MERCHANTIBILITY, DESIGN, OR OPERATION OF THE SOFTWARE. NO WARRANTY OF
FITNESS FOR A PARTICULAR PURPOSE IS OFFERED. EXCEPT AS DESCRIBED IN SECTION 4, ALL WARRANTIES EXPRESS AND
IMPLIED ARE HEREBY DISCLAIMED.
NEITHER COMPANY NOR ITS SUPPLIERS SHALL BE LIABLE FOR ANY LOSS OF PROFITS, LOSS OF BUSINESS OR GOODWILL, LOSS
OF DATA OR USE OF DATA, INTERRUPTION OF BUSINESS NOR FOR ANY OTHER INDIRECT, SPECIAL, INCIDENTAL, OR
CONSEQUENTIAL DAMAGES OF ANY KIND UNDER OR ARISING OUT OF, OR IN ANY RELATED TO THIS AGREEMENT, HOWEVER,
CAUSED, WHETHER FOR BREACH OF WARRANTY, BREACH OR REPUDIATION OF CONTRACT, TORT, NEGLIGENCE, OR OTHERWISE,
EVEN IF COMPANY OR ITS REPRESENTATIVES HAVE BEEN ADVISED OF THE POSSIBILITY OF SUCH LOSS.
6. Miscellaneous: This License Agreement, the License granted hereunder, and the Software may not be assigned or in any way transferred
without the prior written consent of Ektron. This Agreement and its performance and all claims arising from the relationship between the parties
contemplated herein shall be governed by, construed and enforced in accordance with the laws of the State of New Hampshire without regard to
conflict of laws principles thereof. The parties agree that any action brought in connection with this Agreement shall be maintained only in a court
of competent subject matter jurisdiction located in the State of New Hampshire or in any court to which appeal therefrom may be taken. The parties
hereby consent to the exclusive personal jurisdiction of such courts in the State of New Hampshire for all such purposes. The United Nations
Convention on Contracts for the International Sale of Goods is specifically excluded from governing this License. If any provision of this License is
to be held unenforceable, such holding will not affect the validity of the other provisions hereof. Failure of a party to enforce any provision of this
Agreement shall not constitute or be construed as a waiver of such provision or of the right to enforce such provision. If you fail to comply with any
term of this License, YOUR LICENSE IS AUTOMATICALLY TERMINATED. This License represents the entire understanding between the parties
with respect to its subject matter.
YOU ACKNOWLEDGE THAT YOU HAVE READ THIS AGREEMENT, THAT YOU UNDERSTAND THIS AGREEMENT, AND UNDERSTAND
THAT BY CONTINUING THE INSTALLATION OF THE SOFTWARE, BY LOADING OR RUNNING THE SOFTWARE, OR BY PLACING OR
COPYING THE SOFTWARE ONTO YOUR COMPUTER HARD DRIVE, YOU AGREE TO BE BOUND BY THIS AGREEMENT’S TERMS AND
CONDITIONS. YOU FURTHER AGREE THAT, EXCEPT FOR WRITTEN SEPARATE AGREEMENTS BETWEEN EKTRON AND YOU, THIS
AGREEMENT IS A COMPLETE AND EXCLUSIVE STATEMENT OF THE RIGHTS AND LIABILITIES OF THE PARTIES.
Copyright 1999 - 2006 Ektron, Inc. All rights reserved.
LA10031, Revision 1.7
Trademarks
All terms in this manual that are known to be trademarks have been capitalized. Ektron, Inc. cannot attest to the accuracy of this information. Use
of a term in this manual does not affect the validity of any trademark.
The following trademarks might appear in Ektron manuals: Active Directory®, ActiveX®, Authenticode®, BackOffice®, ClearType®, Developer
Studio®, FrontPage®, IntelliSense®, JScript®, Microsoft ®, MS-DOS®, SharePoint ® Visual C++®, Visual C#®, Visual InterDev®, Visual J++®,
Visual J#®, Visual Studio®, Visual Web Developer TM, Win32®, Win32s®, Windows®, Windows NT®, Windows Server TM, Windows Server
System TM, Netscape®, Netscape Navigator®, Mozilla TM, Firefox TM
Table of Contents
Introduction to Photo Gallery.............................................1
System Administrator’s Notes ........................................................... 2
Default Folder and Taxonomy ..................................................... 2
User Permissions ........................................................................ 3
Installing and Signing on to the Photo Gallery ................4
Installing the Photo Gallery ........................................................ 4
Launching the Photo Gallery ...................................................... 4
CMS and Authorized Membership Users .......................................... 4
Site Visitors........................................................................................ 5
The Photo Gallery Screen...................................................7
Viewing Taxonomy Categories ................................................... 8
Viewing Subcategories ...................................................................... 8
Selecting a Category ................................................................. 10
Adding a Category..................................................................... 11
Deleting a Category ................................................................... 11
Adding a Photo to a Category .................................................. 12
Description, Maximum Width, and Address..................................... 13
Viewing Photos .......................................................................... 15
Full Size View .................................................................................. 15
Slide Show View ....................................................................... 16
Viewing a Photo’s Properties........................................................... 16
Copying a Photo ........................................................................ 17
Deleting a Photo ........................................................................ 18
Administrator’s Notes ...................................................................... 19
Ektron CMS40 0.NET Photo Galle ry User Manu al, Version 1 .0
i
Ektron CMS40 0.NET Photo Galle ry User Manu al, Version 1 .0
ii
Introduction to Photo Gallery
Introduction to Photo Gallery
NOTE
The Photo Gallery is built on Ektron CMS400.Net’s Taxonomy feature. Knowledge
of that will enhance your understanding of the Photo Gallery. The Taxonomy
feature is described in the Ektron CMS400.Net Administrator Manual section
“Web Site Navigation Aids” > Taxonomy.”
Ektron Photo Gallery helps users track and manage photos. You
can organize them in any number of taxonomy categories. For
example, you might have the following organization.
• Science
- Biology
- Animals
- Mammals
- Lions
- Bears
After you create a taxonomy, CMS users select an appropriate
category and then drag photos into the gallery. The photo is then
assigned to that category. When site visitors view the Photo
Gallery, they access photos via the categories.
To continue the above example, to see pictures of lions, the Photo
Gallery user or site visitor would select Science then Biology then
Animals then Mammals and finally Lions.
A sample page’s taxonomy hierarchy is circled below.
Ektron CMS40 0.NET Photo Galle ry User Manu al, Version 1 .0
1
Introduction to Photo Gallery
Note that the Ektron Photo Gallery does not supply photos -- it
merely gives you a way to store, organize, and present photos
from other sources.
System Administrator’s Notes
Default Folder and Taxonomy
All photos are stored in a single, Ektron CMS400.NET top-level
folder. By default, the folder is Image Gallery. Also, the default
taxonomy is Image Gallery.
If you want to assign a different folder or taxonomy, follow these
steps.
1. Open webroot/sitename/ImageGallery.aspx. For example,
wwwroot/intranet/ImageGallery.aspx.
2. Change the folder or taxonomy value as assigned in the
following properties.
<uc1:ImageGallery ID="ImageGallery1" TaxonomyId="136" FolderId="354" runat="server" />
3. Save the file.
Ektron CMS40 0.NET Photo Galle ry User Manu al, Version 1 .0
2
Introduction to Photo Gallery
User Permissions
By default, all CMS users have access to all Photo Gallery
functions. Also, if you set up the Photo Gallery in a Community
Folder, Membership users can add, remove and copy photos as
long as they have Add and Edit permissions for the folder.
You can change this by updating the permissions assigned to the
photos folder within Ektron CMS400.NET. See Also: ”Default
Folder and Taxonomy” on page 2
Ektron CMS40 0.NET Photo Galle ry User Manu al, Version 1 .0
3
Installing and Signing on to the Photo Gallery
Installing and Signing on to the
Photo Gallery
Installing the Photo Gallery
If you have an existing CMS400.NET install of 7.0.2 or later, you
can install the Photo Gallery Starter Application.
The Ektron Photo Gallery is also delivered as part of the Intranet or
Developer Starter Site. So, install either of those to access the
Ektron Photo Gallery.
Launching the Photo Gallery
CMS and Authorized Membership Users
To launch the Photo Gallery, first sign into your site. Then, enter
the path to the Photo Gallery in your browser’s address bar. For
example:
webroot folder/siteroot/imagegallery.aspx
If you are using the Intranet or Developer Starter Sites, navigate to
webroot folder/intranet/imagegallery.aspx
or
webroot folder/developer/imagegallery.aspx
That page looks something like this.
Ektron CMS40 0.NET Photo Galle ry User Manu al, Version 1 .0
4
Installing and Signing on to the Photo Gallery
Site Visitors
Site visitors can view the Ektron Photo Gallery via the same page.
The difference is that, since site visitors do not log in, they can only
view photos. An example of their page appears below.
Ektron CMS40 0.NET Photo Galle ry User Manu al, Version 1 .0
5
Installing and Signing on to the Photo Gallery
Ektron CMS40 0.NET Photo Galle ry User Manu al, Version 1 .0
6
The Photo Gallery Screen
The Photo Gallery Screen
This section explains how to use the Ektron Photo Gallery screen
to perform the following functions.
• Working with Categories
- ”Viewing Taxonomy Categories” on page 8
- ”Selecting a Category” on page 10
- ”Adding a Category” on page 11
- ”Deleting a Category” on page 11
• Working with Photos
- ”Adding a Photo to a Category” on page 12
- ”Viewing Photos” on page 15
- ”Copying a Photo” on page 17
- ”Deleting a Photo” on page 18
The following illustrates the main areas of the Photo Gallery
screen.
Ektron CMS40 0.NET Photo Galle ry User Manu al, Version 1 .0
7
The Photo Gallery Screen
Viewing Taxonomy Categories
Viewing Subcategories
When you first view the Ektron Photo Gallery screen, all categories
one level below the top appear under the subcategories folder.
Ektron CMS40 0.NET Photo Galle ry User Manu al, Version 1 .0
8
The Photo Gallery Screen
When you click any subcategory, it moves up to the horizontal
display across the top, and the subcategories (if any) directly
below it appear below the subcategories folder.
The number following a category indicates how many photos have
been assigned to it and its child categories. Also, photos assigned
to the selected category appear in the photos section of the
screen. (In the above example, science is the selected category.)
The example shows that four photos are assigned to the science
category and its subcategories. Since no photos appear in the
Photos section of the screen, you know that subcategories exist
below science and four photos are assigned to them. You cannot
tell how many subcategories exist below science.
Ektron CMS40 0.NET Photo Galle ry User Manu al, Version 1 .0
9
The Photo Gallery Screen
Continue to click and view subcategories until no subcategories
exist appears under the subcategories folder. See an example of
this below.
Selecting a Category
”Viewing Taxonomy Categories” on page 8 explains how to
navigate among categories.
Select a category before assigning a photo to it. When the
appropriate category appears at the right end of the category trail,
you are ready to drop photos into the category.
In the following example, dropped photos will be assigned to the
science category.
Ektron CMS40 0.NET Photo Galle ry User Manu al, Version 1 .0
10
The Photo Gallery Screen
Adding a Category
If a taxonomy does not contain all desired categories, follow these
steps to add a new one.
1. Drill down to the category one level above the new one.
For example, to add a new category for Fish, which should
appear under Animals, navigate to Animals.
• Science
- Biology
- Animals
- Mammals
- Lions
- Bears
2. Click the green plus sign to the right of subcategories.
3. A text field opens up. Enter the name of the new category.
4. Click the folder with the green plus sign (circled below).
Deleting a Category
You cannot delete a category from within the Ektron Photo Gallery.
Ektron CMS40 0.NET Photo Galle ry User Manu al, Version 1 .0
11
The Photo Gallery Screen
However, Ektron CMS400.NET administrators can delete
categories within the associated CMS Workarea. From the
Workarea, go to Modules > Taxonomy > Photo Gallery. From
there, drill down to a category, right click the mouse, and choose
Delete.
Adding a Photo to a Category
You can add the following types of photo files to the Ektron Photo
Gallery: .jpg, .jpeg, .gif, .png, .psd, .psp, .tiff, .tif.
You can drag and drop several photos at once. If you do, the same
description applies to all files. See Also: ”Description” on page 14
To add a photo to the Ektron Photo Gallery, follow these steps.
Prerequisite: You must know the Windows folder location of the
photos you want to add.
1. Resize the Ektron Photo Gallery window so that it occupies the
left part of your screen.
2. Navigate to the category to which you want to assign the
photo(s). See ”Selecting a Category” on page 10.
Ektron CMS40 0.NET Photo Galle ry User Manu al, Version 1 .0
12
The Photo Gallery Screen
3. In the Manage Photos area of the screen, enter a
Description, Photo Size, and Address. See ”Description,
Maximum Width, and Address” on page 13.
4. Open Windows Explorer.
5. Navigate to the folder that contains the photo(s) you want to
add.
6. Resize the Explorer window so it occupies the right part of your
screen. In this way, you can see both windows.
7. A photo’s Windows file name is used for its title in the Ektron
Photo Gallery. So, if the file name is not appropriate or
distinctive enough, rename it in Windows Explorer before
dropping it into the gallery. See Also: ”Description” on page 14
8. Drag the photo from the Explorer window to the gray section of
the Manage Photos area of the Ektron Photo Gallery screen.
NOTE
If a photo is added more than once, a unique number is appended to each
subsequent version’s title. For example, the first version of the lion.jpg file’s title is
lion, the second is lion(2), etc. Since deleted files are kept in Ektron CMS400.Net,
later copies of the same photo will get the next highest number even if all older
versions are deleted.
Description, Maximum Width, and Address
Complete these fields when dropping a photo into the Ektron Photo
Gallery.
Ektron CMS40 0.NET Photo Galle ry User Manu al, Version 1 .0
13
The Photo Gallery Screen
Field
Description
Description
Enter an optional description for the photo. It only appears when the photo is displayed
in full size view (see description circled below). See Also: ”Full Size View” on page 15
When viewed on the main gallery screen, a photo’s caption (circled below) is its
Windows file name without the extension. For example, if the file name is
mountain_lions_sc62.jpg, its caption is mountain_lions_sc62.
Maximum
Width
Use to set a maximum width for the photo. If its width exceeds the maximum, it is
reduced to the size specified here.
If the photo’s width is smaller, nothing happens.
Ektron CMS40 0.NET Photo Galle ry User Manu al, Version 1 .0
14
The Photo Gallery Screen
Field
Description
Address
If you want the photo to appear on an Ektron CMS400.NET map, enter its street
address. For more information, see the Ektron CMS400.NET Developer Manual
section “Map Server Control” > “Controlling the Visitor Experience with Maps” >
“Determining which Content is Found by a Map.”
Viewing Photos
NOTE
Viewing works the same whether or not the user is logged in. For non-logged in
site visitors, viewing is the only available function.
When you navigate to any category, its photos appear in the top
right of the screen.
If more than 12 photos exist in a category, only the first 12 appear.
To view additional photos, use the navigation options (circled
below).
Full Size View
The top part of the Ektron Photo Gallery screen displays a
thumbnail view. To see a photo’s full size, place the cursor over it
and click. When you do, a new screen appears, showing the full
size photo (see example below).
Ektron CMS40 0.NET Photo Galle ry User Manu al, Version 1 .0
15
The Photo Gallery Screen
From full size view, you can use navigation options to move to the
next photo, previous photo, etc.
Slide Show View
You can view the photos in a category as a slide show by clicking
the Slide Show check box. If you do, each photo appears in the
order in which they were copied into the category, beginning with
the one you selected. They change every 3 seconds.
Viewing a Photo’s Properties
You can view the properties of any photo with the Ektron
CMS400.Net Workarea. Once inside the Workarea, authorized
users can view and change its information. For example, you can
view its revision history and approval chain.
To view a photo’s properties, follow these steps.
1. Navigate to the category that has the photo.
2. Click the photo’s Properties icon, above the photo (circled
below).
Ektron CMS40 0.NET Photo Galle ry User Manu al, Version 1 .0
16
The Photo Gallery Screen
3. The photo opens within the Ektron CMS400.Net Workarea.
Copying a Photo
To copy a photo from one category to another, follow these steps.
NOTE
When you copy a photo in the Photo Gallery, you are merely referencing the
photo in the Ektron CMS400.Net Workarea. You are not creating a second photo
within the Workarea.
1. Navigate to the category that has the photo you want to copy.
2. Click the checkbox above the photo.
NOTE
You can check and copy several photos at one time.
3. In the Manage Photos area of the screen, click the copy icon.
Ektron CMS40 0.NET Photo Galle ry User Manu al, Version 1 .0
17
The Photo Gallery Screen
4. Two clipboards appear below the copy icon.
Also, the copied photo’s content ID number appears to the right
of the clipboard to indicate which photos are copied to it.
NOTE
Use the empty clipboard (
) to clear the current contents.
5. Navigate to the category to which you want to paste the photo.
6. Click the paste clipboard icon (
).
7. The photo is pasted to the current category.
Deleting a Photo
To delete a photo, follow these steps.
1. Navigate to the category that has the photo you want to delete.
2. Click the checkbox above the photo.
Ektron CMS40 0.NET Photo Galle ry User Manu al, Version 1 .0
18
The Photo Gallery Screen
NOTE
You can check and delete several photos at one time.
3. In the Manage Photos area of the screen, click the delete icon.
4. The photo is deleted.
Administrator’s Notes
Deleted photos remain in Ektron CMS400.Net’s Photo Gallery
folder. There is no indication that they have been deleted from the
Ektron Photo Gallery.
Ektron CMS40 0.NET Photo Galle ry User Manu al, Version 1 .0
19