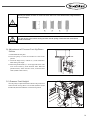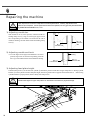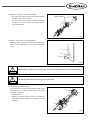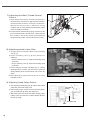
1
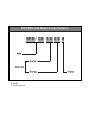
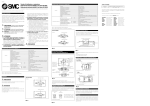
R
USER ’
S
MANUAL
SPS/CE-5050 Series
SPS/CE-8050 Series
Independent Direct Drive,
Electronically Controlled
Pattern
SUNSTAR MACHINERY CO., LTD.
1) FOR AT MOST USE WITH EASINESS,
PLEASE CERTAINLY READ THIS MANUAL
BEFORE STARTING USE.
2) KEEP THIS MANUAL IN SAFE PLACE
FOR REFERENCE WHEN THE MACHINE
BREAKS DOWN.
MME-070313
lity
a
u
tQ
Besst Pricevice
Be st Ser
Be
1. Thank you for purchasing our product. Based on the rich expertise and
experience accumulated in industrial sewing machine production, SUNSTAR
will manufacture industrial sewing machines, which deliver more diverse
functions, high performance, powerful operation, enhanced durability, and
more sophisticated design to meet a number of user’s needs.
2. Please read this user’s manual thoroughly before using the machine. Make
sure to properly use the machine to enjoy its full performance.
3. The specifications of the machine are subject to change, aimed to enhance
product performance, without prior notice.
4. This product is designed, manufactured, and sold as an industrial sewing
machine. It should not be used for other than industrial purpose.
R
SUNSTAR MACHINERY CO., LTD.
PATTERN S/M Model Series Patterns
SPS / CE - 5 0 5 0 H
Series
(X) × 10 mm
Sewing range
(Y) × 10 mm
Purposes
H : Heavy material
Purposes
CONTENTS
1. Safety Rules ...................................................................................................................... 6
1) Machine movement ......................................................................................................... 6
2) Machine installation ......................................................................................................... 7
3) Machine operation ....................................................................................................................... 7
4) Machine operation ........................................................................................................... 8
5) Machine troubleshooting ................................................................................................. 8
6) Position of caution marks ................................................................................................ 9
7) Contents of warning ...................................................................................................... 10
2 Machine specification ................................................................................................... 11
3. Machine Composition .................................................................................................. 12
4. Installing the machine .................................................................................................. 13
1) Conditions for installing the machine ............................................................................ 13
2) Conditions for power supply .......................................................................................... 13
3) Assembling peripheral devices ..................................................................................... 13
5. Preparation before operating machine ................................................................... 16
1) Oil Supply ...................................................................................................................... 16
2) Inserting needle ............................................................................................................. 17
3) Inserting upper thread .................................................................................................. 17
4) Inserting lower thread and adjusting lower thread tension ........................................... 18
5) Attaching and detaching bobbin case ........................................................................... 18
6) Adjusting tensions of upper and lower thread .............................................................. 19
7) Adjustment of bobbin catcher ....................................................................................... 19
8) Bobbin Winder ............................................................................................................... 20
9) Adjustment of Presser Foot Up/Down Stroke .............................................................. 21
10) Presser Foot Height .................................................................................................... 21
11) Adjusting up-down speed of upper feed plate ............................................................ 22
12) Adjusting upper thread holding device ........................................................................ 22
13) Adjust hook lubrication ................................................................................................ 23
14) Caution for the use of floppy disk ................................................................................ 23
4
6. Repairing the machine ................................................................................................. 24
1) Adjusting needle bar ...................................................................................................... 24
2) Adjusting needle and hook ............................................................................................ 24
3) Adjusting feed plate height ............................................................................................ 24
4) Adjustment of Presser Foot Adjusting Arm ................................................................... 25
5) Adjusting thread release and dish opening width ......................................................... 25
6) Adjustment of Lower Trimmer Related Parts ............................................................... 26
7) Adjusting the Main Thread Control Device ................................................................... 28
8) Adjusting speed of arm lifter .......................................................................................... 28
9) Adjusting Hand Pulley Device ....................................................................................... 28
10) Adjusting tension of operating belt .............................................................................. 29
11) Setting X-Y Original Point ........................................................................................... 32
12) Switch from up/down clamp method to cassette method .......................................... 33
13) Air System Schematic Diagram .................................................................................. 35
5
1
Safety Rules
Safety labels in the manual are categorized into danger, warning and caution. Failure to follow the safety rules may result in physical
injuries or mechanical damages.
Danger
: Instructions here shall be observed strictly. Otherwise, the user could suffer damage from installation,
movement, and repair.
Warning : Instructions here shall be observed strictly. Otherwise, the user could suffer severe physical injuries.
Caution : Instructions here shall be observed strictly. So the user could prevent expected malfunction.
1) Machine movement
Only personnel with a full understanding of the safety rules should move the machines. The
following directions must be observed when moving the machines.
1) Delivery by men
In the case, the worker should wear safety shoes and hold tightly on the left and right sides.
Danger
2) Delivery by forklift
The forklift should sustain the weight of the machine and be big enough to deliver the
machine. When lifting the machine, put the center of gravity of the machine on the fork arm
as in the figure 1-1 by using the pallet.
※ Remove obstacles and do not
allow people pass under the
machine.
[Warning] Especially when using the forklift or crane, unlades the machine
horizontally to prevent deformation of the machine and an exposure
of a man to danger.
6
2) Machine installation
Caution
Because physical damages such as the functional obstacles and breakdowns are likely to occur
according to the environment in which the machine is being installed. Therefore, the following
preconditions should be fulfilled.
1) The worktable or desk on which the machine would be installed should be strong enough to
sustain the weight (see the nameplate) of the machine.
2) Because machines are apt to be contaminated and corroded by dust and moisture, you
should install Air Conditioner and clean the machines regularly.
Do not operate the machine with radiation cover open. The air filter on the upper side of
control box should be cleaned once a week.
3) Keep the machines out of the direct rays of the sun. If exposed too much to the direct rays
of the sun, the machine may discolor and deform.
4) Keep right and left sides and the backside of the machines off at least 50cm from the wall to
secure enough space to repair.
[Note] The details about the installment of the machine are described in No. 4 Installating
the machine .
5) Danger of Explosion: In order to avoid danger of explosion, do not run the machine if there
is highly combustible material in the air.
6) Illumination: Because of the peculiarity of the machine, any illuminators are not equipped.
So, users should install the lighting apparatus around the working area.
7) Danger of fall: Do not install the machine on an unstable stand or table. If the machine falls,
it will lead to physical injuries and mechanical damages. When moving the machine,
protect it from outside shock and do not stop abruptly lest it should fall.
3) Machine operation
Warning
SPS/CE-5050 is manufactured to sew textiles and other similar material.
Be aware that the body of the machine has labels of caution or warning on each dangerous
part to highlight the safety regulations. In case of running the machine, users should observe
the following things.
1) Before operating the machine, please read the manual and understand fully the details on its
operation.
2) Don’t forget to put on the garment suited for the safe work.
Long hair, necklaces, bracelets, wide sleeves etc. are likely to be dragged into the machine
in operation. Wear shoes without slip to avoid danger.
3) When operating the machine, make sure that there is no one near the working parts of it.
4) Keep your hands or parts of the body away from running parts of the machine like a needle,
hook, thread take-up spring, pulley etc.
5) Do not remove any safety cover protecting pulley or shaft, while running the machine.
6) Before opening the electric box such as a control box, make sure without fail to shut off the
power supply and make sure that the power switch should be “off.”
7) Before rotating the upper shaft manually, make sure without fail that the power switch
should be “off.”
8) When threading the needle or checking the machine after sewing, be sure to stop the
machine.
7
4) Machine operation
Instructions here should be observed. Otherwise the user could face mechanical damages such
as the functional obstacles and breakdowns. Therefore, the following preconditions should be
fulfilled.
1) Don’t put things on the table of machine.
2) Don’t use crooked needle or needle whose tip is blunt.
3) Use needle plate fit for the work
Caution
5) Machine troubleshooting
In need of troubleshooting, it should be done by the trained A/S engineer of our company.
1) Before cleaning and repair, be sure to shut off the power supply. And wait for about 4
minutes until the machine discharges completely.
Danger
[ Caution ]
For main motor, X/Y drive box, it takes 10 minutes to discharge completely after
the power is shut off.
2) Even specification or a part of or the entire machine should not be modified without any
consultation with our company. The modification would undermine safety of the operation
3) In case of repair, you should replace the damaged part with the genuine parts of our
company (SunStar).
4) After repair, please put again the safety covers disjointed during repairing.
8
6) Position of caution marks
The labels of “Caution” are attached to the machine for safety. When operating the machine,
make sure to follow the safety rules that each “Caution” tells.
1) Position of Caution Marks
CAUTION
경 고
Do not operate without finger guard and
safety devices. Before threading, changing
bobbin and needle, cleaning etc. switch off
main switch.
WARNING
손가락 보호대와 안전장치 없이 작동하지
마십시오.
실, 보빈, 바늘교환시나 청소전에는 반드시
주전원의 스위치를 꺼 주십시오.
Injury may be caused by
winding.
Be sure to turn off the power
before cleaning, lubricating,
adjusting or repairing.
WARNING
Physical damage may be caused by winding.
Don’t put your hands near the arrow while the main shaft
is rotating
WARNING
Physical injury may be caused
by crevice.
WARNING
Don’t put your finger in a groove
on the table.
Injury may be caused by moving
needle.
Ensure that the machine is in a
stop condition before changing,
threading or rethreading of
needies or changing of needles.
WARNING
Physical damage may be caused
by interposition.
While embroidery frame is running
according to the direction of
embroidery frame may be injured
your hands by gap between fixed
body and embroidery frame.
WARNING
Physical injury may be caused by
crevice.
Don’t put your finger in a groove
on the table.
9
7) Contents of warning
1) Contents
ⓐ
WARNING
Injury may be caused by
winding.
Be sure to turn off the power
before cleaning, lubricating,
adjusting or repairing.
[ Caution ]
The safety cover in the warning label refers to all covers
around the operational section.
ⓑ
WARNING
Injury may be caused by moving
needle.
Ensure that the machine is in a
stop condition before changing,
threading or rethreading of
needies or changing of needles.
ⓒ
WARNING
Physical injury may be caused by
crevice.
Don’t put your finger in a groove
on the table.
ⓓ
CAUTION
경 고
Do not operate without finger guard and
safety devices. Before threading, changing
bobbin and needle, cleaning etc. switch off
main switch.
손가락 보호대와 안전장치 없이 작동하지
마십시오.
실, 보빈, 바늘교환시나 청소전에는 반드시
주전원의 스위치를 꺼 주십시오.
ⓔ
WARNING
Physical injury may be caused
by crevice.
Don’t put your finger in a groove
on the table.
ⓕ
WARNING
Physical damage may be caused by winding.
Don’t put your hands near the arrow while the main
shaft is rotating
ⓖ
WARNING
Physical damage may be caused
by interposition.
While embroidery frame is running
according to the direction of
embroidery frame may be injured
your hands by gap between fixed
body and embroidery frame.
10
2
Machine specification
Sewing range
X(horizontal) : 500mm
Y(anteroposterior) : 500mm
Max sewing speed
2,500spm (less than 3mm stitch width)
Stitch width
0.05∼12.7mm
Conveying Method
By motor
Needle bar stroke
41.2mm
Needles
DP×17 , DP×5
Feed plate height
80mm(Standard)
Presser foot stroke
Normal: 4mm [0.7 ~ 7mm]
Presser foot height
22mm
Arm height
50mm
Hook
Rotary 3X hook
Bobbin case
Bobbin case for rotary 3X hook
Bobbin
Bobbin for 3X hook
Storage device
3.5˝ floppy disk (2HD)
Storage pattern: maximum 691 pattern/disk
Emergency stop function
Emergency stop function is available during the machine operation
Maximum speed
Max speed can be limited between 180 ~ 2,000spm by using an exterior switch
Pattern selection
Wide range of patterns from 1 to 999 available
Memory backup
Operation point stored in case that the machine stops working, as in a blackout
Second original point
During the operation, needle position can be set at any randomly chosen point by using Jog Key
Main motor
750W SERVO motor
Power
600VA
Proper temperature
5℃∼40℃
Proper humidity
20%∼80%
Voltage
Rated at ±10% 50/60㎐
Air pressure
4.5~5.5kg/cm2 (0.44~0.54MPa)
11
3
Machine Composition
1) Name of parts
②
⑩
⑪
③
⑤
④
⑦
⑧
①
⑨
⑥
[ Fig. 1 ]
① Power on/off
② Arm
③ Table
④ Control box
⑤ Operation box
⑥ AMP Box
12
⑦ Sewing pedal
⑧ Upper feed plate pedal
⑨ Body
⑩ Emergency stop switch
⑪ Thread stand
4
Installing the machine
1) Conditions for installing the machine
A. In order to prevent accident by malfunctioning, do not operate the machine in the place where rated voltage is more than ±10%.
B. In order to prevent accident by malfunctioning, check if air pressure is proper at devices like air cylinder, before operating the
machine.
C. In order to use the machine safely, operate the machine under the following conditions.
⇒ The machine should be operating at : 0°∼40℃(32°∼104℉)
⇒ The machine should be stored at : -10°∼60℃(14°∼140℉)
D. Humidity: within 45 ~ 85% (relative humidity)
2) Conditions for power supply
A. Voltage
Voltage should be within 10 percent of the rated voltage.
Frequency should be within 1 percent of the rated frequency (50/60Hz).
B. Electromagnetic wave noise
It is required for the machine not to share power with products releasing strong magnetism and high frequency, and to keep the
machine away from them.
C. Make sure to use safe low voltage when it is needed to attach auxiliary devices or accessories to controller.
D. Be careful not to spill water or coffee on control box and Motor.
E. Do not fall control box and motor.
3) Assembling peripheral devices
A. Attach belt cover to the machine by using clamp screws.
[ Fig. 2 ]
13
B. Attach safety plate to faceplate.
(Safety plate must be attached before operation to prevent
accident.)
Faceplate
Safety
plate
[ Fig. 3 ]
C. Connect the plug of standing pedal to the control box.
Standing pedal
[ Fig. 4 ]
D. Install thread stand on the machine body.
[ Fig. 5 ]
Be careful while installing thread stand, or parts can fall down and cause physical injuries.
Caution
14
E. Table Leg Base
ⓐ Put vibration-proof rubber② under the lever adjuster①.
ⓑ Loosen nut③ and turn the lever adjuster① until the
caster④ makes an idle rotation.
ⓒ After installation, fasten nut③ to fix the lever adjuster①.
①
③
④
②
[ Fig. 6 ]
F. Attaching air pressure controlling parts
For the safety, do work with the power switch off.
Caution
ⓐ Link quick joint socket① to air horse②.
ⓑ Link quick joint socket① to quick joint plug③.
ⓒ Open finger valve④ to inflow air and adjust air pressure to 4.5~5.5kgf/cm2 (0.44~0.54MPa).
When the air pressure is low under(4kgf/cm2 ) during operation, the machine stops with the error
message. The error message: Err 24(Low Pressure!)
Caution
[Note]
When closing finger valve after use, the remaining air will automatically go out with the remaining pressure displayed at
0kgf/cm2 (0MPa).
④
③
①
②
[ Fig. 7 ]
15
5
Preparation before operating machine
1) Oil Supply
A. After checking the remaining oil in the oil tank installed on
the arm, supply enough oil.
[ Fig. 8 ]
Make sure to supply oil when using the machine for the first time or after not using it for a long time.
Caution
B. As in the figure, check the remaining oil in the oil tank①
installed on the bed beneath the table and supply enough oil
through the oil inlet②.
②
①
[ Fig. 9 ]
C. Supply enough oil through the oil inlet on the upper part of
the arm.
[ Fig. 10 ]
16
D. Open bobbin case, supply enough oil to the extent that the
oil soaks around the hook.
E. Fill to the tank of oil of the arm (fig 8) and of the bed (fig 9)
1 time to the week, and lubricate the part superior of the
arm (fig 10) and the environs of the hook (fig 11) 1 time to
the day.
[ Fig. 11 ]
2) Inserting needle
Unfasten needle clamp screw on needle bar, with the long
groove on the needle facing forward, insert needle to the point
where its top end meets the end of the needle bar hole, and then
fasten the screw.
Needle-clamping screw
Needle
[ Fig. 12 ]
3) Inserting upper thread
A. Place the thread take-up lever to the highest position and route the upper thread as in Figure. In case of thread guide on the
needle bar, route the thread as in Figure①.
①
For general
materials
For heavy
materials
[ Fig. 13 ]
17
4) Inserting lower thread and adjusting lower thread tension
①
④
③
②
①
Weak
⑤
Strong
⑥
[ Fig. 14 ]
A. Insert the bobbin ② into the bobbin case ①, insert the thread through the thread groove ③ and then make the thread pass under
the tension adjusting spring ④. Turning the tension adjusting screw ⑤ clockwise will make the tension strong and turning the
screw counter-clockwise will make the tension weak. It is standard that, while you grab the end of the thread coming out of the
thread groove, the bobbin case ① drops gradually by its own gravity. (See Figure 14)
B. Attaching and detaching bobbin case
Grab the bobbin case handle ⑥ and insert it into the hook. Grab the handle ⑥ and pull the bobbin to detach it. (The bobbin ②
will be detached, when the handle is let go of.) (See Figure 14)
5) Attaching and detaching bobbin case
Hold the grip of the bobbin case ① and insert it into the hook
until a click is heard.
①
Bobbin case
[ Fig. 15 ]
If the machine operates without bobbin case fully inserted, the thread may get tangled or bobbin case
may be detached.
Caution
18
6) Adjusting tensions of upper and lower
thread
②
A. Adjusting upper thread tension
As in Figure, turning clockwise the tension adjustment nuts
③, ④ of the major thread control assembly ① and the
auxiliary thread control assembly ② respectively makes the
upper thread tension stronger and turning counter clockwise
makes it weaker.
④
①
③
[ Fig. 16 ]
B. Adjusting lower thread tension
As in Figure, turning clockwise the tension adjustment nut
① of the bobbin case makes the lower thread tension
stronger and turning counter clockwise makes it weaker.
①
[ Fig. 17 ]
7) Adjustment of bobbin catcher
A. Operating the bobbin catcher
If the bobbin pressure rod lever① is not working as in
Figure, adjust the end of the bobbin pressure rod lever① so
that it is placed likeⓐ at the end of the mes connecting link
②. Then, loosen the operation bobbin pressure rod lever
fixing screw③ and adjust.
ⓐ
①
③
②
[ Fig. 18 ]
19
8) Bobbin Winder
A. Bobbin winding
– Insert the bobbin onto the shaft ① and manually wind the
thread 5-6 times around the bobbin. Press START button
② to wind the bobbin.
– Bobbin winder will stop winding according to the
embedded timer. But if you want to stop winding before
the bobbin automatically stops, press STOP button ③.
①
③
②
[ Fig. 19 ]
B. Adjusting thread volume on the bobbin
– Fill the bobbin 80% and make sure the thread is parallel to
the bobbin as shown in the figure.
– Thread volume on the bobbin can be adjusted using a
TIME dial. Set it at MAX to increase the volume.
80%
1) Overfilling the bobbin may interfere with the smooth pull of the lower thread.
2) For normal bobbin, 80% fill will render around 80m of lower thread.
Caution
C. Adjusting the bobbin winding condition
– If the thread is not parallel to the bobbin, adjust the body
of the thread guide left and right.
– Adjust the tension of the bobbin winding using the tension
adjusting nut.
[ Fig. 20 ]
20
Winding the bobbin off-center or uneven as shown below can cause thread breaks, skipped stitches,
or thread tangles.
Caution
80%
○
Too tight tension of the bobbin winding can block smooth pulling of the thread and cause thread
breaks or short tails.
Caution
9) Adjustment of Presser Foot Up/Down
Stroke
A. Disassemble the face plate.
B. Turn the pulley to locate the needle bar at the lowest
position.
C. Loosen the hinge screw① and turn it ① in the A direction.
Then stroke grows larger.
D. When the punched mark③ is on the right side of the outer
circle of the washer②, stroke becomes 4mm. When the
punched mark④ meets the outer circle, stroke becomes
7mm. (Default value is 4mm.)
③
④
②
①
[ Fig. 21 ]
10) Presser Foot Height
Turn the pulley to adjust the distance between the presser foot
bottom and the sewing fabric to be 0.5mm (thickness of the
thread used) when the needle bar is at the lowest position.
[ Fig. 22 ]
21
11) Adjusting up-down speed of upper feed plate
A. If the holder② of the speed controller① is turned clockwise as in the figure, down-speed will decrease. If the holder is turned
counter-clockwise, the speed will increase. Adjust at a proper speed and fix with clamp screw③.
(Make a balanced adjustment on the left and right sides.)
②
①
③
[ Fig. 23 ]
12) Adjusting upper thread holding device
A. Check that upper thread holding pin cylinder knuckle ① is
positioned in the middle of the way that upper thread
follows.
B. If the knuckle ① is not positioned that way as mentioned in
A., unfasten the two clamp screws ③ of upper thread
holding bracket ②, position the knuckle in the middle as
mentioned in A, and then fasten clamp screw ③ firmly.
C. It is standard that the end of knuckle ① stays 4.3mm away
from Arm ④.
D. To adjust the clearance between nut and Arm, unfasten two
nuts of pin cylinder ⑤, correct the clearance, and then
fasten the two nuts ⑥ firmly.
③
①
②
⑥
①
⑤
④
4.3mm
[ Fig. 24 ]
22
13) Adjust hook lubrication
ⓐ Turn the screw ① toward A and lubrication volume will
increase. If it is turned toward B, lubrication volume will
decrease.
ⓑ Turn the handle② toward A and lubrication volume will
increase. If it is turned toward B, lubrication volume will
decrease.
①
②
B
A
A
B
[ Fig. 25 ]
14) Caution for the use of floppy disk
When using floppy disk, the following caution should be adhered.
After formating, any floppy disk on sale is available. But make sure to use authorized disk.
Caution
ⓐ Keep floppy disk away from magnet or magnetic items such as television.
ⓑ Be away from overheat, humidity, and direct sunlight when it is stored.
ⓒ Don’t put heavy things on floppy disk.
ⓓ Don’t remove floppy disk from disk drive when formatting the disk or inputting and outputting data.
ⓔ Be sure not to open the cover of floppy disk drive.
ⓕ If the slider② is open, data can not be input to floppy disk.
ⓖ If one disk is used for reading and writing on and on, there would be error on the disk.
ⓗ The important design data would be better to be stored in two floppy disk.
①
②
①shutter
② slider
[ Fig. 26 ]
23
6
Repairing the machine
Warning
Upon shipment, the machine is adjusted for the best performance. Arbitrary adjustment of the
machine is not required. If some parts should need to be replaced, use only genuine parts authorized
by SUNSTAR MACHINERY CO., LTD.
1) Adjusting needle bar
①
With needle bar at its lowest position, unfasten needle bar
holding clamp screw ①, align, as in the Figure, upper carved
line corresponding to the needle to be used with the end of
needle bar bushing, and then fasten needle bar holding clamp
screw ①.
DP×17
More than
#22
DP×17
Less than # 22
[ Fig. 27 ]
2) Adjusting needle and hook
Needle bar lower
bushing
A. As in the Figure on the right, with needle bar at its lowest
position, align lower carved line corresponding, when the
bar is up, to the needle with the end of needle bar bushing.
DP×17
More than #22
DP×17
Less than #22
[ Fig. 28 ]
3) Adjusting feed plate height
Unfasten clamp screws ② at the end of air cylinder ① shaft that is placed on both sides of upper clamp device. Moving cylinder
knuckle ③ toward cylinder increases feed plate height, and moving the knuckle in opposite direction decreases it. After moving
cylinder knuckle to a proper position, fasten it firmly with clamp screws.
Imbalanced heights of upper clamp device on both sides could lead to a physical damage.
Caution
①
②
③
[ Fig. 29 ]
24
4) Adjustment of Presser Foot Adjusting Arm
A. Turn the handle of the presser foot height adjusting shaft in the A direction to make the presser foot driving link touch the B part
of the arm.
B. Move and fix the presser foot height adjusting arm hinge screw① to the right.
C. Turn the pulley to move the needle bar to the lowest position. Pull up the presser bar. Make the moving link of the presser bar
touch the B part of the arm and set the presser bar bushing and the presser bar holder to be separated by 2mm. Fasten the fixing
screw② for the presser foot height adjusting arm.
D. Fasten the fixing screw② and check whether the presser foot height adjusting arm is fixed by shaking it back or forth.
E. Lastly adjust the presser foot height adjusting shaft.
※Results of adjustment
- When there is no distance (space), the presser bar bushing and the presser bar holder interrupt each other causing clearance.
- If distance(space) is too large or too small, the presser bar's lowest position will change due to the adjustment of the presser
foot height adjusting shaft.
Presser foot height adjusting shaft
presser foot driving link
2mm
Presser bar bushing
Presser bar holder
Presser bar
[ Fig. 30 ]
5) Adjusting thread release and dish opening width
ⓐ Unfasten the thread release air cylinder bracket clamp screw ①.
ⓑ Operate a trimming to open and widen the thread guide dish.
ⓒ Adjust the opening of the thread guide dish to be 0.6 ~ 0.8mm wide for general materials, and 0.8 ~ 1mm for heavy materials.
ⓓ The closer the thread release air cylinder is to the needle bar, the wider the opening of thread guide dish becomes; and the closer
the thread release air cylinder is to the upper shaft motor, the narrower the opening becomes.
ⓔ After adjusting the opening of the dish, fasten the clamp screw with the cylinder operating smoothly.
①
The opening
becomes wide
The opening
becomes narrow
[ Fig. 31 ]
25
6) Adjustment of Lower Trimmer Related Parts
A. Structure of Trimmer
The trimmer structure of the sewing machine is as follows:
[ Fig. 32 ]
Caution
The sewing machine has adopted the trimming method driven by the air cylinder.
Therefore, for adjustment, if the pulley is spun while the air cylinder is in operation, the moving blade
will crash the needle. Then the needle and the moving blade will get damaged.
B. Adjustment of Moving and Fixed Blades
The adjustment of “A” which is the distance between the
needle hole guide and the fixed blade and “B” which is the
height difference of the needle bar can be made with
reference to the table below.
- Adjustment of “A”
Loosen the fixing screw for the fixed blade to adjust the
distance from the fixed blade.
- Adjustment of “B”
If the height difference between the fixed blade and the
needle hole guide is inappropriate, bend the edge of the
fixed blade to adjust the height difference.
- Distance between Needle Plate and Fixed Blade
Adjust the distance between the needle plate and the
moving blade at 0.3~0.5mm.
Specifications of H
Size of A
0.8~1mm
Size of B
0.25~0.35mm
If size of A is small and size of B is big, the upper and lower threads could get shorter.
Caution
26
[ Fig. 33 ]
C. Adjustment of Upper Trimmer Moving Blade
ⓐ The speed of the upper trimmer moving blade could be
adjusted using the speed controller.
ⓑ To reduce speed, loosen the speed controller nut and turn
it clockwise. To increase speed, turn the speed controller
nut counterclockwise.
Speed controller
[ Fig. 34 ]
D. Distance between Moving and Fixed Blades
Before the blades operate, the distance between the moving
blade① and the fixed blade② is 0~0.5mm as in the figure
below.
①
②
0~0.5mm
[ Fig.35 ]
Before adjusting, make sure to turn the power off and check whether the motor is in normal condition.
Warning
The moving blade's stroke is equal to the cylinder's stroke.
Caution
E. Spring Pressure of Upper Trimmer
The pressure of the upper thread trimmer holder spring
should remain as small as possible to the extent that
trimming is conducted.
ⓐ Loosen the nut③.
ⓑ Adjust the pressure using the screw⑥ to enable the
upper thread holder④ and the moving blade ⑤ to hold
the thread.
⑥
④
③
⑤
[ Fig. 36 ]
27
7) Adjusting the Main Thread Control
Device
ⓐ If the tension control nuts① of thread control device is
turned clockwise, the tension of upper thread will increase.
If turned counter-clockwise, the tension will decrease.
Because the tension control is affected by sewing
conditions such as sewing material, thread and stitch, adjust
tension according to conditions.
ⓑ To adjust tension of thread take-up spring, insert drive in the
groove of thread tension control device②. Then turning the
drive clockwise will increase tension of thread take-up
spring and turning counter- clockwise decrease the tension.
①
②
[ Fig. 37 ]
8) Adjusting speed of arm lifter
ⓐ To adjust speed of arm lifter, adjust escape controlling
valve , .
ⓑ Escape controlling valve ,
have function as
followings.
·Escape controlling valve : Adjust the descending speed
of arm lifter.
·Escape controlling valve : Adjust the ascending speed
of arm lifter.
ⓒ Loosen fixing nut of escape controlling valve ①. Turning
adjusting knob② clockwise will decrease the speed and
turning adjusting knob counterclockwise will increase the
speed.
ⓓ After adjusting the speed, fasten fixing nut of escape
controlling valve ①.
①
②
[ Fig. 38 ]
9) Adjusting Hand Pulley Device
ⓐ After aligning the hand pulley gear with the end of hand
pulley shaft, fasten with clamp screw.
ⓑ After making proper clearance between the hand pulley
gear and the gear , fasten with clamp screw.
ⓒ When roller meets the end of hand pulley bushing, adjust
bushing in the arrow direction to reduce backlash between
the gear and .
Upper shaft
Hand pulley
bushing
Hand pulley shaft
Roller
[ Fig. 39 ]
28
10) Adjusting tension of operating belt
Caution
1) Adjusting tension of operating belt might affect stitch quality and operation. Therefore when tension
adjustment is necessary, turn to the company serviceman or an expert.
2) Make sure to turn off the power switch when adjusting tension of each operating belt.
A. Specification of operating belt tension adjusting device. (Sonic belt tensiometer)
ⓐ Model: U-505 series sonic belt tensiometer standard.
ⓑ Manufacturer: UNITTA.
B. X-shaft timing belt
a) Motor operating timing belt.
① To check tension of X-motor operating timing belt, use sonic belt tensiometer after separating X-motor base surface
cover from the main body.
② Adjust X-motor operating timing belt to make sure that the measured value of sonic belt tensiometer should be 12~13kg
when the belt center of the final operating pulley⑤ and operating pulley③ is flipped over with finger or stick.
③ When adjusting tension of X-motor operating timing belt, input data of sonic belt tensiometer is as followings.
Weight: 2.5gf/m
Wide: 25mm/#R
Span : 116mm
④ When adjusting tension of X-motor operating timing belt, loosen nut② linked to tension adjusting bolt① and turn
tension adjusting bolt① clockwise. Then operating pulley③ and motor④ will be pushed into the direction of bolt,
which leads to the increase of tension of timing belt. And turning tension adjusting bolt① counterclockwise will
decrease the belt tension.
⑤ After adjusting tension, make sure to fasten nut②.
④
⑤
③
② ①
[ Fig. 40 ]
29
b) X-conveying timing belt
① Check the X-conveying timing belt tension by detaching the upper cover of X fixing frame from the body of the
machine and using sonic belt tensiometer.
② Adjust the X-conveying timing belt tension by moving the X conveying frame ① to the left end and then flipping with
fingers or sticks the middle of the belt that stretches from the end of the timing belt fixing plate block ② to the X-final
operating pulley ③. Make sure that the measured value of the sonic belt tensiometer is 26 ~ 27kgf.
③ Input data for the sonic belt tensiometer, when adjusting X-conveying timing belt tension.
Weight: 3.8gf/m
Wide: 35mm/#R
Span: 566mm
④ In order to adjust X-conveying timing belt tension, unfasten the nut ⑤fastened on the tension adjusting bolt ④ and
unfasten the bolts⑦ (four) that fix the final operating pulley bracket to the extent that the bracket ⑥ can move.
Caution
Turning tension adjusting bolts④ without unfastening fixing bolts⑦ will lead to physical damages to the
machine.
⑤ Turn the tension adjusting bolts④ clockwise. Then the final operating pulley③ and the final operating pulley bracket⑥
will be pushed into the direction of the bolt, which leads to the increase of tension of timing belt. And turning the bolts
④ counter_clockwise will decrease the belt tension.
⑥ After adjusting tension of the belt, fasten nuts② and fixing bolts⑦ firmly.
⑦ Fasten ⑥ using the four bolts which tighten the bracket.
①
②
③
⑥
⑤
④
⑦
[ Fig. 41 ]
30
C. Y-shaft timing belt
a) Timing belt at motor operating parts
① Check timing belt tension of the Y-motor operating
parts by detaching the Y motor base cover from the
body of the machine and using sonic belt
tensiometer.
② Adjust timing belt tension of the Y-motor operating
parts by flipping with fingers or sticks the middle of the
belt that stretches from the operating pulley ⓐ to the
final operating pulley ⓑ. Make sure that the measured
value of the sonic belt tensiometer is 30 ~ 31kgf.
③ Input data for the sonic belt tensiometer, when adjusting the
timing belt tension of the Y-main shaft motor operating parts.
Weight: 003.8gf/m
Wide: 40mm/#R
Span: 137mm
④ In order to adjust timing belt tension of the Y-motor
operating parts, unfasten the four idler bracket fixing
screws ⓒ. Then pushing the idler ⓑ to the left will
increase the tension; while pushing it to the right
will decrease the tension.
ⓑ
ⓓ
ⓒ
ⓐ
[ Fig. 42 ]
b) Y-conveying timing belt
① Check Y-shaft timing belt tension by moving X-fixing/conveying frame, as in the Figure, to the frontal extreme and
using sonic belt tensiometer.
② Adjust Y-shaft timing belt tension by flipping with fingers or sticks the middle of the belt that stretches from the end of
the feed bracket to the center of the operating pulley. Make sure that the measured value of the sonic belt tensiometer
is 37 ~ 38kgf.
③ Input data for the sonic belt tensiometer, when adjusting Y-shaft timing belt tension.
Weight: 3.8gf/m
Wide: 48mm/#R
Span: 840mm
④ In order to adjust Y-shaft timing belt tension, unfasten the tension base clamp screws ① and turning tension adjusting
bolt ②. Turning the tension adjusting bolt ② clockwise will increase the belt tension; while turning it counter-clockwise
will decrease the tension.
⑤ After adjusting the tension, fasten tension base clamp screw ① firmly.
②
①
[ Fig. 43 ]
31
11) Setting X-Y Original Point
A. Setting X-shaft original point.
ⓐ Remove the surface cover of X-fixing frame.
ⓑ Move the upper feed plate to the center of X-shaft.
ⓒ As in the figure, loosen the clamp screw of X-sensor bracket and place X-sensor plate attached on the X-timing belt fixing
plate block at the center of the sensor. And then fasten fixing screw.
Clamp screw
Sensor
Original point detection plate
[ Fig. 44 ]
B. Setting Y-shaft original point.
ⓐ Move the upper feed plate to the center of Y-shaft.
ⓑ As in the figure, loosen the clamp screw of Y-sensor bracket and place X-sensor plate at the center of the sensor. And then
fasten clamp screw.
Original point detection plat
Clamp
screw
Sensor
[ Fig. 45 ]
32
12) Switch from up/down clamp method to cassette method
(1) Separate the up/down clamp
Loosen the fastening nut① of the upper clamp bracket.
Loosen the fastening nut② of the auxiliary clamp base A.
Loosen the fastening nut③ of the auxiliary clamp base B.
Loosen the fastening nut④ of the X-transfer frame cover.
Loosen the fastening nut⑤ of the lower clamp knuckle B.
Take out the air cylinder cable⑥ of the upper clamp.
Take out the air cylinder cable⑦ of the upper clamp.
Take out the air cylinder cable⑧ of the auxiliary clamp.
Take out the air cylinder cable⑨ of the auxiliary clamp.
Separate the upper and lower clamps.
Remove the auxiliary clamp base holder A⑩ from the X-transfer frame.
Remove the auxiliary clamp base holder B⑪ from the X-transfer frame.
Remove the air cylinder cables⑥ and ⑦ of the upper clamp.
⑪
③
⑧
⑨
⑦
⑥
①
④
②
⑩
⑤
①
[ Fig. 46 ]
33
(2) Assemble the cassette
Put the pallet cylinder bracket holderⓑ together with the X-transfer frameⓐ.
Assemble the pallet cylinder bracketⓒ using the pallet cylinder bracket fastening nutⓔ and the pallet cylinder bracket
fastening washerⓓ.
Assemble the pallet air cylinderⓕ using the pallet air cylinder fastening nutⓖ.
Assemble the pallet cylinder shaftⓙ.
Put together the auxiliary bracketⓝ of the pallet cylinder and the bracket holderⓜ of the pallet cylinder by using the pallet
cylinder bracket holder fastening nutⓞ.
Assemble the pallet customized to the customer environment by using the auxiliary bracketⓝ of the pallet cylinder and the
auxiliary bracket fastening nut of the pallet cylinderⓟ.
Insert the upper clamp air cylinder cable⑧ into the pallet air cylinder fittingⓗ of the pallet air cylinderⓕ as in figure 56.
Insert the upper clamp air cylinder cable⑨ into the pallet air cylinder fittingⓘ of the pallet air cylinderⓕ as in figure 56.
ⓐ
ⓒ
ⓕ
ⓗ
ⓑ
ⓖ
ⓓ
ⓠ
ⓘ
ⓙ
ⓔ
ⓛ
ⓚ
ⓜ
ⓟ
ⓝ
ⓞ
[ Fig. 47 ]
34
13) Air System Schematic Diagram
[ SPS/CE-5050H-01 Air System Circuit Diagram ]
[ SPS/CE-5050H-02 Air System Circuit Diagram ]
35